目錄
1、用例運行規則
2、pytest命令參數
3、pytest配置文件
4、前后置
5、斷言
6、參數化---對函數的參數(重要)
7、fixture
7.1、基本用法
7.2、fixture嵌套:
7.3、請求多個fixture:
7.4、yield fixture
7.5、帶參數的fixture
安裝:
pip install pytest==8.3.2
1、用例運行規則
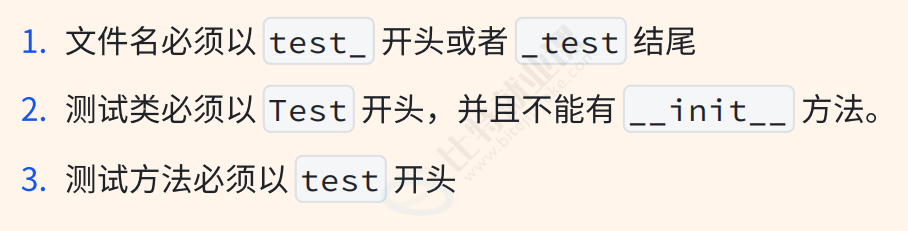
? ?文件名、類名、方法名命名時必須遵循規則,pytest才能自動識別到測試用例,不需要再手動編寫main函數調用測試用例。?
寫一個類:
class Test03():def test03_01(self):print("test03_01")Test類中為什么不能有__init__方法?
1、pytest采用自動發現機制收集測試用例
2、它會自動實例化測試類并調用test測試方法作為測試用例。
如果寫了__init__那么在pytest實例化類的時候,__init__方法就會被調用,這就會掩蓋測試類的實際測試用例
那么,我們在初始化的時候應該怎么做呢?

class test02:#python默認構造方法---類的初始化def __init__(self):print("__init__")#類中的普通方法def init(self)print("init")2、pytest命令參數
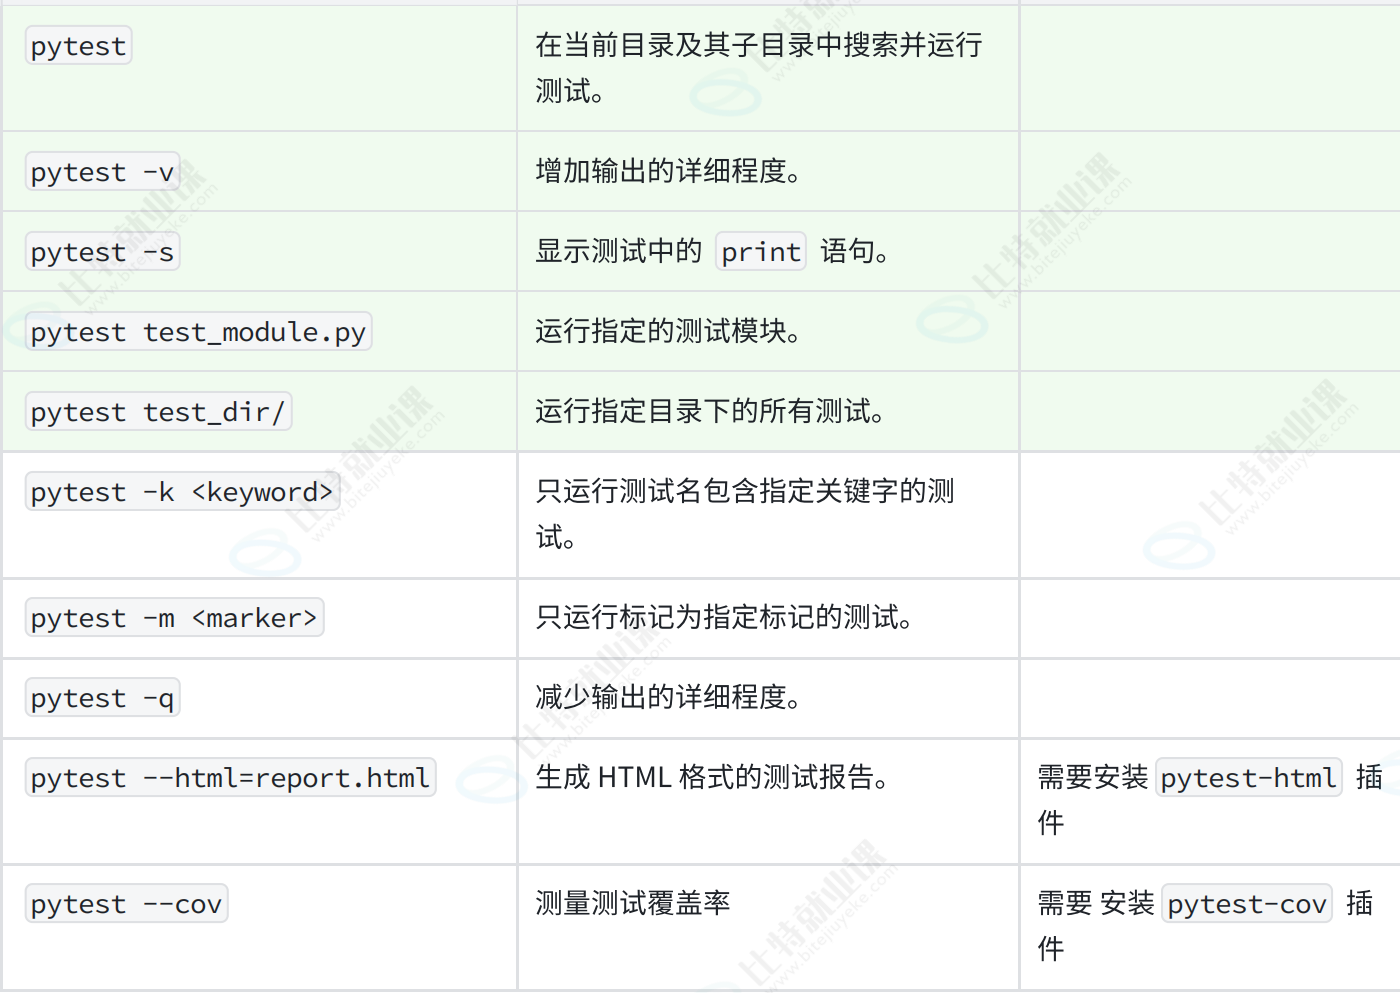
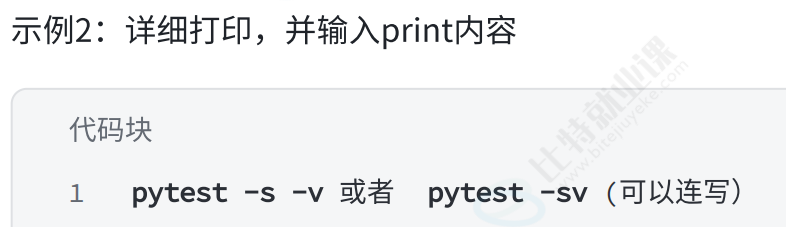
pytest -sv .\tests\test_aaa.py::Testaaa::testa_03:指定運行tests目錄下的test_aaa.py文件中的Testaaa類中的teata_03方法
3、pytest配置文件
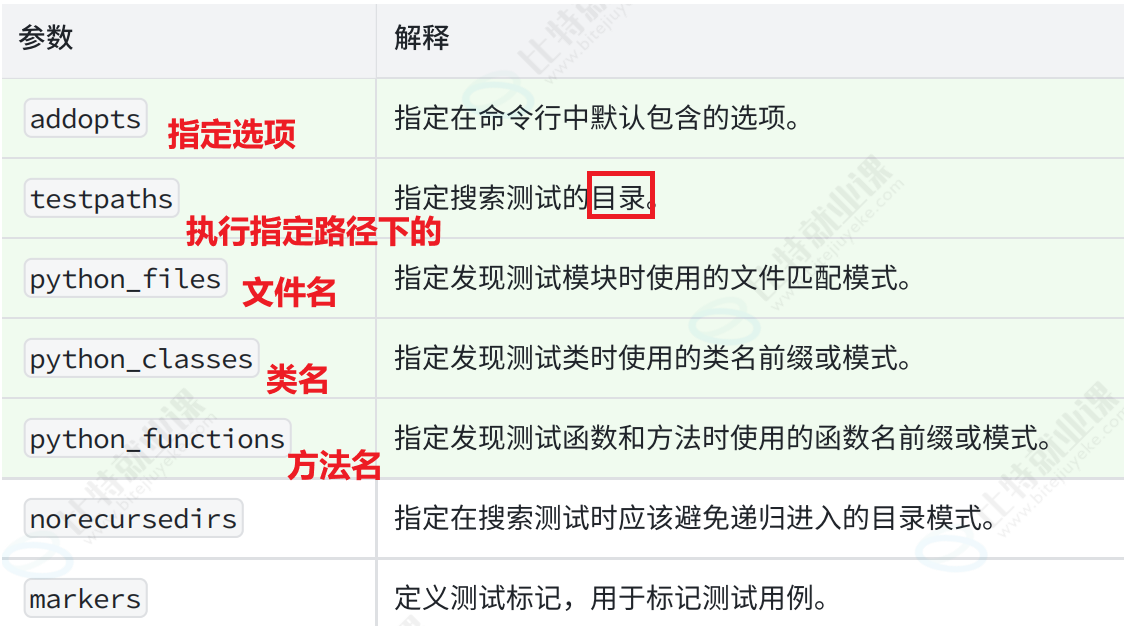
若不配置,則走默認規則。加了配置之后,就可以使用pytest執行不符合規則的文件名、類名、方法名了。
4、前后置
在測試類中,不能有init方法。那我們有初始化的需求該怎么辦呢?
pytest框架提供了三種方法做前后置操作
1、setup_method 和 teardown_method:這兩個方法用于類中的每個測試方法的前后置操作(setup_method 法一?teardown_method、setup_method 法二?teardown_method)2、setup_class和teardown_class:兩個方法用于整個測試類的前后置操作
(setup_clas 法一 teardown_class、 setup_clas 法二 teardown_class)
3、fixture:這是pytest推薦的方式來實現測試用例的前后置操作。這個方法更加靈活,后面專門進行講解
5、斷言
斷言時調試的輔助工具,檢查代碼狀態是否符合預期,如果斷言失敗,即條件為假,就會拋出AssertionError異常。??
對返回值內容進行測試。
assert 條件,錯誤信息
條件:必須是bool值
錯誤信息:當條件為假時顯示,可選。
#斷?接?返回值重要字段
def test2():
url = "http://jsonplaceholder.typicode.com/comments?postId=1"
r = requests.get(url=url)
print(r.json())
assert r.json()[1]['id'] == 1 #下標從0開始
#斷?接?html返回值
def test3():
url = "http://jsonplaceholder.typicode.com/"
r = requests.get(url=url) #r是返回值
assert "Use your own data" in r.text #前面的字符串是不是包含在r.text中
#html返回值是text格式的
6、參數化---對函數的參數(重要)
對測試函數的參數進行參數化,使用pytest內置的pytest.mark.parametrize裝飾器
對單個參數的參數化:可以使用不同的數據類型
eg1:在用例上使用參數化:多個參數的參數化
import pytest@pytest.mark.parametrize("test_input,expected",[("3+5",8),("2+4",6),("6*9",54)])def test_eval(test_input,expected):assert eval(test_input) == expected
#通過eval進行計算
給了三組參數,函數就會執行三次
eg2:在類上使用參數化:在類上使用就可以使用參數集調用多個函數
用例可能用到同樣的參數,就要對多組用例都使用參數化,那么把參數化定義在類上就是更好的方式。下面的每個用例都會跑兩遍。
import pytest
@pytest.mark.parametrize("n,expected", [(1, 2), (3, 4)])class TestClass:
def test_simple_case(self, n, expected):
assert n + 1 == expecte
def test_weird_simple_case(self, n, expected):
assert (n * 1) + 1 == expected
將參數化的結果保存在pytestmark中 表明是一個全局變量,不寫pytestmark的時候就要在每個類前面寫@pytest.mark.parametrize(.......)
#將參數化的結果保存在pytestmark中 表明是一個全局變量
pytestmark = pytest.mark.parametrize("data",(1,2))
class Test_A:def test_a01(self,data):print(data)def test_a02(self,data):print("data")
class Test_B:def test_b01(self,data):print(data)def test_b02(self,data):print("data")
注意我們在使用pytest的時候,import pytest會在語法層面出現報錯,但是實際包是可以找到的,也意味著可以直接使用
自定義參數化數據源,而不是寫死的。
#從函數的返回值來獲取參數
def data_provider():#....return ["a","b","c"]
@pytest.mark.parametrize("data",data_provider())
def test_data(data):print(data)
7、fixture
7.1、基本用法
可以進行前后置操作,也可以進行參數化。?于提供測試函數所需的資源或上下?
import pytest@pytest.fixture
def fixture_01():print("第?個fixture標記的?法")def test_01(fixture_01):print("第?個測試?例")
測試腳本中存在很多重復的代碼、公共的數據對象,使用fixture最為合適。
用例之前必須要先進行登錄:
import pytest@pytest.fixture
def login():print("---執?登陸操作-----")def test_list(login):print("---訪問列表?")
def test_detail(login):print("---訪問詳情?")
7.2、fixture嵌套:
import pytest@pytest.fixture
def first_entry():return "a"@pytest.fixture
def order(first_entry):return [first_entry]def test_string(order):order.append("b")assert order == ["a", "b"] # 斷?
7.3、請求多個fixture:
import pytestclass Fruit:
def __init__(self, name):self.name = name
def __eq__(self, other): #重寫的比較方法 在比較兩個Fruit對象是否相等時被調用return self.name == other.name@pytest.fixture
def my_fruit():return Fruit("apple") #類對象 就會調用Fruit類里面的初始化函數@pytest.fixture
def fruit_basket(my_fruit):return [Fruit("banana"), my_fruit] #類對象放在列表里面def test_my_fruit_in_basket(my_fruit, fruit_basket):assert my_fruit in fruit_basket  #這里是在比較兩個類對象 調用__eq__方法
上面的在測試方法中傳入函數名作為參數時,會先執行傳入的函數,這就實現了前置。那么后置怎么實現呢?
7.4、yield fixture
@pytest.fixture
def operator():print("前置操作:數據的初始化")yieldprint("后置操作:數據的清理")def test_01(operator):print("第一個測試用例")
由結果可以看出,先執行operator中yield之前的部分,再執行調用operator的函數,執行完函數再執行yield的后半部分,就完成了前后置操作。和前面介紹的setup_method和teardown_method效果一樣
yield可以返回數據。那么可以看出,是先執行前部分+yield,再執行測試用例,再執行后部分
@pytest.fixture
def operator():print("數據的初始化")yield 100print("數據的清理")
def test_01(operator):print(100 + operator)
文件:打開——讀模式:讀文件、寫模式:寫文件——關閉
@pytest.fixture
def file_read():print("打開文件句柄")fo = open("case/test.txt","r",encoding="utf-8")yield foprint("關閉文件句柄")fo.close()@pytest.fixture
def file_write():print("打開文件句柄")fo = open("case/test.txt","w",encoding="utf-8")return fo# yield fo# print("關閉文件句柄")# fo.close()def test_file(file_read,file_write):w = file_writew.write("我們")w.close()r = file_readstr = r.read()print(str)
7.5、帶參數的fixture
pytest.fixture(scope='', autouse='',params='',ids='',name='')
1、scope:控制fixture的作用范圍,決定了fixture的生命周期
? ? ? ? 1)funtion(默認)
? ? ? ? 2)class:在同一個測試類中共享(類中的第一個測試函數調用fixture函數的前部分,最后一個函數調用后部分、如果有第二個類的話和第一個類相同)---(初始化--第一個用例、第二個用例---清理--初始化---第一個用例、第二個用例--清理)
? ? ? ? 3)module:在同一個測試模塊中共享這個fixture(一個文件里)(要加一個conftest.py文件)----(一個文件中有兩個類,只會在第一個類之前執行初始化,在第二個類之后執行清理)---(初始化--第一個用例、第二個用例--第一個用例、第二個用例--清除)(同一個文件中的)
? ? ? ? 4)session:整個測試會話中共享這個fixture初始化--第一個用例、第二個用例--第一個用例、第二個用例--清除)---將cnftest.py文件涉及到的所有的文件整合到一起
2、autouse:默認值為false。設置為ture時,就不需要進行顯示傳遞
3、params:用于參數化fixture,支持列表傳入。每個參數都會使fixture執行一次。
4、ids:與params配合使用,給參數取名字
5、name:給fixture取名字
當測試用例在不同的文件里時,需要將fixture放到配置文件里,實現多個文件共享。
scope = "moudle"、scope = "session"時可用于實現全局的前后置應用,這里需要多一個文件配合,conftest.py和@pytest.fixture結合使用實現全局變量的前后置應用
conftest.py名稱時固定的不能改變
每個conftest.py文件都會對其所在的目錄及其子目錄下的測試模塊生效
在不同模塊的測試中需要用到conftest.py的前后置功能時,不需要做任何的import導入操作。
可以在不同的.py文件中使用同一個fixture文件
scope = "moudle"、scope = "session"區別:module每個都進行初始化和清理,session第一個進行初始化,最后一個進行清理
params實現參數化和@pytest.mark.parametrize實現參數化的區別:
parametrize更適合簡單場景,而fixture更適合需要動態數據和資源的復雜場景。
@pytest.mark.parametrize("參數名",(參數1,參數2)
測試函數
@pytest.fixture(params=[1,2,3])
def data_provider(request): #fixture標記的參數里面參數叫做requestreturn request.param #通過request讀取paramsdef test_data(data_provider):print(data_provider)
注意:要寫為request.param而不是request.params


Digit Recognizer 手寫數字識別)


:拷貝構造函數與賦值運算符重載深度解析》)

![[ 數據結構 ] 時間和空間復雜度](http://pic.xiahunao.cn/[ 數據結構 ] 時間和空間復雜度)


