知識點回顧
- 回調函數
- lambda函數
- hook函數的模塊鉤子和張量鉤子
- Grad-CAM的示例
# 定義一個存儲梯度的列表
conv_gradients = []# 定義反向鉤子函數
def backward_hook(module, grad_input, grad_output):# 模塊:當前應用鉤子的模塊# grad_input:模塊輸入的梯度# grad_output:模塊輸出的梯度print(f"反向鉤子被調用!模塊類型: {type(module)}")print(f"輸入梯度數量: {len(grad_input)}")print(f"輸出梯度數量: {len(grad_output)}")# 保存梯度供后續分析conv_gradients.append((grad_input, grad_output))# 在卷積層注冊反向鉤子
hook_handle = model.conv.register_backward_hook(backward_hook)# 創建一個隨機輸入并進行前向傳播
x = torch.randn(1, 1, 4, 4, requires_grad=True)
output = model(x)# 定義一個簡單的損失函數并進行反向傳播
loss = output.sum()
loss.backward()# 釋放鉤子
hook_handle.remove()
import warnings
warnings.filterwarnings("ignore")
import matplotlib.pyplot as plt
# 設置中文字體支持
plt.rcParams["font.family"] = ["SimHei"]
plt.rcParams['axes.unicode_minus'] = False  # 解決負號顯示問題
# 選擇一個隨機圖像
# idx = np.random.randint(len(testset))
idx = 102  # 選擇測試集中的第101張圖片 (索引從0開始)
image, label = testset[idx]
print(f"選擇的圖像類別: {classes[label]}")# 轉換圖像以便可視化
def tensor_to_np(tensor):img = tensor.cpu().numpy().transpose(1, 2, 0)mean = np.array([0.5, 0.5, 0.5])std = np.array([0.5, 0.5, 0.5])img = std * img + meanimg = np.clip(img, 0, 1)return img# 添加批次維度并移動到設備
input_tensor = image.unsqueeze(0).to(device)# 初始化Grad-CAM(選擇最后一個卷積層)
grad_cam = GradCAM(model, model.conv3)# 生成熱力圖
heatmap, pred_class = grad_cam.generate_cam(input_tensor)# 可視化
plt.figure(figsize=(12, 4))# 原始圖像
plt.subplot(1, 3, 1)
plt.imshow(tensor_to_np(image))
plt.title(f"原始圖像: {classes[label]}")
plt.axis('off')# 熱力圖
plt.subplot(1, 3, 2)
plt.imshow(heatmap, cmap='jet')
plt.title(f"Grad-CAM熱力圖: {classes[pred_class]}")
plt.axis('off')# 疊加的圖像
plt.subplot(1, 3, 3)
img = tensor_to_np(image)
heatmap_resized = np.uint8(255 * heatmap)
heatmap_colored = plt.cm.jet(heatmap_resized)[:, :, :3]
superimposed_img = heatmap_colored * 0.4 + img * 0.6
plt.imshow(superimposed_img)
plt.title("疊加熱力圖")
plt.axis('off')plt.tight_layout()
plt.savefig('grad_cam_result.png')
plt.show()# print("Grad-CAM可視化完成。已保存為grad_cam_result.png")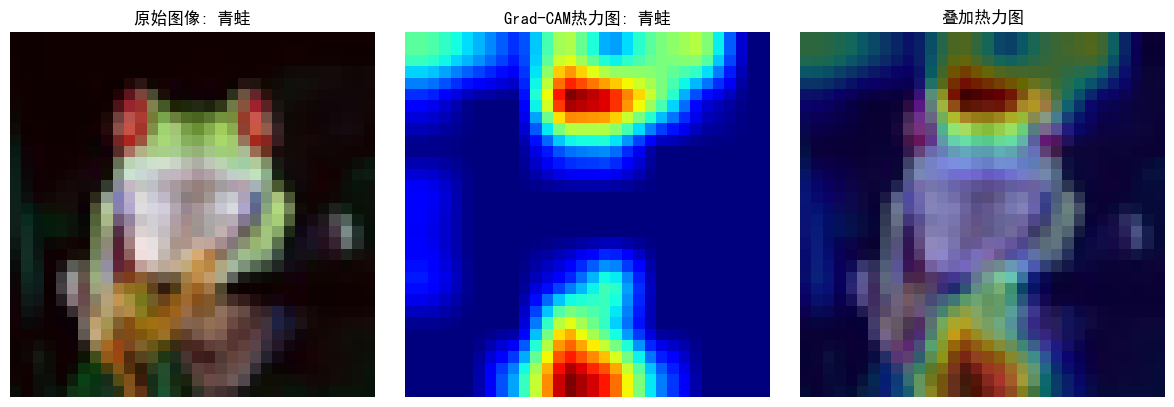

:拷貝構造函數與賦值運算符重載深度解析》)

![[ 數據結構 ] 時間和空間復雜度](http://pic.xiahunao.cn/[ 數據結構 ] 時間和空間復雜度)


)


--54-65關)


 詳解)
)
)

