大語言模型加速技術之KV Cache
- Why we need KV Cache ?
- Self-Attention Without Cache
- Self-Attention With Cache
- Huggingface 官方代碼實現
Why we need KV Cache ?
生成式generative模型的推理過程很有特點,我們給一個輸入文本,模型會輸出一個回答(長度為N),其實該過程中執行了N次推理過程。即GPT類模型一次推理只輸出一個token,輸出token會與輸入tokens 拼接在一起,然后作為下一次推理的輸入,這樣不斷反復直到遇到終止符。
如上描述是我們通常認知的GPT推理過程。代碼描述如下:
import torch
from transformers import GPT2LMHeadModel, GPT2Tokenizerdef main():# 加載模型和 tokenizermodel = GPT2LMHeadModel.from_pretrained("gpt2").eval()tokenizer = GPT2Tokenizer.from_pretrained("gpt2")# 初始輸入in_text = "Open AI is a"in_tokens = torch.tensor(tokenizer.encode(in_text)).unsqueeze(0)  # [1, seq_len]token_eos = torch.tensor([198])  # line break symbolout_token = Nonei = 0with torch.no_grad():while out_token != token_eos:outputs = model(in_tokens)logits = outputs.logitsout_token = torch.argmax(logits[0, -1, :], dim=-1, keepdim=True).unsqueeze(0)  # [1, 1]in_tokens = torch.cat((in_tokens, out_token), dim=1)text = tokenizer.decode(in_tokens[0])print(f'step {i} input: {text}', flush=True)i += 1out_text = tokenizer.decode(in_tokens[0])print(f'\nInput: {in_text}')print(f'Output: {out_text}')if __name__ == "__main__":main()
輸出:
step 0 input: Open AI is a new
step 1 input: Open AI is a new way
step 2 input: Open AI is a new way to
step 3 input: Open AI is a new way to build
step 4 input: Open AI is a new way to build AI
step 5 input: Open AI is a new way to build AI that
step 6 input: Open AI is a new way to build AI that is
step 7 input: Open AI is a new way to build AI that is more
step 8 input: Open AI is a new way to build AI that is more efficient
step 9 input: Open AI is a new way to build AI that is more efficient and
step 10 input: Open AI is a new way to build AI that is more efficient and more
step 11 input: Open AI is a new way to build AI that is more efficient and more efficient
step 12 input: Open AI is a new way to build AI that is more efficient and more efficient than
step 13 input: Open AI is a new way to build AI that is more efficient and more efficient than traditional
step 14 input: Open AI is a new way to build AI that is more efficient and more efficient than traditional AI
step 15 input: Open AI is a new way to build AI that is more efficient and more efficient than traditional AI.
step 16 input: Open AI is a new way to build AI that is more efficient and more efficient than traditional AI.Input: Open AI is a
Output: Open AI is a new way to build AI that is more efficient and more efficient than traditional AI.
在上面的推理過程中,每 step 內,輸入一個 token序列,經過Embedding層將輸入token序列變為一個三維張量 [b, s, h],經過一通計算,最后經 logits 層將計算結果映射至詞表空間,輸出張量維度為 [b, s, vocab_size]。
當前輪輸出token與輸入tokens拼接,并作為下一輪的輸入tokens,反復多次。可以看出第 i+1 輪輸入數據只比第 i 輪輸入數據新增了一個 token,其他全部相同!
因此第 i+1 輪推理時必然包含了第 i 輪的部分計算。KV Cache 的出發點就在這里,緩存當前輪可重復利用的計算結果,下一輪計算時直接讀取緩存結果。
上面所舉例子并沒有使用KV Cache進行推理,請注意。
Self-Attention Without Cache
下圖給出了無 Cache 情況下,類GPT式生成式模型進行推理的過程:
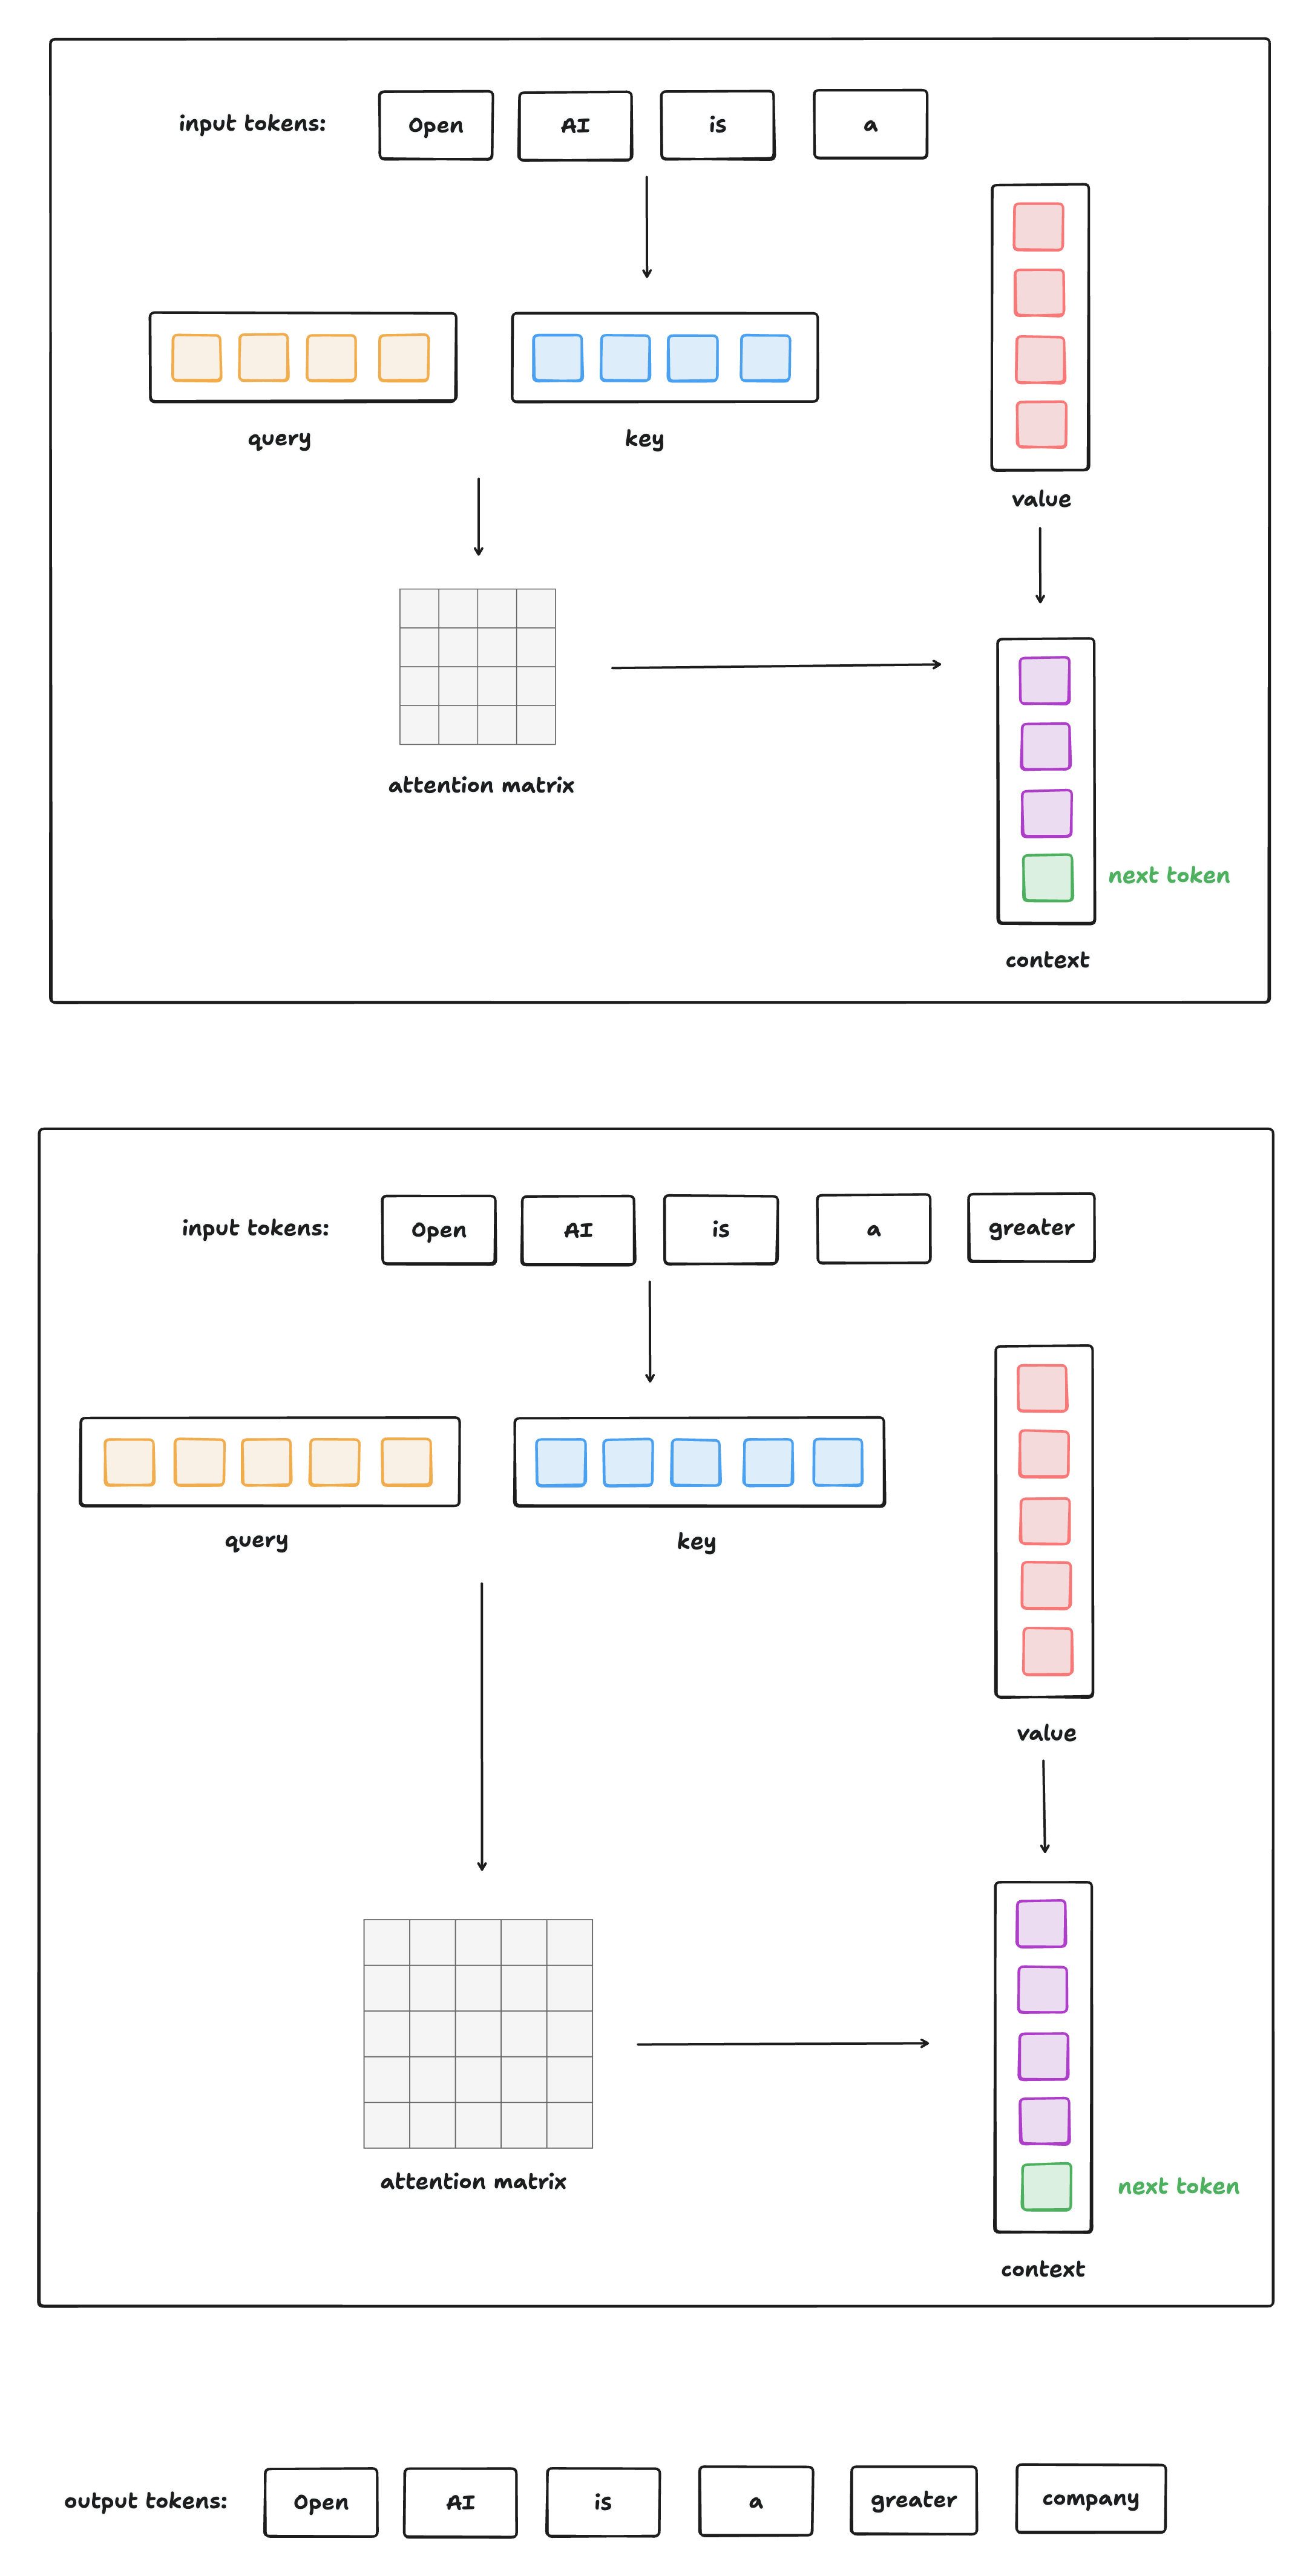
這種方式的問題是: 每生成一個 token,就要重新計算所有之前 token 的 Q/K/V + Attention + FFN 。
Self-Attention With Cache
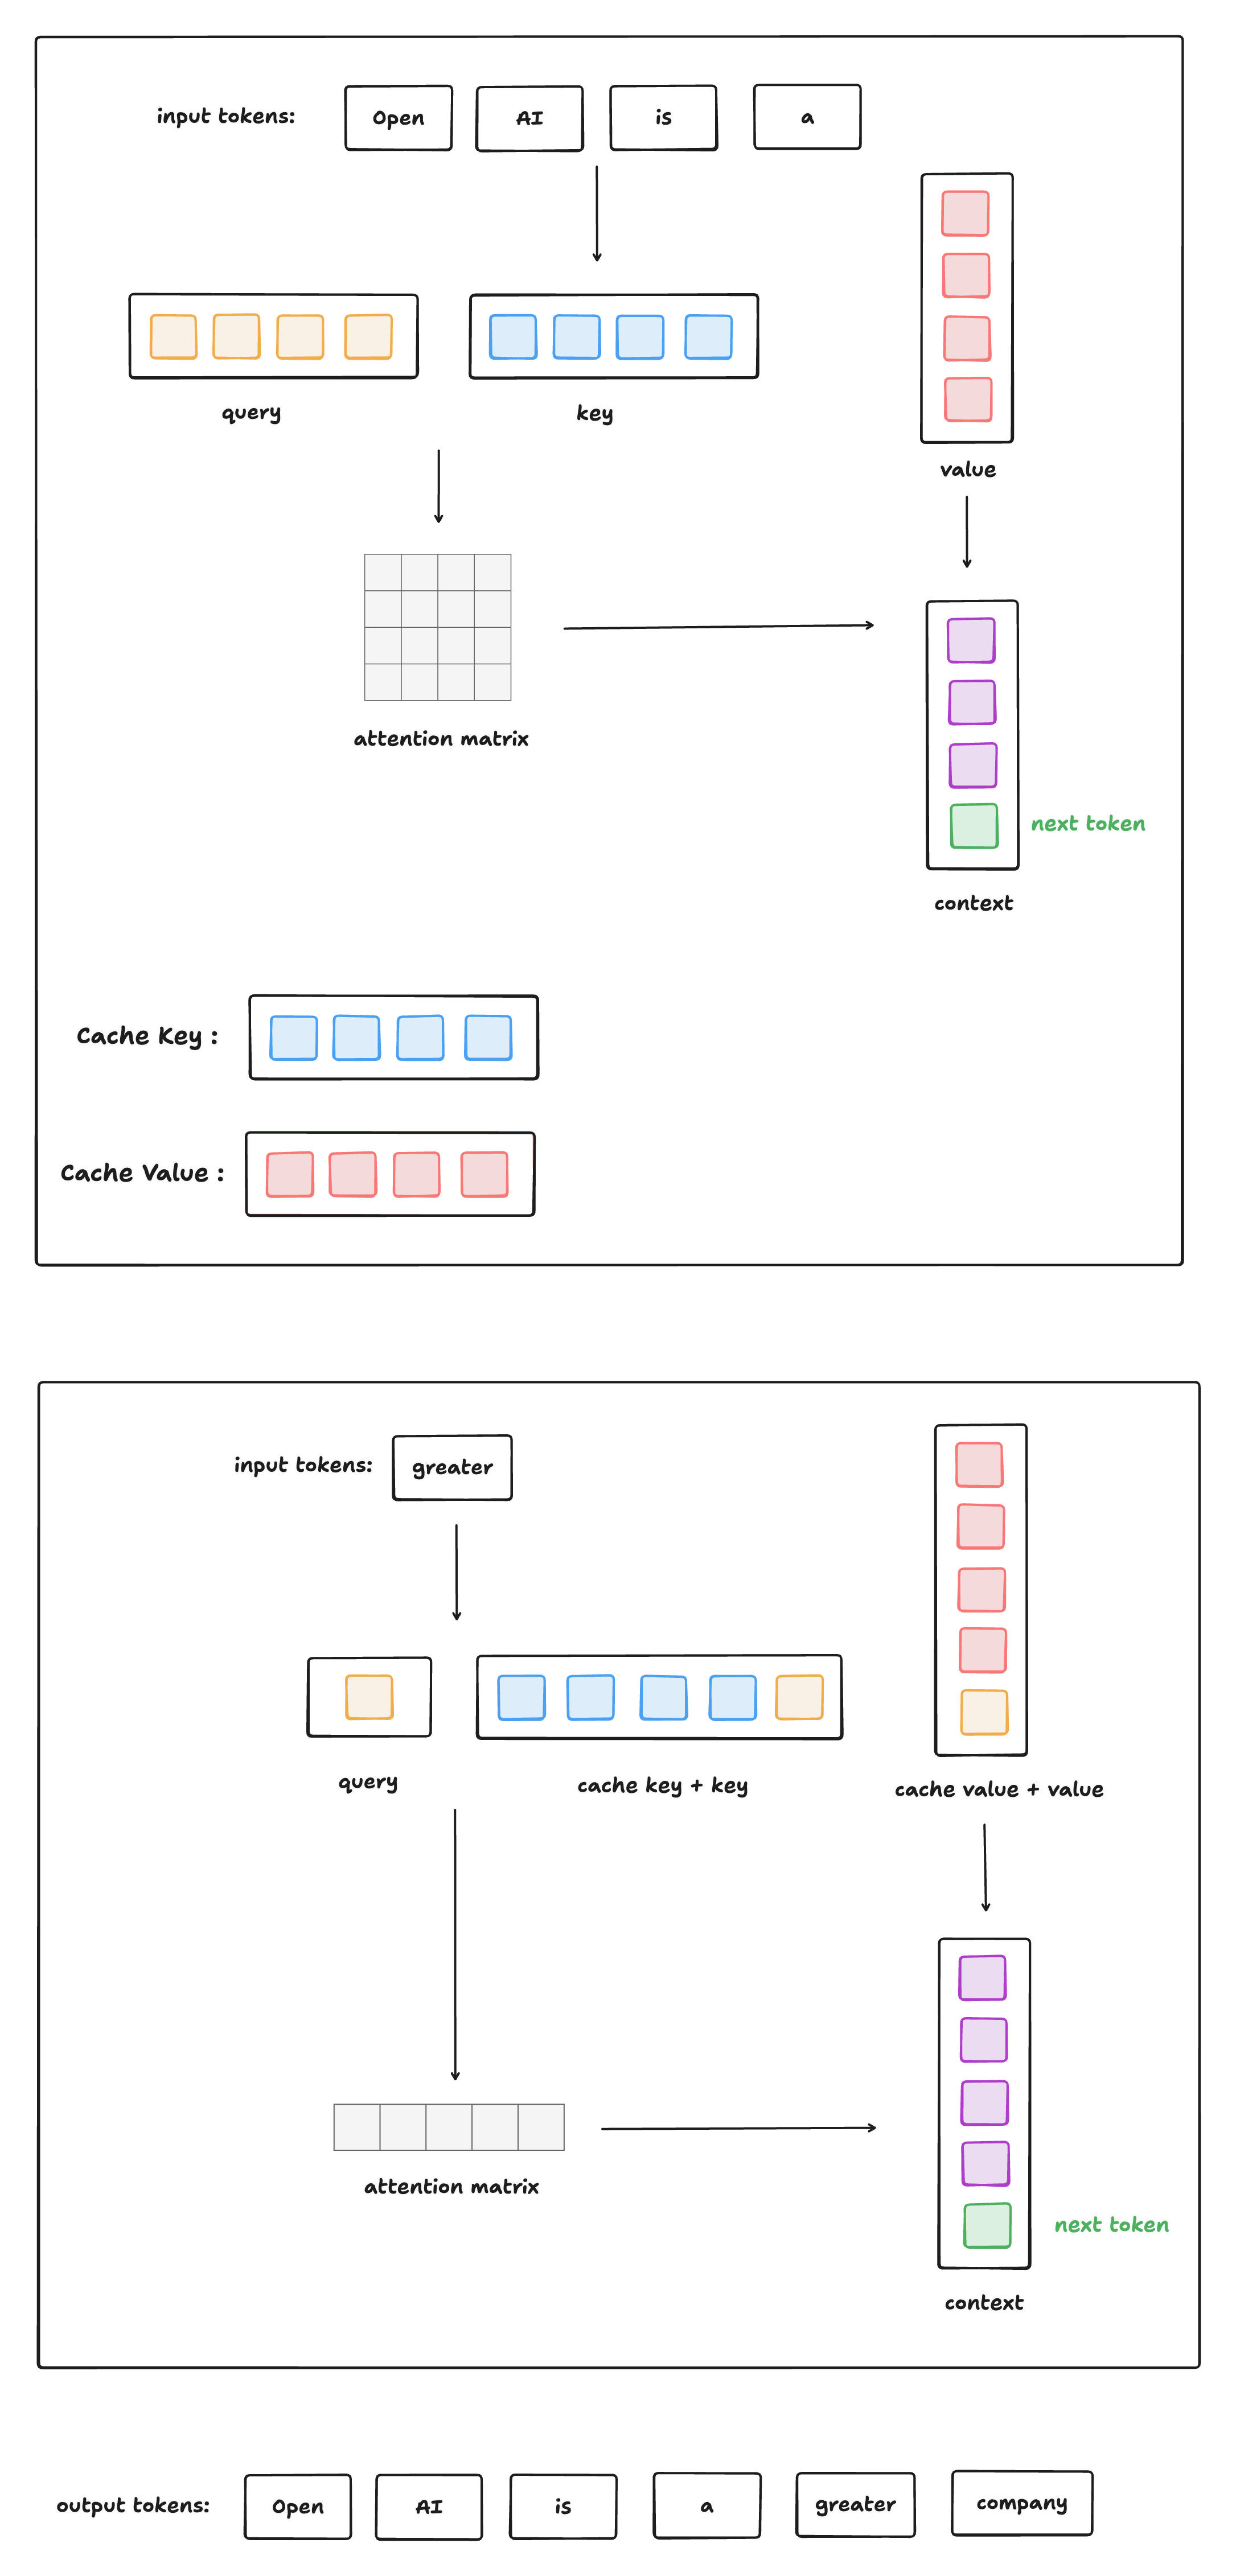
下圖給出了有 Cache 情況下,類GPT式生成式模型進行推理的過程:
Huggingface 官方代碼實現
本節將根據 Huggingface 官方代碼實現進行 KV Cache 實現講解 (只展示核心代碼,移除了大量與本文無關的邏輯)。
官方代碼鏈接: https://github.com/huggingface/transformers/blob/main/src/transformers/models/gpt2/modeling_gpt2.py
下面將給出使用了 KV Cache 進行推理的代碼:
import torch
from transformers import GPT2Tokenizer, GPT2Config
from modeling_gpt2 import GPT2LMHeadModel  # copy from huggingface , 刪除了大量無關代碼def generate_text(model, tokenizer, prompt, max_new_tokens=50, eos_token_id=198):model.eval()input_ids = tokenizer.encode(prompt, return_tensors="pt")past_key_values = Noneoutput_ids = input_ids.clone()with torch.no_grad():for step in range(max_new_tokens):outputs = model(input_ids=input_ids,past_key_values=past_key_values,use_cache=True)logits = outputs.logitspast_key_values = outputs.past_key_valuesnext_token_logits = logits[:, -1, :]next_token = torch.argmax(next_token_logits, dim=-1, keepdim=True)output_ids = torch.cat([output_ids, next_token], dim=-1)if next_token.item() == eos_token_id:breakinput_ids = next_token  # 采用KV Cache后,推理過程修改的關鍵: 下一步只送入新 tokenprint(f"step {step}: {tokenizer.decode(output_ids[0])}", flush=True)return tokenizer.decode(output_ids[0])def main():config = GPT2Config()tokenizer = GPT2Tokenizer.from_pretrained("gpt2")model = GPT2LMHeadModel(config)prompt = "Once upon a time"output = generate_text(model, tokenizer, prompt)print("\nFinal output:")print(output)if __name__ == "__main__":main()
KV Cache 的引入是為了加速自回歸模型的推理速度,具體體現在:
-
每輪推理時,只需要計算當前輪新增 token 的 Q/K/V,而不需要重新計算所有之前 token 的 Q/K/V。
-
緩存當前輪計算結果,下一輪推理時直接讀取緩存結果。
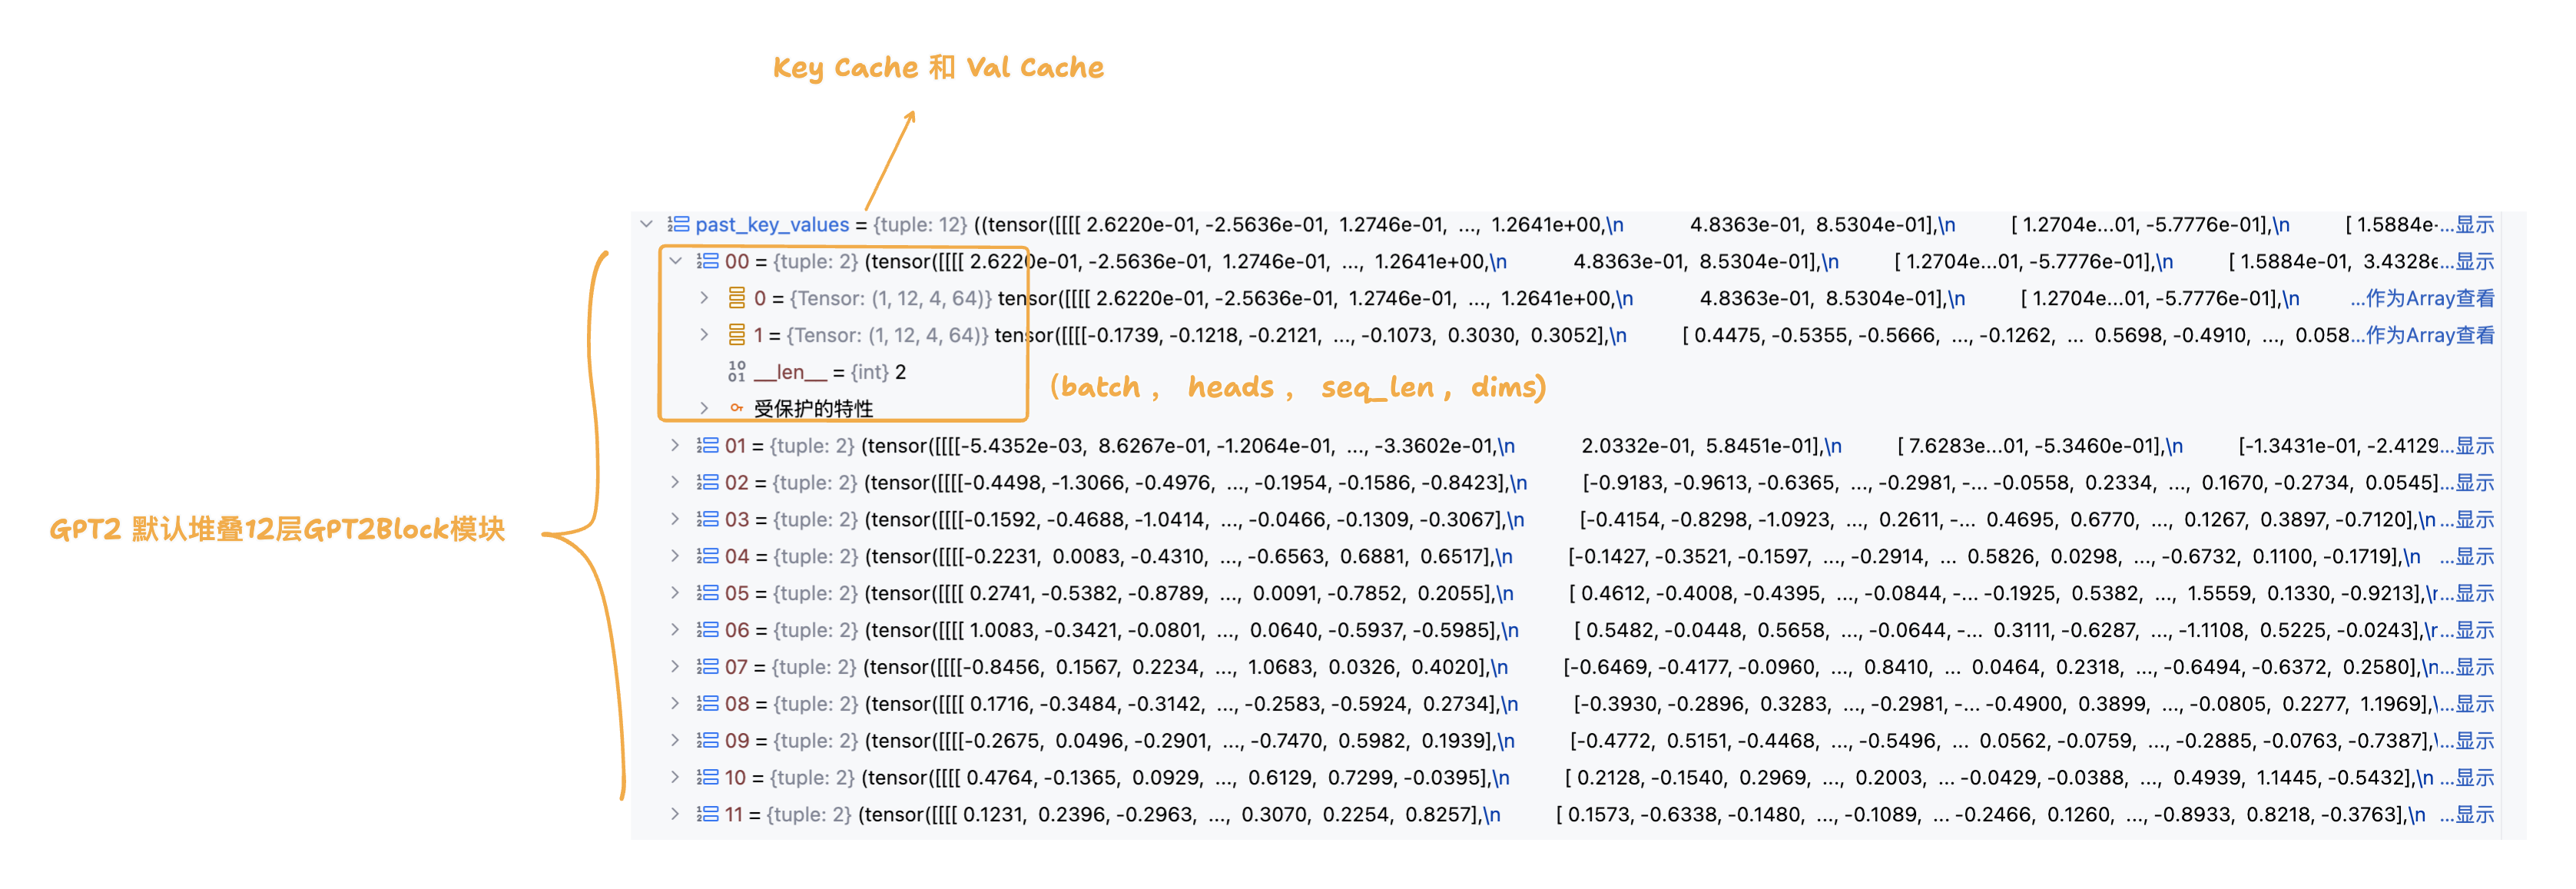
在首輪推理的過程中,我們傳入的是 promt 提示詞列表,并且 KV Cache 此時為空,還未進行初始化。因此首輪推理過程需要完成 promt 提示詞列表的 keys 和 values 的緩存;由于 GPT2 由多層 GPT2Block 堆疊而成,而每一層 GPT2Block 都有一個 GPT2Attention 模塊, 因此 KV Cache 需要準備好每一層 GPT2Attention 模塊的 keys 和 values 緩存 (分層Cache - legacy_cache)。
class GPT2Model(GPT2PreTrainedModel):def forward(self,input_ids=None,past_key_values=None, cache_position=None,attention_mask=None,position_ids=None,head_mask=None,use_cache=None,): return_legacy_cache = Falseif use_cache:# 1. 首輪推理,先進行 Legacy Cache 初始化if past_key_values is None:return_legacy_cache = Truepast_key_values = DynamicCache()# 2. 后續推理,將模型以元組形式返回的緩存重新封裝為Legacy Cache形式elif not isinstance(past_key_values, Cache):return_legacy_cache = Truepast_key_values = DynamicCache.from_legacy_cache(past_key_values)# 3. 詞嵌入 inputs_embeds = self.wte(input_ids)# 4. 位置編碼計算if cache_position is None:# 4.1 已經緩存的詞序列長度past_seen_tokens = past_key_values.get_seq_length() if past_key_values is not None else 0# 4.2 只為當前傳入的詞生成位置序列cache_position = torch.arange(past_seen_tokens, past_seen_tokens + inputs_embeds.shape[1], device=inputs_embeds.device) if position_ids is None:position_ids = cache_position.unsqueeze(0) # 添加batch維度# 4.3 生成位置編碼position_embeds = self.wpe(position_ids)# 5. 詞嵌入 + 位置編碼hidden_states = inputs_embeds + position_embeds.to(inputs_embeds.device)# 6. 進入堆疊GPT2Block模塊前向傳播流程for i, block in enumerate(self.h):hidden_states = block(hidden_states,past_key_values if not (self.gradient_checkpointing and self.training) else None, # 訓練時,不啟用KV Cachecache_position,causal_mask,use_cache=use_cache,)hidden_states = self.ln_f(hidden_states)hidden_states = hidden_states.view(output_shape)# 7. 將KV Cache用元組的形式進行返回 past_key_values = past_key_values if use_cache else Noneif return_legacy_cache:past_key_values = past_key_values.to_legacy_cache()return BaseModelOutputWithPastAndCrossAttentions(last_hidden_state=hidden_states,past_key_values=past_key_values,hidden_states=all_hidden_states,attentions=all_self_attentions,cross_attentions=all_cross_attentions,)
下圖展示的是步驟7中以元組形式返回的KV Cache結構:
下面將展示GPT2Block模塊的實現邏輯,由于不涉及KV Cache的實現細節,所以不過多展開:
class GPT2Block(GradientCheckpointingLayer):def forward(self,hidden_states: Optional[tuple[torch.FloatTensor]],past_key_value: Optional[Cache] = None,cache_position: Optional[torch.LongTensor] = None,attention_mask: Optional[torch.FloatTensor] = None,use_cache: Optional[bool] = False,) -> Union[tuple[torch.Tensor], Optional[tuple[torch.Tensor, tuple[torch.FloatTensor, ...]]]]:# 1. 歸一化residual = hidden_stateshidden_states = self.ln_1(hidden_states)# 2. 自注意力運算attn_output, self_attn_weights = self.attn(hidden_states,past_key_value=past_key_value,cache_position=cache_position,attention_mask=attention_mask,use_cache=use_cache,)# 3. residual connectionhidden_states = attn_output + residual# 4. 歸一化 + MLP + residual connectionresidual = hidden_stateshidden_states = self.ln_2(hidden_states)feed_forward_hidden_states = self.mlp(hidden_states)hidden_states = residual + feed_forward_hidden_statesreturn hidden_states
推理時的常規流程(無 KV Cache), 每生成一個新 token,都要:
-
重新輸入全部歷史 token
-
對所有歷史 token 重新計算 key 和 value
-
這意味著重復計算,效率低,計算開銷線性增長
有了 KV Cache 后的改進:
-
第一次輸入完整句子,計算并緩存其 key/value;
-
后續每次生成新 token 時:
-
只計算新 token 的 query、key、value;
-
把新 token 的 key/value 插入緩存中(代碼中用
past_key_value.update(...)完成); -
attention 直接使用「歷史緩存 key/value + 當前新 token 的 key/value」來完成;
-
-
整個注意力的 query 只有一個(當前 token),key/value 是歷史緩存 + 當前 token。
class GPT2Attention(nn.Module):def __init__(self, config, is_cross_attention=False, layer_idx=None):self.c_attn = Conv1D(3 * self.embed_dim, self.embed_dim) # 輸入維度: (batch,seq_len,embed_dim) , 變換后的輸出維度: (batch,seq_len,3*embed_dim)self.c_proj = Conv1D(self.embed_dim, self.embed_dim)def forward(self,hidden_states: Optional[tuple[torch.FloatTensor]],past_key_value: Optional[Cache] = None,cache_position: Optional[torch.LongTensor] = None,attention_mask: Optional[torch.FloatTensor] = None,) -> tuple[Union[torch.Tensor, tuple[torch.Tensor]], ...]:# 1. 一維卷積進行線性變換和升維,然后切分成query,key,valuequery_states, key_states, value_states = self.c_attn(hidden_states).split(self.split_size, dim=2)# 2. (batch,seq_len,-1,head_dim) , head_dim 是多頭自注意力中每個頭切分到的維度 shape_q = (*query_states.shape[:-1], -1, self.head_dim)shape_kv = (*key_states.shape[:-1], -1, self.head_dim)# 3. 維度統一: (batch,heads,seq_len,head_dim)query_states = query_states.view(shape_q).transpose(1, 2)key_states = key_states.view(shape_kv).transpose(1, 2)value_states = value_states.view(shape_kv).transpose(1, 2)# 4. KV Cache 不為空 if past_key_value is not None:# 4.1 cache_position 記錄當前詞對應輸入詞序列中的索引cache_kwargs = {"cache_position": cache_position}# 4.2 將當前詞的key和val進行緩存,根據所在GPTBlock層級(layer_idx說明),和位于詞序列的索引(cache_kwargs說明),插入對應層的list緩存中去,同時返回對應的key和val listkey_states, value_states = past_key_value.update(key_states, value_states, self.layer_idx, cache_kwargs=cache_kwargs)# 5. 進行經典的多頭自注意力運算(不展開細聊) attn_output, attn_weights = attention_interface(self,query_states, # 當前輸入詞的querykey_states, # cache key list + 輸入詞的keyvalue_states, # cache val list + 輸入詞的valattention_mask, # padding maskdropout=self.attn_dropout.p if self.training else 0.0,)attn_output = attn_output.reshape(*attn_output.shape[:-2], -1).contiguous()attn_output = self.c_proj(attn_output)attn_output = self.resid_dropout(attn_output)return attn_output, attn_weights


)


