注:本文為 “Linux 字符設備驅動” 相關文章合輯。
英文引文,機翻未校。
中文引文,略作重排。
未整理去重,如有內容異常,請看原文。
Simple Linux character device driver
簡單 Linux 字符設備驅動程序
Oleg Kutkov / March 14, 2018
A character device is one of the simplest ways to communicate with a module in the Linux kernel.
字符設備是與 Linux 內核模塊通信的最簡單方式之一。
These devices are presented as special files in a /dev directory and support direct reading and writing of any data, byte by byte, like a stream. Actually, most of the pseudo-devices in /dev are character devices: serial ports, modems, sound, and video adapters, keyboards, some custom I/O interfaces. Userspace programs can easily open, read, write, and custom control requests with such device files.
這些設備以 /dev 目錄中的特殊文件形式呈現,并支持逐字節讀取和寫入任何數據,就像一個數據流一樣。實際上,/dev 中的大多數偽設備都是字符設備:串行端口、調制解調器、音頻設備、視頻適配器、鍵盤以及一些自定義的 I/O 接口。用戶空間程序可以輕松地打開、讀取、寫入以及對這些設備文件進行自定義控制請求。
Here I am describing how to write a simple Linux kernel module which can create one or multiple character device.
本文將介紹如何編寫一個簡單的 Linux 內核模塊,以創建一個或多個字符設備。
Introducing to character devices.
介紹字符設備。
Detection of the device type in /dev directory is pretty simple.
在 /dev 目錄中檢測設備類型非常簡單。
$ ls -l /dev/ttyS0
crw-rw---- 1 root dialout 4, 64 Mar 11 16:52 /dev/ttyS0
Symbol C , in the beginning, means that this device is a character device. Also, you can find here two strange numbers: 4 and 64. This is a Major and Minor number of this device. Inside the Linux kernel, every device is identified not by a symbolic name but by a unique number – the device’s major number. This number is assigned by the kernel during device registration. Every device driver can support multiple “sub-devices”. For example, a serial port adapter may contain two hardware ports. Both of these ports are handled by the same driver, and they share one Major number. But inside this driver, each of these ports is also identified by the unique number, and this is a device Minor number.
開頭的符號 C 表示這是一個字符設備。此外,這里還有兩個奇怪的數字:4 和 64。這是設備的主設備號和次設備號。在 Linux 內核中,每個設備不是通過符號名稱而是通過一個唯一的數字來識別的——設備的主設備號。這個數字是在設備注冊時由內核分配的。每個設備驅動程序可以支持多個“子設備”。例如,一個串行端口適配器可能包含兩個硬件端口。這兩個端口由同一個驅動程序處理,并且它們共享一個主設備號。但在該驅動程序內部,每個端口也通過一個唯一的數字來識別,這就是設備的次設備號。
crw-rw---- 1 root dialout 4, 64 Mar 11 16:52 /dev/ttyS0
crw-rw---- 1 root dialout 4, 65 Mar 11 16:52 /dev/ttyS1
crw-rw---- 1 root dialout 4, 66 Mar 11 16:52 /dev/ttyS2
One Major number 4 for every ttySX device and different (64–65) Minor numbers. The driver’s code assigns minor numbers, and the developer of this driver may select any suitable values.
每個 ttySX 設備有一個主設備號 4 和不同的次設備號(64–65)。驅動程序代碼分配次設備號,驅動程序開發者可以選擇任何合適的值。
As this device acts like a file – programs can do almost everything except seeking. Every file operation on this object commands the driver to do something inside the Linux kernel and start reading some data from the hardware.
由于該設備表現得像一個文件,程序幾乎可以執行任何操作,除了定位(seeking)。對這個對象的每一個文件操作都會命令驅動程序在 Linux 內核中執行某些操作,并開始從硬件讀取一些數據。
At the end of this article, you can find a complete example of the character device driver, but first, let’s discuss how it works.
在本文的最后,您會找到一個完整的字符設備驅動程序示例,但在那之前,讓我們先討論它是如何工作的。
The diagram below shows how the userspace program interacts with the IBM PC serial port using the character device.
下圖展示了用戶空間程序如何通過字符設備與 IBM PC 串行端口進行交互。
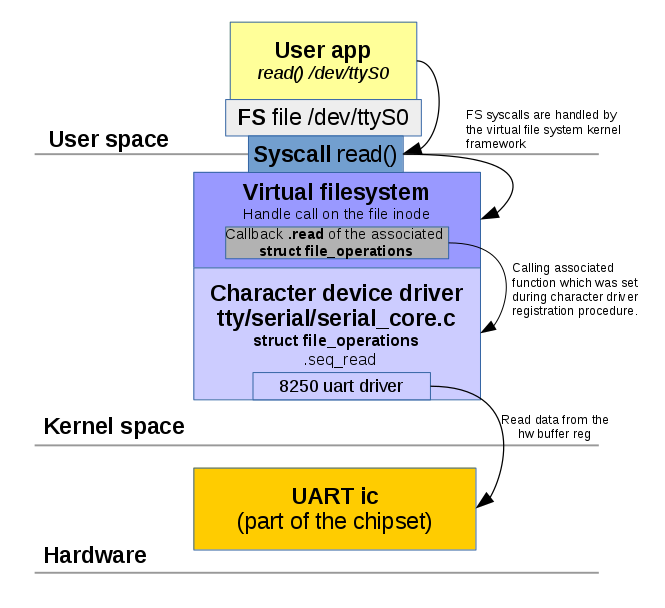
The virtual filesystem is an abstraction layer on top of a more concrete filesystem. A VFS aims to allow client applications to access different types of concrete filesystems uniformly.
虛擬文件系統是更具體的文件系統之上的抽象層。VFS 的目標是允許客戶端應用程序以統一的方式訪問不同類型的文件系統。
File operations
文件操作
In special device files, VFS is responsible for calling I/O functions set by the device driver. To set this function special kernel structure is used.
在特殊設備文件中,VFS 負責調用設備驅動程序設置的 I/O 函數。為此,使用了一個特殊的內核結構。
struct file_operations {struct module *owner;loff_t (*llseek) (struct file *, loff_t, int);ssize_t (*read) (struct file *, char *, size_t, loff_t *);ssize_t (*write) (struct file *, const char *, size_t, loff_t *);int (*readdir) (struct file *, void *, filldir_t);unsigned int (*poll) (struct file *, struct poll_table_struct *);int (*ioctl) (struct inode *, struct file *, unsigned int, unsigned long);int (*mmap) (struct file *, struct vm_area_struct *);int (*open) (struct inode *, struct file *);int (*flush) (struct file *);int (*release) (struct inode *, struct file *);int (*fsync) (struct file *, struct dentry *, int datasync);int (*fasync) (int, struct file *, int);int (*lock) (struct file *, int, struct file_lock *);ssize_t (*readv) (struct file *, const struct iovec *, unsigned long,loff_t *);ssize_t (*writev) (struct file *, const struct iovec *, unsigned long,loff_t *);};
Some operations are not implemented by a driver. For example, a driver that handles a video card won’t need to read from a directory structure. The corresponding entries in the file_operations structure should be set to NULL.
某些操作可能不會由驅動程序實現。例如,處理顯卡的驅動程序不需要從目錄結構中讀取。在這種情況下,file_operations 結構中對應的條目應設置為 NULL。
In a C99 way, initialization is simple.
以 C99 的方式,初始化非常簡單。
struct file_operations fops = {.read = device_read,.write = device_write,.open = device_open,.release = device_release};
Initialized file_operations can be assigned to the character device during device registration.
初始化后的 file_operation 可以在設備注冊期間分配給字符設備。
Registration of the character device
字符設備的注冊
The registration procedure consists of several simple steps.
注冊過程包括幾個簡單的步驟。
First, you need to decide how many minor devices you need. This is a constant which typically depends on your hardware (if you are writing a driver for real hardware).
首先,您需要確定需要多少個次設備。這是一個常量,通常取決于您的硬件(如果您正在為真實硬件編寫驅動程序)。
Minor numbers are convenient to use as part of the device name. For example, /dev/mychardev0 with a Minor 0, /dev/mychardev2 with a Minor 2.
次設備號可以方便地用作設備名稱的一部分。例如,/dev/mychardev0 的次設備號為 0,/dev/mychardev2 的次設備號為 2。
The first step is an allocation and registration of the range of char device numbers using alloc_chrdev_region.
第一步是使用 alloc_chrdev_region 分配和注冊字符設備號范圍。
int alloc_chrdev_region(dev_t *dev, unsigned int firstminor, unsigned int count, char *name);
Where dev is output parameter for first assigned number, firstminor is first of the requested range of minor numbers (e.g., 0), count is a number of minor numbers required, and name – the associated device’s name driver.
其中,dev 是輸出參數,用于第一個分配的設備號;firstminor 是請求范圍內的第一個次設備號(例如,0);count 是所需的次設備號數量;name 是與設備驅動程序關聯的名稱。
The major number will be chosen dynamically and returned (along with the first minor number) in dev. The function returns zero or a negative error code.
主設備號將動態選擇并返回到 dev 中(連同第一個次設備號)。該函數返回零或一個負的錯誤代碼。
To get generated Major number, we can use MAJOR() macros.
要獲取生成的主設備號,可以使用 MAJOR() 宏。
int dev_major = MAJOR(dev);
Now it’s time to initialize a new character device and set file_operations with cdev_init.
現在是時候初始化一個新的字符設備,并使用 cdev_init 設置文件操作了。
void cdev_init(struct cdev *cdev, const struct file_operations *fops);
struct cdev represents a character device and is allocated by this function.
struct cdev 表示一個字符設備,由該函數分配。
Now add the device to the system.
現在將設備添加到系統中。
int cdev_add(struct cdev *p, dev_t dev, unsigned count);
Finally – create a device file node and register it with sysfs.
最后,創建設備文件節點并將其注冊到 sysfs 中。
struct device * device_create(struct class *class, struct device *parent, dev_t devt, const char *fmt, ...);
Now all together. This code creates 2 character devices with names /dev/mychardev0 and /dev/mychardev1.
現在將所有內容放在一起。這段代碼創建了兩個字符設備,名稱分別為 /dev/mychardev0 和 /dev/mychardev1。
#include <linux/cdev.h>
#include <linux/device.h>
#include <linux/kernel.h>
#include <linux/fs.h>// max Minor devices
#define MAX_DEV 2// initialize file_operations
static const struct file_operations mychardev_fops = {.owner      = THIS_MODULE,.open       = mychardev_open,.release    = mychardev_release,.unlocked_ioctl = mychardev_ioctl,.read       = mychardev_read,.write       = mychardev_write
};// device data holder, this structure may be extended to hold additional data
struct mychar_device_data {struct cdev cdev;
};// global storage for device Major number
static int dev_major = 0;// sysfs class structure
static struct class *mychardev_class = NULL;// array of mychar_device_data for
static struct mychar_device_data mychardev_data[MAX_DEV];void mychardev_init(void)
{int err, i;dev_t dev;// allocate chardev region and assign Major numbererr = alloc_chrdev_region(&dev, 0, MAX_DEV, "mychardev");dev_major = MAJOR(dev);// create sysfs classmychardev_class = class_create(THIS_MODULE, "mychardev");// Create necessary number of the devicesfor (i = 0; i < MAX_DEV; i++) {// init new devicecdev_init(&mychardev_data[i].cdev, &mychardev_fops);mychardev_data[i].cdev.owner = THIS_MODULE;// add device to the system where "i" is a Minor number of the new devicecdev_add(&mychardev_data[i].cdev, MKDEV(dev_major, i), 1);// create device node /dev/mychardev-x where "x" is "i", equal to the Minor numberdevice_create(mychardev_class, NULL, MKDEV(dev_major, i), NULL, "mychardev-%d", i);}
}
You can find a few new things in this example. The creation of the sysfs class is a necessary part of the device node creation.
在這個示例中,您會發現一些新的內容。創建 sysfs 類是設備節點創建的必要部分。
Function class_create(THIS_MODULE, “mychardev”) creates sysfs class with paths for each character devices:
函數 class_create(THIS_MODULE, “mychardev”) 為每個字符設備創建 sysfs 類,并為其生成路徑:
$ tree /sys/devices/virtual/mychardev/
/sys/devices/virtual/mychardev/
├── mychardev-0
│   ├── dev
│   ├── power
│   │   ├── async
│   │   ├── autosuspend_delay_ms
│   │   ├── control
│   │   ├── runtime_active_kids
│   │   ├── runtime_active_time
│   │   ├── runtime_enabled
│   │   ├── runtime_status
│   │   ├── runtime_suspended_time
│   │   └── runtime_usage
│   ├── subsystem -> ../../../../class/mychardev
│   └── uevent
└── mychardev-1├── dev├── power│   ├── async│   ├── autosuspend_delay_ms│   ├── control│   ├── runtime_active_kids│   ├── runtime_active_time│   ├── runtime_enabled│   ├── runtime_status│   ├── runtime_suspended_time│   └── runtime_usage├── subsystem -> ../../../../class/mychardev└── uevent
Sysfs can be used as an additional way to interact with userspace. Setting up some driver params, for example.
Sysfs 可以作為一種與用戶空間交互的額外方式。例如,設置一些驅動程序參數。
Another useful thing – configure UDEV variables to set up correct permissions to the character device.
另一個有用的功能是配置 UDEV 變量,以設置字符設備的正確權限。
This can be done by setting uevent callback to sysfs class.
可以通過為 sysfs 類設置 uevent 回調來實現。
static int mychardev_uevent(struct device *dev, struct kobj_uevent_env *env)
{add_uevent_var(env, "DEVMODE=%#o", 0666);return 0;
}...mychardev_class = class_create(THIS_MODULE, "mychardev");
mychardev_class->dev_uevent = mychardev_uevent;
Now we got “rw-rw-rw-” permissions on each mychardev.
現在每個 mychardev 的權限都設置為“rw-rw-rw-”。
$ ls -l /dev/mychardev-*
crw-rw-rw- 1 root root 246, 0 Mar 14 12:24 /dev/mychardev-0
crw-rw-rw- 1 root root 246, 1 Mar 14 12:24 /dev/mychardev-1
Every user can read and write.
每個用戶都可以讀取和寫入。
When a character device is no longer required it must be properly destroyed.
當不再需要字符設備時,必須正確地銷毀它。
void mychardev_destroy(void)
{int i;for (i = 0; i < MAX_DEV; i++) {device_destroy(mychardev_class, MKDEV(dev_major, i));}class_unregister(mychardev_class);class_destroy(mychardev_class);unregister_chrdev_region(MKDEV(dev_major, 0), MINORMASK);
}
Device I/O functions
設備 I/O 函數
To interact with your device file, we need to set a few functions to the struct file_operations.
為了與設備文件進行交互,我們需要為 struct file_operations 設置一些函數。
static int mychardev_open(struct inode *inode, struct file *file)
{printk("MYCHARDEV: Device open\n");return 0;
}static int mychardev_release(struct inode *inode, struct file *file)
{printk("MYCHARDEV: Device close\n");return 0;
}static long mychardev_ioctl(struct file *file, unsigned int cmd, unsigned long arg)
{printk("MYCHARDEV: Device ioctl\n");return 0;
}static ssize_t mychardev_read(struct file *file, char __user *buf, size_t count, loff_t *offset)
{printk("MYCHARDEV: Device read\n");return 0;
}static ssize_t mychardev_write(struct file *file, const char __user *buf, size_t count, loff_t *offset)
{printk("MYCHARDEV: Device write\n");return 0;
}
Now we can handle I/O requests. If build and load the kernel module with this code and then run “cat /dev/mychardev-0” these messages will be printed in dmesg:
現在我們可以處理 I/O 請求。如果構建并加載包含此代碼的內核模塊,然后運行“cat /dev/mychardev-0”,這些消息將打印在 dmesg 中:
$ cat /dev/mychardev-0$ sudo tail -n3 /var/log/messages
Mar 14 12:52:46 oleg-lab kernel: [244801.849652] MYCHARDEV: Device open
Mar 14 12:52:46 oleg-lab kernel: [244801.849665] MYCHARDEV: Device read
Mar 14 12:52:46 oleg-lab kernel: [244801.849672] MYCHARDEV: Device close
It’s working.
它正常工作了。
To transfer some real data within read/write requests, we need to use special kernel functionality. It’s very dangerous or even impossible to do simple memory copying using *buf pointers. Safe way is to use copy_to_user() and copy_from_user()
要在 read/write 請求中傳輸一些真實數據,我們需要使用特殊的內核功能。使用 *buf 指針進行簡單的內存復制是非常危險的,甚至是不可能的。安全的方式是使用 copy_to_user() 和 copy_from_user()。
#include <linux/uaccess.h>unsigned long copy_to_user(void __user *to, const void *from, unsigned long n);
unsigned long copy_from_user(void *to, const void __user *from, unsigned long n);
These functions perform additional checks of the permissions and memory regions before actual data access.
這些函數在實際數據訪問之前會進行額外的權限和內存區域檢查。
Let’s modify our mychardev_read().
讓我們修改 mychardev_read()。
static ssize_t mychardev_read(struct file *file, char __user *buf, size_t count, loff_t *offset)
{uint8_t *data = "Hello from the kernel world!\n";size_t datalen = strlen(data);if (count > datalen) {count = datalen;}if (copy_to_user(buf, data, count)) {return -EFAULT;}return count;
}
It’s always important to check how many bytes users want to read. If this size exceeds the prepared data’s actual size – the user can read the kernel stack which can be a hole in the system security.
始終重要的是要檢查用戶想要讀取的字節數。如果這個大小超過了準備好的數據的實際大小——用戶可能會讀取內核棧,這可能會成為系統安全的一個漏洞。
Now let’s try to read 29 bytes from our character device.
現在讓我們嘗試從我們的字符設備中讀取 29 個字節。
$ head -c29 /dev/mychardev-1
Hello from the kernel world!
Of course, we can send to the user space not only strings but any other raw data structures.
當然,我們不僅可以向用戶空間發送字符串,還可以發送任何其他原始數據結構。
Now mychardev_write().
現在是 mychardev_write()。
static ssize_t mychardev_write(struct file *file, const char __user *buf, size_t count, loff_t *offset)
{size_t maxdatalen = 30, ncopied;uint8_t databuf[maxdatalen];if (count < maxdatalen) {maxdatalen = count;}ncopied = copy_from_user(databuf, buf, maxdatalen);if (ncopied == 0) {printk("Copied %zd bytes from the user\n", maxdatalen);} else {printk("Could't copy %zd bytes from the user\n", ncopied);}databuf[maxdatalen] = 0;printk("Data from the user: %s\n", databuf);return count;
}
It’s also very important to verify how many bytes sending users and how many bytes we can accept.
驗證發送的字節數以及我們可以接受的字節數也非常重要。
Function copy_from_user returns the number of bytes that could not be copied. On success, this will be zero.
函數 copy_from_user 返回未能復制的字節數。成功時,這個值為零。
If some data could not be copied, this function will pad the copied data to the requested size using zero bytes.
如果某些數據未能復制,該函數將使用零字節將已復制的數據填充到請求的大小。
Test:
測試:
$ echo "Hello from the user" > /dev/mychardev-1$ sudo tail -n5 /var/log/messages
Mar 14 15:57:14 oleg-lab kernel: [255870.547447] MYCHARDEV: Device open
Mar 14 15:57:14 oleg-lab kernel: [255870.547466] Copied 20 bytes from the user
Mar 14 15:57:14 oleg-lab kernel: [255870.547468] Data from the user: Hello from the user
Mar 14 15:57:14 oleg-lab kernel: [255870.547468]
Mar 14 15:57:14 oleg-lab kernel: [255870.547472] MYCHARDEV: Device close
You may ask how to identify which device (mychardev-0 or mychardev-1) is used in a specific I/O process? Since our Minor numbers are the same as device names we can get Minor number from the file inode using struct file.
您可能會問,如何識別在特定 I/O 過程中使用的是哪個設備(mychardev-0 還是 mychardev-1)?由于我們的次設備號與設備名稱相同,因此可以通過 struct file 從文件 inode 中獲取 次設備號。
MINOR(file->f_path.dentry->d_inode->i_rdev)
Let’s print this value in the read and write functions and see what happens.
讓我們在 read 和 write 函數中打印這個值,看看會發生什么。
...
printk("Reading device: %d\n", MINOR(file->f_path.dentry->d_inode->i_rdev));...
printk("Writing device: %d\n", MINOR(file->f_path.dentry->d_inode->i_rdev));
Result:
結果:
$ echo "Hello from the user" > /dev/mychardev-0dmesg
Mar 14 16:02:08 oleg-lab kernel: [256164.495609] Writing device: 0$ echo "Hello from the user" > /dev/mychardev-1dmesg
Mar 14 16:02:08 oleg-lab kernel: [256164.495609] Writing device: 1
Few notes about ioctl.
關于 ioctl 的一些說明。
static long mychardev_ioctl(struct file *file, unsigned int cmd, unsigned long arg)
This utility function is used to pass some CMD as the number and some optional data as ARG.
這個工具函數用于傳遞一些作為數字的 CMD 和一些可選數據作為 ARG。
You need to define some magic numbers used as CMD (and probably as ARG) somewhere in a separate header file, shared between driver code and user application code.
您需要在某個單獨的頭文件中定義一些用作 CMD(以及可能用作 ARG)的魔術數字,該頭文件在驅動程序代碼和用戶應用程序代碼之間共享。
All implementation of the ioctl function is a simple switch case routine where you do something depending on the sent CMD.
ioctl 函數的所有實現都是一個簡單的 switch case 例程,您根據發送的 CMD 執行某些操作。
Now a complete example of the Linux kernel module, which implements everything that we were discussed here.
現在是一個完整的 Linux 內核模塊示例,它實現了我們在這里討論的所有內容。
#include <linux/init.h>
#include <linux/module.h>
#include <linux/cdev.h>
#include <linux/device.h>
#include <linux/kernel.h>
#include <linux/uaccess.h>
#include <linux/fs.h>#define MAX_DEV 2static int mychardev_open(struct inode *inode, struct file *file);
static int mychardev_release(struct inode *inode, struct file *file);
static long mychardev_ioctl(struct file *file, unsigned int cmd, unsigned long arg);
static ssize_t mychardev_read(struct file *file, char __user *buf, size_t count, loff_t *offset);
static ssize_t mychardev_write(struct file *file, const char __user *buf, size_t count, loff_t *offset);static const struct file_operations mychardev_fops = {.owner      = THIS_MODULE,.open       = mychardev_open,.release    = mychardev_release,.unlocked_ioctl = mychardev_ioctl,.read       = mychardev_read,.write       = mychardev_write
};struct mychar_device_data {struct cdev cdev;
};static int dev_major = 0;
static struct class *mychardev_class = NULL;
static struct mychar_device_data mychardev_data[MAX_DEV];static int mychardev_uevent(struct device *dev, struct kobj_uevent_env *env)
{add_uevent_var(env, "DEVMODE=%#o", 0666);return 0;
}static int __init mychardev_init(void)
{int err, i;dev_t dev;err = alloc_chrdev_region(&dev, 0, MAX_DEV, "mychardev");dev_major = MAJOR(dev);mychardev_class = class_create(THIS_MODULE, "mychardev");mychardev_class->dev_uevent = mychardev_uevent;for (i = 0; i < MAX_DEV; i++) {cdev_init(&mychardev_data[i].cdev, &mychardev_fops);mychardev_data[i].cdev.owner = THIS_MODULE;cdev_add(&mychardev_data[i].cdev, MKDEV(dev_major, i), 1);device_create(mychardev_class, NULL, MKDEV(dev_major, i), NULL, "mychardev-%d", i);}return 0;
}static void __exit mychardev_exit(void)
{int i;for (i = 0; i < MAX_DEV; i++) {device_destroy(mychardev_class, MKDEV(dev_major, i));}class_unregister(mychardev_class);class_destroy(mychardev_class);unregister_chrdev_region(MKDEV(dev_major, 0), MINORMASK);
}static int mychardev_open(struct inode *inode, struct file *file)
{printk("MYCHARDEV: Device open\n");return 0;
}static int mychardev_release(struct inode *inode, struct file *file)
{printk("MYCHARDEV: Device close\n");return 0;
}static long mychardev_ioctl(struct file *file, unsigned int cmd, unsigned long arg)
{printk("MYCHARDEV: Device ioctl\n");return 0;
}static ssize_t mychardev_read(struct file *file, char __user *buf, size_t count, loff_t *offset)
{uint8_t *data = "Hello from the kernel world!\n";size_t datalen = strlen(data);printk("Reading device: %d\n", MINOR(file->f_path.dentry->d_inode->i_rdev));if (count > datalen) {count = datalen;}if (copy_to_user(buf, data, count)) {return -EFAULT;}return count;
}static ssize_t mychardev_write(struct file *file, const char __user *buf, size_t count, loff_t *offset)
{size_t maxdatalen = 30, ncopied;uint8_t databuf[maxdatalen];printk("Writing device: %d\n", MINOR(file->f_path.dentry->d_inode->i_rdev));if (count < maxdatalen) {maxdatalen = count;}ncopied = copy_from_user(databuf, buf, maxdatalen);if (ncopied == 0) {printk("Copied %zd bytes from the user\n", maxdatalen);} else {printk("Could't copy %zd bytes from the user\n", ncopied);}databuf[maxdatalen] = 0;printk("Data from the user: %s\n", databuf);return count;
}MODULE_LICENSE("GPL");
MODULE_AUTHOR("Oleg Kutkov <elenbert@gmail.com>");module_init(mychardev_init);
module_exit(mychardev_exit);
MODULE_LICENSE("GPL");
MODULE_AUTHOR("Oleg Kutkov <elenbert@gmail.com>");module_init(mychardev_init);
module_exit(mychardev_exit);
And Makefile to build this code.
以及用于構建此代碼的 Makefile。
BINARY     := mychardev
KERNEL      := /lib/modules/$(shell uname -r)/build
ARCH        := x86
C_FLAGS     := -Wall
KMOD_DIR    := $(shell pwd)
TARGET_PATH := /lib/modules/$(shell uname -r)/kernel/drivers/charOBJECTS := main.occflags-y += $(C_FLAGS)obj-m += $(BINARY).o$(BINARY)-y := $(OBJECTS)$(BINARY).ko:make -C $(KERNEL) M=$(KMOD_DIR) modulesinstall:cp $(BINARY).ko $(TARGET_PATH)depmod -auninstall:rm $(TARGET_PATH)/$(BINARY).kodepmod -aclean:make -C $(KERNEL) M=$(KMOD_DIR) clean
Module building and loading
模塊的構建和加載
make && sudo insmod mychardev.ko
You should find two new devices: /dev/mychardev-0 and /dev/mychardev-1, and repeat all experiments from this article.
您應該會找到兩個新的設備:/dev/mychardev-0 和 /dev/mychardev-1,并重復本文中的所有實驗。
I hope this material will be helpful. This code can be used as a basic pattern in some more complex driver project.
希望這些材料能有所幫助。此代碼可以用作更復雜驅動程序項目的基本模板。
Writing a Simple Character Device driver in Linux
在 Linux 中編寫一個簡單的字符設備驅動程序
March 25, 2010
Basic Concepts of Character Device Drivers
字符設備驅動程序的基本概念
A Character device driver needs a major number and a minor number. The devices are registered in the Kernel and it lies either in the /dev/ or in the /proc folder.
字符設備驅動程序需要一個主設備號和一個次設備號。設備在內核中注冊,并且位于 /dev/ 或 /proc 文件夾中。
Example Device Driver
示例設備驅動程序
The following example uses a char device driver with major number 222 and a minor number 0. The name of the device driver namely “new_device”
以下示例使用了一個主設備號為 222、次設備號為 0 的字符設備驅動程序,其設備驅動程序的名稱為 “new_device”。
Functions Used by the Device Driver
設備驅動程序的功能
It uses the following things:
它使用了以下功能:
-
Open or register a device
打開或注冊設備 -
Close or unregister the device
關閉或注銷設備 -
Reading from the device (Kernel to the userspace)
從設備讀取數據(從內核到用戶空間) -
Writing to the device (userlevel to the kernel space)
向設備寫入數據(從用戶級別到內核空間)
Files Included
文件組成
There are three files, Copy the following or download all the three files here
共有三個文件,可以復制以下內容或從 這里下載所有三個文件
Source Code
源代碼
/* new_dev.c */
#include<linux/module.h>
#include<linux/init.h>
#include "new_dev.h"MODULE_AUTHOR("PRADEEPKUMAR");
MODULE_DESCRIPTION("A simple char device");static int r_init(void);
static void r_cleanup(void);module_init(r_init);
module_exit(r_cleanup);static int r_init(void)
{
printk("<1>hi\n");
if(register_chrdev(222,"new_device",&my_fops)){
printk("<1>failed to register");
}
return 0;
}
static void r_cleanup(void)
{
printk("<1>bye\n");
unregister_chrdev(222,"new_device");
return ;
}
/* new_dev.h */
/*
\* my device header file
*/
#ifndef _NEW_DEVICE_H
#define _NEW_DEVICE_H#include <linux/fs.h>
#include <linux/sched.h>
#include <linux/errno.h>
#include <asm/current.h>
#include <asm/segment.h>
#include <asm/uaccess.h>char my_data[80]="hi from kernel"; /* our device */int my_open(struct inode *inode,struct file *filep);
int my_release(struct inode *inode,struct file *filep);
ssize_t my_read(struct file *filep,char *buff,size_t count,loff_t *offp );
ssize_t my_write(struct file *filep,const char *buff,size_t count,loff_t *offp );
struct file_operations my_fops={
open: my_open,
read: my_read,
write: my_write,
release:my_release,
};int my_open(struct inode *inode,struct file *filep)
{
/*MOD_INC_USE_COUNT;*/ /* increments usage count of module */
return 0;
}int my_release(struct inode *inode,struct file *filep)
{
/*MOD_DEC_USE_COUNT;*/ /* decrements usage count of module */
return 0;
}
ssize_t my_read(struct file *filep,char *buff,size_t count,loff_t *offp )
{
/* function to copy kernel space buffer to user space*/
if ( copy_to_user(buff,my_data,strlen(my_data)) != 0 )
printk( "Kernel -> userspace copy failed!\n" );
return strlen(my_data);}
ssize_t my_write(struct file *filep,const char *buff,size_t count,loff_t *offp )
{
/* function to copy user space buffer to kernel space*/
if ( copy_from_user(my_data,buff,count) != 0 )
printk( "Userspace -> kernel copy failed!\n" );
return 0;
}
#endif
Makefile
obj-m += new_dev.oall:
make -C /lib/modules/$(shell uname -r)/build M=$(PWD) modulesclean:
make -C /lib/modules/$(shell uname -r)/build M=$(PWD) clean
Compilation and Usage
編譯和使用
How to Compile
如何編譯
Put all the three files in the same folder and execute the following commands
將所有三個文件放在同一個文件夾中,并執行以下命令
-
make (to compile the module)
make(用于編譯模塊) -
insmod new_dev.ko (To insert the module)
insmod new_dev.ko(用于插入模塊)
After Inserting the Module
插入模塊后
Once the module is inserted, do the following
在插入模塊后,執行以下操作:
mknod /dev/new_device c 222 0 (Command to make an entry in the /dev/, once the device is created, go and see the /dev/ folder for the entry new_device)
mknod /dev/new_device c 222 0(用于在 /dev/ 中創建一個條目,設備創建后,可以在 /dev/ 文件夾中查看名為 new_device 的條目)
cat /dev/new_device (The message will be printed which is from the kernel, that is read operation)
cat /dev/new_device(將打印來自內核的消息,即 讀取操作)
echo “This is a write information to the kernel” > /dev/new_device (This command is to perform the write operation)
echo “This is a write information to the kernel” > /dev/new_device(用于執行 寫入操作)
After Checking the Read and Write Operation
檢查讀取和寫入操作后
After checking the read and write operation, just remove the module
在檢查讀取和寫入操作后,移除模塊:
rmmod new_dev.ko
(Source: Implementing a Simple Char Device in Linux LG #125)(下文)
Implementing a Simple Char Device in Linux
在 Linux 中實現一個簡單的字符設備
By Ranjeet Mishra
Device
For the purpose of this article, let’s consider a device to be a virtual representation, within Linux, of hardware that one would like to drive by using a piece of software. In the Linux world, devices are implemented in the form of modules. By using modules, we can provide device functionality that can be accessed from userspace.
在本文中,我們將“設備”視為 Linux 中硬件的虛擬表示,這些硬件可以通過軟件進行驅動。在 Linux 中,設備以模塊的形式實現。通過使用模塊,我們可以提供可以從用戶空間訪問的設備功能。
A userspace entry point to a device is provided by a file node in the /dev directory. As we know, most of the things in Linux world are represented in the form of files. We can do [ls -l] on any device file, which will report the device type - character or block device, as well as its major number and minor number.
設備的用戶空間入口由 /dev 目錄中的文件節點提供。正如我們所知,Linux 中的大多數事物都以文件的形式表示。我們可以在任何設備文件上執行 [ls -l],它將報告設備類型——字符設備或塊設備,以及其主設備號和次設備號。
The type of device indicates the way data is written to a device. For a character device, it’s done serially, byte by byte, and for a block device (e.g., hard disk) in the form of chunks of bytes - just as the name suggests.
設備的類型表明數據寫入設備的方式。對于字符設備,數據是逐字節順序寫入的,而對于塊設備(例如硬盤),則是以字節塊的形式寫入——正如其名稱所暗示的那樣。
The major number is assigned at the time of registering the device (using some module) and the kernel uses it to differentiate between various devices. The minor number is used by the device driver programmer to access different functions in the same device.
主設備號是在注冊設備時(使用某個模塊)分配的,內核使用它來區分不同的設備。次設備號由設備驅動程序編寫者用來訪問同一設備中的不同功能。
Looking at the number of files in the /dev directory, one might think that a very large number of devices are up and running in the system, but only few might be actually present and running. This can be seen by executing [cat /proc/devices]. (One can then see the major numbers and names of devices that are passed at the time of registering.)
查看 /dev 目錄中文件的數量,人們可能會以為系統中有大量設備正在運行,但實際上可能只有少數設備真正存在并運行。通過執行 [cat /proc/devices] 可以看到這一點。(然后可以看到注冊時傳遞的主設備號和設備名稱。)
Modules
Every device requires a module. Information about the currently loaded modules can be extracted from the kernel through [cat /proc/modules]. A module is nothing more than an object file that can be linked into a running kernel; to accomplish this, Linux provides the [insmod] utility. As an example, let’s say that my module’s object file is called my_dev.o; we can link it to the kernel using [insmod my_dev.o]. If [insmod] is successful we can see our module’s entry using [cat /proc/modules], or [lsmod]. We can remove the module using the rmmod utility, which takes the object file name as an argument.
每個設備都需要一個模塊。可以通過 [cat /proc/modules] 從內核中獲取當前已加載模塊的信息。模塊不過是一個可以鏈接到運行中的內核的對象文件;為此,Linux 提供了 [insmod] 工具。例如,假設我的模塊對象文件名為 my_dev.o,我們可以使用 [insmod my_dev.o] 將其鏈接到內核。如果 [insmod] 成功,我們可以通過 [cat /proc/modules] 或 [lsmod] 查看我們模塊的條目。我們可以使用 rmmod 工具移除模塊,它以對象文件名作為參數。
Writing a Module to register a Char device
First of all, we should know the basics of generating a module object file. The module uses kernel space functions and since the whole kernel code is written inside the KERNEL directive we need to define it at time of compiling, or in our source code. We need to define the MODULE directive before anything else because Module functions are defined inside it. In order to link our module with the kernel, the version of the running kernel should match the version which the module is compiled with, or [insmod] will reject the request. This means that we must include the [include] directory present in the Linux source code of the appropriate version. Again, if my module file is called my_dev.c, a sample compiler instruction could be [gcc -D__KERNEL__ -I/usr/src/linux.2.6.7/linux/include -c my_dev.c]. A -D is used to define any directive symbol. Here we need to define KERNEL, since without this kernel-specific content won’t be available to us.
首先,我們需要了解生成模塊對象文件的基礎知識。模塊使用內核空間函數,由于整個內核代碼都寫在 KERNEL 指令中,因此我們需要在編譯時或在源代碼中定義它。我們需要在其他任何內容之前定義 MODULE 指令,因為模塊函數是在其中定義的。為了將我們的模塊與內核鏈接,運行中的內核版本必須與模塊編譯時的版本匹配,否則 [insmod] 將拒絕請求。這意味著我們必須包含適當版本的 Linux 源代碼中的 [include] 目錄。再次說明,如果我的模塊文件名為 my_dev.c,一個示例編譯指令可以是 [gcc -D__KERNEL__ -I/usr/src/linux.2.6.7/linux/include -c my_dev.c]。-D 用于定義任何指令符號。在這里我們需要定義 KERNEL,因為沒有它,內核特定的內容將無法供我們使用。
The two basic functions for module operations are module_init and module_exit. The insmod utility loads the module and calls the function passed to module_init, and rmmod removes the module and calls function passed to module_exit. So inside module_init, we can do whatever we wish using our kernel API. For registering the char device, the kernel provides register_chrdev which takes three arguments, namely: the major number, the char string (which gives a tag name to the device), and the file operations struct address which defines all the stuff we would like to do with our char device. struct file_operations is defined in $(KERNELDIR)/linux/include/fs.h which declares the function pointers for basic operations like open, read, write, release, etc. One needs to implement whatever functions are necessary for the device. Finally, inside the function passed to module_exit, we should free the resources using unregister_chrdev which will be called when we do rmmod.
模塊操作的兩個基本函數是 module_init 和 module_exit。insmod 工具加載模塊并調用傳遞給 module_init 的函數,而 rmmod 移除模塊并調用傳遞給 module_exit 的函數。因此,在 module_init 中,我們可以使用內核 API 來做任何我們想做的事情。為了注冊字符設備,內核提供了 register_chrdev,它接受三個參數,分別是:主設備號、字符字符串(為設備提供一個標簽名稱)以及定義了我們希望對字符設備進行的所有操作的文件操作結構體地址。struct file_operations 在 $(KERNELDIR)/linux/include/fs.h 中定義,它聲明了基本操作(如打開、讀取、寫入、釋放等)的函數指針。需要為設備實現必要的函數。最后,在傳遞給 module_exit 的函數中,我們應該使用 unregister_chrdev 釋放資源,這將在我們執行 rmmod 時被調用。
Below is the code listing where the device is nothing but an 80 byte chunk of memory.
以下是代碼清單,其中設備只是一個 80 字節的內存塊。
Program Listing
程序列表
- Makefile
- my_dev.c
- my_dev.h
Playing with the char device
Load the device using [insmod my_dev.o]. Look for the entry through /proc/modules and /proc/devices. Create a file node in /dev directory using [mknod /dev/my_device c 222 0]. Look inside the code, we have given the major number as 222. You might think that this number may clash with some other device - well, that’s correct, but I have checked whether this number is already occupied by some other device. One could use dynamic allocation of the major number; for that we have to pass 0 as the argument.
使用 [insmod my_dev.o] 加載設備。通過 /proc/modules 和 /proc/devices 查看條目。使用 [mknod /dev/my_device c 222 0] 在 /dev 目錄中創建一個文件節點。查看代碼,我們指定的主設備號為 222。你可能會擔心這個號碼可能會與其他設備沖突——沒錯,但我已經檢查過這個號碼是否已被其他設備占用。也可以使用主設備號的動態分配;為此我們需要將 0 作為參數傳遞。
Now we can read the data in the device using [cat /dev/my_device] and can write to our device using [echo “something” > /dev/my_device]. We can also write full-fledged userspace code to access our device using standard system calls of open, read, write, close, etc. Sample code is presented below.
現在,我們可以使用 [cat /dev/my_device] 讀取設備中的數據,并使用 [echo “something” > /dev/my_device] 向設備寫入數據。我們還可以編寫完整的用戶空間代碼,使用標準的打開、讀取、寫入、關閉等系統調用來訪問我們的設備。以下是示例代碼。
-------------------------------------------
/* Sample code to access our char device */#include<stdio.h>
#include<unistd.h>
#include<sys/types.h>
#include<sys/stat.h>
#include<fcntl.h>int main()
{int fd=0,ret=0;char buff[80]="";fd=open("/dev/my_device",O_RDONLY);printf("fd :%d\n",fd);ret=read(fd,buff,10);buff[ret]='\0';printf("buff: %s ;length: %d bytes\n",buff,ret);close(fd);
}-------------------------------------------
Output
fd: 3
buff: hi from kernel ;length: 14 bytes
-------------------------------------------
Conclusion
[ Note: a tarball containing all the code in this article can be downloaded here. ]
In this article I have tried to show how to use the kernel functions to register a character device, and how to invoke it from userspace. There are many issues that have not been touched upon here, such as the concurrency problem where we need to provide a semaphore for the device to do mutual exclusion as more than one process may try to access it. I will try to cover these issues in my future articles.
[注意:包含本文所有代碼的 tarball 可以從 這里 下載。]
在本文中,我嘗試展示了如何使用內核函數注冊字符設備,以及如何從用戶空間調用它。這里沒有涉及許多問題,例如并發問題,我們需要為設備提供一個信號量以實現互斥,因為可能會有多個進程嘗試訪問它。我將在未來的文章中嘗試涵蓋這些問題。
Linux —— 字符設備驅動程序設計
1900_ 于 2020-06-23 11:16:20 發布
編寫一個虛擬字符設備驅動程序
char.c。
- 以內核模塊的形式插入內核,編譯方法與內核編譯方法一致。
- 創建設備節點,然后通過編寫一個測試程序。
- 功能:首先向設備中寫入數據,再從設備中讀出數據,并把數據顯示在屏幕上。
- 要求:設備名為
demo,主設備號為 250,次設備號為 0。
首先,要確保環境已經安裝好了。
開始編寫三個文件:
char.c- Makefile (ps:M 必須大寫)
test.c用于測試
vi char.c
vi Makefile
vi test.c
寫好之后執行 make 命令:
make
然后加載驅動程序:
sudo insmod char.ko
lsmod  # 查看是否加載成功
必須使用管理員權限。
在 /dev 目錄下創建設備文件:
sudo mknod /dev/mychar c 250 0
# 要使用管理員權限
# 1. 命令中的數字要和驅動程序定義的 major,minor 保持一致。
# 2. Mychar 文件名與測試程序中的名字一致
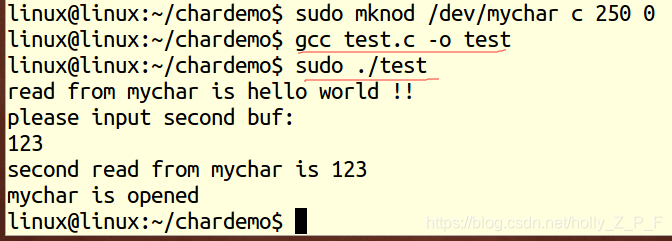
編譯運行測試程序:
gcc test.c -o test
sudo ./test
char.c 代碼
#include <linux/module.h>
#include <linux/kernel.h>
#include <linux/init.h>
#include <linux/fs.h>
#include <linux/cdev.h>
#include <asm/ioctl.h>
#include <asm/io.h>
#include <asm/uaccess.h>MODULE_LICENSE("GPL v2");
MODULE_AUTHOR("Bob Geng");
MODULE_DESCRIPTION("a simple driver");#define N 128
int major = 250;
int minor = 0;
struct cdev mycdev;  // 字符型結構體
char buf[N] = {"hello world !!"};int char_open(struct inode* myinode, struct file* fp)
{printk("char is opened\n");return 0;
}int char_release(struct inode* myinode, struct file* fp)
{printk("char is closeed\n");return 0;
}static ssize_t char_read(struct file* filep, char __user* user_buf, size_t count, loff_t* off)
{// 1. ssize_t :ssize_t 是 signed size_t;size_t: unsigned int// 2. Off:當前文件的偏移量ssize_t ret = 0;long num = 0;printk("char_read is called\n");printk("count is %d\n", count);num = copy_to_user(user_buf, buf, count);if (num < 0){printk("copy_to_user is failed\n");return ret;}return ret;
}ssize_t char_write(struct file* filep, const char __user* from, size_t count, loff_t* off)
{ssize_t ret = 0;long num = 0;printk("char_write is called \n");printk("count is %d\n", count);// if(count > N )  return -ENOMEM;if (count > N)count = N;num = copy_from_user(buf, from, count);if (num < 0){printk("copy_to_user is failed\n");return ret;}printk("from  user is  %s\n", buf);return ret;
}struct file_operations fops = {.owner = THIS_MODULE,.open = char_open,.release = char_release,.read = char_read,.write = char_write,
};static int __init char_init(void)
{int ret;dev_t devno = MKDEV(major, minor);ret = register_chrdev_region(devno, 1, "char");  // 靜態申請設備號if (ret < 0){printk("fail to get devno\n");return ret;}mycdev.owner = THIS_MODULE;cdev_init(&mycdev, &fops);ret = cdev_add(&mycdev, devno, 1);if (ret < 0){printk("cdev_add fail to system\n");return ret;}printk("init_module\n");return 0;
}static void __exit char_exit(void)
{dev_t devno = MKDEV(major, minor);cdev_del(&mycdev);unregister_chrdev_region(devno, 1);printk("cleanup_module\n");
}module_init(char_init);
module_exit(char_exit);
Makefile 代碼
ifeq ($(KERNELRELEASE),)
KERNELDIR ?= /lib/modules/$(shell uname -r)/build
# KERNELDIR ?= /home/linux/workdir/source-pack/linux-3.2-net/ (交叉編譯)
M=$(PWD) modules
PWD := $(shell pwd)modules:$(MAKE) -C $(KERNELDIR) M=$(PWD) modulesmodules_install:$(MAKE) -C $(KERNELDIR) M=$(PWD) modules_installclean:rm -rf *.o *~ core .depend .*.cmd *.ko *.mod.c .tmp_versions Module* modules*.PHONY: modules modules_install clean
else
obj-m := char.o
endif
test.c 代碼
#include <stdio.h>
#include <errno.h>
#include <unistd.h>
#include <sys/types.h>
#include <sys/stat.h>
#include <stdlib.h>
#include <fcntl.h>
#include <sys/ioctl.h>
#include <string.h>#define N 128
char buf[N];int main()
{int fd;if ((fd = open("/dev/mychar", O_RDWR)) < 0){perror("open");exit(-1);}if (read(fd, buf, N) < 0){perror("read");exit(-1);}printf("read from mychar is %s\n", buf);// memset(buf,0,sizeof(buf));// strcpy(buf,"goddbye\0");printf("please input second buf:\n");scanf("%s", buf);if (write(fd, buf, N + 1) < 0){perror("write");exit(-1);}if (read(fd, buf, N) < 0){perror("read");exit(-1);}printf("second read from mychar is %s\n", buf);getchar();printf("mychar is opened\n");close(fd);
}
設備驅動:Linux 系統下的字符設備驅動程序編程
丶di 于 2021-11-01 14:32:37 發布
一、實驗目的
通過一個簡單的設備驅動的實現過程,學會 Linux 中設備驅動程序的編寫。
二、實驗環境
Ubuntu 20.04 TSL, Linux 5.10.0
三、實驗內容
- 編寫一個字符設備驅動程序,并在設備的打開操作中打印主次設備號。
- 編寫一個用戶測試程序,實現設備的讀操作。
四、實驗原理
實驗中用到的系統調用函數(包括實驗原理中介紹的和自己采用的),實驗步驟。
字符設備是指只能一個字節一個字節讀寫的設備,不能隨機讀取設備內存中的某一數據,讀取數據需要按照先后順序。字符設備是面向流的設備,常見的字符設備有鼠標、鍵盤、串口、控制臺和 LED 設備等。每一個字符設備都在 /dev 目錄下對應一個設備文件。Linux 用戶程序通過設備文件(或稱設備節點)來使用驅動程序操作字符設備。一個字符設備都有一個主設備號和一個次設備號。主設備號用來標識與設備文件相連的驅動程序,用來反映設備類型。次設備號被驅動程序用來辨別操作的是哪個設備,用來區分同類型的設備。
描述字符設備的數據結構
在 Linux 2.6 內核中的字符設備用 cdev 結構來描述,其定義如下:
struct cdev
{struct kobject kobj;  // 類似對象類,驅動模塊的基礎對象struct module* owner; // 所屬內核模塊,一般為 THIS_MODULEconst struct file_operations* ops; // 文件操作結構struct list_head list;dev_t dev; // 設備號,int 類型,高 12 位為主設備號,低 20 位為次設備號unsigned int count;
};
字符設備驅動模塊的編寫
實現一個基本的字符驅動設備需要以下幾個部分:字符設備驅動模塊的加載、卸載函數和 file_operations 結構中的成員函數。具體步驟如下:
-
分配和釋放設備號
- 在設備驅動程序中,注冊設備前首先要向系統申請設備號。
- 分配設備號有靜態和動態的兩種方法:
- 靜態分配(
register_chrdev_region()函數) - 動態分配(
alloc_chrdev_region())
- 靜態分配(
- 通過
unregister_chrdev_region()函數釋放已分配的(無論是靜態的還是動態的)設備號。
-
定義并初始化一個
struct file_operations結構,并實現其中的操作函數static struct file_operations cdrv_fops = {.owner = THIS_MODULE, /* 這是一個宏,推向編譯模塊時自動創建的 __this_module 變量 */.open = cdrv_open,.read = cdrv_read,.write = cdrv_write, }; static int cdrv_open(struct inode* inode, struct file* filp) static ssize_t cdrv_read(struct file* filp, char __user* buf, size_t size, loff_t* ppos) static ssize_t cdrv_write(struct file* filp, const char __user* buf, size_t size, loff_t* ppos) -
字符設備的注冊
-
刪除字符設備
-
注銷設備號
-
模塊聲明
MODULE_LICENSE("GPL"); -
加載模塊
module_init(cdrv_init); -
卸載模塊
module_exit(cdrv_exit);
編譯模塊 Makefile 文件
利用 mknod 命令在 /dev 目錄下為字符設備生成對應的節點
五、實驗結果分析
(截屏的實驗結果,與實驗結果對應的實驗分析)
字符設備驅動模塊 device_driver.c
用戶測試程序 test.c
編寫 Makefile 文件

編譯字符驅動內核模塊
……# make
執行發現編譯錯誤,對函數被拼寫錯誤,分號的中英文格式等問題進行修改

根據提示成功修改后,再次執行 make 指令,則會產生一些系列模塊文件

……# sudo insmod device_driver.ko
采用高級管理員權限插入模塊到內核
查看系統信息
……# dmesg
采用 | 管道配合 grep 過濾不需要的文件,篩選出剛出入的 devic_driver 模塊的進程號為 16384

插入的設備需要在 /dev 目錄下生成對應的結點
……# mknod /dev/demo_drv c 主設備號 0

使用 cat /proc/devices 指令,查看當前系統設備上已經存在的設備號,查看到動態申請 237 號作為本次實驗的主設備號
執行指令:sudo mknod /dev/demo_drv c 237 0

查看 /dev 目錄情況
……# ls /dev
在目錄 /dev 下黃色標明文件名的文件,都是當前系統的設備;在這里也可以查看到剛剛插入的 demo_drv 字符設備

編譯用戶測試程序
……# gcc test.c -o test
……# ./test

……# dmesg
使用 dmesg | tail 查看最近的日記信息

Makefile
ifneq ($(KERNELRELEASE),)
obj-m += device_driver.o
else
KERNELDIR := /lib/modules/$(shell uname -r)/build
PWD := $(shell pwd)
default:$(MAKE) -C $(KERNELDIR) M=$(PWD) modules
clean:rm -rf *.o *.mod.c *.ko *.order *.symvers .*.cmd .tmp_versions
endif
Test.c
#include <stdio.h>
#include <unistd.h>
#include <fcntl.h>
#include <stdio.h>#define DEMO_DEV_NAME "/dev/demo_drv"int main()
{char buffer[64];int fd;fd = open(DEMO_DEV_NAME, O_RDONLY);if (fd < 0){printf("open device %s failed\n", DEMO_DEV_NAME);return -1;}read(fd, buffer, 64);printf("%s\n", buffer);close(fd);return 0;
}
Device_driver.c
#include <linux/kernel.h>
#include <linux/module.h>
#include <linux/fs.h>
#include <linux/uaccess.h>
#include <linux/init.h>
#include <linux/cdev.h>#define DEMO_NAME "my_demo_dev" // 設備名static dev_t dev;
static struct cdev* demo_cdev;
static signed count = 1;static int demodrv_open(struct inode* inode, struct file* file)
{int major = MAJOR(inode->i_rdev);int minor = MINOR(inode->i_rdev);printk("%s: major=%d, minor=%d\n", __func__, major, minor);return 0;
}static ssize_t demodrv_read(struct file* file, char __user* buf, size_t lbuf, loff_t* ppos)
{printk("%s enter\n", __func__);return 0;
}static ssize_t demodrv_write(struct file* file, const char __user* buf, size_t count, loff_t* f_pos)
{printk("%s enter\n", __func__);return 0;
}static const struct file_operations demodrv_fops = {.owner = THIS_MODULE,.open = demodrv_open,.read = demodrv_read,.write = demodrv_write,
};static int __init simple_char_init(void)
{int ret;ret = alloc_chrdev_region(&dev, 0, count, DEMO_NAME); // 動態申請設備號if (ret){printk("failed to allocate char device region\n");return ret;}demo_cdev = cdev_alloc(); // 分配設備空間if (!demo_cdev){printk("cedv_alloc failed\n");goto unregister_chrdev;}cdev_init(demo_cdev, &demodrv_fops); // 設備空間進行初始化和賦值操作ret = cdev_add(demo_cdev, dev, count); // 設備添加進系統函數if (ret){printk("cdev_add failed\n");goto cdev_fail;}printk("successed register char device: %s\n", DEMO_NAME);printk("Major number=%d, Minor number=%d\n", MAJOR(dev), MINOR(dev));return 0;cdev_fail:cdev_del(demo_cdev); // 刪除字符設備
unregister_chrdev:unregister_chrdev_region(dev, count); // 注銷設備號return ret;
}static void __exit simple_char_exit(void)
{printk("removing device\n");if (demo_cdev)cdev_del(demo_cdev);unregister_chrdev_region(dev, count); // 注銷字符設備return;
}MODULE_LICENSE("GPL");  // 模塊聲明
module_init(simple_char_init);  // 加載模塊
module_exit(simple_char_exit);  // 卸載模塊
Linux 驅動入門 —— 最簡單字符設備驅動(基于 pc ubuntu)
Wireless_Link 于 2022-12-31 15:07:48 發布
一、字符設備驅動概念
字符設備是 Linux 驅動中最基本的一類設備驅動,字符設備就是一個一個字節,按照字節流進行讀寫操作的設備,讀寫數據是分先后順序的。比如我們最常見的點燈、按鍵、IIC、SPI、LCD 等等都是字符設備,這些設備的驅動就叫做字符設備驅動。
在詳細的學習字符設備驅動架構之前,我們先來簡單的了解一下 Linux 下的應用程序是如何調用驅動程序的,Linux 應用程序對驅動程序的調用如圖

在 Linux 中一切皆為文件,驅動加載成功以后會在 /dev 目錄下生成一個相應的文件,應用程序通過對這個名為 /dev/xxx(xxx 是具體的驅動文件名字)的文件進行相應的操作即可實現對硬件的操作。比如現在有個叫做 /dev/led 的驅動文件,此文件是 led 燈的驅動文件。應用程序使用 open 函數來打開文件 /dev/led,使用完成以后使用 close 函數關閉 /dev/led 這個文件。open 和 close 就是打開和關閉 led 驅動的函數,如果要點亮或關閉 led,那么就使用 write 函數來操作,也就是向此驅動寫入數據,這個數據就是要關閉還是要打開 led 的控制參數。如果要獲取 led 燈的狀態,就用 read 函數從驅動中讀取相應的狀態。
應用程序運行在用戶空間,而 Linux 驅動屬于內核的一部分,因此驅動運行于內核空間。當我們在用戶空間想要實現對內核的操作,比如使用 open 函數打開 /dev/led 這個驅動,因為用戶空間不能直接對內核進行操作,因此必須使用一個叫做“系統調用”的方法來實現從用戶空間“陷入”到內核空間,這樣才能實現對底層驅動的操作。open、close、write 和 read 等這些函數是由 C 庫提供的,在 Linux 系統中,系統調用作為 C 庫的一部分。當我們調用 open 函數的時候流程如圖

其中關于 C 庫以及如何通過系統調用“陷入”到內核空間這個我們不用去管,我們重點關注的是應用程序和具體的驅動,應用程序使用到的函數在具體驅動程序中都有與之對應的函數,比如應用程序中調用了 open 這個函數,那么在驅動程序中也得有一個名為 open 的函數。每一個系統調用,在驅動中都有與之對應的一個驅動函數,在 Linux 內核文件 include/linux/fs.h 中有個叫做 file_operations 的結構體,此結構體就是 Linux 內核驅動操作函數集合,內容如下所示:
struct file_operations {struct module* owner;loff_t (*llseek)(struct file*, loff_t, int);ssize_t (*read)(struct file*, char __user*, size_t, loff_t*);ssize_t (*write)(struct file*, const char __user*, size_t, loff_t*);ssize_t (*read_iter)(struct kiocb*, struct iov_iter*);ssize_t (*write_iter)(struct kiocb*, struct iov_iter*);int (*iterate)(struct file*, struct dir_context*);unsigned int (*poll)(struct file*, struct poll_table_struct*);long (*unlocked_ioctl)(struct file*, unsigned int, unsigned long);long (*compat_ioctl)(struct file*, unsigned int, unsigned long);int (*mmap)(struct file*, struct vm_area_struct*);int (*mremap)(struct file*, struct vm_area_struct*);int (*open)(struct inode*, struct file*);int (*flush)(struct file*, fl_owner_t id);int (*release)(struct inode*, struct file*);int (*fsync)(struct file*, loff_t, loff_t, int datasync);int (*aio_fsync)(struct kiocb*, int datasync);int (*fasync)(int, struct file*, int);int (*lock)(struct file*, int, struct file_lock*);ssize_t (*sendpage)(struct file*, struct page*, int, size_t, loff_t*, int);unsigned long (*get_unmapped_area)(struct file*, unsigned long, unsigned long, unsigned long, unsigned long);int (*check_flags)(int);int (*flock)(struct file*, int, struct file_lock*);ssize_t (*splice_write)(struct pipe_inode_info*, struct file*, loff_t*, size_t, unsigned int);ssize_t (*splice_read)(struct file*, loff_t*, struct pipe_inode_info*, size_t, unsigned int);int (*setlease)(struct file*, long, struct file_lock**, void**);long (*fallocate)(struct file* file, int mode, loff_t offset, loff_t len);void (*show_fdinfo)(struct seq_file* m, struct file* f);
#ifndef CONFIG_MMUunsigned (*mmap_capabilities)(struct file*);
#endif
};
簡單介紹一下 file_operation 結構體中比較重要的、常用的函數:
- owner:擁有該結構體的模塊的指針,一般設置為
THIS_MODULE。 - llseek:函數用于修改文件當前的讀寫位置。
- read:函數用于讀取設備文件。
- write:函數用于向設備文件寫入(發送)數據。
- poll:是個輪詢函數,用于查詢設備是否可以進行非阻塞的讀寫。
- unlocked_ioctl:函數提供對于設備的控制功能,與應用程序中的
ioctl函數對應。 - compat_ioctl:函數與
unlocked_ioctl函數功能一樣,區別在于在 64 位系統上,32 位的應用程序調用將會使用此函數。在 32 位的系統上運行 32 位的應用程序調用的是unlocked_ioctl。 - mmap:函數用于將設備的內存映射到進程空間中(也就是用戶空間),一般幀緩沖設備會使用此函數,比如 LCD 驅動的顯存,將幀緩沖(LCD 顯存)映射到用戶空間中以后應用程序就可以直接操作顯存了,這樣就不用在用戶空間和內核空間之間來回復制。
- open:函數用于打開設備文件。
- release:函數用于釋放(關閉)設備文件,與應用程序中的
close函數對應。 - fasync:函數用于刷新待處理的數據,用于將緩沖區中的數據刷新到磁盤中。
- aio_fsync:函數與
fasync函數的功能類似,只是aio_fsync是異步刷新待處理的數據。
在字符設備驅動開發中最常用的就是上面這些函數,關于其他的函數大家可以查閱相關文檔。我們在字符設備驅動開發中最主要的工作就是實現上面這些函數,不一定全部都要實現,但是像 open、release、write、read 等都是需要實現的,當然了,具體需要實現哪些函數還是要看具體的驅動要求。
二、字符設備驅動開發步驟
我們簡單的介紹了一下字符設備驅動,那么字符設備驅動開發都有哪些步驟呢?我們在學習裸機或者 STM32 的時候關于驅動的開發就是初始化相應的外設寄存器,在 Linux 驅動開發中肯定也是要初始化相應的外設寄存器,這個是毫無疑問的。只是在 Linux 驅動開發中我們需要按照其規定的框架來編寫驅動,所以說學 Linux 驅動開發重點是學習其驅動框架。
1. 驅動模塊的加載和卸載
Linux 驅動有兩種運行方式,第一種就是將驅動編譯進 Linux 內核中,這樣當 Linux 內核啟動的時候就會自動運行驅動程序。第二種就是將驅動編譯成模塊(Linux 下模塊擴展名為 .ko),在 Linux 內核啟動以后使用“insmod”命令加載驅動模塊。在調試驅動的時候一般都選擇將其編譯為模塊,這樣我們修改驅動以后只需要編譯一下驅動代碼即可,不需要編譯整個 Linux 代碼。而且在調試的時候只需要加載或者卸載驅動模塊即可,不需要重啟整個系統。總之,將驅動編譯為模塊最大的好處就是方便開發,當驅動開發完成,確定沒有問題以后就可以將驅動編譯進 Linux 內核中,當然也可以不編譯進 Linux 內核中,具體看自己的需求。
模塊有加載和卸載兩種操作,我們在編寫驅動的時候需要注冊這兩種操作函數,模塊的加載和卸載注冊函數如下:
module_init(xxx_init); // 注冊模塊加載函數
module_exit(xxx_exit); // 注冊模塊卸載函數
module_init 函數用來向 Linux 內核注冊一個模塊加載函數,參數 xxx_init 就是需要注冊的具體函數,當使用“insmod”命令加載驅動的時候,xxx_init 這個函數就會被調用。module_exit() 函數用來向 Linux 內核注冊一個模塊卸載函數,參數 xxx_exit 就是需要注冊的具體函數,當使用“rmmod”命令卸載具體驅動的時候 xxx_exit 函數就會被調用。字符設備驅動模塊加載和卸載模板如下所示:
/* 驅動入口函數 */
static int __init xxx_init(void)
{/* 入口函數的具體內容 */return 0;
}/* 驅動出口函數 */
static void __exit xxx_deinit(void)
{/* 出口函數的具體內容 */
}module_init(xxx_init);
module_exit(xxx_deinit);
驅動編譯完成以后擴展名為 .ko,有兩種命令可以加載驅動模塊:insmod 和 modprobe,insmod 是最簡單的模塊加載命令,此命令用于加載指定的 .ko 模塊,比如加載 drv.ko 這個驅動模塊,命令如下:
insmod drv.ko
insmod 命令不能解決模塊的依賴關系,比如 drv.ko 依賴 first.ko 這個模塊,就必須先使用 insmod 命令加載 first.ko 這個模塊,然后再加載 drv.ko 這個模塊。但是 modprobe 就不會存在這個問題,modprobe 會分析模塊的依賴關系,然后會將所有的依賴模塊都加載到內核中,因此 modprobe 命令相比 insmod 要智能一些。modprobe 命令主要智能在提供了模塊的依賴性分析、錯誤檢查、錯誤報告等功能,推薦使用 modprobe 命令來加載驅動。modprobe 命令默認會去 /lib/modules/<kernel-version> 目錄中查找模塊,比如本書使用的 Linux kernel 的版本號為 4.1.15,因此 modprobe 命令默認會到 /lib/modules/4.1.15 這個目錄中查找相應的驅動模塊,一般自己制作的根文件系統中是不會有這個目錄的,所以需要自己手動創建。
驅動模塊的卸載使用命令“rmmod”即可,比如要卸載 drv.ko,使用如下命令即可:
rmmod drv.ko
也可以使用“modprobe -r”命令卸載驅動,比如要卸載 drv.ko,命令如下:
modprobe -r drv.ko
使用 modprobe 命令可以卸載掉驅動模塊所依賴的其他模塊,前提是這些依賴模塊已經沒有被其他模塊所使用,否則就不能使用 modprobe 來卸載驅動模塊。所以對于模塊的卸載,還是推薦使用 rmmod 命令。
2. 添加 LICENSE 以及作者信息
寫完基本的框架后,我們要加上 LICENSE 信息以及作者信息,LICENSE 是必須添加的,否則的話編譯的時候會報錯,作者信息不是必選,LICENSE 和作者信息的添加使用如下兩個函數:
MODULE_LICENSE(); // 添加模塊 LICENSE 信息
MODULE_AUTHOR(); // 添加模塊作者信息
其中 LICENSE 填寫 GPL,因為 Linux 本身就是 GPL 協議的,實例如下:
MODULE_LICENSE("GPL");
3. 在 Ubuntu 鞏固小節 1 - 2 內容
學習完以上的內容,我們就可以寫程序,光說不練假把式,所以我們直接來實踐。我們在 Ubuntu 來寫一個程序來體驗下(由于最開始的簡單的字符設備驅動,不需要操作特定的板子,所以我們在 Ubuntu 直接寫程序比較簡單驗證)。
3.1 寫一個 hello_driver.c
#include <linux/module.h>
static int __init hello_driver_init(void)
{printk("hello_driver_init\r\n");return 0;
}
static void __exit hello_driver_cleanup(void)
{printk("hello_driver_cleanup\r\n");
}
module_init(hello_driver_init);
module_exit(hello_driver_cleanup);
MODULE_LICENSE("GPL");
就是這么簡單,內容我們之前都見過,只有 printk 我們沒有見過,printk 是內核打印 log 的機制,類似于 app 層面的 printf。
3.2 寫 Makefile
寫完 hello_driver.c,我們要寫一個 Makefile 來編譯以下文件,Makefile 內容如下:
KERNELDIR := /lib/modules/$(shell uname -r)/build
CURRENT_PATH := $(shell pwd)
obj-m := hello_driver.o
build: kernel_modules
kernel_modules:$(MAKE) -C $(KERNELDIR) M=$(CURRENT_PATH) modules
clean:$(MAKE) -C $(KERNELDIR) M=$(CURRENT_PATH) clean
其中 KERNELDIR 就是 Ubuntu build 內核的路徑,至于什么作用下,先不用管,先暫時照著寫,后續再介紹。
3.3 編譯
make

3.4 加載
sudo insmod hello_driver.ko
可以看到并沒有我們 printk 的 log 輸出,那么怎么能確定我們加載成功了呢?lsmod | grep hello_driver

可以看到我們加載成功了,那么 printk 的打印內容呢?那是因為你如果沒有配置 printk 的等級,他不會打印到 terminal 上,查看用 dmesg 來查看就可以看到了。
另外注意的一點在 Ubuntu 需要用 sudo 來加載。
3.5 卸載
sudo rmmod hello_driver
好了,簡單吧,我們來繼續學下字符設備注冊跟注銷用上 file_operations。
4. 字符設備注冊與注銷
對于字符設備驅動而言,當驅動模塊加載成功以后需要注冊字符設備,同樣,卸載驅動模塊的時候也需要注銷掉字符設備。字符設備的注冊和注銷函數原型如下所示:
static inline int register_chrdev(unsigned int major, const char* name, const struct file_operations* fops);
static inline void unregister_chrdev(unsigned int major, const char* name);
register_chrdev 函數用于注冊字符設備,此函數一共有三個參數,這三個參數的含義如下:
- major:主設備號,Linux 下每個設備都有一個設備號,設備號分為主設備號和次設備號兩部分,關于設備號后面會詳細講解。
- name:設備名字,指向一串字符串。
- fops:結構體
file_operations類型指針,指向設備的操作函數集合變量。
unregister_chrdev 函數用戶注銷字符設備,此函數有兩個參數,這兩個參數含義如下:
- major:要注銷的設備對應的主設備號。
- name:要注銷的設備對應的設備名。
一般字符設備的注冊在驅動模塊的入口函數 xxx_init 中進行,字符設備的注銷在驅動模塊的出口函數 xxx_exit 中進行。
4.1 設備號的組成
為了方便管理,Linux 中每個設備都有一個設備號,設備號由主設備號和次設備號兩部分組成,主設備號表示某一個具體的驅動,次設備號表示使用這個驅動的各個設備。Linux 提供了一個名為 dev_t 的數據類型表示設備號,dev_t 定義在文件 include/linux/types.h 里面,定義如下:
typedef __u32 __kernel_dev_t;
typedef __kernel_dev_t dev_t;
可以看出 dev_t 是 __u32 類型的,而 __u32 定義在文件 include/uapi/asm-generic/int-ll64.h 里面,定義如下:
typedef unsigned int __u32;
綜上所述,dev_t 其實就是 unsigned int 類型,是一個 32 位的數據類型。這 32 位的數據構成了主設備號和次設備號兩部分,其中高 12 位為主設備號,低 20 位為次設備號。因此 Linux 系統中主設備號范圍為 0 - 4095,所以大家在選擇主設備號的時候一定不要超過這個范圍。在文件 include/linux/kdev_t.h 中提供了幾個關于設備號的操作函數(本質是宏),如下所示:
#define MINORBITS 20
#define MINORMASK ((1U << MINORBITS) - 1)
#define MAJOR(dev) ((unsigned int)((dev) >> MINORBITS))
#define MINOR(dev) ((unsigned int)((dev) & MINORMASK))
#define MKDEV(ma, mi) (((ma) << MINORBITS) | (mi))
- 宏
MINORBITS表示次設備號位數,一共是 20 位。 - 宏
MINORMASK表示次設備號掩碼。 - 宏
MAJOR用于從dev_t中獲取主設備號,將dev_t右移 20 位即可。 - 宏
MINOR用于從dev_t中獲取次設備號,取dev_t的低 20 位的值即可。 - 宏
MKDEV用于將給定的主設備號和次設備號的值組合成dev_t類型的設備號。
5. 內核空間跟用戶空間交互數據
我們有了 file_operations 的概念后,但是有兩個函數指針 read/write,那么用戶空間可以直接用內核空間的 buffer 指針嗎?內核空間可以直接使用用戶空間的 buffer 指針嗎?答案是不能,所以要有兩個函數來做轉換,函數分別如下:
unsigned long copy_to_user(void* dst, const void* src, unsigned long len);
unsigned long copy_from_user(void* to, const void* from, unsigned long n);
copy_to_user函數來完成內核空間的數據到用戶空間的復制,參數to表示目的,參數from表示源,參數n表示要復制的數據長度。copy_from_user函數來完成用戶空間的數據到內核空間的復制,參數to表示目的,參數from表示源,參數n表示要復制的數據長度。
6. 在 Ubuntu 鞏固小節 4 - 5 內容
6.1 hello_driver.c 的內容
#include <linux/types.h>
#include <linux/init.h>
#include <linux/mm.h>
#include <linux/module.h>
#define CHRDEVBASE_MAJOR 200
uint8_t kernel_buffer[1024] = {0};static int hello_world_open(struct inode* inode, struct file* file)
{printk("hello_world_open\r\n");return 0;
}static int hello_world_release(struct inode* inode, struct file* file)
{printk("hello_world_release\r\n");return 0;
}static ssize_t hello_world_read(struct file* file, char __user* buffer, size_t size, loff_t* ppos)
{printk("hello_world_read size:%ld\r\n", size);copy_to_user(buffer, kernel_buffer, size);return size;
}static ssize_t hello_world_write(struct file* file, const char __user* buffer, size_t size, loff_t* ppos)
{printk("hello_world_write size:%ld\r\n", size);copy_from_user(kernel_buffer, buffer, size);return size;
}static const struct file_operations hello_world_fops = {.owner = THIS_MODULE,.open = hello_world_open,.release = hello_world_release,.read = hello_world_read,.write = hello_world_write,
};static int __init hello_driver_init(void)
{int ret;printk("hello_driver_init\r\n");ret = register_chrdev(CHRDEVBASE_MAJOR, "hello_driver", &hello_world_fops);return 0;
}static void __exit hello_driver_cleanup(void)
{unregister_chrdev(CHRDEVBASE_MAJOR, "hello_driver");printk("hello_driver_cleanup\r\n");
}module_init(hello_driver_init);
module_exit(hello_driver_cleanup);
MODULE_LICENSE("GPL");
hello_driver.c 是驅動,用于編譯出來 .ko,以上的內容就是我們 4 - 5 小節學習的內容,如果看不懂移步前面鞏固內容。
6.2 test_app.c 內容
#include <stdio.h>
#include <unistd.h>
#include <sys/types.h>
#include <sys/stat.h>
#include <stdlib.h>
#include <fcntl.h>
#include <string.h>
#include <stdint.h>/* mknod /dev/hello c 200 0 */
uint8_t buffer[512] = {0};int main(int argc, char* argv[])
{int fd;int ret;fd = open(argv[1], O_RDWR);if (!strcmp("read", argv[2])){printf("read data from kernel\r\n");ret = read(fd, buffer, sizeof(buffer));printf("ret len:%d data:%s\r\n", ret, buffer);}if (!strcmp("write", argv[2])){printf("write data to kernel %s len:%d\r\n", argv[3], strlen(argv[3]));ret = write(fd, argv[3], strlen(argv[3]));printf("ret len:%d\r\n", ret);}close(fd);
}
test_app.c 的內容是用戶態的 app,用于跟驅動的節點去交互。此程序的用法是 test_app /dev/xxx write/read 數據。
6.3 Makefile
KERNELDIR := /lib/modules/$(shell uname -r)/build
CURRENT_PATH := $(shell pwd)
obj-m := hello_driver.o
build: kernel_modules
kernel_modules:$(MAKE) -C $(KERNELDIR) M=$(CURRENT_PATH) modules$(CROSS_COMPILE)gcc -o test_app test_app.c
clean:$(MAKE) -C $(KERNELDIR) M=$(CURRENT_PATH) cleanrm -rf test_app
此 Makefile 跟之前的差不多,只不過多了一個編譯 test_app.c 的動作,應用程序生成的名稱為 test_app。
6.4 驗證程序
- 加載
.ko:sudo insmod hello_driver.ko - 命令行生成節點名稱:
sudo mknod /dev/hello c 200 0,其中c 200 0代表是字符設備驅動,主設備號是 200,次設備號是 0,200 這個是驅動中我們寫的#define CHRDEVBASE_MAJOR 200,也可以通過cat /proc/devices命令行來確認。 - 應用程序寫數據:
sudo ./test_app /dev/hello write 1234567890 - 應用程序讀取數據:
sudo ./test_app /dev/hello read - 卸載驅動:
sudo rmmod hello_driver - 刪除節點:
sudo rm -rf /dev/hello
7. 自動創建節點
在前面的 Linux 驅動實驗中,當我們使用 modprobe 加載驅動程序以后還需要使用命令“mknod”手動創建設備節點。本節就來講解一下如何實現自動創建設備節點,在驅動中實現自動創建設備節點的功能以后,使用 modprobe 加載驅動模塊成功的話就會自動在 /dev 目錄下創建對應的設備文件。
7.1 創建和刪除類
自動創建設備節點的工作是在驅動程序的入口函數中完成的,一般在 cdev_add 函數后面添加自動創建設備節點相關代碼。首先要創建一個 class 類,class 是個結構體,定義在文件 include/linux/device.h 里面。class_create 是類創建函數,class_create 是個宏定義,內容如下:
#define class_create(owner, name) \
({ \static struct lock_class_key __key; \__class_create(owner, name, &__key); \
})
struct class* __class_create(struct module* owner, const char* name, struct lock_class_key* key);
根據上述代碼,將宏 class_create 展開以后內容如下:
struct class* class_create(struct module* owner, const char* name);
class_create 一共有兩個參數,參數 owner 一般為 THIS_MODULE,參數 name 是類名字。返回值是個指向結構體 class 的指針,也就是創建的類。卸載驅動程序的時候需要刪除掉類,類刪除函數為 class_destroy,函數原型如下:
void class_destroy(struct class* cls);
參數 cls 就是要刪除的類。
7.2 創建設備
上一小節創建好類以后還不能實現自動創建設備節點,我們還需要在這個類下創建一個設備。使用 device_create 函數在類下面創建設備,device_create 函數原型如下:
struct device* device_create(struct class* class, struct device* parent, dev_t devt, void* drvdata, const char* fmt, ...);
device_create 是個可變參數函數,參數 class 就是設備要創建哪個類下面;參數 parent 是父設備,一般為 NULL,也就是沒有父設備;參數 devt 是設備號;參數 drvdata 是設備可能會使用的一些數據,一般為 NULL;參數 fmt 是設備名字,如果設置 fmt=xxx 的話,就會生成 /dev/xxx 這個設備文件。返回值就是創建好的設備。
同樣的,卸載驅動的時候需要刪除掉創建的設備,設備刪除函數為 device_destroy,函數原型如下:
void device_destroy(struct class* class, dev_t devt);
參數 class 是要刪除的設備所處的類,參數 devt 是要刪除的設備號。
8. 鞏固小節 7 的內容
我們就來修改下小節 6 的 hello_driver.c 就好了,其他都跟小節 6 一樣(包括 test_app.c 和 Makefile)。
hello_driver.c 的內容如下:
#include <linux/types.h>
#include <linux/init.h>
#include <linux/interrupt.h>
#include <linux/mm.h>
#include <linux/slab.h>
#include <linux/spinlock.h>
#include <linux/module.h>
#include <linux/device.h>#define CHRDEVBASE_MAJOR 200
uint8_t kernel_buffer[1024] = {0};
static struct class* hello_class;static int hello_world_open(struct inode* inode, struct file* file)
{printk("hello_world_open\r\n");return 0;
}static int hello_world_release(struct inode* inode, struct file* file)
{printk("hello_world_release\r\n");return 0;
}static ssize_t hello_world_read(struct file* file, char __user* buffer, size_t size, loff_t* ppos)
{printk("hello_world_read size:%ld\r\n", size);copy_to_user(buffer, kernel_buffer, size);return size;
}static ssize_t hello_world_write(struct file* file, const char __user* buffer, size_t size, loff_t* ppos)
{printk("hello_world_write size:%ld\r\n", size);copy_from_user(kernel_buffer, buffer, size);return size;
}static const struct file_operations hello_world_fops = {.owner = THIS_MODULE,.open = hello_world_open,.release = hello_world_release,.read = hello_world_read,.write = hello_world_write,
};static int __init hello_driver_init(void)
{int ret;printk("hello_driver_init\r\n");ret = register_chrdev(CHRDEVBASE_MAJOR, "hello_driver", &hello_world_fops);hello_class = class_create(THIS_MODULE, "hello_class");device_create(hello_class, NULL, MKDEV(CHRDEVBASE_MAJOR, 0), NULL, "hello"); /* /dev/hello */return 0;
}static void __exit hello_driver_cleanup(void)
{printk("hello_driver_cleanup\r\n");device_destroy(hello_class, MKDEV(CHRDEVBASE_MAJOR, 0));class_destroy(hello_class);unregister_chrdev(CHRDEVBASE_MAJOR, "hello_driver");
}module_init(hello_driver_init);
module_exit(hello_driver_cleanup);
MODULE_LICENSE("GPL");
做完這個步驟后就可以 insmod 后自動生成 /dev/hello 的節點,直接可以用 test_app 做測試了。
9. 新的字符設備驅動
9.1 設備號的分配
使用 register_chrdev 函數注冊字符設備的時候只需要給定一個主設備號即可,但是這樣會帶來兩個問題:
- 需要我們事先確定好哪些主設備號沒有使用。
- 會將一個主設備號下的所有次設備號都使用掉,比如現在設置 LED 這個主設備號為 200,那么 0 - 1048575((2^{20} - 1))這個區間的次設備號就全部都被 LED 一個設備分走了。這樣太浪費次設備號了!一個 LED 設備肯定只能有一個主設備號,一個次設備號。
分配的方式有以下兩種,但是我們推薦盡量用動態分配設備號的方式。
9.1.1 靜態分配設備號
本小節講的設備號分配主要是主設備號的分配。前面講解字符設備驅動的時候說過了,注冊字符設備的時候需要給設備指定一個設備號,這個設備號可以是驅動開發者靜態的指定一個設備號,比如選擇 200 這個主設備號。有一些常用的設備號已經被 Linux 內核開發者給分配掉了,具體分配的內容可以查看文檔 Documentation/devices.txt。并不是說內核開發者已經分配掉的主設備號我們就不能用了,具體能不能用還得看我們的硬件平臺運行過程中有沒有使用這個設備號,使用“cat /proc/devices”命令即可查看當前系統中所有已經使用了的設備號。
9.1.2 動態分配設備號
靜態分配設備號需要我們檢查當前系統中所有被使用了的設備號,然后挑選一個沒有使用的。而且靜態分配設備號很容易帶來沖突問題,Linux 社區推薦使用動態分配設備號,在注冊字符設備之前先申請一個設備號,系統會自動給你一個沒有被使用的設備號,這樣就避免了沖突。卸載驅動的時候釋放掉這個設備號即可,設備號的申請函數如下:
int alloc_chrdev_region(dev_t* dev, unsigned baseminor, unsigned count, const char* name);
函數 alloc_chrdev_region 用于申請設備號,此函數有 4 個參數:
- dev:保存申請到的設備號。
- baseminor:次設備號起始地址,
alloc_chrdev_region可以申請一段連續的多個設備號,這些設備號的主設備號一樣,但是次設備號不同,次設備號以baseminor為起始地址地址開始遞增。一般baseminor為 0,也就是說次設備號從 0 開始。 - count:要申請的設備號數量。
- name:設備名字。
注銷字符設備之后要釋放掉設備號,設備號釋放函數如下:
void unregister_chrdev_region(dev_t from, unsigned count);
此函數有兩個參數:
- from:要釋放的設備號。
- count:表示從
from開始,要釋放的設備號數量。
9.2 新的字符設備注冊方法
9.2.1 cdev 結構體
在 Linux 中使用 cdev 結構體表示一個字符設備,cdev 結構體在 include/linux/cdev.h 文件中,定義如下:
struct cdev {struct kobject kobj;struct module* owner;const struct file_operations* ops;struct list_head list;dev_t dev;unsigned int count;
};
在 cdev 中有兩個重要的成員變量:ops 和 dev,這兩個就是字符設備文件操作函數集合 file_operations 以及設備號 dev_t,其中 file_operations 和 dev_t 我們在前面已經介紹了!
9.2.2 cdev_init 函數
定義好 cdev 變量以后就要使用 cdev_init 函數對其進行初始化,cdev_init 函數原型如下:
void cdev_init(struct cdev* cdev, const struct file_operations* fops);
參數 cdev 就是要初始化的 cdev 結構體變量,參數 fops 就是字符設備文件操作函數集合。
9.2.3 cdev_add 函數
cdev_add 函數用于向 Linux 系統添加字符設備(cdev 結構體變量),首先使用 cdev_init 函數完成對 cdev 結構體變量的初始化,然后使用 cdev_add 函數向 Linux 系統添加這個字符設備。cdev_add 函數原型如下:
int cdev_add(struct cdev* p, dev_t dev, unsigned count);
參數 p 指向要添加的字符設備(cdev 結構體變量),參數 dev 就是設備所使用的設備號,參數 count 是要添加的設備數量。
9.2.4 cdev_del 函數
卸載驅動的時候一定要使用 cdev_del 函數從 Linux 內核中刪除相應的字符設備,cdev_del 函數原型如下:
void cdev_del(struct cdev* p);
參數 p 就是要刪除的字符設備。
下面我們寫個代碼來鞏固下這個小節的內容,主要跟前面程序的差異還是 hello_driver.c。
#include <linux/types.h>
#include <linux/init.h>
#include <linux/interrupt.h>
#include <linux/mm.h>
#include <linux/slab.h>
#include <linux/spinlock.h>
#include <linux/module.h>
#include <linux/device.h>
#include <linux/cdev.h>dev_t hello_devid;
struct cdev hello_cdev;
int hello_major = 0;
int hello_minor;
uint8_t kernel_buffer[1024] = {0};
static struct class* hello_class;static int hello_world_open(struct inode* inode, struct file* file)
{printk("hello_world_open\r\n");return 0;
}static int hello_world_release(struct inode* inode, struct file* file)
{printk("hello_world_release\r\n");return 0;
}static ssize_t hello_world_read(struct file* file, char __user* buffer, size_t size, loff_t* ppos)
{printk("hello_world_read size:%ld\r\n", size);copy_to_user(buffer, kernel_buffer, size);return size;
}static ssize_t hello_world_write(struct file* file, const char __user* buffer, size_t size, loff_t* ppos)
{printk("hello_world_write size:%ld\r\n", size);copy_from_user(kernel_buffer, buffer, size);return size;
}static const struct file_operations hello_world_fops = {.owner = THIS_MODULE,.open = hello_world_open,.release = hello_world_release,.read = hello_world_read,.write = hello_world_write,
};static int __init hello_driver_init(void)
{int ret;printk("hello_driver_init\r\n");alloc_chrdev_region(&hello_devid, 0, 1, "hello");hello_major = MAJOR(hello_devid);hello_minor = MINOR(hello_devid);printk("hello driver major=%d,minor=%d\r\n", hello_major, hello_minor);hello_cdev.owner = THIS_MODULE;cdev_init(&hello_cdev, &hello_world_fops);cdev_add(&hello_cdev, hello_devid, 1);hello_class = class_create(THIS_MODULE, "hello_class");device_create(hello_class, NULL, hello_devid, NULL, "hello"); /* /dev/hello */return 0;
}static void __exit hello_driver_cleanup(void)
{printk("hello_driver_cleanup\r\n");cdev_del(&hello_cdev);unregister_chrdev_region(hello_devid, 1);device_destroy(hello_class, hello_devid);class_destroy(hello_class);
}module_init(hello_driver_init);
module_exit(hello_driver_cleanup);
MODULE_LICENSE("GPL");
三. 總結
在網上找了一個非常不錯的圖片,基本涵蓋了很多內容,在這里貼出來:

參考內容:
- 正點原子 imx6ull 嵌入式 Linux 驅動開發指南.pdf
- 韋東山視頻:01_Hello 驅動(不涉及硬件操作)
via:
-
Simple Linux character device driver – Oleg Kutkov personal blog
https://olegkutkov.me/2018/03/14/simple-linux-character-device-driver/ -
Writing a Simple Character Device driver in Linux
https://www.pradeepkumar.org/2010/03/writing-a-simple-character-device-driver-in-linux.html -
Implementing a Simple Char Device in Linux LG #125
http://linuxgazette.net/125/mishra.html -
Linux— 字符設備驅動程序設計_虛擬字符設備驅動程序設計 - CSDN 博客
https://blog.csdn.net/holly_Z_P_F/article/details/106918733 -
設備驅動: Linux 系統下的字符設備驅動程序編程_字符設備驅動程序實驗平臺運行結果分析 - CSDN 博客
https://blog.csdn.net/hrd535523596/article/details/121079620 -
Linux 驅動入門 - 最簡單字符設備驅動 (基于 pc ubuntu)_ubuntu 應用程序訪問字符驅動程序 - CSDN 博客
https://blog.csdn.net/XiaoXiaoPengBo/article/details/128505550 -
Linux 設備驅動之字符設備驅動(超級詳細~) - 知乎
https://zhuanlan.zhihu.com/p/506834783 -
字符設備驅動 — [野火] 嵌入式 Linux 驅動開發實戰指南 —— 基于 LubanCat - 全志系列板卡 文檔
https://doc.embedfire.com/linux/h618/driver/zh/latest/linux_driver/base/character_device/character_device.html
—-
Developing a Simple Device Driver as a Linux Loadable Kernel Module | CISC 7310X Operating Systems I
https://huichen-cs.github.io/course/CISC7310X/25SP/tutorial/lnxkernelmodule.html -
GitHub - renanleonellocastro/char_driver: A simple char driver that has some basic functions. This driver was create for learning purposes.
https://github.com/renanleonellocastro/char_driver -
GitHub - alessandro-scalambrino/simple-device-driver: This project implements a simple character device driver for Linux, allowing interaction with the kernel through basic read and write operations. It demonstrates the fundamental principles of Linux device driver development, including dynamic device number allocation, handling of character device structures, and sysfs integration.
https://github.com/alessandro-scalambrino/simple-device-driver
-


)


