cocos官方文檔:節點系統事件 | Cocos Creator
游戲界面展示

一、在cocos編譯器隨便畫個頁面 展示頁面
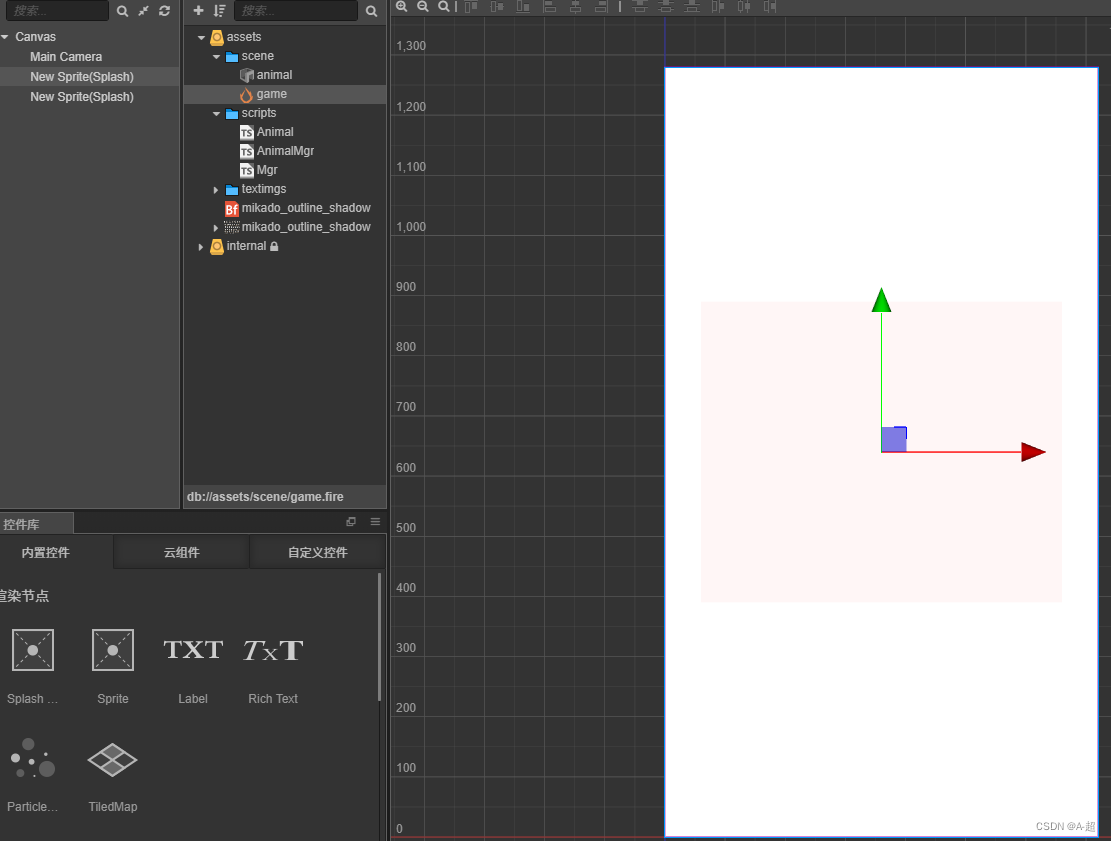
二、連連看元素生成
2.1、準備單個方塊元素,我這里就是直接使用一張圖片,圖片大小為100x100,錨點為(0,0),這圖片命名animal,把這一張圖片設置成Prefab(預制)
(作為后面用代碼生成元素矩陣使用)


2.2、給命名animal的Prefab(預制)綁定一個ts文件,命名Animal.ts,這個類就是存放單個圖片參數了
@property(cc.SpriteFrame)
? sp1 = [];這里就是表示不同的圖片資源,在上圖的最右邊就可以看的綁定了5張圖片進去,為了id對應,[0]位置空了
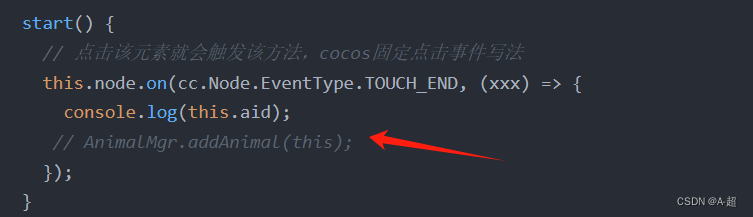
Animal.ts文件代碼如下:
//import { AnimalMgr } from "./AnimalMgr";const { ccclass, property } = cc._decorator;@ccclass
export default class Animal extends cc.Component {// 存放不同圖片,就是元素種類@property(cc.SpriteFrame)sp1 = [];// LIFE-CYCLE CALLBACKS:// onLoad () {}//存放元素種類id,用于后面匹配消除同類元素private _aid: number = 0;public get aid(): number {return this._aid;}public set aid(value: number) {this._aid = value;if (this._aid > 0 && this._aid < this.sp1.length) {this.node.getComponent(cc.Sprite).spriteFrame = this.sp1[this._aid];}}// 該元素位于矩陣第幾行(x)private _rowIndex: number = -1;public get rowIndex(): number {return this._rowIndex;}public set rowIndex(value: number) {this._rowIndex = value;}// 該元素位于矩陣第幾列(y)private _colIndex: number = -1;public get colIndex(): number {return this._colIndex;}public set colIndex(value: number) {this._colIndex = value;}// 該元素矩陣橫著總長度private _rowSum: number = -1;public get rowSum(): number {return this._rowSum;}public set rowSum(value: number) {this._rowSum = value;}// 該元素矩陣豎著總長度private _colSum: number = -1;public get colSum(): number {return this._colSum;}public set colSum(value: number) {this._colSum = value;}start() {// 點擊該元素就會觸發該方法,cocos固定點擊事件寫法this.node.on(cc.Node.EventType.TOUCH_END, (xxx) => {console.log(this.aid);// AnimalMgr.addAnimal(this);});}// update (dt) {}
}
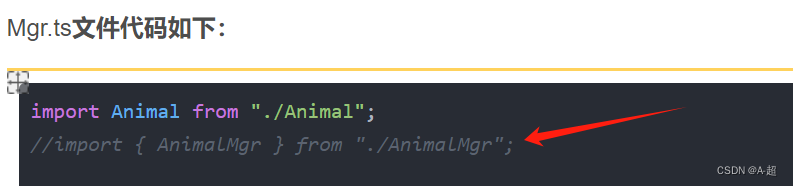
2.3、給整個畫布綁定一個ts文件,命名Mgr.ts,后面在這個Mgr.ts文件聲明一個預制,引入上面的預置文件Animal
里面就是編寫動態生成連連看矩陣元素的邏輯

Mgr.ts文件代碼如下:
import Animal from "./Animal";
//import { AnimalMgr } from "./AnimalMgr";const { ccclass, property } = cc._decorator;@ccclass
export default class Mgr extends cc.Component {@property(cc.Prefab)T0 = null;onLoad() {}private _rows: number = 5; //矩陣的行數private _cols: number = 6; //矩陣的列數private _eleIdSum: number = 5; //可以展示圖片的種類數量start() {// console.log("start");// let _tmp = [//   [1,1,1,1,1,1,],//   [1,1,1,1,1,1,],//   [1,1,1,1,1,1,],//   [1,1,1,1,1,1,],//   [1,1,1,1,1,1,],// ]let _startx: number = -(this._cols * 100) >> 1;let _starty: number = -(this._rows * 100) >> 1;for (let index1 = 0; index1 < this._rows; index1++) {for (let index2 = 0; index2 < this._cols; index2++) {let _xxx: cc.Node = cc.instantiate(this.T0);//創建一個元素this.node.addChild(_xxx); //把這元素添加到頁面上_xxx.x = _startx;_xxx.y = _starty;_startx += 100;// 獲取這個元素組件的元素let _script: Animal = _xxx.getComponent(Animal);  //獲取這個元素的信息_script.aid = this.randomIdFn(index1, index2); //給這個元素渲染的圖片id 該方法并生成對稱id種類個數_script.rowIndex = index1; // 記錄該圖片在矩陣x軸位置_script.colIndex = index2; // 記錄該圖片在矩陣y軸位置_script.rowSum = this._rows; // 該元素矩陣橫著總長度_script.colSum = this._cols; // 該元素矩陣橫著總長度//AnimalMgr.set(index1, index2, 1); //記錄矩陣元素是否消除或者存在,1表示存在,表示不存在}_startx = -(this._cols * 100) >> 1;_starty += 100;}/* 偽節點,就是在連連看矩陣四周加多一層節點數據,標識四周一圈的節點都消除成功了,為后面的鏈接算法做處理*/// for (let index = 0; index < this._cols; index++) {//   AnimalMgr.set(-1, index, 0);// }// for (let index = 0; index < this._cols; index++) {//   AnimalMgr.set(this._rows, index, 0);// }// for (let index = 0; index < this._rows; index++) {//   AnimalMgr.set(index, -1, 0);// }// for (let index = 0; index < this._rows; index++) {//   AnimalMgr.set(index, this._cols, 0);// }}private idMap: Map<number, number> = new Map(); //收集每種元素id生成的個數,用于記錄每種元素已經生成的個數public randomIdFn(rowIndex: number, colIndex: number) {// rowIndex: 記錄元素生成到第幾行, colIndex: 記錄元素生成到第幾列//這里是末尾補偶法,前面元素隨機生成,末尾再把基數種類元素補為偶數 此方法用于保證生成的元素都為偶數對let randomId = 1 + Math.floor(Math.random() * this._eleIdSum); // 渲染的圖片id--> 1~5const eleSum = rowIndex * this._cols + colIndex; //遍歷到第幾個元素了const replenish = this._cols * this._rows - this._eleIdSum; //需要開始補充奇數位的元素開始位置if (eleSum > replenish) {//開始補充基數位的元素-->這里有5類元素,我在格子最后的五位元素補充,確保每種元素都為偶數對// let newCreateIdSum = this.idMap.get(randomId);this.idMap.forEach((value, key) => {if (value % 2 != 0) {randomId = key; //不是偶數的元素種類,補充為偶數}});}//用于記錄每種元素已經生成的個數if (this.idMap.get(randomId) && this.idMap.get(randomId) > 0) {let idSum = this.idMap.get(randomId) + 1;this.idMap.set(randomId, idSum);} else {this.idMap.set(randomId, 1); //初始化}return randomId;}// protected onDestroy(): void {// }update(dt) {}// protected lateUpdate(dt: number): void {// }
}
? ? ? ? 這里總結一下做上面所有步驟都只是為了生成一個 連連看的矩陣畫面,這里的元素生成主要邏輯是:
末尾補齊法,目的讓每一種類元素都可成為偶數,避免消除完后,最后某種元素中有單個元素在頁面上,玩家無法進行匹配,主要代碼邏輯在?public randomIdFn(rowIndex: number, colIndex: number),方法不唯一,可以用自己想法編寫
三、連連看算法邏輯編寫
3.1、在項目新建ts文件,命名AnimalMgr.ts 連連看小游戲的主要邏輯都存放在該文件
在該文件下,AnimalMgr.ts初始化代碼如下:
import Animal from "./Animal";interface VC {rowIndex: number;colIndex: number;
}class _AnimalMgr {private _animals: Array<Animal> = []; //點擊到的元素存進了,這里最大值2個元素private _paths: Map<string, number> = new Map(); //用于記錄矩陣那個元素的消除情況,1表示存在,0表示消除public addAnimal(_Animal: Animal) {if (_Animal) {//console.log(this._animals);if (this._animals.length > 0) {let _start: Animal = this._animals[0];//是否是相同元素,是就不記錄進去if (_start.colIndex == _Animal.colIndex &&_start.rowIndex == _Animal.rowIndex) {return;}}this._animals.push(_Animal);//------------if (this._animals.length == 2) {//TODO:0拐點let _isConnect: boolean = false;let _start: Animal = this._animals[0];let _stop: Animal = this._animals[1];if (_start.aid != _stop.aid) {//是否是相同元素this._animals = [];return;}if (_isConnect) {// 符合連接條件的,在視圖上銷毀這倆連接上的節點,并記錄下來這兩節點已經消除this.set(_start.rowIndex, _start.colIndex, 0);this.set(_stop.rowIndex, _stop.colIndex, 0);_start.node.destroy();_stop.node.destroy();}// console.log("_isConnect",_isConnect);this._animals = [];}}}//判斷這個節點是否存在矩陣圖形上public isPass(_r: number, _c: number) {let _key = `${_r}_${_c}`;if (this._paths.has(_key)) {return this._paths.get(_key) == 0;} else {return false;}}/* 標識矩陣每個元素的位置,并且值為1 代表存在,0代表銷毀_r: number,  //橫坐標_c: number, // 縱坐標_v: number //值為1 代表存在,0代表銷毀*/public set(_r: number, _c: number, _v: number) {let _key = `${_r}_${_c}`;this._paths.set(_key, _v);console.log(this._paths);}
}export const AnimalMgr = new _AnimalMgr();
上面AnimalMgr.ts初始化代碼主要一個目的,記錄元素在矩陣中是否存在,存在的,就在矩陣的對應位置標識為1 不存在就標識為0

3.2、然后把上面Animal.ts和Mgr.ts文件,關于引用到AnimalMgr.ts的代碼,注釋回來,就可正常隨意點擊任意兩個元素,這兩個元素就會消失在頁面上,如下圖所示:


3.3、點擊矩陣的兩個節點,是否能連接成功,符合條件就把連接成功的節點消除
下面是主要邏輯,分三步走,
(第一步)0拐點:
意思是兩個節點都是在同一條直線上,都在同一條x軸或者y軸上面,
比如A到B點,中間只是一條直線連接在同y軸上,或者C到D點也只一條直線連接,在同x軸上,
中間連接線不需要任何直角拐彎就可聯通,就表示這兩個節點0個拐點
在0拐點的兩個節點,只要中間沒有任何東西,就表示可連接成功

0拐點代碼邏輯如下,思路才是重點,代碼可以自己寫,下面代碼只做參考:
// 兩點距離0個拐角(直角)public _0c(start_: VC, stop_: VC): boolean {// 同一條橫直線上if (start_.rowIndex == stop_.rowIndex) {if (start_.colIndex < stop_.colIndex) {//向右移動let _startCol: number = start_.colIndex + 1;//判斷到下一個節點空就為true,有值就falsewhile (this.isPass(start_.rowIndex, _startCol)) {_startCol++;}return _startCol == stop_.colIndex;} else {// 向左移動let _startCol: number = start_.colIndex - 1;while (this.isPass(start_.rowIndex, _startCol)) {_startCol--;}return _startCol == stop_.colIndex;}} else if (start_.colIndex == stop_.colIndex) {// 同一條豎直線上if (start_.rowIndex < stop_.rowIndex) {//向上移動let _startRow: number = start_.rowIndex + 1;while (this.isPass(_startRow, start_.colIndex)) {_startRow++;}return _startRow == stop_.rowIndex;} else {//向下移動let _startRow: number = start_.rowIndex - 1;while (this.isPass(_startRow, start_.colIndex)) {_startRow--;}return _startRow == stop_.rowIndex;}}return;}(第二步:假設0個拐點條件不滿足)1拐點:
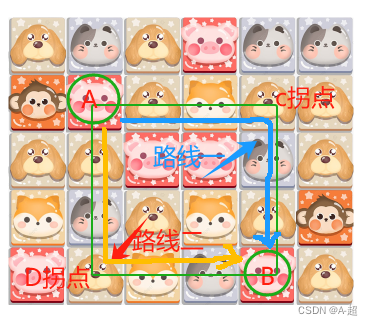
意思是兩個節點坐標x和y都不相同,但是,兩個節點的連接線,只有一個直角
如下圖:
下面需要點擊A和B節點,A和B的直線距離都不能直接連接,現在需要連接只能兩條路線,每條路線只能一個直角,就只有兩條路線可走,每條路線都會有一個拐點,分別是 C和D拐點
A和B要想連接成功,路線一或者路線二,只要有一條能連接上:拐點的位置到起點和終點的直線連接都沒有阻礙物,表示A和B就可以相連
1拐點代碼邏輯如下,思路才是重點,代碼可以自己寫,下面代碼只做參考:
// 兩點距離1個拐角(直角)public _1c(start_: VC, stop_: VC): boolean {//找到兩個節點的兩個直角拐點let _p1: VC = { rowIndex: start_.rowIndex, colIndex: stop_.colIndex }; //拐角點1let _p2: VC = { rowIndex: stop_.rowIndex, colIndex: start_.colIndex }; //拐角點2let _tmp: Array<VC> = [_p1, _p2];// 判斷每個拐角點到初始點和終點之間是否有阻礙節點,有就表示行不通for (let index = 0; index < _tmp.length; index++) {const pt = _tmp[index];if (this.isPass(pt.rowIndex, pt.colIndex)) {let _isOK = true;_isOK = _isOK && this._0c(pt, start_);_isOK = _isOK && this._0c(pt, stop_);if (_isOK) {return true;}}}return false;}(第三步:假設0個1拐點條件都不滿足)2拐點:
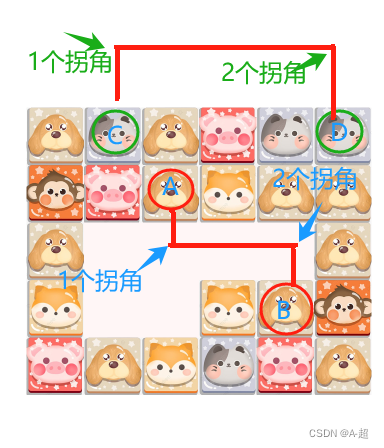
意思是:A到B點的連通需要滿足連接路線會出現兩個直角的
如下圖:
A點到B點要想連接成功,連接路線需要兩個拐角,
C點到D點要想連接成功,連接路線也需要兩個拐角,
兩個節點出現兩個拐角點要是想連接成功,代碼的核心思路是,在起始點,通過上下左右移動的嘗試,起始點移動到的位置,可以實現與終點連接出現一個拐點路線,就能連接成功了,就表示這兩個節點可以連接成功
2拐點代碼邏輯如下,思路才是重點,代碼可以自己寫,下面代碼只做參考:
// 兩點距離2個拐角(直角)public _2c(start_: VC, stop_: VC): boolean {// 向初始節點四面移動,判斷受否可能找到 連接到終節點的一個拐角的路線//TODO:左let _startCol: number = start_.colIndex - 1;//在初始起點向左移動,直到找到可連接到終節點的一個拐角的路線,遇到符合就終止,// 如果都不滿足,就退出向左移動的嘗試,走下面的右移動邏輯while (this.isPass(start_.rowIndex, _startCol)) {// 判斷這個節點是否存在矩陣圖形上--this.isPass(start_.rowIndex, _startCol)this.set(start_.rowIndex, _startCol, 100);//起始點左移動,標記該位置存在元素let _isOk = this._1c({ rowIndex: start_.rowIndex, colIndex: _startCol },{ rowIndex: stop_.rowIndex, colIndex: stop_.colIndex });this.set(start_.rowIndex, _startCol, 0);_startCol -= 1;if (_isOk) {return true;}}//TODO:右_startCol = start_.colIndex + 1;while (this.isPass(start_.rowIndex, _startCol)) {this.set(start_.rowIndex, _startCol, 100);let _isOk = this._1c({ rowIndex: start_.rowIndex, colIndex: _startCol },{ rowIndex: stop_.rowIndex, colIndex: stop_.colIndex });this.set(start_.rowIndex, _startCol, 0);_startCol += 1;if (_isOk) {return true;}}//TODO:上let _startRow = start_.rowIndex + 1;while (this.isPass(_startRow, start_.colIndex)) {this.set(_startRow, start_.colIndex, 100);let _isOk = this._1c({ rowIndex: _startRow, colIndex: start_.colIndex },{ rowIndex: stop_.rowIndex, colIndex: stop_.colIndex });this.set(_startRow, start_.colIndex, 0);_startRow += 1;if (_isOk) {return true;}}//TODO:下_startRow = start_.rowIndex - 1;while (this.isPass(_startRow, start_.colIndex)) {this.set(_startRow, start_.colIndex, 100);let _isOk = this._1c({ rowIndex: _startRow, colIndex: start_.colIndex },{ rowIndex: stop_.rowIndex, colIndex: stop_.colIndex });this.set(_startRow, start_.colIndex, 0);_startRow -= 1;if (_isOk) {return true;}}return false;}AnimalMgr.ts完整代碼如下代碼如下:
import Animal from "./Animal";interface VC {rowIndex: number;colIndex: number;
}class _AnimalMgr {private _animals: Array<Animal> = []; //點擊到的元素存進了,這里最大值2個元素private _paths: Map<string, number> = new Map(); //用于記錄矩陣那個元素的消除情況,1表示存在,0表示消除// AnimalMgr.set(index1,index2,0);public addAnimal(_Animal: Animal) {if (_Animal) {//console.log(this._animals);if (this._animals.length > 0) {let _start: Animal = this._animals[0];//是否是相同元素,是就不記錄進去if (_start.colIndex == _Animal.colIndex &&_start.rowIndex == _Animal.rowIndex) {return;}}this._animals.push(_Animal);//------------if (this._animals.length == 2) {//TODO:0拐點let _isConnect: boolean = false;let _start: Animal = this._animals[0];let _stop: Animal = this._animals[1];if (_start.aid != _stop.aid) {//是否是相同元素this._animals = [];return;}_isConnect = this._0c({ rowIndex: _start.rowIndex, colIndex: _start.colIndex },{ rowIndex: _stop.rowIndex, colIndex: _stop.colIndex });//TODO:1拐點if (!_isConnect) {_isConnect = this._1c({ rowIndex: _start.rowIndex, colIndex: _start.colIndex },{ rowIndex: _stop.rowIndex, colIndex: _stop.colIndex });}//TODO:2拐點if (!_isConnect) {_isConnect = this._2c({ rowIndex: _start.rowIndex, colIndex: _start.colIndex },{ rowIndex: _stop.rowIndex, colIndex: _stop.colIndex });}if (_isConnect) {// 符合連接條件的,在視圖上銷毀這倆連接上的節點,并記錄下來這兩節點已經消除this.set(_start.rowIndex, _start.colIndex, 0);this.set(_stop.rowIndex, _stop.colIndex, 0);_start.node.destroy();_stop.node.destroy();}// console.log("_isConnect",_isConnect);this._animals = [];}}}//判斷這個節點是否存在矩陣圖形上public isPass(_r: number, _c: number) {let _key = `${_r}_${_c}`;if (this._paths.has(_key)) {return this._paths.get(_key) == 0;} else {return false;}}/* 標識矩陣每個元素的位置,并且值為1 代表存在,0代表銷毀_r: number,  //橫坐標_c: number, // 縱坐標_v: number //值為1 代表存在,0代表銷毀*/public set(_r: number, _c: number, _v: number) {let _key = `${_r}_${_c}`;this._paths.set(_key, _v);console.log(this._paths);}// 兩點距離0個拐角(直角)public _0c(start_: VC, stop_: VC): boolean {// 同一條橫直線上if (start_.rowIndex == stop_.rowIndex) {if (start_.colIndex < stop_.colIndex) {//向右移動let _startCol: number = start_.colIndex + 1;//判斷到下一個節點空就為true,有值就falsewhile (this.isPass(start_.rowIndex, _startCol)) {_startCol++;}return _startCol == stop_.colIndex;} else {// 向左移動let _startCol: number = start_.colIndex - 1;while (this.isPass(start_.rowIndex, _startCol)) {_startCol--;}return _startCol == stop_.colIndex;}} else if (start_.colIndex == stop_.colIndex) {// 同一條豎直線上if (start_.rowIndex < stop_.rowIndex) {//向上移動let _startRow: number = start_.rowIndex + 1;while (this.isPass(_startRow, start_.colIndex)) {_startRow++;}return _startRow == stop_.rowIndex;} else {//向下移動let _startRow: number = start_.rowIndex - 1;while (this.isPass(_startRow, start_.colIndex)) {_startRow--;}return _startRow == stop_.rowIndex;}}return;}// 兩點距離1個拐角(直角)public _1c(start_: VC, stop_: VC): boolean {//找到兩個節點的兩個直角拐點let _p1: VC = { rowIndex: start_.rowIndex, colIndex: stop_.colIndex }; //拐角點1let _p2: VC = { rowIndex: stop_.rowIndex, colIndex: start_.colIndex }; //拐角點2let _tmp: Array<VC> = [_p1, _p2];// 判斷每個拐角點到初始點和終點之間是否有阻礙節點,有就表示行不通for (let index = 0; index < _tmp.length; index++) {const pt = _tmp[index];if (this.isPass(pt.rowIndex, pt.colIndex)) {let _isOK = true;_isOK = _isOK && this._0c(pt, start_);_isOK = _isOK && this._0c(pt, stop_);if (_isOK) {return true;}}}return false;}// 兩點距離2個拐角(直角)public _2c(start_: VC, stop_: VC): boolean {// 向初始節點四面移動,判斷受否可能找到 連接到終節點的一個拐角的路線//TODO:左let _startCol: number = start_.colIndex - 1;//在初始起點向左移動,直到找到可連接到終節點的一個拐角的路線,遇到符合就終止,// 如果都不滿足,就退出向左移動的嘗試,走下面的右移動邏輯while (this.isPass(start_.rowIndex, _startCol)) {// 判斷這個節點是否存在矩陣圖形上--this.isPass(start_.rowIndex, _startCol)this.set(start_.rowIndex, _startCol, 100); //起始點左移動,標記該位置存在元素let _isOk = this._1c({ rowIndex: start_.rowIndex, colIndex: _startCol },{ rowIndex: stop_.rowIndex, colIndex: stop_.colIndex });this.set(start_.rowIndex, _startCol, 0);_startCol -= 1;if (_isOk) {return true;}}//TODO:右_startCol = start_.colIndex + 1;while (this.isPass(start_.rowIndex, _startCol)) {this.set(start_.rowIndex, _startCol, 100);let _isOk = this._1c({ rowIndex: start_.rowIndex, colIndex: _startCol },{ rowIndex: stop_.rowIndex, colIndex: stop_.colIndex });this.set(start_.rowIndex, _startCol, 0);_startCol += 1;if (_isOk) {return true;}}//TODO:上let _startRow = start_.rowIndex + 1;while (this.isPass(_startRow, start_.colIndex)) {this.set(_startRow, start_.colIndex, 100);let _isOk = this._1c({ rowIndex: _startRow, colIndex: start_.colIndex },{ rowIndex: stop_.rowIndex, colIndex: stop_.colIndex });this.set(_startRow, start_.colIndex, 0);_startRow += 1;if (_isOk) {return true;}}//TODO:下_startRow = start_.rowIndex - 1;while (this.isPass(_startRow, start_.colIndex)) {this.set(_startRow, start_.colIndex, 100);let _isOk = this._1c({ rowIndex: _startRow, colIndex: start_.colIndex },{ rowIndex: stop_.rowIndex, colIndex: stop_.colIndex });this.set(_startRow, start_.colIndex, 0);_startRow -= 1;if (_isOk) {return true;}}return false;}
}export const AnimalMgr = new _AnimalMgr();


)


)


