文章目錄
- 1 準備
- 2 移植
- 2.1 softAP工程移植到simple工程中
- 2.2 移植注意事項
- 3 驗證
- 4 添加HTML
- 4.1 瀏覽器顯示自己編譯的html
- 4.2 在使用html發數據給ESP32
- 4.3 HTML 內容
- 4.4 更新 html_test.html
1 準備
- 參考工程
Espressif\frameworks\esp-idf-v5.2.1\examples\wifi\getting_started\softAP
softAP工程演示將ESP32作為AP,即熱點,使手機等終端可以連接 - 參考工程
Espressif\frameworks\esp-idf-v5.2.1\examples\protocols\http_server\simple
simple工程演示ESP32作為服務器,響應客戶端的請求
2 移植
2.1 softAP工程移植到simple工程中
-
在simple工程添加自定義ap文件
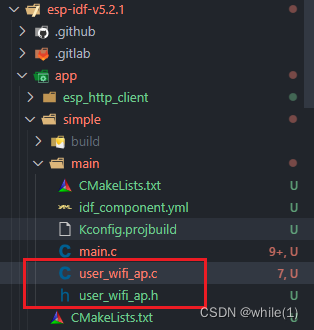
-
在CMakeLists.txt 添加新增 .c 文件
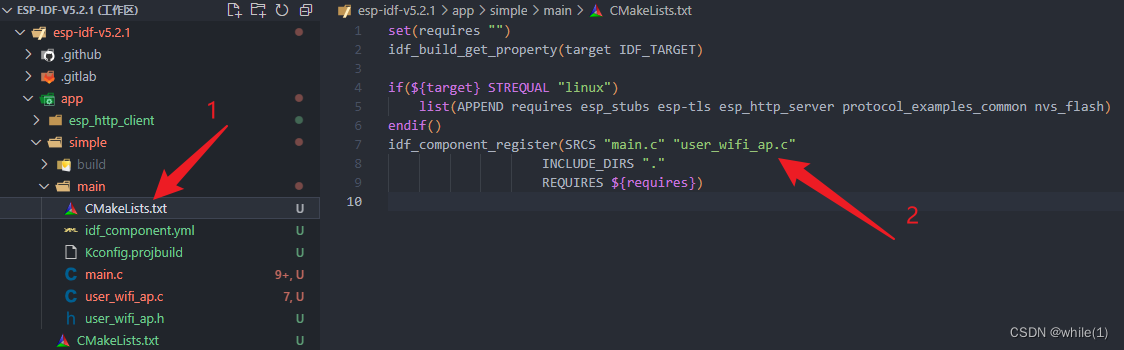
-
將 softAP 工程程序復制到 user_wifi_ap.c 中
注意:1)可以刪除重復的共同的初始化函數; -
簡化后的
app_main函數void app_main(void) {static httpd_handle_t server = NULL;ESP_ERROR_CHECK(nvs_flash_init());ESP_ERROR_CHECK(esp_netif_init());ESP_ERROR_CHECK(esp_event_loop_create_default());wifi_init_softap();/* Register event handlers to stop the server when Wi-Fi or Ethernet is disconnected,* and re-start it upon connection.*/ESP_ERROR_CHECK(esp_event_handler_register(IP_EVENT, IP_EVENT_STA_GOT_IP, &connect_handler, &server));ESP_ERROR_CHECK(esp_event_handler_register(WIFI_EVENT, WIFI_EVENT_STA_DISCONNECTED, &disconnect_handler, &server));/* Start the server for the first time */server = start_webserver(); }
2.2 移植注意事項
-
設置AP WiFi密碼時,長度要大于等于8
#define EXAMPLE_ESP_WIFI_PASS "12345678" // 密碼需要 >= 8 -
WIFI_AUTH_WPA3_PSK和WIFI_AUTH_WPA2_PSK模式
如果使用WIFI_AUTH_WPA3_PSK模式,可能部分電腦和手機不能連接該WiFi熱點
    wifi_config_t wifi_config = {.ap = {...
#ifdef CONFIG_ESP_WIFI_SOFTAP_SAE_SUPPORT.authmode = WIFI_AUTH_WPA3_PSK,.sae_pwe_h2e = WPA3_SAE_PWE_BOTH,
#else /* CONFIG_ESP_WIFI_SOFTAP_SAE_SUPPORT */.authmode = WIFI_AUTH_WPA2_PSK,
#endif...},};
關閉WIFI_AUTH_WPA3_PSK使能

3 驗證
- 編譯、燒錄、打開串口,
idf.py -p COM11 flash monitor; - 使用手機連接WiFi;
- 使用手機瀏覽器輸入
192.168.4.1/hello
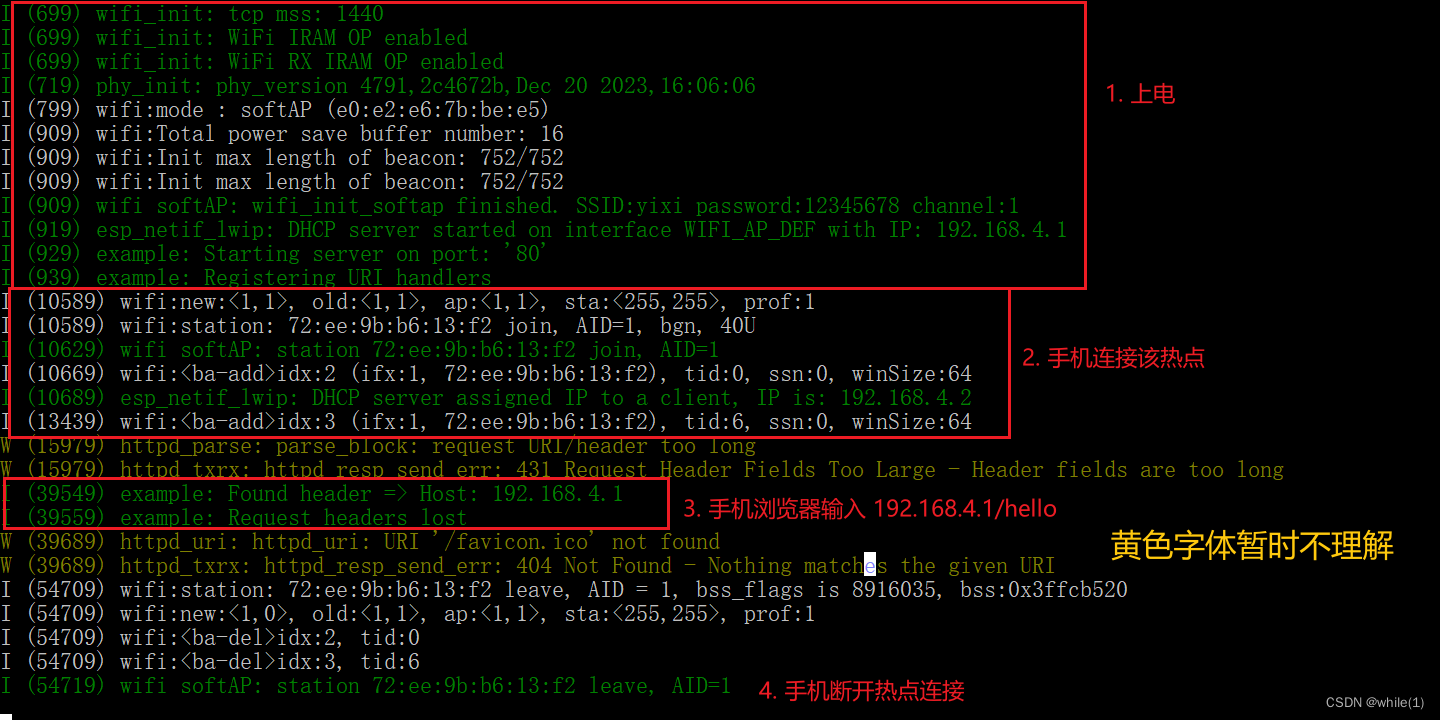
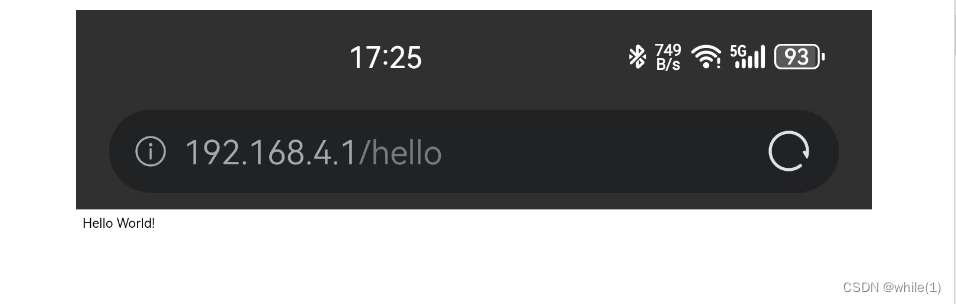
- 手機瀏覽器反饋數據與程序一致
4 添加HTML
注意下文所有與html有關的功能都要對應 html_test.html 詳細在文末
4.1 瀏覽器顯示自己編譯的html
-
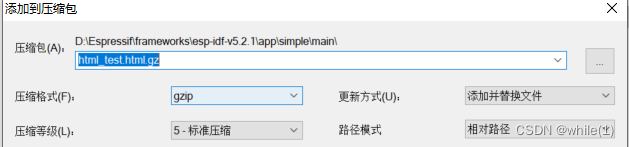
添加一份html文件并壓縮為 .gz格式 到 main文件夾下
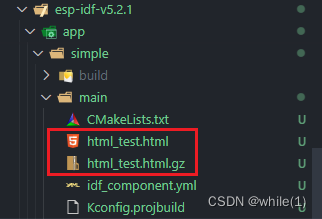
.gz 格式可以使用 7-Zip壓縮軟件 -
打開 CMakeLists.txt文件添加 html_test.html.gz
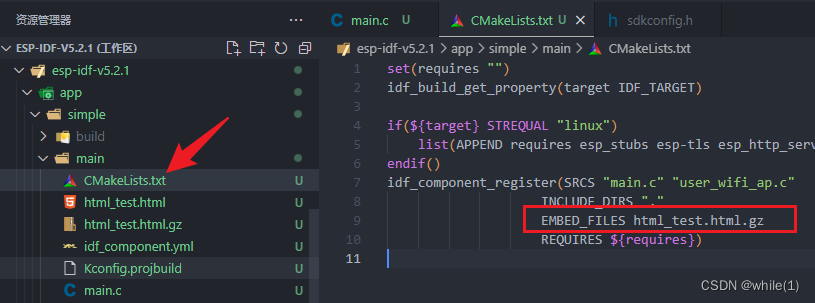
-
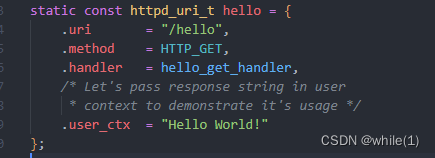
在對應的 .c 文件添加如下程序
extern const unsigned char html_test_html_gz_start[] asm("_binary_html_test_html_gz_start"); extern const unsigned char html_test_html_gz_end[] asm("_binary_html_test_html_gz_end");static esp_err_t index_handler(httpd_req_t *req) {size_t CNB_803_web_html_gz_len = html_test_html_gz_end - html_test_html_gz_start;ESP_LOGI(TAG, "web refresh");httpd_resp_set_type(req, "text/html");httpd_resp_set_hdr(req, "Content-Encoding", "gzip");httpd_resp_set_hdr(req, "X-Content-Type-Options", "nosniff");return httpd_resp_send(req, (const char *)html_test_html_gz_start, CNB_803_web_html_gz_len); }httpd_uri_t index_uri = {.uri = "/",.method = HTTP_GET,.handler = index_handler,.user_ctx = NULL};static httpd_handle_t start_webserver(void){if (httpd_start(&server, &config) == ESP_OK) {// Set URI handlershttpd_register_uri_handler(server, &index_uri); // 添加該函數}} -
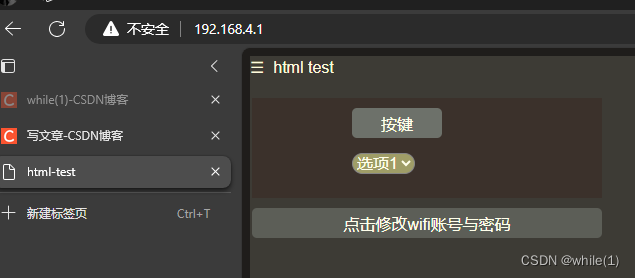
編譯燒錄打開串口,電腦連接無線熱點,并在瀏覽器輸入
192.168.4.1,效果如下
4.2 在使用html發數據給ESP32
-
添加程序
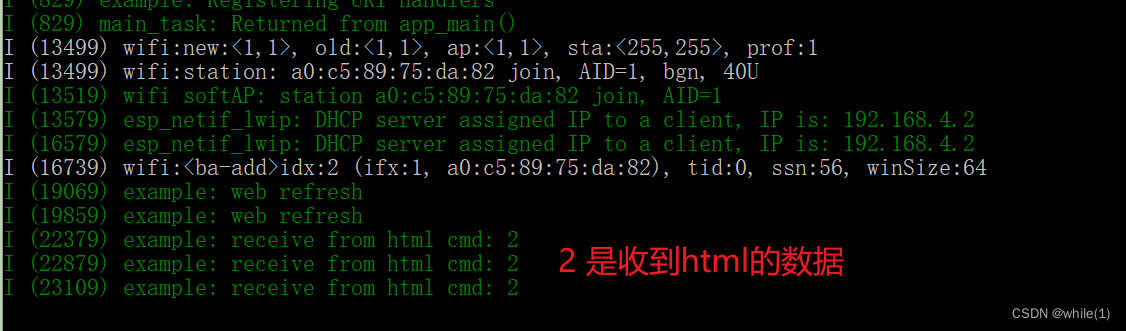
static esp_err_t html_cmd_handler(httpd_req_t *req) {char *buf = NULL;char _cmd_value[16];static char json_response[256];char *p = json_response;if (html_data_parse(req, &buf) != ESP_OK || httpd_query_key_value(buf, "key_value", _cmd_value, sizeof(_cmd_value)) != ESP_OK) // 這里key_value改變時需要網頁端同步修改{free(buf);httpd_resp_send_404(req);return ESP_FAIL;}free(buf);uint8_t cmd_value = atoi(_cmd_value);ESP_LOGI(TAG, "receive from html cmd: %d ", cmd_value);if (cmd_value == 14){*p++ = '{';p += sprintf(p, "\"frame_sensitivity\":%u,", html_data.sensitivity);*p++ = '}';*p++ = 0;}else{html_data.cmd = cmd_value;*p++ = '{';p += sprintf(p, "\"cnb_board\":\"%s\",", PROJECT_NAME);p += sprintf(p, "\"cnb_ver\":\"%s\"", PROJECT_VERSION);*p++ = '}';*p++ = 0;}httpd_resp_set_type(req, "application/json");// Access-Control-Allow-Origin配置成*什么意思?意思是允許任意網站跨域訪問該服務端口,在這種情況下,任意一個前端程序都可以隨意集成該端口內容,實現數據獲取。httpd_resp_set_hdr(req, "Access-Control-Allow-Origin", "*");httpd_resp_set_hdr(req, "X-Content-Type-Options", "nosniff");return httpd_resp_send(req, json_response, strlen(json_response)); }httpd_uri_t html_cmd_uri = {.uri = "/key_value",.method = HTTP_GET,.handler = html_cmd_handler,.user_ctx = NULL};static httpd_handle_t start_webserver(void){if (httpd_start(&server, &config) == ESP_OK) {// Set URI handlershttpd_register_uri_handler(server, &html_cmd_uri ); // 添加該函數}} -
編譯燒錄打開串口,效果如下
4.3 HTML 內容
<!DOCTYPE html>
<html lang="en"><head><meta charset="UTF-8"><meta name="viewport" content="width=device-width, initial-scale=1.0"><link rel="shortcut icon" href="#" /><title>html-test</title><style>/* style 屬于CSS部分 */body {font-family: Arial, Helvetica, sans-serif;background: #413f3f;color: #EFEFEF;font-size: 16px}/* 包裹“按鍵”、“下拉選項”的背景 */ .ctr_field_bkg {background-color: #e0cfcf;height: 100px;width: 350px;position: absolute;left: 10px;top: 50px;}/* 單個按鍵的屬性 */.button_key_1 {left: 50px;top: 10px;}/* 按鍵的父屬性 */.button {display: block;padding: 0 5px;border: 0;position: relative;height: 30px;width: 90px;left: 100px;top: 10px;cursor: pointer;/* cursor:用來設置鼠標光標/指針在指定元素上的形狀; */color: #fff;background: #5a8194;border-radius: 5px;font-size: 16px;}/* 鼠標移動到按鍵時,按鍵會變為該顏色*/.button:hover {background-color: #f88020;color: white;}/* 下拉選項 */.drop_down_option {/* display: flex; */cursor: pointer;/* 用來設置鼠標光標/指針在指定元素上的形狀; */flex-wrap: nowrap;line-height: 22px;position: relative;margin: 5px 0;border-radius: 15px;left: 100px;top: 20px;font-size: 16px;color: #fff;background: #a0b931;display: inline-block;}/* wifi修改按鍵入口 */.wifi_entry_button {display: block;padding: 0 5px;border: 0;position: absolute;height: 30px;width: 350px;left: 10px;top: 160px;cursor: pointer;/* cursor:用來設置鼠標光標/指針在指定元素上的形狀; */color: #fff;background: #96b1b9;border-radius: 5px;font-size: 16px;}/* wifi 彈窗的整體屬性 */.wifi_input_windows {width: 350px;height: 250px;border: 3px solid #f8f8f8;visibility: hidden;position: absolute;z-index: 999;opacity: 1;overflow: hidden;background-color: white;text-align: center;margin-top: 10%;margin-left: 1%;border-radius: 10px;}.open {visibility: visible;opacity: 1;}.wifi_input_windows_box {margin-top: 15px;width: 100%;height: 40px;color: #0e0d0c;}/* WiFi 彈窗中 “wifi賬號與密碼修改” 字體 */.wifi_input_windows_box .login_logo {text-align: left;font-size: 20px;font-weight: 300;padding-left: 80px;float: left;}/* WiFi 彈窗中右上角的X */.wifi_input_windows_box .close {width: 20px;height: 20px;color: #d83434;text-align: center;line-height: 20px;border: 1px solid #5d5d5d;border-radius: 50%;float: right;padding-top: 0px;margin-right: 10px;font-size: 12px;}/* 鼠標移動到對應位置時,按鍵會變為該顏色*/.wifi_input_windows_box .close:hover {cursor: pointer;background-color: #aa1111;color: white;}hr {background-color: #F8F8F8;}.wifi_input_windows_box .submit_1 {border: 2px solid #f88020;height: 40px;width: 80px;background-color: white;}.wifi_input_windows_box .submit_1:hover {background-color: #f88020;color: white;}.msg {display: inline-block;font-size: 16px;/* margin-top: 2%; */margin-left: 5%;color: #d83434;}</style>
</head><body><section class="main"><div id="logo"><label for="nav-toggle-cb" id="nav-toggle">☰ html test</label></div><canvas id="frame_check" width="340" height="200" class="detection_box">您的瀏覽器不支持 HTML5 canvas 標簽,感應框無法顯示。</canvas><!-- <div class="ctr_field_bkg"> --><div class="ctr_field_bkg"><button class="button button_key_1" id="key_id_1" value="2">按鍵</button><select title="下拉選項" class="drop_down_option" id="down_option"><option value="9">選項1</option><option value="10">選項2</option><option value="11">選項3</option></select></div><div><button class="wifi_entry_button" id="btn_1">點擊修改wifi賬號與密碼</button><div class="wifi_input_windows"><form><div class="wifi_input_windows_box"><div class="login_logo">wifi賬號與密碼修改</div><div class="close">X</div></div><hr><div class="wifi_input_windows_box">wifi 賬號輸入:<input type="text" name="ssid" id="id_ssid" value=""><span class="msg"id="id_span_ssid"></span></div><div class="wifi_input_windows_box">wifi 密碼輸入:<input type="text" name="password" id="id_password" value=""><span class="msg" id="id_span_password"></span></div><div class="wifi_input_windows_box"><input class="submit_1" type="submit" name="submit" id="id_submit" value="提 交"></div></form></div></div></section><script>var baseHost = document.location.origin;var btn_1 = document.getElementById("btn_1");var close = document.getElementsByClassName("close");var wifi_input_windows = document.getElementsByClassName("wifi_input_windows");function fetchUrl(url, cb) {fetch(url).then(response => response.json()).then(function (data) {cb(200, data);}).catch(function (err) {cb(-1, err);});}function transmit_cmd_value(key_value, cb) {fetchUrl(`${baseHost}/key_value?key_value=${key_value}`, function (code, txt) {cb(code, txt);// cb(200, txt); //測試用});}function transmit_wifi_value(wifi_ssid, wifi_password, cb) {fetchUrl(`${baseHost}/wifi?wifi_ssid=${wifi_ssid}&wifi_password=${wifi_password}`, function (code, txt) {cb(code, txt);// cb(200, txt); //測試用});}btn_1.addEventListener('click', function () {wifi_input_windows[0].className = "wifi_input_windows open";})close[0].addEventListener('click', function () {var span_password = document.getElementById("id_span_password");var span_ssid = document.getElementById("id_span_ssid");span_password.innerHTML =''span_ssid.innerHTML =''wifi_input_windows[0].className = "wifi_input_windows";})const ssid = document.querySelector('[name=ssid]')ssid.addEventListener('change', verifyName)function verifyName() {const span = ssid.nextElementSiblingconst reg = /^[a-zA-Z0-9-_]{2,16}$/if (!reg.test(ssid.value)) {span.innerHTML = '2到16個字符且只能包含數字、字母、下劃線'return false}span.innerHTML = ''return true}const password = document.querySelector('[name=password]')password.addEventListener('change', verifyPassword)function verifyPassword() {const span = password.nextElementSiblingconst reg = /^[a-zA-Z0-9-_]{8,16}$/if (!reg.test(password.value)) {span.innerHTML = '8到16個字符且只能包含數字、字母、下劃線'return false}span.innerHTML = ''return true}const form = document.querySelector('form')form.addEventListener('submit', function (e) {if ((!verifyName()) || (!verifyPassword())) {e.preventDefault()}else {transmit_wifi_value(ssid.value, password.value, function (code, txt) {if (code != 200) {alert('Error[' + code + ']: ' + txt);} else {// console.log(txt.cnb_board);}});alert('請重新連接新的wifi賬號與密碼。')}})// 監聽來自MCU的信號document.addEventListener('DOMContentLoaded', function (event) {function update_frame() {transmit_cmd_value(14, function (code, txt) {if (code != 200) {alert('Error[' + code + ']: ' + txt);} else {console.log(txt);a_area_ctx.clearRect(0, 0, document.getElementById('frame_check').width, document.getElementById('frame_check').height);document.getElementById("down_option").selectedIndex = txt.frame_sensitivity; }});}//setInterval(update_frame, 1000); // 網頁更新周期const sensitivity_option = document.getElementById('down_option')sensitivity_option.onchange = () => {transmit_cmd_value(sensitivity_option.value, function (code, txt) {if (code != 200) {alert('Error[' + code + ']: ' + txt);} else {console.log(txt.cnb_board);}});}const ButtonKey_1 = document.getElementById('key_id_1');ButtonKey_1.onclick = () => {let key_value = parseInt(document.getElementById('key_id_1').value);transmit_cmd_value(key_value, function (code, txt) {if (code != 200) {alert('Error[' + code + ']: ' + txt);} else {console.log(txt.cnb_board);}});}})</script>
</body></html>
4.4 更新 html_test.html
- 直接編輯html_test.html,使用瀏覽器打開就可以直接看效果
- 更新,使用7-Zip壓縮軟件重新壓縮
- 編譯燒錄即可


)


)


