1 分庫分表案例
-
下面實現一個分庫分表案例,將一批課程信息分別拆分到兩個庫,四個表中:
-
需提前準備一個 MySQL 數據庫,并在其中創建 Course 表。Course 表的建表語句如下:
CREATE TABLE course  (`cid` bigint(0) NOT NULL,`cname` varchar(50) CHARACTER SET utf8 COLLATE utf8_general_ci NOT NULL,`user_id` bigint(0) NOT NULL,`cstatus` varchar(10) CHARACTER SET utf8 COLLATE utf8_general_ci NOT NULL,PRIMARY KEY (`cid`) USING BTREE
) ENGINE = InnoDB CHARACTER SET = utf8 COLLATE = utf8_general_ci ROW_FORMAT = Dynamic;
1.1 搭建基礎 JDBC 應用
-
接下來使用 SpringBoot+MyBatisPlus 快速搭建一個可以訪問數據庫的簡單應用,以這個應用作為后續分庫分表的基礎;
-
搭建一個 Maven 項目,在
pom.xml中加入相關依賴,其中就包含訪問數據庫最為簡單的幾個組件:
<dependencyManagement><dependencies><dependency><groupId>org.springframework.boot</groupId><artifactId>spring-boot-dependencies</artifactId><version>2.7.18</version><type>pom</type><scope>import</scope></dependency><dependency><groupId>mysql</groupId><artifactId>mysql-connector-java</artifactId><version>8.0.33</version></dependency><dependency><groupId>com.baomidou</groupId><artifactId>mybatis-plus-boot-starter</artifactId><version>3.5.7</version></dependency><dependency><groupId>com.alibaba</groupId><artifactId>druid-spring-boot-starter</artifactId><version>1.1.20</version></dependency></dependencies>
</dependencyManagement>
<dependencies><dependency><groupId>org.springframework.boot</groupId><artifactId>spring-boot-starter</artifactId></dependency><dependency><groupId>com.baomidou</groupId><artifactId>mybatis-plus-boot-starter</artifactId></dependency><dependency><groupId>com.alibaba</groupId><artifactId>druid-spring-boot-starter</artifactId></dependency><dependency><groupId>mysql</groupId><artifactId>mysql-connector-java</artifactId></dependency><dependency><groupId>org.springframework.boot</groupId><artifactId>spring-boot-starter-test</artifactId><scope>test</scope></dependency><dependency><groupId>junit</groupId><artifactId>junit</artifactId><version>4.13.2</version><scope>test</scope></dependency> </dependencies> -
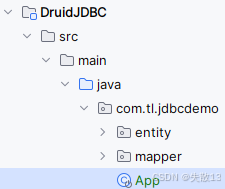
使用 MyBatisPlus 的方式,直接聲明 Entity 和 Mapper,映射數據庫中的 course 表:
public class Course {private Long cid;private String cname;private Long userId;private String cstatus;//省略。getter ... setter ....
}
public interface CourseMapper extends BaseMapper<Course> { } -
增加 SpringBoot 啟動類,掃描 mapper 接口:
@SpringBootApplication @MapperScan("com.tl.jdbcdemo.mapper") public class App {public static void main(String[] args) {SpringApplication.run(App.class,args);} } -
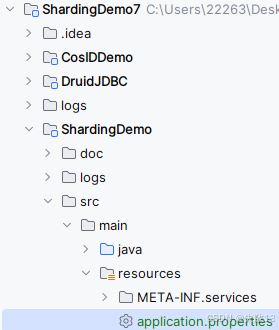
在 SpringBoot 的配置文件
application.properties中增加數據庫配置: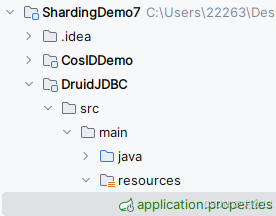
spring.datasource.druid.db-type=mysql spring.datasource.druid.driver-class-name=com.mysql.cj.jdbc.Driver spring.datasource.druid.url=jdbc:mysql://192.168.65.212:3306/test?serverTimezone=UTC spring.datasource.druid.username=root spring.datasource.druid.password=root -
做一個單元測試:把course課程信息插入到數據庫,然后從數據庫中進行查詢
@SpringBootTest
@RunWith(SpringRunner.class)
public class JDBCTest {@Resourceprivate CourseMapper courseMapper;@Testpublic void addcourse() {for (int i = 0; i < 10; i++) {Course c = new Course();c.setCname("java");c.setUserId(1001L);c.setCstatus("1");courseMapper.insert(c);//insert into course values ....System.out.println(c);}}@Testpublic void queryCourse() {QueryWrapper<Course> wrapper = new QueryWrapper<Course>();wrapper.eq("cid",1L);List<Course> courses = courseMapper.selectList(wrapper);courses.forEach(course -> System.out.println(course));}
}
1.2 引入 ShardingSphere-JDBC 快速實現分庫分表
-
另起了一個新模塊來講解,除了下面的依賴,其余的內容,比如實體類、mapper接口等,與上面
1.1 搭建基礎 JDBC 應用中講解的一致; -
在
pom.xml中引入ShardingSphere:
<dependencies><!-- ShardingSphere-JDBC核心依賴 --><dependency><groupId>org.apache.shardingsphere</groupId><artifactId>shardingsphere-jdbc-core-spring-boot-starter</artifactId><version>5.2.1</version><exclusions><exclusion><artifactId>snakeyaml</artifactId><groupId>org.yaml</groupId></exclusion></exclusions></dependency><!-- 版本沖突 --><dependency><groupId>org.yaml</groupId><artifactId>snakeyaml</artifactId><version>1.33</version></dependency><!-- SpringBoot依賴 --><dependency><groupId>org.springframework.boot</groupId><artifactId>spring-boot-starter</artifactId><exclusions><exclusion><artifactId>snakeyaml</artifactId><groupId>org.yaml</groupId></exclusion></exclusions></dependency><!-- 數據源連接池 --><!--注意不要用這個依賴,他會創建數據源,跟上面ShardingSphere-JDBC的SpringBoot集成依賴有沖突 --><!-- <dependency>--><!-- <groupId>com.alibaba</groupId>--><!-- <artifactId>druid-spring-boot-starter</artifactId>--><!-- <version>1.1.20</version>--><!-- </dependency>--><dependency><groupId>com.alibaba</groupId><artifactId>druid</artifactId><version>1.1.20</version></dependency><!-- mysql連接驅動 --><dependency><groupId>mysql</groupId><artifactId>mysql-connector-java</artifactId></dependency><!-- mybatisplus依賴 --><dependency><groupId>com.baomidou</groupId><artifactId>mybatis-plus-boot-starter</artifactId></dependency><dependency><groupId>org.springframework.boot</groupId><artifactId>spring-boot-starter-test</artifactId><scope>test</scope></dependency><dependency><groupId>junit</groupId><artifactId>junit</artifactId><version>4.13.2</version><scope>test</scope></dependency> </dependencies> -
按照設計,要創建
m0和m1數據庫,在其中分別創建course_1和course_2表,他們的表結構與course表是一致的; -
增加 ShardingSphere-JDBC 的分庫分表配置:
# 啟用SQL日志打印,在控制臺輸出實際執行的SQL語句,便于調試和監控
spring.shardingsphere.props.sql-show = true
# 允許Bean定義覆蓋,解決多個數據源配置時可能出現的Bean沖突問題
spring.main.allow-bean-definition-overriding = true# 定義數據源名稱列表,此處配置了兩個數據源:m0和m1
spring.shardingsphere.datasource.names=m0,m1# 配置第一個數據源m0的連接參數
spring.shardingsphere.datasource.m0.type=com.alibaba.druid.pool.DruidDataSource
spring.shardingsphere.datasource.m0.driver-class-name=com.mysql.cj.jdbc.Driver
spring.shardingsphere.datasource.m0.url=jdbc:mysql://192.168.65.212:3306/shardingdb1?serverTimezone=UTC
spring.shardingsphere.datasource.m0.username=root
spring.shardingsphere.datasource.m0.password=root# 配置第二個數據源m1的連接參數
spring.shardingsphere.datasource.m1.type=com.alibaba.druid.pool.DruidDataSource
spring.shardingsphere.datasource.m1.driver-class-name=com.mysql.cj.jdbc.Driver
spring.shardingsphere.datasource.m1.url=jdbc:mysql://192.168.65.212:3306/shardingdb2?serverTimezone=UTC
spring.shardingsphere.datasource.m1.username=root
spring.shardingsphere.datasource.m1.password=root# 配置分布式主鍵生成器(雪花算法)
spring.shardingsphere.rules.sharding.key-generators.alg_snowflake.type=SNOWFLAKE
# 設置雪花算法的worker-id,用于分布式環境下避免ID沖突
spring.shardingsphere.rules.sharding.key-generators.alg_snowflake.props.worker-id=1# 為course表配置主鍵生成策略:使用cid字段作為主鍵,并采用雪花算法生成
spring.shardingsphere.rules.sharding.tables.course.key-generate-strategy.column=cid
spring.shardingsphere.rules.sharding.tables.course.key-generate-strategy.key-generator-name=alg_snowflake# 配置course表的實際數據節點:分布在m0和m1兩個數據庫中,每個庫有course_1和course_2兩個表
spring.shardingsphere.rules.sharding.tables.course.actual-data-nodes=m$->{0..1}.course_$->{1..2}# 配置分庫策略:采用標準分片策略,使用cid字段作為分片鍵
spring.shardingsphere.rules.sharding.tables.course.database-strategy.standard.sharding-column=cid
# 指定分庫算法名稱為course_db_alg
spring.shardingsphere.rules.sharding.tables.course.database-strategy.standard.sharding-algorithm-name=course_db_alg# 配置分庫算法:使用MOD取模算法,分成2個庫
spring.shardingsphere.rules.sharding.sharding-algorithms.course_db_alg.type=MOD
spring.shardingsphere.rules.sharding.sharding-algorithms.course_db_alg.props.sharding-count=2# 配置分表策略:采用標準分片策略,使用cid字段作為分片鍵
spring.shardingsphere.rules.sharding.tables.course.table-strategy.standard.sharding-column=cid
# 指定分表算法名稱為course_tbl_alg
spring.shardingsphere.rules.sharding.tables.course.table-strategy.standard.sharding-algorithm-name=course_tbl_alg# 配置分表算法:使用INLINE表達式分表算法
spring.shardingsphere.rules.sharding.sharding-algorithms.course_tbl_alg.type=INLINE
# 分表表達式:根據cid取模2再加1,結果將為1或2,對應course_1和course_2表
spring.shardingsphere.rules.sharding.sharding-algorithms.course_tbl_alg.props.algorithm-expression=course_$->{cid%2+1}# 當前配置使用雪花算法生成cid,但雪花算法生成的ID不是嚴格遞增的
# 如果需要更均勻的數據分布,可以改用自定義的MYSNOWFLAKE算法并調整分表表達式,((cid+1)%4).intdiv(2)+1 可以將數據更均勻分布到4個分片中
#spring.shardingsphere.rules.sharding.sharding-algorithms.course_tbl_alg.props.algorithm-expression=course_$->{((cid+1)%4).intdiv(2)+1}
上面配置中用到了 Groovy 表達式,比如
m$->{0..1}.course_$->{1..2}、course_$->{cid % 2 + 1}數據節點表達式:
m$->{0..1}.course_$->{1..2},這個表達式定義了物理表在數據庫中的實際分布位置,即“數據節點”;-
結構解析:
-
m和course_是靜態的字符串前綴; -
$->{0..1}是一個Groovy范圍表達式,動態生成一個序列; -
中間的
.是字面意義上的點,用于分隔數據庫名和表名;
-
-
Groovy范圍表達式
{0..1}:- 在Groovy中,
{0..1}表示生成一個從0開始到1結束的整數序列,即[0, 1]; - 同理,
{1..2}生成的序列是[1, 2];
- 在Groovy中,
-
ShardingSphere會解析這個表達式,進行笛卡爾積計算,生成所有可能的數據節點組合。最終,這個表達式解析出的物理表有:
m0.course_1(數據庫m0中的表course_1)m0.course_2(數據庫m0中的表course_2)m1.course_1(數據庫m1中的表course_1)m1.course_2(數據庫m1中的表course_2)
總結:這條配置告訴ShardingSphere,邏輯表
course的數據實際上被分散存儲在 2個數據庫(m0, m1) 且每個數據庫中有 2張表(course_1, course_2),總共 4個物理分片 中;分片算法表達式:
course_$->{cid % 2 + 1},這個表達式是一個分片策略算法,它定義了如何根據某個字段的值(分片鍵)來計算出一條數據應該被路由到哪個具體的物理表;-
結構解析:
course_是靜態的字符串前綴,是目標表名的前半部分;$->{cid % 2 + 1}是一個Groovy算法表達式,會根據每行數據的cid值進行動態計算,得出表名的后綴部分;
-
Groovy算法表達式
{cid % 2 + 1}:cid:這是我們的數據中的分片鍵字段的值(例如:1001,1002);%:是取模(求余數)運算符。cid % 2的意思是計算cid的值除以2后的余數。結果只能是0或1;+ 1:將取模的結果加1;
-
代入不同的
cid值來計算一下:- 如果
cid = 4:4 % 2 = 0->0 + 1 = 1-> 最終表名為course_1 - 如果
cid = 7:7 % 2 = 1->1 + 1 = 2-> 最終表名為course_2 - 如果
cid = 10:10 % 2 = 0->0 + 1 = 1-> 最終表名為course_1 - 如果
cid = 15:15 % 2 = 1->1 + 1 = 2-> 最終表名為course_2
- 如果
總結:這條配置定義了一個簡單的取模分表算法。它根據主鍵
cid的奇偶性來決定數據存放在course_1(cid為偶數) 還是course_2(cid為奇數) 表中。+1的操作是為了讓結果從(0,1)映射到(1,2),以匹配我們之前定義的物理表名course_1和course_2; -
-
執行同
1.1 搭建基礎 JDBC 應用一樣的測試案例,就可以看到:執行addcourse方法時,十條課程信息會根據cid(課程 ID)的奇偶性,被拆分到m0.course_1和m1.course_2兩張表中。從日志能看到實際執行的 SQL 語句,比如向course_2或course_1插入數據;根據配置文件,十條課程信息按
cid奇偶性拆分到m0.course_1和m1.course_2的全過程如下:-
系統使用雪花算法生成
cid(主鍵),配置了兩個數據源:m0(對應數據庫shardingdb1)和m1(對應數據庫shardingdb2),每個數據源中存在course_1和course_2兩張物理表; -
分庫決策(確定存儲到 m0 還是 m1):當系統執行添加課程操作時,會按以下步驟決定數據存儲位置:
-
生成
cid,雪花算法自動生成cid值(分布式唯一ID),假設生成的值為123456 -
根據分庫算法:
MOD(取模算法),配置sharding-count=2; -
計算邏輯:
cid % 2。若結果為0:數據分配到m0數據源;若結果為1:數據分配到m1數據源; -
示例:
123456 % 2 = 0→ 選擇m0數據源;
-
-
分表決策(確定存儲到course_1還是course_2)
-
根據分表算法:
INLINE表達式,配置course_$->{cid%2+1}; -
計算邏輯:若
cid為偶數(cid%2=0):0+1=1→ 選擇course_1表;若cid為奇數(cid%2=1):1+1=2→ 選擇course_2表; -
示例:
123456 % 2 + 1 = 1→ 選擇course_1表;
-
-
最后這條
cid為123456的數據最終存儲到m0.course_1表。由于雪花算法生成的ID奇偶性大致各占一半,最終分布為:-
約5條偶數
cid數據 → 存儲到m0.course_1 -
約5條奇數
cid數據 → 存儲到m1.course_2
-

-
-
現在想把數據均勻分配到四張表,但目前只能分到兩張表。若要實現,需從數據(ID 生成規則)和分片算法兩方面調整;
- 若
cid是連續增長的,可把分片算法course_db_alg的計算表達式改為course_$->((cid+1)%4).intdiv(2)+1; - 但實際情況是,這里的
cid由 snowflake(雪花算法) 生成,而雪花算法生成的 ID 并非連續的,所以這個修改思路在當前場景下無法真正實現數據分到四張表,后續會在講解“分布式 ID”的相關內容中詳細分析原因。
- 若
2 核心概念
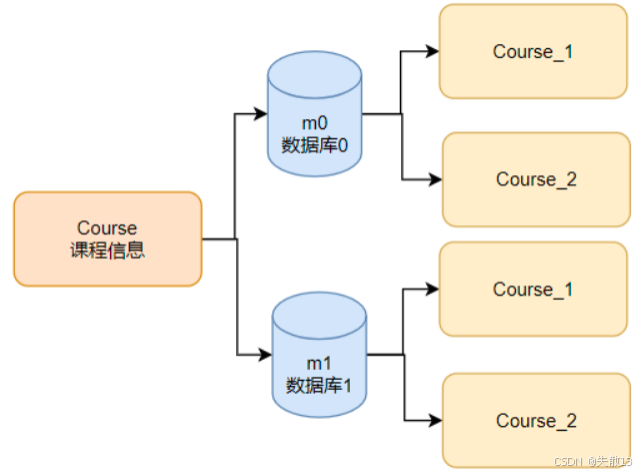
2.1 ShardingSphere 分庫分表的核心概念
- 表 :: ShardingSphere;
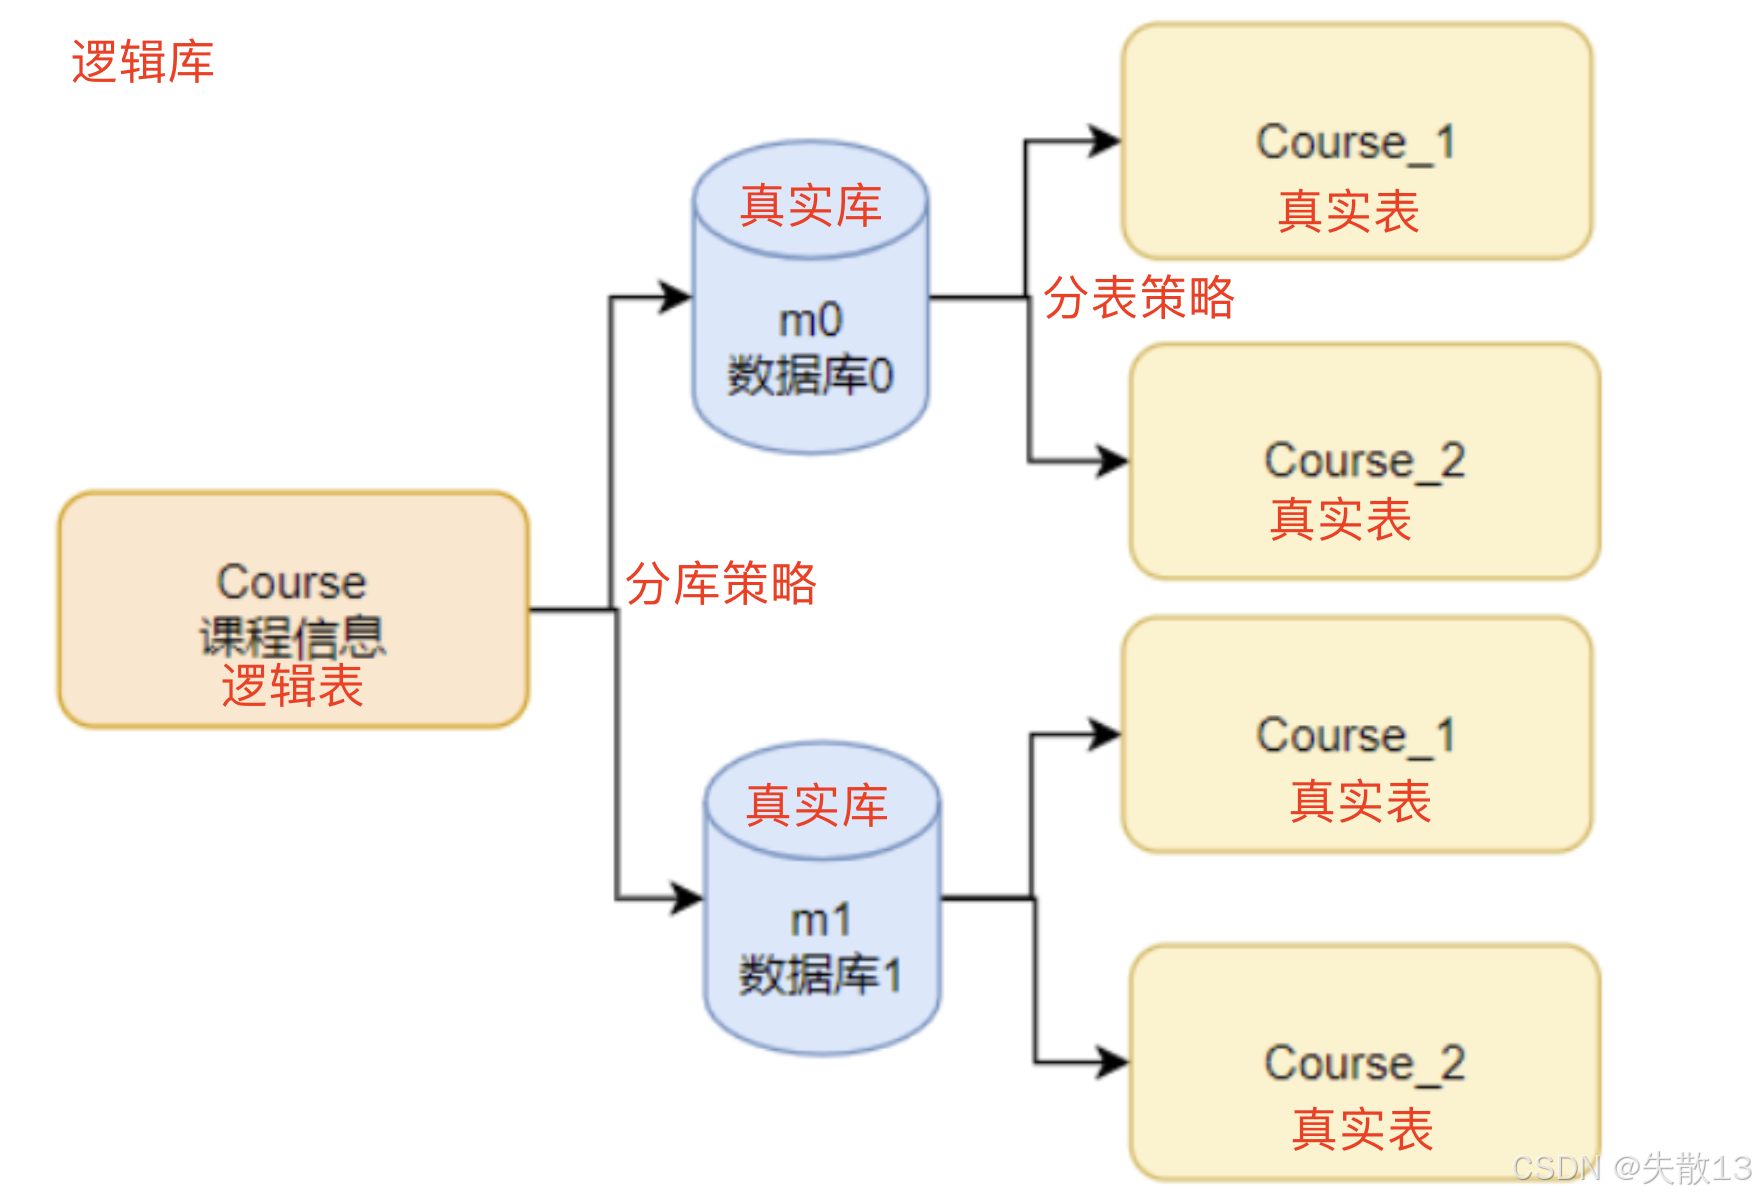
-
核心角色:
-
邏輯表(Logic Table):應用程序直接操作的表,圖中是
Course。它不需要在實際數據庫中真實存在,是對真實表的抽象; -
真實庫(Actual Database):實際存儲數據的數據庫,圖中有
m0和m1這兩個真實庫,它們被包含在 ShardingSphere 的數據源實例中,由 ShardingSphere 來決定實際上使用哪一個; -
真實表(Actual Table):實際存儲數據的表,圖中每個真實庫下有
Course_1和Course_2這兩個真實表。真實表與邏輯表結構需相同,可分布在不同真實庫中,應用維護邏輯表與真實表的對應關系;
-
-
分片策略的作用
-
分庫策略:決定邏輯表的數據如何分配到不同的真實庫中。通過分庫策略,ShardingSphere 確定在操作邏輯表時,具體使用哪個真實庫;
-
分表策略:決定邏輯表的數據如何分配到真實庫內的不同真實表中。借助分表策略,ShardingSphere 能確定在某個真實庫中,具體使用哪個真實表;
-
-
以操作
Course邏輯表為例:- 應用程序向
Course邏輯表發起操作請求; - 分庫策略生效,ShardingSphere 根據分庫策略,從
m0和m1中選擇一個真實庫; - 進入選中的真實庫后,分表策略生效,ShardingSphere 再從該真實庫內的
Course_1和Course_2中選擇一個真實表; - 最終,操作實際作用于所選真實庫的所選真實表上;
- 應用程序向
-
其他關鍵概念
-
虛擬庫:ShardingSphere 提供的具備分庫分表功能的虛擬庫,是
ShardingSphereDataSource實例。應用程序只需像操作單數據源一樣訪問它,示例中 MyBatis 框架使用的就是 ShardingSphere 的DataSource; -
分布式主鍵生成算法:用于為邏輯表生成唯一主鍵。因為邏輯表數據分布在多個真實表,單表索引無法保證主鍵全局唯一,所以需要獨立的分布式主鍵生成算法,示例中用的是
SNOWFLAKE(雪花算法); -
分片策略的組成:分為分庫策略和分表策略,由分片鍵和分片算法組成。分片鍵是進行水平拆分的關鍵字段,分片算法則根據分片鍵確定對應的真實庫和真實表,示例中對
cid(課程 ID)取模就是一種分片算法。若 ShardingSphere 匹配不到合適分片策略,會進行全分片路由,這是效率最差的實現方式;
在
1.2 引入 ShardingSphere-JDBC 快速實現分庫分表配置文件中,分片鍵和分片算法的定義如下:分片鍵是用于決定數據分片(分庫或分表)的字段,當前配置中統一使用
cid作為分片鍵:-
分庫分片鍵:
cid-
配置位置:
spring.shardingsphere.rules.sharding.tables.course.database-strategy.standard.sharding-column=cid -
作用:通過
cid的值決定數據存儲到哪個數據庫(m0 或 m1)
-
-
分表分片鍵:
cid- 配置位置:
spring.shardingsphere.rules.sharding.tables.course.table-strategy.standard.sharding-column=cid - 作用:通過
cid的值決定數據存儲到對應數據庫中的哪個表(course_1 或 course_2)
- 配置位置:
分庫算法
-
算法名稱:
course_db_alg -
算法類型:
MOD(取模算法)- 配置位置:
spring.shardingsphere.rules.sharding.sharding-algorithms.course_db_alg.type=MOD
- 配置位置:
-
算法參數:
sharding-count=2(分 2 個庫)- 配置位置:
spring.shardingsphere.rules.sharding.sharding-algorithms.course_db_alg.props.sharding-count=2
- 配置位置:
-
計算邏輯:
cid % 2- 結果為
0→ 數據分配到m0庫 - 結果為
1→ 數據分配到m1庫
- 結果為
分表算法
-
算法名稱:
course_tbl_alg -
算法類型:
INLINE(表達式算法)- 配置位置:
spring.shardingsphere.rules.sharding.sharding-algorithms.course_tbl_alg.type=INLINE
- 配置位置:
-
算法表達式:
course_$->{cid%2+1}- 配置位置:
spring.shardingsphere.rules.sharding.sharding-algorithms.course_tbl_alg.props.algorithm-expression=...
- 配置位置:
-
計算邏輯:
cid為偶數時(cid%2=0)→0+1=1→ 數據分配到course_1表cid為奇數時(cid%2=1)→1+1=2→ 數據分配到course_2表
總結
- 分片鍵:全程使用
cid(課程 ID)作為分庫和分表的判斷依據; - 分庫算法:基于
MOD取模,將數據分到 2 個庫(m0、m1); - 分表算法:基于
INLINE表達式,在每個庫內將數據分到 2 個表(course_1、course_2)。
-
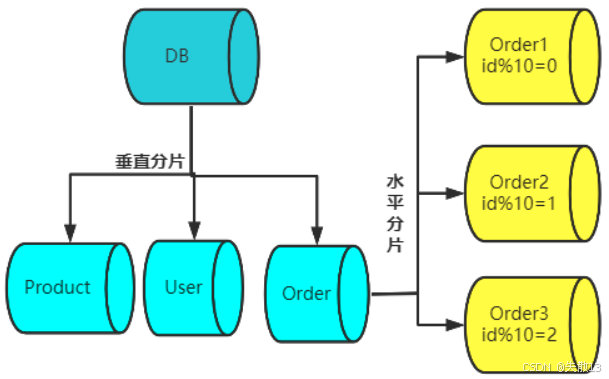
2.2 垂直分片和水平分片
-
在設計分庫分表方案時,有垂直分片和水平分片兩種拆分數據的維度,目的都是提高查詢效率;
-
垂直分片
-
核心邏輯:按照業務維度,把不同的表分到不同的庫中;
-
示例展示:原本有一個包含多類業務表(比如產品表、用戶表、訂單表等)的數據庫(上圖中的藍色大“DB”)。通過垂直分片,將產品相關表放到
Product庫、用戶相關表放到User庫、訂單相關表放到Order庫; -
作用:減少每個數據庫的數據量以及客戶端的連接數,從而提高查詢效率;
-
-
水平分片
-
核心邏輯:按照數據分布維度,把原本同一張表中的數據,拆分到多張子表中,每個子表只存儲一部分數據;
-
示例展示:以訂單表為例,原本訂單表在
Order庫中是一張大表。通過水平分片,依據訂單ID(id)取模的規則(如id%10=0分到Order1表、id%10=1分到Order2表、id%10=2分到Order3表等),將訂單數據拆分到Order1、Order2、Order3等多張子表中; -
作用:減少單張表的數據量,提升查詢效率;
-
-
通常我們說的分庫分表主要指水平分片,因為它能從根本上減少數據量,解決數據量過大帶來的存儲和查詢問題。但垂直分片方案也很重要,并非可以忽視。
3 ShardingSphere-JDBC常見數據分片策略
3.1 INLINE 簡單分片
-
INLINE 簡單分片主要用于處理針對分片鍵的
=和in這類查詢操作。在這些操作里,能獲取到分片鍵的精確值,進而通過表達式計算出可能的真實庫和真實表,ShardingSphere-JDBC 會把邏輯 SQL 轉化為對應的真實 SQL,并路由到真實庫中執行。例:/*** 針對分片鍵進行精確查詢,都可以使用表達式控制*/ @Test public void queryCourse() {QueryWrapper<Course> wrapper = new QueryWrapper<Course>();// 傳入分片鍵cid的具體值進行精確查詢wrapper.eq("cid",924770131651854337L);// 傳入分片鍵cid的多個值進行范圍查詢// wrapper.in("cid",901136075815124993L, 901136075903205377L, 901136075966119937L,5L);// 可以添加排序條件,不會影響分片邏輯// wrapper.orderByDesc("user_id");List<Course> courses = courseMapper.selectList(wrapper);courses.forEach(course -> System.out.println(course)); } -
ShardingSphere-JDBC 對查詢條件的關注重點
-
ShardingSphere-JDBC 關注的是過濾數據的關鍵查詢條件中是否包含分片鍵,而非簡單關注附加條件。比如在 SQL 語句后面加上
order by user_id,不會影響 ShardingSphere-JDBC 的處理過程。但如果查詢條件中不包含分片鍵,ShardingSphere-JDBC 就只能根據actual-nodes,到所有的真實表和真實庫中查詢,這就是全分片路由; -
對于全分片路由,ShardingSphere-JDBC 做了一定優化,比如通過
Union將同一庫的多條語句結合起來,減少與數據庫的交互次數。比如下面的日志示例,邏輯SQL會被轉化為針對不同真實庫(如m0、m1)下不同真實表(如course_1、course_2)的SELECT語句,再通過UNION ALL組合。不過在真實項目中,要盡力避免全分片路由,因為真實項目通常有幾十個甚至上百個分片,這種情況下進行全分片路由,效率會非常低;[INFO] ShardingSphere-SQL :Logic SQL: SELECT cid,cname,user_id,cstatus FROM course [INFO] ShardingSphere-SQL :Actual SQL: m0 ::: SELECT cid,cname,user_id,cstatus FROM course_1 UNION ALL SELECT cid,cname,user_id,cstatus FROM course_2 [INFO] ShardingSphere-SQL :Actual SQL: m1 ::: SELECT cid,cname,user_id,cstatus FROM course_1 UNION ALL SELECT cid,cname,user_id,cstatus FROM course_2
-
-
ShardingSphere-JDBC 只負責改寫和路由SQL,至于有沒有數據,它并不關心。
3.2 STANDARD 標準分片
-
在應用中,對于主鍵信息,不只是進行精確查詢,還需要進行范圍查詢(比如查詢
cid在某個區間內的數據),這時候就需要能同時支持精確查詢和范圍查詢的分片算法,即STANDARD標準分片; -
例:
@Test public void queryCourseRange(){//select * from course where cid between xxx and xxxQueryWrapper<Course> wrapper = new QueryWrapper<>();// 構建cid在799020473758714891到799020475802988351之間的范圍查詢條件wrapper.between("cid", 799020475735871489L, 799020475802980353L);List<Course> courses = courseMapper.selectList(wrapper);courses.forEach(course -> System.out.println(course)); } -
如果不修改分片算法,直接執行范圍查詢,ShardingSphere 無法根據配置的表達式計算出可能的分片情況,執行時會拋出異常。從報錯信息看,是因為
allow-range-query-with-inline-sharding屬性為false,內聯(INLINE)分片算法無法處理范圍查詢;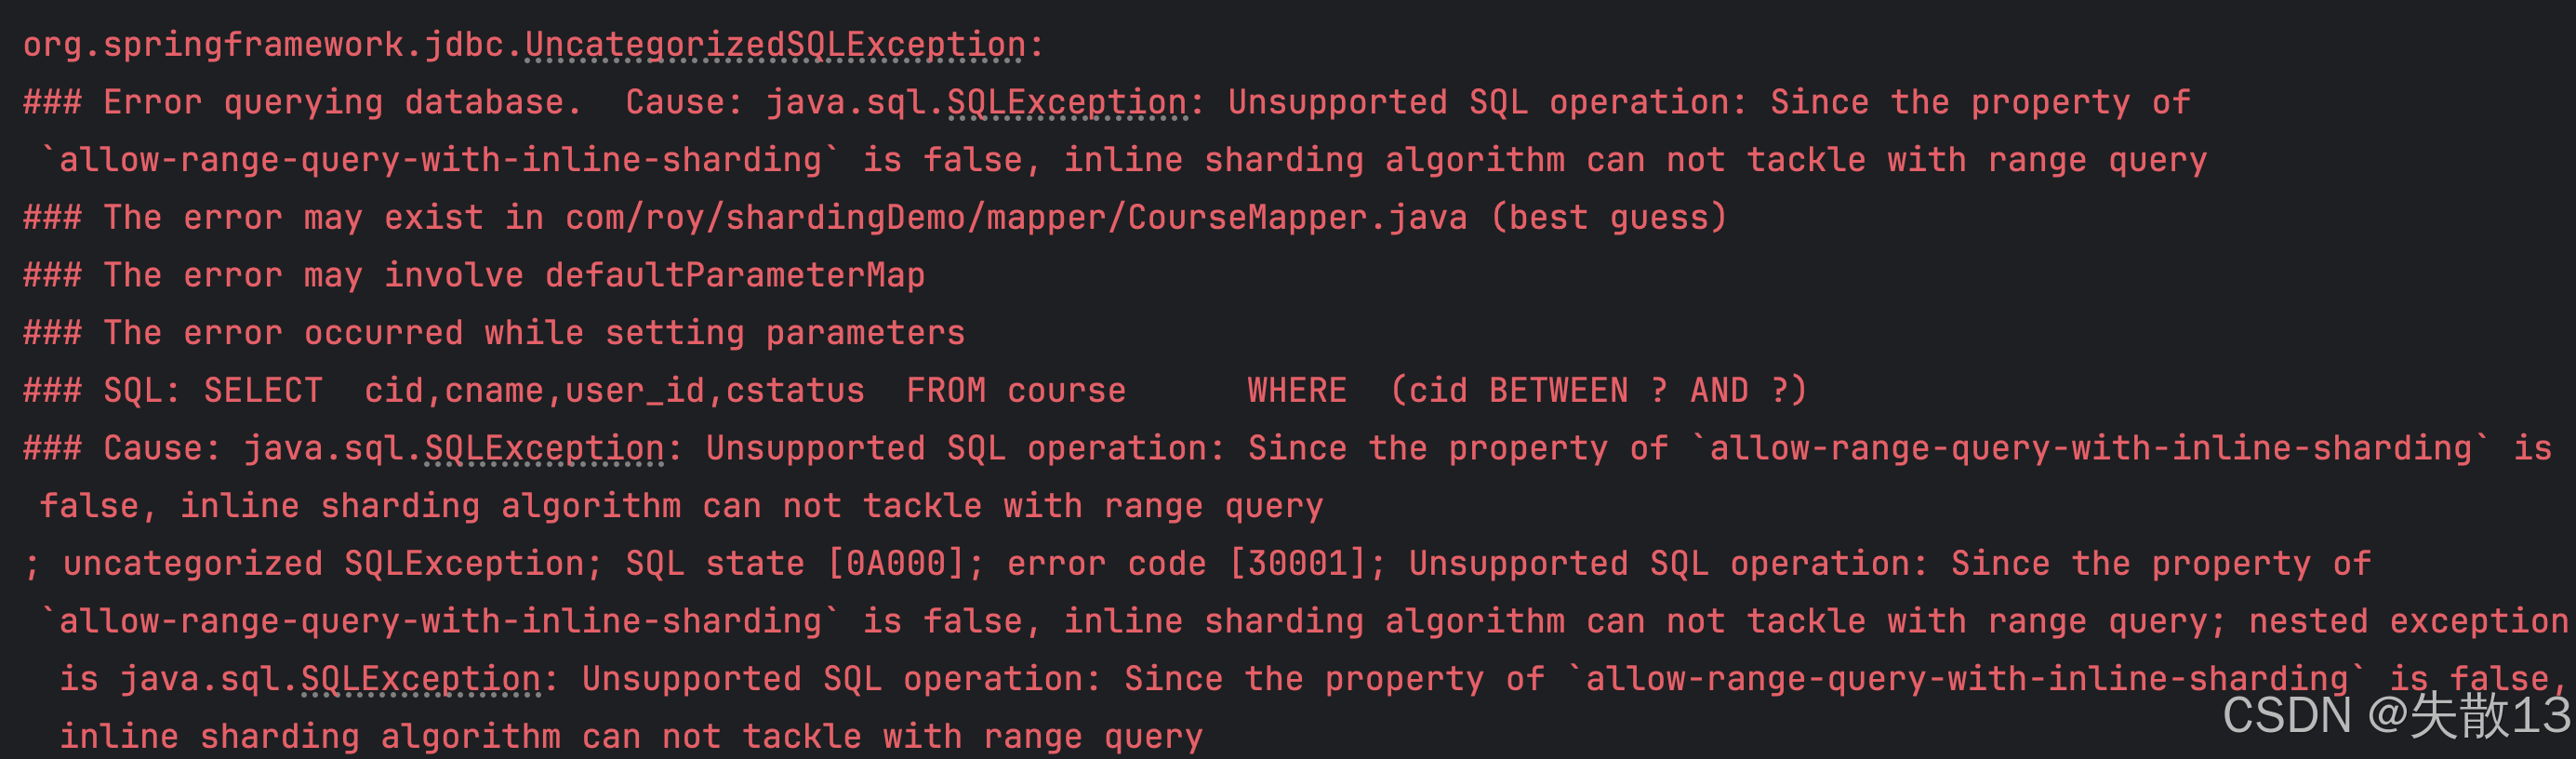
-
解決:修改配置文件,允許在內聯策略中使用范圍查詢
# 允許在inline策略中使用范圍查詢 spring.shardingsphere.rules.sharding.sharding-algorithms.course_tbl_alg.props.allow-range-query-with-inline-sharding=true -
加上該參數后,雖然可以進行范圍查詢,但觀察實際執行的 SQL(Actual SQL),會發現 SQL 還是按照全路由的方式執行,這種方式效率很低。那有沒有辦法通過查詢的執行范圍下限和范圍上限自己計算出目標真實庫和真實表呢?其實是支持的,不過這種范圍查詢要匹配的精確值太多,無法通過簡單的表達式來處理,后續的講解會解決這個問題。
3.3 COMPLEX_INLINE 復雜分片
-
除了針對單個分片鍵(如
cid)的查詢,實際應用中還可能需要針對多個屬性(比如同時涉及cid和user_id)進行組合查詢。例:@Test public void queryCourseComplexSimple(){// select * from couse where cid in (xxx) and user_id =xxxQueryWrapper<Course> wrapper = new QueryWrapper<Course>();wrapper.in("cid",851198095084486657L, 851198095139012609L); // cid的in查詢wrapper.eq("user_id", 1001L); // user_id的eq查詢wrapper.orderByDesc("user_id"); // 按user_id降序排序List<Course> course = courseMapper.selectList(wrapper);System.out.println(course); } -
上面的代碼是可以執行的,但是有一個小問題:
user_id查詢條件只能參與數據查詢,卻不能參與到分片算法中;- 數據庫中的測試數據的所有
user_id都是1001L,這是很明顯的分片規律,但如果user_id查詢條件不是1001L,我們知道不需要到數據庫中查詢就能知道不會有結果; - 所以希望
user_id也能參與到分片算法中,而之前的STANDARD策略無法滿足這個需求;
- 數據庫中的測試數據的所有
-
此時需要引入
COMPLEX_INLINE策略。具體操作是注釋掉之前給course表配置的分表策略,重新配置新的分表策略:# 指定分表策略為complex,即按多個分片鍵進行組合分表,設置分片鍵為cid和user_id spring.shardingsphere.rules.sharding.tables.course.table-strategy.complex.sharding-columns=cid,user_id # 指定分片算法名稱為course_tbl_alg spring.shardingsphere.rules.sharding.tables.course.table-strategy.complex.sharding-algorithm-name=course_tbl_alg # 配置分片算法類型為COMPLEX_INLINE spring.shardingsphere.rules.sharding.sharding-algorithms.course_tbl_alg.type=COMPLEX_INLINE # 設置算法表達式 spring.shardingsphere.rules.sharding.sharding-algorithms.course_tbl_alg.props.algorithm-expression=course_$->{(cid+user_id+1)%2+1} -
在這個配置中,可以使用
cid和user_id兩個字段聯合確定真實表。例如在查詢時,將user_id條件設定為1002L,此時不管cid傳什么值,都會路由到錯誤的表中,查不出數據,這就體現了user_id參與到分片算法后的效果。
3.4 CLASS_BASED 自定義分片
-
在涉及多屬性(如
cid和user_id)的組合查詢,且有特殊范圍查詢規則時,之前的COMPLEX_INLINE策略雖能支持范圍查詢,但無法用簡單表達式滿足復雜規則判斷。例:@Test public void queryCourdeComplex(){QueryWrapper<Course> wrapper = new QueryWrapper<Course>();// 精確查詢cid(課程 ID)在指定集合中的數據wrapper.in("cid", 799020475735871489L, 799020475802980353L);// 范圍查詢user_id在指定范圍的數據wrapper.between("user_id", 3L, 8L);List<Course> course = courseMapper.selectList(wrapper);System.out.println(course); }- 數據庫中的測試數據的所有
user_id都是1001L,那么希望在對user_id進行范圍查詢時,能夠提前判斷一些不合理的查詢條件,比如在對user_id進行between范圍查詢時,要求查詢的范圍必須包括 1001L 這個值。如果無法滿足該查詢規則,那么這個SQL語句的執行結果明顯不可能有數據。對于這樣的SQL,當然是希望他不要去數據庫里執行了。那么這樣的需求要怎么實現呢? - 雖然對于 COMPLEX_INLINE 策略,也支持添加
allow-range-query-with-inline-sharding參數讓他能夠支持分片鍵的范圍查詢,但是這時這種復雜的分片策略就顯得不夠用了,此時需要自定義分片算法;
- 數據庫中的測試數據的所有
-
要實現這樣的規則,需要編寫一個 Java 類實現 ShardingSphere 提供的
ComplexKeysShardingAlgorithm接口:public class MyComplexAlgorithm implements ComplexKeysShardingAlgorithm<Long> {private static final String SHARING_COLUMNS_KEY = "sharding-columns";private Properties props;// 配置的分片列private Collection<String> shardingColumns;@Overridepublic void init(Properties props) {this.props = props;this.shardingColumns = getShardingColumns(props);}/*** 復合分片鍵分片算法實現* @param availableTargetNames 所有可用的數據源或表名稱(在配置中定義的實際分片目標)* @param shardingValue 包含復合分片鍵信息的值對象,這里分片鍵類型為Long* @return 返回需要路由到的目標分片集合*/@Overridepublic Collection<String> doSharding(Collection<String> availableTargetNames, ComplexKeysShardingValue<Long> shardingValue) {// 從分片值中獲取cid列的精確值集合(IN查詢的值列表)Collection<Long> cidCol = shardingValue.getColumnNameAndShardingValuesMap().get("cid");// 從分片值中獲取user_id列的范圍查詢值(BETWEEN查詢的范圍)Range<Long> userIdRange = shardingValue.getColumnNameAndRangeValuesMap().get("user_id");// 提取范圍查詢的上下界Long lowerEndpoint = userIdRange.lowerEndpoint();Long upperEndpoint = userIdRange.upperEndpoint();// 檢查范圍查詢的有效性if(lowerEndpoint >= upperEndpoint){// 范圍無效:下限大于等于上限,拋出異常阻止無效查詢throw new UnsupportedShardingOperationException("empty record query","course");}else if(upperEndpoint<1001L || lowerEndpoint>1001L){// 范圍明確不包含特定值1001時,拋出異常阻止查詢throw new UnsupportedShardingOperationException("error range query param","course");}else{// 范圍包含1001時,按cid的奇偶性進行分片路由List<String> result = new ArrayList<>();String logicTableName = shardingValue.getLogicTableName(); // 獲取邏輯表名(如"course")// 遍歷所有cid值,根據奇偶性確定目標分片for (Long cidVal : cidCol) {// 計算分片后綴:cid為奇數時取1,偶數時取2(cid%2+1)String targetTable = logicTableName+"_"+(cidVal%2+1);// 確保計算出的分片在可用分片中存在if(availableTargetNames.contains(targetTable)){result.add(targetTable);}}return result;}}// 從配置屬性中獲取分片列配置(實際未在算法邏輯中使用)private Collection<String> getShardingColumns(final Properties props) {String shardingColumns = props.getProperty(SHARING_COLUMNS_KEY, "");return shardingColumns.isEmpty() ? Collections.emptyList() : Arrays.asList(shardingColumns.split(","));}public void setProps(Properties props) {this.props = props;}@Overridepublic Properties getProps() {return this.props;} }-
類中定義了一些常量和屬性,用于存儲分片列等配置信息;
-
核心的
doSharding方法中,會獲取user_id的范圍查詢上下限(lowerEndpoint和upperEndpoint); -
然后進行規則判斷,若范圍查詢的上下限不符合要求(比如不包含
1001L),就拋出UnsupportedShardingOperationException異常,阻止后續數據庫查詢操作;若符合要求,則根據cid的值計算目標分片表并返回;
-
-
接下來還需要修改配置文件,使用
CLASS_BASED分片算法:# 指定分片算法類型為CLASS_BASED spring.shardingsphere.rules.sharding.sharding-algorithms.course_tbl_alg.type=CLASS_BASED # 指定策略為COMPLEX spring.shardingsphere.rules.sharding.sharding-algorithms.course_tbl_alg.props.strategy=COMPLEX # 指定算法實現類為com.tl.shardingDemo.algorithm.MyComplexAlgoritm spring.shardingsphere.rules.sharding.sharding-algorithms.course_tbl_alg.props.algorithmClassName=com.tl.shardingDemo.algorithm.MyComplexAlgorithm -
這時,再去執行查詢方法,就會得到這樣的異常信息:

- 當執行包含不符合規則的
user_id范圍查詢的操作時,ShardingSphere會根據自定義算法拋出異常(如error range query param),阻止SQL發送到數據庫執行; - 這并非是出現錯誤,而是對數據庫性能的保護,因為
ShardingSphere模擬成獨立虛擬數據庫,內部執行異常會以SQLException形式拋出。
- 當執行包含不符合規則的
3.5 HINT_INLINE 強制分片
-
接下來需要查詢所有
cid為奇數的課程信息。按照 MyBatisPlus 的機制,可能會想到在CourseMapper中實現自定義 SQL 語句來進行查詢:public interface CourseMapper extends BaseMapper<Course> {@Select("select * from course where MOD(cid,2)=1")List<Long> unsupportSql(); } -
測試一下:
@Test public void unsupportTest(){//select * from course where mod(cid,2)=1List<Long> res = courseMapper.unsupportSql();res.forEach(System.out::println); } -
執行上述自定義 SQL 語句,執行結果本身沒問題,但分庫分表的問題出現了;
- 因為課程信息是按照
cid的奇偶分片的,理想情況下只需要查詢一個真實表即可,但由于這種基于虛擬列的查詢語句,ShardingSphere 很難解析出是按照cid分片進行查詢的,也不知道如何組織對應的策略進行分庫分表,所以只能進行性能最低的全路由查詢; - 而且實際上,ShardingSphere 無法正常解析的語句還有很多,分庫分表后,應用就難以進行多表關聯查詢、多層嵌套子查詢、
distinct查詢等各種復雜查詢了;
- 因為課程信息是按照
-
由于
cid的奇偶關系無法通過 SQL 語句正常體現,這時候就需要使用 ShardingSphere 提供的HINT強制路由分片策略。HINT強制路由可以用一種與 SQL 無關的方式進行分庫分表; -
注釋掉之前給
course表分配的分表算法,重新分配一個HINT_INLINE類型的分表算法:# 指定分表策略為 hint,并設置分片算法名稱為 course_tbl_alg spring.shardingsphere.rules.sharding.tables.course.table-strategy.hint.sharding-algorithm-name=course_tbl_alg # 配置分片算法類型為 HINT_INLINE spring.shardingsphere.rules.sharding.sharding-algorithms.course_tbl_alg.type=HINT_INLINE # 設置算法表達式為 course_$->{value} spring.shardingsphere.rules.sharding.sharding-algorithms.course_tbl_alg.props.algorithm-expression=course_$->{value} -
然后,在應用進行查詢時,使用 HintManager 給 HINT 策略指定 value 的值:
@Test public void queryCourseByHint(){// 獲取 HintManager 實例HintManager hintManager = HintManager.getInstance();// 然后調用 addTablesShardingValue 方法,強制指定查詢 course 表的 course_1 表(傳入參數 "course" 和 "1")hintManager.addTableShardingValue("course", "1");// 執行查詢操作List<Course> courses = courseMapper.selectList(null);courses.forEach(course -> System.out.println(course));// 關閉 HintManager 實例hintManager.close();// HintManager 關閉的主要作用是清除 ThreadLocal,釋放內存,也可以使用 try-resource 方式讓其用完自動關閉,即:// try(HintManager hintManager = HintManager.getInstance()){ xxxx } } -
這樣就可以讓SQL語句只查詢
course_1表,在當前場景下,也就相當于是實現了只查奇數cid的需求。
3.6 小結
-
分庫分表的本質是解決數據量大的問題,但不同業務場景下,數據的生成、查詢、增長模式差異極大,這決定了需要多種分片策略適配:
-
簡單場景:如按ID奇偶分表(
MOD策略)、按ID哈希后取模(HASH-MOD),適合數據均勻分布、查詢以ID為主的場景; -
復雜場景:
- 需同時用多個字段決定分片(如
cid+user_id組合,對應complex_inline策略); - 需支持范圍查詢(如按時間范圍分片,對應
standard策略); - 需繞過SQL解析直接指定分片(如特殊業務查詢,對應
hint_inline策略); - 需自定義業務規則(如按用戶地區+注冊時間分片,對應
CLASS_BASED擴展策略)。
- 需同時用多個字段決定分片(如
-
ShardingSphere 提供多種策略,正是為了覆蓋這些千差萬別的業務需求,讓分庫分表能在不同場景下落地;
-
-
數據庫(如MySQL)是成熟的獨立產品,能解析并執行幾乎所有標準SQL,但分庫分表中間件(如ShardingSphere)本質是模擬數據庫行為,存在天然局限:
-
SQL解析難度:復雜SQL(如多表關聯、嵌套子查詢、
distinct、group by跨分片)的分片鍵提取和路由邏輯極其復雜,中間件難以完美處理; -
性能代價:若SQL無法匹配分片策略(如缺少分片鍵的查詢),會觸發全分片路由(掃描所有分庫分表),性能極差;
-
因此,ShardingSphere無法像原生數據庫那樣支持所有SQL,必須依賴分片策略來優化路由;
-
-
一旦采用分庫分表,開發模式需從隨意寫SQL轉變為結合分片策略設計SQL:
-
寫SQL前需明確:是否包含分片鍵?用了哪種查詢方式(
IN/BETWEEN/范圍查詢)?是否匹配當前分片策略? -
避免使用中間件不支持的復雜SQL,必要時需拆分查詢或改用
hint等特殊策略;
-
-
簡言之,分庫分表帶來了性能提升,但代價是業務SQL需適配分片策略,不能再像操作單庫單表那樣隨心所欲。
4 數據加密功能
-
ShardingSphere 內置了多種加密算法,可以用來快速對關鍵數據(比如用戶的密碼)進行加密。使用 ShardingSphere 就可以用應用無感知的方式,快速實現數據加密,并且可以靈活切換多種內置的加密算法;
-
在
m0、m1數據庫中分別新建user_1和user_2兩張用戶表,來實現數據加密的功能:CREATE TABLE user (`userid` varchar(64) CHARACTER SET utf8 COLLATE utf8_general_ci NOT NULL,`username` varchar(32) CHARACTER SET utf8 COLLATE utf8_general_ci DEFAULT NULL,`password` varchar(64) CHARACTER SET utf8 COLLATE utf8_general_ci DEFAULT NULL,`password_cipher` varchar(64) CHARACTER SET utf8 COLLATE utf8_general_ci DEFAULT NULL,`userstatus` varchar(32) CHARACTER SET utf8 COLLATE utf8_general_ci DEFAULT NULL,`age` int(0) DEFAULT NULL,`sex` varchar(2) CHARACTER SET utf8 COLLATE utf8_general_ci DEFAULT NULL COMMENT 'F or M',PRIMARY KEY (`userid`) USING BTREE ) ENGINE = InnoDB CHARACTER SET = utf8 COLLATE = utf8_general_ci ROW_FORMAT = Dynamic;該表后續還可以用來測試字符串型主鍵的生成以及數據分片等功能,因此建議在
shardingdb1和shardingdb2兩個數據庫中也分別創建user_1和user_2兩個分片表; -
創建實體:
@TableName("user") public class User {private String userid;private String username;private String password;private String userstatus;private int age;private String sex;// getter ... setter ... } -
創建 mapper:
public interface UserCourseInfoMapper extends BaseMapper<UserCourseInfo> { } -
配置文件中配置
user表的加密算法:# 啟用SQL日志打印,在控制臺輸出ShardingSphere改寫后的真實SQL,用于調試 spring.shardingsphere.props.sql-show = true # 允許Bean定義覆蓋,解決多數據源等配置可能引起的Bean沖突問題 spring.main.allow-bean-definition-overriding = true# ---------------- 數據源配置 ---------------- # 定義兩個數據源的邏輯名稱 spring.shardingsphere.datasource.names=m0,m1# 配置第一個數據源m0的連接參數(使用Druid連接池) spring.shardingsphere.datasource.m0.type=com.alibaba.druid.pool.DruidDataSource spring.shardingsphere.datasource.m0.driver-class-name=com.mysql.cj.jdbc.Driver spring.shardingsphere.datasource.m0.url=jdbc:mysql://192.168.65.212:3306/shardingdb1?serverTimezone=Asia/Shanghai spring.shardingsphere.datasource.m0.username=root spring.shardingsphere.datasource.m0.password=root# 配置第二個數據源m1的連接參數(使用Druid連接池) spring.shardingsphere.datasource.m1.type=com.alibaba.druid.pool.DruidDataSource spring.shardingsphere.datasource.m1.driver-class-name=com.mysql.cj.jdbc.Driver spring.shardingsphere.datasource.m1.url=jdbc:mysql://192.168.65.212:3306/shardingdb2?serverTimezone=Asia/Shanghai spring.shardingsphere.datasource.m1.username=root spring.shardingsphere.datasource.m1.password=root#------------------------ 分布式序列算法配置 ------------------------ # 配置NANOID算法生成器,用于生成字符串類型的分布式主鍵(相比UUID更短且有序) spring.shardingsphere.rules.sharding.key-generators.user_keygen.type=NANOID # 為user表指定主鍵生成策略:使用userid字段,并采用NANOID算法生成值 spring.shardingsphere.rules.sharding.tables.user.key-generate-strategy.column=userid spring.shardingsphere.rules.sharding.tables.user.key-generate-strategy.key-generator-name=user_keygen#----------------------- 分片規則配置 ----------------------- # 配置user表的實際數據節點分布:分布在m0和m1兩個庫,每個庫有user_1和user_2兩張表 spring.shardingsphere.rules.sharding.tables.user.actual-data-nodes=m$->{0..1}.user_$->{1..2}# 配置分庫策略:使用標準分片策略,以userid字段作為分片鍵 spring.shardingsphere.rules.sharding.tables.user.database-strategy.standard.sharding-column=userid spring.shardingsphere.rules.sharding.tables.user.database-strategy.standard.sharding-algorithm-name=user_db_alg# 配置分庫算法:使用HASH_MOD哈希取模算法,分成2個庫 spring.shardingsphere.rules.sharding.sharding-algorithms.user_db_alg.type=HASH_MOD spring.shardingsphere.rules.sharding.sharding-algorithms.user_db_alg.props.sharding-count=2# 配置分表策略:使用標準分片策略,以userid字段作為分片鍵 spring.shardingsphere.rules.sharding.tables.user.table-strategy.standard.sharding-column=userid spring.shardingsphere.rules.sharding.tables.user.table-strategy.standard.sharding-algorithm-name=user_tbl_alg# 配置分表算法:使用INLINE表達式分表算法 spring.shardingsphere.rules.sharding.sharding-algorithms.user_tbl_alg.type=INLINE # 分表表達式:將數據分布到4個分片中(user_1, user_2) # 1. 對userid字符串取hashCode轉為整型 # 2. 對4取模,結果可能為0,1,2,3 # 3. 使用intdiv(2)進行整數除法,將4種結果映射為2種(0,1) # 4. 加1得到最終的表后綴(1,2) spring.shardingsphere.rules.sharding.sharding-algorithms.user_tbl_alg.props.algorithm-expression=user_$->{Math.abs(userid.hashCode()%4).intdiv(2) +1}# ---------------- 數據加密規則配置 ---------------- # 為user表的password字段配置加密規則 # 配置明文存儲字段(可選,用于加密解密過程中臨時存儲或兼容舊數據) spring.shardingsphere.rules.encrypt.tables.user.columns.password.plainColumn = password # 配置密文存儲字段(實際存儲加密后的密碼) spring.shardingsphere.rules.encrypt.tables.user.columns.password.cipherColumn = password_cipher # 指定使用的加密器名稱 spring.shardingsphere.rules.encrypt.tables.user.columns.password.encryptorName = user_password_encry# 配置SM3加密器(國密算法,密碼散列函數,不可逆加密) spring.shardingsphere.rules.encrypt.encryptors.user_password_encry.type=SM3 # 配置SM3加密的鹽值,增強安全性 spring.shardingsphere.rules.encrypt.encryptors.user_password_encry.props.sm3-salt=12345678 -
單元測試案例:
@Test public void addUser(){for (int i = 0; i < 10; i++) {User user = new User();user.setUsername("user"+i);user.setPassword("123qweasd");user.setUserstatus("NORMAL");user.setAge(30+i);user.setSex(i%2==0?"F":"M");userMapper.insert(user);} } -
在插入時,就會在
password_cipher字段中加入加密后的密文:
-
接下來針對
password字段的查詢,會轉化成為密文后,再去查詢。查詢案例:@Test public void queryUser() {QueryWrapper<User> queryWrapper = new QueryWrapper<>();queryWrapper.eq("password","123qweasd");List<User> users = userMapper.selectList(queryWrapper);for(User user : users){System.out.println(user);} }
5 讀寫分離實現
-
讀寫分離是應用中常用的保護數據庫的方案。其核心思路是將寫請求和讀請求分發到不同的數據庫(主庫
Master和從庫Slave),從而減少主庫的客戶端請求壓力;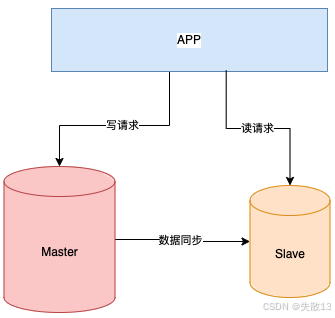
-
讀寫分離方案通常需要分兩個層面配合解決:
-
數據層面:需要將
Master的數據實時同步到Slave,這部分通常借助第三方工具(如Canal框架)或者數據庫自身提供的主從同步方案(如MySQL的主從同步)來實現; -
應用層面:要把讀請求和寫請求分發到不同的數據庫中,這本質是一種數據路由功能,使用
ShardingSphere來實現較為簡單,只需配置一個readwrite-splitting的分片規則即可;
-
-
以針對
user表的讀寫分離配置為例:# 啟用SQL日志打印,在控制臺輸出ShardingSphere執行的真實SQL,便于調試和監控 spring.shardingsphere.props.sql-show = true # 允許Bean定義覆蓋,解決多數據源配置時可能出現的Bean沖突問題 spring.main.allow-bean-definition-overriding = true# ---------------- 數據源配置 ---------------- # 定義兩個數據源的邏輯名稱:m0(主庫)和m1(從庫) spring.shardingsphere.datasource.names=m0,m1# 配置主庫數據源m0(使用Druid連接池) spring.shardingsphere.datasource.m0.type=com.alibaba.druid.pool.DruidDataSource spring.shardingsphere.datasource.m0.driver-class-name=com.mysql.cj.jdbc.Driver spring.shardingsphere.datasource.m0.url=jdbc:mysql://localhost:3306/coursedb?serverTimezone=UTC spring.shardingsphere.datasource.m0.username=root spring.shardingsphere.datasource.m0.password=root# 配置從庫數據源m1(使用Druid連接池) spring.shardingsphere.datasource.m1.type=com.alibaba.druid.pool.DruidDataSource spring.shardingsphere.datasource.m1.driver-class-name=com.mysql.cj.jdbc.Driver spring.shardingsphere.datasource.m1.url=jdbc:mysql://localhost:3306/coursedb2?serverTimezone=UTC spring.shardingsphere.datasource.m1.username=root spring.shardingsphere.datasource.m1.password=root#------------------------ 分布式序列算法配置 ------------------------ # 配置NANOID算法生成器,用于生成字符串類型的分布式主鍵(相比UUID更短且有序) spring.shardingsphere.rules.sharding.key-generators.user_keygen.type=NANOID # 為user表指定主鍵生成策略:使用userid字段作為主鍵,并采用NANOID算法生成值 spring.shardingsphere.rules.sharding.tables.user.key-generate-strategy.column=userid spring.shardingsphere.rules.sharding.tables.user.key-generate-strategy.key-generator-name=user_keygen#----------------------- 讀寫分離配置 ----------------------- # 配置user表的實際數據節點:指向讀寫分離的虛擬數據庫userdb中的user表 spring.shardingsphere.rules.sharding.tables.user.actual-data-nodes=userdb.user# 配置讀寫分離虛擬數據庫userdb:設置寫操作指向主庫m0,讀操作指向從庫m1 spring.shardingsphere.rules.readwrite-splitting.data-sources.userdb.static-strategy.write-data-source-name=m0 spring.shardingsphere.rules.readwrite-splitting.data-sources.userdb.static-strategy.read-data-source-names[0]=m1# 為讀寫分離數據源指定負載均衡器名稱 spring.shardingsphere.rules.readwrite-splitting.data-sources.userdb.load-balancer-name=user_lb# 配置負載均衡器:使用輪詢策略(按操作輪詢) # 每次讀請求會依次選擇不同的從庫,實現負載均衡 spring.shardingsphere.rules.readwrite-splitting.load-balancers.user_lb.type=ROUND_ROBIN# 其他可選的負載均衡策略: # 按事務輪詢:在同一事務中的所有讀請求都會路由到同一個從庫 #spring.shardingsphere.rules.readwrite-splitting.load-balancers.user_lb.type=TRANSACTION_ROUND_ROBIN# 隨機選擇從庫:每次讀請求隨機選擇一個從庫 #spring.shardingsphere.rules.readwrite-splitting.load-balancers.user_lb.type=RANDOM# 按事務隨機:在同一事務中的所有讀請求都會路由到同一個隨機選擇的從庫 #spring.shardingsphere.rules.readwrite-splitting.load-balancers.user_lb.type=TRANSACTION_RANDOM# 強制路由到主庫:所有讀請求都路由到主庫,適用于需要強一致性讀的場景 #spring.shardingsphere.rules.readwrite-splitting.load-balancers.user_lb.type=FIXED_PRIMARY -
執行對
user表的插入和查詢操作,從日志中就能體會到讀寫分離的實現效果,插入操作會路由到m0(寫數據源),查詢操作會路由到m1(讀數據源)。
6 廣播表與綁定表
- 表 :: ShardingSphere。
6.1 廣播表
-
廣播表是指在分庫分表的所有分片數據源中都存在的表,且每個數據庫里,該表的結構和數據完全一致,適用于數據量不大,但需要和海量數據的表做關聯查詢的場景;
-
建表:
CREATE TABLE dict (`dictId` bigint NOT NULL,`dictKey` varchar(32) NULL,`dictVal` varchar(32) NULL,PRIMARY KEY (`dictId`) ); -
創建實體:
@TableName("dict") public class Dict {private Long dictid;private String dictkey;private String dictval;// getter ... setter } -
創建 mapper:
public interface DictMapper extends BaseMapper<Dict> { } -
配置廣播規則:
# 啟用SQL日志打印,在控制臺輸出ShardingSphere執行的真實SQL,便于調試和監控 spring.shardingsphere.props.sql-show = true # 允許Bean定義覆蓋,解決多數據源配置時可能出現的Bean沖突問題 spring.main.allow-bean-definition-overriding = true# ---------------- 數據源配置 ---------------- # 定義兩個數據源的邏輯名稱:m0和m1 spring.shardingsphere.datasource.names=m0,m1# 配置數據源m0(使用Druid連接池) spring.shardingsphere.datasource.m0.type=com.alibaba.druid.pool.DruidDataSource spring.shardingsphere.datasource.m0.driver-class-name=com.mysql.cj.jdbc.Driver spring.shardingsphere.datasource.m0.url=jdbc:mysql://localhost:3306/coursedb?serverTimezone=UTC spring.shardingsphere.datasource.m0.username=root spring.shardingsphere.datasource.m0.password=root# 配置數據源m1(使用Druid連接池) spring.shardingsphere.datasource.m1.type=com.alibaba.druid.pool.DruidDataSource spring.shardingsphere.datasource.m1.driver-class-name=com.mysql.cj.jdbc.Driver spring.shardingsphere.datasource.m1.url=jdbc:mysql://localhost:3306/coursedb2?serverTimezone=UTC spring.shardingsphere.datasource.m1.username=root spring.shardingsphere.datasource.m1.password=root#------------------------ 分布式序列算法配置 ------------------------ # 配置SNOWFLAKE雪花算法生成器,用于生成長整型分布式主鍵 spring.shardingsphere.rules.sharding.key-generators.dict_keygen.type=SNOWFLAKE # 為dict表指定主鍵生成策略:使用dictId字段作為主鍵,并采用雪花算法生成值 spring.shardingsphere.rules.sharding.tables.dict.key-generate-strategy.column=dictId spring.shardingsphere.rules.sharding.tables.dict.key-generate-strategy.key-generator-name=dict_keygen#----------------------- 分片配置 ----------------------- # 配置dict表的實際數據節點:分布在m0和m1兩個庫中,每個庫都有一個名為dict的表 # 注釋掉的分表配置示例:如果需要進行分表,可以使用這種格式 m$->{0..1}.dict_$->{1..2} spring.shardingsphere.rules.sharding.tables.dict.actual-data-nodes=m$->{0..1}.dict# 將dict表配置為廣播表:廣播表會在所有分片庫中都存在完全相同的副本 # 對廣播表的任何寫操作(INSERT/UPDATE/DELETE)都會自動同步到所有庫的對應表中 # 查詢廣播表時,ShardingSphere會從任意一個庫中獲取數據(因為所有庫的數據都相同) spring.shardingsphere.rules.sharding.broadcast-tables=dict -
測試示例:
@Test public void addDict() {Dict dict = new Dict();dict.setDictkey("F");dict.setDictval("女");dictMapper.insert(dict);Dict dict2 = new Dict();dict2.setDictkey("M");dict2.setDictval("男");dictMapper.insert(dict2); } -
這樣,對于
dict表的操作就會被同時插入到兩個庫當中。
6.2 綁定表
-
綁定表指分片規則一致的一組分片表。使用綁定表進行多表關聯查詢時,必須使用分片鍵進行關聯,否則會出現笛卡爾積關聯或跨庫關聯,從而影響查詢效率;
-
下面另外創建一張用戶信息表,與用戶表一起來演示這種情況:
-
建表:
CREATE TABLE user_course_info (`infoid` bigint NOT NULL,`userid` varchar(32) NULL,`courseid` bigint NULL,PRIMARY KEY (`infoid`) ); -
創建實體、創建 mapper,省略;
-
配置分片規則:
# 啟用SQL日志打印,在控制臺輸出ShardingSphere執行的真實SQL,便于調試和監控 spring.shardingsphere.props.sql-show = true # 允許Bean定義覆蓋,解決多數據源配置時可能出現的Bean沖突問題 spring.main.allow-bean-definition-overriding = true# ---------------- 數據源配置 ---------------- # 定義單個數據源的邏輯名稱:m0(單庫多表架構) spring.shardingsphere.datasource.names=m0# 配置數據源m0(使用Druid連接池) spring.shardingsphere.datasource.m0.type=com.alibaba.druid.pool.DruidDataSource spring.shardingsphere.datasource.m0.driver-class-name=com.mysql.cj.jdbc.Driver spring.shardingsphere.datasource.m0.url=jdbc:mysql://localhost:3306/coursedb?serverTimezone=UTC spring.shardingsphere.datasource.m0.username=root spring.shardingsphere.datasource.m0.password=root#------------------------ 分布式序列算法配置 ------------------------ # 配置SNOWFLAKE雪花算法生成器,用于生成長整型分布式主鍵 spring.shardingsphere.rules.sharding.key-generators.usercourse_keygen.type=SNOWFLAKE # 為user_course_info表指定主鍵生成策略:使用infoid字段作為主鍵,并采用雪花算法生成值 spring.shardingsphere.rules.sharding.tables.user_course_info.key-generate-strategy.column=infoid spring.shardingsphere.rules.sharding.tables.user_course_info.key-generate-strategy.key-generator-name=usercourse_keygen# ---------------------- 配置真實表分布 ---------------------- # 配置user表的實際數據節點:在m0庫中分為user_1和user_2兩個物理表 spring.shardingsphere.rules.sharding.tables.user.actual-data-nodes=m0.user_$->{1..2} # 配置user_course_info表的實際數據節點:在m0庫中分為user_course_info_1和user_course_info_2兩個物理表 spring.shardingsphere.rules.sharding.tables.user_course_info.actual-data-nodes=m0.user_course_info_$->{1..2}# ---------------------- 配置分片策略 ---------------------- # 為user表配置分表策略:使用標準分片策略,以userid字段作為分片鍵 spring.shardingsphere.rules.sharding.tables.user.table-strategy.standard.sharding-column=userid spring.shardingsphere.rules.sharding.tables.user.table-strategy.standard.sharding-algorithm-name=user_tbl_alg# 為user_course_info表配置分表策略:使用標準分片策略,以userid字段作為分片鍵 spring.shardingsphere.rules.sharding.tables.user_course_info.table-strategy.standard.sharding-column=userid spring.shardingsphere.rules.sharding.tables.user_course_info.table-strategy.standard.sharding-algorithm-name=usercourse_tbl_alg# ---------------------- 配置分表算法 ---------------------- # 配置user表的分表算法:使用INLINE表達式分表算法 spring.shardingsphere.rules.sharding.sharding-algorithms.user_tbl_alg.type=INLINE # user表分表表達式:將數據分布到2個分片表(user_1, user_2) # 1. 對userid字符串取hashCode轉為整型 # 2. 對4取模,結果可能為0,1,2,3 # 3. 使用intdiv(2)進行整數除法,將4種結果映射為2種(0,1) # 4. 加1得到最終的表后綴(1,2) spring.shardingsphere.rules.sharding.sharding-algorithms.user_tbl_alg.props.algorithm-expression=user_$->{Math.abs(userid.hashCode()%4).intdiv(2) +1}# 配置user_course_info表的分表算法:使用INLINE表達式分表算法 spring.shardingsphere.rules.sharding.sharding-algorithms.usercourse_tbl_alg.type=INLINE # user_course_info表分表表達式:與user表使用相同的分片邏輯 # 確保相同userid的數據在兩個表中被路由到相同后綴的物理表 spring.shardingsphere.rules.sharding.sharding-algorithms.usercourse_tbl_alg.props.algorithm-expression=user_course_info_$->{Math.abs(userid.hashCode()%4).intdiv(2) +1}# 指定綁定表關系:user表和user_course_info表為綁定表 # 綁定表指的是具有相同分片規則且存在關聯關系的表 spring.shardingsphere.rules.sharding.binding-tables[0]=user,user_course_info -
然后把
user表的數據都清空,重新插入一些有對應關系的用戶和用戶信息表:@Test public void addUserCourseInfo(){for (int i = 0; i < 10; i++) {String userId = NanoIdUtils.randomNanoId();User user = new User();user.setUserid(userId);user.setUsername("user"+i);user.setPassword("123qweasd");user.setUserstatus("NORMAL");user.setAge(30+i);user.setSex(i%2==0?"F":"M");userMapper.insert(user);for (int j = 0; j < 5; j++) {UserCourseInfo userCourseInfo = new UserCourseInfo();userCourseInfo.setInfoid(System.currentTimeMillis()+j);userCourseInfo.setUserid(userId);userCourseInfo.setCourseid(10000+j);userCourseInfoMapper.insert(userCourseInfo);}} } -
接下來按照用戶ID進行一次關聯查詢。在
UserCourseInfoMapper中配置SQL語句:public interface UserCourseInfoMapper extends BaseMapper<UserCourseInfo> {@Select("select uci.* from user_course_info uci ,user u where uci.userid = u.userid")List<UserCourseInfo> queryUserCourse(); } -
查詢案例:
@Test public void queryUserCourseInfo(){List<UserCourseInfo> userCourseInfos = userCourseInfoMapper.queryUserCourse();for (UserCourseInfo userCourseInfo : userCourseInfos) {System.out.println(userCourseInfo);} } -
在進行查詢時,可以先把
application.properties文件中最后一行,綁定表的配置注釋掉。此時兩張表的關聯查詢將要進行笛卡爾查詢:Actual SQL: m0 ::: select uci.* from user_course_info_1 uci ,user_1 u where uci.userid = u.userid Actual SQL: m0 ::: select uci.* from user_course_info_1 uci ,user_2 u where uci.userid = u.userid Actual SQL: m0 ::: select uci.* from user_course_info_2 uci ,user_1 u where uci.userid = u.userid Actual SQL: m0 ::: select uci.* from user_course_info_2 uci ,user_2 u where uci.userid = u.userid -
這種查詢明顯性能是非常低的,如果兩張表的分片數更多,執行的SQL也會更多。而實際上,用戶表和用戶信息表,他們都是按照
userid進行分片的,他們的分片規則是一致的。再把綁定關系的注釋加上,此時查詢,就會按照相同的userid分片進行查詢:Actual SQL: m0 ::: select uci.* from user_course_info_1 uci ,user_1 u where uci.userid = u.userid Actual SQL: m0 ::: select uci.* from user_course_info_2 uci ,user_2 u where uci.userid = u.userid
7 分片審計
-
分片審計功能是針對數據庫分片場景下對執行的SQL語句進行審計操作。它既可以進行攔截操作,攔截系統配置的非法SQL語句,也可以對SQL語句進行統計操作;
-
目前ShardingSphere內置的分片審計算法只有一個,即
DML_SHARDING_CONDITIONS。它的功能是要求對邏輯表進行查詢時,必須帶上分片鍵; -
例如在之前的示例中,給
course表配置一個分片審計策略:# 指定審計器名稱為course_auditor spring.shardingsphere.rules.sharding.tables.course.audit-strategy.auditor-names[0]=course_auditor # 設置允許通過提示禁用審計 spring.shardingsphere.rules.sharding.tables.course.audit-strategy.allow-hint-disable=true # 配置審計器course_auditor的類型為DML_SHARDING_CONDITIONS spring.shardingsphere.rules.sharding.auditors.course_auditor.type=DML_SHARDING_CONDITIONS -
這樣配置后,再次執行之前使用
HINT策略(3.5 HINT_INLINE 強制分片)的示例時,就會報錯:
- 黃框內容:不允許在沒有分片條件的情況下執行DML操作,這是因為
DML_SHARDING_CONDITIONS算法檢測到查詢沒有帶上分片鍵,從而攔截了該非法SQL;
- 黃框內容:不允許在沒有分片條件的情況下執行DML操作,這是因為
-
當前這個
DML_SHARDING_CONDITIONS策略看起來用處好像不是很大,但 ShardingSphere 具有可插拔的設計,分片審計是一個擴展點,開發者可以自行擴展,從而實現很多有用的功能,比如根據業務需求定制更復雜的SQL審計規則等。


)


——微調Transformer語言模型進行回歸分析)

——系統包管理)


