圖像分割筆記
- 1、源碼下載
- 2、數據獲取
- 3、環境配置
- 4、模型訓練
- 5、模型推理
- 6、模型部署
- 6.1 yolov5_flask學習
- 7、版本上傳
1、源碼下載
git clone https://github.com/ultralytics/ultralytics.git
git回到對應版本:
方式一:使用 git checkout(臨時查看舊版本)
git checkout <commit-hash>
git checkout v8.3.170
方式二:使用 git reset(永久回退當前分支)
git reset --hard <commit-hash>
查看距離哪個標簽最近
# 查看某個提交的最近標簽
git describe abc1234# 只顯示標簽名(忽略距離)
git describe --tags --abbrev=0 abc1234# 查看當前提交的最近標簽
git describe
2、數據獲取
1、yolo官方分割數據集: https://docs.ultralytics.com/zh/datasets/segment/#ultralytics-yolo-format
https://github.com/ultralytics/assets/releases/download/v0.0.0/coco8-seg.zip
2、 自己標注數據集
通過網盤分享的文件:馬
鏈接: https://pan.baidu.com/s/1vX9WokV8Nx-MzHXZt8Ppnw?pwd=4xca 提取碼: 4xca
3、參考鏈接
(1)基于YOLOv11的語義分割模型訓練自己的數據集:
https://blog.csdn.net/qq_51828120/article/details/147215779
(2)基于yolo11-seg的水果桃子語義分割:
https://mp.weixin.qq.com/s/a2Ln_zGvO07lep5oJqhZ4w?login=from_csdn
2、人工標注數據集后轉yolo
2.1 文件夾劃分
datadir_preprocess.py
import os
import shutil# 原始文件夾路徑
source_folder = r"D:\songlin\data\8.圖像分割相關\馬"# 創建目標文件夾
json_folder = os.path.join(source_folder, "json")
image_folder = os.path.join(source_folder, "image")# 如果目標文件夾不存在,則創建
os.makedirs(json_folder, exist_ok=True)
os.makedirs(image_folder, exist_ok=True)# 遍歷文件夾中的所有文件
for filename in os.listdir(source_folder):file_path = os.path.join(source_folder, filename)# 如果是JSON文件,移動到json_files文件夾if filename.endswith(".json"):shutil.move(file_path, os.path.join(json_folder, filename))# 如果是圖片文件(常見格式),移動到image_files文件夾elif filename.lower().endswith(('.png', '.jpg', '.jpeg', '.bmp', '.gif')):shutil.move(file_path, os.path.join(image_folder, filename))print("文件分類完成!")
2.2 數據集格式處理
json2yolo_seg.py
import os
import json# 指定JSON文件夾路徑和YOLO保存文件夾路徑
json_folder = r"D:\songlin\data\8.圖像分割相關\馬\json"  # 替換為實際的JSON文件夾路徑
yolo_save_folder = r"D:\songlin\data\8.圖像分割相關\馬\yolo_txt"  # 替換為實際保存YOLO txt文件的文件夾name = ["horse"] #標簽名
# 如果保存文件夾不存在,創建它
if not os.path.exists(yolo_save_folder):os.makedirs(yolo_save_folder)# 將實例分割數據轉換為YOLO格式
def convert_to_yolo_format(json_data, image_width, image_height):yolo_data = []shapes = json_data['shapes']for shape in shapes:label = shape['label']points = shape['points']# 獲取分割邊界框的x和y的最大最小值x_coords = [p[0] for p in points]y_coords = [p[1] for p in points]x_min = min(x_coords)x_max = max(x_coords)y_min = min(y_coords)y_max = max(y_coords)# 計算中心點,寬度和高度(歸一化到[0, 1]范圍)x_center = (x_min + x_max) / 2 / image_widthy_center = (y_min + y_max) / 2 / image_heightbbox_width = (x_max - x_min) / image_widthbbox_height = (y_max - y_min) / image_height# 歸一化分割點normalized_points = [(x / image_width, y / image_height) for x, y in points]# 創建YOLO格式的字符串 (格式: class_id x_center y_center width height seg_points)if label not in name:name.append(label)class_id = name.index(label)yolo_format = f"{class_id} {x_center} {y_center} {bbox_width} {bbox_height} "# 添加分割坐標點yolo_format += " ".join([f"{x} {y}" for x, y in normalized_points])yolo_data.append(yolo_format)return yolo_data# 遍歷文件夾中的所有JSON文件
for filename in os.listdir(json_folder):if filename.endswith(".json"):json_path = os.path.join(json_folder, filename)with open(json_path, 'r', encoding='utf-8') as f:json_data = json.load(f)# 獲取圖像大小image_width = json_data['imageWidth']image_height = json_data['imageHeight']# 轉換為YOLO格式yolo_data = convert_to_yolo_format(json_data, image_width, image_height)# 保存為txt文件txt_filename = os.path.splitext(filename)[0] + ".txt"txt_save_path = os.path.join(yolo_save_folder, txt_filename)with open(txt_save_path, 'w', encoding='utf-8') as f:for line in yolo_data:f.write(line + "\n")print("轉換完成并保存為YOLO格式!")
3、 數據集劃分
import os
import shutil# 原始文件夾路徑
source_folder = r"D:\songlin\data\8.圖像分割相關\馬"# 創建目標文件夾
json_folder = os.path.join(source_folder, "json")
image_folder = os.path.join(source_folder, "image")# 如果目標文件夾不存在,則創建
os.makedirs(json_folder, exist_ok=True)
os.makedirs(image_folder, exist_ok=True)# 遍歷文件夾中的所有文件
for filename in os.listdir(source_folder):file_path = os.path.join(source_folder, filename)# 如果是JSON文件,移動到json_files文件夾if filename.endswith(".json"):shutil.move(file_path, os.path.join(json_folder, filename))# 如果是圖片文件(常見格式),移動到image_files文件夾elif filename.lower().endswith(('.png', '.jpg', '.jpeg', '.bmp', '.gif')):shutil.move(file_path, os.path.join(image_folder, filename))print("文件分類完成!")
參考鏈接:
1、https://blog.csdn.net/zqq19980906_/article/details/143092674
3、環境配置
conda create -n yolov11 python==3.8.10 -y
conda activate yolov11
pip install torch==2.4.1 torchvision==0.19.1 torchaudio==2.4.1 --index-url https://download.pytorch.org/whl/cu118
conda install cudatoolkit==11.8.0
# 找到cudnn地址,解壓進對應環境里的library文件夾下,將解壓后的cudnn文件夾直接復制進去替換
E:\software_install\miniconda\envs\yolov11\Library
pip install opencv-python tqdm pyyaml requests matplotlib pandas scipy
4、模型訓練
train.py
from ultralytics import YOLOif __name__ == '__main__':# model = YOLO(r'ultralytics/cfg/models/11/yolo11-seg.yaml')model = YOLO(r'yolo11n-seg.pt')model.train(data=r'data.yaml',imgsz=640,epochs=100,single_cls=True,batch=16,workers=10,device='0',)
5、模型推理
predict.py
import warnings
warnings.filterwarnings('ignore')
from ultralytics import YOLOif __name__ == '__main__':model = YOLO('runs/segment/train/weights/best.pt')model.predict(source=r'D:\songlin\data\8.圖像分割相關\馬\dataset\val\images\19302950_164550132000_2.jpg',imgsz=640,device='0',save=True,conf=0.25,line_width=4,box=True,show_labels=True,show_conf=True,retina_masks=True,show=True  # 新增,實時顯示預測結果窗口)
6、模型部署
6.1 yolov5_flask學習
1、 環境配置
conda create -n yolov5_flask python=3.8 -ypip install torch==2.2.0 torchvision==0.17.0 torchaudio==2.2.0 --index-url https://download.pytorch.org/whl/cu118pip install flask opencv-python pyyaml matplotlib scipy tqdm
下載yolov5_v3.0版本,這個不需要操作,yolov5版本不能setup.py安裝
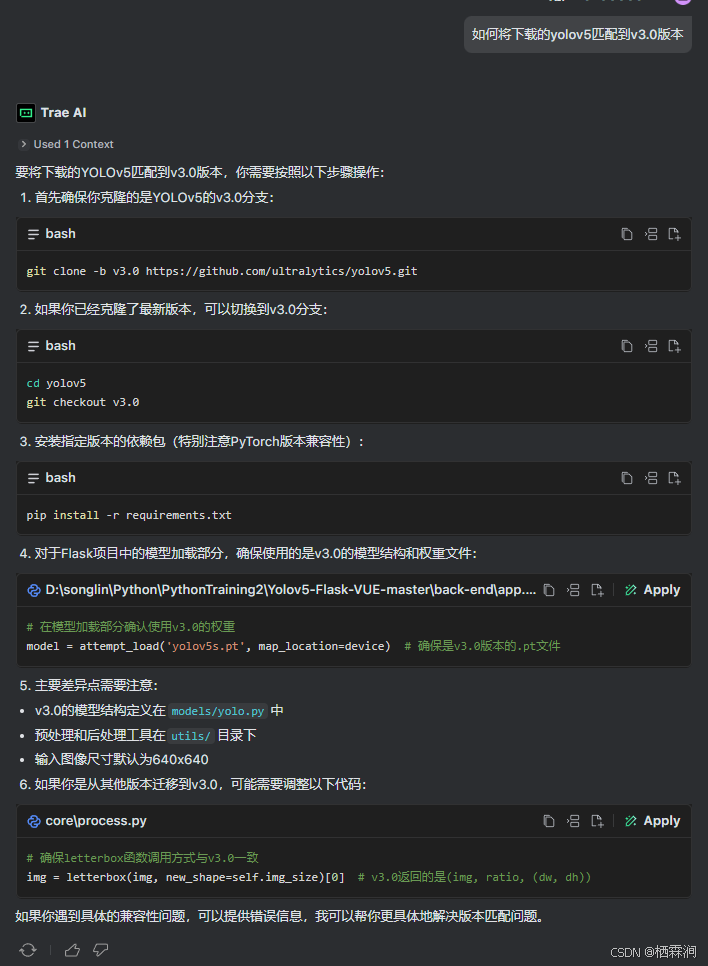
代碼存儲鏈接:https://gitee.com/songyulining/yolov5_flask_vue
2、npm前端環境配置
安裝Node.js
https://nodejs.org/zh-cn
安裝依賴
npm install
7、版本上傳
git remote set-url origin https://gitee.com/songyulining/yolov11_seg_run.git
git push origin HEAD:refs/heads/v8.3.170
clamAV工具離線查殺)


)


![[spring6: HttpSecurity]-全新寫法](http://pic.xiahunao.cn/[spring6: HttpSecurity]-全新寫法)

)


