pytest 使用
test_basic.py
Pytest 完全實戰手冊
一、核心概念與基礎
1、在pytest框架下運行測試用例,最基礎的一共有三點。
-
- 導入pytest的包
-
- 寫一個方法,或者類。后面運行的時候,相當于運行這個方法,或者類里的方法,無需單個調用。
-
- pycharm 里,python基礎工具,配置成pytest

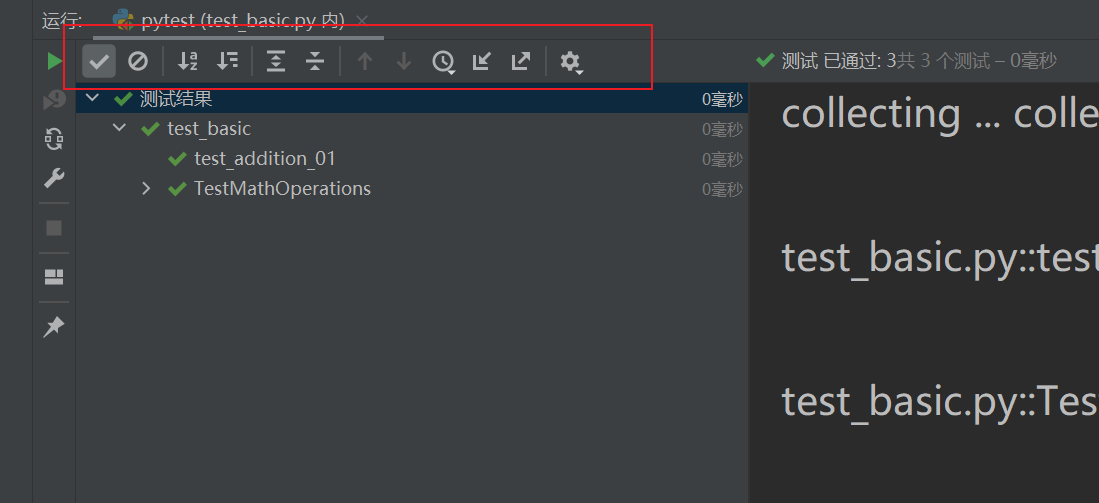
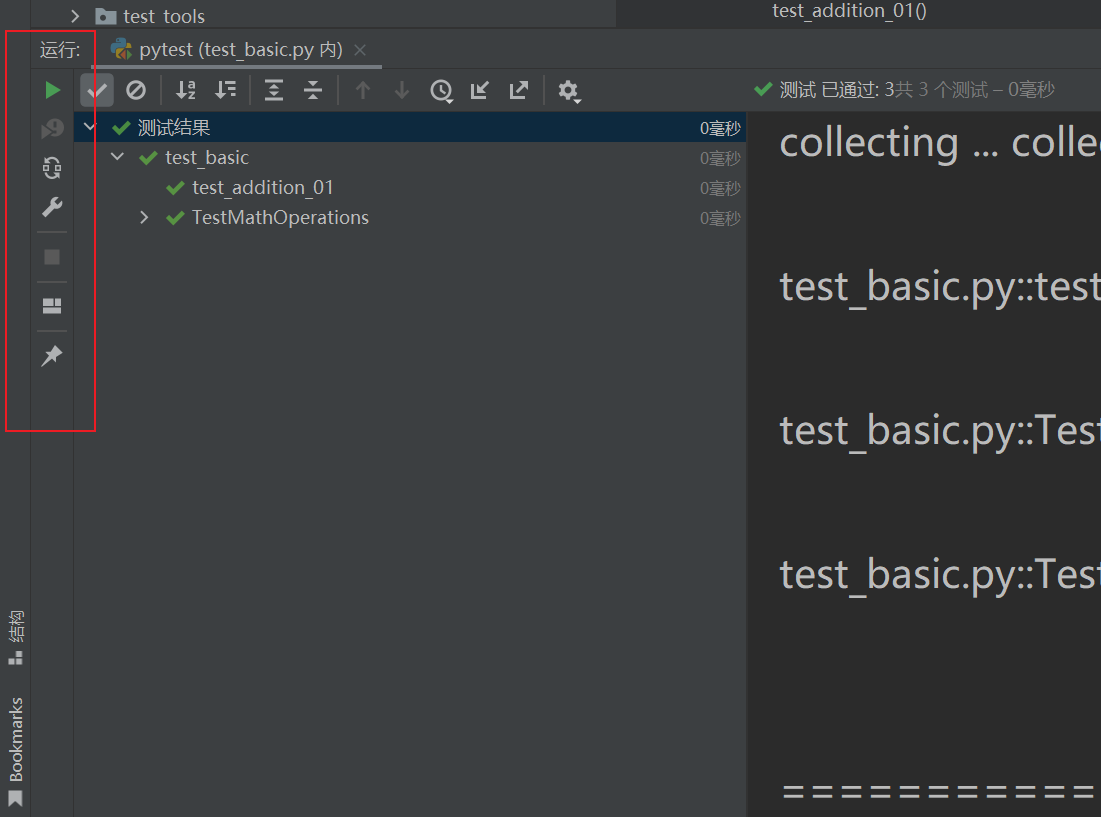
標紅的從左向右依次是:
- pycharm 里,python基礎工具,配置成pytest
-
對號表示可以查看所有通過的測試用例;
-
禁止號表示可以查看所有忽略的測試用例;
-
按a~z的順序排序;
-
按執行的時間排序;
-
展開所有結果 收起所有結果;
-
向上箭頭表示執行前一個失敗的用例;
-
向下箭頭表示執行下一個失敗的用例;
-
導出測試結果;
-
鐘表表示導入執行過的測試結果可選;
最后一個是工具選項。
從上到下依次是:
- 綠色的三角形 為運行測試方法;
- 重新運行失敗的測試用例;
- 切換自動測試;
- 配置運行環境
- 停止測試;
- 默認布局;
- 釘住窗口。
1.1 Pytest 特性
- 零繼承架構:測試類無需繼承任何基類
- 命名約定:
- 測試文件:
test_*.py或*_test.py - 測試類:
Test*開頭(推薦但非強制) - 測試方法:
test_*開頭
- 測試文件:
- 智能測試發現:自動收集符合命名規則的測試
- (1)從一個或多個目錄開始查找,可以在命令行指定文件名或目錄名。如果未指定,則使用當前目錄。
- (2)在該目錄和所有子目錄下遞歸查找測試模塊。
- (3)測試模塊指文件名為test_.py或_test.py的文件。
- (4)在測試模塊中查找以test_開頭的函數名。
- (5)查找名字以Test開頭的類,其中,首先篩選掉包含__init__函數的類,再查找以test_開頭類中的方法。
- 原生斷言:使用 Python 內置
assert語句
1.2 基本測試結構
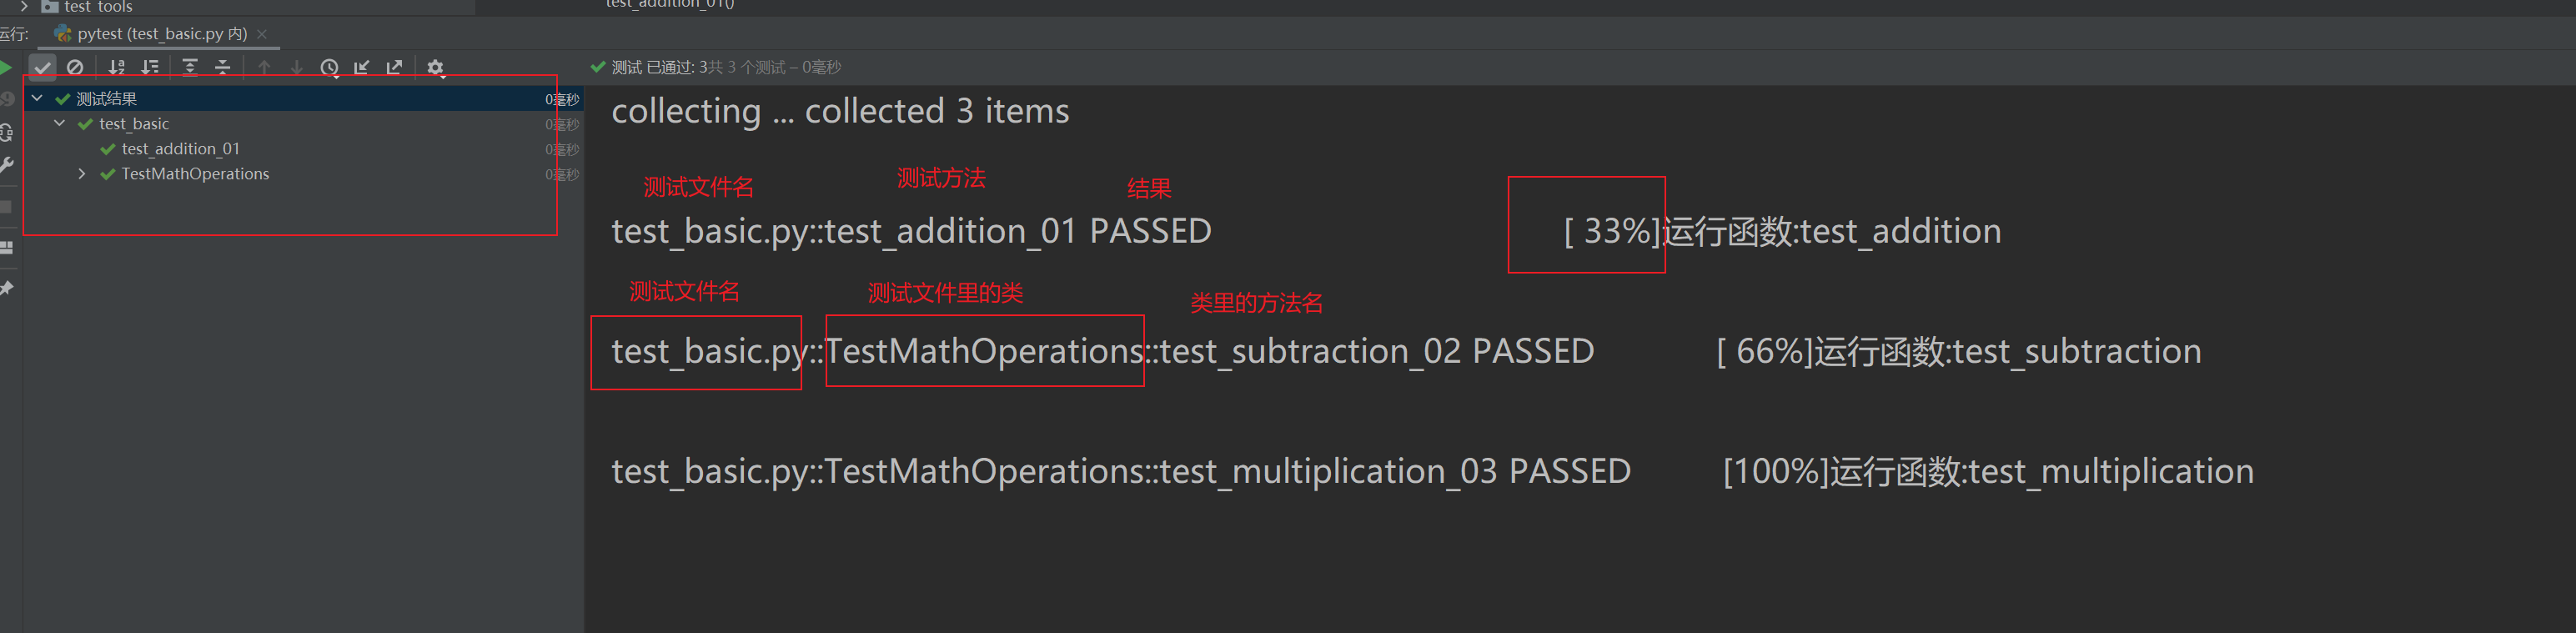
# test_basic.py
# -*- coding: utf-8 -*-
import pytest# 函數式測試
def test_addition_01():print("運行函數:test_addition")# 類式測試
class TestMathOperations:def test_subtraction_02(self):print("運行函數:test_subtraction")assert 5 - 3 == 2def test_multiplication_03(self):print("運行函數:test_multiplication")assert 2 * 3 == 6
結果:
二、測試執行控制
2.1 命令行核心參數
| 參數 | 作用 | 示例 |
|---|---|---|
-v | 詳細輸出 | pytest -v |
-s | 顯示打印輸出 | pytest -s |
-k | 關鍵字過濾 | pytest -k "add" |
-x | 遇錯即停 | pytest -x |
--maxfail=n | 最大失敗數 | pytest --maxfail=3 |
-n | 并發執行 | pytest -n 4 |
-q | 靜默模式 | pytest -q |
--collect-only | 只收集不執行 | pytest --collect-only |
2.2 精確執行控制
# 執行特定文件
pytest tests/calculator/test_basic.py# 執行特定類
pytest test_api.py::TestLogin# 執行特定方法
pytest test_db.py::TestUser::test_create_user# 組合定位
pytest tests/integration/test_payment.py::TestCreditCard::test_3ds_verification
2.3 通過代碼執行
# run_tests.py
import pytestif __name__ == "__main__":pytest.main(["-v", "--maxfail=2","tests/security/","tests/api/test_login.py::TestOAuth"])
三、高級測試組織
fixture是pytest特有的功能,它用@pytest.fixture標識,定義在函數前面。在編寫測試函數的時候,可以將此函數的名稱作為傳入參數,pytest會以依賴注入方式將該函數的返回值作為測試函數的傳入參數。 即被這個@pytest.fixture 裝飾的函數,相當于執行了一次。然后把這個函數返回的結果,返回給這個函數名。 所以這個函數名,可以直接作為一個值傳給另一個函數了。
3.1 夾具系統 (Fixtures)
3.1.1 夾具系統 (Fixtures) 基本功能 @pytest.fixture()
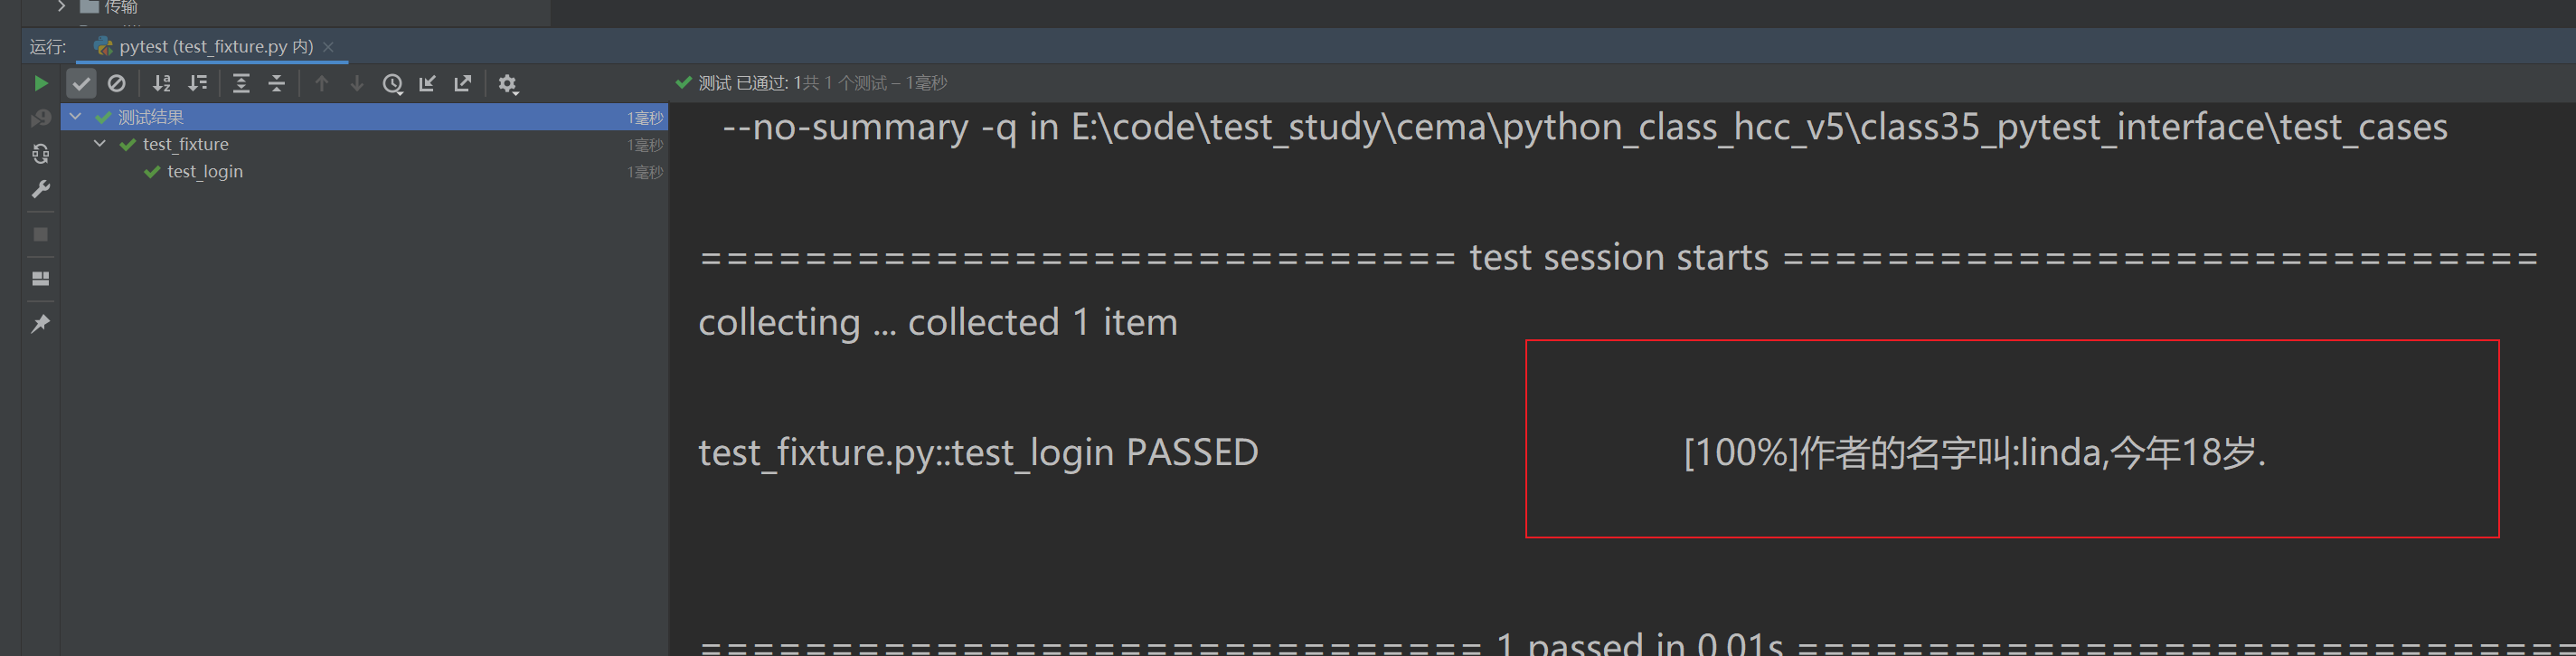
# -*- coding: utf-8 -*-
import pytest@pytest.fixture()
def data():test_data = {'name': 'linda', 'age': 18}return test_datadef test_login(data):name = data['name']age = data['age']print("作者的名字叫:{},今年{}歲.".format(name,age))
所以用這個裝飾后,有兩個作用。
-
1、第一個就是不用運行,直接用函數名,替代運行函數的操作。
-
2、第二個好處和第一個本質是一樣的,因為傳入函數名后,相當于直接執行了這個函數,所以,可以在這個函數里加上我們想要的前置操作。
-
3、如果是想后置操的話呢?參考下面的內容。
-
如果測試數據是從csv文件中讀取的,可以建立一個csv 文件,然后用一個函數去讀取整個文件的數據。
# userinfo.csv文件username,age
ming,19
qing,100
ting,55
# -*- coding: utf-8 -*-
import pytest
import csv@pytest.fixture()
def data():test_data = {'name': 'linda', 'age': 18}return test_data@pytest.fixture()
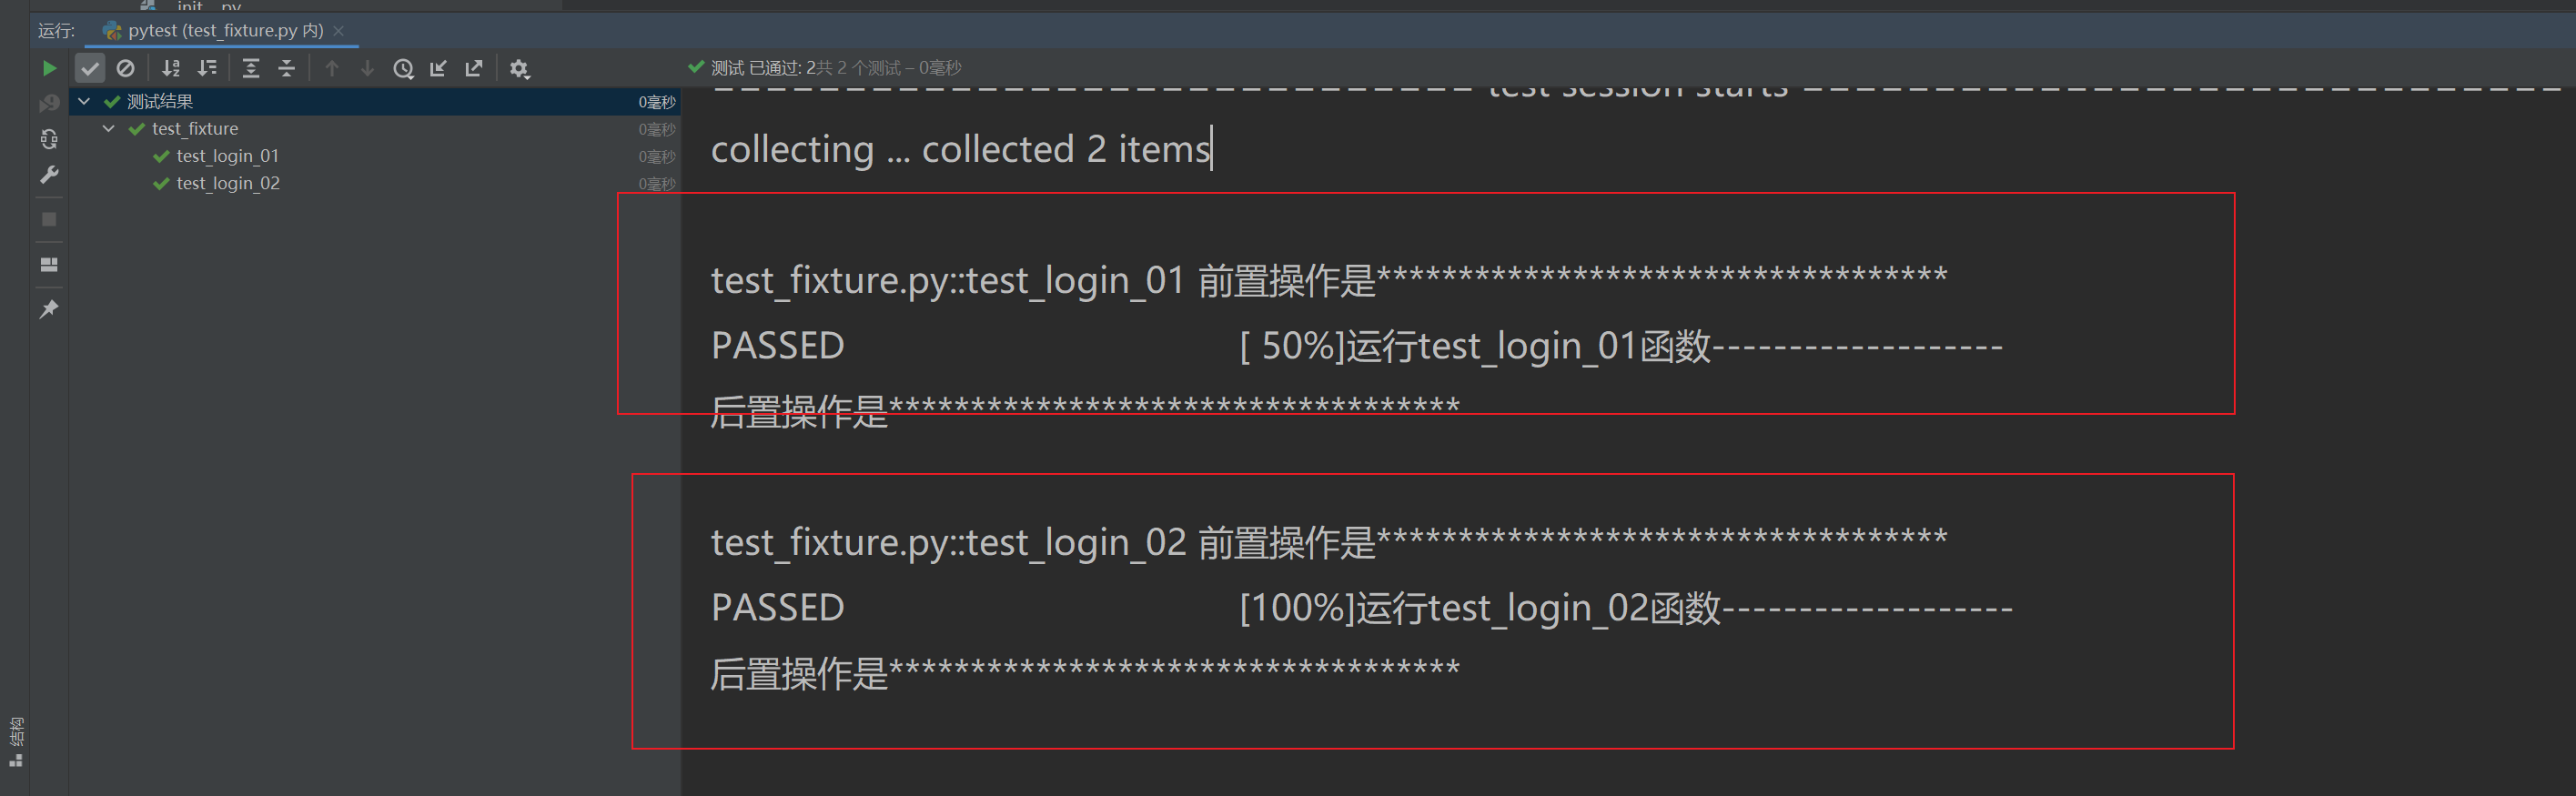
def read_data():with open('./userinfo.csv') as f:row = csv.reader(f, delimiter=',')next(row) # 不讀取行首,跳到下一行users = []for r in row:users.append(r) # 讀取的字段均為str類型。print("前置操作是***********************************") return usersdef test_login(read_data):name = read_data[0][0]age = read_data[0][1]print("作者的名字叫:{},今年{}歲.".format(name, age))
3.1.2 夾具系統 (Fixtures) 返回時,使用yield 代替return
- 上面使用的,裝飾后,直接調用函數名可以直接調用方法,也相當于前置操作。 如國想加上后置操作,可以用 yield (生成器)代替return 。
# -*- coding: utf-8 -*-
import pytest
import csv@pytest.fixture()
def data():test_data = {'name': 'linda', 'age': 18}print("前置操作是***********************************")yield test_dataprint("后置操作是***********************************")def test_login_01(data):print("運行test_login_01函數-------------------")def test_login_02(data):print("運行test_login_02函數-------------------")
3.1.3 夾具系統fixpipe, 去裝飾函數的時候,裝飾的范圍是什么。
通過從 fixture這個函數能看出:
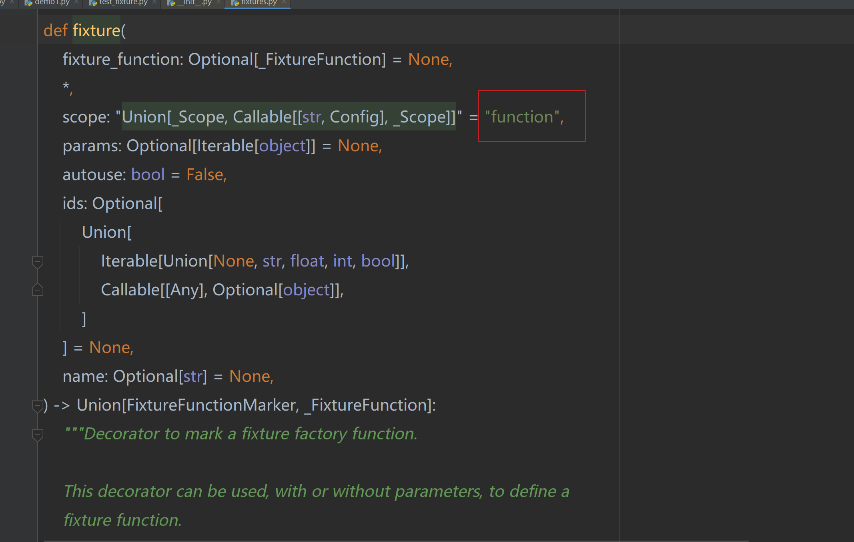
fixture(scope=“function”,params=None,autouse=False,ids=None,name=None):
scope有5個級別參數function(默認)?、class、module、package和session。
package被認為是實驗性的,不用關注。
- function:每個被裝飾的 函數或方法都會調用;
- class: 在一個個類里面的,一個類可以有多種方法,如果給每個函數和方法都裝飾上,這個只會裝飾一次。
# -*- coding: utf-8 -*-
import pytest
import csv@pytest.fixture(scope='class')
def data():test_data = {'name': 'linda', 'age': 18}print("前置操作是***********************************")yield test_dataprint("后置操作是***********************************")class Test_login():def test_login_01(self, data):print("運行test_login_01函數-------------------")def test_login_02(self, data):print("運行test_login_02函數-------------------")def test_login_03(self, data):print("運行test_login_03函數-------------------")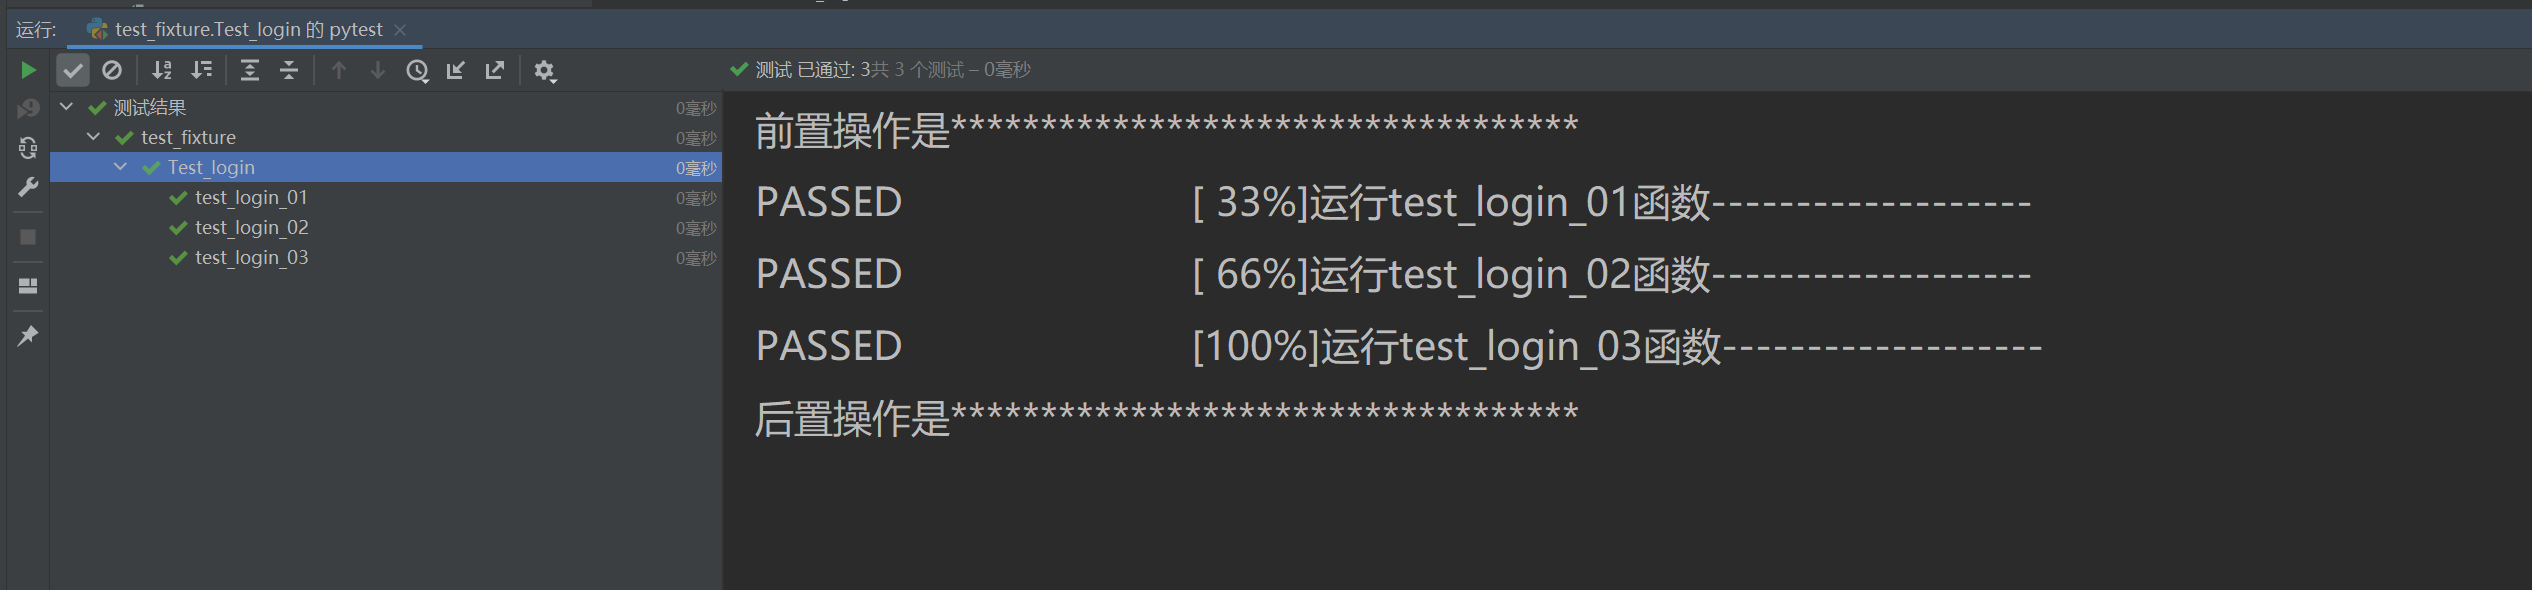
- module:同理每個.py文件調用一次,該文件內又有多個function和class;
- Session:同理多個文件調用一次,可以跨.py文件調用,每個.py文件就是module。
fixture為session級別是可以跨.py模塊調用的,也就是當有多個.py文件用例的時候,如果多個用例只需調用一次fixture,那就可以設置為scope=“session”。 這種我們會和conftest.py配合使用。
- 既然已經是跨模塊,需要在.py模塊之上。因此采用一個單獨的文件conftest.py(必須是這個文件名),文件名稱是固定的,pytest會自動識別該文件。放到工程的根目錄下就可以全局調用了,如果放到某個package包下,那就只在該package內有效。
- (1) 在本目錄下創建conftest.py文件(文件名必須是這個)?。
- (2) 將登錄模塊帶 @pytest.fixture寫在conftest.py文件中。
在執行過程中當讀到test_login_01時,如果在本用例中沒找到,則去本目錄下conftest.py中查找。如果找到就執行,如果找不到就報錯。同時其他工程師也可以在本目錄中新建文件,并使用test_login_01函數。
# -*- coding: utf-8 -*-
import pytest# 定義一個參數化 fixture
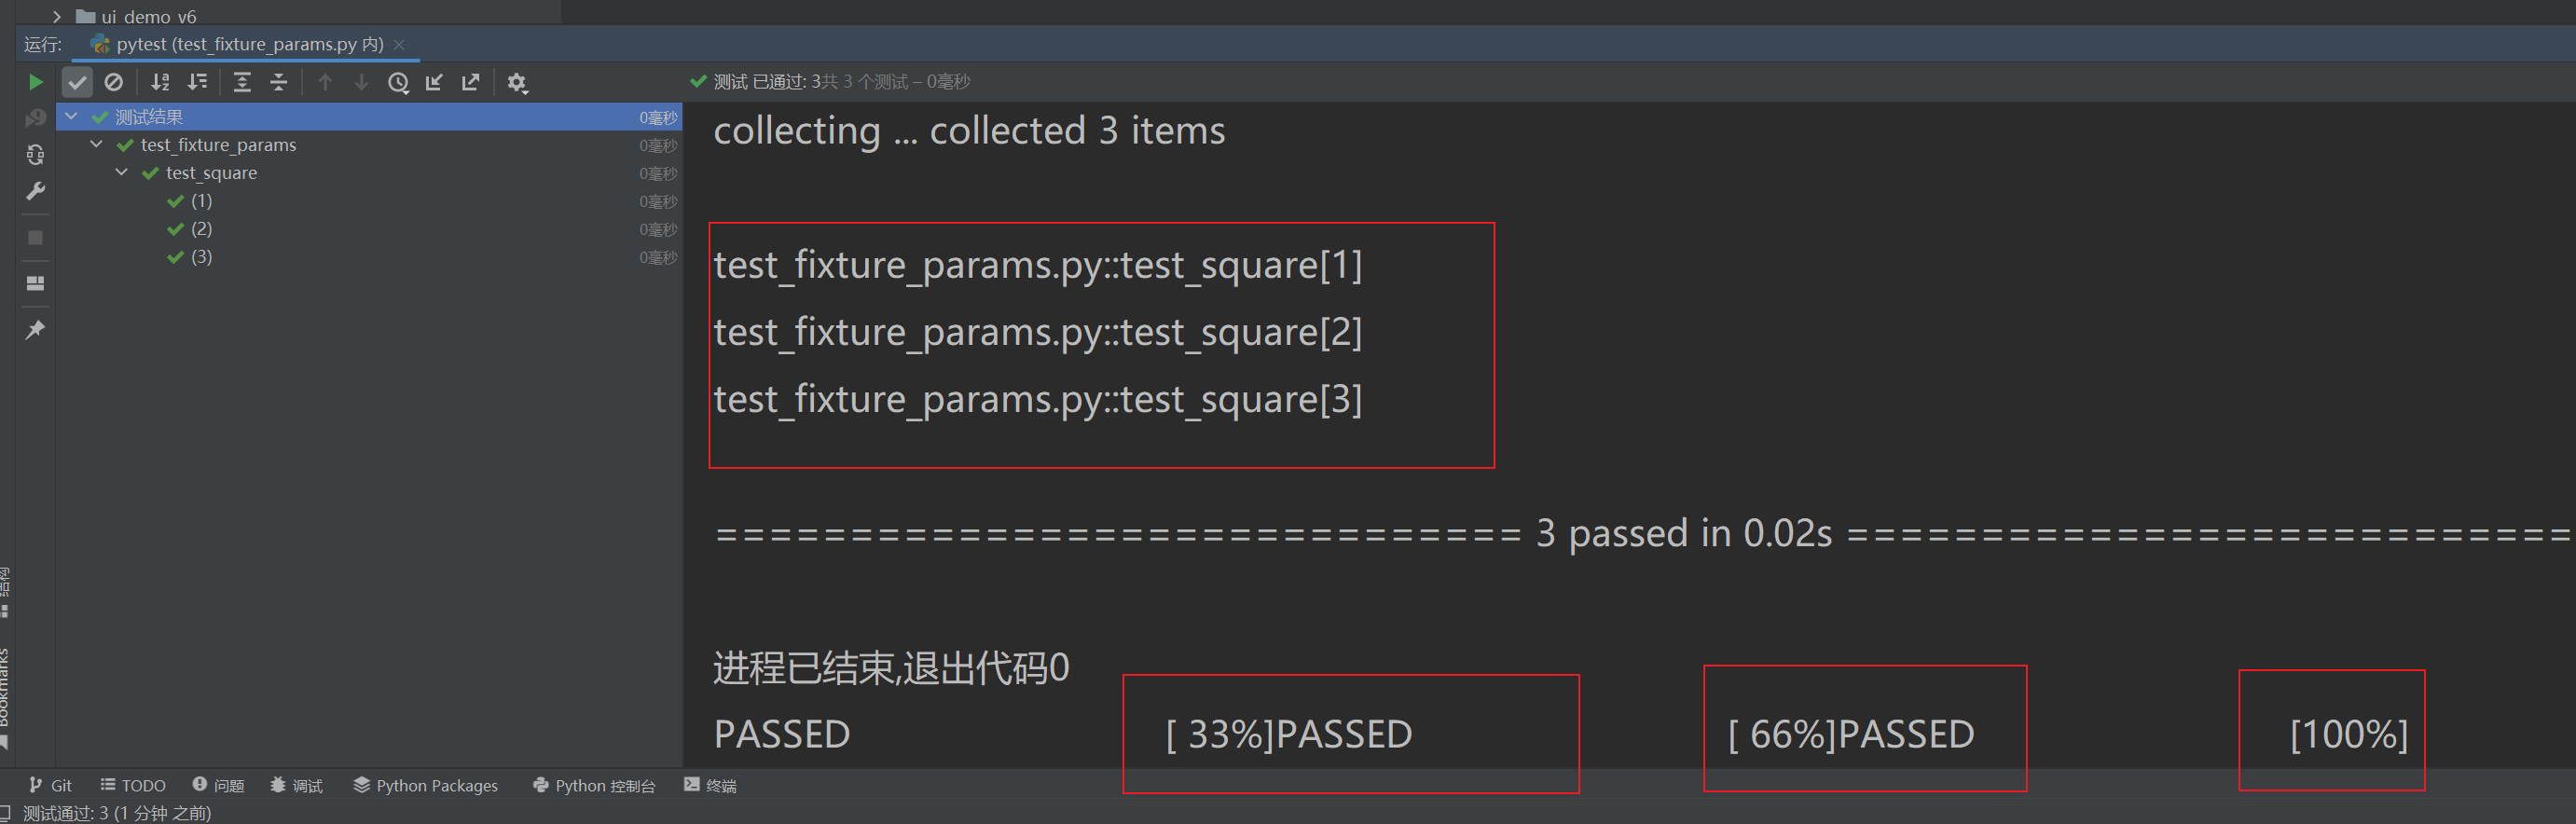
@pytest.fixture(params=[1, 2, 3])
def number(request):"""返回不同的數字"""return request.param # request.param 是當前參數值# 測試函數將運行三次(每個參數一次)
def test_square(number):assert number * number == number ** 2
關鍵概念
-
params參數:- 接受一個可迭代對象(列表、元組等)
- 每個元素代表一個測試參數
-
request內置 fixture:- 提供測試上下文信息
request.param訪問當前參數值
-
測試執行次數:
- 使用參數化 fixture 的測試函數會運行多次
- 次數 = 參數數量 × 測試函數數量
場景 1:不同用戶角色的權限測試
@pytest.fixture(params=["admin", "user", "guest"])
def user_role(request):"""模擬不同權限的用戶"""role = request.paramreturn User(role=role)def test_admin_access(user_role):# 管理員有所有權限if user_role.role == "admin":assert user_role.can_access("admin_panel")assert user_role.can_edit("all")# 普通用戶有部分權限elif user_role.role == "user":assert user_role.can_access("dashboard")assert not user_role.can_access("admin_panel")# 訪客只有查看權限else:assert not user_role.can_edit("any")assert user_role.can_view("public")
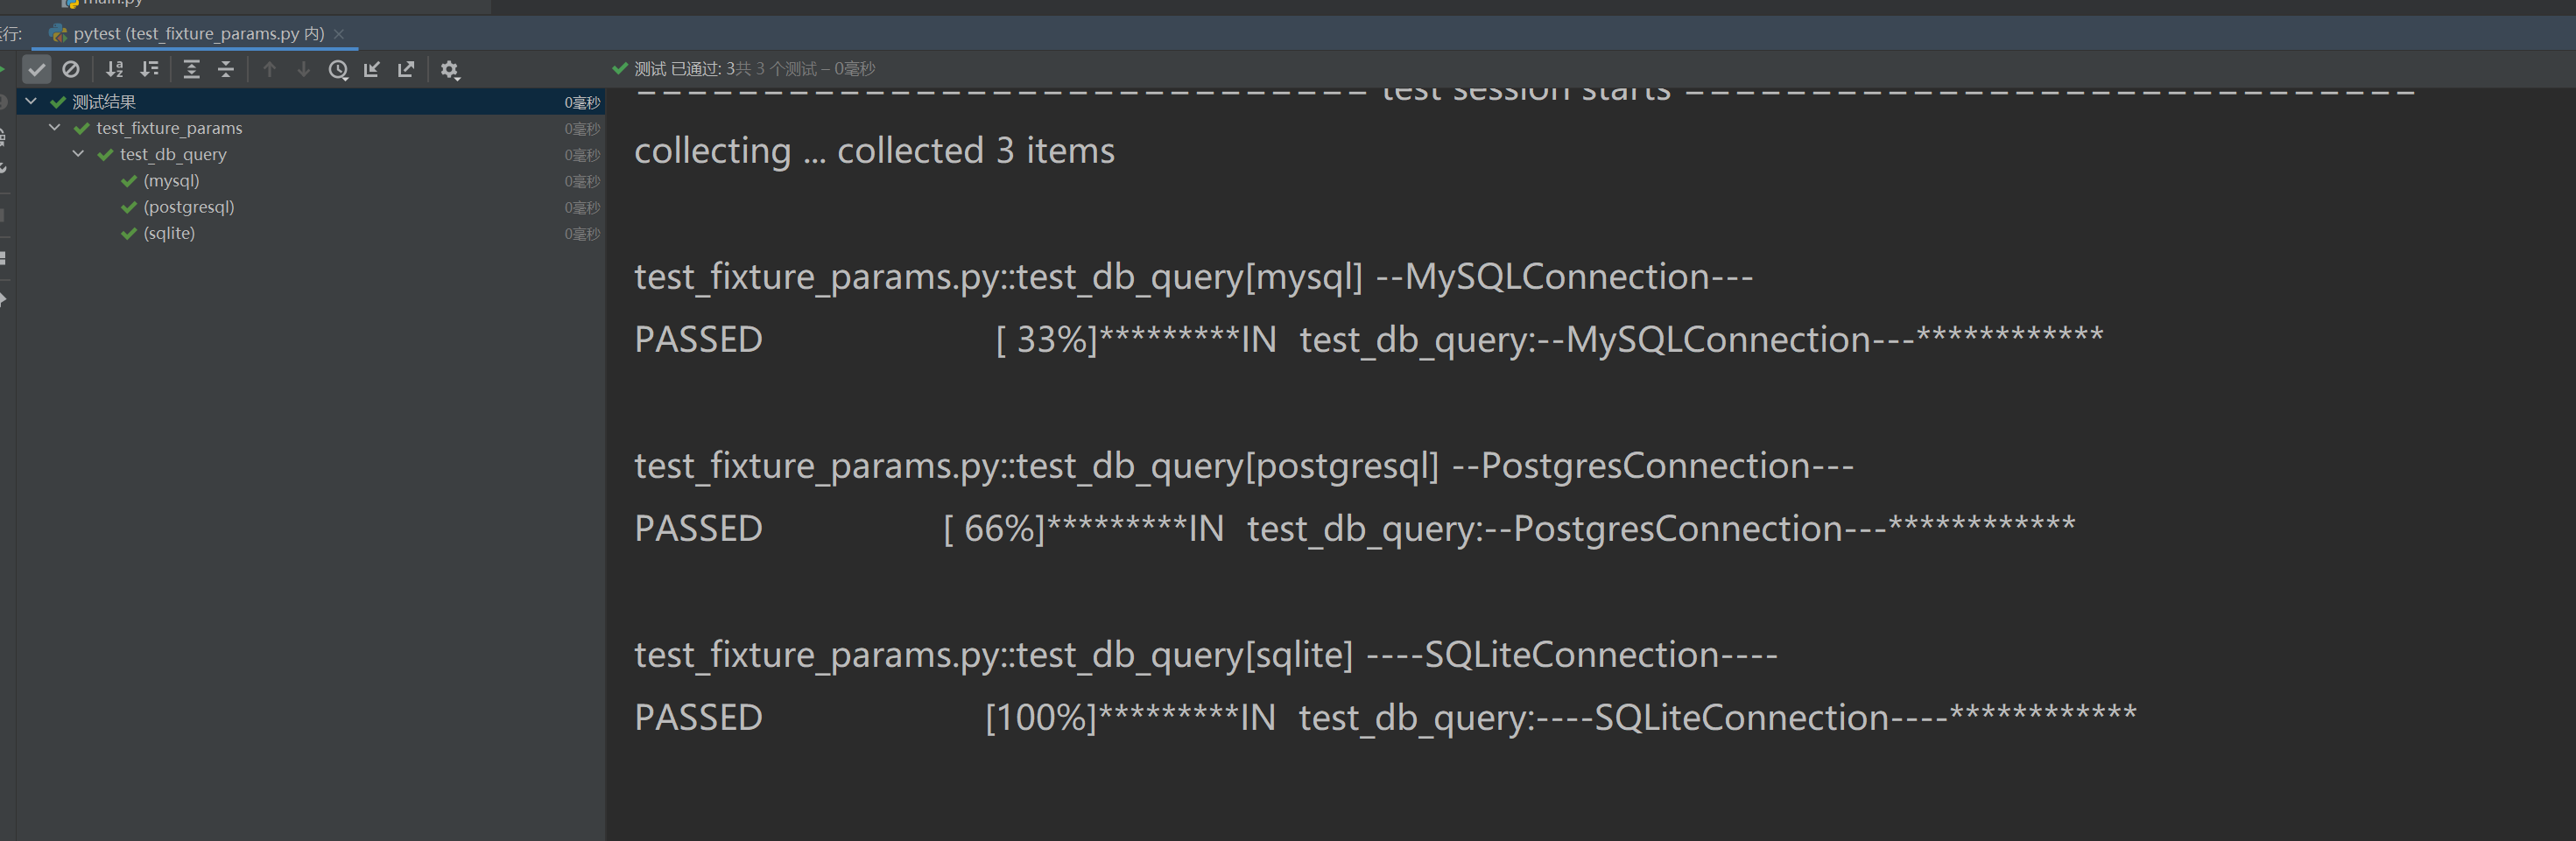
場景 2:不同數據庫連接測試
# -*- coding: utf-8 -*-
import pytestdef MySQLConnection():print("--MySQLConnection---")return ("--MySQLConnection---")def PostgresConnection():print("--PostgresConnection---")return ("--PostgresConnection---")def SQLiteConnection():print('----SQLiteConnection----')return ('----SQLiteConnection----')@pytest.fixture(params=["mysql", "postgresql", "sqlite"])
def db_connection(request):"""創建不同數據庫的連接"""db_type = request.paramif db_type == "mysql":return MySQLConnection()elif db_type == "postgresql":return PostgresConnection()else:return SQLiteConnection()def test_db_query(db_connection):# result = db_connection.execute("SELECT 1")print("*********IN  test_db_query:{}************".format(db_connection))
場景 3:多語言環境測試
@pytest.fixture(params=["en_US", "zh_CN", "ja_JP"])
def locale(request):"""設置不同語言環境"""lang = request.paramset_locale(lang)return langdef test_translation(locale):greeting = translate("hello", locale)if locale == "en_US":assert greeting == "Hello"elif locale == "zh_CN":assert greeting == "你好"elif locale == "ja_JP":assert greeting == "こんにちは"
3.2 使用夾具
class TestAdminPanel:def test_user_management(self, admin_user, database):assert admin_user.has_permission("manage_users")users = database.list_users()assert len(users) > 0
3.3 參數化測試
- 參數化介紹常見使用場景:簡單注冊功能,也就是輸入用戶名、輸入密碼、單擊注冊,而測試數據會有很多個,可以通過測試用例設計技術組織出很多測試數據,例如用戶名都是字母,密碼也都是字母,或者都是數字,也可是它們的組合,或是邊界值長度的測試數據等。這時可以通過參數化技術實現測試數據驅動執行每組測試用例。測試數據與測試用例是多對一的關系,所以完全可以把它們分開來看,把數據部分抽象成參數,通過對參數的賦值來驅動用例的執行。參數化傳遞是實現數據驅動的一種技術,可以實現測試數據與測試用例分離。
- 各個方面的參數化如下:
- ·測試用例的參數化:使用@pytest.mark.parametrize可以在測試用例、測試類甚至測試模塊中標記多個參數或fixture的組合;
- ·參數化的行為可以表現在不同的層級上;
- ·多參數的參數化:一個以上參數與數據驅動結果;
- ·fixture的參數化:相關知識可參考第3.8節;
- ·自定義參數化:可以通過pytest_generate_tests這個鉤子方法自定義參數化的方案;
- ·使用第三方插件實現數據驅動DDT。
import pytest@pytest.mark.parametrize("username,password,expected", [("admin", "secret", True),("guest", "123456", False),("", "", False),("admin", "wrong", False)
])
def test_login(username, password, expected):result = login(username, password)assert result == expected
- 對于復雜類型的測試數據通常加上id或name來表明數據的含義,并標記測試要點。測試數據除了字符串以外,還可以是表達式,以及元組、字典、類等類型。使用ids關鍵字參數,自定義測試ID。
二、為什么使用夾具
Pytest 夾具系統詳解
什么是夾具系統?
夾具(Fixture)系統是 pytest 最強大的功能之一,它提供了一種可復用的機制來:
- 準備測試環境(如數據庫連接、配置文件)
- 管理測試資源(如臨時文件、網絡連接)
- 執行清理操作(如關閉連接、刪除臨時數據)
- 共享測試數據(如預定義的用戶對象)
為什么需要夾具?
考慮以下場景:
# 沒有夾具的情況
def test_user_creation():db = connect_db()  # 每個測試都要創建連接user = db.create_user(name="Alice")assert user.id is not Nonedb.close()  # 每個測試都要關閉連接def test_user_deletion():db = connect_db()  # 重復代碼user = db.create_user(name="Bob")db.delete_user(user.id)assert not db.user_exists(user.id)db.close()  # 重復代碼
問題:
- 大量重復代碼
- 資源管理容易出錯
- 維護困難
夾具如何解決這些問題?
基本夾具示例
import pytest# 定義夾具
@pytest.fixture
def database():print("\n=== 建立數據庫連接 ===")db = Database()yield db  # 將對象提供給測試用例print("\n=== 關閉數據庫連接 ===")db.close()# 使用夾具
def test_user_creation(database):  # 通過參數注入夾具user = database.create_user(name="Alice")assert user.id is not None
執行流程
1. 測試開始前: 執行 yield 之前的代碼 (建立連接)
2. 執行測試用例: 使用數據庫對象
3. 測試結束后: 執行 yield 之后的代碼 (關閉連接)
夾具的核心特性
1. 作用域控制
通過 scope 參數管理資源生命周期:
| 作用域 | 描述 | 使用場景 |
|---|---|---|
function | 每個測試函數執行一次 | 默認值,適合輕量資源 |
class | 每個測試類執行一次 | 類中多個測試共享資源 |
module | 每個模塊執行一次 | 模塊級共享資源 |
package | 每個包執行一次 | 跨模塊共享資源 |
session | 整個測試會話一次 | 全局資源(如登錄會話) |
@pytest.fixture(scope="module")
def shared_resource():print("\n初始化模塊級資源")resource = Resource()yield resourceprint("\n清理模塊級資源")
2. 夾具依賴
夾具可以依賴其他夾具:
@pytest.fixture
def admin_user(database):  # 依賴 database 夾具return database.create_user(role="admin")def test_admin_permissions(admin_user):assert admin_user.has_permission("admin_panel")
3. 自動使用夾具
無需顯式聲明即可自動應用:
@pytest.fixture(autouse=True)
def setup_logging():logging.basicConfig(level=logging.INFO)print("\n日志系統已初始化")# 所有測試都會自動應用此夾具
def test_example():assert True
4. 參數化夾具
動態生成不同測試場景:
@pytest.fixture(params=["admin", "editor", "viewer"])
def user_role(request):return request.param  # 訪問參數值def test_role_permissions(user_role):assert get_permissions(user_role) != []
高級夾具用法
1. 工廠模式夾具
創建多個實例:
@pytest.fixture
def user_factory(database):def create_user(name, role="user"):return database.create_user(name=name, role=role)return create_user  # 返回工廠函數def test_user_roles(user_factory):admin = user_factory("Admin", role="admin")guest = user_factory("Guest")assert admin.is_admin()assert not guest.is_admin()
2. 動態資源管理
@pytest.fixture
def temp_config(tmp_path):# 使用內置的 tmp_path 夾具config_file = tmp_path / "config.ini"config_file.write_text("[DEFAULT]\nlang=en_US")return config_filedef test_config_loading(temp_config):config = load_config(temp_config)assert config["DEFAULT"]["lang"] == "en_US"
3. 夾具重寫
在特定位置覆蓋夾具:
# conftest.py (全局)
@pytest.fixture
def database():return RealDatabase()# test_dev.py (局部覆蓋)
@pytest.fixture
def database():return MockDatabase()  # 使用模擬數據庫def test_with_mock_db(database):assert isinstance(database, MockDatabase)
最佳實踐
1. 合理組織夾具
使用 conftest.py 文件管理共享夾具:
project/
├── conftest.py         # 全局夾具
├── database/
│   ├── conftest.py     # 數據庫相關夾具
│   └── test_queries.py
└── api/├── conftest.py     # API 測試夾具└── test_endpoints.py
2. 命名規范
- 夾具函數:
名詞(如database,admin_user) - 測試函數:
test_動詞(如test_create_user)
3. 避免過度使用
- 只在需要共享資源時使用夾具
- 簡單測試可直接在測試函數內準備數據
常用內置夾具
| 夾具名稱 | 用途 |
|---|---|
tmp_path | 創建臨時目錄(返回 Path 對象) |
tmpdir | 創建臨時目錄(返回 py.path) |
capsys | 捕獲 stdout/stderr |
caplog | 捕獲日志輸出 |
monkeypatch | 臨時修改環境/對象 |
request | 訪問測試上下文信息 |
def test_output_capture(capsys):print("Hello, pytest!")captured = capsys.readouterr()assert "pytest" in captured.out
總結:夾具系統的價值
- 資源管理:自動化管理測試資源的生命周期
- 代碼復用:消除重復的初始化和清理代碼
- 依賴注入:解耦測試邏輯與測試環境
- 可維護性:集中管理環境配置,一處修改全局生效
- 靈活性:支持多種作用域和組合方式
通過夾具系統,pytest 實現了測試環境的聲明式管理,讓開發者能專注于測試邏輯本身,而不是繁瑣的環境準備工作。
三、參數話是怎么實現的
Pytest 參數化測試詳解
參數化測試是 pytest 最強大的功能之一,它允許您使用不同的輸入數據運行同一個測試邏輯,從而顯著減少重復代碼并提高測試覆蓋率。下面通過多個實際示例詳細說明參數化實現方式:
1. 基本參數化實現
使用 @pytest.mark.parametrize 裝飾器
import pytest# 簡單的加法測試參數化
@pytest.mark.parametrize("a, b, expected", [(1, 2, 3),      # 測試用例1(0, 0, 0),      # 測試用例2(-1, 1, 0),     # 測試用例3(10, -5, 5)     # 測試用例4
])
def test_addition(a, b, expected):"""測試加法函數"""assert a + b == expected
執行結果:
test_math.py::test_addition[1-2-3] PASSED
test_math.py::test_addition[0-0-0] PASSED
test_math.py::test_addition[-1-1-0] PASSED
test_math.py::test_addition[10--5-5] PASSED
2. 參數化實現原理
pytest 的參數化本質上是一個測試生成器:
- 解析
parametrize裝飾器的參數 - 為每組參數創建獨立的測試用例
- 每個用例擁有唯一的ID(可自定義)
- 執行時按順序運行所有生成的測試
3. 高級參數化技巧
3.1 參數化類方法
class TestMathOperations:@pytest.mark.parametrize("x, y, expected", [(4, 2, 2),(9, 3, 3),(15, 5, 3)])def test_division(self, x, y, expected):assert x / y == expected
3.2 多參數組合(笛卡爾積)
@pytest.mark.parametrize("a", [1, 10, 100])
@pytest.mark.parametrize("b", [2, 20, 200])
def test_multiplication(a, b):"""測試所有組合:1×2, 1×20, 1×200, 10×2..."""assert a * b == a * b  # 實際項目中應有具體邏輯
3.3 參數化夾具(動態生成測試數據)
import pytest# 動態生成用戶數據的夾具
@pytest.fixture(params=[("admin", "secret123"),("editor", "edit_pass"),("viewer", "view_only")
])
def user_credentials(request):return request.paramdef test_login(user_credentials):username, password = user_credentials# 執行登錄邏輯assert login(username, password) is True
4. 參數化高級應用
4.1 自定義測試ID
@pytest.mark.parametrize("input, expected",[("3+5", 8),("2*4", 8),("6/2", 3),("10-3", 7)],ids=["加法測試","乘法測試","除法測試","減法測試"]
)
def test_eval(input, expected):assert eval(input) == expected
4.2 從外部文件加載參數
import json
import pytestdef load_test_data():with open("test_data.json") as f:return json.load(f)# 從JSON文件加載測試數據
@pytest.mark.parametrize("data", load_test_data())
def test_with_external_data(data):result = process_data(data["input"])assert result == data["expected"]
4.3 條件參數化
import sys
import pytest# 根據環境條件選擇參數
params = []
if sys.platform == "win32":params.append(("Windows", "C:\\"))
else:params.append(("Linux", "/home"))@pytest.mark.parametrize("os_name, home_dir", params)
def test_platform_specific(os_name, home_dir):assert get_home_directory() == home_dir
5. 參數化最佳實踐
5.1 保持參數化數據簡潔
# 推薦:使用變量提高可讀性
VALID_EMAILS = ["test@example.com","user.name@domain.co","name+tag@domain.org"
]INVALID_EMAILS = ["invalid","missing@domain","@domain.com"
]@pytest.mark.parametrize("email", VALID_EMAILS)
def test_valid_email(email):assert validate_email(email)@pytest.mark.parametrize("email", INVALID_EMAILS)
def test_invalid_email(email):assert not validate_email(email)
5.2 組合參數化與夾具
import pytest@pytest.fixture
def calculator():return Calculator()# 參數化與夾具結合
@pytest.mark.parametrize("a, b, expected", [(5, 3, 8),(10, -2, 8),(0, 0, 0)
])
def test_calculator_add(calculator, a, b, expected):assert calculator.add(a, b) == expected
5.3 處理異常的參數化
import pytest@pytest.mark.parametrize("a, b, exception", [(1, 0, ZeroDivisionError),("text", 2, TypeError),(None, 5, ValueError)
])
def test_division_errors(a, b, exception):with pytest.raises(exception):divide(a, b)
6. 參數化在實戰中的應用
場景:測試用戶權限系統
import pytest# 用戶角色數據
ROLES = ["admin", "editor", "viewer", "guest"]# 權限矩陣
PERMISSIONS = {"create": [True, True, False, False],"delete": [True, False, False, False],"edit": [True, True, True, False],"view": [True, True, True, True]
}# 生成參數化數據
def generate_permission_tests():for role_idx, role in enumerate(ROLES):for permission, access_list in PERMISSIONS.items():expected = access_list[role_idx]yield role, permission, expected@pytest.mark.parametrize("role, permission, expected", list(generate_permission_tests()))
def test_permission_access(role, permission, expected):user = create_user(role=role)assert user.has_permission(permission) == expected
執行結果示例:
test_permissions.py::test_permission_access[admin-create-True] PASSED
test_permissions.py::test_permission_access[admin-delete-True] PASSED
test_permissions.py::test_permission_access[admin-edit-True] PASSED
test_permissions.py::test_permission_access[admin-view-True] PASSED
test_permissions.py::test_permission_access[editor-create-True] PASSED
test_permissions.py::test_permission_access[editor-delete-False] PASSED
...
總結:參數化測試的核心價值
- 減少重復代碼:相同測試邏輯只需編寫一次
- 提高覆蓋率:輕松測試多種邊界條件和輸入組合
- 測試數據分離:將測試數據與測試邏輯解耦
- 清晰報告:每個參數組合作為獨立測試顯示
- 靈活擴展:輕松添加新測試用例
參數化測試是 pytest 區別于其他測試框架的核心優勢之一,通過將測試數據從測試邏輯中分離出來,您可以創建更簡潔、更強大且更易維護的測試套件。
四、怎么實現和代碼分析的參數話
Pytest 參數化測試數據分離實踐
將參數化測試數據與測試代碼分離是提高測試可維護性的重要實踐。下面詳細介紹多種實現方式,并提供完整示例:
1. JSON 文件存儲測試數據
數據文件:test_data/addition.json
[{"a": 1, "b": 2, "expected": 3},{"a": 0, "b": 0, "expected": 0},{"a": -1, "b": 1, "expected": 0},{"a": 10, "b": -5, "expected": 5},{"a": 100, "b": 200, "expected": 300}
]
測試代碼:test_math.py
import json
import pytestdef load_json_data(file_name):"""從JSON文件加載測試數據"""with open(f"test_data/{file_name}", encoding="utf-8") as f:return json.load(f)# 使用JSON參數化
@pytest.mark.parametrize("data", load_json_data("addition.json"),ids=lambda d: f"{d['a']}+{d['b']}={d['expected']}"
)
def test_addition_json(data):assert data["a"] + data["b"] == data["expected"]
2. YAML 文件存儲測試數據(需要安裝PyYAML)
安裝依賴:
pip install pyyaml
數據文件:test_data/login.yaml
- username: "admin"password: "secure_pass"expected: truescenario: "有效管理員賬戶"- username: "editor"password: "edit123"expected: truescenario: "有效編輯賬戶"- username: "invalid_user"password: "wrong_pass"expected: falsescenario: "無效憑據"- username: ""password: "empty_user"expected: falsescenario: "空用戶名"- username: "admin"password: ""expected: falsescenario: "空密碼"
測試代碼:test_auth.py
import yaml
import pytestdef load_yaml_data(file_name):"""從YAML文件加載測試數據"""with open(f"test_data/{file_name}", encoding="utf-8") as f:return yaml.safe_load(f)# 使用YAML參數化
@pytest.mark.parametrize("test_data", load_yaml_data("login.yaml"),ids=lambda d: d["scenario"]
)
def test_login_yaml(test_data):result = login_user(test_data["username"], test_data["password"])assert result == test_data["expected"]
3. CSV 文件存儲測試數據
數據文件:test_data/multiplication.csv
a,b,expected,description
2,3,6,正整數
0,5,0,零乘數
-4,3,-12,負數乘正數
-2,-3,6,負負得正
10,0.5,5,小數乘法
測試代碼:test_math.py
import csv
import pytestdef load_csv_data(file_name):"""從CSV文件加載測試數據"""data = []with open(f"test_data/{file_name}", encoding="utf-8") as f:reader = csv.DictReader(f)for row in reader:# 轉換數值類型row["a"] = float(row["a"]) if "." in row["a"] else int(row["a"])row["b"] = float(row["b"]) if "." in row["b"] else int(row["b"])row["expected"] = float(row["expected"]) if "." in row["expected"] else int(row["expected"])data.append(row)return data# 使用CSV參數化
@pytest.mark.parametrize("data",load_csv_data("multiplication.csv"),ids=lambda d: d["description"]
)
def test_multiplication_csv(data):assert data["a"] * data["b"] == data["expected"]
4. Python 模塊存儲測試數據
數據文件:test_data/user_data.py
# 用戶創建測試數據
USER_CREATION_DATA = [{"name": "Alice Johnson","email": "alice@example.com","role": "admin","expected_status": 201},{"name": "Bob Smith","email": "bob.smith@test.org","role": "editor","expected_status": 201},{"name": "Invalid User","email": "not-an-email","role": "viewer","expected_status": 400,"expected_error": "Invalid email format"},{"name": "","email": "empty@name.com","role": "guest","expected_status": 400,"expected_error": "Name cannot be empty"}
]# 用戶刪除測試數據
USER_DELETION_DATA = [(1, 204),  # 有效用戶ID(999, 404),  # 不存在的用戶ID("invalid", 400)  # 無效ID格式
]
測試代碼:test_user_api.py
import pytest
from test_data import user_data# 用戶創建測試
@pytest.mark.parametrize("user_data",user_data.USER_CREATION_DATA,ids=lambda d: d["name"] or "Empty Name"
)
def test_create_user(user_data):response = create_user_api(name=user_data["name"],email=user_data["email"],role=user_data["role"])assert response.status_code == user_data["expected_status"]if user_data["expected_status"] != 201:error_data = response.json()assert user_data["expected_error"] in error_data["message"]# 用戶刪除測試
@pytest.mark.parametrize("user_id, expected_status",user_data.USER_DELETION_DATA,ids=lambda x: f"ID={x[0]}-Status={x[1]}"
)
def test_delete_user(user_id, expected_status):response = delete_user_api(user_id)assert response.status_code == expected_status
5. 數據庫存儲測試數據
測試代碼:test_db_integration.py
import pytest
import sqlite3@pytest.fixture(scope="module")
def test_db():"""創建內存中的測試數據庫"""conn = sqlite3.connect(":memory:")cursor = conn.cursor()# 創建測試表cursor.execute("""CREATE TABLE test_data (id INTEGER PRIMARY KEY,input_a INTEGER,input_b INTEGER,expected INTEGER,test_name TEXT)""")# 插入測試數據test_cases = [(1, 2, 3, "Positive numbers"),(0, 0, 0, "Zeros"),(-1, 1, 0, "Negative and positive"),(10, -5, 5, "Positive and negative")]cursor.executemany("INSERT INTO test_data (input_a, input_b, expected, test_name) VALUES (?, ?, ?, ?)",test_cases)conn.commit()yield connconn.close()def load_db_data(db_conn):"""從數據庫加載測試數據"""cursor = db_conn.cursor()cursor.execute("SELECT input_a, input_b, expected, test_name FROM test_data")return cursor.fetchall()# 使用數據庫參數化
@pytest.mark.parametrize("a, b, expected, test_name",load_db_data(test_db()),ids=lambda x: x[3]  # 使用test_name作為ID
)
def test_addition_db(a, b, expected, test_name):assert a + b == expected
6. 動態生成測試數據
測試代碼:test_data_generators.py
import pytest
import randomdef generate_performance_test_data():"""生成性能測試數據"""for size in [10, 100, 1000, 10000]:# 生成測試數據集data = [random.randint(1, 1000) for _ in range(size)]# 預期結果:排序后的列表expected = sorted(data)yield pytest.param(data, expected, id=f"Size_{size}")# 動態參數化性能測試
@pytest.mark.parametrize("input_data, expected",generate_performance_test_data()
)
def test_sorting_performance(input_data, expected):result = sorted(input_data)  # 實際排序操作assert result == expected
7. 混合數據源參數化
測試代碼:test_mixed_sources.py
import pytest
from test_data import user_data
from .data_loader import load_json_data, load_csv_data# 從多個來源組合測試數據
def combined_test_data():# 來源1:JSON文件for data in load_json_data("api_test_cases.json"):yield pytest.param(data, id=f"JSON-{data['case_id']}")# 來源2:Python模塊for data in user_data.API_TEST_CASES:yield pytest.param(data, id=f"Module-{data['id']}")# 來源3:CSV文件for data in load_csv_data("additional_cases.csv"):yield pytest.param(data, id=f"CSV-{data['test_id']}")# 使用混合數據源
@pytest.mark.parametrize("test_case",combined_test_data()
)
def test_api_endpoint(test_case):response = call_api(endpoint=test_case["endpoint"],method=test_case["method"],data=test_case["payload"])assert response.status_code == test_case["expected_status"]if "expected_data" in test_case:assert response.json() == test_case["expected_data"]
最佳實踐總結
-
選擇合適的數據格式:
- 簡單結構:JSON/YAML
- 表格數據:CSV
- 復雜邏輯:Python模塊
- 動態數據:數據庫/生成器
-
數據文件組織:
project/ ├── src/ ├── tests/ │ ├── test_modules/ │ ├── test_data/ # 所有數據文件 │ │ ├── json/ │ │ ├── yaml/ │ │ ├── csv/ │ │ └── __init__.py # Python數據模塊 │ └── conftest.py -
數據加載器封裝:
# tests/data_loader.py import json import csv import yaml import osDATA_DIR = os.path.join(os.path.dirname(__file__), "test_data")def load_json(relative_path):path = os.path.join(DATA_DIR, relative_path)with open(path, encoding="utf-8") as f:return json.load(f)def load_yaml(relative_path):path = os.path.join(DATA_DIR, relative_path)with open(path, encoding="utf-8") as f:return yaml.safe_load(f)# 其他加載函數... -
數據驗證:
- 使用JSON Schema驗證數據結構
- 添加數據版本控制
- 編寫數據完整性檢查腳本
-
數據與測試分離優勢:
- 非技術人員可維護測試數據
- 數據變更不影響測試邏輯
- 易于添加新的測試用例
- 支持數據驅動的大規模測試
- 提高測試代碼可讀性
通過以上方法,您可以實現測試數據與測試代碼的清晰分離,創建更健壯、更易維護的測試套件,同時保持測試的靈活性和可擴展性。
四、 怎么寫測試報錯
Pytest 測試報告生成完全指南
測試報告是將測試結果可視化展示的關鍵工具,下面詳細介紹多種生成專業測試報告的方法和工具:
一、內置報告輸出
1. 控制臺基礎報告
# 詳細模式(顯示每個測試用例)
pytest -v# 顯示打印輸出
pytest -s# 組合使用
pytest -sv
2. 測試結果摘要
pytest -ra  # 顯示所有結果摘要
pytest -rA  # 顯示詳細摘要(包括通過用例)
輸出示例:
========================= short test summary info =========================
PASSED test_math.py::test_addition[1-2-3]
PASSED test_math.py::test_addition[0-0-0]
FAILED test_math.py::test_addition[-1-1-0] - assert (-1 + 1) == 0
PASSED test_auth.py::test_login[admin-secure_pass-True]
二、HTML 測試報告 (pytest-html)
1. 安裝插件
pip install pytest-html
2. 生成基礎報告
pytest --html=report.html
3. 高級配置
# 包含額外信息(環境、CSS等)
pytest --html=report.html --self-contained-html# 添加元數據
pytest --html=report.html \--metadata Python-version $(python --version) \--metadata Platform $(uname -a)
4. 自定義報告內容
在 conftest.py 中添加鉤子:
def pytest_html_report_title(report):report.title = "自動化測試報告 - 2023"def pytest_html_results_summary(prefix, summary, postfix):prefix.extend([html.p("項目: 電商系統V2.0")])summary.extend([html.h2("關鍵指標統計")])def pytest_html_results_table_row(report, cells):if report.passed:cells.insert(1, html.td("?"))elif report.failed:cells.insert(1, html.td("?"))
三、Allure 高級報告
1. 安裝與配置
# 安裝Allure框架
# macOS: brew install allure
# Windows: scoop install allure# 安裝pytest插件
pip install allure-pytest
2. 生成報告
# 運行測試并收集結果
pytest --alluredir=./allure-results# 生成HTML報告
allure generate ./allure-results -o ./allure-report --clean# 打開報告
allure open ./allure-report
3. 增強報告內容
在測試代碼中添加豐富信息:
import allure
import pytest@allure.epic("認證模塊")
@allure.feature("用戶登錄")
class TestLogin:@allure.story("成功登錄場景")@allure.title("管理員登錄測試")@allure.severity(allure.severity_level.CRITICAL)@pytest.mark.parametrize("username,password", [("admin", "secure_pass")])def test_admin_login(self, username, password):with allure.step("輸入用戶名和密碼"):allure.attach(f"用戶名: {username}", "輸入信息")allure.attach(f"密碼: {password}", "輸入信息", allure.attachment_type.TEXT)with allure.step("點擊登錄按鈕"):pass  # 模擬點擊操作with allure.step("驗證登錄成功"):result = login(username, password)assert result is Trueallure.attach.file('./screenshots/login_success.png', name='登錄成功截圖', attachment_type=allure.attachment_type.PNG)@allure.story("失敗登錄場景")@allure.title("錯誤密碼登錄測試")def test_failed_login(self):with allure.step("輸入錯誤密碼"):result = login("admin", "wrong_pass")with allure.step("驗證登錄失敗"):assert result is Falseallure.attach("""<h4>預期行為:</h4><ul><li>顯示錯誤提示</li><li>登錄按鈕禁用3秒</li></ul>""", "驗證點", allure.attachment_type.HTML)
四、JUnit XML 報告(持續集成集成)
1. 生成XML報告
pytest --junitxml=test-results.xml
2. XML報告示例
<?xml version="1.0" encoding="utf-8"?>
<testsuites><testsuite name="pytest" errors="0" failures="1" skipped="0" tests="4" time="0.5"><testcase classname="test_math" name="test_addition[1-2-3]" time="0.1"/><testcase classname="test_math" name="test_addition[0-0-0]" time="0.05"/><testcase classname="test_math" name="test_addition[-1-1-0]" time="0.1"><failure message="AssertionError: assert (-1 + 1) == 0">...</failure></testcase><testcase classname="test_auth" name="test_login" time="0.25"/></testsuite>
</testsuites>
3. 與CI工具集成
在Jenkins中使用JUnit插件:
pipeline {agent anystages {stage('Test') {steps {sh 'pytest --junitxml=test-results.xml'}}stage('Report') {steps {junit 'test-results.xml'}}}
}
五、自定義報告系統
1. 使用pytest鉤子收集結果
# conftest.py
import json
from datetime import datetimedef pytest_sessionfinish(session, exitstatus):"""測試結束后生成自定義報告"""report_data = {"timestamp": datetime.now().isoformat(),"total": session.testscollected,"passed": session.testscollected - session.testsfailed - session.testsskipped,"failed": session.testsfailed,"skipped": session.testsskipped,"duration": round(session.duration, 2),"test_details": []}# 遍歷所有測試項for item in session.items:report_data["test_details"].append({"nodeid": item.nodeid,"outcome": item.report.outcome if hasattr(item, 'report') else "unknown","duration": getattr(item.report, 'duration', 0),"error": getattr(item.report, 'longreprtext', '') if hasattr(item.report, 'longreprtext') else ''})# 保存為JSON文件with open("custom_report.json", "w") as f:json.dump(report_data, f, indent=2)
2. 生成可視化報告
使用Python創建HTML報告:
# generate_report.py
import json
from jinja2 import Template# 加載測試數據
with open('custom_report.json') as f:report_data = json.load(f)# HTML模板
html_template = """
<!DOCTYPE html>
<html>
<head><title>測試報告 - {{ timestamp }}</title><style>.passed { color: green; }.failed { color: red; }.skipped { color: orange; }table { width: 100%; border-collapse: collapse; }th, td { border: 1px solid #ddd; padding: 8px; text-align: left; }tr:nth-child(even) { background-color: #f2f2f2; }</style>
</head>
<body><h1>自動化測試報告</h1><p>執行時間: {{ timestamp }}</p><div class="summary"><h2>測試概覽</h2><p>總用例數: {{ total }}</p><p>通過: <span class="passed">{{ passed }}</span></p><p>失敗: <span class="failed">{{ failed }}</span></p><p>跳過: <span class="skipped">{{ skipped }}</span></p><p>執行時長: {{ duration }} 秒</p></div><div class="details"><h2>測試詳情</h2><table><tr><th>測試用例</th><th>狀態</th><th>時長(秒)</th><th>錯誤信息</th></tr>{% for test in test_details %}<tr><td>{{ test.nodeid }}</td><td class="{{ test.outcome }}">{{ test.outcome }}</td><td>{{ test.duration | round(3) }}</td><td>{{ test.error | truncate(200) }}</td></tr>{% endfor %}</table></div>
</body>
</html>
"""# 渲染報告
template = Template(html_template)
html_report = template.render(**report_data)# 保存報告
with open("custom_report.html", "w") as f:f.write(html_report)print("自定義報告已生成: custom_report.html")
六、商業與開源報告工具對比
| 工具/插件 | 類型 | 特點 | 適用場景 |
|---|---|---|---|
| pytest-html | 開源 | 簡單易用,無需額外依賴 | 快速生成基礎報告 |
| Allure | 開源 | 高度可定制,支持步驟展示 | 企業級測試報告 |
| ReportPortal | 開源 | 實時分析,AI輔助 | 大型持續集成環境 |
| Xray | 商業 | Jira集成,需求跟蹤 | Jira用戶 |
| TestRail | 商業 | 測試管理集成 | 專業測試團隊 |
| Qase | 商業 | 現代化界面,豐富API | SaaS測試管理 |
七、最佳實踐建議
-
分層報告策略:
- 開發環境:控制臺報告(快速反饋)
- CI流水線:JUnit XML + Allure(自動化分析)
- 團隊分享:HTML/PDF格式(易讀易分享)
-
報告內容優化:
# 添加截圖和日志 @pytest.hookimpl(hookwrapper=True) def pytest_runtest_makereport(item, call):outcome = yieldreport = outcome.get_result()if report.when == "call" and report.failed:# 失敗時截圖driver = item.funcargs.get("browser")if driver:screenshot = driver.get_screenshot_as_base64()html = f'<div><img src="data:image/png;base64,{screenshot}"></div>'report.extra = [pytest_html.extras.html(html)]# 附加日志with open("test.log", "r") as log_file:report.extra.append(pytest_html.extras.text(log_file.read(), "日志")) -
定期清理:
# 保留最近7天的報告 find ./reports -name "*.html" -mtime +7 -exec rm {} \; -
報告安全:
- 敏感信息脫敏處理
- 訪問權限控制
- HTTPS傳輸報告
-
自動化歸檔:
# 示例:測試后自動歸檔報告
pytest --html=reports/$(date +%Y%m%d).html
八、完整工作流示例
# 1. 運行測試并生成多種報告
pytest \--html=reports/$(date +%Y%m%d_%H%M).html \--junitxml=reports/junit-results.xml \--alluredir=reports/allure-results# 2. 生成Allure報告
allure generate reports/allure-results -o reports/allure-report --clean# 3. 歸檔報告
zip -r reports_$(date +%Y%m%d).zip reports/# 4. 發送通知
python send_notification.py --report reports/latest.html
通過合理選擇報告工具和優化報告內容,您可以創建信息豐富、直觀易懂的測試報告,有效提升團隊對產品質量的可視性和信心。
六、 綜述
Pytest 全功能測試用例實戰教程
下面是一套完整的測試用例,涵蓋了 pytest 的核心功能和高級特性。每個測試用例都包含詳細注釋,幫助您全面掌握 pytest 的使用方法。
"""
Pytest 全功能實戰測試套件
包含 pytest 核心功能、高級特性和最佳實踐
"""import pytest
import logging
import sys
import os
from datetime import datetime# 設置日志
logging.basicConfig(level=logging.INFO)
logger = logging.getLogger(__name__)# 示例業務邏輯函數
def add(a, b):"""加法函數"""return a + bdef divide(a, b):"""除法函數"""if b == 0:raise ValueError("除數不能為零")return a / bdef create_user(username, role="user"):"""創建用戶"""if not username:raise ValueError("用戶名不能為空")return {"username": username, "role": role, "created_at": datetime.now()}# ======================
# 1. 基礎測試用例
# ======================
def test_addition_basic():"""基礎測試示例"""result = add(2, 3)assert result == 5, "2+3應該等于5"class TestMathOperations:"""測試類示例"""def test_addition_in_class(self):"""類中的測試方法"""assert add(10, 20) == 30def test_negative_addition(self):"""負數加法測試"""assert add(-5, -3) == -8# ======================
# 2. 參數化測試
# ======================
@pytest.mark.parametrize("a, b, expected", [(1, 2, 3),      # 正整數(0, 0, 0),      # 零(-1, 1, 0),     # 負數與正數(2.5, 3.5, 6.0) # 浮點數
], ids=["正整數", "零", "負數與正數", "浮點數"])
def test_parametrized_addition(a, b, expected):"""參數化加法測試"""result = add(a, b)assert result == expected, f"{a}+{b}應該等于{expected},實際得到{result}"# ======================
# 3. 夾具系統 (Fixtures)
# ======================
@pytest.fixture(scope="module")
def database_connection():"""模塊級夾具 - 模擬數據庫連接"""logger.info("\n=== 建立數據庫連接 ===")# 這里模擬數據庫連接db = {"connected": True, "users": []}yield db  # 測試中使用這個對象logger.info("\n=== 關閉數據庫連接 ===")# 清理操作db["connected"] = False@pytest.fixture
def admin_user(database_connection):"""函數級夾具 - 創建管理員用戶"""user = create_user("admin_user", "admin")database_connection["users"].append(user)return user@pytest.fixture
def regular_user(database_connection):"""函數級夾具 - 創建普通用戶"""user = create_user("regular_user")database_connection["users"].append(user)return userdef test_user_creation(admin_user, regular_user):"""測試用戶創建"""assert admin_user["role"] == "admin"assert regular_user["role"] == "user"assert "created_at" in admin_userdef test_database_connection(database_connection):"""測試數據庫連接"""assert database_connection["connected"] is True# ======================
# 4. 標記 (Marks) 和跳過
# ======================
@pytest.mark.slow
def test_slow_operation():"""標記為慢速測試"""# 模擬耗時操作import timetime.sleep(2)assert True@pytest.mark.skip(reason="功能尚未實現")
def test_unimplemented_feature():"""跳過未實現的功能測試"""assert False, "這個測試不應該執行"@pytest.mark.skipif(sys.version_info < (3, 8), reason="需要Python 3.8+")
def test_python38_feature():"""條件跳過測試"""# Python 3.8+ 的特性assert (x := 5) == 5  # 海象運算符@pytest.mark.xfail(reason="已知問題,待修復")
def test_known_bug():"""預期失敗的測試"""assert add(0.1, 0.2) == 0.3  # 浮點數精度問題# ======================
# 5. 異常測試
# ======================
def test_divide_by_zero():"""測試除零異常"""with pytest.raises(ValueError) as exc_info:divide(10, 0)assert "除數不能為零" in str(exc_info.value)@pytest.mark.parametrize("username", ["", None, "   "])
def test_invalid_username(username):"""測試無效用戶名"""with pytest.raises(ValueError) as exc_info:create_user(username)assert "用戶名不能為空" in str(exc_info.value)# ======================
# 6. 臨時文件和目錄
# ======================
def test_file_operations(tmp_path):"""測試臨時文件操作"""# 創建臨時文件test_file = tmp_path / "test.txt"test_file.write_text("Hello pytest!")# 讀取文件內容content = test_file.read_text()assert content == "Hello pytest!"# 創建子目錄sub_dir = tmp_path / "subdir"sub_dir.mkdir()assert sub_dir.exists()# ======================
# 7. 輸出捕獲
# ======================
def test_output_capture(capsys):"""測試輸出捕獲"""print("標準輸出消息")sys.stderr.write("標準錯誤消息")# 捕獲輸出captured = capsys.readouterr()assert "標準輸出消息" in captured.outassert "標準錯誤消息" in captured.errdef test_log_capture(caplog):"""測試日志捕獲"""caplog.set_level(logging.INFO)logger.info("這是一條信息日志")logger.warning("這是一條警告日志")assert "信息日志" in caplog.textassert "警告日志" in [rec.message for rec in caplog.records]# ======================
# 8. 并發測試 (需要pytest-xdist)
# ======================
@pytest.mark.parametrize("index", range(10))
def test_concurrent_execution(index):"""模擬并發測試"""import timetime.sleep(0.1)  # 模擬工作負載assert index < 10  # 總是成功# ======================
# 9. Allure 報告增強
# ======================
@pytest.mark.allure
class TestAllureFeatures:"""Allure 報告增強功能測試"""@pytest.mark.parametrize("a,b,expected", [(2, 3, 5), (5, 5, 10)])def test_parametrized_with_allure(self, a, b, expected):"""參數化測試與Allure結合"""result = add(a, b)assert result == expected# Allure 步驟if hasattr(pytest, 'allure'):import allurewith allure.step("驗證加法結果"):allure.attach(f"{a} + {b} = {result}", "計算詳情")def test_allure_attachments(self):"""測試Allure附件功能"""if hasattr(pytest, 'allure'):import allure# 添加文本附件allure.attach("這是一段文本附件", name="文本附件", attachment_type=allure.attachment_type.TEXT)# 添加HTML附件allure.attach("<h1>HTML附件</h1><p>這是一個HTML格式的附件</p>", name="HTML附件", attachment_type=allure.attachment_type.HTML)# ======================
# 10. 自定義標記和分組
# ======================
@pytest.mark.integration
def test_integration_feature():"""集成測試標記"""assert True@pytest.mark.security
class TestSecurityFeatures:"""安全測試分組"""def test_authentication(self):"""認證測試"""assert Truedef test_authorization(self):"""授權測試"""assert True# ======================
# 11. 夾具參數化
# ======================
@pytest.fixture(params=["admin", "editor", "viewer"])
def user_role(request):"""參數化夾具 - 不同用戶角色"""return request.paramdef test_role_based_access(user_role):"""測試基于角色的訪問控制"""if user_role == "admin":assert True  # 管理員有完全訪問權限elif user_role == "editor":assert True  # 編輯者有部分權限else:assert True  # 查看者只有讀取權限# ======================
# 12. 測試配置 (pytest.ini)
# ======================
# 實際項目中會在 pytest.ini 中配置
# 這里僅作演示
def test_config_usage():"""測試配置使用"""# 通常用于檢查標記或配置選項assert "integration" in [mark.name for mark in test_integration_feature.pytestmark]# ======================
# 13. 測試選擇和過濾
# ======================
# 這些測試用于演示選擇功能,實際通過命令行執行
def test_select_by_keyword():"""可通過關鍵字選擇的測試"""assert Truedef test_another_selectable_test():"""另一個可選擇測試"""assert True# ======================
# 14. 自定義鉤子和插件
# ======================
# 在 conftest.py 中實現
# 這里僅作演示
def test_custom_hook():"""測試自定義鉤子(通常在conftest中實現)"""# 實際項目中可能有自定義行為assert True# ======================
# 15. 測試覆蓋率 (需要pytest-cov)
# ======================
def test_coverage_important_function():"""重要功能測試(用于覆蓋率)"""# 測試業務關鍵函數assert add(100, 200) == 300assert divide(10, 2) == 5.0# 測試邊界情況with pytest.raises(ValueError):divide(5, 0)# ======================
# 16. 猴子補丁 (Monkeypatch)
# ======================
def test_monkeypatch_example(monkeypatch):"""使用猴子補丁修改環境"""# 修改環境變量monkeypatch.setenv("APP_ENV", "testing")assert os.getenv("APP_ENV") == "testing"# 修改系統路徑monkeypatch.syspath_prepend("/custom/path")assert "/custom/path" in sys.path# 修改函數行為def mock_add(a, b):return 42monkeypatch.setattr("__main__.add", mock_add)assert add(2, 3) == 42# ======================
# 17. 測試執行順序控制
# ======================
@pytest.mark.run(order=1)
def test_first():"""第一個執行的測試"""logger.info("首先執行")assert True@pytest.mark.run(order=3)
def test_third():"""第三個執行的測試"""logger.info("第三執行")assert True@pytest.mark.run(order=2)
def test_second():"""第二個執行的測試"""logger.info("第二執行")assert True# ======================
# 18. 測試依賴管理
# ======================
@pytest.mark.dependency()
def test_service_available():"""測試服務可用性"""# 模擬服務檢查assert True@pytest.mark.dependency(depends=["test_service_available"])
def test_api_call():"""依賴服務的API調用測試"""# 只有服務可用時才執行assert True# ======================
# 19. 測試報告增強
# ======================
def test_report_enhancement():"""測試報告增強功能"""# 添加額外信息到報告pytest_html = pytest.config.pluginmanager.getplugin("html")if pytest_html:extra = pytest_html.extras# 添加文本extra.append(extra.text("額外的文本信息"))# 添加URLextra.append(extra.url("https://example.com"))# 添加圖片# extra.append(extra.image("screenshot.png"))assert True# ======================
# 20. 工廠夾具模式
# ======================
@pytest.fixture
def user_factory():"""工廠夾具 - 創建用戶"""def _create_user(username, role="user"):return create_user(username, role)return _create_userdef test_user_factory(user_factory):"""測試工廠夾具"""admin = user_factory("factory_admin", "admin")user = user_factory("factory_user")assert admin["role"] == "admin"assert user["role"] == "user"
如何運行這些測試
1. 基礎運行
# 運行所有測試
pytest test_pytest_features.py# 顯示詳細信息
pytest -v test_pytest_features.py# 顯示打印輸出
pytest -s test_pytest_features.py
2. 選擇性運行
# 運行特定標記的測試
pytest -m "slow or integration" test_pytest_features.py# 運行包含特定關鍵字的測試
pytest -k "addition" test_pytest_features.py# 運行特定類
pytest test_pytest_features.py::TestMathOperations# 運行特定方法
pytest test_pytest_features.py::test_parametrized_addition
3. 高級運行選項
# 并發運行(需要pytest-xdist)
pytest -n 4 test_pytest_features.py# 遇到第一個錯誤停止
pytest -x test_pytest_features.py# 允許最多2個失敗
pytest --maxfail=2 test_pytest_features.py
4. 生成報告
# 生成HTML報告
pytest --html=report.html test_pytest_features.py# 生成Allure報告
pytest --alluredir=allure-results test_pytest_features.py
allure serve allure-results
學習要點總結
通過這套測試用例,您可以學習到:
- 基礎測試結構:函數式測試和類測試
- 參數化測試:使用不同數據集運行相同測試邏輯
- 夾具系統:資源管理和依賴注入
- 標記系統:分組、跳過和預期失敗測試
- 異常測試:驗證代碼是否按預期拋出異常
- 臨時文件處理:使用
tmp_path夾具 - 輸出捕獲:捕獲 stdout/stderr 和日志
- 并發測試:使用 pytest-xdist 插件
- 報告增強:Allure 報告集成
- 猴子補丁:動態修改測試環境
- 測試順序控制:管理測試執行順序
- 測試依賴:指定測試之間的依賴關系
- 工廠夾具:創建靈活的對象實例
- 配置管理:使用 pytest.ini
- 覆蓋率集成:使用 pytest-cov 插件
每個測試用例都包含詳細注釋,解釋了其目的和使用的 pytest 功能。通過運行這些測試并查看結果,您將能夠全面掌握 pytest 的核心功能和高級特性。


)


)


