問題描述
ROS里的虛擬機械臂可以實現和真實機械臂的位置同步,真實機械臂如何動,ROS里的虛擬機械臂就如何動
效果

步驟
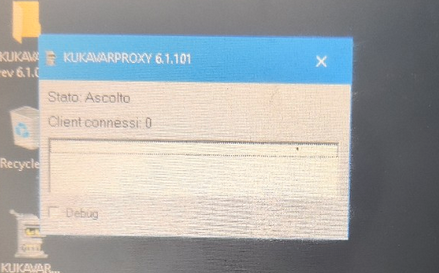
確保庫卡機械臂端安裝有EthernetKRL輔助軟件和KUKAVARPROXY 6.1.101(它是一個 TCP/IP 服務器 ,可通過網絡實現對庫卡機器人變量的讀取和寫入,負責 KUKA 控制器與遠程 PC 之間全局變量的交換。)
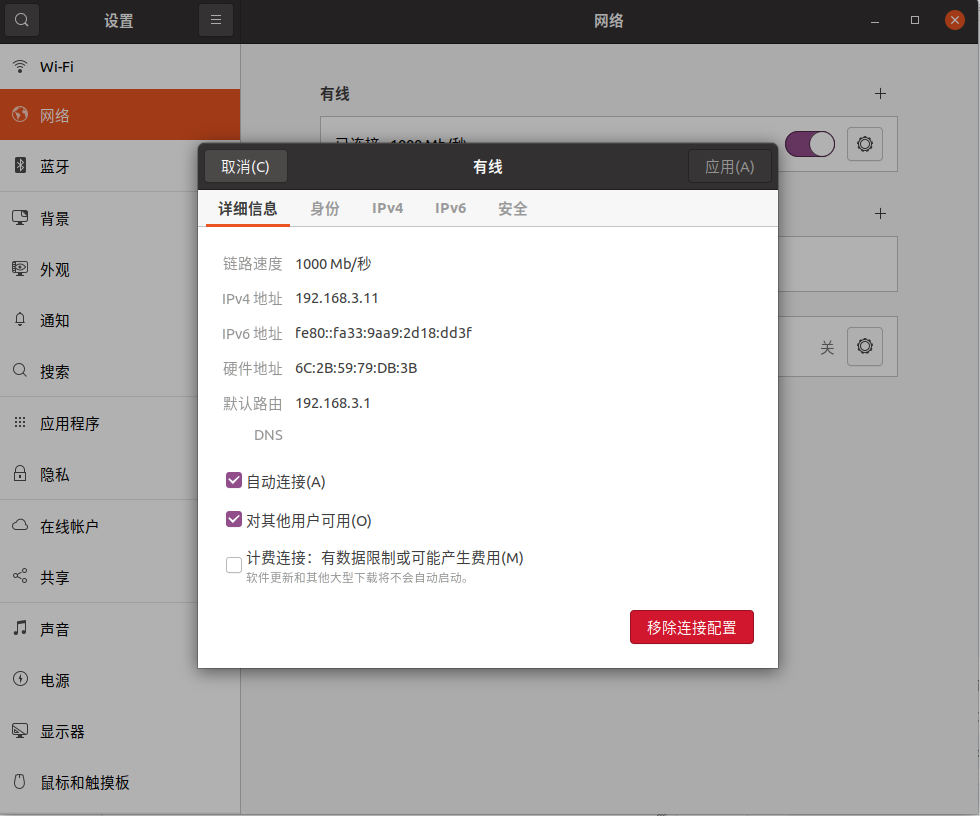
1.利用網線連接庫卡機械臂與上位機
機械臂IP在主目錄-投入運行-網絡配置里(IP:192.168.3.10? 端口:7000)將上位機有線連接的IP設置為與機械臂在同一網段下的IP
2. 打開上位機,終端輸入驗證是否可以實現IP端口連接
telnet 192.168.3.10 7000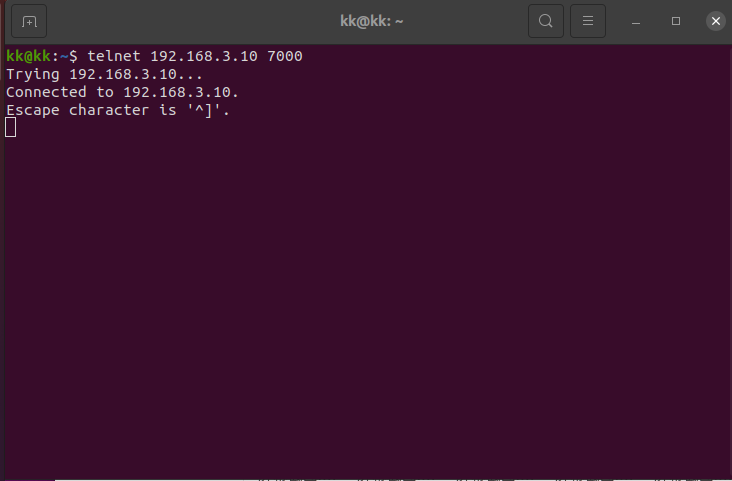
3. 編寫節點
創建功能包
cd ~/ws_moveit/src
catkin_create_pkg kuka_eki_interface roscpp moveit_ros_planning_interface sensor_msgs geometry_msgs boost_system在src目錄下創建kuka_eki_interface.cpp
touch kuka_eki_interface.cppkuka_eki_interface.cpp中寫入程序(需考慮真實機械臂和虛擬機械臂的坐標配準問題,我的虛擬機械臂的關節2和關節3與真實機械臂相差了+90度和-90度,需要手動在程序里進行配準)
#include <ros/ros.h>
#include <moveit/move_group_interface/move_group_interface.h>
#include <moveit/robot_state/robot_state.h>
#include <sensor_msgs/JointState.h>
#include <boost/asio.hpp>
#include <vector>
#include <string>
#include <thread>
#include <mutex>
#include <cmath>using namespace boost::asio;
using ip::tcp;std::vector<double> current_joint_positions(6, 0.0);
std::mutex data_mutex;
bool running = true;
bool has_valid_data = false;class KukaEKIInterface {
private:ros::NodeHandle nh_;std::string robot_ip_;int robot_port_;ros::Publisher joint_state_pub_;moveit::planning_interface::MoveGroupInterface move_group_;ros::Timer timer_;moveit::core::RobotStatePtr robot_state_;io_service ios;tcp::socket socket;tcp::endpoint endpoint;// 發送請求并接收響應bool sendRequestAndReceiveResponse(const std::vector<unsigned char>& request, std::vector<char>& response) {try {boost::system::error_code ec;socket.write_some(buffer(request), ec);if (ec) {ROS_ERROR("Failed to send request: %s", ec.message().c_str());return false;}size_t len = socket.read_some(buffer(response), ec);if (ec) {if (ec == boost::asio::error::eof) return false;ROS_ERROR("Failed to receive response: %s", ec.message().c_str());return false;}return true;} catch (std::exception& e) {ROS_ERROR("Exception in sending request and receiving response: %s", e.what());return false;}}// 獲取當前關節位置bool getCurrentJointPositions() {std::vector<unsigned char> axis_request = {0x00, 0x01, 0x00, 0x0c, 0x00, 0x00, 0x09, 0x24, 0x41, 0x58, 0x49, 0x53, 0x5f, 0x41, 0x43, 0x54};std::vector<char> axis_response(210);if (!sendRequestAndReceiveResponse(axis_request, axis_response)) {return false;}std::string axis_str(axis_response.begin() + 8, axis_response.end());return parseAxisData(axis_str);}// 解析軸數據bool parseAxisData(const std::string& data) {std::vector<double> new_positions(6, 0.0);std::vector<std::string> axis_names = {"A1", "A2", "A3", "A4", "A5", "A6"};for (size_t i = 0; i < axis_names.size(); ++i) {size_t start = data.find(axis_names[i]);if (start == std::string::npos) {ROS_ERROR("Axis %s not found", axis_names[i].c_str());return false;}start += axis_names[i].length();size_t end = data.find_first_of(",\n", start);if (end == std::string::npos) end = data.length();try {double deg = std::stod(data.substr(start, end - start));double rad = deg * M_PI / 180.0;// 調整J2方向并規范化角度,逆時針90度(pi/2弧度)if (i == 1) {//rad *= -1;  rad += M_PI / 2 ;  // 再加上逆時針90度的偏移}if (i == 2) {rad += -M_PI / 2 ;  // 再加上順時針90度的偏移}rad = fmod(rad + M_PI, 2*M_PI) - M_PI;new_positions[i] = rad;} catch (const std::exception& e) {ROS_ERROR("Parse error: %s", e.what());return false;}}std::lock_guard<std::mutex> lock(data_mutex);current_joint_positions = new_positions;return true;}// 更新MoveIt狀態void updateMoveItState() {auto new_state = std::make_shared<moveit::core::RobotState>(move_group_.getRobotModel());{std::lock_guard<std::mutex> lock(data_mutex);new_state->setJointGroupPositions("kuka_arm", current_joint_positions);}robot_state_.swap(new_state);}// 發布關節狀態void publishJointStates() {sensor_msgs::JointState joint_state;joint_state.header.stamp = ros::Time::now();joint_state.name = {"j1", "j2", "j3", "j4", "j5", "j6"};{std::lock_guard<std::mutex> lock(data_mutex);joint_state.position = current_joint_positions;}joint_state.velocity.assign(6, 0.0);joint_state.effort.assign(6, 0.0);joint_state_pub_.publish(joint_state);}// 定時器回調函數void timerCallback(const ros::TimerEvent& event) {if (!running || !ros::ok()) return;static ros::Time last_valid_time = ros::Time::now();bool success = getCurrentJointPositions();if (success) {// 更新MoveIt內部狀態updateMoveItState();// 發布關節狀態publishJointStates();last_valid_time = ros::Time::now();has_valid_data = true;} else {ROS_WARN_THROTTLE(1, "Failed to get joint positions");// 使用最后有效數據更新if ((ros::Time::now() - last_valid_time).toSec() < 1.0) {updateMoveItState();publishJointStates();}}}public:KukaEKIInterface() : nh_("~"),move_group_("kuka_arm"),socket(ios){nh_.param<std::string>("robot_ip", robot_ip_, "192.168.3.10");nh_.param<int>("robot_port", robot_port_, 7000);// 初始化機器人狀態robot_state_ = std::make_shared<moveit::core::RobotState>(move_group_.getRobotModel());try {// 連接機器人socket.connect(tcp::endpoint(ip::address::from_string(robot_ip_), robot_port_));ROS_INFO("Connected to KUKA at %s:%d", robot_ip_.c_str(), robot_port_);// 獲取初始狀態if (!getCurrentJointPositions()) {throw std::runtime_error("Initial position fetch failed");}updateMoveItState();// 初始化發布者joint_state_pub_ = nh_.advertise<sensor_msgs::JointState>("/joint_states", 1);// 配置MoveItmove_group_.setPlanningTime(0.1);move_group_.allowReplanning(true);move_group_.stop();  // 清除殘留運動// 設置定時器(50Hz)timer_ = nh_.createTimer(ros::Duration(0.02), &KukaEKIInterface::timerCallback, this);ROS_INFO("Interface initialized successfully");} catch (std::exception& e) {ROS_ERROR("Initialization failed: %s", e.what());throw;}}~KukaEKIInterface() {running = false;if (socket.is_open()) {socket.close();}}
};int main(int argc, char** argv) {ros::init(argc, argv, "kuka_eki_interface");ros::AsyncSpinner spinner(2);spinner.start();try {KukaEKIInterface interface;ros::waitForShutdown();} catch (const std::exception& e) {ROS_ERROR("Fatal error: %s", e.what());return 1;}return 0;
}
修改CMakeLists.txt
cmake_minimum_required(VERSION 3.0.2)
project(kuka_eki_interface)## Compile as C++11, supported in ROS Kinetic and newer
# add_compile_options(-std=c++11)## Find catkin macros and libraries
## if COMPONENTS list like find_package(catkin REQUIRED COMPONENTS xyz)
## is used, also find other catkin packages
find_package(catkin REQUIRED COMPONENTSgeometry_msgsmoveit_ros_planning_interfaceroscppsensor_msgs
)## System dependencies are found with CMake's conventions
find_package(Boost REQUIRED COMPONENTS system)## Uncomment this if the package has a setup.py. This macro ensures
## modules and global scripts declared therein get installed
## See http://ros.org/doc/api/catkin/html/user_guide/setup_dot_py.html
# catkin_python_setup()################################################
## Declare ROS messages, services and actions ##
################################################## To declare and build messages, services or actions from within this
## package, follow these steps:
## * Let MSG_DEP_SET be the set of packages whose message types you use in
##   your messages/services/actions (e.g. std_msgs, actionlib_msgs, ...).
## * In the file package.xml:
##   * add a build_depend tag for "message_generation"
##   * add a build_depend and a exec_depend tag for each package in MSG_DEP_SET
##   * If MSG_DEP_SET isn't empty the following dependency has been pulled in
##     but can be declared for certainty nonetheless:
##     * add a exec_depend tag for "message_runtime"
## * In this file (CMakeLists.txt):
##   * add "message_generation" and every package in MSG_DEP_SET to
##     find_package(catkin REQUIRED COMPONENTS ...)
##   * add "message_runtime" and every package in MSG_DEP_SET to
##     catkin_package(CATKIN_DEPENDS ...)
##   * uncomment the add_*_files sections below as needed
##     and list every .msg/.srv/.action file to be processed
##   * uncomment the generate_messages entry below
##   * add every package in MSG_DEP_SET to generate_messages(DEPENDENCIES ...)## Generate messages in the 'msg' folder
# add_message_files(
#   FILES
#   Message1.msg
#   Message2.msg
# )## Generate services in the 'srv' folder
# add_service_files(
#   FILES
#   Service1.srv
#   Service2.srv
# )## Generate actions in the 'action' folder
# add_action_files(
#   FILES
#   Action1.action
#   Action2.action
# )## Generate added messages and services with any dependencies listed here
# generate_messages(
#   DEPENDENCIES
#   geometry_msgs#   sensor_msgs
# )################################################
## Declare ROS dynamic reconfigure parameters ##
################################################## To declare and build dynamic reconfigure parameters within this
## package, follow these steps:
## * In the file package.xml:
##   * add a build_depend and a exec_depend tag for "dynamic_reconfigure"
## * In this file (CMakeLists.txt):
##   * add "dynamic_reconfigure" to
##     find_package(catkin REQUIRED COMPONENTS ...)
##   * uncomment the "generate_dynamic_reconfigure_options" section below
##     and list every .cfg file to be processed## Generate dynamic reconfigure parameters in the 'cfg' folder
# generate_dynamic_reconfigure_options(
#   cfg/DynReconf1.cfg
#   cfg/DynReconf2.cfg
# )###################################
## catkin specific configuration ##
###################################
## The catkin_package macro generates cmake config files for your package
## Declare things to be passed to dependent projects
## INCLUDE_DIRS: uncomment this if your package contains header files
## LIBRARIES: libraries you create in this project that dependent projects also need
## CATKIN_DEPENDS: catkin_packages dependent projects also need
## DEPENDS: system dependencies of this project that dependent projects also need
catkin_package(
#  INCLUDE_DIRS include
#  LIBRARIES kuka_eki_interface
#  CATKIN_DEPENDS boost_system geometry_msgs moveit_ros_planning_interface roscpp sensor_msgs
#  DEPENDS system_lib
)###########
## Build ##
############# Specify additional locations of header files
## Your package locations should be listed before other locations
include_directories(
# include${catkin_INCLUDE_DIRS}${Boost_INCLUDE_DIRS}
)## Declare a C++ library
# add_library(${PROJECT_NAME}
#   src/${PROJECT_NAME}/kuka_eki_interface.cpp
# )## Add cmake target dependencies of the library
## as an example, code may need to be generated before libraries
## either from message generation or dynamic reconfigure
# add_dependencies(${PROJECT_NAME} ${${PROJECT_NAME}_EXPORTED_TARGETS} ${catkin_EXPORTED_TARGETS})## Declare a C++ executable
## With catkin_make all packages are built within a single CMake context
## The recommended prefix ensures that target names across packages don't collide
# add_executable(${PROJECT_NAME}_node src/kuka_eki_interface_node.cpp)
add_executable(kuka_eki_interface src/kuka_eki_interface.cpp)## Rename C++ executable without prefix
## The above recommended prefix causes long target names, the following renames the
## target back to the shorter version for ease of user use
## e.g. "rosrun someones_pkg node" instead of "rosrun someones_pkg someones_pkg_node"
# set_target_properties(${PROJECT_NAME}_node PROPERTIES OUTPUT_NAME node PREFIX "")## Add cmake target dependencies of the executable
## same as for the library above
# add_dependencies(${PROJECT_NAME}_node ${${PROJECT_NAME}_EXPORTED_TARGETS} ${catkin_EXPORTED_TARGETS})## Specify libraries to link a library or executable target against
# target_link_libraries(${PROJECT_NAME}_node
#   ${catkin_LIBRARIES}
# )
target_link_libraries(kuka_eki_interface${catkin_LIBRARIES}${Boost_LIBRARIES}
)#############
## Install ##
############## all install targets should use catkin DESTINATION variables
# See http://ros.org/doc/api/catkin/html/adv_user_guide/variables.html## Mark executable scripts (Python etc.) for installation
## in contrast to setup.py, you can choose the destination
# catkin_install_python(PROGRAMS
#   scripts/my_python_script
#   DESTINATION ${CATKIN_PACKAGE_BIN_DESTINATION}
# )## Mark executables for installation
## See http://docs.ros.org/melodic/api/catkin/html/howto/format1/building_executables.html
# install(TARGETS ${PROJECT_NAME}_node
#   RUNTIME DESTINATION ${CATKIN_PACKAGE_BIN_DESTINATION}
# )## Mark libraries for installation
## See http://docs.ros.org/melodic/api/catkin/html/howto/format1/building_libraries.html
# install(TARGETS ${PROJECT_NAME}
#   ARCHIVE DESTINATION ${CATKIN_PACKAGE_LIB_DESTINATION}
#   LIBRARY DESTINATION ${CATKIN_PACKAGE_LIB_DESTINATION}
#   RUNTIME DESTINATION ${CATKIN_GLOBAL_BIN_DESTINATION}
# )
install(TARGETS kuka_eki_interfaceRUNTIME DESTINATION ${CATKIN_PACKAGE_BIN_DESTINATION}
)## Mark cpp header files for installation
# install(DIRECTORY include/${PROJECT_NAME}/
#   DESTINATION ${CATKIN_PACKAGE_INCLUDE_DESTINATION}
#   FILES_MATCHING PATTERN "*.h"
#   PATTERN ".svn" EXCLUDE
# )## Mark other files for installation (e.g. launch and bag files, etc.)
# install(FILES
#   # myfile1
#   # myfile2
#   DESTINATION ${CATKIN_PACKAGE_SHARE_DESTINATION}
# )#############
## Testing ##
############### Add gtest based cpp test target and link libraries
# catkin_add_gtest(${PROJECT_NAME}-test test/test_kuka_eki_interface.cpp)
# if(TARGET ${PROJECT_NAME}-test)
#   target_link_libraries(${PROJECT_NAME}-test ${PROJECT_NAME})
# endif()## Add folders to be run by python nosetests
# catkin_add_nosetests(test)
4.修改一下啟動文件demo.launch的配置
(我的節點程序里發布了一個關節狀態(fake控制器),與demo.launch里發布的虛擬關節狀態發生線性沖突,需要注釋掉虛擬關節的發布,否則MoveIt 會交替接收兩種不同的關節狀態,造成顯示跳躍。)
<launch><!-- specify the planning pipeline --><arg name="pipeline" default="ompl" /><!-- By default, we do not start a database (it can be large) --><arg name="db" default="false" /><!-- Allow user to specify database location --><arg name="db_path" default="$(find kuka4_moveit_config)/default_warehouse_mongo_db" /><!-- By default, we are not in debug mode --><arg name="debug" default="false" /><!-- By default, we will load or override the robot_description --><arg name="load_robot_description" default="true"/><!-- Choose controller manager: fake, simple, or ros_control --><arg name="moveit_controller_manager" default="fake" /><!-- Set execution mode for fake execution controllers --><arg name="fake_execution_type" default="interpolate" /><!-- By default, hide joint_state_publisher's GUI in 'fake' controller_manager mode --><arg name="use_gui" default="false" /><arg name="use_rviz" default="true" /><!-- If needed, broadcast static tf for robot root --><node pkg="tf2_ros" type="static_transform_publisher" name="virtual_joint_broadcaster_0" args="0 0 0 0 0 0 world base_link" /><!-- 完全禁用 fake 控制器//確保ros機械臂不會出現向原始關節狀態跳躍閃動 -->
<!--
<group if="$(eval arg('moveit_controller_manager') == 'fake')"><node name="joint_state_publisher" pkg="joint_state_publisher" type="joint_state_publisher" unless="$(arg use_gui)"><rosparam param="source_list">[move_group/fake_controller_joint_states]</rosparam></node><node name="joint_state_publisher" pkg="joint_state_publisher_gui" type="joint_state_publisher_gui" if="$(arg use_gui)"><rosparam param="source_list">[move_group/fake_controller_joint_states]</rosparam></node><node name="robot_state_publisher" pkg="robot_state_publisher" type="robot_state_publisher" respawn="true" output="screen" />
</group>
--><!-- Run the main MoveIt executable without trajectory execution (we do not have controllers configured by default) --><include file="$(dirname)/move_group.launch"><arg name="allow_trajectory_execution" value="true"/><arg name="moveit_controller_manager" value="$(arg moveit_controller_manager)" /><arg name="fake_execution_type" value="$(arg fake_execution_type)"/><arg name="info" value="true"/><arg name="debug" value="$(arg debug)"/><arg name="pipeline" value="$(arg pipeline)"/><arg name="load_robot_description" value="$(arg load_robot_description)"/></include><!-- Run Rviz and load the default config to see the state of the move_group node --><include file="$(dirname)/moveit_rviz.launch" if="$(arg use_rviz)"><arg name="rviz_config" value="$(dirname)/moveit.rviz"/><arg name="debug" value="$(arg debug)"/></include><!-- If database loading was enabled, start mongodb as well --><include file="$(dirname)/default_warehouse_db.launch" if="$(arg db)"><arg name="moveit_warehouse_database_path" value="$(arg db_path)"/></include></launch>
5.編譯運行
catkin build
確保所有功能包正確被編譯
啟動機械臂
roslaunch kuka4_moveit_config demo.launch運行編譯的節點
rosrun kuka_eki_interface kuka_eki_interface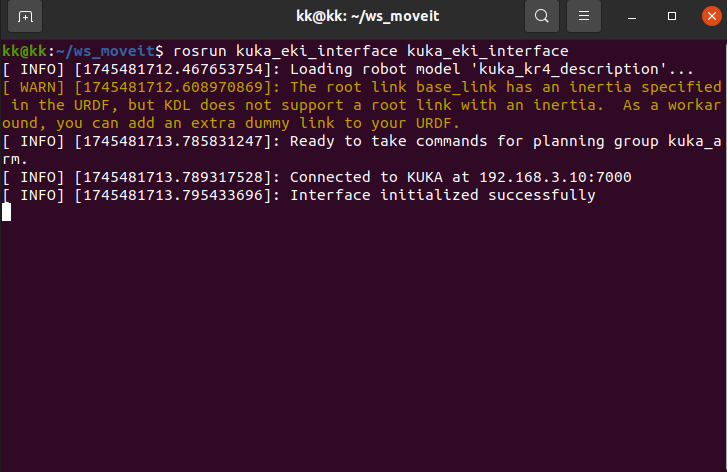
?
實現真機向虛擬機械臂映射


)


解決 Vue 項目中路徑別名 `@` 在 IDE 中報錯無法識別的問題)
)
![[論文閱讀]REPLUG: Retrieval-Augmented Black-Box Language Models](http://pic.xiahunao.cn/[論文閱讀]REPLUG: Retrieval-Augmented Black-Box Language Models)