一、步驟
1、目前支持ESP32
2、同一個局域網
3、上位機要安裝代理(電腦或者linux設備)
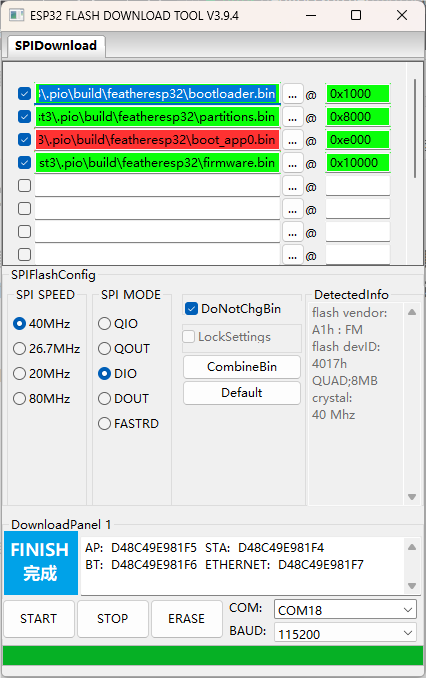
4、可直接通過USB下載,也可以使用官方燒錄工具,具體的分區表地址要從USB燒錄的時候日志查看,一共四個文件,第三個文件在安裝目錄下。
4.1在Platformio項目下終端運行命令燒錄
platformio.ini文件
; PlatformIO Project Configuration File
;
;   Build options: build flags, source filter
;   Upload options: custom upload port, speed and extra flags
;   Library options: dependencies, extra library storages
;   Advanced options: extra scripting
;
; Please visit documentation for the other options and examples
; https://docs.platformio.org/page/projectconf.html[env:featheresp32]
platform = espressif32
board = featheresp32
framework = arduino
board_microros_transport = wifi
lib_deps = https://gitee.com/ohhuo/micro_ros_platformio.git
main.cpp文件
#include <Arduino.h>
#include <micro_ros_platformio.h>
#include <WiFi.h>
#include <rcl/rcl.h>
#include <rclc/rclc.h>
#include <rclc/executor.h>rclc_executor_t executor;
rclc_support_t support;
rcl_allocator_t allocator;
rcl_node_t node;void setup()
{Serial.begin(115200);// 設置通過WIFI進行MicroROS通信IPAddress agent_ip;agent_ip.fromString("192.168.31.79");// 設置wifi名稱,密碼,電腦IP,端口號set_microros_wifi_transports("Xiaomi_320C", "66222888", agent_ip, 8888);// 延時時一段時間,等待設置完成delay(2000);// 初始化內存分配器allocator = rcl_get_default_allocator();// 創建初始化選項rclc_support_init(&support, 0, NULL, &allocator);// 創建節點 microros_wifirclc_node_init_default(&node, "microros_wifi", "", &support);// 創建執行器rclc_executor_init(&executor, &support.context, 1, &allocator);
}void loop()
{delay(100);// 循環處理數據rclc_executor_spin_some(&executor, RCL_MS_TO_NS(100));
}
pio run -v -t upload
4.2 官方工具燒錄
5、上位機安裝 代理
官方安裝參考
安裝參考
注意:
sudo apt install ros-foxy-micro-ros-msgs
6、上位機運行代理
6.1
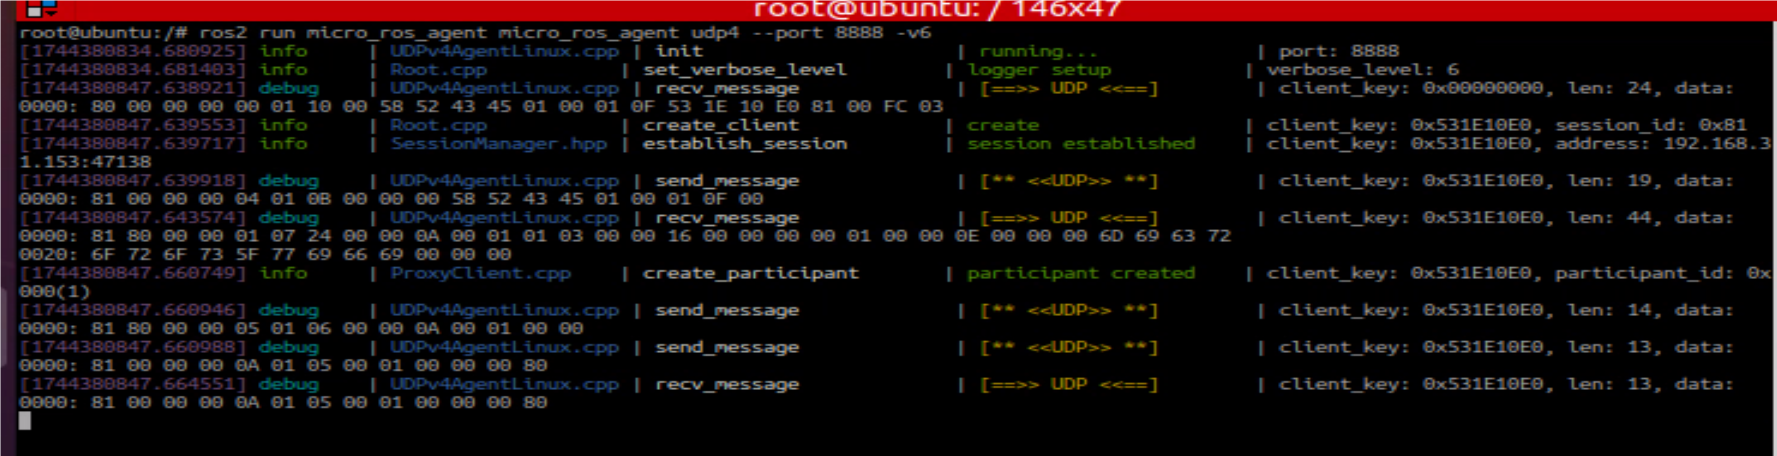
ros2 run micro_ros_agent micro_ros_agent udp4 --port 8888 -v6
或者
ros2 run micro_ros_agent micro_ros_agent serial --dev /dev/ttyUSB0
6.2 重啟ESP32
7、上位機查看


圖形工具總結(二))
)


:類與繼承)


)

