宏碁筆記本電腦擎7PRO搭載的 NVIDIA RTX 5080 顯卡是一款高性能移動 GPU,基于 NVIDIA 最新的 Blackwell 架構設計,通過修正架構(Blackwell)、顯存類型與帶寬(GDDR7、960GB/s)、Tensor Core 與 RT Core 全面代際升級。專為滿足深度學習、科學計算和圖形密集型任務需求而優化。
第一部分:宏碁筆記本電腦5080顯卡介紹
RTX 5080 顯卡作為 NVIDIA 移動工作站系列的高端產品,具有以下顯著特點:
第一,CUDA 核心數量:超過 5000 個,提供強大的并行計算能力。
第二,顯存配置:配備 16GB GDDR7 顯存,帶寬高達 960GB/s。
第三,計算能力:支持 FP32、FP64 和 INT8 計算,特別適合深度學習訓練與推理。
第四,Tensor Core:第五代 Tensor Core,加速混合精度訓練。
第五,RT Core:第四代 RT Core,支持實時光線追蹤,對 3D 渲染和科學可視化有顯著提升。
第六,DLSS:支持 DLSS 4,進一步提升圖形渲染效率。
性能表現
在深度學習任務中,RTX 5080 顯卡相比前代產品有顯著提升:
1,訓練 ResNet - 50 模型速度提升約 40%;
2,推理性能提高 50% 以上;
3,支持更大的 batch size,提高訓練效率。
軟件兼容性
RTX 5080 顯卡完全兼容主流深度學習框架:PyTorch(需適配 CUDA 版本)、TensorFlow、MXNet 等該顯卡還支持 NVIDIA 專為深度學習優化的軟件棧,包括 cuDNN、TensorRT 等,可以充分發揮硬件性能。
第二部分:RTX 5080顯卡安裝PyTorch的步驟
Windows 11 64位已經安裝了python 3.13,使用NVIDIA App安裝驅動572.83版本。
1,安裝CUDA Toolkit 12.8 Update 1
訪問NVIDIA官方下載頁面:
https://developer.nvidia.com/cuda-downloads?target_os=Windows&target_arch=x86_64&target_version=11&target_type=exe_local
選擇"Windows"、"x86_64"、"11"和"exe(local)"選項下載安裝包
運行安裝程序,選擇"自定義安裝",取消勾選"Driver components"(避免覆蓋現有驅動)
安裝完成后,添加環境變量:

?
2,安裝cuDNN 9.8.0
1,下載地址:
https://developer.nvidia.com/cudnn-downloads?target_os=Windows&target_arch=x86_64&target_version=Agnostic&cuda_version=11
2,解壓下載的ZIP文件,將以下文件夾內容復制到CUDA安裝目錄:
bin → C:\Program Files\NVIDIA GPU Computing Toolkit\CUDA\v12.8\bin
include → C:\Program Files\NVIDIA GPU Computing Toolkit\CUDA\v12.8\include
lib → C:\Program Files\NVIDIA GPU Computing Toolkit\CUDA\v12.8\lib\x64
3,環境變量PATH添加:

4,驗證安裝:
#檢查cuDNN是否安裝成功
cd C:\Program Files\NVIDIA GPU Computing Toolkit\CUDA\v12.8\extras\demo_suite\
bandwidthTest.exe
deviceQuery.exe
兩個命令都應返回"Result = PASS"
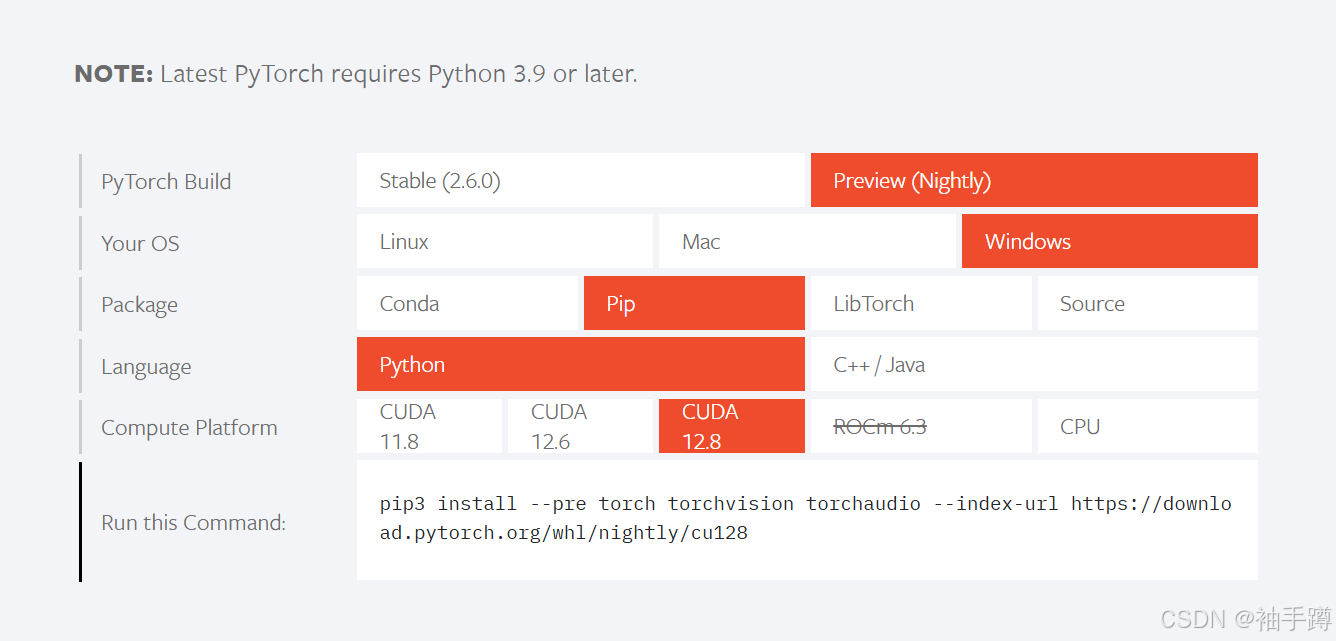
3,安裝PyTorch預覽版
按照官方給出的命令,由于國內網絡環境問題安裝過程過于漫長,建議使用迅雷下載whl文件以后再安裝。
(1)分別下載torch、torchvision和torchaudiowhl文件(注意選擇Python 3.13和cu128版本對應關系):
https://download.pytorch.org/whl/nightly/cu128/torch
https://download.pytorch.org/whl/nightly/cu128/torchvision
https://download.pytorch.org/whl/nightly/cu128/torchaudio
(2)創建虛擬環境和安裝:
cd E:\workspace\mytorch
python -m venv .ven
.ven\Scripts\activate
python.exe -m pip install --upgrade pip
pip3 install wheel
pip3 install torch-2.8.0.dev20250404+cu128-cp313-cp313-win_amd64.whl
pip3 install --no-deps torchvision-0.22.0.dev20250404+cu128-cp313-cp313-win_amd64.whl
pip3 install --no-deps torchaudio-2.6.0.dev20250404+cu128-cp313-cp313-win_amd64.whl
(3)驗證安裝:
創建check_cuda.py文件,內容如下:
import torch
import torchaudio
import torchvisionprint(f"PyTorch version: {torch.__version__}")
print(f"Torchaudio version: {torchaudio.__version__}")
print(f"Torchvision version: {torchvision.__version__}")
print(f"CUDA available: {torch.cuda.is_available()}")if torch.cuda.is_available():print(f"CUDA version: {torch.version.cuda}")print(f"Device count: {torch.cuda.device_count()}")print(f"Current device: {torch.cuda.current_device()}")print(f"Device name: {torch.cuda.get_device_name(0)}")# Test torchaudio functionalityprint("\nTorchaudio tests:")try:# 生成測試音頻test_audio = torch.rand(1, 16000)  # 1通道,16000采樣點print(f"Generated test audio: {test_audio.shape}")# 測試頻譜圖spectrogram = torchaudio.transforms.Spectrogram()(test_audio)print(f"Spectrogram test passed: {spectrogram.shape}")except Exception as e:print(f"Torchaudio test failed: {str(e)}")# Test torchvision functionalityprint("\nTorchvision tests:")try:# 生成測試圖像test_img = torch.rand(3, 256, 256)  # 3通道,256x256print(f"Generated test image: {test_img.shape}")# 測試調整大小resized = torchvision.transforms.Resize((128, 128))(test_img)print(f"Resize test passed: {resized.shape}")except Exception as e:print(f"Torchvision test failed: {str(e)}")
else:print("CUDA is not available")
(4)實驗結果:


 --- 中的多協議與漏洞利用技術(雜項知識點 重點) 持續更新)


)


)


)