目錄
六 RabbitMQ工作模式
6.1Hello World簡單模式
6.1.1 什么是簡單模式
6.1.2 RabbitMQ管理界面操作
6.1.3 生產者代碼
6.1.4 消費者代碼
6.2 Work queues工作隊列模式
6.2.1 什么是工作隊列模式
6.2.2 RabbitMQ管理界面操作
6.2.3 生產者代碼
6.2.4 消費者代碼
6.3 三種模式概覽
6.4 Publish/Subscribe發布與訂閱模式
6.4.1 什么是發布訂閱模式
6.4.2 RabbitMQ管理界面操作
6.4.3 生產者代碼
6.4.4 消費者代碼
6.5 Routing路由模式
6.5.1 什么是路由模式
6.5.2 RabbitMQ管理界面操作
6.5.3 生產者代碼
6.5.4 消費者代碼
6.6 Topics通配符模式(主題模式)
6.6.1 什么是通配符(主題)模式
6.6.2 RabbitMQ管理界面操作
6.6.3 生產者代碼
6.6.4 消費者代碼
6.7 模式總結RabbitMQ
6.8 使用代碼創建隊列和交換機
6.8.1 初始化exchange、queue
6.8.2 發布消息到RabbitMQ
6.8.3 創建消費者監聽消息
官方文檔? RabbitMQ Documentation | RabbitMQ
?MQ全稱為Message Queue,消息隊列是應用程序和應用程序之間的通信方法。
RabbitMQ是一個Erlang開發的AMQP(高級消息排隊 協議)(英文全稱:Advanced Message Queuing Protocol )的開源實現。-------------接上章?
六 RabbitMQ工作模式
6.1Hello World簡單模式
6.1.1 什么是簡單模式

在上圖的模型中,有以下概念:
P:生產者: 也就是要發送消息的程序
C:消費者:消息的接受者,會一直等待消息到來。
queue:消息隊列,圖中紅色部分。類似一個郵箱,可以緩存消息;生產者向其中投遞消息,消費者從其中取出消息。
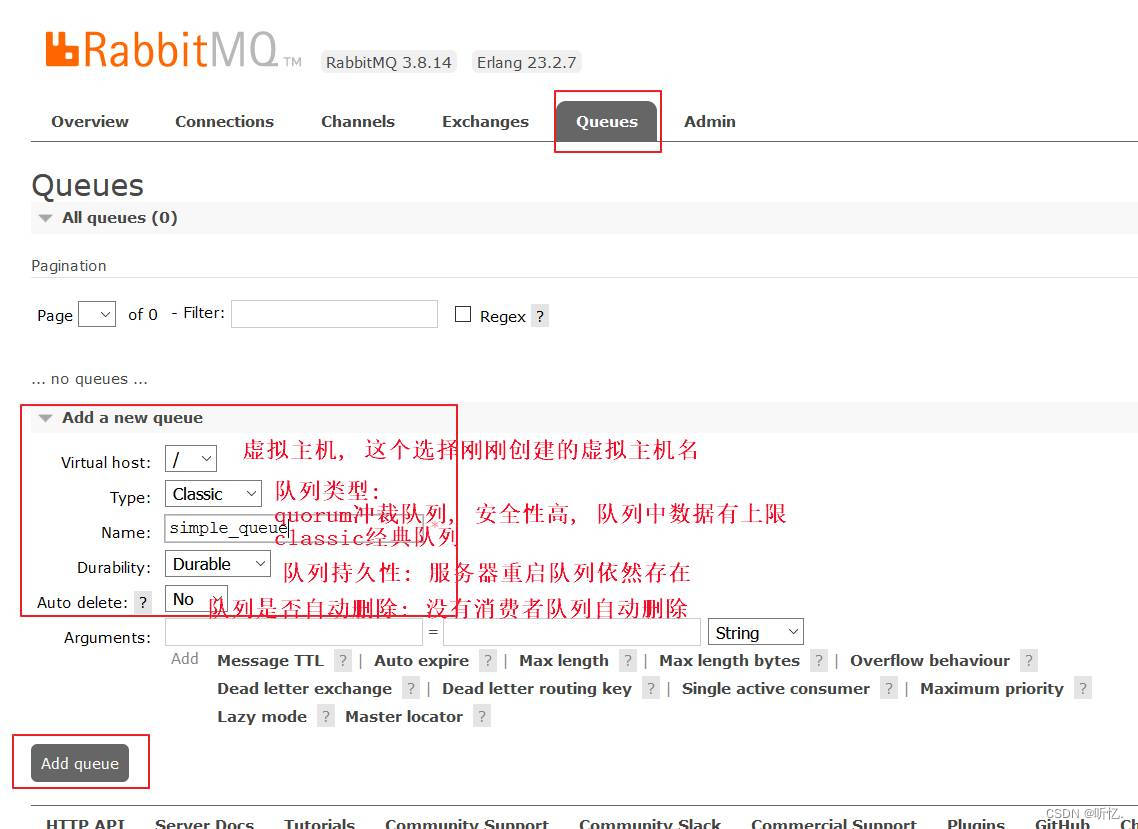
6.1.2 RabbitMQ管理界面操作
-
創建simple_queue隊列用于演示Hello World簡單模式
6.1.3 生產者代碼
-
rabbitmq_producer項目測試代碼如下:
package com.tingyi.test;
?
import com.tingyi.rabbitmq.ProducerApplication;
import org.junit.Test;
import org.junit.runner.RunWith;
import org.springframework.amqp.rabbit.core.RabbitTemplate;
import org.springframework.beans.factory.annotation.Autowired;
import org.springframework.boot.test.context.SpringBootTest;
import org.springframework.test.context.junit4.SpringRunner;
?
/*** @author 聽憶*/
@SpringBootTest(classes = ProducerApplication.class)
@RunWith(SpringRunner.class)
public class TestSimple {@Autowiredprivate RabbitTemplate rabbitTemplate;
?@Testpublic void testSimpleSend() {rabbitTemplate.convertAndSend("simple_queue", "你好哇, 聽憶!");}
}
6.1.4 消費者代碼
-
rabbitmq_consumer項目創建監聽器:
@Component
@RabbitListener(queues = "simple_queue")
public class SimpleListen {
?@RabbitHandlerpublic void onMessage(String message){System.out.println(message);}
}
然后啟動ConsumerApplication.java, 就可以接收到RabbitMQ服務器發送來的消息
6.2 Work queues工作隊列模式
6.2.1 什么是工作隊列模式
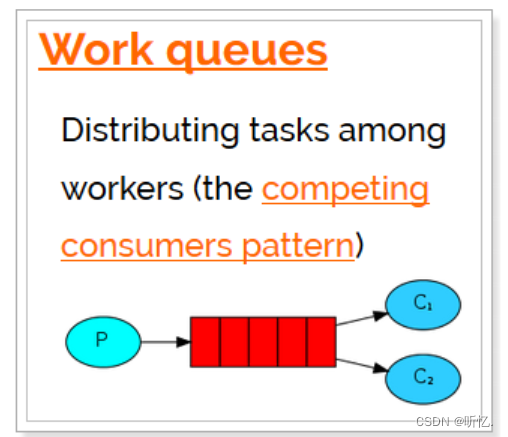
Work Queues與入門程序的簡單模式相比,多了一個或一些消費端,多個消費端共同消費同一個隊列中的消息。應用場景:對于任務過重或任務較多情況使用工作隊列可以提高任務處理的速度。
在一個隊列中如果有多個消費者,那么消費者之間對于同一個消息的關系是競爭的關系。
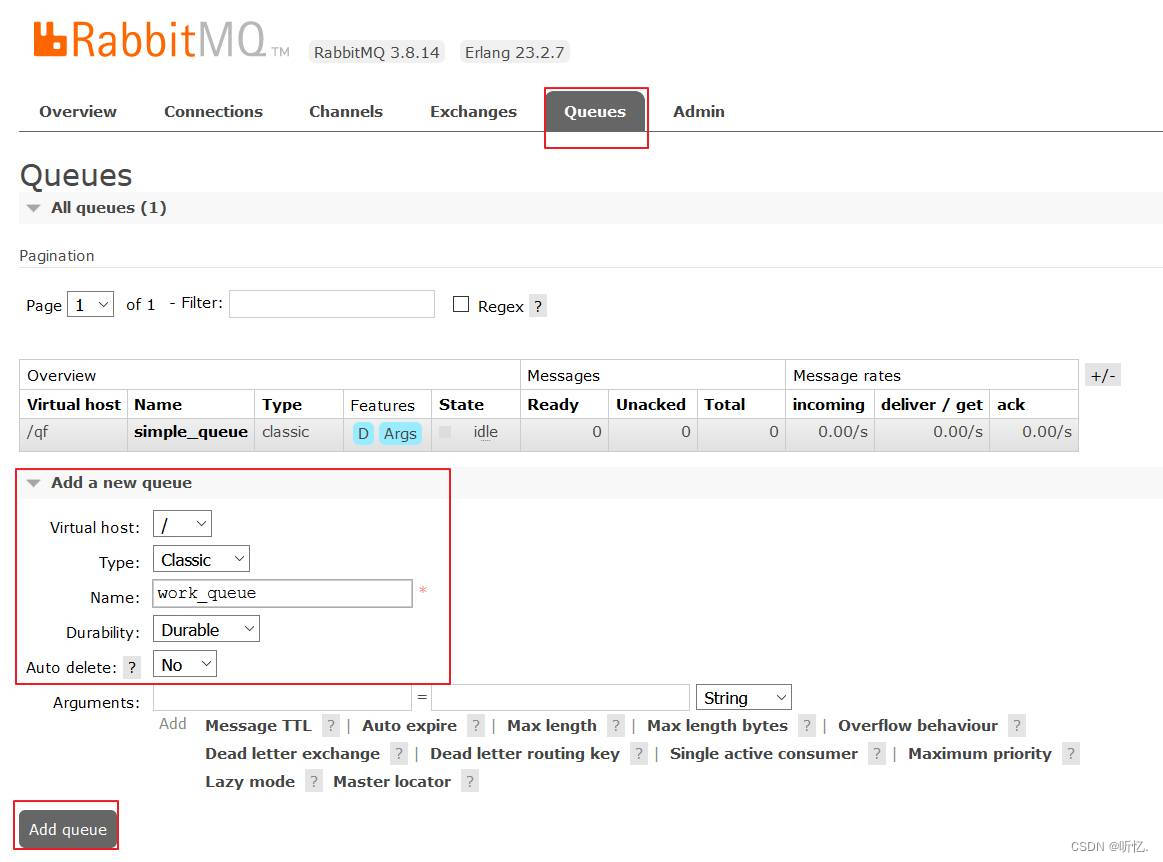
6.2.2 RabbitMQ管理界面操作
-
創建
work_queue隊列用于演示work工作隊列模式
6.2.3 生產者代碼
rabbitmq_producer項目測試代碼如下:
package com.qf.test;
?
import com.tingyi.rabbitmq.ProducerApplication;
import org.junit.Test;99
import org.junit.runner.RunWith;
import org.springframework.amqp.rabbit.core.RabbitTemplate;
import org.springframework.beans.factory.annotation.Autowired;
import org.springframework.boot.test.context.SpringBootTest;
import org.springframework.test.context.junit4.SpringRunner;
?
/*** @author 聽憶*/
@SpringBootTest(classes = ProducerApplication.class)
@RunWith(SpringRunner.class)
public class TestWork {@Autowiredprivate RabbitTemplate rabbitTemplate;
?@Testpublic void testWorkSend() {for (int i = 0; i < 1000; i++){rabbitTemplate.convertAndSend("work_queue", "你好哇, 聽憶" + i);}
?}
}
6.2.4 消費者代碼
-
rabbitmq_consumer項目創建監聽器1:
package com.tingyi.rabbitmq.work;
?
import org.springframework.amqp.rabbit.annotation.RabbitHandler;
import org.springframework.amqp.rabbit.annotation.RabbitListener;
import org.springframework.stereotype.Component;
?
/*** @author 聽憶*/
@Component
@RabbitListener(queues = "work_queue")
public class WorkListener1 {@RabbitHandlerpublic void testListener(String message) {System.out.println("======WorkListener1接收到的消息為:======" + message);}
}-
rabbitmq_consumer項目創建監聽器2:
package com.tingyi.rabbitmq.work;
?
import org.springframework.amqp.rabbit.annotation.RabbitHandler;
import org.springframework.amqp.rabbit.annotation.RabbitListener;
import org.springframework.stereotype.Component;
?
/*** @author 聽憶*/
@Component
@RabbitListener(queues = "work_queue")
public class WorkListener2 {@RabbitHandlerpublic void testListener(String message) {System.out.println("======WorkListener2接收到的消息為:======" + message);}
}
6.3 三種模式概覽

前面2個案例中,只有3個角色:
-
P:生產者,也就是要發送消息的程序
-
C:消費者:消息的接受者,會一直等待消息到 來。
-
queue:消息隊列,圖中紅色部分
而在訂閱模型中,多了一個exchange角色,而且過程略有變化:
-
P:生產者,也就是要發送消息的程序,但是不再發送到隊列中,而是發給X(交換機)
-
C:消費者,消息的接受者,會一直等待消息到來。
-
Queue:消息隊列,接收消息、緩存消息。
-
Exchange:交換機,圖中的X。一方面,接收生產者發送的消息。另一方面,知道如何處理消息,例如遞交給某個特別隊列、遞交給所有隊列、或是將消息丟棄。到底如何操作,取決于Exchange的類型。
Exchange有常見以下3種類型:
-
? Fanout:廣播 將消息交給所有綁定到交換機的隊列, 不處理路由鍵。只需要簡單的將隊列綁定到交換機上。fanout 類型交換機轉發消息是最快的。
-
? Direct:定向 把消息交給符合指定routing key 的隊列. 處理路由鍵。需要將一個隊列綁定到交換機上,要求該消息與一個特定的路由鍵完全匹配。如果一個隊列綁定到該交換機上要求路由鍵 “dog”,則只有被標記為 “dog” 的消息才被轉發,不會轉發 dog.puppy,也不會轉發 dog.guard,只會轉發dog。
其中,路由模式使用的是 direct 類型的交換機。
-
? Topic:主題(通配符) 把消息交給符合routing pattern(路由模式)的隊列. 將路由鍵和某模式進行匹配。此時隊列需要綁定要一個模式上。符號
#匹配一個或多個詞,符號*匹配不多不少一個詞。因此“audit.#” 能夠匹配到“audit.irs.corporate”,但是“audit.*” 只會匹配到 “audit.irs”。
其中,主題模式(通配符模式)使用的是 topic 類型的交換機。
-
Exchange(交換機)只負責轉發消息,不具備存儲消息的能力,因此如果沒有任何隊列與Exchange綁定,或者沒有符合路由規則的隊列,那么消息會丟失
6.4 Publish/Subscribe發布與訂閱模式
6.4.1 什么是發布訂閱模式

發布訂閱模式:
? 1、每個消費者監聽自己的隊列。
? 2、生產者將消息發給broker,由交換機將消息轉發到綁定此交換機的每個隊列,每個綁定交換機的隊列都將接收到消息
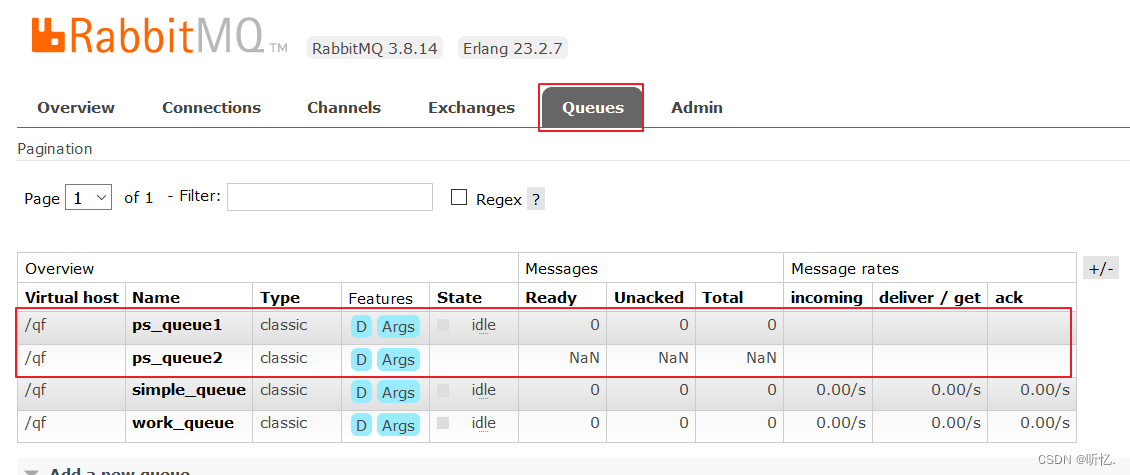
6.4.2 RabbitMQ管理界面操作
-
創建兩個隊列
ps_queue1和ps_queue2
-
創建Exchange交換器
fanout_exchange
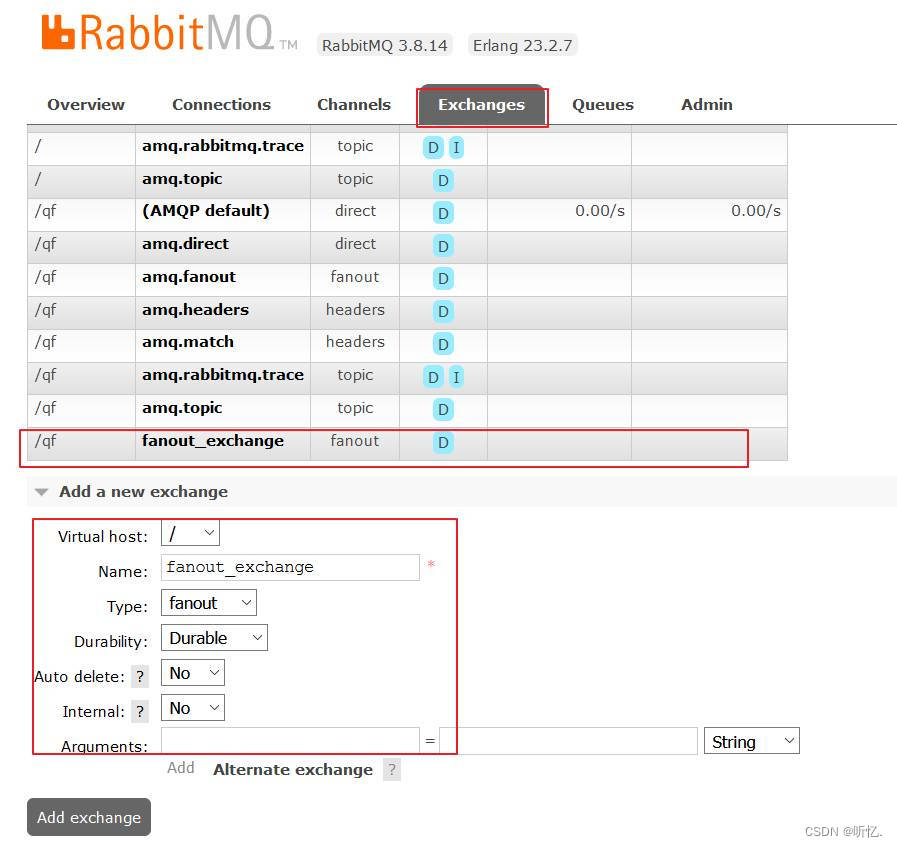
-
將創建的fanout_exchange交換器和
ps_queue1,ps_queue2隊列綁定

6.4.3 生產者代碼
-
rabbitmq_producer項目測試代碼如下:
package com.tingyi.test;
?
import com.tingyi.rabbitmq.ProducerApplication;
import org.junit.Test;
import org.junit.runner.RunWith;
import org.springframework.amqp.rabbit.core.RabbitTemplate;
import org.springframework.beans.factory.annotation.Autowired;
import org.springframework.boot.test.context.SpringBootTest;
import org.springframework.test.context.junit4.SpringRunner;
?
/*** @author 聽憶*/
@SpringBootTest(classes = ProducerApplication.class)
@RunWith(SpringRunner.class)
public class TestPubAndSub {@Autowiredprivate RabbitTemplate rabbitTemplate;
?@Testpublic void testPubAndSubSend() {for(int i = 1; i < 100; i++) {rabbitTemplate.convertAndSend("fanout_exchange","" , "你好哇,2024聽憶 " + i);}}
}
6.4.4 消費者代碼
-
rabbitmq_consumer項目創建監聽器:
package com.tingyi.rabbitmq.ps;
?
import org.springframework.amqp.rabbit.annotation.RabbitHandler;
import org.springframework.amqp.rabbit.annotation.RabbitListener;
import org.springframework.stereotype.Component;
?
/*** @author 聽憶*/
@Component
@RabbitListener(queues = "ps_queue1")
public class TestListener1 {@RabbitHandlerpublic void testListener(String message) {System.out.println("======ps_queue1接收到的消息為:======" + message);}
}-
rabbitmq_consumer項目創建監聽器:
package com.tingyi.rabbitmq.ps;
?
import org.springframework.amqp.rabbit.annotation.RabbitHandler;
import org.springframework.amqp.rabbit.annotation.RabbitListener;
import org.springframework.stereotype.Component;
?
/*** @author 聽憶*/
@Component
@RabbitListener(queues = "ps_queue2")
public class TestListener2 {@RabbitHandlerpublic void testListener(String message) {System.out.println("======ps_queue2接收到的消息為:======" + message);}
}
6.5 Routing路由模式
6.5.1 什么是路由模式
路由模式特點:隊列與交換機的綁定,不能是任意綁定了,而是要指定一個RoutingKey(路由key)消息的發送方在向 Exchange發送消息時,也必須指定消息的RoutingKey。Exchange不再把消息交給每一個綁定的隊列,而是根據消息的Routing Key進行判斷,只有隊列的Routingkey與消息的Routing key完全一致,才會接收到消息.

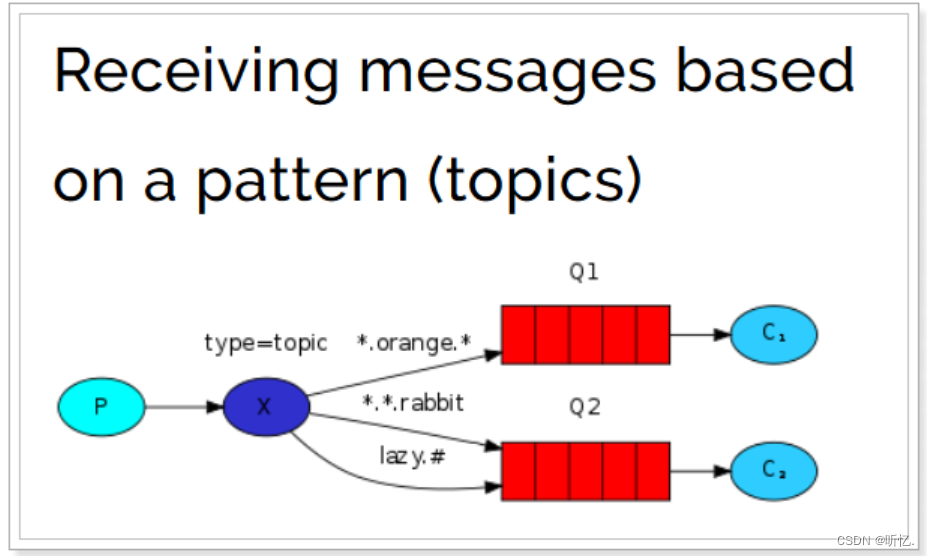
圖解:
P:生產者,向Exchange發送消息,發送消息時,會指定一個routing key。
X:Exchange(交換機),接收生產者的消息,然后把消息遞交給與routing key完全匹配的隊列
C1:消費者,其所在隊列指定了需要routing key 為 error 的消息
C2:消費者,其所在隊列指定了需要routing key 為 info、error、warning 的消息
6.5.2 RabbitMQ管理界面操作
-
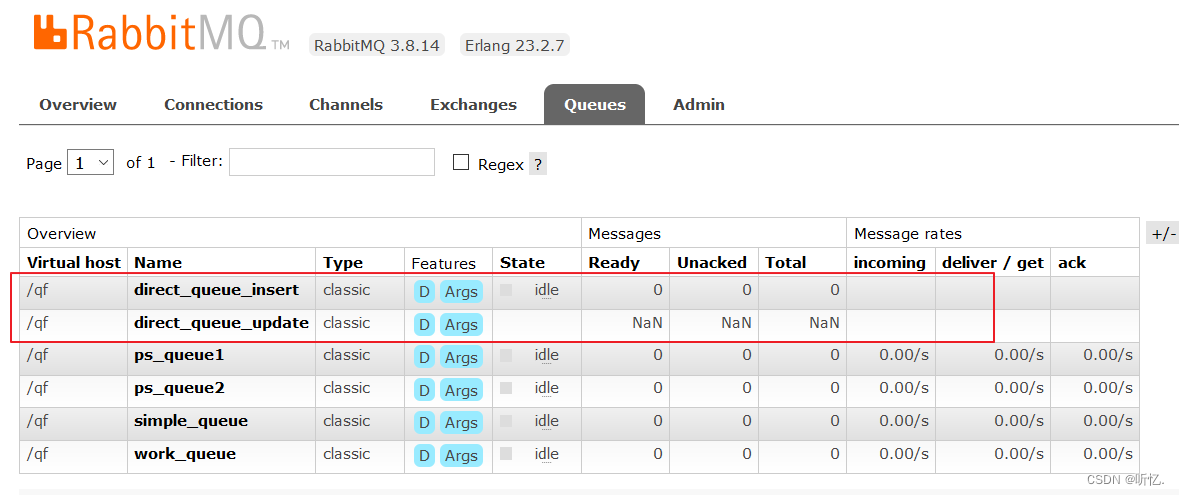
創建兩個隊列分別叫做
direct_queue_insert和direct_queue_update用戶演示
-
創建交換器
direct_exchange, 類型為direct, 用于演示路由模式

-
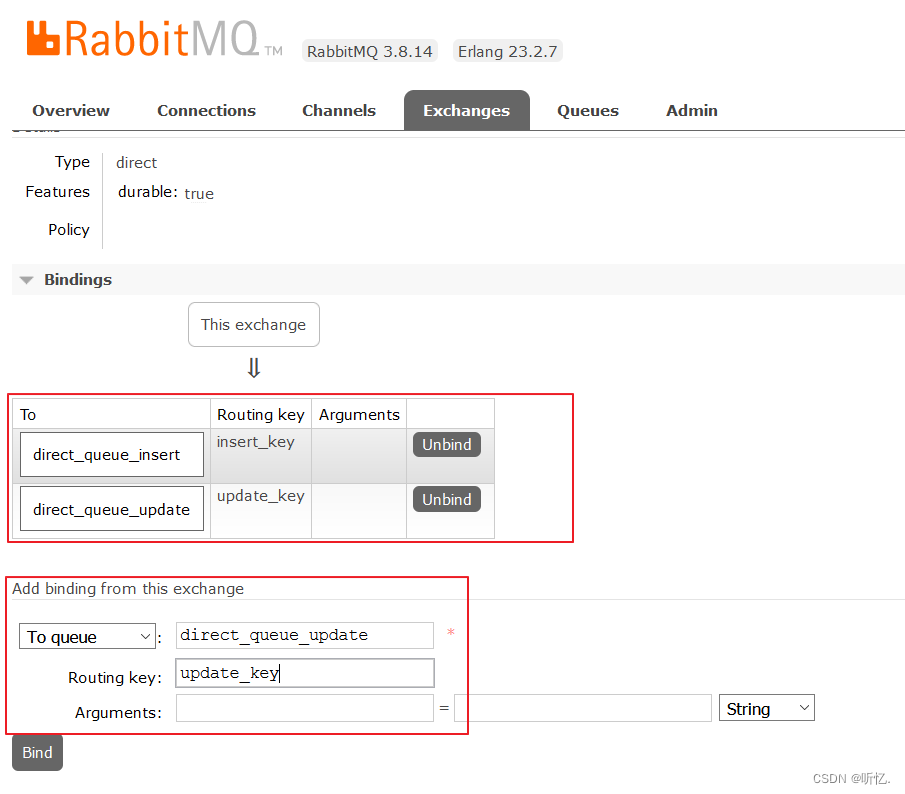
設置綁定: 將創建的交換器
direct_exchange和direct_queue_insert,direct_queue_update綁定在一起, 路由鍵Routing Key分別為insertKey和updateKey
6.5.3 生產者代碼
-
rabbitmq_producer項目測試代碼如下:
package com.tingyi.test;
?
import com.tingyi.rabbitmq.ProducerApplication;
import org.junit.Test;
import org.junit.runner.RunWith;
import org.springframework.amqp.rabbit.core.RabbitTemplate;
import org.springframework.beans.factory.annotation.Autowired;
import org.springframework.boot.test.context.SpringBootTest;
import org.springframework.test.context.junit4.SpringRunner;
?
/*** @author 聽憶*/
@SpringBootTest(classes = ProducerApplication.class)
@RunWith(SpringRunner.class)
public class TestRouting {@Autowiredprivate RabbitTemplate rabbitTemplate;
?@Testpublic void testPubAndSubSend() {for(int i = 1; i < 100; i++) {if (i % 2 == 0) {rabbitTemplate.convertAndSend("direct_exchange","insert_key" , "你好, 2024聽憶" + i);} else {rabbitTemplate.convertAndSend("direct_exchange","update_key" , "你好, 小崔" + i);}}}
}
6.5.4 消費者代碼
-
rabbitmq_consumer項目創建監聽器:
package com.tingyi.rabbitmq.routing;
?
import org.springframework.amqp.rabbit.annotation.RabbitHandler;
import org.springframework.amqp.rabbit.annotation.RabbitListener;
import org.springframework.stereotype.Component;
?
/*** @author 聽憶*/
@Component
@RabbitListener(queues = "direct_queue_insert")
public class TestInsertListener {@RabbitHandlerpublic void testListener(String message) {System.out.println("======test1_queue接收到的消息為:======" + message);}
}-
rabbitmq_consumer項目創建監聽器:
package com.tingyi.rabbitmq.routing;
?
import org.springframework.amqp.rabbit.annotation.RabbitHandler;
import org.springframework.amqp.rabbit.annotation.RabbitListener;
import org.springframework.stereotype.Component;
?
/*** @author 聽憶*/
@Component
@RabbitListener(queues = "direct_queue_update")
public class TestUpdateListener {@RabbitHandlerpublic void testListener(String message) {System.out.println("======test2_queue接收到的消息為:======" + message);}
}
6.6 Topics通配符模式(主題模式)
6.6.1 什么是通配符(主題)模式
Topic類型與Direct相比,都是可以根據RoutingKey把消息路由到不同的隊列。只不過Topic類型Exchange可以讓隊列在綁定Routing key的時候使用通配符!
Routingkey: 一般都是有一個或多個單詞組成,多個單詞之間以”.”分割,例如:item.insert
通配符規則:
? #:匹配一個或多個
? *:匹配不多不少恰好1個詞
舉例:
item.#: 能夠匹配item.insert.abc或者item.insert
item.*:只能匹配item.insert item.update
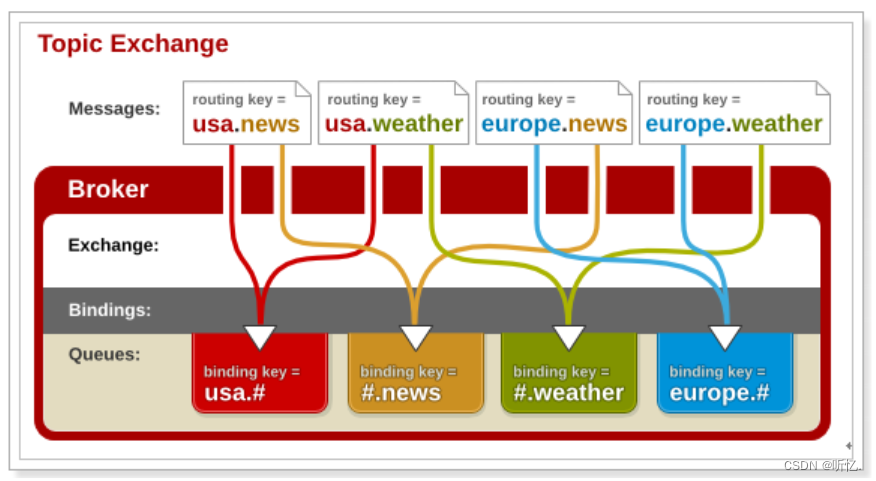
圖解:
-
紅色Queue:綁定的是
usa.#,因此凡是以usa.開頭的routing key都會被匹配到 -
黃色Queue:綁定的是
#.news,因此凡是以.news結尾的routing key都會被匹配
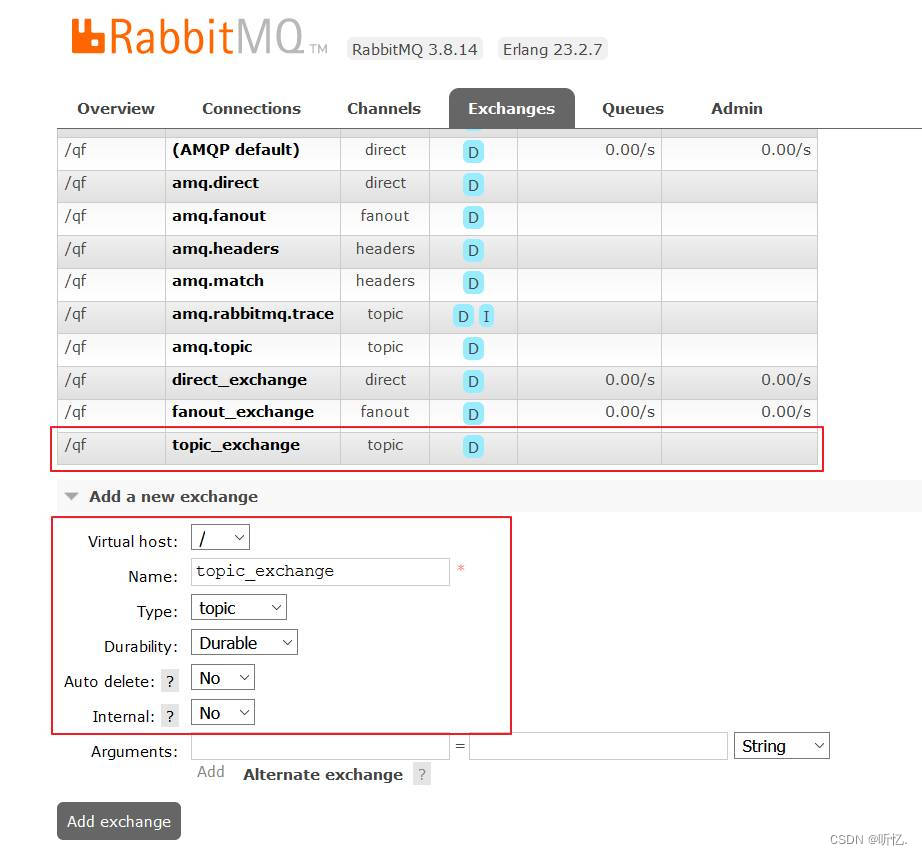
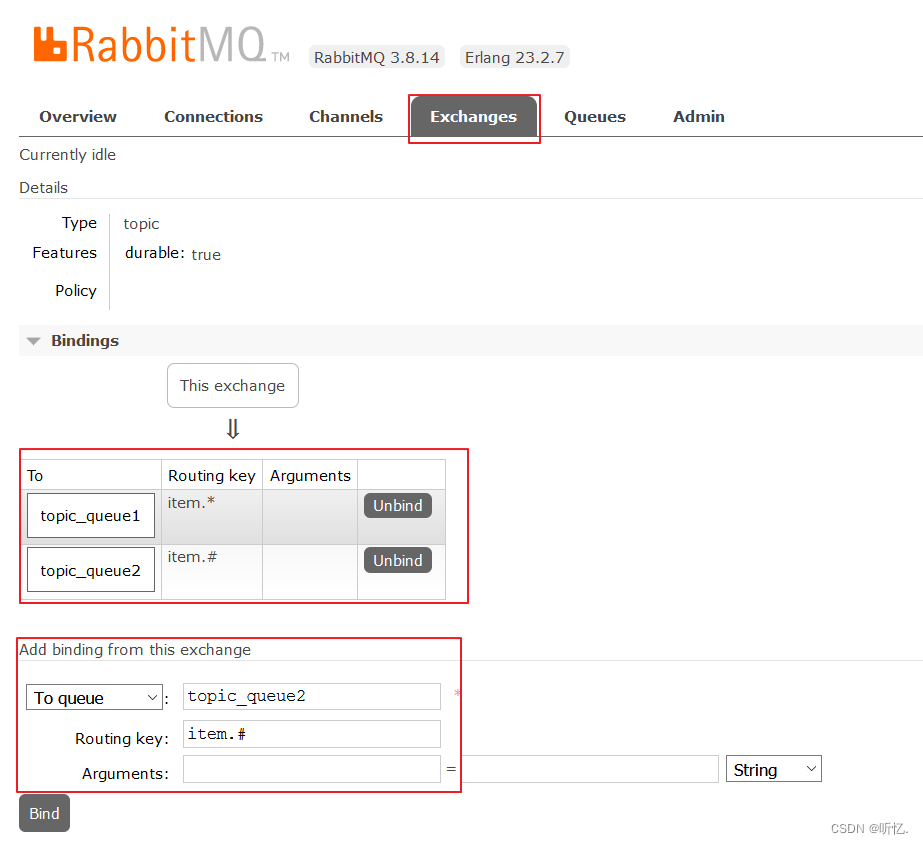
6.6.2 RabbitMQ管理界面操作
-
創建隊列
topic_queue1和topic_queue1

-
創建交換器
topic_exchange, type類型為topic
-
設置綁定:
?
topic_queue1綁定的Routing Key路由鍵為item.*?
topic_queue2綁定的Routing Key路由鍵為item.#
6.6.3 生產者代碼
-
rabbitmq_producer項目測試代碼如下:
package com.tingyi.test;
?
import com.tingyi.rabbitmq.ProducerApplication;
import org.junit.Test;
import org.junit.runner.RunWith;
import org.springframework.amqp.rabbit.core.RabbitTemplate;
import org.springframework.beans.factory.annotation.Autowired;
import org.springframework.boot.test.context.SpringBootTest;
import org.springframework.test.context.junit4.SpringRunner;
?
/*** @author 聽憶*/
@SpringBootTest(classes = ProducerApplication.class)
@RunWith(SpringRunner.class)
public class TestTopic {@Autowiredprivate RabbitTemplate rabbitTemplate;
?@Testpublic void testTopicSend() {rabbitTemplate.convertAndSend("topic_exchange","item.select" , "你好, 2024聽憶");rabbitTemplate.convertAndSend("topic_exchange","item.select.abc" , "你好, 2024小崔");}
}
6.6.4 消費者代碼
-
rabbitmq_consumer項目創建監聽器:
package com.tingyi.rabbitmq.topic;
?
import org.springframework.amqp.rabbit.annotation.RabbitHandler;
import org.springframework.amqp.rabbit.annotation.RabbitListener;
import org.springframework.stereotype.Component;
?
/*** @author 聽憶*/
@Component
@RabbitListener(queues = "topic_queue1")
public class TestTopicListener1 {@RabbitHandlerpublic void testListener(String message) {System.out.println("======topic_queue1接收到的消息為:======" + message);}
}-
rabbitmq_consumer項目創建監聽器:
package com.tingyi.rabbitmq.topic;
?
import org.springframework.amqp.rabbit.annotation.RabbitHandler;
import org.springframework.amqp.rabbit.annotation.RabbitListener;
import org.springframework.stereotype.Component;
?
/*** @author 聽憶*/
@Component
@RabbitListener(queues = "topic_queue2")
public class TestTopicListener2 {@RabbitHandlerpublic void testListener(String message) {System.out.println("======topic_queue2接收到的消息為:======" + message);}
}
6.7 模式總結RabbitMQ
工作模式:
1、簡單模式 HelloWorld : 一個生產者、一個消費者,不需要設置交換機(使用默認的交換機)
2、工作隊列模式 Work Queue: 一個生產者、多個消費者(競爭關系),不需要設置交換機(使用默認的交換機)
3、發布訂閱模式 Publish/subscribe: 需要設置類型為fanout的交換機,并且交換機和隊列進行綁定,當發送消息到交換機后,交換機會將消息發送到綁定的隊列
4、路由模式 Routing: 需要設置類型為direct的交換機,交換機和隊列進行綁定,并且指定routing key,當發送消息到交換機后,交換機會根據routing key將消息發送到對應的隊列
5、通配符模式 Topic: 需要設置類型為topic的交換機,交換機和隊列進行綁定,并且指定通配符方式的routing key,當發送消息到交換機后,交換機會根據routing key將消息發送到對應的隊列
6.8 使用代碼創建隊列和交換機
6.8.1 初始化exchange、queue
-
下面初始化隊列和交換器類放在消費方和生產方都可以.
package com.tingyi.rabbitmq.config;
?
import org.springframework.amqp.core.Binding;
import org.springframework.amqp.core.BindingBuilder;
import org.springframework.amqp.core.Queue;
import org.springframework.amqp.core.TopicExchange;
import org.springframework.context.annotation.Bean;
import org.springframework.context.annotation.Configuration;
?
/*** @author 聽憶*/
@Configuration
public class RabbitMQConfig {
?/*** 1. 創建exchange - topic* 第一個參數: 交換器名稱* 第二個參數: 交換器是否持久化, 也就是服務器重啟交換器是否自動刪除* 第三個參數: 如果沒有消費者, 交換器是否自動刪除*/@Beanpublic TopicExchange getTopicExchange(){return new TopicExchange("boot-topic-exchange",true,false);}
?/*** 2. 創建queue* 第一個參數: 隊列名稱* 第二個參數: 隊列是否持久化, 也就是服務器重啟隊列是否自動刪除* 第三個參數: 是否排外的,有兩個作用,* ? ? ? ?  1.當連接關閉時該隊列是否會自動刪除;* ? ? ? ?  2.該隊列是否是私有的private,如果不是排外的,* ? ? ? ? ? ?  可以使用兩個消費者都訪問同一個隊列,沒有任何問題,如果是排外的,* ? ? ? ? ? ?  會對當前隊列加鎖,其他通道channel是不能訪問的* 第四個參數: 隊列是否自動刪除, 也就是當沒有消費者時, 隊列是否自動刪除* 第五個參數: 隊列參數, 比如是否設置為延時隊列等參數.*/@Beanpublic Queue getQueue(){return new Queue("boot-queue",true,false,false,null);}
?/*** 3. 隊列和交換器綁定在一起*/@Beanpublic Binding getBinding(TopicExchange topicExchange,Queue queue){return BindingBuilder.bind(queue).to(topicExchange).with("*.red.*");}
}
6.8.2 發布消息到RabbitMQ
@Autowired
private RabbitTemplate rabbitTemplate;
?
@Test
public void testContextLoads() {rabbitTemplate.convertAndSend("boot-topic-exchange","slow.red.dog","聽憶哇!!");
}
6.8.3 創建消費者監聽消息
package com.tingyi.rabbitmq.topic;
?
import org.springframework.amqp.rabbit.annotation.RabbitListener;
import org.springframework.stereotype.Component;
?
/*** @author 聽憶*/
@Component
public class Consumer {
?@RabbitListener(queues = "boot-queue")public void getMessage(Object message){System.out.println("接收到消息:" + message);}
}


)


)
