文章目錄
- 一、什么是RNN?
- 二、準備環境和數據
- 2.1 導入數據
- 三、構建模型
- 四、訓練和預測
- 五、其他
- (1)sklearn模塊導入報錯:`ModuleNotFoundError: No module named 'sklearn'`
- (2)優化器改為SGD,accuracy=25.81%
- (3)使用訓練acc最高的模型進行預測
- 🍨 本文為🔗365天深度學習訓練營 中的學習記錄博客
- 🍖 原作者:K同學啊 | 接輔導、項目定制
一、什么是RNN?
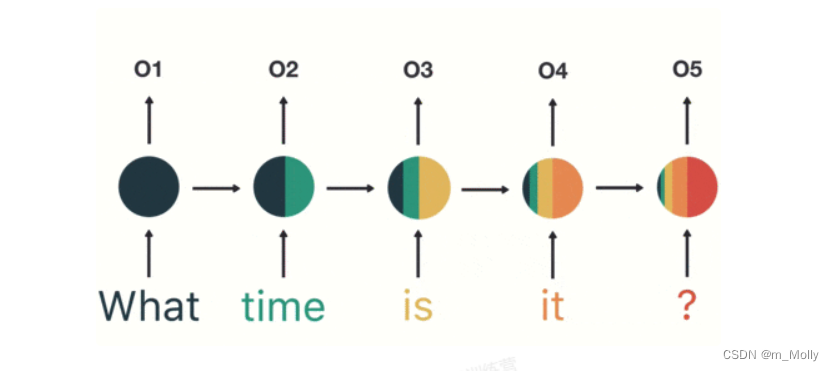
RNN:Recurrent Neural Network,用于處理序列數據。和傳統神經網絡不同的點在于,當前一層的輸出會被當做輸入,帶到下一個隱藏層中,進行訓練,于是除了第一層,RNN中每一個隱藏層的輸入都包含兩個部分【上一層的輸出和當前層的輸入】,如教案中給出的簡易示意圖,每個單詞用一種顏色表示,01~05為不同的隱藏層,到達最后一層得到的輸出為 05,也是神經網絡需要判斷的層。
二、準備環境和數據
環境:tensorflow框架,py312,cpu
編譯:VSCode
使用CPU進行編譯,就無需再設置GPU
2.1 導入數據
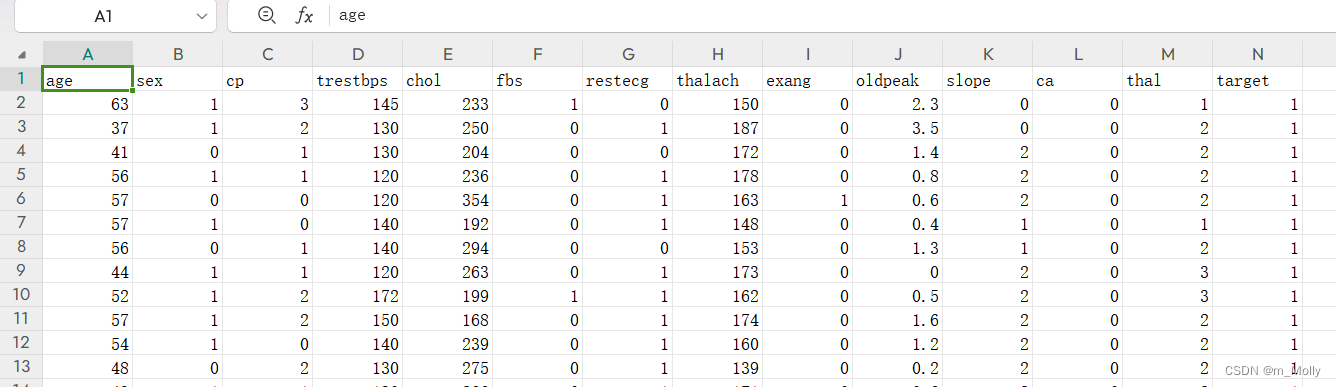
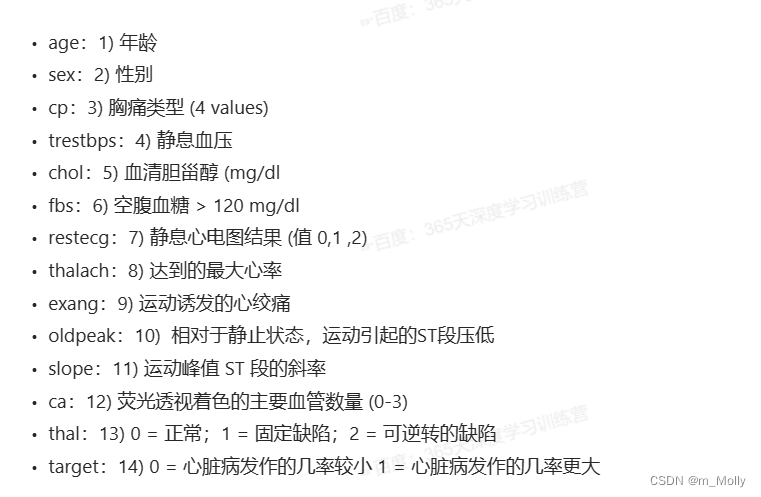
根據給出的數據集文件,分析如下:
import tensorflow as tfgpus = tf.config.list_physical_devices("GPU")if gpus:gpu0 = gpus[0]tf.config.experimental.set_memory_growth(gpu0,true)tf.config.set_visible_devices([gpu0],"GPU")print("GPU: ",gpus)
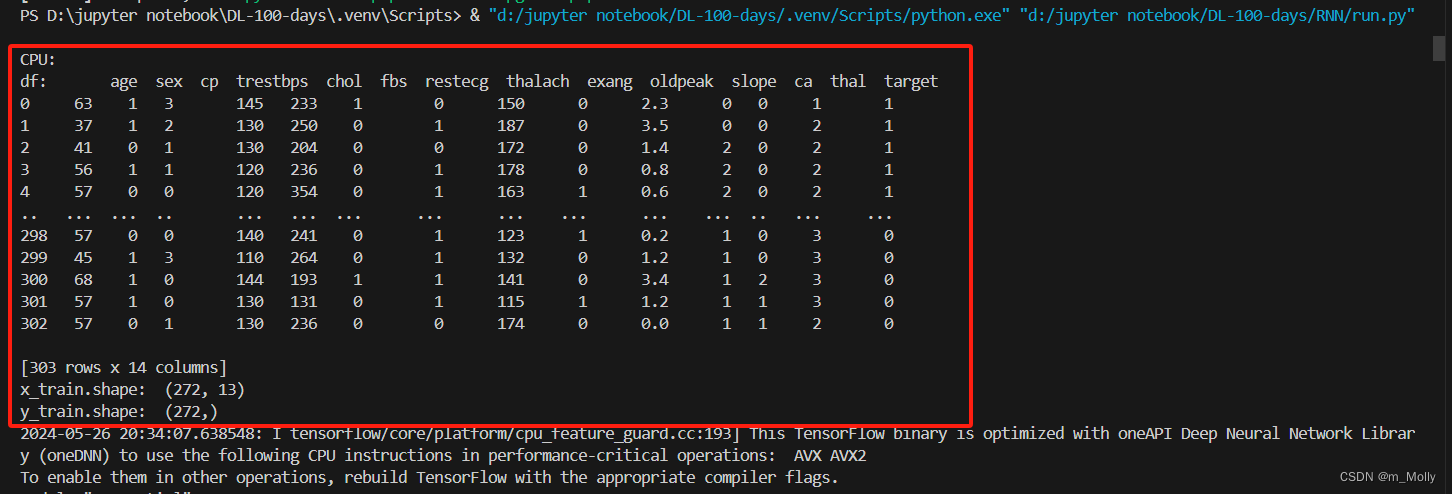
else:print("CPU:")# 2.1 導入數據
import numpy as np
import pandas as pddf = pd.read_csv("D:\\jupyter notebook\\DL-100-days\\RNN\\heart.csv")
print("df: ", df)# 2.2 檢查是否有空值
df.isnull().sum()
#3.1 劃分訓練集與測試集
from sklearn.preprocessing import StandardScaler
from sklearn.model_selection import train_test_splitx = df.iloc[:, :-1]
y = df.iloc[:, -1]
x_train, x_test, y_train, y_test = train_test_split(x,y,test_size=0.1,random_state=1)
print("x_train.shape: ", x_train.shape)
print("y_train.shape: ", y_train.shape)# 3.2 標準化: 針對每一列進行標準化
sc = StandardScaler()
x_train = sc.fit_transform(x_train)
x_test = sc.transform(x_test)x_train = x_train.reshape(x_train.shape[0], x_train.shape[1], 1)
x_test = x_test.reshape(x_test.shape[0], x_test.shape[1], 1)
三、構建模型
tf官方教程 Keras中的循環神經網絡RNN 一文中有提到:
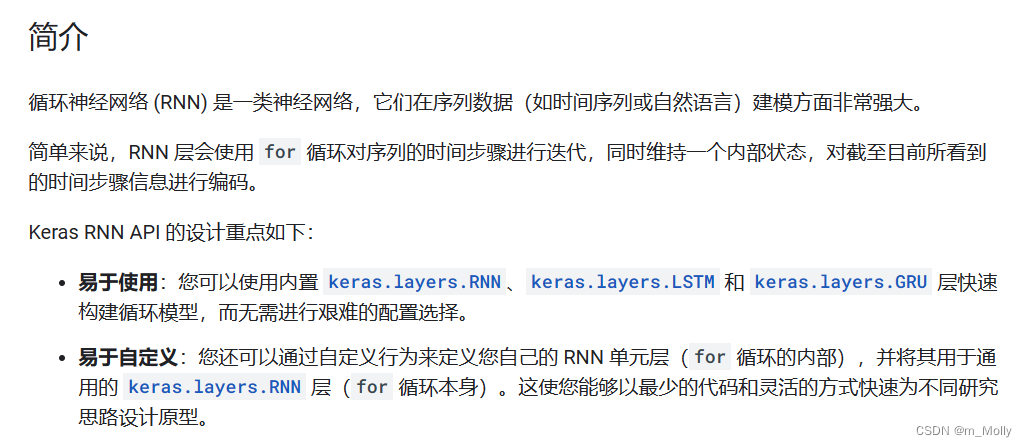
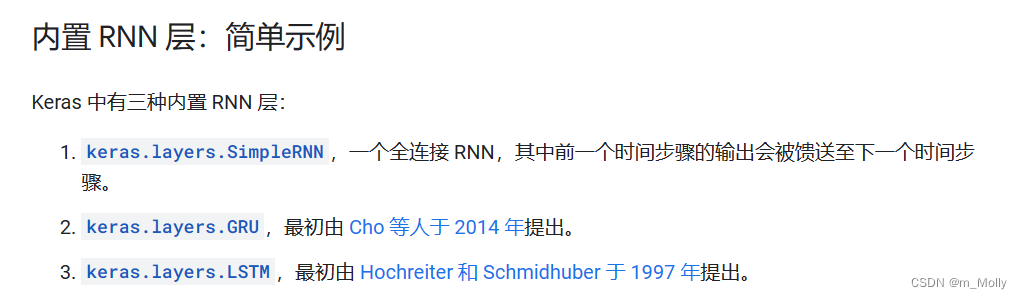
本次學習使用的是SimpleRNN內置層,其關鍵參數說明:
● units: 正整數,輸出空間的維度。● activation: 要使用的激活函數。 默認:雙曲正切(tanh)。 如果傳入 None,則不使用激活函數 (即 線性激活:a(x) = x)。● use_bias: 布爾值,該層是否使用偏置向量。● kernel_initializer: kernel 權值矩陣的初始化器, 用于輸入的線性轉換 (詳見 initializers)。● recurrent_initializer: recurrent_kernel 權值矩陣 的初始化器,用于循環層狀態的線性轉換 (詳見 initializers)。● bias_initializer:偏置向量的初始化器 (詳見initializers).● dropout: 在 0 和 1 之間的浮點數。 單元的丟棄比例,用于輸入的線性轉換。
# 4.1 構建RNN模型
import keras
from keras.models import Sequential
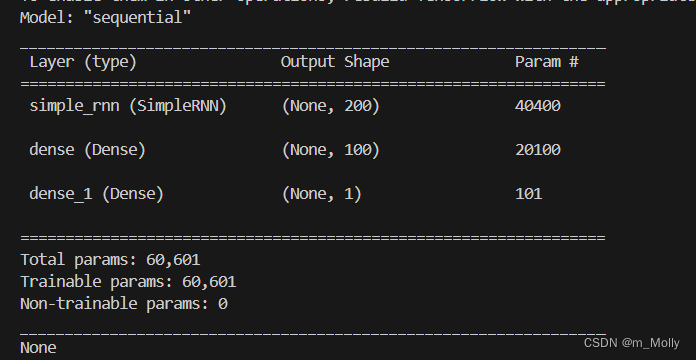
from keras.layers import Dense,LSTM,SimpleRNNmodel = Sequential()
model.add(SimpleRNN(200, input_shape=(13,1), activation='relu'))
model.add(Dense(100, activation='relu'))
model.add(Dense(1, activation='sigmoid'))
print(model.summary())
四、訓練和預測
#4.2 編譯模型
opt = tf.keras.optimizers.Adam(learning_rate=1e-4)
model.compile(loss='binary_crossentropy',optimizer = opt,metrics="accuracy")# 4.3 訓練模型
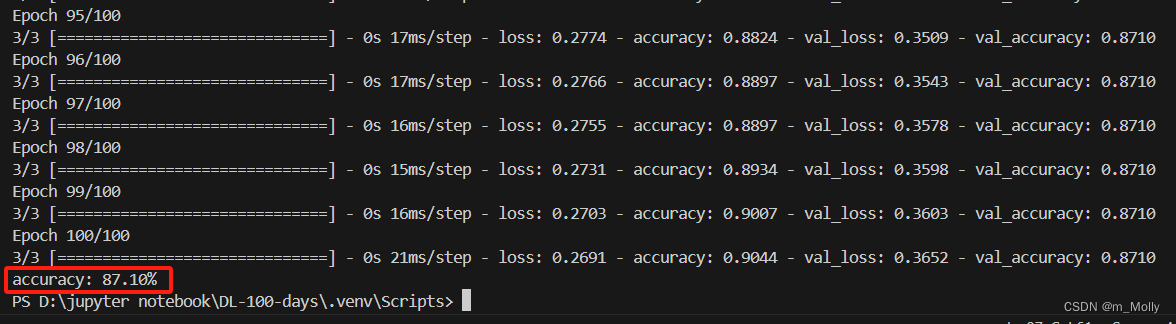
epochs = 100
history = model.fit(x_train, y_train,epochs=epochs,batch_size=128,validation_data=(x_test,y_test),verbose=1)
#4.4 評估模型
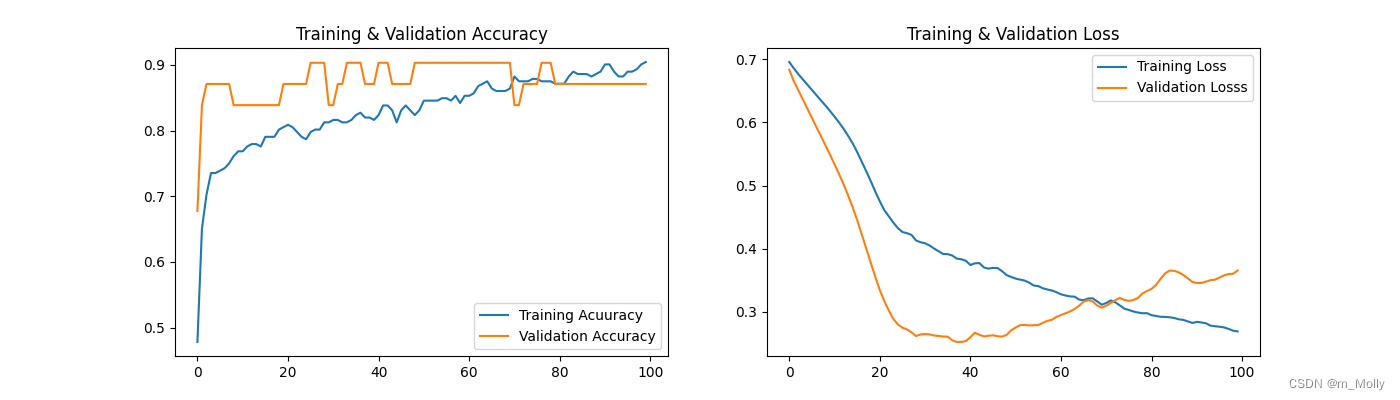
import matplotlib.pyplot as plt
acc = history.history['accuracy']
val_acc = history.history['val_accuracy']loss = history.history['loss']
val_loss = history.history['val_loss']epochs_range = range(epochs)plt.figure(figsize=(14,4))
plt.subplot(1,2,1)
plt.plot(epochs_range, acc, label='Training Acuuracy')
plt.plot(epochs_range, val_acc, label='Validation Accuracy')
plt.legend(loc='lower right')
plt.title('Training & Validation Accuracy')plt.subplot(1,2,2)
plt.plot(epochs_range, loss, label='Training Loss')
plt.plot(epochs_range, val_loss, label='Validation Losss')
plt.legend(loc='upper right')
plt.title('Training & Validation Loss')plt.savefig("D:\\jupyter notebook\\DL-100-days\\RNN\\result.png")
plt.show()scores = model.evaluate(x_test,y_test,verbose=0)
print("%s: %.2f%%" % (model.metrics_names[1], scores[1]*100))
五、其他
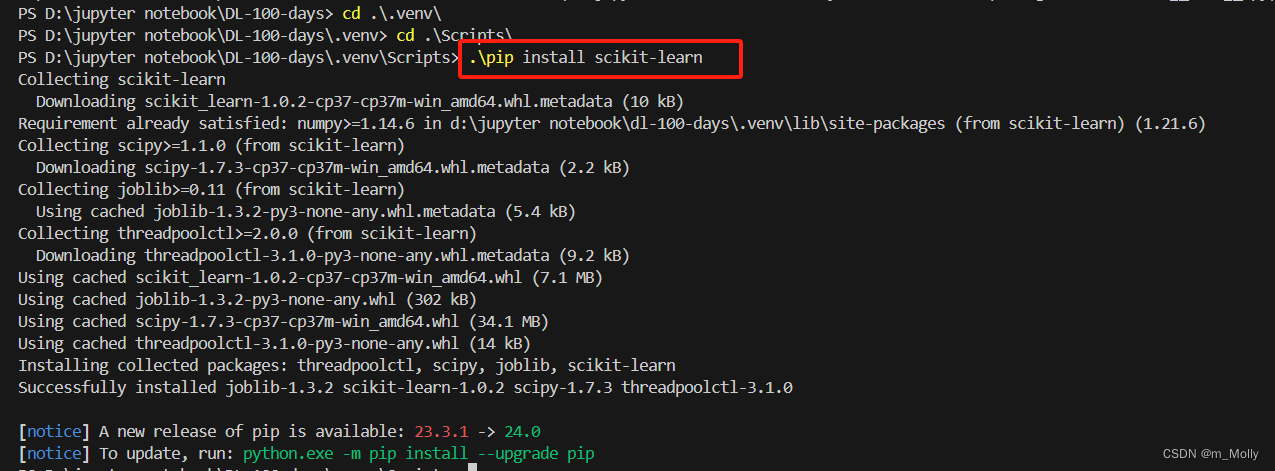
(1)sklearn模塊導入報錯:ModuleNotFoundError: No module named 'sklearn'
解決辦法:在VSCode終端中,cd到.venv/Script路徑下,執行.\pip install scikit-learn,等待安裝完成,如下:
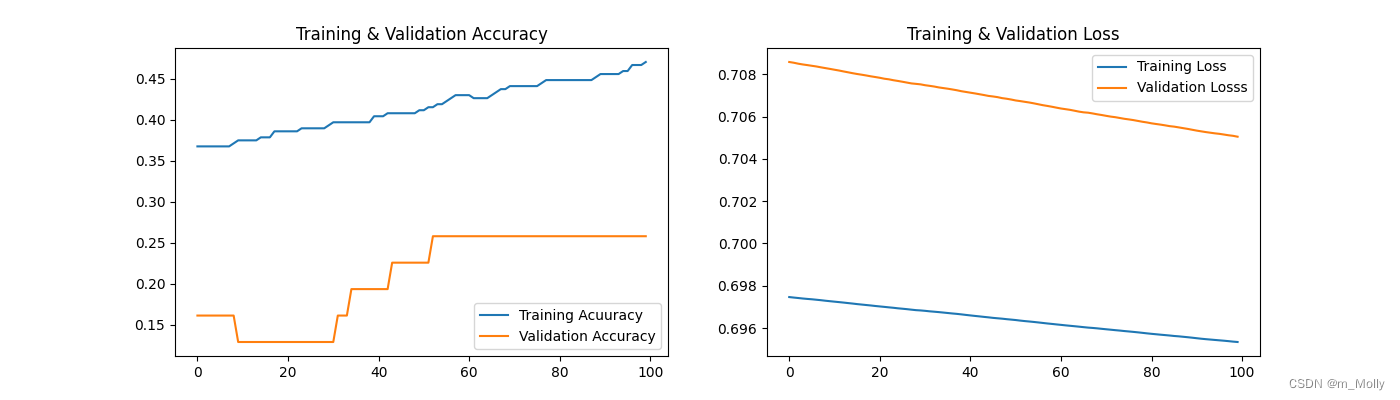
(2)優化器改為SGD,accuracy=25.81%

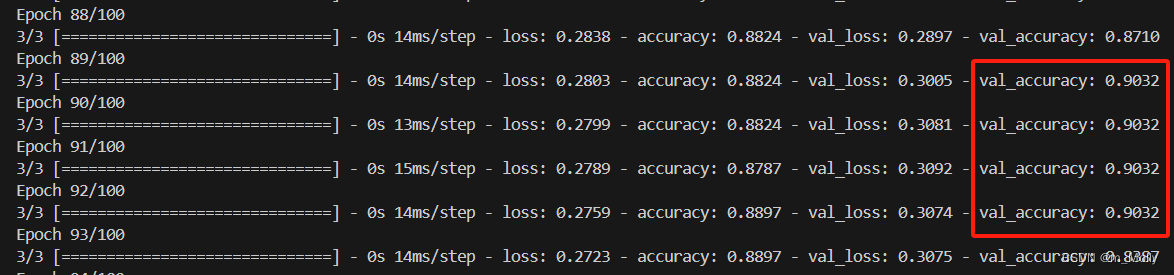
(3)使用訓練acc最高的模型進行預測
觀察100個epoch輸出的訓練結果,可以看到最高的val_accuracy=0.9032,可以把這次的模型保存出來,作為預測模型。
修改代碼如下:

得到結果:


執行ipynb 文件。可以不依賴jupyter)


)

![AT_abc351_c [ABC351C] Merge the balls 題解](http://pic.xiahunao.cn/AT_abc351_c [ABC351C] Merge the balls 題解)
)


)


