系列文章目錄
【Python搞定車載自動化測試】系列文章目錄匯總
文章目錄
- 系列文章目錄
- 💯💯💯 前言💯💯💯
- 一、環境搭建
- 1.軟件環境
- 2.硬件環境
- 二、目錄結構
- 三、源碼展示
- 1.診斷基礎函數方法
- 2.診斷業務函數方法
- 3.27服務安全解鎖
- 4.Bootloader刷寫
- 5.配置參數
- 四、測試報告
- 五、完整源碼鏈接
💯💯💯 前言💯💯💯
在之前的專欄【如何學習CAN總線測試】中介紹了如何通過CAPL語言實現Bootloader刷寫,但CAPL語言依賴于Vector CANoe設備,隨著智能電動汽車行業的發展,目前也普遍使用Python語言實現Bootloader刷寫,本章節主要介紹如何使用Python語言來實現CAN總線UDS Bootloader刷寫。
首先回顧一下Bootloader刷寫基礎知識:
UDS(Unified Diagnostic Services)是一種汽車行業內廣泛使用的診斷標準,用于車輛電子控制單元(ECU)的診斷和編程。當提到“UDS Bootloader刷寫”,通常是指利用UDS協議對車輛ECU中的Bootloader進行更新或重新編程的過程。這一過程允許通過標準化的服務和子功能訪問ECU內部的軟件組件,包括其Bootloader,從而實現安全且可靠的遠程更新能力。以下是UDS Bootloader刷寫的簡要流程:
通信建立:
物理連接:首先,需要通過診斷接口(如OBD-II接口)將車輛與編程工具(或編程工作站)相連。
建立診斷會話:使用UDS的會話管理服務(如Diagnostic Session Control service)建立安全或編程會話。
安全訪問:
為了保護ECU不被非法訪問,刷寫前通常需要通過UDS的安全訪問服務(Security Access service)進行鑒權,這可能涉及密碼或密鑰交換。
刷寫準備:
讀取當前狀態:使用Read Data by Identifier (0x22) 或 Request Seed (0x27) 等服務獲取ECU當前狀態和刷寫條件。
編程模式激活:通過Programming Enable (0x2E) 服務使ECU進入可編程模式。
數據傳輸:
分區擦除:如果需要,先發送請求擦除指定Flash區域的命令(如Request Download (0x34))。
Bootloader傳輸:使用Transfer Data (0x36) 服務將新的Bootloader二進制文件分塊傳輸至ECU。
驗證與激活:
數據校驗:傳輸完成后,使用Request Transfer Exit (0x37) 結束傳輸,并通過Control Module Programming (0x31) 服務執行完整性校驗。
激活新Bootloader:確認無誤后,通過專門的服務命令激活新刷寫的Bootloader,可能需要復位ECU。
會話結束與驗證:
完成刷寫后,退出編程會話,回到正常工作模式,并通過診斷測試驗證ECU及新Bootloader的功能完整性。
整個過程中,嚴格遵循UDS協議的指令和服務,確保操作的可靠性和安全性,防止因錯誤操作導致ECU功能異常。此外,由于涉及到車輛安全和穩定性,此類操作通常由專業技術人員在符合制造商規范的條件下執行。
一、環境搭建
1.軟件環境
Python版本:python3.9
第三方庫:
pip install allure-pytest2.13.5
pip install can-isotp2.0.4
pip install python-can4.3.1
pip install udsoncan1.23.0
allure:安裝allure工具并設置環境變量,https://github.com/allure-framework/allure2/releases
2.硬件環境
支持CAN設備硬件接口:
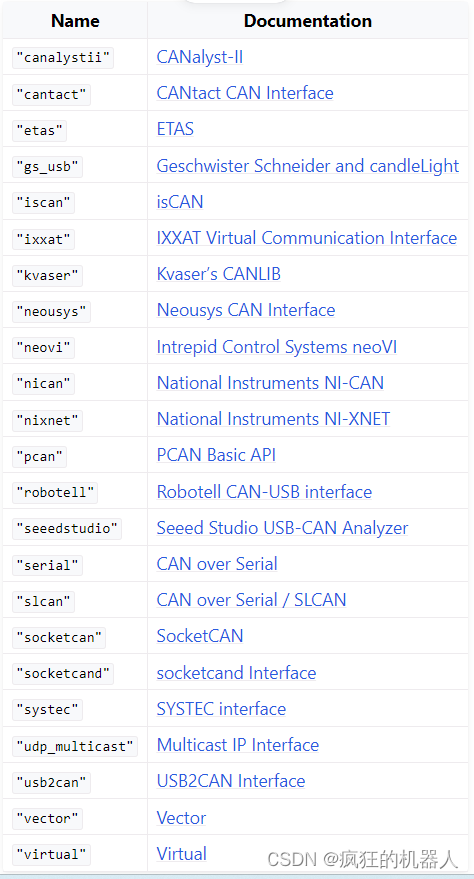
https://python-can.readthedocs.io/en/stable/configuration.html
二、目錄結構
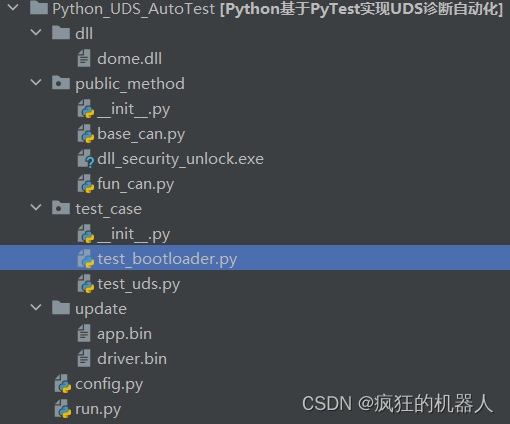
dll目錄:存放27服務安全解鎖DLL文件(同CANoe中使用的DLL文件)。
public_method目錄:存放公共函數方法和27安全解鎖工具。
test_case目錄:存放python自動化測試用例。
update目錄:存放升級包和效驗文件。
config.py文件:CAN相關配置參數。
run.py文件:運行入口文件。
三、源碼展示
1.診斷基礎函數方法
base_can.py文件主要封裝了CAN初始化、診斷配置、診斷請求、診斷響應基礎方法,源碼如下:
class CanBus:def __init__(self, interface: str = None, channel: int = None, bitrate: int = None, fd: bool = None,data_bitrate: int = None, can_filters: CanFilters = None, *args, **kwargs):self.interface = interfaceself.channel = channelself.bitrate = bitrateself.fd = fdself.data_bitrate = data_bitrateself.can_filters = can_filterstry:self.bus = can.interface.Bus(channel=self.channel, interface=self.interface, app_name="CANoe",bitrate=self.bitrate, fd=self.fd, data_bitrate=self.data_bitrate,can_filters=self.can_filters, *args, **kwargs)except Exception as e:raise Exception("初始化失敗:%s" % e)else:print("初始化成功")def diag_congfig(self, tx: int, rx: int, addressingmode=isotp.AddressingMode.Normal_11bits):"""診斷配置函數:param tx: 診斷請求ID,功能尋址、物理尋址:param rx: 診斷響應ID:return:"""self.isotp_params = {'stmin': 20, # 流控幀間隔時間'blocksize': 8, # 流控幀單包大小,0表示不限制'tx_padding': 0, # 當 notNone表示用于填充發送的消息的字節。'rx_flowcontrol_timeout': 1000, # 在停止接收和觸發之前等待流控制幀的毫秒數'rx_consecutive_frame_timeout': 1000, # 在停止接收和觸發 a 之前等待連續幀的毫秒數}try:self.tp_addr = isotp.Address(addressing_mode=addressingmode, txid=tx, rxid=rx) # 網絡層尋址方案tp_stack = isotp.CanStack(bus=self.bus, address=self.tp_addr, params=self.isotp_params) # 網絡/傳輸層(IsoTP 協議)self.conn = PythonIsoTpConnection(tp_stack) # 應用層和傳輸層之間的接口except Exception as e:print("UDS配置失敗:%s" % e)return self.conndef diag_request(self, request_command: str, request_data_log_flag=True):"""診斷請求"""requestPdu = binascii.a2b_hex(request_command.replace(' ', ''))if not self.conn.is_open():self.conn.open()try:self.conn.send(requestPdu)except Exception as e:print("診斷請求失敗:%s" % e)else:req_info = ''request_command = request_command.replace(' ', '')for i in range(len(request_command)):if i >= len(request_command) / 2:breakreq_info += request_command[2 * i:2 * i + 2] + ' 'if request_data_log_flag:print("診斷請求:%s" % req_info)def diag_respond(self, timeout1=1):"""診斷響應"""try:respPdu = self.conn.wait_frame(timeout=timeout1)except Exception as e:print(e)else:if respPdu is None:return Noneresp1 = respPdu.hex().upper()resp2 = ''for i in range(len(resp1)):if i != 0 and i % 2 == 0:resp2 += ' 'resp2 += resp1[i]print("診斷響應:%s" % resp2)return resp2
2.診斷業務函數方法
fun_can.py主要二次封裝UDS診斷函數,包括:27安全解鎖,34服務、36服務、診斷78響應處理、UDS診斷測試、CRC效驗等函數,源碼如下:
import binascii
import os
import subprocess
import timeimport pytestfrom config import Parameter
from public_method.base_can import CanBusclass CanMethod(CanBus):def __init__(self, config):self.interface = config['can']['interface']self.channel = config['can']['channel']self.bitrate = config['can']['bitrate']self.fd = config['can']['canfd']self.data_bitrate = config['can']['data_bitrate']self.addressingmode = config['can']['addressing_mode']self.tx = config['can']['physics_id_default']self.rx = config['can']['response_id_default']CanBus.__init__(self, interface=self.interface, channel=self.channel, bitrate=self.bitrate, fd=self.fd,data_bitrate=self.data_bitrate, )self.diag_congfig(addressingmode=self.addressingmode, tx=self.tx, rx=self.rx)self.sign_nrc78 = 0def __diag_get_seed(self, req_data="27 01"):"""27服務獲取種子并解析"""self.diag_request(req_data)try:uds_res_data = self.conn.specific_wait_frame(timeout=2)while uds_res_data[0] == 0x7F and uds_res_data[2] == 0x78:print("已收到 %d bytes : [%s]" % (len(uds_res_data), binascii.hexlify(uds_res_data)))uds_res_data = self.conn.specific_wait_frame(timeout=3)resp1 = uds_res_data.hex().upper()resp2 = ''for i in range(len(resp1)):if i != 0 and i % 2 == 0:resp2 += ' 'resp2 += resp1[i]print("診斷響應:%s" % resp2)except:print("響應數據失敗")else:seed = []res_seed = resp2.split(' ')[2:]for i in range(len(res_seed)):seed.append(eval('0x' + res_seed[i]))print("seed:%s" % seed)return seeddef get_key_level(self, seed):"""dll_security_unlock.exe工具解鎖語法:dll_security_unlock.exe --dll_path dome.dll --seed [11,22,33,44] --seedsize 4 --level 1 --keysize 4--dll_path DLL路徑--seed 請求種子--seedsize 種子長度--level 安全級別--keysize 秘鑰長度"""seed = str(seed).replace(' ', '')tool = os.path.join(os.path.dirname(__file__), 'dll_security_unlock.exe')cmd = '{} --dll_path {} --seed {}'.format(tool, os.path.join(os.path.dirname(os.path.dirname(__file__)), r'dll\dome.dll'), seed)key = subprocess.getoutput(cmd)return keydef unlock_level(self):"""27安全解鎖"""seed = self.__diag_get_seed(req_data="27 01")if seed is not None:if seed != 0 and len(seed) > 1:key = self.get_key_level(seed)print("key= %s" % key)req_data = "27 02 %s" % keyself.diag_request(req_data)self.uds_respond_0x78()time.sleep(0.1)else:print("seed響應不正確")def diag_send(self, req_data="3E 80"):"""發送診斷請求,不斷言診斷響應"""self.diag_request(req_data)response = self.uds_respond_0x78()time.sleep(0.1)return responsedef diag_send_exp(self, req_data="3E 80", exp=None):"""發送診斷請求,并斷言診斷響應"""self.diag_request(req_data)result = self.__diag_test_response_judge(exp=exp)time.sleep(0.1)return resultdef diag_send_0x34(self, req_data="34 00 44", address="00 00 00 00", size=0, exp=None):"""刷寫時使用,請求傳輸升級包"""print("傳輸包大小= %s" % size)self.diag_request(req_data + address + "{:08X}".format(size))self.__diag_test_response_judge(exp=exp)time.sleep(0.1)def diag_send_0x36(self, req_data="36", trans_size=255, path="", exp=None):"""36服務傳包"""total_size = os.path.getsize(path)print("size = %s" % total_size)with open(path, "rb") as f:file_read = f.read()print("CRC= %s" % "{:02X}".format(binascii.crc32(file_read)))file_byte = []for i in range(len(file_read)):file_byte.append("{:02X}".format(file_read[i]))sequence = 1transmitted_size = 0try:status = Truewhile status:trans_data = ""for i in range(trans_size):if transmitted_size < total_size:trans_data = trans_data + file_byte[transmitted_size]transmitted_size = transmitted_size + 1else:status = Falsebreakprint("data_num=%s" % transmitted_size)self.diag_request(request_command=req_data + "{:02X}".format(sequence) + trans_data,request_data_log_flag=False,)print(req_data + "{:02X}".format(sequence) + "...")self.__diag_test_response_judge(exp=exp)sequence += 1if sequence == 256:sequence = 0finally:print("36傳輸結束")def diag_crc32(self, req_data="31 01 02 02", path="", exp=None):"""刷寫時使用,CRC32校驗"""size = os.path.getsize(path)print("size = %s" % size)with open(path, "rb") as f:file_read = f.read()crc32 = "{:08X}".format(binascii.crc32(file_read))print("crc 32 = %s " % crc32)self.diag_send_exp(req_data=req_data + crc32, exp=exp)def __diag_session_mode(self, session):"""診斷會話模式"""if session == "01":self.diag_send(req_data="10 01")elif session == "03":self.diag_send(req_data="10 03")elif session == "02":self.diag_send(req_data="10 03")self.unlock_level()self.diag_send(req_data="10 02")def uds_respond_0x78(self, timeout1=2):"""78響應處理"""response = self.diag_respond(timeout1=timeout1)if response is not None:try:response2 = response.replace(' ', '')cyc = 0while response2[:2] == '7F' and response2[4:6] == '78':self.sign_nrc78 = 1response = self.diag_respond(timeout1=timeout1)if response is not None:response2 = response.replace(' ', '')cyc += 1if cyc > 20:breakexcept Exception as e:print("異常:%s" % e)return responsedef __diag_test_response_judge(self, exp=None):"""斷言響應結果與預期結果是否一致"""response = self.uds_respond_0x78()response_return = responseif (exp is not None) & (response is not None):exp = exp.replace(" ", "").upper()exp2 = ""for i in range(len(exp)):if i != 0 and i % 2 == 0:exp2 += " "exp2 += exp[i]exp = exp2if len(exp) < len(response):response = response[0: len(exp)]if response == exp:return response_returnelse:print("診斷結果與預期結果不匹配")pytest.fail("診斷結果與預期結果不匹配")def diag_test(self, session="01", req_data=None, exp=None):"""診斷測試:param session: 執行前會話模式,01默認會話,02編程會話,03擴展會話:param req_data:請求數據:param exp:預期結果:return:"""self.__diag_session_mode(session=session)if req_data is not None:self.diag_request(req_data)self.__diag_test_response_judge(exp=exp)uds = CanMethod(Parameter.config)
3.27服務安全解鎖
dll_security_unlock.exe文件可實現DLL安全解鎖,使用方法如下:
語法:
舉例:dll_security_unlock.exe --dll_path dome.dll --seed [11,22,33,44] --seedsize 4 --level 1 --keysize 4
–dll_path DLL路徑
–seed 請求種子
–seedsize 種子長度
–level 安全級別
–keysize 秘鑰長度
4.Bootloader刷寫
test_uds.py主要是自動化測試用例舉例,包括10服務測試、11服務測試、14服務測試、19服務測試、22服務測試、28服務測試、31服務測試、85服務測試等,源碼如下:
import os
import timeimport allurefrom public_method.fun_can import udsclass TestBootloader:@allure.title("Bootloader刷寫")def test_diag_Bootloader(self):print("#####Bootloader刷寫#####")path_driver=r'update\driver.bin'path_app=r"update\001_app.bin"uds.diag_send_exp(req_data='10 03', exp='50 03')time.sleep(0.2)uds.diag_send_exp(req_data='31 01 02 03', exp='71 01 02 03')time.sleep(0.2)uds.diag_send(req_data='85 82')time.sleep(1)uds.diag_send(req_data='28 81 01')time.sleep(1)uds.unlock_level()time.sleep(0.2)uds.diag_send_exp(req_data='10 02', exp='50 02')time.sleep(0.2)uds.diag_send_0x34(req_data='34 00 44 ', address='00 00 00 01 ', size=os.path.getsize(path_driver),exp='74')time.sleep(0.2)uds.diag_send_0x36(req_data='36', path=path_driver, trans_size=1024, exp='76')time.sleep(0.2)uds.diag_send_exp(req_data='37', exp='77')time.sleep(0.2)uds.diag_crc32(req_data='31 01 02 02 ', path=path_driver, exp='71 01 02 02')time.sleep(0.2)uds.diag_send_exp(req_data='31 01 ff 00 44 00 00 00 01 00 00 00 02', exp='71 01 ff 00')time.sleep(0.2)uds.diag_send_0x34(req_data='34 00 44 ', address='00 00 00 01 ', size=os.path.getsize(path_app), exp='74')time.sleep(0.2)uds.diag_send_0x36(req_data='36',path=path_app, trans_size=102400, exp='76')time.sleep(0.2)uds.diag_send_exp(req_data='37', exp='77')time.sleep(0.2)uds.diag_crc32(req_data='31 01 02 02 ', path=path_app, exp='71 01 02 02')time.sleep(1)uds.diag_send_exp(req_data='31 01 ff 01', exp='71 01 ff 01')time.sleep(0.2)uds.diag_send_exp(req_data='11 01', exp='51 01')print('重啟中,等待5分鐘..')time.sleep(300)uds.diag_send(req_data='10 83')time.sleep(1)uds.diag_send(req_data='28 80 01')time.sleep(1)uds.diag_send(req_data='85 81')
5.配置參數
config主要配置CAN和診斷相關的參數:
interface:配置can設備類型(支持python-can三方庫的設備)
channel:通道
bitrate:波特率
addressing_mode:數據比特率
physics_id_default:物理尋址
response_id_default:響應尋址
class Parameter():"""CAN參數配置"""config = {"can": {"interface": "vector","channel": 0,"bitrate": 500000,"data_bitrate": 2000000,"canfd": False, # 是否canfd"addressing_mode": 0,"physics_id_default": 0x56A,"response_id_default": 0x56B,"function_id_default": 0x56C,}}
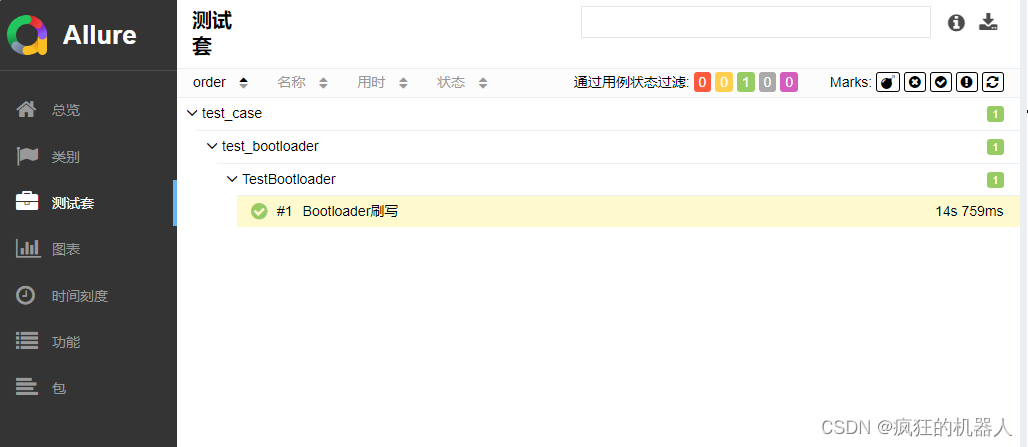
四、測試報告
五、完整源碼鏈接
如下載源碼鏈接失效,請將購買專欄截圖和用戶名截圖通過CSDN私信發送給博主,博主更新源碼鏈接:
鏈接:https://pan.baidu.com/s/1EIx0upnVz-ZiudXE9Ki8Bg
提取碼:4kdj


![[SCTF2019]babyre](http://pic.xiahunao.cn/[SCTF2019]babyre)


:SpringMVC基本介紹)
)
