因為安全風險中提到當app處于后臺卡片狀態時,顯示的卡片頁面應該為模糊效果,否則容易泄露用戶隱私,尤其當前頁涉及個人信息、資產信息等,都會造成信息泄露!基于這種場景,我研究了下這種業務下的模糊效果
找了半天,沒有找到太現成的,只能自己動手寫一寫了,最后試了試,感覺效果湊乎,先用著吧
為了解決該安全風險,主要用到了 BlurView 三方框架
- github地址 - BlurView(國內外)
- gitcode地址 - BlurView(國內)
人生,哪有事事如意?
- 框架介紹
- 事前注意
- AndroidX 兼容了嗎?
- View未加載完就設置 blurView 了?
- 倉庫引用不到?
- 實踐檢驗
- 控件引入
- 使用方式
- 基礎使用
- 兼容使用
- 有那么一刻想優化一下么?
框架介紹
如果想詳細了解框架使用,及其源代碼的話可以直接前往上方地址
Effect
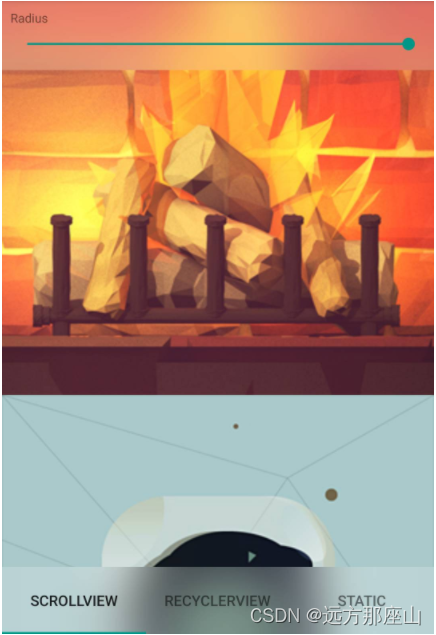
Tip:不支持 SurfaceView, TextureView, VideoView, MapFragment, GLSurfaceView, etc 模糊

框架引入
implementation 'com.github.Dimezis:BlurView:version-2.0.3'
視圖引入
Tip:是處于BlurView的視圖是不會被模糊的
<eightbitlab.com.blurview.BlurViewandroid:id="@+id/blurView"android:layout_width="match_parent"android:layout_height="wrap_content"app:blurOverlayColor="@color/colorOverlay"><!--Any child View here, TabLayout for example. This View will NOT be blurred --></eightbitlab.com.blurview.BlurView>
調用方式
float radius = 20f;View decorView = getWindow().getDecorView();// ViewGroup you want to start blur from. Choose root as close to BlurView in hierarchy as possible.ViewGroup rootView = (ViewGroup) decorView.findViewById(android.R.id.content);// Optional:// Set drawable to draw in the beginning of each blurred frame.// Can be used in case your layout has a lot of transparent space and your content// gets a too low alpha value after blur is applied.Drawable windowBackground = decorView.getBackground();blurView.setupWith(rootView, new RenderScriptBlur(this)) // or RenderEffectBlur.setFrameClearDrawable(windowBackground) // Optional.setBlurRadius(radius)
關于這部分尚未使用,就不做解釋了
事前注意
主要記錄我在使用中遇到的問題
AndroidX 兼容了嗎?
android.useAndroidX=true
View未加載完就設置 blurView 了?
這個并是不必現問題,可能基本遇不到,僅做記錄(該 rootView 可以使用xml中最外層布局控件)
rootView.viewTreeObserver.addOnGlobalLayoutListener {blurView.setupWith(contextView, algorithm).setFrameClearDrawable(background).setBlurRadius(radius)//如不要需要,無需設置}
倉庫引用不到?
如果你運氣不錯的話,直接引入框架可能就可以使用了,但是我運氣可能不太好
implementation 'com.github.Dimezis:BlurView:version-2.0.3'
根據介紹 JCenter 倉庫已經關閉了,需要配置 jitpack

解決方式
repositories {maven { url 'https://jitpack.io' }}
allprojects {repositories {maven { url 'https://jitpack.io' }}
}
小課堂
我們常見的遠程倉庫主要有三種 JCenter、mavenCentral、jitpack
- JCenter:JCenter是JFrog公司提供的Android第三方庫的倉庫,JFrog公司宣布即將廢棄該倉庫,jcenter倉庫是也曾經google默認推薦的第三方庫。最早宣布廢棄時,2022年2月后,將不可以下載上邊的庫,如果這些庫的開發
者不做庫遷移,那么普通開發者將無法使用這些庫,不過,好在最后JFrog公司可能和Google達成了什么協議,后續還能下載,但不能更新維護。目前Google推薦使用mavenCentral倉庫。 - mavenCentral:sonatype公司提供的第三方倉庫,當時使用比較麻煩,審核也比較嚴格,比如你發布庫的時候,庫的包名,你必須要有這個域名的所有權,才能發布,不像jcenter誰先用,就歸誰。目前Google推薦使用的第三方倉庫。
- jitpack (https://jitpack.io/):在jcenter廢棄后,逐漸被用的越來越多,使用比較簡單,適合個人開發者使用,缺點是不是Google官方推薦,使用時要手動添加maven依賴。
實踐檢驗
可能是能力不足,解決小問題花了一些時間,所以建議大家保證已經解決了上述提到的注意點
build.gradle 引入框架
implementation 'com.github.Dimezis:BlurView:version-2.0.3'
控件引入
關于這部分要了解視圖層次的概念,感覺有以下幾點需要特別注意一下
- 最外層布局可以采用
FrameLayout、RelativeLayout、ConstraintLayout,不然可能無法達到視圖覆蓋的效果 - 模糊效果是
直接將模糊后的視圖覆蓋到原正常視圖之上 - 正常視圖位于底層,從xml角度一般先寫,模糊視圖后寫,可以參考棧結構
activity_main (引入BlurView)
<?xml version="1.0" encoding="utf-8"?>
<android.support.constraint.ConstraintLayout xmlns:android="http://schemas.android.com/apk/res/android"xmlns:app="http://schemas.android.com/apk/res-auto"xmlns:tools="http://schemas.android.com/tools"android:layout_width="match_parent"android:layout_height="match_parent"tools:context=".MainActivity"><LinearLayoutandroid:layout_width="match_parent"android:layout_height="match_parent"android:background="@drawable/ic_launcher_background"android:orientation="vertical"><TextViewandroid:layout_width="match_parent"android:layout_height="60dp"android:gravity="center"android:textSize="20sp"android:text="放置正常視圖,模糊后被覆蓋"android:textColor="#333333" /></LinearLayout><eightbitlab.com.blurview.BlurViewandroid:id="@+id/blur_view"android:layout_width="match_parent"android:layout_height="match_parent"app:blurOverlayColor="#78ffffff"><!--        <LinearLayout--><!--            android:layout_width="match_parent"--><!--            android:layout_height="match_parent"--><!--            android:orientation="vertical">--><!--            <TextView--><!--                android:layout_width="match_parent"--><!--                android:layout_height="50dp"--><!--                android:gravity="center"--><!--                android:text="放置模糊后的正常視圖,模糊后依舊正常顯示"--><!--                android:textColor="#333333" />--><!--        </LinearLayout>--></eightbitlab.com.blurview.BlurView></android.support.constraint.ConstraintLayout>
使用方式
關于 BlurView 所需 rootView
- 可以采用
xml內的最外層ViewGroup - 也可以采用
Window的ContentView
基礎使用
package com.example.blurviewimport android.os.Build
import android.os.Bundle
import android.support.v7.app.AppCompatActivity
import android.view.View
import android.view.ViewGroup
import eightbitlab.com.blurview.BlurAlgorithm
import eightbitlab.com.blurview.BlurView
import eightbitlab.com.blurview.RenderEffectBlur
import eightbitlab.com.blurview.RenderScriptBlurclass MainActivity : AppCompatActivity() {private val blurView: BlurView by lazy {findViewById(R.id.blur_view)}override fun onCreate(savedInstanceState: Bundle?) {super.onCreate(savedInstanceState)setContentView(R.layout.activity_main)val contextView = window.decorView.findViewById<ViewGroup>(android.R.id.content)blurView.setupWith(contextView, RenderScriptBlur(this@MainActivity))}override fun onPause() {super.onPause()blurView.visibility = View.VISIBLE}override fun onResume() {super.onResume()blurView.visibility = View.GONE}
}
兼容使用
- 用到了
Window相關的DecorView原理 (系統級) - 因
RenderScriptBlur過時,用到了RenderEffectBlur(框架級)
package com.example.blurviewimport android.os.Build
import android.os.Bundle
import android.support.v7.app.AppCompatActivity
import android.view.View
import android.view.ViewGroup
import eightbitlab.com.blurview.BlurAlgorithm
import eightbitlab.com.blurview.BlurView
import eightbitlab.com.blurview.RenderEffectBlur
import eightbitlab.com.blurview.RenderScriptBlurclass MainActivity : AppCompatActivity() {private val blurView: BlurView by lazy {findViewById(R.id.blur_view)}override fun onCreate(savedInstanceState: Bundle?) {super.onCreate(savedInstanceState)setContentView(R.layout.activity_main)val background = window.decorView.backgroundval contextView = window.decorView.findViewById<ViewGroup>(android.R.id.content)val radius = 20fval algorithm: BlurAlgorithm = getBlurAlgorithm()blurView.setupWith(contextView, algorithm).setFrameClearDrawable(background).setBlurRadius(radius) //如不要需要,無需設置}override fun onPause() {super.onPause()blurView.visibility = View.VISIBLE}override fun onResume() {super.onResume()blurView.visibility = View.GONE}/*** 兼容處理* */private fun getBlurAlgorithm(): BlurAlgorithm {val algorithm: BlurAlgorithm = if (Build.VERSION.SDK_INT >= Build.VERSION_CODES.S) {RenderEffectBlur()} else {RenderScriptBlur(this)}return algorithm}}
有那么一刻想優化一下么?
我發現在后臺切換卡片時,當卡片處于當前 position,好像會偶顯正常視圖,基于這點可以考慮同時兼容前后臺監聽來實現更好的效果
以前寫過一篇 Android進階之路 - 前后臺切換監聽,有興趣的話可以去看下
隨機找了一篇別人的偽代碼,各位可以簡單參考下
public class MainActivity extends AppCompatActivity {private boolean isForeground = false;@Overrideprotected void onCreate(Bundle savedInstanceState) {super.onCreate(savedInstanceState);setContentView(R.layout.activity_main);}@Overrideprotected void onResume() {super.onResume();if (isForeground) {// 從后臺進入前臺,恢復界面狀態和數據// TODO: 恢復界面狀態和數據}isForeground = true;}@Overrideprotected void onPause() {super.onPause();if (!isAppOnForeground()) {// 從前臺進入后臺,保存界面狀態和數據// TODO: 保存界面狀態和數據}isForeground = false;}/*** 判斷當前應用是否處于前臺*/private boolean isAppOnForeground() {ActivityManager activityManager = (ActivityManager) getSystemService(Context.ACTIVITY_SERVICE);List<ActivityManager.RunningAppProcessInfo> appProcesses = activityManager.getRunningAppProcesses();if (appProcesses == null) {return false;}String packageName = getPackageName();for (ActivityManager.RunningAppProcessInfo appProcess : appProcesses) {if (appProcess.processName.equals(packageName)&& appProcess.importance == ActivityManager.RunningAppProcessInfo.IMPORTANCE_FOREGROUND) {return true;}}return false;}
}


)


回歸預測)


![[實例] Unity Shader 逐像素漫反射與半蘭伯特光照](http://pic.xiahunao.cn/[實例] Unity Shader 逐像素漫反射與半蘭伯特光照)

