文章目錄
- 前言
- 一 比較器
- 1.1 關于兩個對象的比較
- 1.2 Comparable接口:
- 1.3 Arrays.sort方法的實現
- 1.4 比較器的實現
- Comparator接口
- 二 深拷貝與淺拷貝
- 2.1 淺拷貝:
- Cloneable接口:
- clone方法:
- 實現拷貝:
- 淺拷貝:
- 2.2 深拷貝:
前言
上一篇博客并沒有將接口的內容闡述完畢,這篇博客繼續闡述!
一 比較器
1.1 關于兩個對象的比較
在比較單個基本數據類型時,我們可以通過關系運算符進行比較。
public class Test {public static void main(String[] args) {int age1 = 10;int age2 = 8;System.out.println(age1 > age2);}

但是當比較對象等引用數據類型時,便不能僅僅通過關系運算符進行比較了。
class Student {String name;int age;public Student(int age, String name) {this.age = age;this.name = name;}}public class Test {public static void main(String[] args) {Student student1 = new Student(10,"張三");Student student2 = new Student(12,"李四");System.out.println(student1>student2);}}

要進行對象間的比較,需要確定進行比較的規則是什么,比較哪一個屬性。
1.2 Comparable接口:
Comparable接口中的compareTo 方法用于進行對象間屬性的比較。
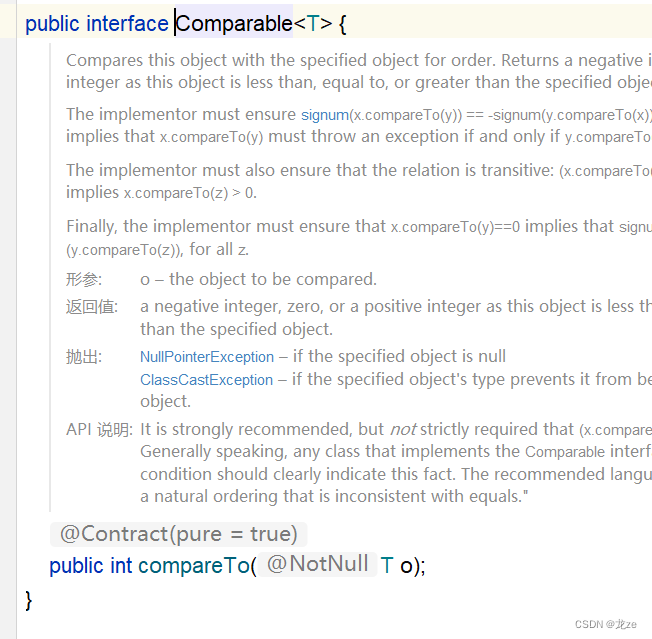
compareTo是一個抽象方法,我們需要重寫:
//創建一個Student類,實現Comparable接口
class Student implements Comparable<Student> {String name;int age;public Student(int age, String name) {this.age = age;this.name = name;}@Overridepublic String toString() {return "Student{" +"name='" + name + '\'' +", age=" + age +'}';}
//重寫compareTo方法@Overridepublic int compareTo(Student o) {//比較年齡:if(this.age == o.age){return 0;}else if(this.age>o.age){return 1;}else {return -1;}}//比較姓名//  return this.name.compareTo(o.name);}public class Test {public static void main(String[] args) {Student student1 = new Student(10,"張三");Student student2 = new Student(12,"李四");System.out.println(student1.compareTo(student2));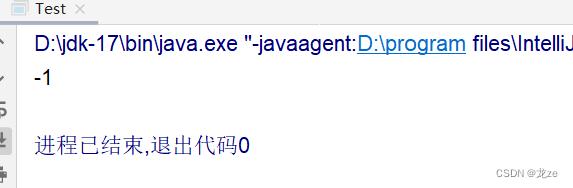
結果為-1 ,表明student1的年齡比student2的年齡小。
代碼分析:
Student類實現了Comparable接口,
<>是泛型的標記,以后會闡述到,比較那個類,就將類名填寫在<>中!
對象間的比較本質上依然是對象屬性之間的比較。
1.3 Arrays.sort方法的實現
如果創建一個對象數組,使得數組中的這些對象按照某種規則進行排序
則可以使用Array.sort方法
class Student implements Comparable<Student> {String name;int age;public Student(int age, String name) {this.age = age;this.name = name;}@Overridepublic String toString() {return "Student{" +"name='" + name + '\'' +", age=" + age +'}';}@Overridepublic int compareTo(Student o) {//比較年齡:if(this.age == o.age){return 0;}else if(this.age>o.age){return 1;}else {return -1;}}//比較姓名//  return this.name.compareTo(o.name);}public class Test {public static void main(String[] args) {Student[] arr1 = new Student[3];arr1[0] = new Student(10, "王五");arr1[1] = new Student(8, "李四");arr1[2] = new Student(9, "張三");Student[] arr1 = {student1,student2,student3};System.out.println("排序前:"+Arrays.toString(arr1));Arrays.sort(arr1);System.out.println("排序后:"+Arrays.toString(arr1));}
}

排序后,年齡從小到大,依次遞增。
如果不實現Comparable接口,會怎么樣呢?

結果表明Student類型,不能轉換成Comparable類型,這是怎么回事,我們調用Arrays.sort方法進行排序,與轉換類型有什么關系?
這里我們需要手動實現一下Arrays.sort方法
public static void mysort(Comparable[] comparables){// 用接口數組接收實現接口的數組 采用冒號排序的方式//比較的趟數!for (int i = 0;i<comparables.length-1 ;i++){for (int j = 0; j<comparables.length - 1-i;j++){if(comparables[j].compareTo(comparables[j+1])>0){//如果數組前面元素的值大于數組后面元素的值,則交換引用的值,這是升序Comparable tmp = comparables[j];comparables[j] = comparables[j+1];comparables[j+1] = tmp;}}}}
代碼分析: 問題就在于 if(comparables[j].compareTo(comparables[j+1])>0) 這條語句
我們通過接口類型數組來接收實現了接口的數組,并且對compareTo方法進行調用!
在上個例子中,因為沒有Student沒有實現Comparable接口,所以會發生Student類型無法發生向上轉型成Comparable接口類型的情況。
調用自己實現的mysort方法:
class Student implements Comparable<Student> {String name;int age;public Student(int age, String name) {this.age = age;this.name = name;}@Overridepublic String toString() {return "Student{" +"name='" + name + '\'' +", age=" + age +'}';}public int compareTo(Student o) {//比較年齡:if(this.age == o.age){return 0;}else if(this.age>o.age){return 1;}else {return -1;}}//比較姓名// return this.name.compareTo(o.name);}public class Test {public static void main(String[] args) {Student[] arr1 = new Student[3];arr1[0] = new Student(10, "王五");arr1[1] = new Student(8, "李四");arr1[2] = new Student(9, "張三");System.out.println("排序前:" + Arrays.toString(arr1));mysort(arr1);System.out.println("排序后:" + Arrays.toString(arr1));}}
1.4 比較器的實現
在上面實現compareTo方法時,我們只能比較某一固定的屬性,比如年齡或者名字,
這比較有局限性,總不能當需要比較某一屬性時,再去修改類的實現。解決方案:當需要比較某一屬性時,就調用相關的類!
Comparator接口
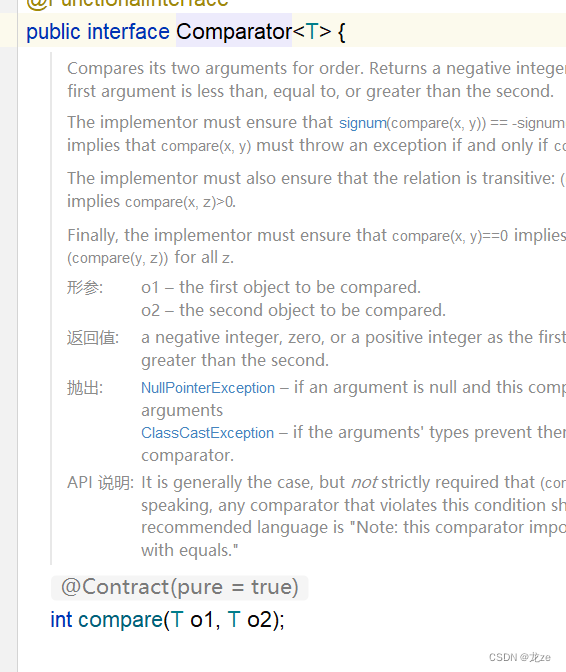
如圖所示:Comparator接口中有一個compare抽象方法。
我們可以創建不同的類來實現此接口,當需要比較不同的屬性值時,調用不同的類:
舉例:
//在單獨一個java文件中
package demo1;import java.util.Comparator;
//創建一個NameComparator類,實現Comparator接口
public class NameComparator implements Comparator<Student> {@Override//實現接口中的抽象方法,用于進行名字之間的比較!public int compare(Student o1, Student o2) {return o1.name.compareTo(o2.name);}
}
o1.name之所以可以引用compareTo方法是因為String類中重寫了compareTo方法:
//在另一個java文件中
package demo1;import java.util.Comparator;
//實現Comparator接口
public class AgeComparator implements Comparator<Student> {@Overridepublic int compare(Student o1, Student o2) {return o1.age - o2.age;}
}
package demo1;import java.util.Arrays;
import java.util.Comparator;//接口的應用!
// 比較兩個對象的嘗試!
// 實現關于comparable接口!
class Student implements Comparable<Student> {String name;int age;public Student(int age, String name) {this.age = age;this.name = name;}@Overridepublic String toString() {return "Student{" +"name='" + name + '\'' +", age=" + age +'}';}public int compareTo(Student o) {//比較年齡:if(this.age == o.age){return 0;}else if(this.age>o.age){return 1;}else {return -1;}}//比較姓名//  return this.name.compareTo(o.name);}public class Test {public static void main(String[] args) {Student[] arr1 = new Student[3];arr1[0] = new Student(10, "王五");arr1[1] = new Student(8, "李四");arr1[2] = new Student(9, "張三");System.out.println("排序前:" + Arrays.toString(arr1));//創建一個NameComparator對象。NameComparator nameComparator   =  new NameComparator();//進行名字間的比較!//Arrays.sort方法可以接收第二個參數!Arrays.sort(arr1,nameComparator);System.out.println("排序后:" + Arrays.toString(arr1));}}
這是按照姓名排序的結果:

按照年齡排序,則調用AgeComparator類:
System.out.println("排序前:" + Arrays.toString(arr1));AgeComparator ageComparator = new AgeComparator();//根據年齡進行比較!Arrays.sort(arr1,ageComparator);System.out.println("排序后:"+Arrays.toString(arr1));排序后,年齡從小到大!

我們通過創建不同的實現Comparator的類,并實現抽象方法compare,
當需要比較某一屬性時,即調用某一屬性對應類進行比較,這就是比較器的思想與實現!
二 深拷貝與淺拷貝
2.1 淺拷貝:
所謂拷貝即將一個對象復制一份,由另一個引用指向新復制出的對象。
Cloneable接口:
要進行拷貝的類,需要先實現Cloneable接口.
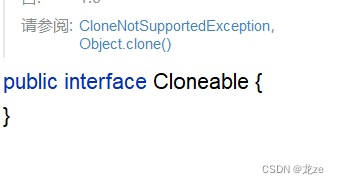
Cloneable接口是一個空接口,代表著實現此接口的類可以被拷貝!
clone方法:
clone方法是Object類中用來拷貝對象的方法。
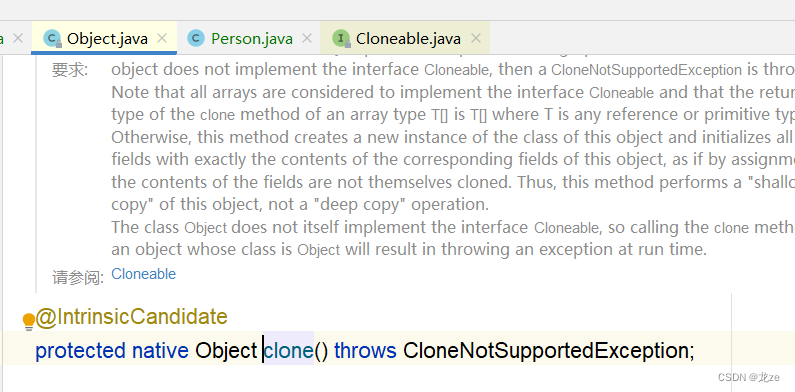
此方法被Native修飾,說明它是由C/C++等其他編程語言實現,不能查看其具體實現。
實現拷貝:
package demo1;public class Person implements Cloneable{   //實現空接口的類,代表可以拷貝String name;int age ;public Person(String name, int age) {this.name = name;this.age = age;}@Overridepublic String toString() {return "Person{" +"name='" + name + '\'' +", age=" + age +'}';}
}
package demo1;
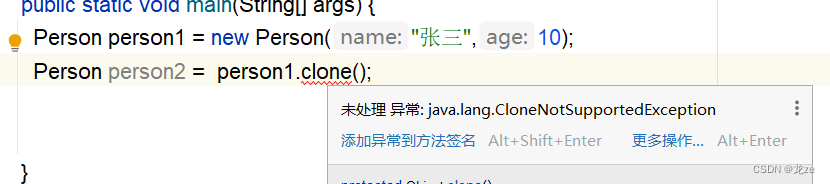
// 淺拷貝public class Test {public static void main(String[] args) {Person person1 = new Person("張三",10);Person person2 = person1.clone();}
}
(1)此時編譯器報警告:
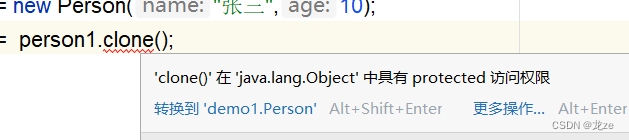
盡管clone方法的訪問權限是protected且Test也是Object的子類,但是當person1調用clone方法時,
是在Person類的外部,所以報錯。
解決這個問題,我們需要在子類中重寫clone方法:
protected Object clone() throws CloneNotSupportedException {return super.clone();}
(2) 此時編譯器又報警告:
這是異常的問題,以后會闡述到,解決這個問題,在main方法后,加上一條語句即可:
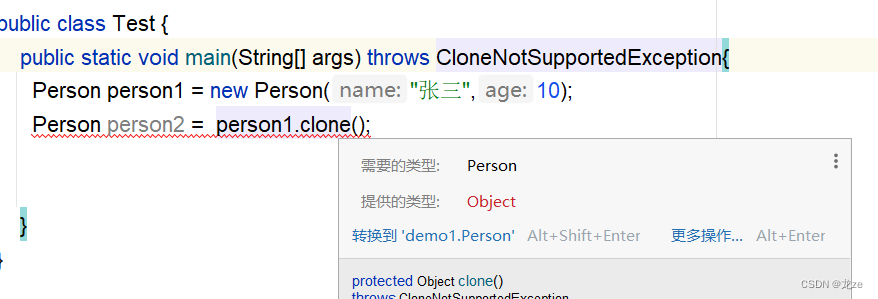
(3)編譯器又報警告的原因是:
方法的返回值類型為Object類型,我們需要將其強制為Person類型。
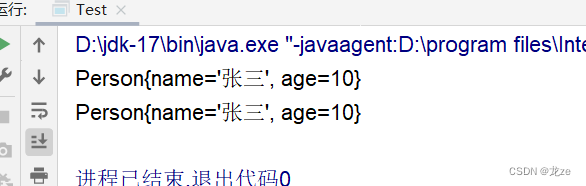
package demo1;
// 淺拷貝public class Test {public static void main(String[] args) throws CloneNotSupportedException{Person person1 = new Person("張三",10);Person person2 = (Person) person1.clone();System.out.println(person1);System.out.println(person2);}
}
此刻,內存中情況如下:
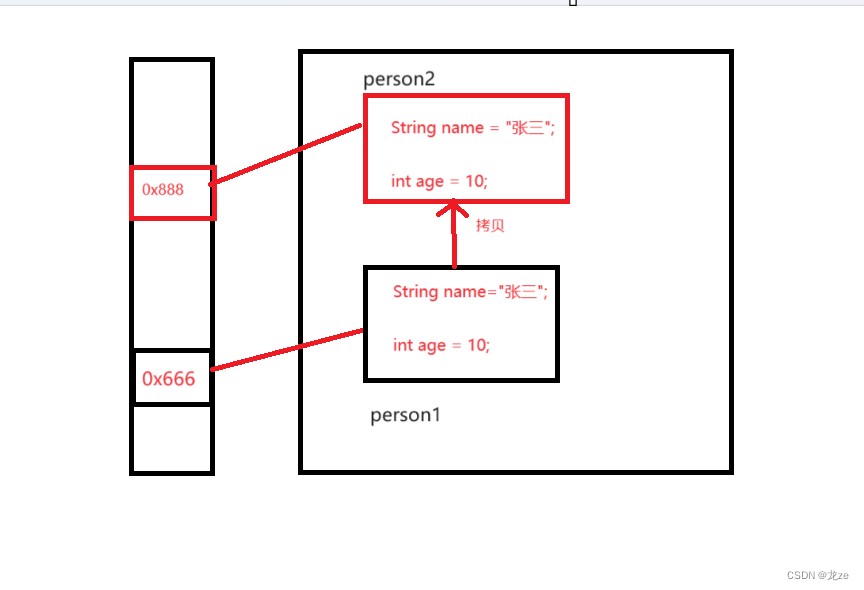
淺拷貝:
拷貝的情況講完了,那什么是淺拷貝呢?
當對象中有對象的創建時,此時只拷貝外部的對象,而不拷貝內部的對象,稱為淺拷貝!
舉例:
package demo1;
//創建一個Person類,實現接口
public class Person implements Cloneable{   //實現空接口的類,代表可以拷貝String name;int age ;Money money1 = new Money(10);public Person(String name, int age) {this.name = name;this.age = age;}@Overridepublic String toString() {return "Person{" +"name='" + name + '\'' +", age=" + age +'}';}
//重寫克隆方法@Overrideprotected Object clone() throws CloneNotSupportedException {return super.clone();}
}
package demo1;
//創建一個Money類
public class Money {int moneycount ;public Money(int moneycount) {this.moneycount = moneycount;}
}package demo1;
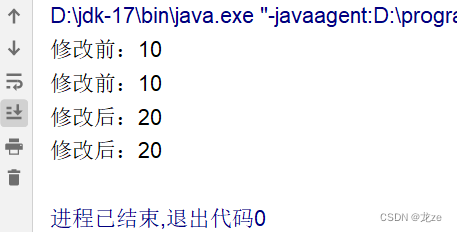
// 淺拷貝public class Test {public static void main(String[] args) throws CloneNotSupportedException{Person person1 = new Person("張三",10);Person person2 = (Person) person1.clone();System.out.println("修改前:"+person1.money1.moneycount);System.out.println("修改前:"+person2.money1.moneycount);
//僅僅修改person2中的money對象的值,會不會改變person1中的值?person2.money1.moneycount = 20;System.out.println("修改后:"+person1.money1.moneycount);System.out.println("修改后:"+person2.money1.moneycount);}
}
在內存中情況:
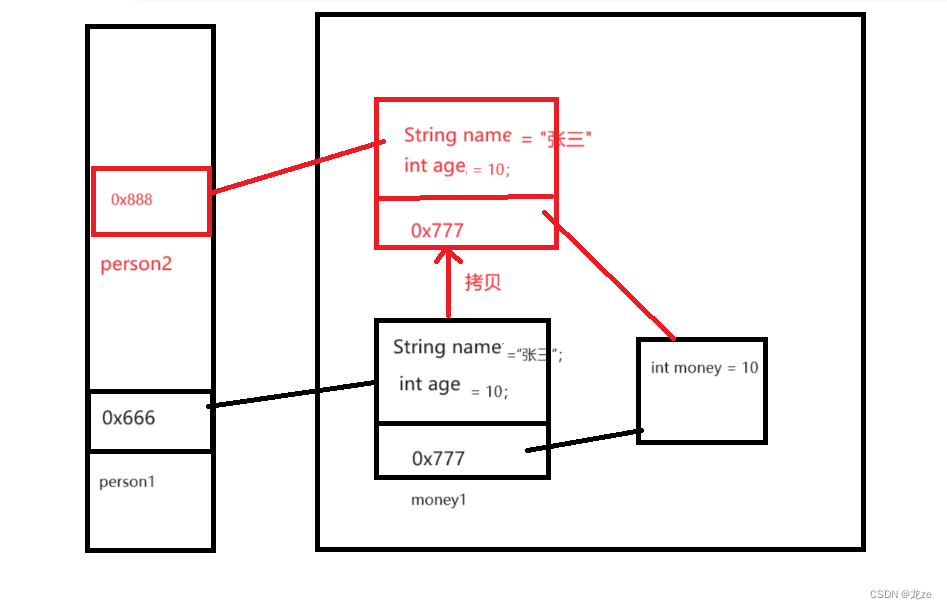
這種未將對象 中的對象 拷貝的不徹底拷貝,我們稱為淺拷貝!
2.2 深拷貝:
深拷貝也就是將對象中的對象也進行拷貝,
這需要對Person類中的clone方法進行重寫:
并且對Money類按照Person類中的格式進行重寫編寫
代碼:
//Person類
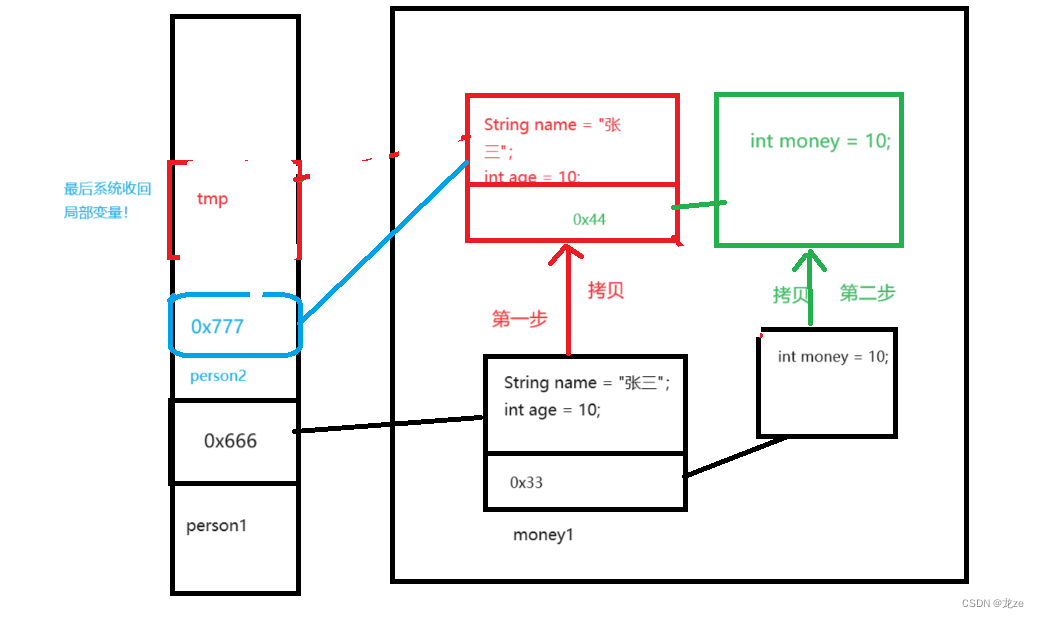
package demo1;public class Person implements Cloneable{ //實現空接口的類,代表可以拷貝String name;int age ;Money money1 = new Money(10);public Person(String name, int age) {this.name = name;this.age = age;}@Overridepublic String toString() {return "Person{" +"name='" + name + '\'' +", age=" + age +'}';}@Override//重寫后的方法protected Object clone() throws CloneNotSupportedException {Person tmp = (Person) super.clone(); //誰調用了super方法,不需要this指定對象。//對于對象中的對象也進行拷貝!tmp.money1 = (Money) this.money1.clone();return tmp;}
}//Money類
package demo1;public class Money implements Cloneable {int moneycount ;public Money(int moneycount) {this.moneycount = moneycount;}
//也重寫clone方法@Overrideprotected Object clone() throws CloneNotSupportedException {return super.clone();}
}
//測試類
package demo1;
// 淺拷貝public class Test {public static void main(String[] args) throws CloneNotSupportedException{Person person1 = new Person("張三",10);Person person2 = (Person) person1.clone();System.out.println("修改前:"+person1.money1.moneycount);System.out.println("修改前:"+person2.money1.moneycount);person2.money1.moneycount = 20;System.out.println("修改后:"+person1.money1.moneycount);System.out.println("修改后:"+person2.money1.moneycount);}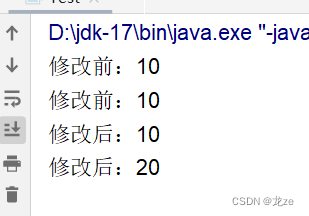
結果表明,此時深拷貝成功,修改person2中的money值,不會改變person1中的值!
在內存中的展示:


)


)


)


