前言:網絡編程的意義與價值
前言:網絡編程的意義與價值
在當今互聯網時代,網絡編程是軟件開發的核心技能之一。無論是桌面應用、移動應用還是企業級系統,幾乎都需要與網絡交互。Java 作為一門跨平臺的編程語言,提供了完善的網絡編程 API,使得開發者能夠輕松實現各種網絡通信功能。
本指南將全面覆蓋 Java 網絡編程的方方面面,從基礎的 TCP/IP 協議到高級的 NIO 框架,從簡單的 Socket 通信到復雜的分布式系統,輔以大量圖解和實例代碼,幫助讀者構建完整的 Java 網絡編程知識體系。
第一章:計算機網絡基礎
1.1 網絡的基本概念
計算機網絡是指將地理位置不同的具有獨立功能的多臺計算機及其外部設備,通過通信線路連接起來,在網絡操作系統、網絡管理軟件及網絡通信協議的管理和協調下,實現資源共享和信息傳遞的計算機系統。
1.2 網絡協議與分層模型
網絡協議是計算機網絡中進行數據交換而建立的規則、標準或約定的集合。為了簡化網絡設計,通常采用分層模型。
1.2.1 OSI 七層模型
OSI(Open Systems Interconnection)七層模型是國際標準化組織(ISO)提出的一個網絡通信模型,將網絡通信分為七個層次:
- 物理層(Physical Layer):負責物理介質上的比特流傳輸
- 數據鏈路層(Data Link Layer):負責將比特流封裝成幀,提供節點間的可靠傳輸
- 網絡層(Network Layer):負責數據包的路由和轉發
- 傳輸層(Transport Layer):負責端到端的可靠數據傳輸
- 會話層(Session Layer):負責建立、管理和終止會話
- 表示層(Presentation Layer):負責數據的格式轉換和加密
- 應用層(Application Layer):直接為應用程序提供服務
1.2.2 TCP/IP 四層模型
TCP/IP 模型是實際應用中廣泛使用的網絡模型,它將 OSI 七層模型簡化為四層:
- 網絡接口層:對應 OSI 的物理層和數據鏈路層
- 網絡層:對應 OSI 的網絡層,主要協議有 IP、ICMP、ARP 等
- 傳輸層:對應 OSI 的傳輸層,主要協議有 TCP、UDP
- 應用層:對應 OSI 的會話層、表示層和應用層,主要協議有 HTTP、FTP、SMTP 等
1.3 核心網絡協議
1.3.1 IP 協議
IP(Internet Protocol)是網絡層的核心協議,負責將數據包從源主機發送到目標主機。
主要特點:
- 無連接:發送數據前不需要建立連接
- 不可靠:不保證數據的可靠傳輸
- 盡最大努力交付:會盡力傳輸數據,但不保證一定到達
IP 地址是 IP 協議中的重要概念,用于標識網絡中的主機。IPv4 地址是 32 位的二進制數,通常表示為四個十進制數(如 192.168.1.1)。IPv6 地址是 128 位的二進制數,用于解決 IPv4 地址耗盡的問題。
1.3.2 TCP 協議
TCP(Transmission Control Protocol)是傳輸層的協議,提供可靠的、面向連接的數據流傳輸服務。
TCP 的主要特點:
- 面向連接:通信前需要建立連接(三次握手),通信結束后需要釋放連接(四次揮手)
- 可靠傳輸:通過確認機制、重傳機制、流量控制和擁塞控制保證數據的可靠傳輸
- 面向字節流:將應用層的數據視為字節流,無消息邊界
TCP 三次握手過程:
客戶端發送 SYN 報文,請求建立連接
服務器收到 SYN 報文后,發送 SYN+ACK 報文,確認客戶端的請求并請求建立連接
客戶端收到 SYN+ACK 報文后,發送 ACK 報文,確認服務器的請求,連接建立
TCP 四次揮手過程:
客戶端發送 FIN 報文,請求釋放連接
服務器收到 FIN 報文后,發送 ACK 報文,確認客戶端的請求
服務器準備好釋放連接后,發送 FIN 報文
客戶端收到 FIN 報文后,發送 ACK 報文,確認服務器的請求,連接釋放
1.3.3 UDP 協議
UDP(User Datagram Protocol)是傳輸層的另一種協議,提供不可靠的、無連接的數據報傳輸服務。
UDP 的主要特點:
- 無連接:通信前不需要建立連接
- 不可靠:不保證數據的可靠傳輸,沒有確認機制和重傳機制
- 面向數據報:數據以數據報的形式發送,有消息邊界
- 開銷小:相比 TCP,UDP 的頭部開銷小,傳輸效率高
1.3.4 應用層協議
應用層協議建立在 TCP 或 UDP 之上,為特定的應用提供服務:
- HTTP(HyperText Transfer Protocol):用于萬維網(WWW)服務,基于 TCP
- HTTPS:HTTP 的安全版本,使用 SSL/TLS 加密,基于 TCP
- FTP(File Transfer Protocol):用于文件傳輸,基于 TCP
- SMTP(Simple Mail Transfer Protocol):用于發送電子郵件,基于 TCP
- POP3(Post Office Protocol 3):用于接收電子郵件,基于 TCP
- DNS(Domain Name System):用于域名解析,通常基于 UDP
- Telnet:用于遠程登錄,基于 TCP
- SSH(Secure Shell):用于安全的遠程登錄,基于 TCP
1.4 端口與套接字
1.4.1 端口
端口是傳輸層的概念,用于標識主機上的進程。端口號是一個 16 位的整數,范圍是 0-65535。
- 0-1023:知名端口,用于知名服務(如 HTTP 使用 80 端口,HTTPS 使用 443 端口)
- 1024-49151:注冊端口,用于一些應用程序
- 49152-65535:動態端口,用于臨時分配
1.4.2 套接字
套接字(Socket)是網絡編程的抽象概念,用于表示網絡中的一個連接端點。在 TCP/IP 協議中,套接字由 IP 地址和端口號組成,即(IP 地址,端口號)。
通過套接字,應用程序可以與遠程主機上的應用程序進行通信。
第二章:Java 網絡編程基礎
2.1 Java 網絡編程 API 概述
Java 提供了豐富的網絡編程 API,主要位于java.net包中,包括:
- Socket 和 ServerSocket:用于 TCP 通信
- DatagramSocket 和 DatagramPacket:用于 UDP 通信
- URL 和 URLConnection:用于訪問 URL 資源
- InetAddress:用于表示 IP 地址
- NetworkInterface:用于表示網絡接口
- Proxy:用于表示代理服務器
Java NIO(New IO)提供了更高效的網絡編程 API,位于 java.nio 包及其子包中,包括:
- SocketChannel 和 ServerSocketChannel:用于 TCP 通信的通道
- DatagramChannel:用于 UDP 通信的通道
- Selector:用于多路復用
- Buffer:用于數據緩沖
2.2 InetAddress 類
InetAddress 類用于表示 IP 地址,它沒有公共的構造方法,只能通過靜態方法獲取實例。
常用方法:
- static InetAddress getByName(String host):根據主機名或 IP 地址字符串獲取 InetAddress 實例
- static InetAddress getLocalHost():獲取本地主機的 InetAddress 實例
- String getHostName():獲取主機名
- String getHostAddress():獲取 IP 地址字符串
- boolean isReachable(int timeout):測試是否可以到達該地址
import java.net.InetAddress;
import java.net.UnknownHostException;public class InetAddressExample {public static void main(String[] args) {try {// 獲取本地主機的InetAddress實例InetAddress localHost = InetAddress.getLocalHost();System.out.println("本地主機名: " + localHost.getHostName());System.out.println("本地IP地址: " + localHost.getHostAddress());// 獲取指定主機的InetAddress實例InetAddress baidu = InetAddress.getByName("www.baidu.com");System.out.println("\n百度主機名: " + baidu.getHostName());System.out.println("百度IP地址: " + baidu.getHostAddress());// 獲取指定IP地址的InetAddress實例InetAddress ipAddr = InetAddress.getByName("127.0.0.1");System.out.println("\nIP地址對應的主機名: " + ipAddr.getHostName());// 測試是否可以到達該地址boolean reachable = baidu.isReachable(5000);System.out.println("\n是否可以到達百度服務器: " + reachable);} catch (Exception e) {e.printStackTrace();}}
}
2.3 TCP 編程
TCP 是一種面向連接的、可靠的傳輸層協議。Java 中使用 Socket 和 ServerSocket 類實現 TCP 通信。
2.3.1 TCP 通信基本流程
TCP 通信分為服務器端和客戶端:
服務器端流程:
- 創建 ServerSocket 對象,綁定到指定端口
- 調用 accept () 方法,監聽客戶端連接,該方法會阻塞直到有客戶端連接
- 獲得客戶端的 Socket 對象后,通過輸入流和輸出流與客戶端通信
- 通信結束后,關閉 Socket 和 ServerSocket
客戶端流程:
- 創建 Socket 對象,指定服務器的 IP 地址和端口號,與服務器建立連接
- 通過輸入流和輸出流與服務器通信
- 通信結束后,關閉 Socket
2.3.2 TCP 服務器端示例
import java.io.*;
import java.net.*;public class TCPServer {public static void main(String[] args) {ServerSocket serverSocket = null;try {// 創建ServerSocket,綁定到8888端口serverSocket = new ServerSocket(8888);System.out.println("服務器已啟動,等待客戶端連接...");// 循環接受客戶端連接while (true) {// 監聽客戶端連接,阻塞方法Socket clientSocket = serverSocket.accept();System.out.println("客戶端已連接:" + clientSocket.getInetAddress().getHostAddress());// 為每個客戶端創建一個線程處理new Thread(new ClientHandler(clientSocket)).start();}} catch (IOException e) {e.printStackTrace();} finally {if (serverSocket != null) {try {serverSocket.close();} catch (IOException e) {e.printStackTrace();}}}}// 處理客戶端請求的線程類static class ClientHandler implements Runnable {private Socket clientSocket;public ClientHandler(Socket socket) {this.clientSocket = socket;}@Overridepublic void run() {BufferedReader in = null;PrintWriter out = null;try {// 獲取輸入流,讀取客戶端發送的數據in = new BufferedReader(new InputStreamReader(clientSocket.getInputStream()));// 獲取輸出流,向客戶端發送數據out = new PrintWriter(clientSocket.getOutputStream(), true);String inputLine;// 讀取客戶端發送的信息while ((inputLine = in.readLine()) != null) {System.out.println("收到客戶端消息:" + inputLine);// 向客戶端發送響應out.println("服務器已收到:" + inputLine);// 如果客戶端發送"bye",則關閉連接if ("bye".equals(inputLine)) {break;}}System.out.println("客戶端已斷開連接");} catch (IOException e) {e.printStackTrace();} finally {// 關閉資源try {if (in != null) in.close();if (out != null) out.close();if (clientSocket != null) clientSocket.close();} catch (IOException e) {e.printStackTrace();}}}}
}
2.3.3 TCP 客戶端示例
import java.io.*;
import java.net.*;public class TCPClient {public static void main(String[] args) {Socket socket = null;BufferedReader in = null;PrintWriter out = null;BufferedReader stdIn = null;try {// 創建Socket,連接到本地的8888端口socket = new Socket("localhost", 8888);System.out.println("已連接到服務器");// 獲取輸入流,讀取服務器發送的數據in = new BufferedReader(new InputStreamReader(socket.getInputStream()));// 獲取輸出流,向服務器發送數據out = new PrintWriter(socket.getOutputStream(), true);// 讀取用戶從控制臺輸入的數據stdIn = new BufferedReader(new InputStreamReader(System.in));String userInput;// 循環讀取用戶輸入并發送給服務器while ((userInput = stdIn.readLine()) != null) {// 向服務器發送數據out.println(userInput);// 讀取服務器的響應String response = in.readLine();System.out.println("服務器響應:" + response);// 如果用戶輸入"bye",則退出循環if ("bye".equals(userInput)) {break;}}} catch (UnknownHostException e) {System.err.println("不知道的主機:localhost");e.printStackTrace();} catch (IOException e) {System.err.println("無法與服務器建立連接");e.printStackTrace();} finally {// 關閉資源try {if (in != null) in.close();if (out != null) out.close();if (stdIn != null) stdIn.close();if (socket != null) socket.close();} catch (IOException e) {e.printStackTrace();}}}
}
2.3.4 TCP 通信的注意事項
- 多線程處理:服務器端需要使用多線程處理多個客戶端的連接,否則一個客戶端的連接會阻塞其他客戶端。
- 流的關閉順序:通常先關閉輸出流,再關閉輸入流,最后關閉 Socket。
- 異常處理:網絡通信中可能會出現各種異常,需要妥善處理。
- 編碼問題:在使用字符流時,需要注意編碼問題,避免出現亂碼。
- 緩沖區刷新:使用緩沖流時,需要注意及時刷新緩沖區,確保數據被發送出去。
2.4 UDP 編程
UDP 是一種無連接的、不可靠的傳輸層協議。Java 中使用 DatagramSocket 和 DatagramPacket 類實現 UDP 通信。
2.4.1 UDP 通信基本流程
UDP 通信也分為服務器端和客戶端:
服務器端流程:
- 創建 DatagramSocket 對象,綁定到指定端口
- 創建 DatagramPacket 對象,用于接收數據
- 調用 receive () 方法接收數據,該方法會阻塞直到收到數據
- 處理收到的數據
- 如果需要響應,創建新的 DatagramPacket 對象,調用 send () 方法發送響應
- 通信結束后,關閉 DatagramSocket
客戶端流程:
- 創建 DatagramSocket 對象
- 創建 DatagramPacket 對象,包含要發送的數據、服務器的 IP 地址和端口號
- 調用 send () 方法發送數據
- 如果需要接收響應,創建新的 DatagramPacket 對象,調用 receive () 方法接收響應
- 通信結束后,關閉 DatagramSocket
2.4.2 UDP 服務器端示例
import java.net.*;
import java.io.*;public class UDPServer {public static void main(String[] args) {DatagramSocket socket = null;try {// 創建DatagramSocket,綁定到8888端口socket = new DatagramSocket(8888);System.out.println("UDP服務器已啟動,等待數據...");// 創建接收數據的緩沖區byte[] receiveBuffer = new byte[1024];// 循環接收數據while (true) {// 創建DatagramPacket用于接收數據DatagramPacket receivePacket = new DatagramPacket(receiveBuffer, receiveBuffer.length);// 接收數據,阻塞方法socket.receive(receivePacket);// 解析收到的數據String data = new String(receivePacket.getData(), 0, receivePacket.getLength());InetAddress clientAddress = receivePacket.getAddress();int clientPort = receivePacket.getPort();System.out.println("收到來自 " + clientAddress.getHostAddress() + ":" + clientPort + " 的數據:" + data);// 如果收到"bye",則退出循環if ("bye".equals(data)) {break;}// 準備響應數據String response = "服務器已收到:" + data;byte[] sendBuffer = response.getBytes();// 創建DatagramPacket用于發送響應DatagramPacket sendPacket = new DatagramPacket(sendBuffer, sendBuffer.length, clientAddress, clientPort);// 發送響應socket.send(sendPacket);}System.out.println("服務器關閉");} catch (IOException e) {e.printStackTrace();} finally {if (socket != null) {socket.close();}}}
}
2.4.3 UDP 客戶端示例
import java.net.*;
import java.io.*;public class UDPClient {public static void main(String[] args) {DatagramSocket socket = null;BufferedReader stdIn = null;try {// 創建DatagramSocket,不指定端口,由系統分配socket = new DatagramSocket();// 獲取服務器地址InetAddress serverAddress = InetAddress.getByName("localhost");int serverPort = 8888;// 讀取用戶從控制臺輸入的數據stdIn = new BufferedReader(new InputStreamReader(System.in));String userInput;// 循環讀取用戶輸入并發送給服務器while ((userInput = stdIn.readLine()) != null) {// 準備發送的數據byte[] sendBuffer = userInput.getBytes();// 創建DatagramPacket用于發送數據DatagramPacket sendPacket = new DatagramPacket(sendBuffer, sendBuffer.length, serverAddress, serverPort);// 發送數據socket.send(sendPacket);// 如果用戶輸入"bye",則退出循環if ("bye".equals(userInput)) {break;}// 創建接收響應的緩沖區byte[] receiveBuffer = new byte[1024];// 創建DatagramPacket用于接收響應DatagramPacket receivePacket = new DatagramPacket(receiveBuffer, receiveBuffer.length);// 接收響應,阻塞方法socket.receive(receivePacket);// 解析響應數據String response = new String(receivePacket.getData(), 0, receivePacket.getLength());System.out.println("服務器響應:" + response);}} catch (UnknownHostException e) {System.err.println("不知道的主機:localhost");e.printStackTrace();} catch (IOException e) {e.printStackTrace();} finally {if (socket != null) {socket.close();}if (stdIn != null) {try {stdIn.close();} catch (IOException e) {e.printStackTrace();}}}}
}
2.4.4 UDP 通信的注意事項
- 數據報大小限制:UDP 數據報的大小有限制,通常建議不超過 512 字節,否則可能會被分片。
- 不可靠性:UDP 不保證數據的可靠傳輸,可能會丟失、重復或亂序,需要應用層自己處理這些問題。
- 無連接:UDP 通信不需要建立連接,每個數據報都是獨立的。
- 廣播和多播:UDP 支持廣播和多播,這在某些場景下非常有用。
2.5 URL 和 URLConnection
Java 提供了 URL 和 URLConnection 類,用于訪問互聯網上的資源。
2.5.1 URL 類
URL(Uniform Resource Locator)表示統一資源定位符,用于標識互聯網上的資源。
URL 的格式通常為:協議://主機名:端口/路徑?查詢參數#片段
常用方法:
- String getProtocol():獲取協議名稱
- String getHost():獲取主機名
- int getPort():獲取端口號
- String getPath():獲取路徑
- String getQuery():獲取查詢參數
- URLConnection openConnection():打開與該 URL 的連接
2.5.2 URLConnection 類
URLConnection 是一個抽象類,表示與 URL 所指向資源的連接。它的子類 HttpURLConnection 用于 HTTP 連接。
常用方法:
- void setRequestMethod(String method):設置請求方法(GET、POST 等)
- void setDoInput(boolean doInput):設置是否允許輸入
- void setDoOutput(boolean doOutput):設置是否允許輸出
- void setRequestProperty(String key, String value):設置請求頭
- InputStream getInputStream():獲取輸入流,用于讀取響應
- OutputStream getOutputStream():獲取輸出流,用于發送數據
- int getResponseCode():獲取響應碼
- String getResponseMessage():獲取響應消息
- Map<String, List> getHeaderFields():獲取響應頭
2.5.3 使用 URL 和 URLConnection 訪問網絡資源
import java.net.*;
import java.io.*;
import java.util.*;public class URLExample {public static void main(String[] args) {try {// 創建URL對象URL url = new URL("https://www.baidu.com");System.out.println("協議: " + url.getProtocol());System.out.println("主機名: " + url.getHost());System.out.println("端口: " + url.getPort());System.out.println("路徑: " + url.getPath());// 打開連接URLConnection connection = url.openConnection();// 設置連接超時connection.setConnectTimeout(5000);// 設置讀取超時connection.setReadTimeout(5000);// 獲取響應頭Map<String, List<String>> headers = connection.getHeaderFields();System.out.println("\n響應頭:");for (Map.Entry<String, List<String>> entry : headers.entrySet()) {String key = entry.getKey();for (String value : entry.getValue()) {System.out.println(key + ": " + value);}}// 如果是HTTP連接,可以獲取更多信息if (connection instanceof HttpURLConnection) {HttpURLConnection httpConnection = (HttpURLConnection) connection;System.out.println("\n響應碼: " + httpConnection.getResponseCode());System.out.println("響應消息: " + httpConnection.getResponseMessage());}// 讀取響應內容try (BufferedReader in = new BufferedReader(new InputStreamReader(connection.getInputStream(), "UTF-8"))) {String line;StringBuilder content = new StringBuilder();while ((line = in.readLine()) != null) {content.append(line).append("\n");}System.out.println("\n響應內容前100個字符:");if (content.length() > 100) {System.out.println(content.substring(0, 100));} else {System.out.println(content.toString());}}// 斷開連接if (connection instanceof HttpURLConnection) {((HttpURLConnection) connection).disconnect();}} catch (MalformedURLException e) {System.err.println("URL格式錯誤");e.printStackTrace();} catch (IOException e) {e.printStackTrace();}}
}
2.5.4 使用 HttpURLConnection 發送 POST 請求
import java.net.*;
import java.io.*;
import java.nio.charset.StandardCharsets;public class HTTPPostExample {public static void main(String[] args) {HttpURLConnection connection = null;OutputStream os = null;BufferedReader in = null;try {// 創建URL對象URL url = new URL("https://httpbin.org/post");// 打開連接connection = (HttpURLConnection) url.openConnection();// 設置請求方法為POSTconnection.setRequestMethod("POST");// 允許輸入輸出connection.setDoInput(true);connection.setDoOutput(true);// 設置請求頭connection.setRequestProperty("Content-Type", "application/x-www-form-urlencoded");connection.setRequestProperty("User-Agent", "Mozilla/5.0");// 設置連接超時和讀取超時connection.setConnectTimeout(5000);connection.setReadTimeout(5000);// 準備POST數據String postData = "name=張三&age=25&city=北京";byte[] postDataBytes = postData.getBytes(StandardCharsets.UTF_8);// 發送POST數據os = connection.getOutputStream();os.write(postDataBytes);os.flush();// 獲取響應碼int responseCode = connection.getResponseCode();System.out.println("響應碼: " + responseCode);// 讀取響應內容in = new BufferedReader(new InputStreamReader(connection.getInputStream(), StandardCharsets.UTF_8));String line;StringBuilder response = new StringBuilder();while ((line = in.readLine()) != null) {response.append(line);}System.out.println("響應內容: " + response.toString());} catch (MalformedURLException e) {System.err.println("URL格式錯誤");e.printStackTrace();} catch (IOException e) {e.printStackTrace();} finally {// 關閉資源try {if (os != null) os.close();if (in != null) in.close();if (connection != null) connection.disconnect();} catch (IOException e) {e.printStackTrace();}}}
}
第三章:Java NIO 網絡編程
3.1 NIO 概述
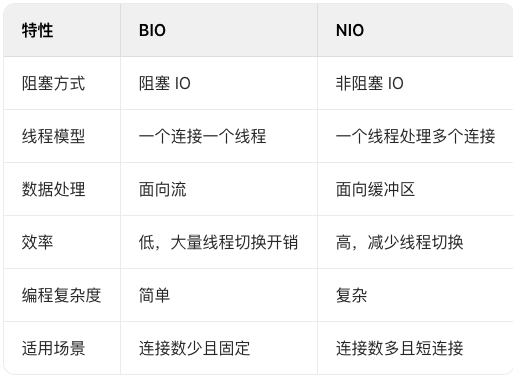
NIO(New IO)是 Java 1.4 引入的新 IO 模型,與傳統的 IO(也稱為 BIO,Blocking IO)相比,NIO 提供了更高效的 IO 操作方式。
NIO 的核心組件:
- 通道(Channel):類似于流,但可以雙向操作,既可以讀也可以寫
- 緩沖區(Buffer):用于存儲數據,所有數據的讀寫都必須通過緩沖區
- 選擇器(Selector):用于多路復用,可以同時監控多個通道的事件
NIO 的主要特點:
- 非阻塞 IO:通道可以設置為非阻塞模式,避免線程阻塞在 IO 操作上
- 多路復用:一個線程可以處理多個通道的 IO 操作
- 面向緩沖區:數據的讀寫都通過緩沖區,提高了 IO 效率
3.2 緩沖區(Buffer)
Buffer 是一個抽象類,用于存儲數據。它有多個子類,對應不同的數據類型:ByteBuffer、CharBuffer、ShortBuffer、IntBuffer、LongBuffer、FloatBuffer、DoubleBuffer。
Buffer 的核心屬性:
- capacity:緩沖區的容量,創建后不可改變
- position:下一個要讀寫的位置
- limit:緩沖區的限制,不能讀寫超過 limit 的數據
- mark:標記位置,用于后續的 reset 操作
Buffer 的常用方法:
flip():將緩沖區從寫模式切換到讀模式,設置 limit=position,position=0
rewind():重置 position 為 0,用于重新讀取緩沖區的數據
clear():清空緩沖區,設置 position=0,limit=capacity,但不實際清除數據
compact():將未讀取的數據移到緩沖區的開頭,設置 position 為未讀取數據的長度,limit=capacity
mark():標記當前 position
reset():將 position 重置為 mark 標記的位置
remaining():返回 remaining = limit - position,即還可以讀寫的數據量
import java.nio.ByteBuffer;public class BufferExample {public static void main(String[] args) {// 創建一個容量為10的ByteBufferByteBuffer buffer = ByteBuffer.allocate(10);System.out.println("初始狀態: capacity=" + buffer.capacity() + ", position=" + buffer.position() + ", limit=" + buffer.limit());// 向緩沖區寫入數據byte[] data = "Hello".getBytes();buffer.put(data);System.out.println("寫入數據后: capacity=" + buffer.capacity() + ", position=" + buffer.position() + ", limit=" + buffer.limit());// 切換到讀模式buffer.flip();System.out.println("flip后: capacity=" + buffer.capacity() + ", position=" + buffer.position() + ", limit=" + buffer.limit());// 讀取緩沖區的數據byte[] readData = new byte[buffer.remaining()];buffer.get(readData);System.out.println("讀取的數據: " + new String(readData));System.out.println("讀取數據后: capacity=" + buffer.capacity() + ", position=" + buffer.position() + ", limit=" + buffer.limit());// 重置position,重新讀取buffer.rewind();System.out.println("rewind后: capacity=" + buffer.capacity() + ", position=" + buffer.position() + ", limit=" + buffer.limit());// 讀取前兩個字節byte[] partData = new byte[2];buffer.get(partData);System.out.println("讀取的部分數據: " + new String(partData));System.out.println("讀取部分數據后: capacity=" + buffer.capacity() + ", position=" + buffer.position() + ", limit=" + buffer.limit());// 壓縮緩沖區,將未讀取的數據移到開頭buffer.compact();System.out.println("compact后: capacity=" + buffer.capacity() + ", position=" + buffer.position() + ", limit=" + buffer.limit());// 繼續寫入數據buffer.put("World".getBytes());System.out.println("繼續寫入數據后: capacity=" + buffer.capacity() + ", position=" + buffer.position() + ", limit=" + buffer.limit());// 切換到讀模式buffer.flip();System.out.println("再次flip后: capacity=" + buffer.capacity() + ", position=" + buffer.position() + ", limit=" + buffer.limit());// 讀取所有數據byte[] allData = new byte[buffer.remaining()];buffer.get(allData);System.out.println("最終讀取的數據: " + new String(allData));}
}
3.3 通道(Channel)
Channel 是一個接口,用于 IO 操作。與流不同,通道可以雙向操作,并且可以異步讀寫。
常用的 Channel 實現類:
- FileChannel:用于文件 IO
- SocketChannel:用于 TCP 客戶端
- ServerSocketChannel:用于 TCP 服務器端
- DatagramChannel:用于 UDP
- Pipe.SinkChannel 和 Pipe.SourceChannel:用于線程間通信
Channel 的常用方法:
open():打開通道
close():關閉通道
read(Buffer dst):從通道讀取數據到緩沖區
write(Buffer src):從緩沖區寫入數據到通道
configureBlocking(boolean block):設置通道為阻塞或非阻塞模式
3.4 選擇器(Selector)
Selector 是 NIO 中的多路復用器,它可以同時監控多個通道的事件,使得一個線程可以處理多個通道的 IO 操作。
常用的事件:
- SelectionKey.OP_ACCEPT:接受連接事件,用于 ServerSocketChannel
- SelectionKey.OP_CONNECT:連接就緒事件,用于 SocketChannel
- SelectionKey.OP_READ:讀就緒事件,通道中有數據可以讀取
- SelectionKey.OP_WRITE:寫就緒事件,通道可以寫入數據
Selector 的使用流程:
創建 Selector 對象
將通道注冊到 Selector 上,并指定感興趣的事件
調用 Selector 的 select () 方法,等待事件發生
獲取就緒的事件集合
處理每個事件
重復步驟 3-5
Selector使用示例:
import java.net.*;
import java.nio.*;
import java.nio.channels.*;
import java.nio.charset.StandardCharsets;
import java.util.*;public class SelectorServer {public static void main(String[] args) {Selector selector = null;ServerSocketChannel serverSocketChannel = null;try {// 創建Selectorselector = Selector.open();// 創建ServerSocketChannelserverSocketChannel = ServerSocketChannel.open();// 綁定到8888端口serverSocketChannel.socket().bind(new InetSocketAddress(8888));// 設置為非阻塞模式serverSocketChannel.configureBlocking(false);// 將ServerSocketChannel注冊到Selector,關注ACCEPT事件serverSocketChannel.register(selector, SelectionKey.OP_ACCEPT);System.out.println("NIO服務器已啟動,監聽端口8888...");while (true) {// 等待事件發生,返回就緒的通道數量int readyChannels = selector.select();if (readyChannels == 0) {continue;}// 獲取就緒的事件集合Set<SelectionKey> selectionKeys = selector.selectedKeys();Iterator<SelectionKey> iterator = selectionKeys.iterator();while (iterator.hasNext()) {SelectionKey key = iterator.next();// 處理完事件后,需要從集合中移除,避免重復處理iterator.remove();// 處理接受連接事件if (key.isAcceptable()) {handleAccept(key, selector);}// 處理讀事件if (key.isReadable()) {handleRead(key);}// 處理寫事件(本例中不處理)if (key.isWritable()) {// 處理寫事件...}}}} catch (IOException e) {e.printStackTrace();} finally {// 關閉資源try {if (selector != null) {selector.close();}if (serverSocketChannel != null) {serverSocketChannel.close();}} catch (IOException e) {e.printStackTrace();}}}// 處理接受連接事件private static void handleAccept(SelectionKey key, Selector selector) throws IOException {ServerSocketChannel serverSocketChannel = (ServerSocketChannel) key.channel();// 接受客戶端連接SocketChannel socketChannel = serverSocketChannel.accept();if (socketChannel == null) {return;}System.out.println("客戶端已連接:" + socketChannel.getRemoteAddress());// 設置為非阻塞模式socketChannel.configureBlocking(false);// 將SocketChannel注冊到Selector,關注READ事件socketChannel.register(selector, SelectionKey.OP_READ);// 向客戶端發送歡迎消息String welcomeMsg = "歡迎連接到NIO服務器!\n";ByteBuffer buffer = ByteBuffer.wrap(welcomeMsg.getBytes(StandardCharsets.UTF_8));socketChannel.write(buffer);}// 處理讀事件private static void handleRead(SelectionKey key) throws IOException {SocketChannel socketChannel = (SocketChannel) key.channel();// 創建緩沖區ByteBuffer buffer = ByteBuffer.allocate(1024);// 讀取數據int bytesRead = socketChannel.read(buffer);if (bytesRead == -1) {// 客戶端關閉連接System.out.println("客戶端已斷開連接:" + socketChannel.getRemoteAddress());key.cancel();socketChannel.close();return;}// 切換到讀模式buffer.flip();// 解析數據byte[] data = new byte[buffer.remaining()];buffer.get(data);String message = new String(data, StandardCharsets.UTF_8);System.out.println("收到來自 " + socketChannel.getRemoteAddress() + " 的消息:" + message);// 如果客戶端發送"bye",則關閉連接if ("bye\n".equals(message) || "bye\r\n".equals(message)) {String byeMsg = "再見!\n";ByteBuffer byeBuffer = ByteBuffer.wrap(byeMsg.getBytes(StandardCharsets.UTF_8));socketChannel.write(byeBuffer);System.out.println("關閉與 " + socketChannel.getRemoteAddress() + " 的連接");key.cancel();socketChannel.close();return;}// 發送響應String response = "服務器已收到:" + message;ByteBuffer responseBuffer = ByteBuffer.wrap(response.getBytes(StandardCharsets.UTF_8));socketChannel.write(responseBuffer);}
}
NIO客戶端示例:
import java.net.*;
import java.nio.*;
import java.nio.channels.*;
import java.nio.charset.StandardCharsets;
import java.io.*;public class NIOClient {public static void main(String[] args) {SocketChannel socketChannel = null;BufferedReader stdIn = null;try {// 創建SocketChannelsocketChannel = SocketChannel.open();// 設置為非阻塞模式socketChannel.configureBlocking(false);// 連接服務器InetSocketAddress serverAddress = new InetSocketAddress("localhost", 8888);socketChannel.connect(serverAddress);// 創建SelectorSelector selector = Selector.open();// 將SocketChannel注冊到Selector,關注CONNECT和READ事件socketChannel.register(selector, SelectionKey.OP_CONNECT | SelectionKey.OP_READ);// 讀取用戶輸入stdIn = new BufferedReader(new InputStreamReader(System.in));boolean running = true;while (running) {// 等待事件發生selector.select();// 獲取就緒的事件集合Set<SelectionKey> selectionKeys = selector.selectedKeys();Iterator<SelectionKey> iterator = selectionKeys.iterator();while (iterator.hasNext()) {SelectionKey key = iterator.next();iterator.remove();// 處理連接事件if (key.isConnectable()) {if (socketChannel.finishConnect()) {System.out.println("已連接到服務器");// 連接成功后,只關注READ事件key.interestOps(SelectionKey.OP_READ);// 提示用戶輸入System.out.println("請輸入消息(輸入bye退出):");} else {// 連接失敗key.cancel();running = false;}}// 處理讀事件if (key.isReadable()) {ByteBuffer buffer = ByteBuffer.allocate(1024);int bytesRead = socketChannel.read(buffer);if (bytesRead == -1) {// 服務器關閉連接System.out.println("服務器已關閉連接");key.cancel();socketChannel.close();running = false;break;}// 解析服務器響應buffer.flip();byte[] data = new byte[buffer.remaining()];buffer.get(data);System.out.println("服務器響應:" + new String(data, StandardCharsets.UTF_8));// 如果收到服務器的再見消息,退出if (new String(data, StandardCharsets.UTF_8).contains("再見")) {running = false;break;}// 提示用戶輸入System.out.println("請輸入消息(輸入bye退出):");}}// 如果連接已關閉,退出循環if (!running) {break;}// 檢查是否有用戶輸入if (stdIn.ready()) {String userInput = stdIn.readLine();if (userInput != null) {// 向服務器發送消息userInput += "\n";ByteBuffer buffer = ByteBuffer.wrap(userInput.getBytes(StandardCharsets.UTF_8));socketChannel.write(buffer);// 如果用戶輸入bye,準備退出if ("bye".equals(userInput.trim())) {running = false;}}}}} catch (IOException e) {e.printStackTrace();} finally {// 關閉資源try {if (socketChannel != null) {socketChannel.close();}if (stdIn != null) {stdIn.close();}} catch (IOException e) {e.printStackTrace();}}}
}
3.5 NIO 與 BIO 的對比
第四章:高級網絡編程技術
4.1 異步 IO(AIO)
AIO(Asynchronous IO)是 Java 7 引入的異步 IO 模型,它與 NIO 的主要區別在于:NIO 是基于事件驅動的,需要輪詢事件;而 AIO 是基于回調的,當 IO 操作完成后,會自動調用回調函數。
AIO 的核心類:
- AsynchronousSocketChannel:用于 TCP 客戶端的異步通道
- AsynchronousServerSocketChannel:用于 TCP 服務器端的異步通道
- AsynchronousDatagramChannel:用于 UDP 的異步通道
- CompletionHandler:用于處理 IO 操作完成后的回調
AIO服務器示例:
import java.net.*;
import java.nio.ByteBuffer;
import java.nio.channels.*;
import java.nio.charset.StandardCharsets;
import java.util.concurrent.Future;public class AIOServer {public static void main(String[] args) {try {// 創建AsynchronousServerSocketChannelAsynchronousServerSocketChannel serverSocketChannel = AsynchronousServerSocketChannel.open();// 綁定到8888端口serverSocketChannel.bind(new InetSocketAddress(8888));System.out.println("AIO服務器已啟動,監聽端口8888...");// 接受客戶端連接serverSocketChannel.accept(null, new CompletionHandler<AsynchronousSocketChannel, Object>() {@Overridepublic void completed(AsynchronousSocketChannel socketChannel, Object attachment) {try {System.out.println("客戶端已連接:" + socketChannel.getRemoteAddress());// 繼續接受其他客戶端連接serverSocketChannel.accept(null, this);// 向客戶端發送歡迎消息String welcomeMsg = "歡迎連接到AIO服務器!\n";ByteBuffer buffer = ByteBuffer.wrap(welcomeMsg.getBytes(StandardCharsets.UTF_8));Future<Integer> writeFuture = socketChannel.write(buffer);writeFuture.get(); // 等待寫入完成// 準備讀取客戶端數據ByteBuffer readBuffer = ByteBuffer.allocate(1024);readBuffer.clear();// 讀取客戶端數據socketChannel.read(readBuffer, readBuffer, new CompletionHandler<Integer, ByteBuffer>() {@Overridepublic void completed(Integer bytesRead, ByteBuffer buffer) {try {if (bytesRead == -1) {// 客戶端關閉連接System.out.println("客戶端已斷開連接:" + socketChannel.getRemoteAddress());socketChannel.close();return;}// 解析數據buffer.flip();byte[] data = new byte[buffer.remaining()];buffer.get(data);String message = new String(data, StandardCharsets.UTF_8);System.out.println("收到來自 " + socketChannel.getRemoteAddress() + " 的消息:" + message);// 如果客戶端發送"bye",則關閉連接if ("bye\n".equals(message) || "bye\r\n".equals(message)) {String byeMsg = "再見!\n";ByteBuffer byeBuffer = ByteBuffer.wrap(byeMsg.getBytes(StandardCharsets.UTF_8));socketChannel.write(byeBuffer).get();System.out.println("關閉與 " + socketChannel.getRemoteAddress() + " 的連接");socketChannel.close();return;}// 發送響應String response = "服務器已收到:" + message;ByteBuffer responseBuffer = ByteBuffer.wrap(response.getBytes(StandardCharsets.UTF_8));socketChannel.write(responseBuffer).get();// 繼續讀取客戶端數據buffer.clear();socketChannel.read(buffer, buffer, this);} catch (Exception e) {e.printStackTrace();try {socketChannel.close();} catch (Exception ex) {ex.printStackTrace();}}}@Overridepublic void failed(Throwable exc, ByteBuffer buffer) {exc.printStackTrace();try {socketChannel.close();} catch (Exception e) {e.printStackTrace();}}});} catch (Exception e) {e.printStackTrace();}}@Overridepublic void failed(Throwable exc, Object attachment) {exc.printStackTrace();}});// 保持服務器運行Thread.sleep(Integer.MAX_VALUE);} catch (Exception e) {e.printStackTrace();}}
}
AIO客戶端示例:
import java.net.*;
import java.nio.ByteBuffer;
import java.nio.channels.*;
import java.nio.charset.StandardCharsets;
import java.util.concurrent.Future;
import java.io.*;public class AIOClient {public static void main(String[] args) {try {// 創建AsynchronousSocketChannelAsynchronousSocketChannel socketChannel = AsynchronousSocketChannel.open();// 連接服務器Future<Void> connectFuture = socketChannel.connect(new InetSocketAddress("localhost", 8888));connectFuture.get(); // 等待連接完成System.out.println("已連接到服務器");// 讀取服務器響應ByteBuffer readBuffer = ByteBuffer.allocate(1024);Future<Integer> readFuture = socketChannel.read(readBuffer);int bytesRead = readFuture.get();if (bytesRead > 0) {readBuffer.flip();byte[] data = new byte[readBuffer.remaining()];readBuffer.get(data);System.out.println("服務器響應:" + new String(data, StandardCharsets.UTF_8));}// 讀取用戶輸入BufferedReader stdIn = new BufferedReader(new InputStreamReader(System.in));// 啟動一個線程讀取服務器響應new Thread(() -> {try {ByteBuffer buffer = ByteBuffer.allocate(1024);while (true) {buffer.clear();Future<Integer> future = socketChannel.read(buffer);int bytes = future.get();if (bytes == -1) {System.out.println("服務器已關閉連接");System.exit(0);}buffer.flip();byte[] data = new byte[buffer.remaining()];buffer.get(data);System.out.println("服務器響應:" + new String(data, StandardCharsets.UTF_8));// 如果收到服務器的再見消息,退出if (new String(data, StandardCharsets.UTF_8).contains("再見")) {System.exit(0);}System.out.println("請輸入消息(輸入bye退出):");}} catch (Exception e) {e.printStackTrace();}}).start();// 發送用戶輸入到服務器System.out.println("請輸入消息(輸入bye退出):");String userInput;while ((userInput = stdIn.readLine()) != null) {userInput += "\n";ByteBuffer buffer = ByteBuffer.wrap(userInput.getBytes(StandardCharsets.UTF_8));socketChannel.write(buffer).get();if ("bye".equals(userInput.trim())) {socketChannel.close();break;}}} catch (Exception e) {e.printStackTrace();}}
}
4.2 網絡編程中的設計模式
在網絡編程中,常用的設計模式有:
4.2.1 工廠模式(Factory Pattern)
工廠模式用于創建對象,隱藏對象的創建細節。在網絡編程中,可以使用工廠模式創建不同類型的連接或協議處理器。
工廠模式示例:
import java.net.Socket;// 連接接口
interface Connection {void send(String data) throws Exception;String receive() throws Exception;void close() throws Exception;
}// TCP連接實現
class TcpConnection implements Connection {private Socket socket;// 其他成員變量和構造方法...@Overridepublic void send(String data) throws Exception {// 實現TCP發送邏輯}@Overridepublic String receive() throws Exception {// 實現TCP接收邏輯return null;}@Overridepublic void close() throws Exception {// 實現關閉邏輯}
}// UDP連接實現
class UdpConnection implements Connection {// 實現類似TcpConnection的方法...@Overridepublic void send(String data) throws Exception {// 實現UDP發送邏輯}@Overridepublic String receive() throws Exception {// 實現UDP接收邏輯return null;}@Overridepublic void close() throws Exception {// 實現關閉邏輯}
}// 連接工廠
class ConnectionFactory {public static Connection createConnection(String type, String host, int port) throws Exception {if ("tcp".equalsIgnoreCase(type)) {return new TcpConnection(); // 實際中需要傳入host和port} else if ("udp".equalsIgnoreCase(type)) {return new UdpConnection(); // 實際中需要傳入host和port} else {throw new IllegalArgumentException("不支持的連接類型: " + type);}}
}// 使用工廠模式
public class FactoryPatternExample {public static void main(String[] args) {try {Connection tcpConnection = ConnectionFactory.createConnection("tcp", "localhost", 8888);Connection udpConnection = ConnectionFactory.createConnection("udp", "localhost", 8888);// 使用連接...tcpConnection.send("Hello TCP");udpConnection.send("Hello UDP");// 關閉連接...tcpConnection.close();udpConnection.close();} catch (Exception e) {e.printStackTrace();}}
}
4.2.2 觀察者模式(Observer Pattern)
觀察者模式用于對象間的一對多依賴關系,當一個對象的狀態發生變化時,所有依賴它的對象都會收到通知并自動更新。在網絡編程中,可以使用觀察者模式處理網絡事件。
4.2.3 裝飾器模式(Decorator Pattern)
裝飾器模式用于動態地給對象添加額外的職責。在網絡編程中,可以使用裝飾器模式為網絡連接添加日志、壓縮、加密等功能。
裝飾器模式示例:
// 連接接口(與工廠模式中的相同)
interface Connection {void send(String data) throws Exception;String receive() throws Exception;void close() throws Exception;
}// 基礎連接實現(如TCP連接)
class BasicConnection implements Connection {// 實現方法...@Overridepublic void send(String data) throws Exception {System.out.println("發送數據: " + data);}@Overridepublic String receive() throws Exception {return "收到的數據";}@Overridepublic void close() throws Exception {System.out.println("關閉連接");}
}// 裝飾器抽象類
abstract class ConnectionDecorator implements Connection {protected Connection connection;public ConnectionDecorator(Connection connection) {this.connection = connection;}@Overridepublic void send(String data) throws Exception {connection.send(data);}@Overridepublic String receive() throws Exception {return connection.receive();}@Overridepublic void close() throws Exception {connection.close();}
}// 日志裝飾器
class LoggingConnectionDecorator extends ConnectionDecorator {public LoggingConnectionDecorator(Connection connection) {super(connection);}@Overridepublic void send(String data) throws Exception {System.out.println("日志: 準備發送數據");super.send(data);System.out.println("日志: 數據發送完成");}@Overridepublic String receive() throws Exception {System.out.println("日志: 準備接收數據");String data = super.receive();System.out.println("日志: 數據接收完成");return data;}
}// 加密裝飾器
class EncryptingConnectionDecorator extends ConnectionDecorator {public EncryptingConnectionDecorator(Connection connection) {super(connection);}@Overridepublic void send(String data) throws Exception {// 加密數據String encryptedData = encrypt(data);super.send(encryptedData);}@Overridepublic String receive() throws Exception {String encryptedData = super.receive();// 解密數據return decrypt(encryptedData);}private String encrypt(String data) {// 簡單的加密實現return new StringBuilder(data).reverse().toString();}private String decrypt(String data) {// 簡單的解密實現return new StringBuilder(data).reverse().toString();}
}// 使用裝飾器模式
public class DecoratorPatternExample {public static void main(String[] args) {try {// 創建基礎連接Connection connection = new BasicConnection();// 添加日志功能Connection loggingConnection = new LoggingConnectionDecorator(connection);// 添加加密功能Connection encryptedConnection = new EncryptingConnectionDecorator(loggingConnection);// 使用裝飾后的連接encryptedConnection.send("Hello World");String data = encryptedConnection.receive();System.out.println("解密后的數據: " + data);encryptedConnection.close();} catch (Exception e) {e.printStackTrace();}}
}
4.3 網絡安全
網絡安全是網絡編程中非常重要的方面,常見的網絡安全技術包括:
4.3.1 加密與解密
加密是保護數據安全的重要手段,Java 提供了豐富的加密 API,位于 javax.crypto 包中。
常見的加密算法:
- 對稱加密:DES、AES 等,加密和解密使用相同的密鑰
- 非對稱加密:RSA 等,加密和解密使用不同的密鑰(公鑰和私鑰)
- 哈希算法:MD5、SHA 等,用于生成數據的哈希值,不能解密
import javax.crypto.Cipher;
import javax.crypto.KeyGenerator;
import javax.crypto.SecretKey;
import javax.crypto.spec.SecretKeySpec;
import java.util.Base64;public class EncryptionExample {// 加密算法private static final String ALGORITHM = "AES";// 密鑰長度private static final int KEY_SIZE = 128;public static void main(String[] args) {try {// 生成密鑰SecretKey secretKey = generateKey();System.out.println("生成的密鑰: " + Base64.getEncoder().encodeToString(secretKey.getEncoded()));// 要加密的數據String data = "Hello, 這是一段需要加密的數據!";System.out.println("原始數據: " + data);// 加密數據String encryptedData = encrypt(data, secretKey);System.out.println("加密后的數據: " + encryptedData);// 解密數據String decryptedData = decrypt(encryptedData, secretKey);System.out.println("解密后的數據: " + decryptedData);} catch (Exception e) {e.printStackTrace();}}// 生成密鑰public static SecretKey generateKey() throws Exception {KeyGenerator keyGenerator = KeyGenerator.getInstance(ALGORITHM);keyGenerator.init(KEY_SIZE);return keyGenerator.generateKey();}// 加密數據public static String encrypt(String data, SecretKey secretKey) throws Exception {Cipher cipher = Cipher.getInstance(ALGORITHM);cipher.init(Cipher.ENCRYPT_MODE, secretKey);byte[] encryptedBytes = cipher.doFinal(data.getBytes("UTF-8"));return Base64.getEncoder().encodeToString(encryptedBytes);}// 解密數據public static String decrypt(String encryptedData, SecretKey secretKey) throws Exception {Cipher cipher = Cipher.getInstance(ALGORITHM);cipher.init(Cipher.DECRYPT_MODE, secretKey);byte[] decryptedBytes = cipher.doFinal(Base64.getDecoder().decode(encryptedData));return new String(decryptedBytes, "UTF-8");}// 根據密鑰字節數組獲取SecretKeypublic static SecretKey getSecretKey(byte[] keyBytes) {return new SecretKeySpec(keyBytes, ALGORITHM);}
}
4.3.2 SSL/TLS
SSL(Secure Sockets Layer)和 TLS(Transport Layer Security)是用于在網絡上提供安全通信的協議。Java 提供了 JSSE(Java Secure Socket Extension)來支持 SSL/TLS。
使用 SSL/TLS 的步驟:
創建 SSLContext 對象
創建 SSLSocketFactory 或 SSLServerSocketFactory
使用工廠創建 SSLSocket 或 SSLServerSocket
使用 SSLSocket 或 SSLServerSocket 進行通信
SSL/TLS示例:
import javax.net.ssl.*;
import java.io.*;
import java.security.KeyStore;public class SSLServer {private static final int PORT = 8888;private static final String KEY_STORE = "server.keystore";private static final String KEY_STORE_PASSWORD = "password";public static void main(String[] args) {SSLServerSocket serverSocket = null;try {// 加載密鑰庫KeyStore keyStore = KeyStore.getInstance("JKS");keyStore.load(new FileInputStream(KEY_STORE), KEY_STORE_PASSWORD.toCharArray());// 創建密鑰管理器工廠KeyManagerFactory kmf = KeyManagerFactory.getInstance(KeyManagerFactory.getDefaultAlgorithm());kmf.init(keyStore, KEY_STORE_PASSWORD.toCharArray());// 創建SSL上下文SSLContext sslContext = SSLContext.getInstance("TLS");sslContext.init(kmf.getKeyManagers(), null, null);// 創建SSL服務器套接字工廠SSLServerSocketFactory factory = sslContext.getServerSocketFactory();// 創建SSL服務器套接字serverSocket = (SSLServerSocket) factory.createServerSocket(PORT);serverSocket.setNeedClientAuth(false); // 不需要客戶端認證System.out.println("SSL服務器已啟動,監聽端口" + PORT + "...");while (true) {// 接受客戶端連接SSLSocket socket = (SSLSocket) serverSocket.accept();System.out.println("客戶端已連接:" + socket.getInetAddress().getHostAddress());// 處理客戶端請求new Thread(new SSLClientHandler(socket)).start();}} catch (Exception e) {e.printStackTrace();} finally {if (serverSocket != null) {try {serverSocket.close();} catch (IOException e) {e.printStackTrace();}}}}static class SSLClientHandler implements Runnable {private SSLSocket socket;public SSLClientHandler(SSLSocket socket) {this.socket = socket;}@Overridepublic void run() {BufferedReader in = null;PrintWriter out = null;try {// 獲取輸入流和輸出流in = new BufferedReader(new InputStreamReader(socket.getInputStream()));out = new PrintWriter(socket.getOutputStream(), true);String inputLine;while ((inputLine = in.readLine()) != null) {System.out.println("收到客戶端消息:" + inputLine);out.println("服務器已收到:" + inputLine);if ("bye".equals(inputLine)) {break;}}System.out.println("客戶端已斷開連接");} catch (IOException e) {e.printStackTrace();} finally {try {if (in != null) in.close();if (out != null) out.close();if (socket != null) socket.close();} catch (IOException e) {e.printStackTrace();}}}}
}
SSL客戶端示例:
import javax.net.ssl.SSLSocket;
import javax.net.ssl.SSLSocketFactory;
import java.io.*;public class SSLClient {private static final String HOST = "localhost";private static final int PORT = 8888;private static final String TRUST_STORE = "client.truststore";private static final String TRUST_STORE_PASSWORD = "password";public static void main(String[] args) {// 設置信任庫System.setProperty("javax.net.ssl.trustStore", TRUST_STORE);System.setProperty("javax.net.ssl.trustStorePassword", TRUST_STORE_PASSWORD);SSLSocket socket = null;BufferedReader in = null;PrintWriter out = null;BufferedReader stdIn = null;try {// 獲取SSL套接字工廠SSLSocketFactory factory = (SSLSocketFactory) SSLSocketFactory.getDefault();// 創建SSL套接字并連接到服務器socket = (SSLSocket) factory.createSocket(HOST, PORT);System.out.println("已連接到SSL服務器");// 獲取輸入流和輸出流in = new BufferedReader(new InputStreamReader(socket.getInputStream()));out = new PrintWriter(socket.getOutputStream(), true);stdIn = new BufferedReader(new InputStreamReader(System.in));String userInput;while ((userInput = stdIn.readLine()) != null) {out.println(userInput);String response = in.readLine();System.out.println("服務器響應:" + response);if ("bye".equals(userInput)) {break;}}} catch (Exception e) {e.printStackTrace();} finally {try {if (in != null) in.close();if (out != null) out.close();if (stdIn != null) stdIn.close();if (socket != null) socket.close();} catch (IOException e) {e.printStackTrace();}}}
}
第五章:網絡編程框架
5.1 Netty
Netty 是一個高性能、異步事件驅動的 NIO 框架,用于開發可維護的高性能協議服務器和客戶端。
Netty 的主要特點:
- 高性能:基于 NIO,采用多路復用和異步 IO
- 易于使用:提供了簡單易用的 API,隱藏了 NIO 的復雜性
- 靈活性:支持多種協議和編碼解碼方式
- 可靠性:處理了各種邊緣情況,保證了網絡通信的可靠性
- 可擴展性:采用模塊化設計,易于擴展
Netty 的核心組件:
- Channel:表示一個網絡連接
- EventLoop:處理 Channel 的 IO 事件
- ChannelHandler:處理 Channel 的 IO 事件和數據
- ChannelPipeline:ChannelHandler 的集合,形成一個處理鏈
- ByteBuf:Netty 的緩沖區,比 Java NIO 的 ByteBuffer 更強大
Netty服務器示例:
import io.netty.bootstrap.ServerBootstrap;
import io.netty.channel.*;
import io.netty.channel.nio.NioEventLoopGroup;
import io.netty.channel.socket.SocketChannel;
import io.netty.channel.socket.nio.NioServerSocketChannel;
import io.netty.handler.codec.string.StringDecoder;
import io.netty.handler.codec.string.StringEncoder;public class NettyServer {private final int port;public NettyServer(int port) {this.port = port;}public void start() throws Exception {// 創建兩個EventLoopGroup:bossGroup用于接受連接,workerGroup用于處理連接EventLoopGroup bossGroup = new NioEventLoopGroup();EventLoopGroup workerGroup = new NioEventLoopGroup();try {// 創建ServerBootstrapServerBootstrap bootstrap = new ServerBootstrap();bootstrap.group(bossGroup, workerGroup).channel(NioServerSocketChannel.class) // 使用NIO的服務器通道.childHandler(new ChannelInitializer<SocketChannel>() { // 設置通道初始化器@Overridepublic void initChannel(SocketChannel ch) throws Exception {// 獲取ChannelPipelineChannelPipeline pipeline = ch.pipeline();// 添加編碼器和解碼器pipeline.addLast(new StringDecoder());pipeline.addLast(new StringEncoder());// 添加自定義的處理器pipeline.addLast(new ServerHandler());}}).option(ChannelOption.SO_BACKLOG, 128) // 設置TCP參數.childOption(ChannelOption.SO_KEEPALIVE, true); // 設置TCP參數// 綁定端口并啟動服務器ChannelFuture future = bootstrap.bind(port).sync();System.out.println("Netty服務器已啟動,監聽端口" + port + "...");// 等待服務器關閉future.channel().closeFuture().sync();} finally {// 優雅地關閉EventLoopGroupworkerGroup.shutdownGracefully();bossGroup.shutdownGracefully();}}// 自定義的ChannelHandlerpublic static class ServerHandler extends SimpleChannelInboundHandler<String> {@Overridepublic void channelActive(ChannelHandlerContext ctx) throws Exception {System.out.println("客戶端已連接:" + ctx.channel().remoteAddress());// 發送歡迎消息ctx.writeAndFlush("歡迎連接到Netty服務器!\n");}@Overrideprotected void channelRead0(ChannelHandlerContext ctx, String msg) throws Exception {System.out.println("收到來自 " + ctx.channel().remoteAddress() + " 的消息:" + msg);// 如果客戶端發送"bye",則關閉連接if ("bye".equals(msg)) {ctx.writeAndFlush("再見!\n");ctx.close();return;}// 發送響應ctx.writeAndFlush("服務器已收到:" + msg + "\n");}@Overridepublic void channelInactive(ChannelHandlerContext ctx) throws Exception {System.out.println("客戶端已斷開連接:" + ctx.channel().remoteAddress());}@Overridepublic void exceptionCaught(ChannelHandlerContext ctx, Throwable cause) throws Exception {cause.printStackTrace();ctx.close();}}public static void main(String[] args) throws Exception {int port = 8888;new NettyServer(port).start();}
}
Netty客戶端示例:
import io.netty.bootstrap.Bootstrap;
import io.netty.channel.*;
import io.netty.channel.nio.NioEventLoopGroup;
import io.netty.channel.socket.SocketChannel;
import io.netty.channel.socket.nio.NioSocketChannel;
import io.netty.handler.codec.string.StringDecoder;
import io.netty.handler.codec.string.StringEncoder;import java.io.BufferedReader;
import java.io.InputStreamReader;public class NettyClient {private final String host;private final int port;public NettyClient(String host, int port) {this.host = host;this.port = port;}public void start() throws Exception {// 創建EventLoopGroupEventLoopGroup group = new NioEventLoopGroup();try {// 創建BootstrapBootstrap bootstrap = new Bootstrap();bootstrap.group(group).channel(NioSocketChannel.class) // 使用NIO的客戶端通道.option(ChannelOption.TCP_NODELAY, true) // 設置TCP參數.handler(new ChannelInitializer<SocketChannel>() { // 設置通道初始化器@Overridepublic void initChannel(SocketChannel ch) throws Exception {// 獲取ChannelPipelineChannelPipeline pipeline = ch.pipeline();// 添加編碼器和解碼器pipeline.addLast(new StringDecoder());pipeline.addLast(new StringEncoder());// 添加自定義的處理器pipeline.addLast(new ClientHandler());}});// 連接服務器ChannelFuture future = bootstrap.connect(host, port).sync();Channel channel = future.channel();// 讀取用戶輸入并發送到服務器BufferedReader in = new BufferedReader(new InputStreamReader(System.in));System.out.println("請輸入消息(輸入bye退出):");while (true) {String line = in.readLine();if (line == null) {continue;}// 發送消息channel.writeAndFlush(line + "\n");// 如果輸入bye,等待服務器響應后退出if ("bye".equals(line)) {channel.closeFuture().sync();break;}}} finally {// 優雅地關閉EventLoopGroupgroup.shutdownGracefully();}}// 自定義的ChannelHandlerpublic static class ClientHandler extends SimpleChannelInboundHandler<String> {@Overrideprotected void channelRead0(ChannelHandlerContext ctx, String msg) throws Exception {System.out.println("服務器響應:" + msg);// 如果收到服務器的再見消息,提示用戶if (msg.contains("再見")) {System.out.println("連接將關閉");} else {System.out.println("請輸入消息(輸入bye退出):");}}@Overridepublic void exceptionCaught(ChannelHandlerContext ctx, Throwable cause) throws Exception {cause.printStackTrace();ctx.close();}}public static void main(String[] args) throws Exception {new NettyClient("localhost", 8888).start();}
}
5.2 Apache MINA
Apache MINA 是另一個流行的 NIO 框架,與 Netty 類似,提供了高性能的網絡編程能力。
MINA 的主要特點:
- 基于 NIO,支持阻塞和非阻塞 IO
- 提供了統一的 API,隱藏了底層 IO 細節
- 支持多種傳輸協議(TCP、UDP、串口等)
- 內置了多種編碼器和解碼器
- 支持過濾器鏈,易于擴展
第六章:網絡編程實踐與案例
6.1 文件傳輸
文件傳輸是網絡編程中的常見需求,可以使用 TCP 或 UDP 實現。由于 TCP 提供可靠傳輸,通常用于文件傳輸。
文件傳輸示例:
import java.io.*;
import java.net.*;public class FileServer {public static void main(String[] args) {ServerSocket serverSocket = null;try {// 創建ServerSocket,綁定到8888端口serverSocket = new ServerSocket(8888);System.out.println("文件服務器已啟動,等待客戶端連接...");while (true) {// 接受客戶端連接Socket socket = serverSocket.accept();System.out.println("客戶端已連接:" + socket.getInetAddress().getHostAddress());// 處理文件傳輸new Thread(new FileHandler(socket)).start();}} catch (IOException e) {e.printStackTrace();} finally {if (serverSocket != null) {try {serverSocket.close();} catch (IOException e) {e.printStackTrace();}}}}static class FileHandler implements Runnable {private Socket socket;public FileHandler(Socket socket) {this.socket = socket;}@Overridepublic void run() {DataInputStream dis = null;FileOutputStream fos = null;try {// 獲取輸入流dis = new DataInputStream(socket.getInputStream());// 讀取文件名和長度String fileName = dis.readUTF();long fileLength = dis.readLong();System.out.println("準備接收文件:" + fileName + ",大小:" + fileLength + "字節");// 創建文件輸出流File file = new File("received_" + fileName);fos = new FileOutputStream(file);// 接收文件內容byte[] buffer = new byte[4096];int bytesRead;long totalRead = 0;while (totalRead < fileLength && (bytesRead = dis.read(buffer)) != -1) {fos.write(buffer, 0, bytesRead);totalRead += bytesRead;// 打印進度double progress = (double) totalRead / fileLength * 100;System.out.printf("接收進度:%.2f%%\r", progress);}System.out.println("\n文件接收完成:" + file.getAbsolutePath());} catch (IOException e) {e.printStackTrace();} finally {// 關閉資源try {if (dis != null) dis.close();if (fos != null) fos.close();if (socket != null) socket.close();} catch (IOException e) {e.printStackTrace();}}}}
}
文件客戶端示例:
import java.io.*;
import java.net.*;public class FileClient {public static void main(String[] args) {String serverHost = "localhost";int serverPort = 8888;String filePath = "example.txt"; // 要發送的文件路徑Socket socket = null;DataOutputStream dos = null;FileInputStream fis = null;try {// 創建Socket,連接到服務器socket = new Socket(serverHost, serverPort);System.out.println("已連接到文件服務器");// 獲取文件信息File file = new File(filePath);if (!file.exists() || !file.isFile()) {System.err.println("文件不存在或不是一個文件:" + filePath);return;}String fileName = file.getName();long fileLength = file.length();System.out.println("準備發送文件:" + fileName + ",大小:" + fileLength + "字節");// 獲取輸出流dos = new DataOutputStream(socket.getOutputStream());// 發送文件名和長度dos.writeUTF(fileName);dos.writeLong(fileLength);dos.flush();// 讀取文件內容并發送fis = new FileInputStream(file);byte[] buffer = new byte[4096];int bytesRead;long totalSent = 0;while ((bytesRead = fis.read(buffer)) != -1) {dos.write(buffer, 0, bytesRead);totalSent += bytesRead;dos.flush();// 打印進度double progress = (double) totalSent / fileLength * 100;System.out.printf("發送進度:%.2f%%\r", progress);}System.out.println("\n文件發送完成");} catch (UnknownHostException e) {System.err.println("不知道的主機:" + serverHost);e.printStackTrace();} catch (IOException e) {e.printStackTrace();} finally {// 關閉資源try {if (dos != null) dos.close();if (fis != null) fis.close();if (socket != null) socket.close();} catch (IOException e) {e.printStackTrace();}}}
}
6.2 聊天程序
聊天程序是網絡編程的經典案例,通常包括服務器和客戶端,支持一對一或群聊功能。
聊天服務器示例:
import java.io.*;
import java.net.*;
import java.util.*;public class ChatServer {// 保存所有連接的客戶端private static Set<PrintWriter> clientWriters = new HashSet<>();public static void main(String[] args) {ServerSocket serverSocket = null;try {// 創建ServerSocket,綁定到8888端口serverSocket = new ServerSocket(8888);System.out.println("聊天服務器已啟動,等待客戶端連接...");while (true) {// 接受客戶端連接Socket socket = serverSocket.accept();System.out.println("客戶端已連接:" + socket.getInetAddress().getHostAddress());// 添加客戶端的輸出流到集合PrintWriter out = new PrintWriter(socket.getOutputStream(), true);synchronized (clientWriters) {clientWriters.add(out);}// 處理客戶端消息new Thread(new ChatHandler(socket, out)).start();}} catch (IOException e) {e.printStackTrace();} finally {if (serverSocket != null) {try {serverSocket.close();} catch (IOException e) {e.printStackTrace();}}}}// 廣播消息給所有客戶端public static void broadcast(String message) {synchronized (clientWriters) {for (PrintWriter writer : clientWriters) {writer.println(message);}}}static class ChatHandler implements Runnable {private Socket socket;private PrintWriter out;private String username;public ChatHandler(Socket socket, PrintWriter out) {this.socket = socket;this.out = out;}@Overridepublic void run() {BufferedReader in = null;try {// 獲取輸入流in = new BufferedReader(new InputStreamReader(socket.getInputStream()));// 讀取用戶名username = in.readLine();if (username == null) {return;}// 廣播用戶加入消息broadcast("系統消息:" + username + " 加入了聊天室");System.out.println(username + " 加入了聊天室");// 讀取用戶消息并廣播String message;while ((message = in.readLine()) != null) {System.out.println(username + ":" + message);broadcast(username + ":" + message);}} catch (IOException e) {e.printStackTrace();} finally {// 移除客戶端的輸出流synchronized (clientWriters) {clientWriters.remove(out);}// 廣播用戶離開消息if (username != null) {broadcast("系統消息:" + username + " 離開了聊天室");System.out.println(username + " 離開了聊天室");}// 關閉資源try {if (in != null) in.close();if (out != null) out.close();if (socket != null) socket.close();} catch (IOException e) {e.printStackTrace();}}}}
}
聊天客戶端示例:
import java.io.*;
import java.net.*;public class ChatClient {public static void main(String[] args) {String serverHost = "localhost";int serverPort = 8888;Socket socket = null;PrintWriter out = null;BufferedReader in = null;BufferedReader stdIn = null;try {// 創建Socket,連接到服務器socket = new Socket(serverHost, serverPort);System.out.println("已連接到聊天服務器");// 獲取輸入輸出流out = new PrintWriter(socket.getOutputStream(), true);in = new BufferedReader(new InputStreamReader(socket.getInputStream()));stdIn = new BufferedReader(new InputStreamReader(System.in));// 輸入用戶名System.out.print("請輸入用戶名:");String username = stdIn.readLine();out.println(username);// 啟動線程讀取服務器消息new Thread(new ServerMessageReader(in)).start();// 讀取用戶輸入并發送到服務器System.out.println("請輸入消息(輸入exit退出):");String userInput;while ((userInput = stdIn.readLine()) != null) {if ("exit".equals(userInput)) {break;}out.println(userInput);}} catch (UnknownHostException e) {System.err.println("不知道的主機:" + serverHost);e.printStackTrace();} catch (IOException e) {e.printStackTrace();} finally {// 關閉資源try {if (out != null) out.close();if (in != null) in.close();if (stdIn != null) stdIn.close();if (socket != null) socket.close();} catch (IOException e) {e.printStackTrace();}}}// 讀取服務器消息的線程static class ServerMessageReader implements Runnable {private BufferedReader in;public ServerMessageReader(BufferedReader in) {this.in = in;}@Overridepublic void run() {try {String message;while ((message = in.readLine()) != null) {System.out.println(message);System.out.print("請輸入消息(輸入exit退出):");}} catch (IOException e) {// 服務器斷開連接時退出System.out.println("\n與服務器的連接已斷開");System.exit(0);}}}
}
第七章:網絡編程性能優化
7.1 性能瓶頸分析
網絡編程中的性能瓶頸可能來自以下幾個方面:
- 網絡帶寬:網絡帶寬限制了數據傳輸的速度
- IO 操作:磁盤 IO 或網絡 IO 可能成為瓶頸
- CPU:數據處理、加密解密等操作可能消耗大量 CPU 資源
- 內存:內存不足或內存泄漏可能導致性能下降
- 線程管理:線程創建和切換的開銷可能影響性能
7.2 性能優化策略
7.2.1 減少網絡傳輸量
- 數據壓縮:傳輸前壓縮數據,減少數據量
- 數據序列化:使用高效的序列化方式(如 Protocol Buffers、Kryo)
- 批量傳輸:將多個小數據合并為一個大數據包傳輸
- 增量傳輸:只傳輸變化的數據,而不是整個數據集
7.2.2 優化 IO 操作
- 使用 NIO 或 AIO:相比 BIO,NIO 和 AIO 可以處理更多的并發連接
- 緩沖區優化:使用合適大小的緩沖區,減少 IO 操作次數
- 異步 IO:使用異步 IO 避免線程阻塞
- 直接緩沖區:對于頻繁使用的緩沖區,使用直接緩沖區減少內存復制
7.2.3 線程管理優化
- 線程池:使用線程池管理線程,避免頻繁創建和銷毀線程
- 合理設置線程池參數:根據 CPU 核心數和任務類型設置合適的線程數
- 避免線程阻塞:減少線程在 IO 操作上的阻塞時間
- 使用協程:在支持協程的環境中,使用協程替代線程,減少上下文切換開銷
7.2.4 協議優化
- 使用高效協議:選擇合適的協議(如 UDP 用于實時性要求高的場景,TCP 用于可靠性要求高的場景)
- 協議簡化:自定義簡潔的協議,減少協議開銷
- 連接復用:使用長連接復用連接,減少連接建立和關閉的開銷
- HTTP/2 或 HTTP/3:對于 HTTP 通信,使用 HTTP/2 或 HTTP/3,支持多路復用和二進制傳輸
7.2.5 硬件和網絡優化
- 使用高性能網絡設備:如千兆網卡、負載均衡器等
- CDN 加速:對于靜態資源,使用 CDN 加速
- 就近部署:將服務部署在離用戶近的地方,減少網絡延遲
- 增加帶寬:在必要時增加網絡帶寬
7.3 性能測試與監控
- 性能測試工具:使用 JMeter、LoadRunner 等工具進行性能測試
- 監控工具:使用 JConsole、VisualVM 等工具監控 JVM 性能
- 日志分析:記錄和分析性能相關的日志
- 指標監控:監控吞吐量、響應時間、錯誤率等指標
- 持續優化:根據測試和監控結果,持續優化系統性能
第八章:網絡編程常見問題與解決方案
8.1 連接超時
問題:客戶端連接服務器時超時,無法建立連接。
可能原因:
服務器未啟動或端口未開放
網絡不通或防火墻阻止連接
服務器負載過高,無法處理新連接
連接超時時間設置過短
解決方案:
檢查服務器是否啟動,端口是否正確
檢查網絡連接和防火墻設置
增加服務器處理能力或優化服務器
適當增加連接超時時間
8.2 數據傳輸不完整
問題:發送的數據與接收的數據不一致,或數據不完整。
可能原因:
使用 UDP 協議,數據報丟失
緩沖區大小設置不合理
未正確處理 TCP 的粘包問題
編碼解碼方式不一致
解決方案:
對于可靠傳輸,使用 TCP 協議
設置合適的緩沖區大小
實現數據分包和粘包處理機制
確保發送端和接收端使用相同的編碼解碼方式
8.3 內存泄漏
問題:程序運行一段時間后,內存占用不斷增加,最終導致內存溢出。
可能原因:
未正確關閉 Socket、流等資源
連接管理不當,導致大量無效連接
緩存未設置過期時間,數據不斷累積
線程未正確終止,導致資源無法釋放
解決方案:
使用 try-with-resources 確保資源正確關閉
實現連接超時和心跳機制,及時關閉無效連接
為緩存設置合理的過期時間和大小限制
確保線程能夠正確終止,避免線程泄漏
8.4 并發問題
問題:多線程環境下,出現數據不一致、死鎖等問題。
可能原因:
共享資源未正確同步
鎖使用不當,導致死鎖或活鎖
線程池參數設置不合理
異步操作處理不當
解決方案:
對共享資源進行正確的同步處理
合理設計鎖的粒度和順序,避免死鎖
根據實際情況調整線程池參數
正確處理異步操作的回調和結果
8.5 安全問題
問題:網絡通信存在安全隱患,如數據泄露、中間人攻擊等。
可能原因:
數據未加密傳輸
未驗證服務器或客戶端身份
使用不安全的協議或算法
輸入未經過濾,存在注入攻擊風險
解決方案:
使用 SSL/TLS 加密傳輸數據
實現身份驗證機制
使用安全的協議和加密算法
對輸入進行嚴格驗證和過濾
結語
Java 網絡編程是 Java 開發中的重要組成部分,從基礎的 Socket 編程到高級的 NIO 框架,從簡單的文件傳輸到復雜的分布式系統,Java 提供了豐富的 API 和框架支持。
本指南全面介紹了 Java 網絡編程的基礎知識、核心技術和高級應用,包括:
- 計算機網絡基礎和核心協議
- Java BIO、NIO 和 AIO 編程
- 網絡安全和加密技術
- 主流網絡編程框架
- 實際應用案例和性能優化
掌握 Java 網絡編程不僅能夠幫助我們開發各種網絡應用,還能讓我們更好地理解分布式系統的工作原理。在實際開發中,我們需要根據具體需求選擇合適的技術和框架,同時關注性能、安全和可靠性等方面。
隨著互聯網技術的不斷發展,網絡編程也在不斷演進,新的協議、框架和技術不斷涌現。作為開發者,我們需要不斷學習和實踐,跟上技術發展的步伐,編寫出更高質量的網絡應用。
:如何直接拉起騰訊/百度/高德地圖進行導航)


)


 :Transformer在computer vision領域的應用(三))


