一.負載均衡(3.6 )
1.1.什么是負載均衡:
????????負載均衡:Load Balance,簡稱LB,是一種服務或基于硬件設備等實現的高可用反向代理技術,負載均 衡將特定的業務(web服務、網絡流量等)分擔給指定的一個或多個后端特定的服務器或設備,從而提高了 公司業務的并發處理能力、保證了業務的高可用性、方便了業務后期的水平動態擴展。
????????阿里云SLB介紹 :https://yq.aliyun.com/articles/1803
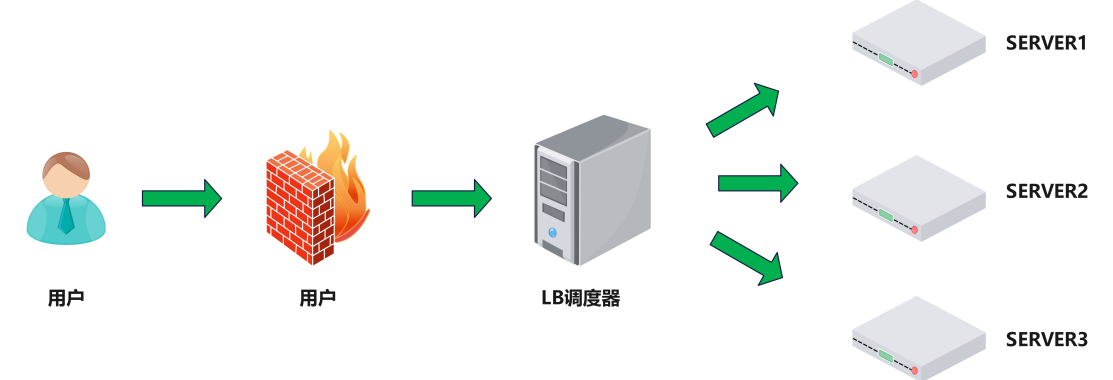
1.2.為什么用負載均衡:
????????Web服務器的動態水平擴展-->對用戶無感知
????????增加業務并發訪問及處理能力-->解決單服務器瓶頸問題
????????節約公網IP地址-->降低IT支出成本
????????隱藏內部服務器IP-->提高內部服務器安全性
????????配置簡單-->固定格式的配置文件
????????功能豐富-->支持四層和七層,支持動態下線主機
????????性能較強-->并發數萬甚至數十萬
1.3.負載均衡類型
1.3.1硬件:
F5????????????????????????美國F5網絡公司 https://f5.com/zh
Netscaler? ? ? ? ? ? ?美國思杰公司 https://www.citrix.com.cn/products/citrix-adc/
Array? ? ? ? ? ? ? ? ? ?華耀 https://www.arraynetworks.com.cn/
AD-1000? ? ? ? ? ? ? 深信服 http://www.sangfor.com.cn/
1.3.2.四層負載均衡:

1.通過ip+port決定負載均衡的去向。
2.對流量請求進行NAT處理,轉發至后臺服務器。
3.記錄tcp、udp流量分別是由哪臺服務器處理,后續該請求連接的流量都通過該服務器處理。
4.支持四層的軟件
lvs:重量級四層負載均衡器。
Nginx:輕量級四層負載均衡器,可緩存。(nginx四層是通過upstream模塊)
Haproxy:模擬四層轉發。
1.3.3.七層負載均衡:
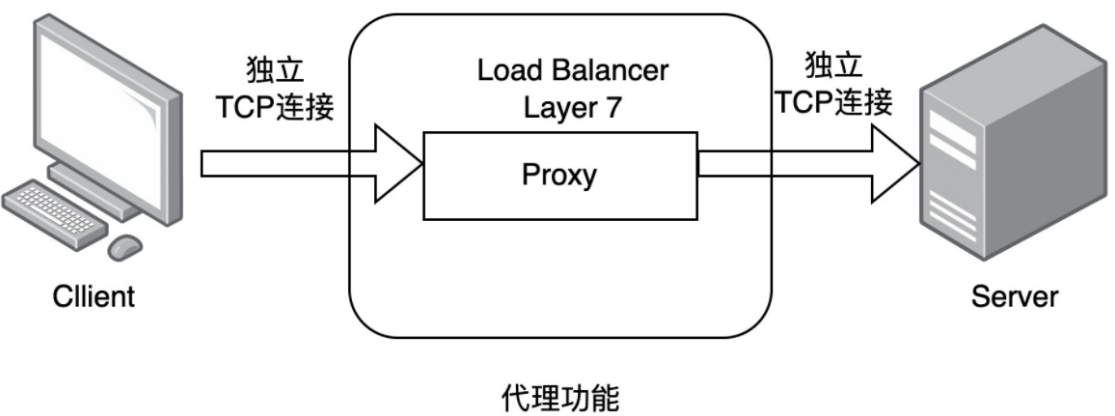
1.通過虛擬ur|或主機ip進行流量識別,根據應用層信息進行解析,決定是否需要進行負載均衡。
2.代理后臺服務器與客戶端建立連接,如nginx可代理前后端,與前端客戶端tcp連接,與后端服務器建立 tcp連接,
3.支持7層代理的軟件:
????????Nginx:基于http協議(nginx七層是通過proxy_pass)
????????Haproxy:七層代理,會話保持、標記、路徑轉移等。
1.3.4 四層和七層的區別:
????????所謂的四到七層負載均衡,就是在對后臺的服務器進行負載均衡時,依據四層的信息或七層的信息來決定怎么樣轉發流量。
????????四層的負載均衡,就是通過發布三層的IP地址(VIP),然后加四層的端口號,來決定哪些流量需要做負 載均衡,對需要處理的流量進行NAT處理,轉發至后臺服務器,并記錄下這個TCP或者UDP的流量是由哪 臺服務器處理的,后續這個連接的所有流量都同樣轉發到同一臺服務器處理
七層的負載均衡,就是在四層的基礎上(沒有四層是絕對不可能有七層的),再考慮應用層的特征,比 如同一個Web服務器的負載均衡,除了根據VIP加80端口辨別是否需要處理的流量,還可根據七層的 URL、瀏覽器類別、語言來決定是否要進行負載均衡。
1.分層位置:四層負載均衡在傳輸層及以下,七層負載均衡在應用層及以下
2.性能 :四層負載均衡架構無需解析報文消息內容,在網絡吞吐量與處理能力上較高:七層可支持解析應用 層報文消息內容,識別URL、Cookie、HTTP header等信息。、
3.原理 :四層負載均衡是基于ip+port;七層是基于虛擬的URL或主機IP等。
4.功能類比:四層負載均衡類似于路由器;七層類似于代理服務器。
5.安全性:四層負載均衡無法識別DDoS攻擊;七層可防御SYN Cookie/Flood攻擊
二.haproxy簡介
HAProxy是法國開發者 威利塔羅(Willy Tarreau) 在2000年使用C語言開發的一個開源軟件
是一款具備高并發(萬級以上)、高性能的TCP和HTTP負載均衡器 支持基于cookie的持久性,自動故障切換,支持正則表達式及web狀態統計。
企業版網站:https://www.haproxy.com
社區版網站:http://www.haproxy.org
github:https://github.com/haprox
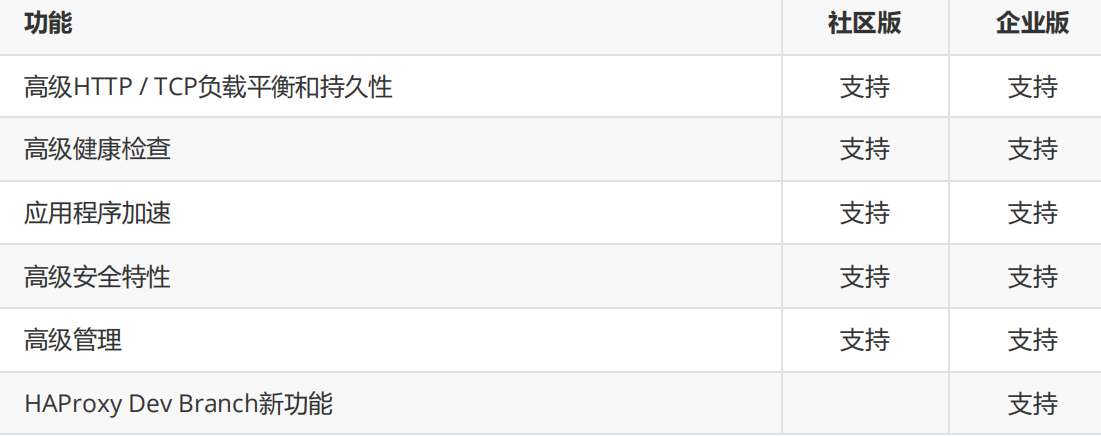
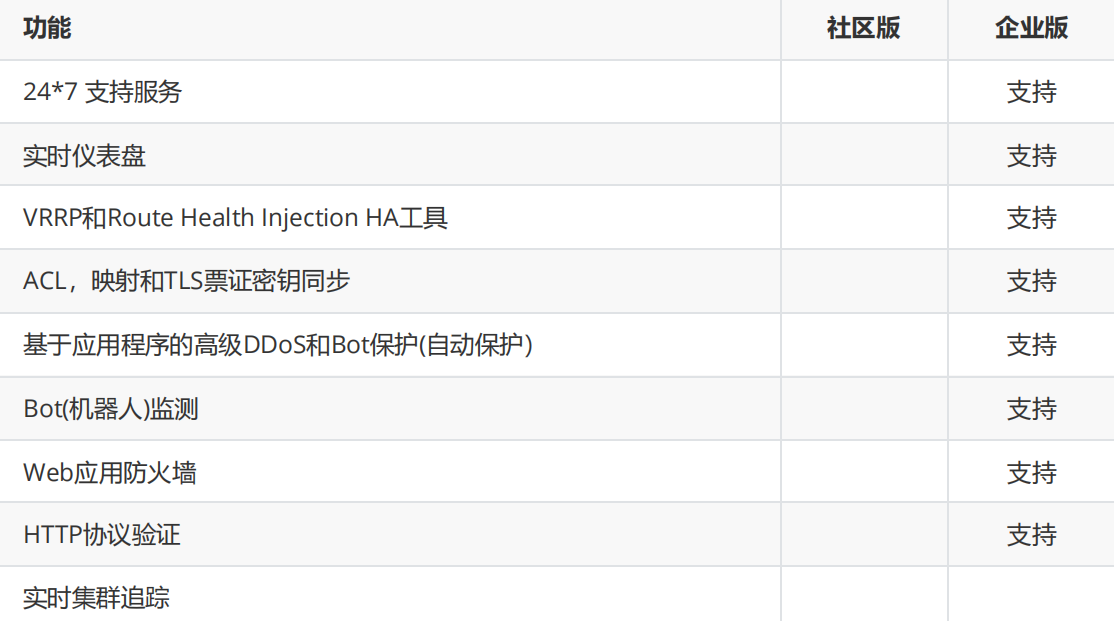
企業版本和社區版功能對比
三.haproxy的安裝和服務信息

3.1.實驗環境:
功能 | IP |
| clinet | eth0:172.,25.254.111 |
haproxy | eth0:172.25.254.50 |
RS1 | eth0:172.25.254.10 |
RS2 | eth0:172.25.254.20 |
3.2.軟件安裝:
#軟件包下載地址
https://github.com/haproxy/wiki/wiki/Packages
#安裝軟件包:
[haproxy ~]# dnf install haproxy -y
#查看版本
[root@haproxy ~]# haproxy -v
HAProxy version 2.4.22-f8e3218 2023/02/14 - https://haproxy.org/
Status: long-term supported branch - will stop receiving fixes around Q2 2026.
Known bugs: http://www.haproxy.org/bugs/bugs-2.4.22.html
Running on: Linux 5.14.0-427.13.1.el9_4.x86_64 #1 SMP PREEMPT_DYNAMIC Wed Apr 10
10:29:16 EDT 2024 x86_64#haproxy軟件基本信息
軟件安裝包: haproxy-2.4.22-3.el9_3.x86_64.rpm
啟動文件: /lib/systemd/system/haproxy.service
主配置目錄: /etc/haproxy/
主配置文件: /etc/haproxy/haproxy.cfg
子配置目錄: /etc/haproxy/conf.d3.3.haproxy的基本配置信息:
?官方文檔:http://cbonte.github.io/haproxy-dconv/
?HAProxy 的配置文件haproxy.cfg由兩大部分組成,分別是:
?global:全局配置段
? ? ? ? 進程及安全配置相關的參數
? ? ? ? 性能調整相關參數
????????Debug參數
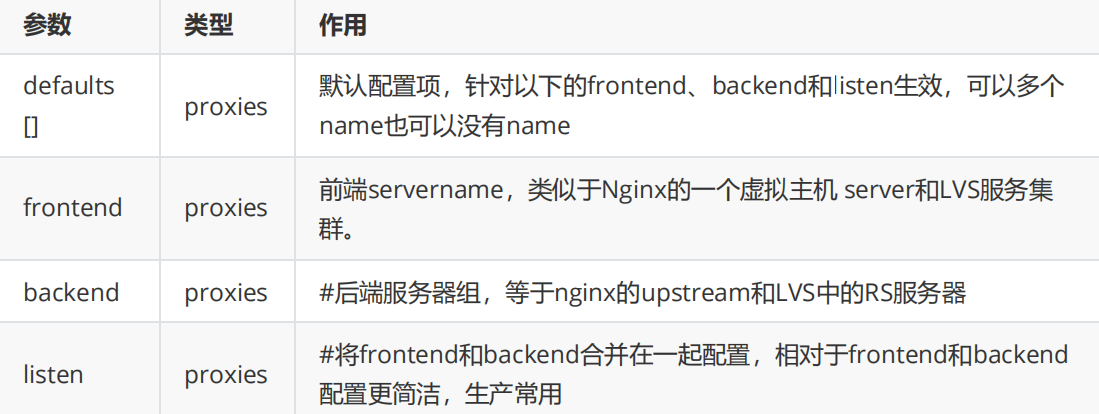
?proxies:代理配置段
????????defaults:為frontend, backend, listen提供默認配置
????????frontend:前端,相當于nginx中的server {}
????????backend:后端,相當于nginx中的upstream {}
????????listen:同時擁有前端和后端配置,配置簡單,生產推薦使用
3.3.1.2 多進程和線程:
多進程和socket文件配置如下:
haproxy ~]# vim /etc/haproxy/haproxy.cfg
...上面內容省略...
global
log 127.0.0.1 local2
chroot /var/lib/haproxy
pidfile /var/run/haproxy.pid
maxconn 100000
user haproxy
group haproxy
daemon
# turn on stats unix socket
stats socket /var/lib/haproxy/haproxy.sock1 mode 600 level admin process 1 #
啟用多個sock文件
stats socket /var/lib/haproxy/haproxy.sock2 mode 600 level admin process 2
nbproc 2 #啟用多進程
cpu-map 1 0 #進程和cpu核心綁定防止cpu抖動從而減少系統資源消耗
cpu-map 2 1 #2 表示第二個進程,1表示第二個cpu核心
...下面內容省略 ...
haproxy haproxy]# pstree -p | grep haproxy
|-haproxy(4816)-+-haproxy(4820)
| `-haproxy(4821)
[haproxy ~]# vim /etc/haproxy/haproxy.cfg
...上面內容省略...
log 127.0.0.1 local2
chroot /var/lib/haproxy
pidfile /var/run/haproxy.pid
maxconn 100000
user haproxy
group haproxy
daemon
# turn on stats unix socket
stats socket /var/lib/haproxy/haproxy.sock1 mode 600 level admin process 1 #
啟用多個sock文件
stats socket /var/lib/haproxy/haproxy.sock2 mode 600 level admin process 2
#nbproc 2
#cpu-map 1 0
#cpu-map 2 1
nbthread 2 #啟用多線程
...下面內容省略...
未開啟多線程
haproxy ~]# cat /proc/xxxx(haproxy子進程id)/status
...上面內容省略...
Threads: 1
...下面內容省略...
開啟后
haproxy ~]# cat /proc/xxxx(haproxy子進程id)/status
...上面內容省略...
Threads: 2
...下面內容省略...
3.3.2 proxies配置:
3.3.2.1.proxies參數說明proxies:
3.3.2.2 Proxies配置-defaults:
defaults
mode http     #HAProxy實例使用的連接協議
log global     #指定日志地址和記錄日志條目的
syslog/rsyslog 日志設備#此處的 global表示使用 global配置段中設定的log值。
option httplog     #日志記錄選項,httplog表示記錄與 HTTP會話相關的各種屬性值
#包括 HTTP請求、會話狀態、連接數、源地址以及連接時間等
option dontlognull  #dontlognull表示不記錄空會話連接日志
option http-server-close #等待客戶端完整HTTP請求的時間,此處為等待10s。
option forwardfor except 127.0.0.0/8     #透傳客戶端真實IP至后端web服務器#在apache配置文件中加入:<br>%{X-Forwarded-For}i#后在webserver中看日志即可看到地址透傳信息
option redispatch         #當server Id對應的服務器掛掉后,強制定向到其他健康的服務器,重新派發
option http-keep-alive         #開啟與客戶端的會話保持
retries                     #連接后端服務器失敗次數timeout http-request 10s     #等待客戶端請求完全被接收和處理的最長時
間
timeout queue 1m         #設置刪除連接和客戶端收到503或服務不可用等提示信息前的等待時間
timeout connect 120s     #設置等待服務器連接成功的時間
timeout client 600s     #設置允許客戶端處于非活動狀態,即既不發送數據也不接收數據的時間
timeout server 600s     #設置服務器超時時間,即允許服務器處于既不接收也不發送數據的非活動時間
timeout http-keep-alive 60s #session 會話保持超時時間,此時間段內會轉發到相同的后端服務器
timeout check 10s     #指定后端服務器健康檢查的超時時間
maxconn 3000
default-server inter 1000 weight 3
3.3.2.3 Proxies配置-frontend:
frontend 配置參數:
bind:指定HAProxy的監聽地址,可以是IPV4或IPV6,可以同時監聽多個IP或端口,可同時用于listen字段中#格式:
bind [<address>]:<port_range> [, ...] [param*]
#注意:如果需要綁定在非本機的IP,需要開啟內核參數:net.ipv4.ip_nonlocal_bind=1
backlog <backlog> #針對所有server配置,當前端服務器的連接數達到上限后的后援隊列長度,注意:不支持backend
frontend 配置示例:
haproxy ~]# vim /etc/haproxy/haproxy.cfg
...上面內容省略...
frontend lee-webserver-80
bind 172.25.254.100:80
mode http
use_backend lee-webserver-80-RS #調用backend的名稱
...下面內容省略...
3.3.2.4 Proxies配置-backend:
????????定義一組后端服務器,backend服務器將被frontend進行調用。
????????注意: backend 的名稱必須唯一,并且必須在listen或frontend中事先定義才可以使用,否則服務無法 啟動
mode http|tcp #指定負載協議類型,和對應的frontend必須一致
option #配置選項
server #定義后端real server,必須指定IP和端口server 配置:
#針對一個server配置
check     #對指定real進行健康狀態檢查,如果不加此設置,默認不開啟檢查,只有check后面沒
有其它配置也可以啟用檢查功能#默認對相應的后端服務器IP和端口,利用TCP連接進行周期性健康性檢查,注意必須指定端口才能實現健康性檢查
addr <IP>     #可指定的健康狀態監測IP,可以是專門的數據網段,減少業務網絡的流量
port <num>     #指定的健康狀態監測端口
inter <num>     #健康狀態檢查間隔時間,默認2000 ms
fall <num>     #后端服務器從線上轉為線下的檢查的連續失效次數,默認為3
rise <num>     #后端服務器從下線恢復上線的檢查的連續有效次數,默認為2
weight <weight>     #默認為1,最大值為256,0(狀態為藍色)表示不參與負載均衡,但仍接受持久連接backup #將后端服務器標記為備份狀態,只在所有非備份主機down機時提供服務,類似Sorry
Server
disabled     #將后端服務器標記為不可用狀態,即維護狀態,除了持久模式#將不再接受連接,狀態為深黃色,優雅下線,不再接受新用戶的請求
redirect prefix http://www.baidu.com/     #將請求臨時(302)重定向至其它URL,只適用于http模式
maxconn <maxconn>     #當前后端server的最大并發連接數
haproxy ~]# vim /etc/haproxy/haproxy.cfg
...上面內容省略...
backend lee-webserver-80-RS
mode http
server web1 192.168.0.101:80 check inter 3s fall 3 rise 5
server web2 192.168.0.102:80 check inter 3s fall 3 rise 5
...上面內容省略...
[Administrator.WIN-20240602BIS] ? for N in {1..6};do curl 172.25.254.100;done
RS1 server - 192.168.0.10
RS2 server - 192.168.0.20
RS1 server - 192.168.0.10
RS2 server - 192.168.0.20
RS1 server - 192.168.0.10
RS2 server - 192.168.0.20
3.3.2.5 Proxies配置-listen 簡化配置
使用listen替換 frontend和backend的配置方式,可以簡化設置,通常只用于TCP協議的應用
listen配置示例:
haproxy ~]# vim /etc/haproxy/haproxy.cfg
...上面內容省略...
listen webserver_80
bind 172.25.254.100:80
mode http
option forwardfor
server webserver1 192.168.0.101:80 check inter 3s fall 3 rise 5
server webserver2 192.168.0.102:80 check inter 3s fall 3 rise 5
...上面內容省略...
3.4.socat 工具:
對服務器動態權重和其它狀態可以利用 socat工具進行調整,Socat 是 Linux 下的一個多功能的網絡工 具,名字來由是Socket CAT,相當于netCAT的增強版.Socat 的主要特點就是在兩個數據流之間建立雙向 通道,且支持眾多協議和鏈接方式。如 IP、TCP、 UDP、IPv6、Socket文件等
范例:利用工具socat 對服務器動態權重調整
#修改配置文件
[root@haproxy ~]# vim /etc/haproxy/haproxy.cfg
stats socket /var/lib/haproxy/stats mode 600 level admin
#查看幫助
haproxy ~]# socat -h
haproxy ~]# echo "help" | socat stdio /var/lib/haproxy/stats
The following commands are valid at this level:
help : this message
prompt : toggle interactive mode with prompt
quit : disconnect
。。。省略 。。。
enable server : enable a disabled server (use 'set server' instead) #啟用服務器
set maxconn server : change a server's maxconn setting
set server : change a server's state, weight or address #設置服務器
get weight : report a server's current weight #查看權重
set weight : change a server's weight (deprecated) #設置權重
show startup-logs : report logs emitted during HAProxy startup
how peers [peers section]: dump some information about all the peers or this
peers section
set maxconn global : change the per-process maxconn setting
set rate-limit : change a rate limiting value
set severity-output [none|number|string] : set presence of severity level in
feedback information
set timeout : change a timeout setting
show env [var] : dump environment variables known to the process
show cli sockets : dump list of cli sockets
show cli level : display the level of the current CLI session
show fd [num] : dump list of file descriptors in use
。。。省略 。。。
#查看haproxy狀態
[root@haproxy ~]# echo "show info" | socat stdio /var/lib/haproxy/stats
Name: HAProxy
Version: 2.4.22-f8e3218
Release_date: 2023/02/14
Nbthread: 1
Nbproc: 1
Process_num: 1
Pid: 33542
Uptime: 0d 0h03m43s
Uptime_sec: 223
Memmax_MB: 0
PoolAlloc_MB: 0
#查看集群狀態
[root@haproxy ~]# echo "show servers state" | socat stdio /var/lib/haproxy/stats
1
# be_id be_name srv_id srv_name srv_addr srv_op_state srv_admin_state srv_uweight
srv_iweight srv_time_since_last_change srv_check_status srv_check_result
srv_check_health srv_check_state srv_agent_state bk_f_forced_id srv_f_forced_id
srv_fqdn srv_port srvrecord srv_use_ssl srv_check_port srv_check_addr
srv_agent_addr srv_agent_port
2 webcluster 1 web1 172.25.254.20 2 0 2 2 188 6 3 7 6 0 0 0 - 80 - 0 0 - - 0
2 webcluster 2 web2 172.25.254.30 2 0 1 1 188 6 3 7 6 0 0 0 - 80 - 0 0 - - 0
4 static 1 static 127.0.0.1 0 0 1 1 187 8 2 0 6 0 0 0 - 4331 - 0 0 - - 0
5 app 1 app1 127.0.0.1 0 0 1 1 187 8 2 0 6 0 0 0 - 5001 - 0 0 - - 0
5 app 2 app2 127.0.0.1 0 0 1 1 187 8 2 0 6 0 0 0 - 5002 - 0 0 - - 0
5 app 3 app3 127.0.0.1 0 0 1 1 186 8 2 0 6 0 0 0 - 5003 - 0 0 - - 0
5 app 4 app4 127.0.0.1 0 0 1 1 186 8 2 0 6 0 0 0 - 5004 - 0 0 - - 0
#查看集群權重
[root@haproxy ~]# echo get weight webcluster/web1 | socat stdio
/var/lib/haproxy/stats
2 (initial 2)
[root@haproxy ~]# echo get weight webcluster/web2 | socat stdio
/var/lib/haproxy/stats
1 (initial 1)
#設置權重
[root@haproxy ~]# echo "set weight webcluster/web1 1 " | socat stdio
/var/lib/haproxy/stats
[root@haproxy ~]# echo "set weight webcluster/web1 2 " | socat stdio
/var/lib/haproxy/stats
#下線后端服務器
[root@haproxy ~]# echo "disable server webserver_80/webserver1 " | socat stdio
/var/lib/haproxy/stats
#上線后端服務器
[root@haproxy ~]# echo "enable server webserver_80/webserver1 " | socat stdio
/var/lib/haproxy/stats
針對多進程處理方法
如果開啟多進程那么我們在對進程的sock文件進行操作時其對進程的操作時隨機的
如果需要指定操作進程那么需要用多soct文件方式來完成
haproxy ~]# vim /etc/haproxy/haproxy.cfg
...上面內容省略...
stats socket /var/lib/haproxy/stats1 mode 600 level admin process 1
stats socket /var/lib/haproxy/stats2 mode 600 level admin process 2
nbproc 2
cpu-map 1 0
cpu-map 2 1
...上面內容省略...
[root@haproxy ~]# ll /var/lib/haproxy/
總用量 0
srw------- 1 root root 0 8月 8 13:43 stats
srw------- 1 root root 0 8月 8 13:46 stats1
srw------- 1 root root 0 8月 8 13:46 stats2
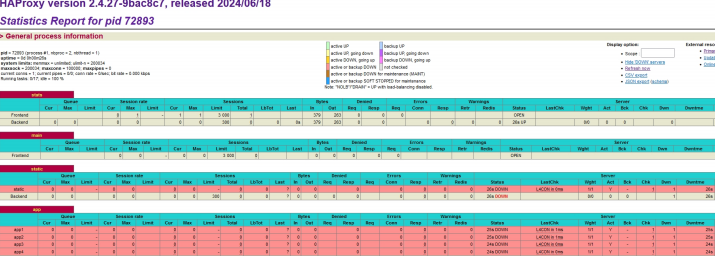
3.5 haproxy的狀態界面:
haproxy ~]# vim /etc/haproxy/haproxy.cfg
...上面內容省略...
listen stats
mode http
bind 0.0.0.0:8888
stats enable
log global
stats uri /haproxy-status
stats auth lee:lee
...下面內容省略...
3.6 haproxy的負載均衡集群簡單配置:
編輯haproxy配置文件?/etc/haproxy/haproxy.cfg
82 frontend webcluster83 bind *:8084 mode http85 balance roundrobin86 use_backend webserver8788 backend webserver89 server web1 172.25.254.10:8090 server web2 172.25.254.20:80
重啟服務并查看80端口:
[root@hp ~]# systemctl restart haproxy.service
[root@hp ~]# netstat -antlupe | grep 80
tcp        0      0 0.0.0.0:80              0.0.0.0:*               LISTEN      0          27935      1717/haproxy
udp        0      0 127.0.0.1:323           0.0.0.0:*                           0          22803      757/chronyd
udp6       0      0 ::1:323                 :::*                                0          22804      757/chronyd
客戶機上測試(記得關閉RS1 RS2防火墻并啟動服務)
[root@client ~]# for i in {1..10};do curl 172.25.254.50;done
RS1 - 172.25.254.10
RS2 - 172.25.254.20
RS1 - 172.25.254.10
RS2 - 172.25.254.20
RS1 - 172.25.254.10
RS2 - 172.25.254.20
RS1 - 172.25.254.10
RS2 - 172.25.254.20
RS1 - 172.25.254.10
RS2 - 172.25.254.20

四.haproxy的算法
HAProxy通過固定參數 balance 指明對后端服務器的調度算法
balance參數可以配置在listen或backend選項中。
HAProxy的調度算法分為靜態和動態調度算法
有些算法可以根據參數在靜態和動態算法中相互轉換。
4.1 靜態算法:
靜態算法:按照事先定義好的規則輪詢公平調度,不關心后端服務器的當前負載、連接數和響應速度 等,且無法實時修改權重(只能為0和1,不支持其它值),只能靠重啟HAProxy生效。
4.1.1 static-rr:基于權重的輪詢調度
haproxy ~]# vim /etc/haproxy/haproxy.cfg
...上面內容省略...
listen webserver_80
bind 172.25.254.100:80
mode http
balance static-rr
server webserver1 192.168.0.101:80 weight 2 check inter 3s fall 3 rise 5
server webserver2 192.168.0.102:80 weight 1 check inter 3s fall 3 rise 5
...上面內容省略...
4.1.2 first:
根據服務器在列表中的位置,自上而下進行調度
其只會當第一臺服務器的連接數達到上限,新請求才會分配給下一臺服務
其會忽略服務器的權重設置
不支持用socat進行動態修改權重,可以設置0和1,可以設置其它值但無效
示例:
haproxy ~]# vim /etc/haproxy/haproxy.cfg
...上面內容省略...
listen webserver_80
bind 172.25.254.100:80
mode http
balance first
server webserver1 192.168.0.101:80 maxconn 3 check inter 3s fall 3 rise 5
server webserver2 192.168.0.102:80 check inter 3s fall 3 rise 5
...上面內容省略...
#在兩臺主機上分別執行此循環,可以觀察是否102被調度到
while true;do curl 172.25.254.100 ; sleep 0.1;done
4.2 動態算法
4.2.1 roundrobin
haproxy ~]# vim /etc/haproxy/haproxy.cfg
...上面內容省略...
listen webserver_80
bind 172.25.254.100:80
mode http
balance roundrobin
server webserver1 192.168.0.101:80 weight 1 check inter 3s fall 3 rise 5
server webserver2 192.168.0.102:80 weight 1 check inter 3s fall 3 rise 5
...上面內容省略...
[root@haproxy ~]# echo "set weight webserver_80/webserver1 2" | socat stdio
/var/lib/haproxy/haproxy.sock
4.2.2 leastconn
leastconn加權的最少連接的動態
支持權重的運行時調整和慢啟動,即:根據當前連接最少的后端服務器而非權重進行優先調度(新客戶 端連接)
比較適合長連接的場景使用,比如:MySQL等場景。
示例:
haproxy ~]# vim /etc/haproxy/haproxy.cfg
...上面內容省略...
listen webserver_80
bind 172.25.254.100:80
mode http
balance leastconn
server webserver1 192.168.0.101:80 weight 1 check inter 3s fall 3 rise 5
server webserver2 192.168.0.102:80 weight 1 check inter 3s fall 3 rise 5
...上面內容省略
4.3 其他算法
其它算法即可作為靜態算法,又可以通過選項成為動態算法
4.3.1 source
源地址hash,基于用戶源地址hash并將請求轉發到后端服務器,后續同一個源地址請求將被轉發至同一 個后端web服務器。此方式當后端服務器數據量發生變化時,會導致很多用戶的請求轉發至新的后端服 務器,默認為靜態方式,但是可以通過hash-type支持的選項更改這個算法一般是在不插入Cookie的TCP 模式下使用,也可給拒絕會話cookie的客戶提供最好的會話粘性,適用于session會話保持但不支持 cookie和緩存的場景源地址有兩種轉發客戶端請求到后端服務器的服務器選取計算方式,分別是取模法 和一致性hash
haproxy ~]# vim /etc/haproxy/haproxy.cfg
...上面內容省略...
listen webserver_80
bind 172.25.254.100:80
mode http
balance source
server webserver1 192.168.0.101:80 weight 1 check inter 3s fall 3 rise 5
server webserver2 192.168.0.102:80 weight 1 check inter 3s fall 3 rise 5
...上面內容省略...[root@node10 ~]# for N in {1..6}; do curl 172.25.254.100; done
RS1 server - 192.168.0.101
RS1 server - 192.168.0.101
RS1 server - 192.168.0.101
RS1 server - 192.168.0.101
RS1 server - 192.168.0.101
RS1 server - 192.168.0.1014.3.1.1 map-base 取模法
map-based:取模法,對source地址進行hash計算,再基于服務器總權重的取模,最終結果決定將此請 求轉發至對應的后端服務器。
此方法是靜態的,即不支持在線調整權重,不支持慢啟動,可實現對后端服務器均衡調度
缺點是當服務器的總權重發生變化時,即有服務器上線或下線,都會因總權重發生變化而導致調度結果 整體改變
hash-type 指定的默值為此算法
所謂取模運算,就是計算兩個數相除之后的余數,10%7=3, 7%4=3
map-based算法:基于權重取模,hash(source_ip)%所有后端服務器相加的總權重
比如當源hash值時1111,1112,1113,三臺服務器a b c的權重均為1,即abc的調度標簽分別會被設定為 0 1 2(1111%3=1,1112%3=2,1113%3=0)1111 ----- > nodeb1112 ------> nodec1113 ------> nodea如果a下線后,權重數量發生變化1111%2=1,1112%2=0,1113%2=11112和1113被調度到的主機都發生變化,這樣會導致會話丟失
取模法配置示例:
haproxy ~]# vim /etc/haproxy/haproxy.cfg
...上面內容省略...
listen webserver_80
bind 172.25.254.100:80
mode http
balance source
server webserver1 192.168.0.101:80 weight 1 check inter 3s fall 3 rise 5
server webserver2 192.168.0.102:80 weight 1 check inter 3s fall 3 rise 5
...上面內容省略...
#不支持動態調整權重值
[root@haproxy ~]# echo "set weight webserver_80/webserver1 2" | socat stdio
/var/lib/haproxy/haproxy.sock
Backend is using a static LB algorithm and only accepts weights '0%' and '100%'.
#只能動態上線和下線
[root@haproxy ~]# echo "set weight webserver_80/webserver1 0" | socat stdio
/var/lib/haproxy/haproxy.sock
[root@haproxy ~]# echo "get weight webserver_80/webserver1" | socat stdio
/var/lib/haproxy/haproxy.sock
0 (initial 1)
4.3.1.2 一致性hash
一致性哈希,當服務器的總權重發生變化時,對調度結果影響是局部的,不會引起大的變動hash(o) mod n
該hash算法是動態的,支持使用 socat等工具進行在線權重調整,支持慢啟動
1、后端服務器哈希環點keyA=hash(后端服務器虛擬ip)%(2^32)
2、客戶機哈希環點key1=hash(client_ip)%(2^32) 得到的值在[0---4294967295]之間,
3、將keyA和key1都放在hash環上,將用戶請求調度到離key1最近的keyA對應的后端服務器

hash環偏斜問題
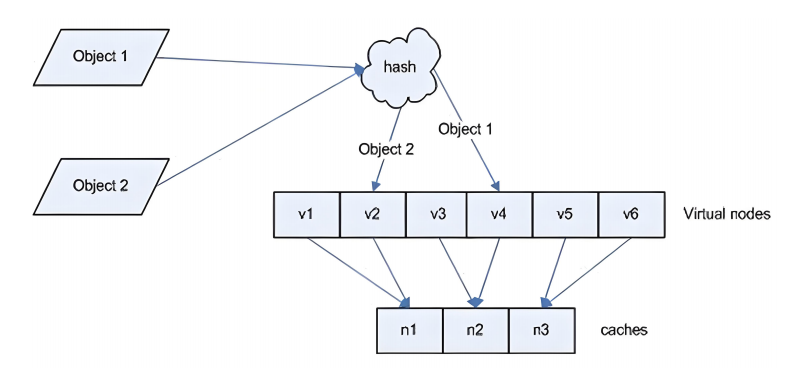
一致性hash示意圖
后端服務器在線與離線的調度方式

haproxy ~]# vim /etc/haproxy/haproxy.cfg
...上面內容省略...
listen webserver_80
bind 172.25.254.100:80
mode http
balance source
hash-type consistent
server webserver1 192.168.0.101:80 weight 1 check inter 3s fall 3 rise 5
server webserver2 192.168.0.102:80 weight 1 check inter 3s fall 3 rise 5
...上面內容省略...
4.3.2 uri
<scheme>://<user>:<password>@<host>:<port>/<path>;<params>?<query>#<frag>
左半部分:/<path>;<params>
整個uri:/<path>;<params>?<query>#<frag>

4.3.2.1 uri 取模法配置示例
haproxy ~]# vim /etc/haproxy/haproxy.cfg
...上面內容省略...
listen webserver_80
bind 172.25.254.100:80
mode http
balance uri
server webserver1 192.168.0.101:80 weight 1 check inter 3s fall 3 rise 5
server webserver2 192.168.0.102:80 weight 1 check inter 3s fall 3 rise 5
...上面內容省略...
4.3.2.2 uri 一致性hash配置示例
haproxy ~]# vim /etc/haproxy/haproxy.cfg
...上面內容省略...
listen webserver_80
bind 172.25.254.100:80
mode http
balance uri
hash-type consistent
server webserver1 192.168.0.101:80 weight 1 check inter 3s fall 3 rise 5
server webserver2 192.168.0.102:80 weight 1 check inter 3s fall 3 rise 5
...上面內容省略..
4.3.2.3 訪問測試
訪問不同的uri,確認可以將用戶同樣的請求轉發至相同的服務器
root@rs1 ~]# echo RS1 192.168.0.101 index1 > /var/www/html/index1.html
[root@rs1 ~]# echo RS1 192.168.0.101 index2 > /var/www/html/index2.html
[root@rs1 ~]# echo RS1 192.168.0.101 index3 > /var/www/html/index3.html
[root@rs2 ~]# echo RS1 192.168.0.102 index1 > /var/www/html/index1.html
[root@rs2 ~]# echo RS1 192.168.0.102 index2 > /var/www/html/index2.html
[root@rs2 ~]# echo RS1 192.168.0.102 index3 > /var/www/html/index3.html
[root@node10 ~]# curl 172.25.254.100/index.html
RS2 server - 192.168.0.102
[root@node10 ~]# curl 172.25.254.100/index1.html
RS1 192.168.0.101 index1
[root@node10 ~]# curl 172.25.254.100/index2.html
RS1 192.168.0.102 index2
[root@node10 ~]# curl 172.25.254.100/index3.html
RS1 192.168.0.101 index3
4.3.3 url_param
url_param對用戶請求的url中的 params 部分中的一個參數key對應的value值作hash計算,并由服務器 總權重相除以后派發至某挑出的服務器,后端搜索同一個數據會被調度到同一個服務器,多用與電商
通常用于追蹤用戶,以確保來自同一個用戶的請求始終發往同一個real server
如果無沒key,將按roundrobin算法
#假設:
url = http://www.timinglee.com/foo/bar/index.php?key=value
#則:
host = "www.timinglee.com"
url_param = "key=value"
4.3.3.1 url_param取模法配置示例
haproxy ~]# vim /etc/haproxy/haproxy.cfg
...上面內容省略...
listen webserver_80
bind 172.25.254.100:80
mode http
balance url_param name,userid #支持對多個url_param hash
server webserver1 192.168.0.101:80 weight 1 check inter 3s fall 3 rise 5
server webserver2 192.168.0.102:80 weight 1 check inter 3s fall 3 rise 5
...上面內容省略...
4.3.3.2 url_param一致性hash配置示例
haproxy ~]# vim /etc/haproxy/haproxy.cfg
...上面內容省略...
listen webserver_80
bind 172.25.254.100:80
mode http
balance url_param name,userid #支持對多個url_param hash
hash-type consistent
server webserver1 192.168.0.101:80 weight 1 check inter 3s fall 3 rise 5
server webserver2 192.168.0.102:80 weight 1 check inter 3s fall 3 rise 5
...上面內容省略...
4.3.3.3 測試訪問
[root@node10 ~]# curl 172.25.254.100/index.html?name=timinglee
RS1 192.168.0.101 index3
[root@node10 ~]# curl 172.25.254.100/index.html?name=timinglee
RS1 192.168.0.101 index3
[root@node10 ~]# curl 172.25.254.100/index.html?userid=lee
RS1 192.168.0.102 index3
[root@node10 ~]# curl 172.25.254.100/index.html?userid=lee
RS1 192.168.0.102 index3針對用戶每個http頭部(header)請求中的指定信息做hash,
此處由 name 指定的http首部將會被取出并做hash計算,
然后由服務器總權重取模以后派發至某挑出的服務器,如果無有效值,則會使用默認的輪詢調度。
4.3.4.1 hdr取模法配置示例
haproxy ~]# vim /etc/haproxy/haproxy.cfg
...上面內容省略...
listen webserver_80
bind 172.25.254.100:80
mode http
balance hdr(User-Agent)
server webserver1 192.168.0.101:80 weight 1 check inter 3s fall 3 rise 5
server webserver2 192.168.0.102:80 weight 1 check inter 3s fall 3 rise 5
...上面內容省略...
4.3.4.2 一致性hash配置示例
haproxy ~]# vim /etc/haproxy/haproxy.cfg
...上面內容省略...
listen webserver_80
bind 172.25.254.100:80
mode http
balance hdr(User-Agent)
hash-type consistent
server webserver1 192.168.0.101:80 weight 1 check inter 3s fall 3 rise 5
server webserver2 192.168.0.102:80 weight 1 check inter 3s fall 3 rise 5
...上面內容省略.
4.3.4.3 測試訪問
[root@node10 ~]# curl -v 172.25.254.100
[root@node10 ~]# curl -vA "firefox" 172.25.254.100
[root@node10 ~]# curl -vA "sougou" 172.25.254.100
4.3.6 算法總結
#靜態
static-rr--------->tcp/http
first------------->tcp/http
#動態
roundrobin-------->tcp/http
leastconn--------->tcp/http
random------------>tcp/http
#以下靜態和動態取決于hash_type是否consistent
source------------>tcp/http
Uri--------------->http
url_param--------->http
hdr--------------->http
4.3.7 各算法使用場景
first #使用較少
static-rr #做了session共享的web集群
roundrobin
random
leastconn #數據庫
source
#基于客戶端公網IP的會話保持
Uri--------------->http #緩存服務器,CDN服務商,藍汛、百度、阿里云、騰訊
url_param--------->http #可以實現session保持
hdr #基于客戶端請求報文頭部做下一步處理五.高級功能及配置
5.1 基于cookie的會話保持
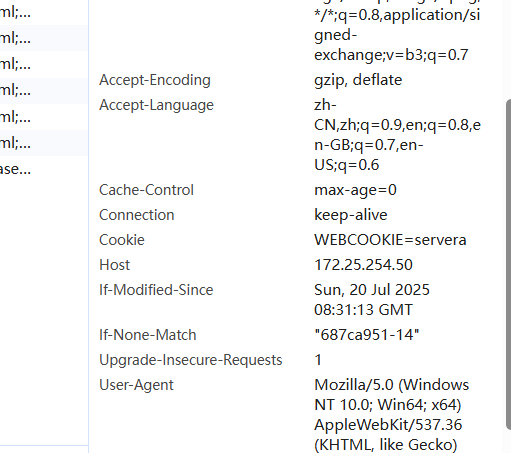
cookie value:為當前server指定cookie值,實現基于cookie的會話黏性,相對于基于 source 地址hash 調度算法對客戶端的粒度更精準,但同時也加大了haproxy負載,目前此模式使用較少, 已經被session 共享服務器代替
5.1.1 配置選項
cookie name [ rewrite | insert | prefix ][ indirect ] [ nocache ][ postonly ] [
preserve ][ httponly ] [ secure ][ domain ]* [ maxidle <idle> ][ maxlife ]
name: #cookie 的 key名稱,用于實現持久連接
insert: #插入新的cookie,默認不插入cookie
indirect: #如果客戶端已經有cookie,則不會再發送cookie信息
nocache: #當client和hapoxy之間有緩存服務器(如:CDN)時,不允許中間緩存器緩存cookie,
#因為這會導致很多經過同一個CDN的請求都發送到同一臺后端服務器
5.1.2 配置示例
配置文件:
88 listen webcluster89 bind *:8090 mode http91 balance roundrobin92 hash-type consistent93 cookie WEBCOOKIE insert nocache indirect94 server web1 172.25.254.10:80 cookie servera check inter 5s fall 395 server web2 172.25.254.20:80 cookie serverb check inter 5s fall 3
重啟服務:
[root@hp ~]# systemctl restart haproxy.service
驗證:

5.2 HAProxy狀態頁:
5.2.1 狀態頁配置項
stats enable #基于默認的參數啟用stats page
stats hide-version #將狀態頁中haproxy版本隱藏
stats refresh <delay> #設定自動刷新時間間隔,默認不自動刷新
stats uri <prefix> #自定義stats page uri,默認值:/haproxy?stats
stats auth <user>:<passwd> #認證時的賬號和密碼,可定義多個用戶,每行指定一個用戶
#默認:no authentication
stats admin { if | unless } <cond> #啟用stats page中的管理功能
haproxy ~]# vim /etc/haproxy/haproxy.cfg
...上面內容省略...
listen stats:
mode http
bind 0.0.0.0:8888
stats enable
log global
stats uri /status #自定義stats page uri
stats auth lee:lee #認證,此行可以出現多次
...上面內容省略...
測試:
瀏覽器訪問:172.25.254.100:8888/status
#pid為當前pid號,process為當前進程號,nbproc和nbthread為一共多少進程和每個進程多少個線程
pid = 27134 (process #1, nbproc = 1, nbthread = 1)
#啟動了多長時間
uptime = 0d 0h00m04s
#系統資源限制:內存/最大打開文件數/
system limits: memmax = unlimited; ulimit-n = 200029
#最大socket連接數/單進程最大連接數/最大管道數maxpipes
maxsock = 200029; maxconn = 100000; maxpipes = 0
#當前連接數/當前管道數/當前連接速率
current conns = 2; current pipes = 0/0; conn rate = 2/sec; bit rate = 0.000 kbps
5.2.4 backend server信息
session rate(每秒的連接會話信息): Errors(錯誤統計信息):
cur:每秒的當前會話數量 : Req:錯誤請求量
max:每秒新的最大會話數量 conn:錯誤鏈接量
limit:每秒新的會話限制量 Resp:錯誤響應量
sessions(會話信息): Warnings(警告統計信息):
cur:當前會話量 Retr:重新嘗試次數
max:最大會話量 Redis:再次發送次數
limit: 限制會話量
Total:總共會話量 Server(real server信息):
LBTot:選中一臺服務器所用的總時間 Status:后端機的狀態,包括UP和DOWN
Last:和服務器的持續連接時間 LastChk:持續檢查后端服務器的時間
Wght:權重
Bytes(流量統計): Act:活動鏈接數量
In:網絡的字節輸入總量 Bck:備份的服務器數量
Out:網絡的字節輸出總量 Chk:心跳檢測時間
Dwn:后端服務器連接后都是DOWN的數量
Denied(拒絕統計信息): Dwntme:總的downtime時間
Req:拒絕請求量 Thrtle:server 狀態
Resp:拒絕回復量
5.3 IP透傳
web服務器中需要記錄客戶端的真實IP地址,用于做訪問統計、安全防護、行為分析、區域排行等場景。
#運行的任務/當前空閑率
Running tasks: 1/14; idle = 100 %
active UP: #在線服務器
backup UP: #標記為backup的服務器
active UP, going down: #監測未通過正在進入down過程
backup UP, going down: #備份服務器正在進入down過程
active DOWN, going up: #down的服務器正在進入up過程
backup DOWN, going up: #備份服務器正在進入up過程
active or backup DOWN: #在線的服務器或者是backup的服務器已經轉換成了down狀態
not checked: #標記為不監測的服務器
#active或者backup服務器人為下線的
active or backup DOWN for maintenance (MAINT)
#active或者backup被人為軟下線(人為將weight改成0)
active or backup SOFT STOPPED for maintenance
session rate(每秒的連接會話信息): ????????????????Errors(錯誤統計信息):
cur:每秒的當前會話數量 : ???????????????????????????????Req:錯誤請求量
max:每秒新的最大會話數量?????????????????????????????conn:錯誤鏈接量
limit:每秒新的會話限制量 ????????????????????????????????Resp:錯誤響應量
sessions(會話信息):? ? ? ? ? ? ? ? ? ? ? ? ? ? ? ? ? ? ? ? ?Warnings(警告統計信息):
cur:當前會話量????????????????????????????????????????????????Retr:重新嘗試次數
max:最大會話量??????????????????????????????????????????????Redis:再次發送次數
limit: 限制會話量? ???????????????????????????????????????????Total:總共會話量
Server(real server信息): ??????????????????????????????LBTot:選中一臺服務器所用的總間????????????????
Status:后端機的狀態,包括UP和DOWN ???????Last:和服務器的持續連接時間
LastChk:持續檢查后端服務器的時間? ? ? ? ? ? ? Wght:權重
Bytes(流量統計):? ? ? ? ? ? ? ? ? ? ? ? ? ? ? ? ? ? ? ? ? Act:活動鏈接數量
In:網絡的字節輸入總量? ? ? ? ? ? ? ? ? ? ? ? ? ? ? ? ? ?Bck:備份的服務器數量
Out:網絡的字節輸出總量????????????????????????????????Chk:心跳檢測時間
Dwn:后端服務器連接后都是DOWN的數量? ? ?Denied(拒絕統計信息):
Dwntme:總的downtime時間? ? ? ? ? ? ? ? ? ? ? ? ? ?Req:拒絕請求量
Thrtle:server 狀態 ?????????????????????????????????????????Resp:拒絕回復量
5.3 IP透傳:
5.3.2 四層IP透傳
修改nginx配置文件(RS1 RS2)
 修改haproxy配置文件
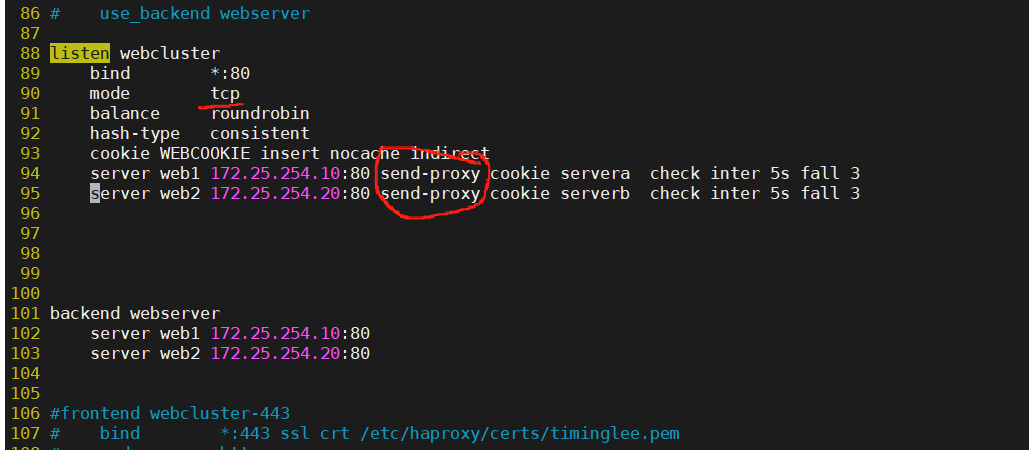
測試:


5.3.3 七層IP透傳:
當haproxy工作在七層的時候,也可以透傳客戶端真實IP至后端服務器
5.4 ACL:
#示例
frontend test_acl
bind *:80
mode http
#acl bad_browers hdr_beg(User-Agent) -i curl
#http-request deny if bad_browers
#acl test hdr_dom(host) -i www.timinglee.org
#acl test hdr_end(host) -i .org
#acl test base_sub -m sub org
#acl test path_sub -m sub /a
#acl test path_end -m sub /a
#acl test path_reg -i ^/t
acl test url_sub -m sub lee
acl test path_dir -m sub a
use_backend test_web if test
default_backend default_webserver
backend default_webserver
mode http
server web1 172.25.254.20:80 check inter 3 fall 3 rise 5
backend test_web
mode http
server web2 172.25.254.30:80 check inter 3 fall 3 rise 5
5.4.1 ACL配置選項
#用acl來定義或聲明一個acl
acl <aclname> <criterion> [flags] [operator] [<value>]
acl 名稱 匹配規范 匹配模式 具體操作符 操作對象類型
5.4.1.1 ACL-Name 名稱
acl test path_end -m sub /a
#ACL名稱,可以使用大字母A-Z、小寫字母a-z、數字0-9、冒號:、點.、中橫線和下劃線,并且嚴格區分大
小寫,比如:my_acl和My_Acl就是兩個完全不同的acl5.8.1.2 ACL-criterion
5.4.1.2 ACL-criterion 匹配規范
定義ACL匹配規范,即:判斷條件
整數比較:eq、ge、gt、le、lt
字符比較:
- exact match (-m str) :字符串必須完全匹配模式
- substring match (-m sub) :在提取的字符串中查找模式,如果其中任何一個被發現,ACL將匹配
- prefix match (-m beg) :在提取的字符串首部中查找模式,如果其中任何一個被發現,ACL將匹配
- suffix match (-m end) :將模式與提取字符串的尾部進行比較,如果其中任何一個匹配,則ACL進行
匹配
- subdir match (-m dir) :查看提取出來的用斜線分隔(“/")的字符串,如其中任一個匹配,則ACL
進行匹配
- domain match (-m dom) :查找提取的用點(“.")分隔字符串,如果其中任何一個匹配,則ACL進行
匹配
5.4.1.3 ACL-flags 匹配模式
-i 不區分大小寫
-m 使用指定的正則表達式匹配方法
-n 不做DNS解析
-u 禁止acl重名,否則多個同名ACL匹配或關系
5.4.1.4 ACL-operator 具體操作符
ACL 操作符
整數比較:eq、ge、gt、le、lt
字符比較:
- exact match (-m str) :字符串必須完全匹配模式
- substring match (-m sub) :在提取的字符串中查找模式,如果其中任何一個被發現,ACL將匹配
- prefix match (-m beg) :在提取的字符串首部中查找模式,如果其中任何一個被發現,ACL將匹配
- suffix match (-m end) :將模式與提取字符串的尾部進行比較,如果其中任何一個匹配,則ACL進行
匹配
- subdir match (-m dir) :查看提取出來的用斜線分隔(“/")的字符串,如其中任一個匹配,則ACL
進行匹配
- domain match (-m dom) :查找提取的用點(“.")分隔字符串,如果其中任何一個匹配,則ACL進行
匹配
5.4.1.5 ACL-value 操作對象
The ACL engine can match these types against patterns of the following types :
- Boolean #布爾值
- integer or integer range #整數或整數范圍,比如用于匹配端口范圍
- IP address / network #IP地址或IP范圍, 192.168.0.1 ,192.168.0.1/24
- string--> www.timinglee.org
exact #精確比較
substring #子串
suffix #后綴比較
prefix #前綴比較
subdir #路徑, /wp-includes/js/jquery/jquery.js
domain #域名,www.timinglee.org
- regular expression #正則表達式
- hex block #16進制
5.4.2 多個ACL的組合調用方式
與:隱式(默認)使用
或:使用“or" 或 “||"表示
否定:使用 "!" 表示
#示例:
if valid_src valid_port #與關系,ACL中A和B都要滿足為true,默認為與
if invalid_src || invalid_port #或,ACL中A或者B滿足一個為true
if ! invalid_src #非,取反,不滿足ACL才為true
5.4.3 ACL示例-域名匹配
haproxy ~]# vim /etc/haproxy/haproxy.cfg
...上面內容省略...
frontend testacl
bind :80
mode http
########### ACL settings #######################
acl web_host hdr_dom(host) www.timinglee.org
########### host ###########################
use_backend timinglee_host if web_host
########### default server ###################
default_backend default_webserver
backend timinglee_host
mode http
server web1 192.168.0.101:80 check weight 1 inter 3s fall 3 rise 5
server web2 192.168.0.102:80 check weight 1 inter 3s fall 3 rise 5
backend default_webserver
mode http
server web1 172.25.254.10:80 check weight 1 inter 3s fall 3 rise 5
...上面內容省略...
#在瀏覽器所在主機中做地址解析
[root@node10 html]# vim /etc/hosts
172.25.254.100 www.timinglee.org
#測試結果
[root@node10 html]# curl www.timinglee.org
RS1 192.168.0.101
[root@node10 html]# curl www.timinglee.org
RS2 server - 192.168.0.102
[root@node10 html]# curl 172.25.254.100
default web server node10
5.4.4 ACL示例-基于源IP或子網調度訪問
haproxy ~]# vim /etc/haproxy/haproxy.cfg
...上面內容省略...
測試結果
5.4.5 ACL示例-基于源地址的訪問控制
拒絕指定IP或者IP范圍訪問
frontend testacl
bind :80
mode http
########### ACL settings #######################
acl ip_test src 172.25.254.1 192.168.0.0/24
########### host ###########################
use_backend ip_test-host if ip_test
########### default server ###################
default_backend default_webserver
backend ip_test-host
mode http
server web1 192.168.0.101:80 check weight 1 inter 3s fall 3 rise 5
backend default_webserver
mode http
server web1 172.25.254.10:80 check weight 1 inter 3s fall 3 rise 5
#測試結果
[172.25.254.10 root@node10 html]# curl 172.25.254.100
default web server node10
[172.25.254.1 Administrator.WIN-20240602BIS] ? curl 172.25.254.100
RS1 192.168.0.101
[192.168.0.102 root@rs1 ~]# curl 192.168.0.101
RS1 192.168.0.101
5.4.5 ACL示例-基于源地址的訪問控制
拒絕指定IP或者IP范圍訪問
haproxy ~]# vim /etc/haproxy/haproxy.cfg
...上面內容省略...
frontend testacl
bind :80
mode http
########### ACL settings #######################
acl web_host hdr_dom(host) www.timinglee.org
acl ip_test src 172.25.254.1 192.168.0.0/24
########### host ###########################
http-request deny if web_host
########### default server ###################
default_backend default_webserver
backend ip_test-host
mode http
server web1 192.168.0.101:80 check weight 1 inter 3s fall 3 rise 5
backend default_webserver
mode http
server web1 172.25.254.10:80 check weight 1 inter 3s fall 3 rise 5
測試
[root@node10 ~]# curl www.timinglee.org
<html><body><h1>403 Forbidden</h1>
Request forbidden by administrative rules.
</body></html>
[root@node10 ~]# curl 172.25.254.100
default web server node10
5.4.6 ACL示例-匹配瀏覽器類型
匹配客戶端瀏覽器,將不同類型的瀏覽器調動至不同的服務器組、
范例: 拒絕curl和wget的訪問
示例:
haproxy ~]# vim /etc/haproxy/haproxy.cfg
...上面內容省略...
frontend testacl
bind :80
mode http
########### ACL settings #######################
acl user_agent_block hdr_sub(User-Agent) -i curl wget
acl user_agent_redirect hdr_sub(User-Agent) -i Mozilla/5.0
########### host ###########################
http-request deny if user_agent_block
redirect prefix https://www.baidu.com if user_agent_redirect
########### default server ###################
default_backend default_webserver
backend ip_test-hostmode http
server web1 192.168.0.101:80 check weight 1 inter 3s fall 3 rise 5
backend default_webserver
mode http
server web1 172.25.254.10:80 check weight 1 inter 3s fall 3 rise 5
測試:1。
[root@node10 ~]# curl 172.25.254.100
<html><body><h1>403 Forbidden</h1>
Request forbidden by administrative rules.
</body></html>
2.
[root@node10 ~]# wget http://172.25.254.100/index.html
--2024-07-11 23:04:36-- http://172.25.254.100/index.html
Connecting to 172.25.254.100:80... connected.
HTTP request sent, awaiting response... 403 Forbidden
2024-07-11 23:04:36 ERROR 403: Forbidden.
3.瀏覽器中測試
5.4.7 ACL示例-基于文件后綴名實現動靜分離
haproxy ~]# vim /etc/haproxy/haproxy.cfg
...上面內容省略...
frontend testacl
bind :80
mode http
########### ACL settings #######################
acl url_static path_end -i .jpg .png .css .js .html
acl url_php path_end -i .php
########### host ###########################
use_backend static_host if url_static
use_backend php_host if url_php
########### default server ###################
default_backend default_webserver
backend static_host
mode http
server web2 192.168.0.101:80 check weight 1 inter 3s fall 3 rise 5
backend php_host
mode http
server web1 192.168.0.102:80 check weight 1 inter 3s fall 3 rise 5backend default_webserver
mode http
server web1 172.25.254.10:80 check weight 1 inter 3s fall 3 rise 5測試:
[root@rs1 ~]# echo css 192.168.0.101 > /usr/share/nginx/html/index.css
[root@rs2 ~]# echo php 192.168.0.102 > /var/www/html/index.php
[root@node10 ~]# curl 172.25.254.100/index.php
php 192.168.0.102
[root@node10 ~]# curl 172.25.254.100/index.css
css 192.168.0.101
5.4.8 ACL-匹配訪問路徑實現動靜分離
haproxy ~]# vim /etc/haproxy/haproxy.cfg
...上面內容省略...
frontend testacl
bind :80
mode http
########### ACL settings #######################
acl url_static path_end -i .jpg .png .css .js .html
acl url_static path_end -m sub /static /images /javascript
acl acl_app path_beg -m sub /api
########### host ###########################
use_backend static_host if url_static
use_backend api_host if acl_app
########### default server ###################
default_backend default_webserver
backend static_host
mode http
server web2 192.168.0.101:80 check weight 1 inter 3s fall 3 rise 5
backend api_host
mode http
server web1 192.168.0.102:80 check weight 1 inter 3s fall 3 rise 5
backend default_webserver
mode http
server web1 172.25.254.10:80 check weight 1 inter 3s fall 3 rise 5#創建相關文件
[root@rs1 ~]# mkdir /usr/share/nginx/html/static
[root@rs1 ~]# echo static 192.168.0.101 > /usr/share/nginx/html/static/index.html
[root@rs2 ~]# mkdir /var/www/html/api/
[root@rs2 ~]# echo api 192.168.0.102 > /var/www/html/api/index.html
#測試訪問
[root@node10 ~]# curl 172.25.254.100/api/
api 192.168.0.102
[root@node10 ~]# curl 172.25.254.100/static/
static 192.168.0.101
5.5 自定義HAProxy 錯誤界面
haproxy ~]# vim /etc/haproxy/haproxy.cfg
...上面內容省略...
defaults
測試:
5.5.2 基于http重定向錯誤頁面
范例:
mode http
...內容省略...
timeout client 1m
timeout server 1m
timeout http-keep-alive 10s
timeout check 10s
maxconn 1000000
errorfile 503 /haproxy/errorpages/503page.http
[root@haproxy ~]# mkdir /haproxy/errorpages/ -p
[root@haproxy ~]# cp /usr/share/haproxy/503.http /haproxy/errorpages/503page.http
[root@haproxy ~]# vim /haproxy/errorpages/503page.http
HTTP/1.0 503 Service Unavailable
Cache-Control: no-cache
Connection: close
Content-Type: text/html;charset=UTF-8^M
<html><body><h1>什么動物生氣最安靜</h1>
大猩猩!!
</body></html>
關閉后端的RS主機
然后用瀏覽器去訪問172.25.254.100
#錯誤頁面重定向
errorloc <code> <url>
#相當于errorloc302 <code> <url>,利用302重定向至指URL
#示例:
errorloc 503 https://www.baidu.com
haproxy ~]# vim /etc/haproxy/haproxy.cfg
...上面內容省略...
defaults
mode http
...內容省略...
timeout client 1m
timeout server 1m
timeout http-keep-alive 10s
timeout check 10s
5.6 HAProxy 四層負載
針對除HTTP以外的TCP協議應用服務訪問的應用場景
四層負載示例
注意:如果使用frontend和backend,一定在 frontend 和 backend 段中都指定mode tcp
范例:對 MySQL 服務實現四層負載
maxconn 1000000
errorloc 503 https://www.baidu.com
#瀏覽器訪問172.25.254.100 自動跳轉到百度
5.6 HAProxy 四層負載
針對除HTTP以外的TCP協議應用服務訪問的應用場景
MySQL
Redis
Memcache
RabbitMQ
首先在RS1 RS2 中下載
rs1 ~]# yum install mariadb-server -y
rs2 ~]# yum install mariadb-server -y
給數據庫加id
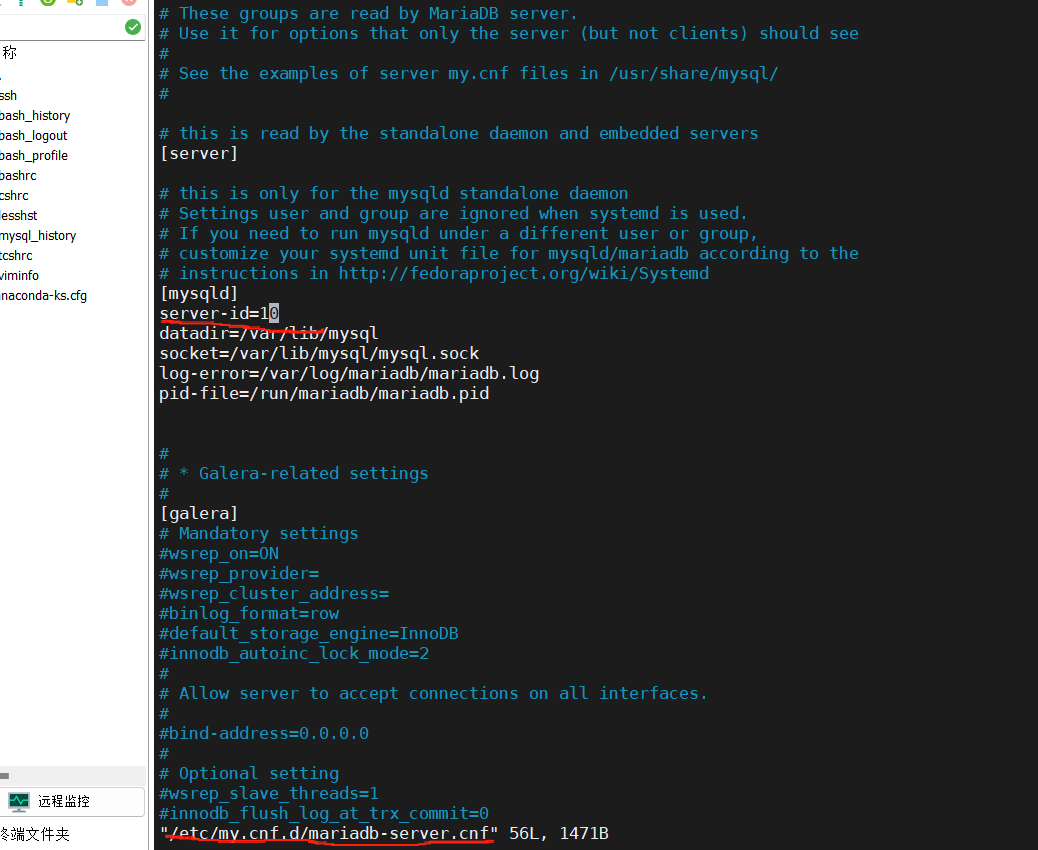
rs1 ~]# systemctl start mariadb
rs2 ~]# systemctl start mariadb
rs1 ~]# mysql -e "grant all on *.* to lee@'%' identified by 'lee';"
rs2 ~]# mysql -e "grant all on *.* to lee@'%' identified by 'lee';"
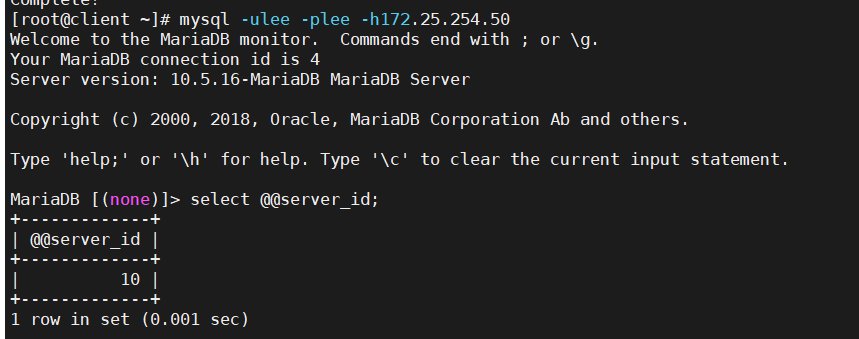
haproxy做四層負載(修改配置文件)并重啟服務:

測試:
客戶端安裝mariadb
[root@client ~]# dnf install mariadb -y
5.7 HAProxy https 實現
#配置HAProxy支持https協議,支持ssl會話;
bind *:443 ssl crt /PATH/TO/SOME_PEM_FILE
#指令 crt 后證書文件為PEM格式,需要同時包含證書和所有私鑰
cat demo.key demo.crt > demo.pem
#把80端口的請求重向定443
bind *:80
redirect scheme https if !{ ssl_fc }
5.7.1 證書制作
haproxy ~]# mkdir /etc/haproxy/certs/
haproxy ~]# openssl req -newkey rsa:2048 \
-nodes -sha256 –keyout /etc/haproxy/certs/timinglee.org.key \
-x509 -days 365 -out /etc/haproxy/certs/timinglee.org.crt
5.7.2 https配置示例
haproxy ~]# vim /etc/haproxy/haproxy.cfg
frontend webserver
bind *:80
redirect scheme https if !{ ssl_fc }
mode http
use_backend webcluster
frontend webserver-https
bind *:443 ssl crt /etc/haproxy/timinglee.org.pem
mode http
use_backend webcluster
backend webcluster
mode http
balance roundrobin
server web1 172.25.254.200:80 check inter 3s fall 3 rise 5
server web2 172.25.254.201:80 check inter 3s fall 3 rise 5
)


![[ComfyUI] -入門2- 小白零基礎搭建ComfyUI圖像生成環境教程](http://pic.xiahunao.cn/[ComfyUI] -入門2- 小白零基礎搭建ComfyUI圖像生成環境教程)


的跨越)


