本章用于介紹如何創建Book List Page。
?TBD
1. 匯總
ABP-Book Store Application中文講解-匯總-CSDN博客
2. 前一章?
ABP-Book Store Application中文講解 - Part 1: Creating the Server Side
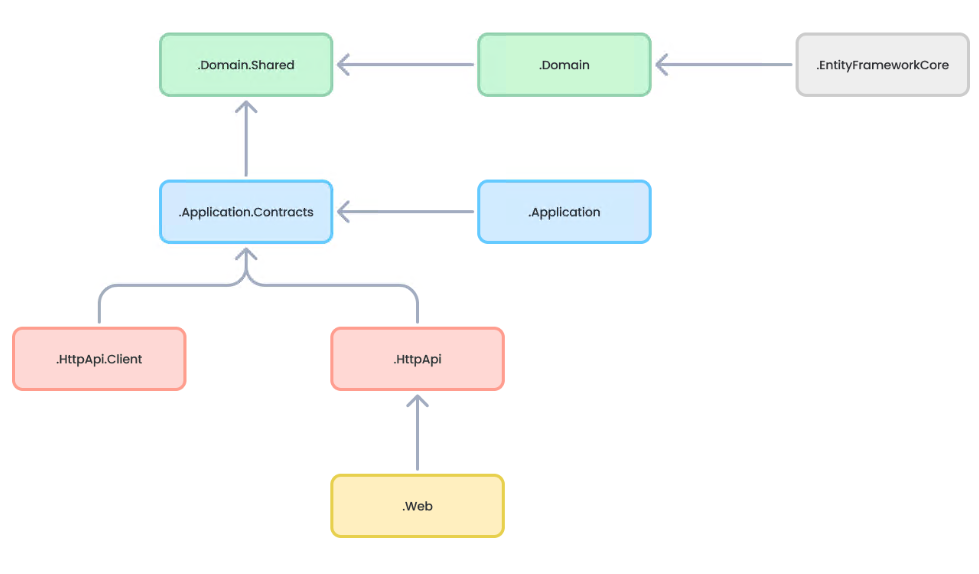
項目之間的引用關系。
目錄
1. 多語言配置?
1.1 zh-Hans.json?
1.2 en.json
2. 添加proxy
2.1 前置條件
2.2 利用abp自動生成angular端的service
3. 創建Books頁面
3.1 利用ng generate生成頁面組件
3.2 在route.provider.ts中配置菜單
3.2?添加頁面內容到BookComponent
3.2.1 book.component.ts?
3.2.1.1 非standalone模式
3.2.1.2?standalone 模式 (推薦此模式)
?3.2.2?book.component.html
4.啟動項目
5. Angular推薦使用全獨立模式避免NgModule的干擾
?6. 繼續學習
1. 多語言配置?
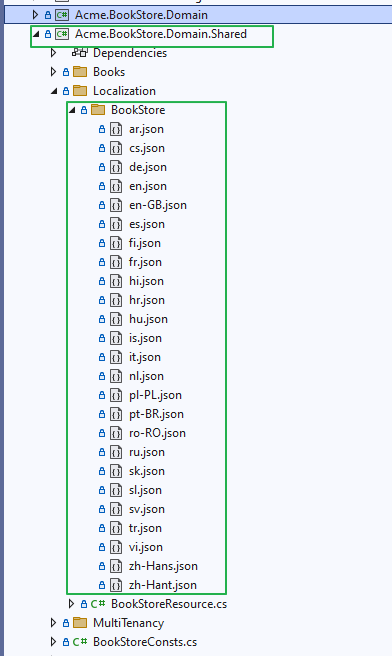
在開始做UI的開發前,我們需要對UI端的一些信息做多語言處理。Localization\BookStore里面有很多json文件。
zh-Hans.json簡體中文
zh-Hant.json繁體中文
en.json English
此處根據自己需要自行添加。不用的語言可以自行刪除。
需要注意的是要保證你所更改的json文件里面的key一一對應。
1.1 zh-Hans.json?
{"culture": "zh-Hans","texts": {"AppName": "BookStore","Menu:Home": "首頁","Welcome": "歡迎","LongWelcomeMessage": "歡迎使用本應用程序。這是一個基于 ABP 框架的啟動項目。更多信息,請訪問 abp.io。",// 以下內容是新增內容"Menu:BookStore": "Book Store","Menu:Books": "Books","Actions": "操作","Close": "關閉","Delete": "刪除","Edit": "編輯","PublishDate": "發布日期","NewBook": "新增書","Name": "名字","Type": "類型","Price": "價格","CreationTime": "新建日期","AreYouSure": "你確定嗎?","AreYouSureToDelete": "你確定你要刪除此條目嗎?","Enum:BookType.0": "未定義","Enum:BookType.1": "冒險","Enum:BookType.2": "傳記","Enum:BookType.3": "反烏托邦","Enum:BookType.4": "奇幻","Enum:BookType.5": "恐怖","Enum:BookType.6": "科學","Enum:BookType.7": "科幻","Enum:BookType.8": "詩歌"}
}
1.2 en.json
{"Culture": "en","Texts": {"Menu:Home": "Home","Welcome": "Welcome","LongWelcomeMessage": "Welcome to the application. This is a startup project based on the ABP. For more information, visit abp.io.",// 以下內容是新增內容"Menu:BookStore": "Book Store","Menu:Books": "Books","Actions": "Actions","Close": "Close","Delete": "Delete","Edit": "Edit","PublishDate": "Publish date","NewBook": "New book","Name": "Name","Type": "Type","Price": "Price","CreationTime": "Creation time","AreYouSure": "Are you sure?","AreYouSureToDelete": "Are you sure you want to delete this item?","Enum:BookType.0": "Undefined","Enum:BookType.1": "Adventure","Enum:BookType.2": "Biography","Enum:BookType.3": "Dystopia","Enum:BookType.4": "Fantastic","Enum:BookType.5": "Horror","Enum:BookType.6": "Science","Enum:BookType.7": "Science fiction","Enum:BookType.8": "Poetry"}
}
2. 添加proxy
2.1 前置條件
打開cmd.exe,輸入ng --version查看是否安裝了@angular/cli,如果沒安裝,可通過以下命令安裝。
npm install -g @angular/cli利用abp的命令自動生成proxy。此時有個前置條件是abp的命令只能調用dotnet tool下的API啟動方式,無法調用基于IIS Express啟動下的API。
即需要將Acme.BookStore.HttpApi.Host啟動模式選擇Acme.BookStore.HttpApi.Host
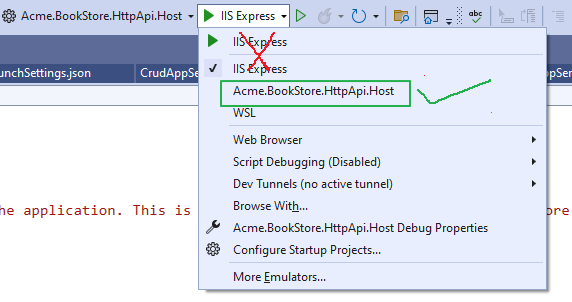
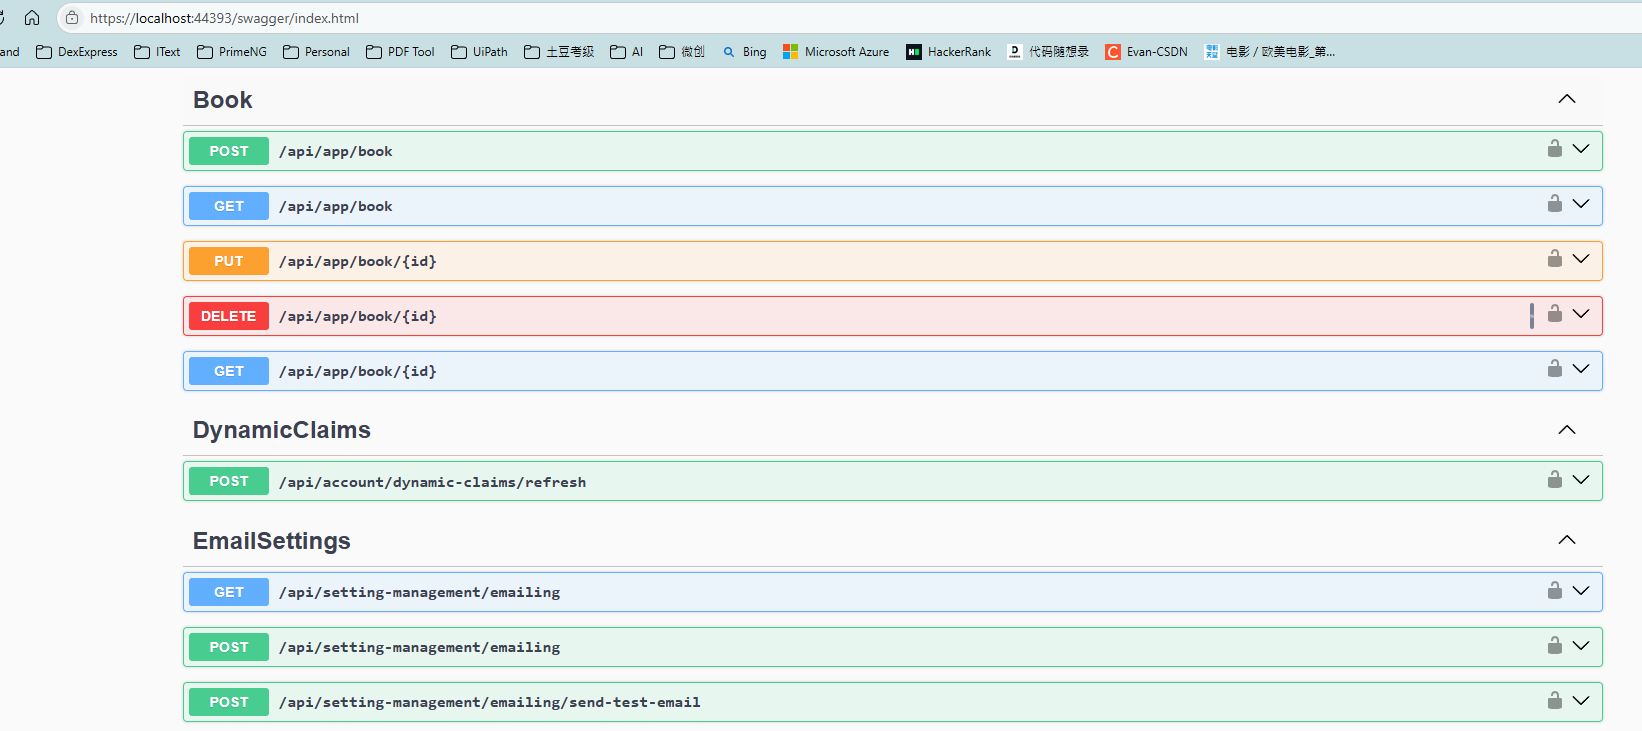
?設置好后,點擊F5啟動程序。
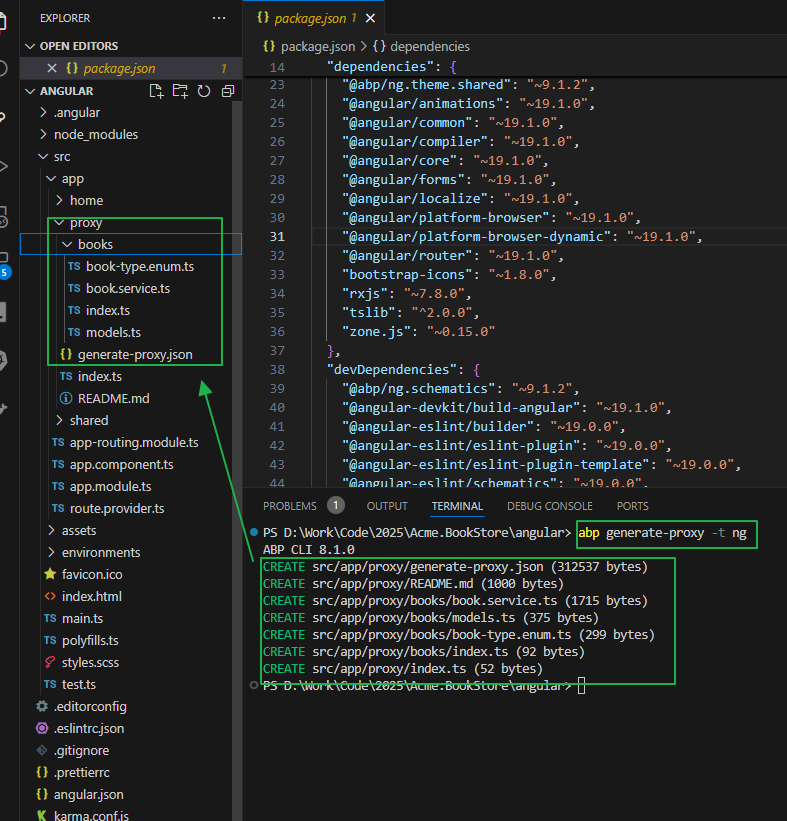
2.2 利用abp自動生成angular端的service
vs code 打開angular目錄,ctrl+`打開Terminal window, 然后輸入一下命令敲回車。
3. 創建Books頁面
此處UI組件用的是Ng Bootstrap, datatable組件用的是Ngx-Datatable.或者你可以使用PrimeNG - Angular UI Component Library
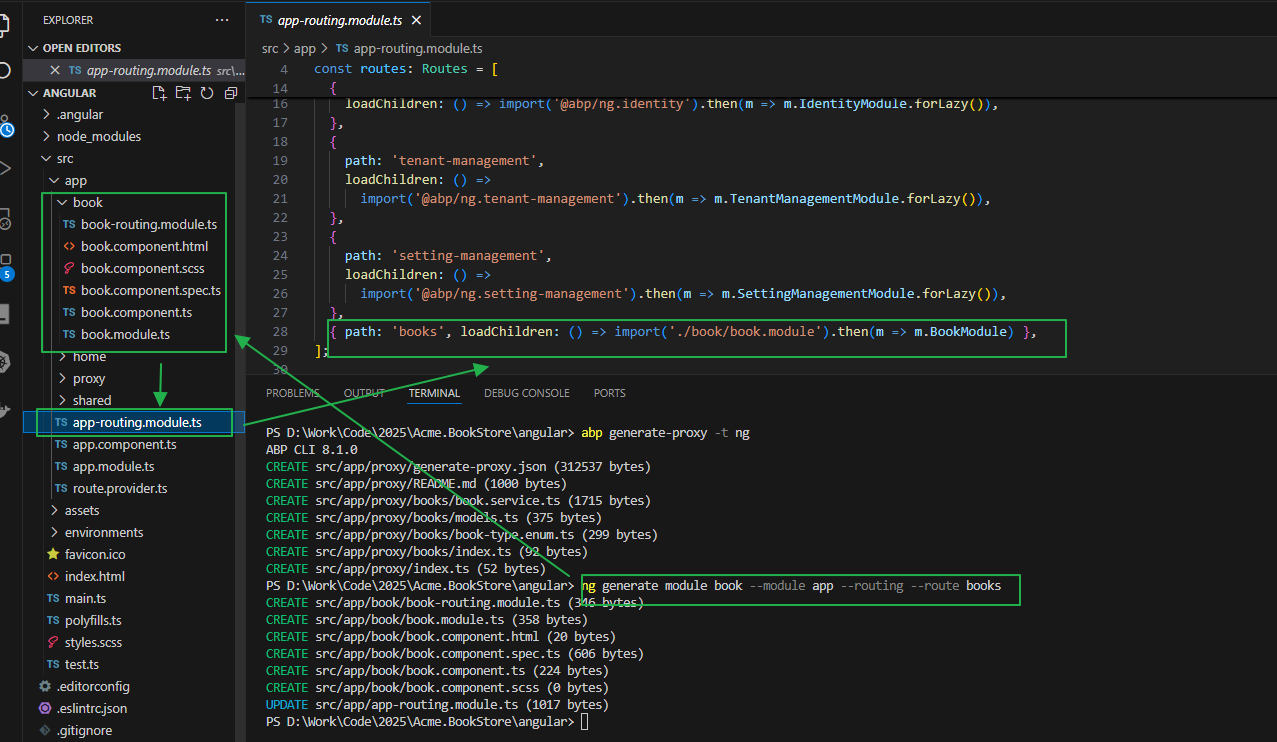
3.1 利用ng generate生成頁面組件
此處利用ng命令去自動生成相關的ts文件。
ng generate module book --module app --routing --route books以上代碼創建book module和routing并指定route是books,并自動創建book相關的component,module和router,router會被自動添加到app-routing.module.ts中。
如果是你手動創建的component或者module,需要自己手動添加到app-routing.module.ts中。
loadChildren: () => import('./book/book.module').then(m => m.BookModule)這種方式是lazy-load的方式,只有在用戶點擊對應的頁面的時候才會加載對應頁面的js、css、html等。
3.2 在route.provider.ts中配置菜單
打開src/app/route.provider.ts,添加book-store 和books.
RoutesService是ABP用于配置主菜單和路徑的,不是angualr原生。
path?訪問此頁面的URLname?本地化菜單名字(localization document?).如果你不需要本地化,直接寫死也可以的iconClass?菜單圖標 (你可以從Font Awesome?上面找到你需要的icons).order?菜單的順序.layout?BooksModule's routes布局方式 (提供了三種布局方式:?eLayoutType.application,?eLayoutType.account?or?eLayoutType.empty).后面我會單獨針對ABP的前端UI-Angular UI寫一系列的文章ABP User Interface-Angular UI中文詳解-CSDN博客。
import { RoutesService, eLayoutType } from '@abp/ng.core';
import { APP_INITIALIZER } from '@angular/core';export const APP_ROUTE_PROVIDER = [{ provide: APP_INITIALIZER, useFactory: configureRoutes, deps: [RoutesService], multi: true },
];function configureRoutes(routesService: RoutesService) {return () => {routesService.add([{path: '/',name: '::Menu:Home',iconClass: 'fas fa-home',order: 1,layout: eLayoutType.application,},{path: '/book-store',name: '::Menu:BookStore',iconClass: 'fas fa-book',order: 2,layout: eLayoutType.application,},{path: '/books',name: '::Menu:Books',// iconClass: 'fas fa-user',parentName: '::Menu:BookStore',order: 3,layout: eLayoutType.application,}]);};
}
3.2?添加頁面內容到BookComponent
添加頁面內容。
導入并注冊BookService和ListService.
BookService是利用ng generate-proxy生成的服務
ListService是ABP團隊創建的,提供了分頁、排序和查詢。ListService不是注冊在root級別,他是component級別的,即component銷毀后,當前頁面的ListService會同步銷毀。
具體可以在Working with Lists | ABP.IO Documentation中找到,后序我會在ABP User Interface-Angular UI中文詳解-CSDN博客提供中文版本的使用說明。
3.2.1 book.component.ts?
3.2.1.1 非standalone模式
import { Component, OnInit } from '@angular/core';
import { ListService, PagedResultDto } from '@abp/ng.core';  // Import ListService and PagedResultDto
import { BookService, BookDto } from '../proxy/books';  // Import your BookService and BookDto model
import { SharedModule } from '../shared/shared.module';@Component({selector: 'app-book',templateUrl: './book.component.html',styleUrl: './book.component.scss',standalone: false, // 標記為獨立組件// imports: [SharedModule], // 導入需要的模塊providers: [ListService]  // Provide ListService for this component
})
export class BookComponent implements OnInit {book = { items: [], totalCount: 0 } as PagedResultDto<BookDto>;  // Initialize books as an empty PagedResultDtoconstructor(private bookService: BookService, public readonly list: ListService) { }  // Inject BookService and ListServicengOnInit() {  // Use ngOnInit to fetch books when the component initializesthis.list.hookToQuery(this.bookService.getList).subscribe((response) => {  // Hook to the query and subscribe to the responsethis.book = response;  // Assign the response to books});}
}
還需要在book.module.ts聲明BookComponent
import { NgModule } from '@angular/core';
// import { CommonModule } from '@angular/common';import { SharedModule } from '../shared/shared.module';
import { BookRoutingModule } from './book-routing.module';
import { BookComponent } from './book.component';@NgModule({declarations: [BookComponent],imports: [BookRoutingModule,SharedModule// shared module already export CommonModule, so we don't need to import it again.]
})
export class BookModule { }
3.2.1.2?standalone 模式 (推薦此模式)
如果使用的是Angualr 14+, 則需要改成如下所示:
import { Component, OnInit } from '@angular/core';
import { ListService, PagedResultDto } from '@abp/ng.core';  // Import ListService and PagedResultDto
import { BookService, BookDto } from '../proxy/books';  // Import your BookService and BookDto model
import { SharedModule } from '../shared/shared.module';@Component({selector: 'app-book',templateUrl: './book.component.html',styleUrl: './book.component.scss',standalone: true, // 標記為獨立組件imports: [SharedModule], // standalone: true導入需要的模塊providers: [ListService]  // Provide ListService for this component
})
export class BookComponent implements OnInit {book = { items: [], totalCount: 0 } as PagedResultDto<BookDto>;  // Initialize books as an empty PagedResultDtoconstructor(private bookService: BookService, public readonly list: ListService) { }  // Inject BookService and ListServicengOnInit() {  // Use ngOnInit to fetch books when the component initializesthis.list.hookToQuery(this.bookService.getList).subscribe((response) => {  // Hook to the query and subscribe to the responsethis.book = response;  // Assign the response to books});}
}
?book.module.ts移除BookComponent聲明
import { NgModule } from '@angular/core';
import { SharedModule } from '../shared/shared.module';
import { BookRoutingModule } from './book-routing.module';@NgModule({declarations: [],imports: [BookRoutingModule,SharedModule// shared module already export CommonModule, so we don't need to import it again.]
})
export class BookModule { }
?3.2.2?book.component.html
Tips: 比如你想實現<div class="card"></div>, 此時你只需要輸入div.card然后直接敲Tab,vs code可以幫你自動生成。
類似的輸入h5.card-title敲Tab自動生成<h5 class="card-title"></h5>
4.啟動項目
后端API需要先啟動。
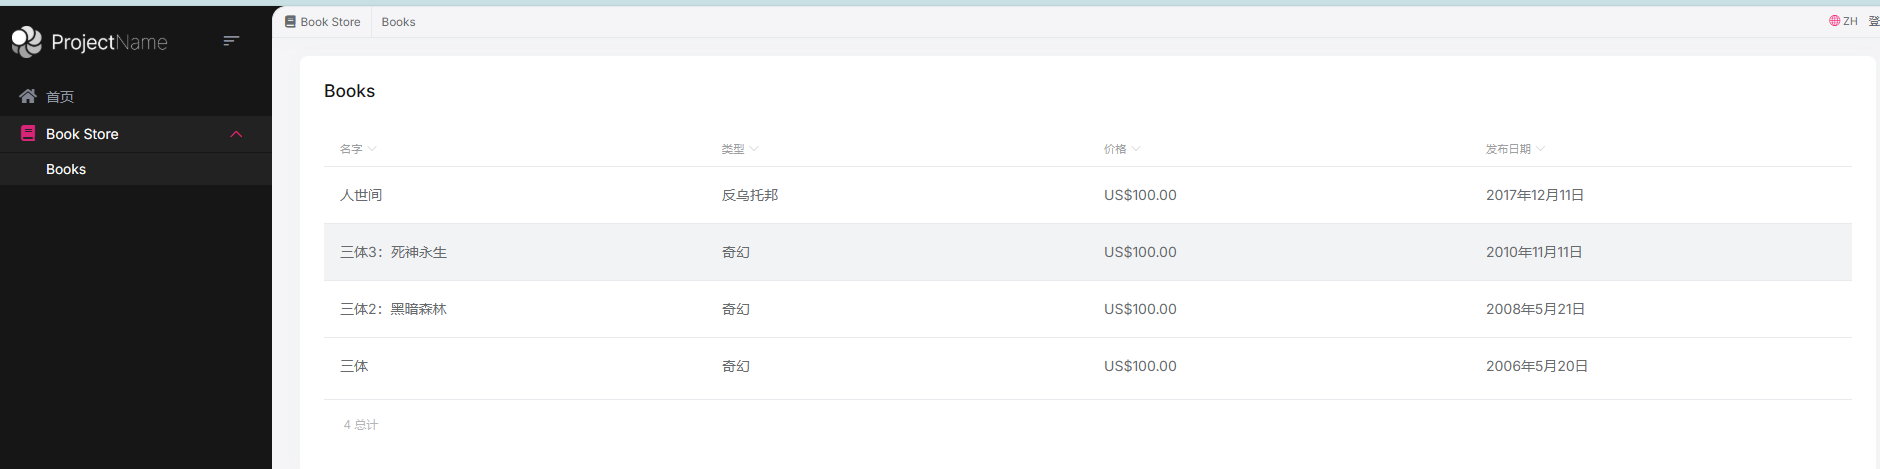
npm start重新編譯后,瀏覽器會自動打開,然后左側會顯示Book Store菜單。
展開后選擇Books,加載數據完成如下圖所示:
5. Angular推薦使用全獨立模式避免NgModule的干擾
// AppComponent.ts(獨立根組件)
import { Component } from '@angular/core';
import { BookComponent } from './book/book.component';
import { BrowserModule } from '@angular/platform-browser'; // 若需導入模塊,需在 imports 中聲明@Component({selector: 'app-root',template: `<app-book></app-book>`,imports: [BrowserModule, BookComponent], // 導入依賴的模塊和獨立組件。類似把app.module.ts中的imports都放在此處standalone: true // 根組件標記為獨立
})
export class AppComponent { }
?6. 繼續學習
ABP-Book Store Application中文講解 - Part 3: Creating, Updating and Deleting Books


)


)
