Vue 3 項目啟動流程詳解
Vue 3 項目的啟動流程相比 Vue 2 有了顯著變化,采用了新的應用實例創建方式和組合式 API。下面我將詳細講解 Vue 3 項目的啟動過程,并提供一個可視化演示。


實現思路
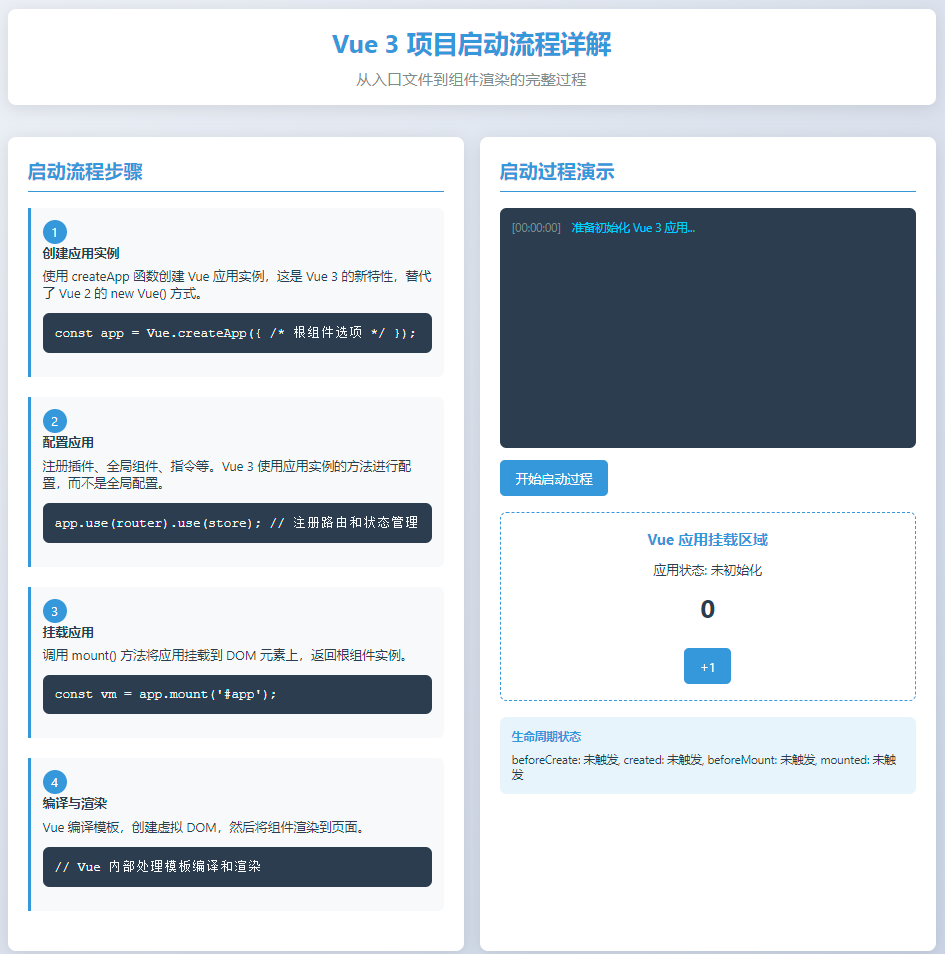
創建 Vue 3 應用實例
配置根組件和必要的插件
掛載應用到 DOM
展示啟動過程中的關鍵步驟
代碼實現
html
<!DOCTYPE html>
<html lang="zh-CN">
<head><meta charset="UTF-8"><meta name="viewport" content="width=device-width, initial-scale=1.0"><title>Vue 3 啟動流程詳解</title><script src="https://unpkg.com/vue@3/dist/vue.global.js"></script><style>* {margin: 0;padding: 0;box-sizing: border-box;font-family: 'Segoe UI', Tahoma, Geneva, Verdana, sans-serif;}body {background: linear-gradient(135deg, #f5f7fa 0%, #c3cfe2 100%);min-height: 100vh;padding: 20px;color: #2c3e50;}.container {max-width: 1200px;margin: 0 auto;padding: 20px;}header {text-align: center;margin-bottom: 40px;padding: 20px;background: white;border-radius: 10px;box-shadow: 0 4px 20px rgba(0, 0, 0, 0.1);}h1 {color: #3498db;margin-bottom: 10px;}.subtitle {color: #7f8c8d;font-size: 1.2rem;}.content {display: flex;flex-wrap: wrap;gap: 20px;}.explanation {flex: 1;min-width: 300px;background: white;padding: 25px;border-radius: 10px;box-shadow: 0 4px 20px rgba(0, 0, 0, 0.1);}.demo {flex: 1;min-width: 300px;background: white;padding: 25px;border-radius: 10px;box-shadow: 0 4px 20px rgba(0, 0, 0, 0.1);}h2 {color: #3498db;margin-bottom: 20px;padding-bottom: 10px;border-bottom: 2px solid #3498db;}.step {margin-bottom: 25px;padding: 15px;border-left: 4px solid #3498db;background: #f8f9fa;border-radius: 0 8px 8px 0;}.step-number {display: inline-block;width: 30px;height: 30px;background: #3498db;color: white;text-align: center;line-height: 30px;border-radius: 50%;margin-right: 10px;}.step-title {font-weight: bold;margin-bottom: 8px;color: #2c3e50;}.code-block {background: #2c3e50;color: #f8f9fa;padding: 15px;border-radius: 8px;margin: 15px 0;overflow-x: auto;font-family: 'Courier New', monospace;}.console {background: #2c3e50;color: #00d0ff;padding: 15px;border-radius: 8px;height: 200px;overflow-y: auto;margin-top: 20px;font-family: 'Courier New', monospace;}.log-entry {margin-bottom: 8px;font-size: 0.9rem;}.timestamp {color: #7f8c8d;margin-right: 10px;}button {background: #3498db;color: white;border: none;padding: 12px 20px;border-radius: 6px;cursor: pointer;font-size: 1rem;margin-top: 15px;transition: background 0.3s;}button:hover {background: #2980b9;}.app-container {margin-top: 20px;padding: 20px;border: 2px dashed #3498db;border-radius: 8px;text-align: center;}.app-title {color: #3498db;margin-bottom: 15px;}.counter {font-size: 2rem;font-weight: bold;color: #2c3e50;margin: 15px 0;}.lifecycle {margin-top: 20px;padding: 15px;background: #e8f4fc;border-radius: 8px;font-size: 0.9rem;}.lifecycle-title {font-weight: bold;margin-bottom: 10px;color: #3498db;}</style>
</head>
<body><div id="app" class="container"><header><h1>Vue 3 項目啟動流程詳解</h1><p class="subtitle">從入口文件到組件渲染的完整過程</p></header><div class="content"><div class="explanation"><h2>啟動流程步驟</h2><div class="step"><span class="step-number">1</span><div class="step-title">創建應用實例</div><p>使用 <code>createApp</code> 函數創建 Vue 應用實例,這是 Vue 3 的新特性,替代了 Vue 2 的 <code>new Vue()</code> 方式。</p><div class="code-block">const app = Vue.createApp({ /* 根組件選項 */ });</div></div><div class="step"><span class="step-number">2</span><div class="step-title">配置應用</div><p>注冊插件、全局組件、指令等。Vue 3 使用應用實例的方法進行配置,而不是全局配置。</p><div class="code-block">app.use(router).use(store); // 注冊路由和狀態管理</div></div><div class="step"><span class="step-number">3</span><div class="step-title">掛載應用</div><p>調用 <code>mount()</code> 方法將應用掛載到 DOM 元素上,返回根組件實例。</p><div class="code-block">const vm = app.mount('#app');</div></div><div class="step"><span class="step-number">4</span><div class="step-title">編譯與渲染</div><p>Vue 編譯模板,創建虛擬 DOM,然后將組件渲染到頁面。</p><div class="code-block">// Vue 內部處理模板編譯和渲染</div></div></div><div class="demo"><h2>啟動過程演示</h2><div class="console" id="console"><div class="log-entry"><span class="timestamp">[00:00:00]</span> 準備初始化 Vue 3 應用...</div></div><button id="start-btn">開始啟動過程</button><div class="app-container"><h3 class="app-title">Vue 應用掛載區域</h3><p>應用狀態: <span id="app-status">未初始化</span></p><div class="counter" id="counter">0</div><button id="increment-btn" disabled>+1</button></div><div class="lifecycle"><div class="lifecycle-title">生命周期狀態</div><div id="lifecycle-status">beforeCreate: 未觸發, created: 未觸發, beforeMount: 未觸發, mounted: 未觸發</div></div></div></div></div><script>// 模擬控制臺輸出const consoleElement = document.getElementById('console');function logToConsole(message) {const now = new Date();const timestamp = `[${now.getHours().toString().padStart(2, '0')}:${now.getMinutes().toString().padStart(2, '0')}:${now.getSeconds().toString().padStart(2, '0')}]`;const logEntry = document.createElement('div');logEntry.className = 'log-entry';logEntry.innerHTML = `<span class="timestamp">${timestamp}</span> ${message}`;consoleElement.appendChild(logEntry);consoleElement.scrollTop = consoleElement.scrollHeight;}// 模擬啟動過程document.getElementById('start-btn').addEventListener('click', function() {this.disabled = true;logToConsole('開始創建 Vue 應用實例...');setTimeout(() => {logToConsole('調用 Vue.createApp()...');document.getElementById('app-status').textContent = '創建中';setTimeout(() => {logToConsole('應用實例創建完成');logToConsole('配置應用: 注冊插件和組件...');setTimeout(() => {logToConsole('調用 app.mount("#app")...');document.getElementById('app-status').textContent = '掛載中';// 模擬生命周期setTimeout(() => {logToConsole('生命周期: beforeCreate → created');document.getElementById('lifecycle-status').textContent = 'beforeCreate: 已觸發, created: 已觸發, beforeMount: 未觸發, mounted: 未觸發';setTimeout(() => {logToConsole('生命周期: beforeMount → mounted');document.getElementById('lifecycle-status').textContent = 'beforeCreate: 已觸發, created: 已觸發, beforeMount: 已觸發, mounted: 已觸發';logToConsole('應用掛載完成!');document.getElementById('app-status').textContent = '已掛載';// 啟用計數器按鈕document.getElementById('increment-btn').disabled = false;// 簡單計數器功能let count = 0;const counterElement = document.getElementById('counter');document.getElementById('increment-btn').addEventListener('click', function() {count++;counterElement.textContent = count;logToConsole(`計數器增加: ${count}`);});}, 1000);}, 1000);}, 1000);}, 1000);}, 500);});</script>
</body>
</html>
Vue 3 啟動流程關鍵點
應用實例創建:Vue 3 使用?
createApp()?函數創建應用實例,這種方式避免了 Vue 2 中全局配置的污染問題。配置方式變化:所有插件、組件和指令的注冊都通過應用實例的方法進行,而不是全局方法。
掛載過程:
mount()?方法替代了 Vue 2 的?$mount(),返回的是根組件實例而不是應用實例。性能改進:Vue 3 的啟動速度更快,打包體積更小,這得益于新的編譯器和響應式系統。
組合式API:Vue 3 引入了組合式 API,提供了更好的邏輯組織和代碼復用能力。
這個示例展示了 Vue 3 項目啟動的關鍵步驟,包括應用實例創建、配置、掛載和渲染過程。通過可視化方式,可以更直觀地理解 Vue 3 應用的初始化流程。

科大訊飛)


![P4342 [IOI 1998] Polygon -普及+/提高](http://pic.xiahunao.cn/P4342 [IOI 1998] Polygon -普及+/提高)

)
)
)


-Ubuntu從零搭建深度學習環境)
