1.創建類型
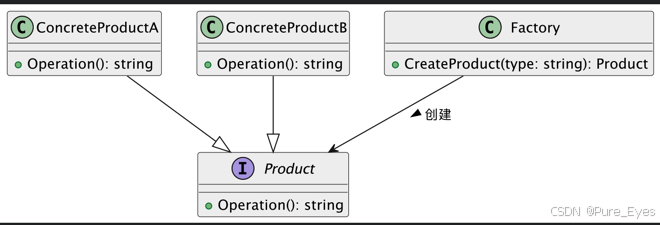
1.1 簡單工廠
@startuml
' 抽象產品接口
interface Product {+ Operation(): string
}' 具體產品A
class ConcreteProductA {+ Operation(): string
}' 具體產品B
class ConcreteProductB {+ Operation(): string
}' 工廠類
class Factory {+ CreateProduct(type: string): Product
}' 關系定義
ConcreteProductA --|> Product
ConcreteProductB --|> Product
Factory --> Product: 創建 >
@enduml
代碼示例
// 產品接口
interface Shape {void draw();
}// 具體產品:圓形
class Circle implements Shape {@Overridepublic void draw() {System.out.println("繪制圓形");}
}// 具體產品:矩形
class Rectangle implements Shape {@Overridepublic void draw() {System.out.println("繪制矩形");}
}// 簡單工廠類
class ShapeFactory {// 根據類型創建不同形狀public static Shape getShape(String type) {if (type == null) {return null;}if (type.equalsIgnoreCase("CIRCLE")) {return new Circle();} else if (type.equalsIgnoreCase("RECTANGLE")) {return new Rectangle();}return null;}
}
package mainimport "fmt"// 產品接口
type Shape interface {Draw()
}// 具體產品:圓形
type Circle struct{}func (c *Circle) Draw() {fmt.Println("繪制圓形")
}// 具體產品:矩形
type Rectangle struct{}func (r *Rectangle) Draw() {fmt.Println("繪制矩形")
}// 簡單工廠
type ShapeFactory struct{}func (f *ShapeFactory) CreateShape(shapeType string) Shape {switch shapeType {case "circle":return &Circle{}case "rectangle":return &Rectangle{}default:return nil}
}
1.2 工廠方法
@startuml
interface Product {+ operation(): void
}class ConcreteProductA implements Product {+ operation(): void
}class ConcreteProductB implements Product {+ operation(): void
}interface Factory {+ createProduct(): Product
}class ConcreteFactoryA implements Factory {+ createProduct(): Product
}class ConcreteFactoryB implements Factory {+ createProduct(): Product
}Factory <|-- ConcreteFactoryA
Factory <|-- ConcreteFactoryB
Product <|-- ConcreteProductA
Product <|-- ConcreteProductB
ConcreteFactoryA --> ConcreteProductA: creates
ConcreteFactoryB --> ConcreteProductB: creates
@enduml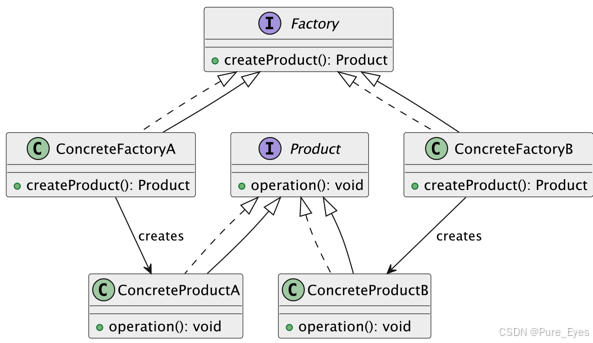
代碼示例
// 產品接口
interface Product {void operation();
}// 具體產品A
class ConcreteProductA implements Product {@Overridepublic void operation() {System.out.println("執行ConcreteProductA的操作");}
}// 具體產品B
class ConcreteProductB implements Product {@Overridepublic void operation() {System.out.println("執行ConcreteProductB的操作");}
}// 工廠接口
interface Factory {Product createProduct();
}// 具體工廠A,負責創建ProductA
class ConcreteFactoryA implements Factory {@Overridepublic Product createProduct() {return new ConcreteProductA();}
}// 具體工廠B,負責創建ProductB
class ConcreteFactoryB implements Factory {@Overridepublic Product createProduct() {return new ConcreteProductB();}
}// 客戶端代碼
public class FactoryMethodDemo {public static void main(String[] args) {// 使用工廠A創建產品AFactory factoryA = new ConcreteFactoryA();Product productA = factoryA.createProduct();productA.operation();// 使用工廠B創建產品BFactory factoryB = new ConcreteFactoryB();Product productB = factoryB.createProduct();productB.operation();}
}
package mainimport "fmt"// 產品接口
type Product interface {Operation()
}// 具體產品A
type ConcreteProductA struct{}func (p *ConcreteProductA) Operation() {fmt.Println("執行ConcreteProductA的操作")
}// 具體產品B
type ConcreteProductB struct{}func (p *ConcreteProductB) Operation() {fmt.Println("執行ConcreteProductB的操作")
}// 工廠接口
type Factory interface {CreateProduct() Product
}// 具體工廠A
type ConcreteFactoryA struct{}func (f *ConcreteFactoryA) CreateProduct() Product {return &ConcreteProductA{}
}// 具體工廠B
type ConcreteFactoryB struct{}func (f *ConcreteFactoryB) CreateProduct() Product {return &ConcreteProductB{}
}// 客戶端代碼
func main() {// 使用工廠A創建產品Avar factoryA Factory = &ConcreteFactoryA{}productA := factoryA.CreateProduct()productA.Operation()// 使用工廠B創建產品Bvar factoryB Factory = &ConcreteFactoryB{}productB := factoryB.CreateProduct()productB.Operation()
}
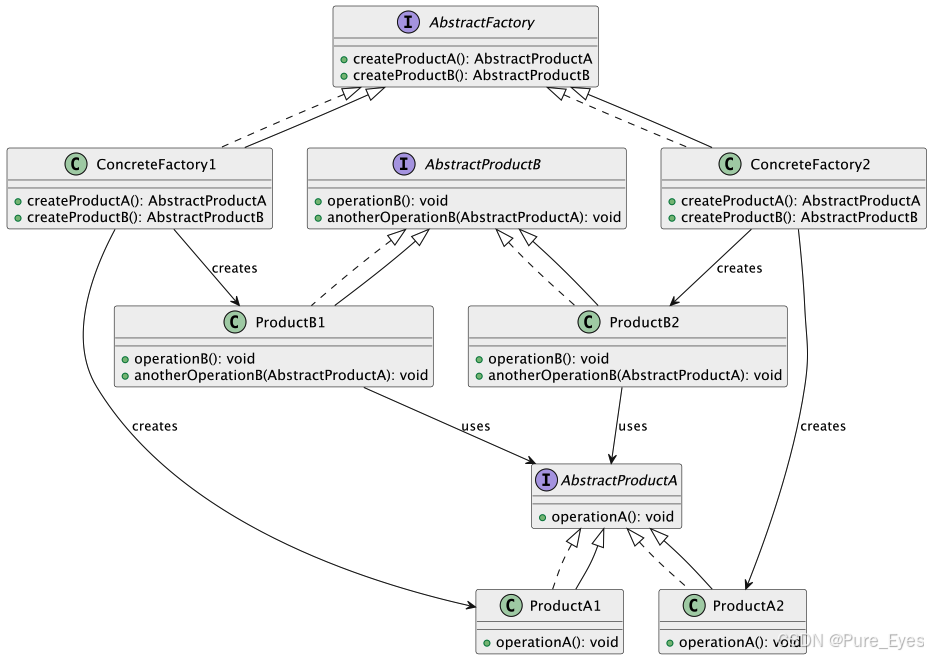
1.3 抽象工廠
@startuml
interface AbstractFactory {+ createProductA(): AbstractProductA+ createProductB(): AbstractProductB
}class ConcreteFactory1 implements AbstractFactory {+ createProductA(): AbstractProductA+ createProductB(): AbstractProductB
}class ConcreteFactory2 implements AbstractFactory {+ createProductA(): AbstractProductA+ createProductB(): AbstractProductB
}interface AbstractProductA {+ operationA(): void
}class ProductA1 implements AbstractProductA {+ operationA(): void
}class ProductA2 implements AbstractProductA {+ operationA(): void
}interface AbstractProductB {+ operationB(): void+ anotherOperationB(AbstractProductA): void
}class ProductB1 implements AbstractProductB {+ operationB(): void+ anotherOperationB(AbstractProductA): void
}class ProductB2 implements AbstractProductB {+ operationB(): void+ anotherOperationB(AbstractProductA): void
}AbstractFactory <|-- ConcreteFactory1
AbstractFactory <|-- ConcreteFactory2
AbstractProductA <|-- ProductA1
AbstractProductA <|-- ProductA2
AbstractProductB <|-- ProductB1
AbstractProductB <|-- ProductB2ConcreteFactory1 --> ProductA1: creates
ConcreteFactory1 --> ProductB1: creates
ConcreteFactory2 --> ProductA2: creates
ConcreteFactory2 --> ProductB2: creates
ProductB1 --> AbstractProductA: uses
ProductB2 --> AbstractProductA: uses
@enduml
代碼示例
// 抽象產品A
interface AbstractProductA {void operationA();
}// 具體產品A1
class ProductA1 implements AbstractProductA {@Overridepublic void operationA() {System.out.println("ProductA1的操作");}
}// 具體產品A2
class ProductA2 implements AbstractProductA {@Overridepublic void operationA() {System.out.println("ProductA2的操作");}
}// 抽象產品B
interface AbstractProductB {void operationB();void anotherOperationB(AbstractProductA productA);
}// 具體產品B1
class ProductB1 implements AbstractProductB {@Overridepublic void operationB() {System.out.println("ProductB1的操作");}@Overridepublic void anotherOperationB(AbstractProductA productA) {System.out.println("ProductB1與" + productA.getClass().getSimpleName() + "交互");}
}// 具體產品B2
class ProductB2 implements AbstractProductB {@Overridepublic void operationB() {System.out.println("ProductB2的操作");}@Overridepublic void anotherOperationB(AbstractProductA productA) {System.out.println("ProductB2與" + productA.getClass().getSimpleName() + "交互");}
}// 抽象工廠
interface AbstractFactory {AbstractProductA createProductA();AbstractProductB createProductB();
}// 具體工廠1
class ConcreteFactory1 implements AbstractFactory {@Overridepublic AbstractProductA createProductA() {return new ProductA1();}@Overridepublic AbstractProductB createProductB() {return new ProductB1();}
}// 具體工廠2
class ConcreteFactory2 implements AbstractFactory {@Overridepublic AbstractProductA createProductA() {return new ProductA2();}@Overridepublic AbstractProductB createProductB() {return new ProductB2();}
}// 客戶端代碼
public class AbstractFactoryDemo {public static void main(String[] args) {// 使用工廠1創建產品族1AbstractFactory factory1 = new ConcreteFactory1();AbstractProductA productA1 = factory1.createProductA();AbstractProductB productB1 = factory1.createProductB();productA1.operationA();productB1.operationB();productB1.anotherOperationB(productA1);// 使用工廠2創建產品族2AbstractFactory factory2 = new ConcreteFactory2();AbstractProductA productA2 = factory2.createProductA();AbstractProductB productB2 = factory2.createProductB();productA2.operationA();productB2.operationB();productB2.anotherOperationB(productA2);}
}
package mainimport "fmt"// 抽象產品A
type AbstractProductA interface {OperationA()
}// 具體產品A1
type ProductA1 struct{}func (p *ProductA1) OperationA() {fmt.Println("ProductA1的操作")
}// 具體產品A2
type ProductA2 struct{}func (p *ProductA2) OperationA() {fmt.Println("ProductA2的操作")
}// 抽象產品B
type AbstractProductB interface {OperationB()AnotherOperationB(AbstractProductA)
}// 具體產品B1
type ProductB1 struct{}func (p *ProductB1) OperationB() {fmt.Println("ProductB1的操作")
}func (p *ProductB1) AnotherOperationB(productA AbstractProductA) {fmt.Printf("ProductB1與%T交互\n", productA)
}// 具體產品B2
type ProductB2 struct{}func (p *ProductB2) OperationB() {fmt.Println("ProductB2的操作")
}func (p *ProductB2) AnotherOperationB(productA AbstractProductA) {fmt.Printf("ProductB2與%T交互\n", productA)
}// 抽象工廠
type AbstractFactory interface {CreateProductA() AbstractProductACreateProductB() AbstractProductB
}// 具體工廠1
type ConcreteFactory1 struct{}func (f *ConcreteFactory1) CreateProductA() AbstractProductA {return &ProductA1{}
}func (f *ConcreteFactory1) CreateProductB() AbstractProductB {return &ProductB1{}
}// 具體工廠2
type ConcreteFactory2 struct{}func (f *ConcreteFactory2) CreateProductA() AbstractProductA {return &ProductA2{}
}func (f *ConcreteFactory2) CreateProductB() AbstractProductB {return &ProductB2{}
}// 客戶端代碼
func main() {// 使用工廠1創建產品族1var factory1 AbstractFactory = &ConcreteFactory1{}productA1 := factory1.CreateProductA()productB1 := factory1.CreateProductB()productA1.OperationA()productB1.OperationB()productB1.AnotherOperationB(productA1)// 使用工廠2創建產品族2var factory2 AbstractFactory = &ConcreteFactory2{}productA2 := factory2.CreateProductA()productB2 := factory2.CreateProductB()productA2.OperationA()productB2.OperationB()productB2.AnotherOperationB(productA2)
}
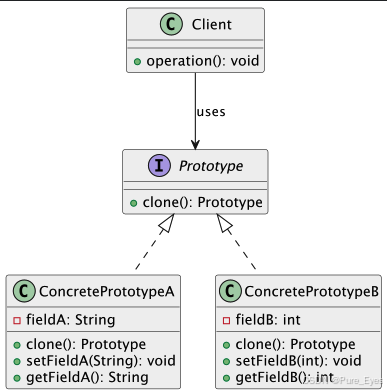
1.4 原型模式
@startuml
interface Prototype {+ clone(): Prototype
}class ConcretePrototypeA implements Prototype {- fieldA: String+ clone(): Prototype+ setFieldA(String): void+ getFieldA(): String
}class ConcretePrototypeB implements Prototype {- fieldB: int+ clone(): Prototype+ setFieldB(int): void+ getFieldB(): int
}class Client {+ operation(): void
}Client --> Prototype: uses
@enduml
代碼示例
// 原型接口
interface Prototype {Prototype clone();
}// 具體原型A
class ConcretePrototypeA implements Prototype {private String fieldA;public ConcretePrototypeA(String fieldA) {this.fieldA = fieldA;}// 實現克隆方法@Overridepublic Prototype clone() {return new ConcretePrototypeA(this.fieldA);}public String getFieldA() {return fieldA;}public void setFieldA(String fieldA) {this.fieldA = fieldA;}
}// 具體原型B
class ConcretePrototypeB implements Prototype {private int fieldB;public ConcretePrototypeB(int fieldB) {this.fieldB = fieldB;}// 實現克隆方法@Overridepublic Prototype clone() {return new ConcretePrototypeB(this.fieldB);}public int getFieldB() {return fieldB;}public void setFieldB(int fieldB) {this.fieldB = fieldB;}
}// 客戶端代碼
public class PrototypeDemo {public static void main(String[] args) {// 創建原型實例Prototype prototypeA = new ConcretePrototypeA("初始值A");Prototype prototypeB = new ConcretePrototypeB(100);// 克隆對象Prototype cloneA = prototypeA.clone();Prototype cloneB = prototypeB.clone();// 修改克隆對象的屬性(不會影響原型)((ConcretePrototypeA) cloneA).setFieldA("修改后的值A");((ConcretePrototypeB) cloneB).setFieldB(200);// 打印結果System.out.println("原型A: " + ((ConcretePrototypeA) prototypeA).getFieldA());System.out.println("克隆A: " + ((ConcretePrototypeA) cloneA).getFieldA());System.out.println("原型B: " + ((ConcretePrototypeB) prototypeB).getFieldB());System.out.println("克隆B: " + ((ConcretePrototypeB) cloneB).getFieldB());}
}
package mainimport "fmt"// 原型接口
type Prototype interface {Clone() Prototype
}// 具體原型A
type ConcretePrototypeA struct {FieldA string
}func (c *ConcretePrototypeA) Clone() Prototype {return &ConcretePrototypeA{FieldA: c.FieldA}
}// 具體原型B
type ConcretePrototypeB struct {FieldB int
}func (c *ConcretePrototypeB) Clone() Prototype {return &ConcretePrototypeB{FieldB: c.FieldB}
}// 客戶端代碼
func main() {// 創建原型實例prototypeA := &ConcretePrototypeA{FieldA: "初始值A"}prototypeB := &ConcretePrototypeB{FieldB: 100}// 克隆對象cloneA := prototypeA.Clone().(*ConcretePrototypeA)cloneB := prototypeB.Clone().(*ConcretePrototypeB)// 修改克隆對象的屬性(不會影響原型)cloneA.FieldA = "修改后的值A"cloneB.FieldB = 200// 打印結果fmt.Printf("原型A: %s\n", prototypeA.FieldA)fmt.Printf("克隆A: %s\n", cloneA.FieldA)fmt.Printf("原型B: %d\n", prototypeB.FieldB)fmt.Printf("克隆B: %d\n", cloneB.FieldB)
}
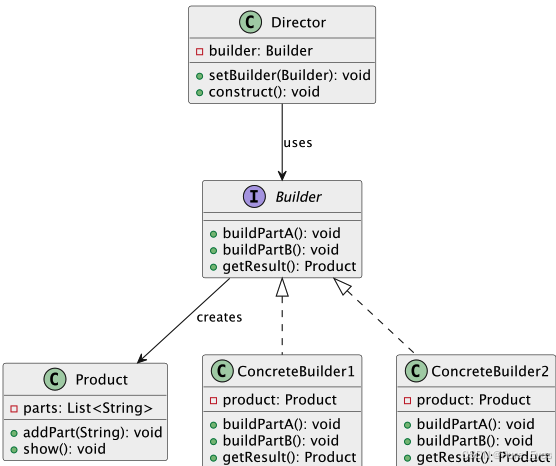
1.5 建造者模式
@startuml
class Product {- parts: List<String>+ addPart(String): void+ show(): void
}interface Builder {+ buildPartA(): void+ buildPartB(): void+ getResult(): Product
}class ConcreteBuilder1 implements Builder {- product: Product+ buildPartA(): void+ buildPartB(): void+ getResult(): Product
}class ConcreteBuilder2 implements Builder {- product: Product+ buildPartA(): void+ buildPartB(): void+ getResult(): Product
}class Director {- builder: Builder+ setBuilder(Builder): void+ construct(): void
}Director --> Builder: uses
Builder --> Product: creates
@enduml
代碼示例
import java.util.ArrayList;
import java.util.List;// 產品類
class Product {private List<String> parts = new ArrayList<>();public void addPart(String part) {parts.add(part);}public void show() {System.out.println("產品組成:");for (String part : parts) {System.out.println("- " + part);}}
}// 建造者接口
interface Builder {void buildPartA();void buildPartB();Product getResult();
}// 具體建造者1
class ConcreteBuilder1 implements Builder {private Product product = new Product();@Overridepublic void buildPartA() {product.addPart("部件A1");}@Overridepublic void buildPartB() {product.addPart("部件B1");}@Overridepublic Product getResult() {return product;}
}// 具體建造者2
class ConcreteBuilder2 implements Builder {private Product product = new Product();@Overridepublic void buildPartA() {product.addPart("部件A2");}@Overridepublic void buildPartB() {product.addPart("部件B2");}@Overridepublic Product getResult() {return product;}
}// 指揮者
class Director {private Builder builder;public void setBuilder(Builder builder) {this.builder = builder;}public void construct() {builder.buildPartA();builder.buildPartB();}
}// 客戶端代碼
public class BuilderDemo {public static void main(String[] args) {Director director = new Director();// 使用建造者1構建產品Builder builder1 = new ConcreteBuilder1();director.setBuilder(builder1);director.construct();Product product1 = builder1.getResult();product1.show();// 使用建造者2構建產品Builder builder2 = new ConcreteBuilder2();director.setBuilder(builder2);director.construct();Product product2 = builder2.getResult();product2.show();}
}
package mainimport "fmt"// 產品類
type Product struct {parts []string
}func (p *Product) AddPart(part string) {p.parts = append(p.parts, part)
}func (p *Product) Show() {fmt.Println("產品組成:")for _, part := range p.parts {fmt.Printf("- %s\n", part)}
}// 建造者接口
type Builder interface {BuildPartA()BuildPartB()GetResult() *Product
}// 具體建造者1
type ConcreteBuilder1 struct {product *Product
}func NewConcreteBuilder1() *ConcreteBuilder1 {return &ConcreteBuilder1{product: &Product{},}
}func (b *ConcreteBuilder1) BuildPartA() {b.product.AddPart("部件A1")
}func (b *ConcreteBuilder1) BuildPartB() {b.product.AddPart("部件B1")
}func (b *ConcreteBuilder1) GetResult() *Product {return b.product
}// 具體建造者2
type ConcreteBuilder2 struct {product *Product
}func NewConcreteBuilder2() *ConcreteBuilder2 {return &ConcreteBuilder2{product: &Product{},}
}func (b *ConcreteBuilder2) BuildPartA() {b.product.AddPart("部件A2")
}func (b *ConcreteBuilder2) BuildPartB() {b.product.AddPart("部件B2")
}func (b *ConcreteBuilder2) GetResult() *Product {return b.product
}// 指揮者
type Director struct {builder Builder
}func (d *Director) SetBuilder(builder Builder) {d.builder = builder
}func (d *Director) Construct() {d.builder.BuildPartA()d.builder.BuildPartB()
}// 客戶端代碼
func main() {director := &Director{}// 使用建造者1構建產品builder1 := NewConcreteBuilder1()director.SetBuilder(builder1)director.Construct()product1 := builder1.GetResult()product1.Show()// 使用建造者2構建產品builder2 := NewConcreteBuilder2()director.SetBuilder(builder2)director.Construct()product2 := builder2.GetResult()product2.Show()
}


函數)


,自回歸圖像生成過程)


等級考試試卷-客觀題(2023年12月))


)
)

多種查詢方式)
