
使用 Python 處理 Excel 數據非常常見。這通常涉及將數據從 Excel 轉換為可高效操作的形式。將 Excel 數據轉換為可分析的格式可能非常棘手。在本篇教程中,您將學習借助強大Excel處理控件Aspose.Cells for Python,如何僅用幾行代碼將 Excel 轉換為 NumPy 數組。
為什么選擇 NumPy?
NumPy(數值 Python)是一個開源 Python 庫。它是 Python 數據科學和機器學習的支柱。NumPy 提供快速的數組操作和高效的數值計算。它可以與 Pandas、TensorFlow 和 scikit-learn 流暢協作。該庫支持多維數組、矩陣、線性代數和傅里葉變換。數組使用連續內存,因此比 Python 列表更快。如此高的速度使 NumPy 成為科學計算和數據分析的核心工具。
Excel 廣泛用于存儲數據集,但它并未針對 Python 工作流程進行優化。傳統的轉換方法通常需要額外的庫、多個步驟以及手動解析。Aspose.Cells?允許您將數據從Excel、TSV、CSV和JSON格式直接導出到 NumPy 數組。這將電子表格與 Python 的數值工具連接起來。
什么是 Aspose.Cells for Python?
Aspose.Cells是面向 Python 開發人員的最佳 Excel 庫。它允許讀取、創建和操作電子表格,而無需依賴 Microsoft Excel。通過 .NET 的 Python 版本嵌入了?Aspose.Cells?的 .NET 版本并將其公開給 Python。Aspose.Cells?簡化了 Excel 到 NumPy 的轉換過程。它允許您將整個工作簿、工作表、范圍、行、列,甚至列表對象直接導出到 NumPy ndarray 中。這意味著您可以輕松將原始 Excel 文件轉換為干凈、可立即使用的數據,用于分析或機器學習。
Aspose.Cells官方試用版免費下載
您可以從 PyPI 安裝它:
pip install aspose?cells?python
安裝完成后,將該庫與 NumPy 一起導入:
import aspose.cells as cells
import numpy as np
如何將 Excel 工作簿轉換為 NumPy
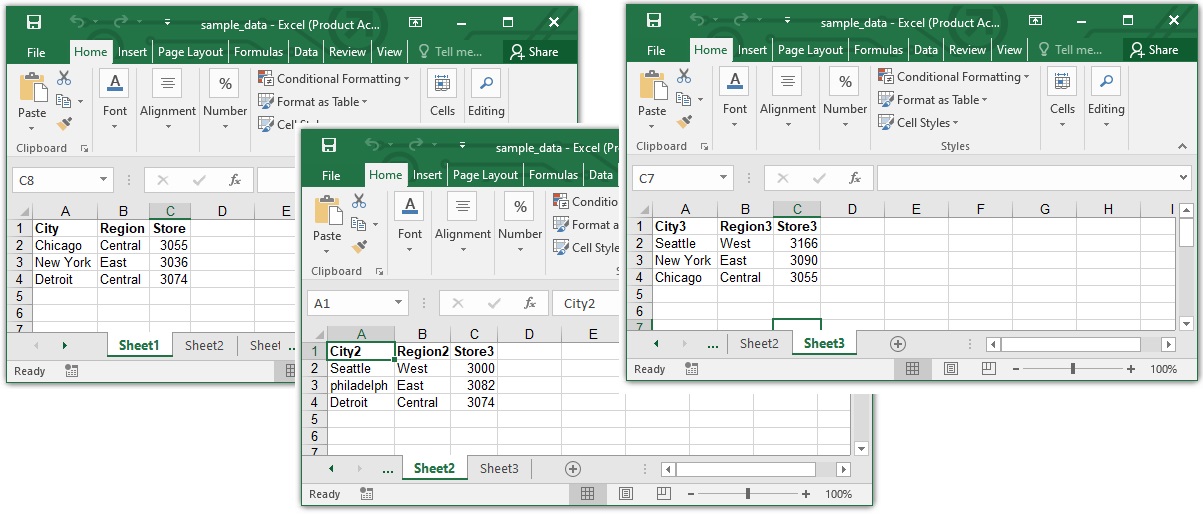
一個工作簿可能包含多個工作表。您可以一次性將整個 Excel 工作簿導出為 NumPy ndarray。當您想直接在 Python 中處理所有工作表的數據時,這非常方便。
按照以下步驟將 Excel 工作簿轉換為 NumPy ndarray:
- 使用該類加載 Excel 工作簿Workbook。
- 從工作簿訪問所有工作表。
- 循環遍歷每個工作表以讀取其使用的行和列。
- 逐行提取單元格值。
- 將每張表的數據存儲到列表列表中。
- 使用 np.asarray() 將收集的數據轉換為 NumPy ndarray。
以下是導出示例工作簿的簡化 Python 腳本:
import aspose.cells as cells
import numpy as np# load workbook
workbook = cells.Workbook("sample_data.xlsx")
sheets = workbook.worksheets# prepare an empty list to hold sheet data
sheets_data = []# loop through worksheets
for sheet in sheets:# sheet = workbook.worksheets.get(sheet_index)sheet_cells = sheet.cellsmax_row = sheet_cells.max_data_row + 1  # number of populated rowsmax_col = sheet_cells.max_data_column + 1  # number of populated columnssheet_rows = []for r in range(max_row):row_values = []for c in range(max_col):cell = sheet_cells.check_cell(r, c)row_values.append(cell.value if cell else "")sheet_rows.append(row_values)sheets_data.append(sheet_rows)# convert to ndarray with dtype=object to preserve strings
excel_array = np.asarray(sheets_data, dtype=object)
print(excel_array)
如何將 Excel 工作簿轉換為 NumPy
此腳本將所有空白單元格替換為空字符串,并將所有工作表合并為一個 NumPy 數組。最終的 excel_array 是三維的:第一層代表工作表,第二層代表行,第三層代表列。
[[['City', 'Region', 'Store'],['Chicago', 'Central', '3055'],['New York', 'East', '3036'],['Detroit', 'Central', '3074']],[['City2', 'Region2', 'Store3'],['Seattle', 'West', '3000'],['philadelph', 'East', '3082'],['Detroit', 'Central', '3074']],[['City3', 'Region3', 'Store3'],['Seattle', 'West', '3166'],['New York', 'East', '3090'],['Chicago', 'Central', '3055']]]
將單個工作表轉換為 NumPy
有時,您可能希望使用單個工作表而不是整個工作簿。您可以按照以下步驟直接提取一個工作表的單元格值并將其轉換為 NumPy ndarray:
- 將類加載到 Excel 文件Workbook。
- 通過索引訪問目標工作表。
- 獲取最大使用的行數和列數。
- 循環遍歷每一行和每一列來收集單元格值。
- 將提取的數據存儲在列表中。
- 使用 np.asarray() 將列表轉換為 NumPy ndarray。
以下是導出單個工作表的 Python 腳本:
import aspose.cells as cells
import numpy as np# load workbook
workbook = cells.Workbook("sample_data.xlsx")# access the first worksheet
sheet = workbook.worksheets[0]# get max rows and columns with data
max_row = sheet.cells.max_data_row + 1
max_col = sheet.cells.max_data_column + 1# extract data
rows = []
for r in range(max_row):row_values = []for c in range(max_col):cell = sheet.cells.check_cell(r, c)row_values.append(cell.value if cell else "")rows.append(row_values)# convert to numpy ndarray
worksheet_array = np.asarray(rows, dtype=object)
print(worksheet_array)
這將創建一個 2D ndarray,其中行映射到 Excel 行,列映射到 Excel 列。
[['City' 'Region' 'Store'] ['Chicago' 'Central' '3055'] ['New York' 'East' '3036'] ['Detroit' 'Central' '3074']]
如何將 Excel 數據轉換為 NumPy 數據
在某些情況下,您只需要特定范圍的單元格。Aspose.Cells?允許您定義一個范圍并將其直接導出到 NumPy ndarray。
請按照以下步驟操作:
- 將類加載到工作簿中Workbook。
- 選擇目標工作表。
- 使用該方法定義一個范圍worksheet.cells.create_range()。
- 循環遍歷范圍的行和列來提取值。
- 使用 np.asarray() 將值轉換為 NumPy ndarray。
以下代碼示例顯示如何將一系列單元格從 Excel 轉換為 NumPy ndarray:
import aspose.cells as cells
import numpy as np# load workbook
workbook = cells.Workbook("sample_data.xlsx")# select first worksheet
sheet = workbook.worksheets.get(0)# define a range (B1 to C3)
cell_range = sheet.cells.create_range("B1", "C3")# extract data from range
range_data = []
for r in range(cell_range.row_count):row_values = []for c in range(cell_range.column_count):cell = sheet.cells.check_cell(r, c)row_values.append(cell.value if cell else "")range_data.append(row_values)# convert to numpy ndarray
range_array = np.asarray(range_data, dtype=object)
print(range_array)
如果選定范圍覆蓋兩列三行,則生成的數組將為 3×2,例如:
[['City' 'Region']['Chicago' 'Central']['New York' 'East']]
將 Excel 表(ListObject)轉換為 NumPy
Excel 表格是包含標題和行的結構化數據區域。在?Aspose.Cells?中,它以 ListObject 的形式表示。您可以輕松地將 Excel 表格的內容導出到 NumPy ndarray 中,以便在 Python 中進一步處理。
- 加載工作簿并選擇工作表。
- 從工作表訪問 ListObject(Excel 表)。
- 將表的數據導出到二維數組中。
- 將數組轉換為 NumPy ndarray。
- 使用 ndarray 進行數據科學或機器學習工作流程。
以下代碼示例顯示如何將 Excel 表(ListObject)導出到 NumPy:
import aspose.cells as cells
import numpy as np# Load Excel file
workbook = cells.Workbook("sample_data.xlsx")
sheet = workbook.worksheets.get(0)# Create a table covering A1:C4 with headers
index = sheet.list_objects.add("A1", "C4", True)
table = sheet.list_objects[index]rows = []
for r in range(table.start_row, table.end_row + 1):row_vals = []for c in range(table.start_column, table.end_column + 1):cell = sheet.cells.check_cell(r, c)row_vals.append(cell.value if cell else "")rows.append(row_vals)list_object_array = np.asarray(rows, dtype=object)
print(list_object_array)
生成的 NumPy ndarray 將包含 Excel 表的行和列,如果它們是數據范圍的一部分,則包括標題。
[['City', 'Region', 'Store'],['Chicago', 'Central', '3055'],['New York', 'East', '3036'],['Detroit', 'Central', '3074']]
如何將 Excel 中的一行數據轉換為 NumPy 格式
有時您只需要 Excel 中一行的數據。Aspose.Cells?可以輕松提取一行并將其直接加載到 NumPy ndarray 中。
- 加載 Excel 工作簿。
- 選擇工作表。
- 選擇要導出的行索引。
- 將行值導出為數組。
- 將數組轉換為 NumPy ndarray 進行處理。
以下 Python 代碼顯示如何將 Excel 表的一行轉換為 NumPy ndarray:
import aspose.cells as cells
import numpy as np# Load Excel file
workbook = cells.Workbook("sample_data.xlsx")
sheet = workbook.worksheets.get(0)
sheet_cells = sheet.cellsmax_col = sheet_cells.max_data_column + 1# choose a row (e.g., last data row)
row_index = sheet_cells.max_data_row
row_vals = []
for c in range(max_col):cell = sheet_cells.check_cell(row_index, c)row_vals.append(cell.value if cell else "")row_array = np.asarray(row_vals, dtype=object)
print(row_array)
生成的 NumPy ndarray 將是一個一維數組,包含所選行的所有值。
['Detroit' 'Central' 3074]
將 Excel 列轉換為 NumPy
在某些情況下,您可能只需要 Excel 工作表單列中的值。Aspose.Cells?可讓您輕松導出該列并將其轉換為 NumPy ndarray。
- 加載 Excel 工作簿。
- 選擇目標工作表。
- 選擇要導出的列索引。
- 導出列值。
- 將值轉換為 NumPy ndarray。
以下 Python 代碼顯示如何將 Excel 表的列轉換為 NumPy ndarray:
import aspose.cells as cells
import numpy as np# Load Excel file
workbook = cells.Workbook("D:\\Files\\sample_data.xlsx")
sheet = workbook.worksheets.get(0)
sheet_cells = sheet.cells
max_row = sheet_cells.max_data_row + 1# choose a column (e.g., last data column)
col_index = sheet_cells.max_data_column
col_vals = []
for r in range(max_row):cell = sheet_cells.check_cell(r, col_index)col_vals.append(cell.value if cell else "")column_array = np.asarray(col_vals, dtype=object)
print(column_array)
生成的 NumPy ndarray 將是一個包含所選列的所有值的一維數組。
['Store' 3055 3036 3074]
使用 Aspose.Cells 和 NumPy 的技巧
-
內存注意事項:將非常大的工作簿轉換為 NumPy 數組可能會消耗大量內存。請單獨處理工作表,或盡可能讀取特定范圍的數據。
-
數據類型:如果您的電子表格包含混合類型(字符串、數字、日期),請在將列表轉換為 NumPy 數組時指定 dtype=object。對于同質數值數據,您可以讓 NumPy 推斷其類型。
-
缺失值:Aspose.Cells 對于空單元格返回 None。在上面的示例中,我們用空字符串替換了它們。您也可以根據具體情況,用 np.nan 或其他標記值替換它們。
結論
Aspose.Cells for Python via .NET?簡化了 Excel 數據到 NumPy 數組的轉換。無論您需要的是整個工作簿、單個工作表、特定區域、表格、行還是列,該庫都提供了清晰的方法來遍歷單元格并構建 NumPy 可以使用的列表。通過將?Aspose.Cells?讀取多種電子表格格式的能力與 NumPy 的數值計算能力相結合,您可以將 Excel 數據無縫集成到您的 Python 數據管道中。


)
)


