更大的應用 - 多個文件
假設文件結構如下:
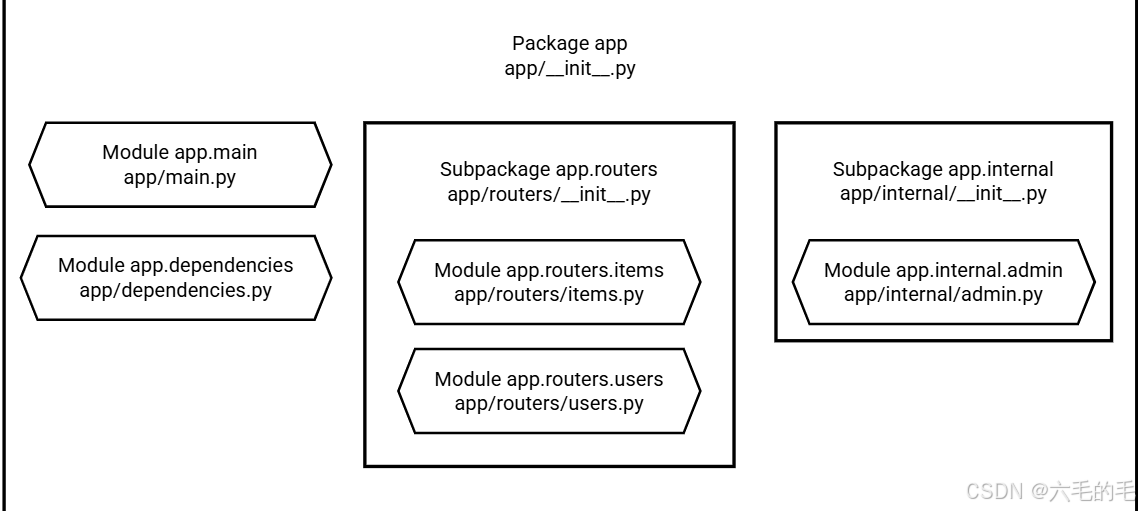
.
├── app                  # 「app」是一個 Python 包
│   ├── __init__.py      # 這個文件使「app」成為一個 Python 包
│   ├── main.py          # 「main」模塊,例如 import app.main
│   ├── dependencies.py  # 「dependencies」模塊,例如 import app.dependencies
│   └── routers          # 「routers」是一個「Python 子包」
│   │   ├── __init__.py  # 使「routers」成為一個「Python 子包」
│   │   ├── items.py     # 「items」子模塊,例如 import app.routers.items
│   │   └── users.py     # 「users」子模塊,例如 import app.routers.users
│   └── internal         # 「internal」是一個「Python 子包」
│       ├── __init__.py  # 使「internal」成為一個「Python 子包」
│       └── admin.py     # 「admin」子模塊,例如 import app.internal.admin
APIRouter
假設專門用于處理用戶邏輯的文件是位于 /app/routers/users.py 的子模塊
你可以使用 APIRouter 為該模塊創建路徑操作。
然后你可以使用它來聲明路徑操作。
from fastapi import APIRouterrouter = APIRouter()@router.get("/users")
async def read_users():return [{"username": "Rick"}, {"username": "Morty"}]@router.get("/users/me", tags=["users"])
async def read_user_me():return {"username": "fakecurrentuser"}@router.get("/users/{username}", tags=["users"])
async def read_user(username: str):return {"username": username}
依賴項
我們將需要一些在應用程序的好幾個地方所使用的依賴項。因此,我們將它們放在它們自己的 dependencies 模塊(app/dependencies.py)中
from fastapi import Header, HTTPExceptionasync def get_token_header(x_token: str = Header()):if x_token != "fake-super-secret-token":raise HTTPException(status_code=400, detail="X-Token header invalid")async def get_query_token(token: str):if token != "jessica":raise HTTPException(status_code=400, detail="No Jessica token provided")
其他使用 APIRouter 的模塊
假設你在位于 app/routers/items.py 的模塊中還有專門用于處理應用程序中「item」的端點。
我們知道此模塊中的所有路徑操作都有相同的:
- 路徑 prefix:/items。
- tags:(僅有一個 items 標簽)。
- 額外的 responses。
- dependencies:它們都需要我們創建的 X-Token 依賴項。
因此,我們可以將其添加到 APIRouter 中,而不是將其添加到每個路徑操作中
我們還可以添加一個 tags 列表和額外的 responses 列表,這些參數將應用于此路由器中包含的所有路徑操作。
我們可以添加一個 dependencies 列表,這些依賴項將被添加到路由器中的所有路徑操作中,并將針對向它們發起的每個請求執行/解決。
我們仍然可以添加更多將會應用于特定的路徑操作的 tags,以及一些特定于該路徑操作的額外 responses
from fastapi import APIRouter, Depends, HTTPExceptionfrom ..dependencies import get_token_headerrouter = APIRouter(prefix="/items",tags=["items"],dependencies=[Depends(get_token_header)],responses={404: {"description": "Not found"}}, # 當 API 端點可能返回 404 錯誤時,在文檔中顯示 "Not found" 的描述
)fake_items_db = {"plumbus": {"name": "Plumbus"}, "gun": {"name": "Portal Gun"}}@router.get("/")
async def read_items():return fake_items_db@router.get("/{item_id}")
async def read_item(item_id: str):if item_id not in fake_items_db:raise HTTPException(status_code=404, detail="Item not found")return {"name": fake_items_db[item_id]["name"], "item_id": item_id}@router.put("/{item_id}", tags=["custom"], responses={403: {"description": "Operation forbidden"}})
async def update_item(item_id: str):if item_id != "plumbus":raise HTTPException(status_code=403, detail="You can only update the plumbus")return {"item_id": item_id, "name": "The Great Plumbus"}
FastAPI 主體
from fastapi import Depends, FastAPIfrom .dependencies import get_query_token, get_token_header
from .routers import items, users
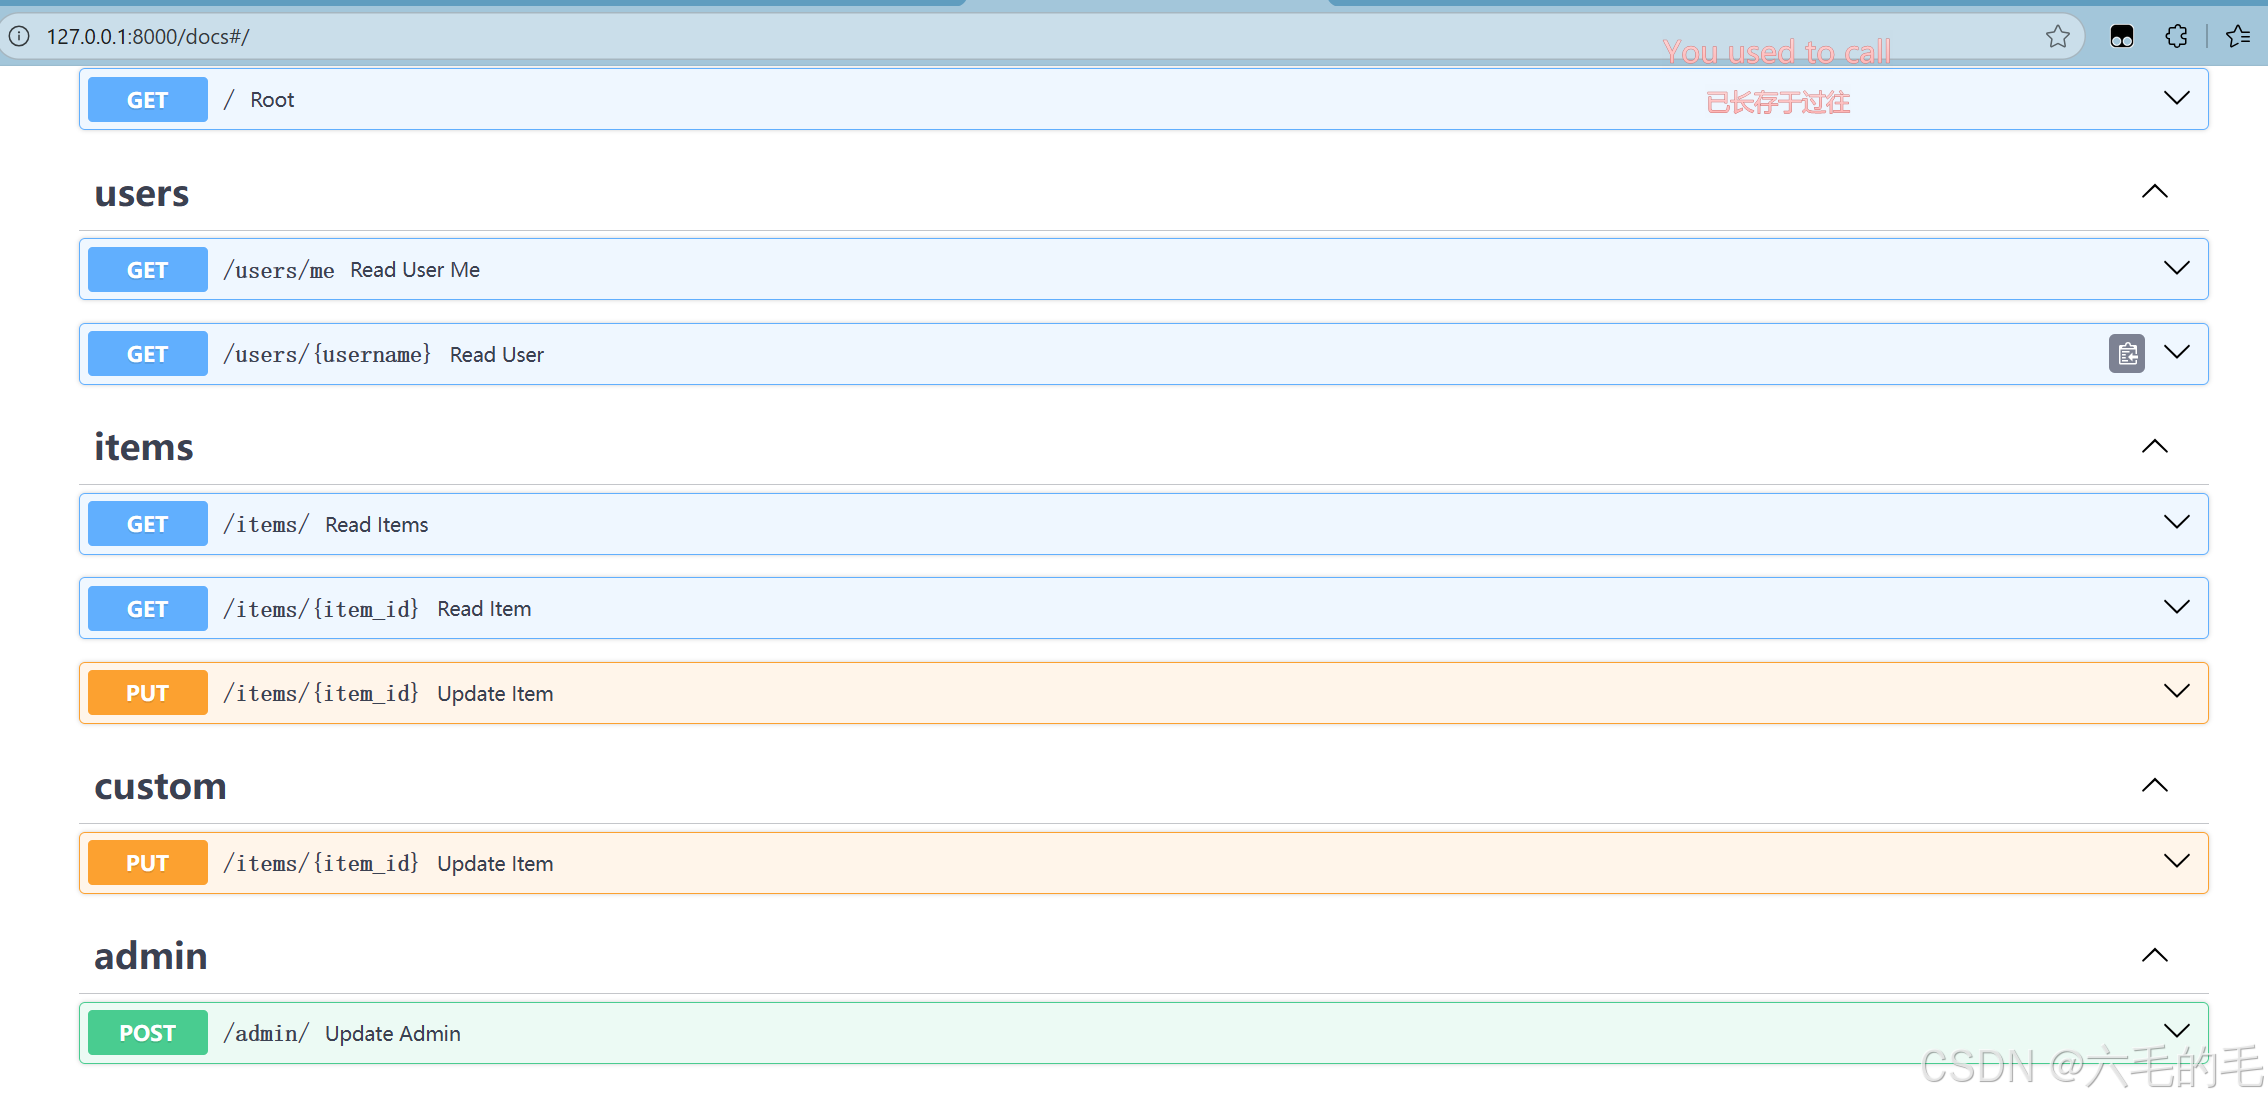
from .internal import adminapp = FastAPI(dependencies=[Depends(get_query_token)]) # 聲明全局依賴# 加入路由
app.include_router(users.router)
app.include_router(items.router)
app.include_router(admin.router,prefix="/admin",tags=["admin"],dependencies=[Depends(get_token_header)],responses={418: {"description": "I'm a teapot"}}, # 示例響應
)@app.get("/")
async def root():return {"message": "Hello World"}
假設你的組織為你提供了 app/internal/admin.py 文件。
它包含一個帶有一些由你的組織在多個項目之間共享的管理員路徑操作的 APIRouter。
對于此示例,它將非常簡單。但是假設由于它是與組織中的其他項目所共享的,因此我們無法對其進行修改,以及直接在 APIRouter 中添加 prefix、dependencies、tags 等
可是我們仍然希望在包含 APIRouter 時設置一個自定義的 prefix,以便其所有路徑操作以 /admin 開頭,我們希望使用本項目已經有的 dependencies 保護它,并且我們希望它包含自定義的 tags 和 responses。
我們可以通過將這些參數傳遞給 app.include_router() 來完成所有的聲明,而不必修改原始的 APIRouter
查看自動化的 API 文檔
現在,使用 app.main 模塊和 app 變量運行 uvicorn
后臺任務
你可以定義在返回響應后運行的后臺任務。
這對需要在請求之后執行的操作很有用,但客戶端不必在接收響應之前等待操作完成。
使用 BackgroundTasks
創建要作為后臺任務運行的函數。
它只是一個可以接收參數的標準函數。
它可以是 async def 或普通的 def 函數,FastAPI 知道如何正確處理。
然后在你的 路徑操作函數 里,用 .add_task() 方法將任務函數傳到 后臺任務 對象中
from email import message
from fastapi import BackgroundTasks, FastAPIapp = FastAPI()def write_notification(email: str, message = ""):with open("log.txt", mode="w") as email_file:content = f"notification for {email} with message: {message}\n" email_file.write(content)@app.post("/send-notification/{email}")
async def send_notification(email: str, background_tasks: BackgroundTasks):background_tasks.add_task(write_notification,email, message="some notification")return {"message": "Notification sent in the background"}
依賴注入
使用 BackgroundTasks 也適用于依賴注入系統,你可以在多個級別聲明 BackgroundTasks 類型的參數:在 路徑操作函數 里,在依賴中(可依賴),在子依賴中,等等。
from tkinter import NO
from typing import Annotatedfrom fastapi import BackgroundTasks, Depends, FastAPIapp = FastAPI()def write_log(message: str):with open("log.txt", mode="a") as log:log.write(message)def get_query(background_tasks: BackgroundTasks, q: str | None = None):if q:message = f"found query: {q}\n"background_tasks.add_task(write_log, message)return q@app.post("/send-notification/{email}")
async def send_notification(email: str, background_tasks: BackgroundTasks, q: Annotated[str, Depends(get_query)]
):message = f"message to {email}\n"background_tasks.add_task(write_log, message)return {"message": "Message sent"}
運行程序,此時設置q為3

元數據和文檔 URL
API 元數據
你可以在設置 OpenAPI 規范和自動 API 文檔 UI 中使用的以下字段:
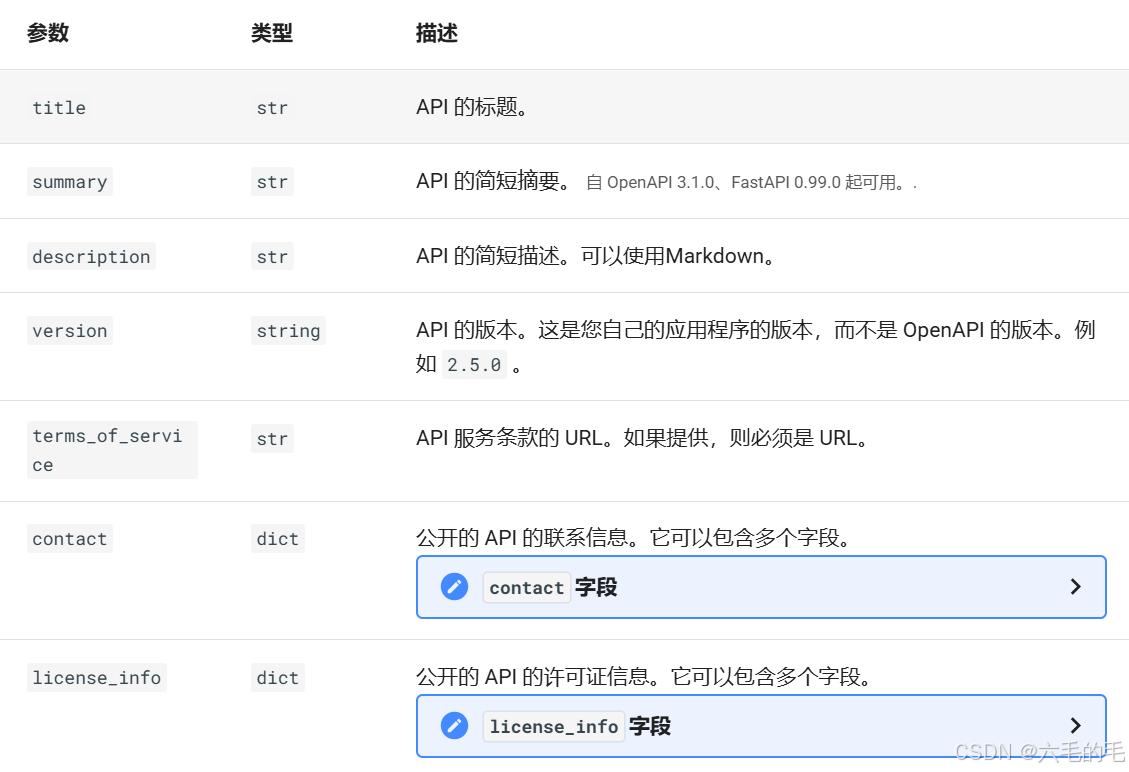
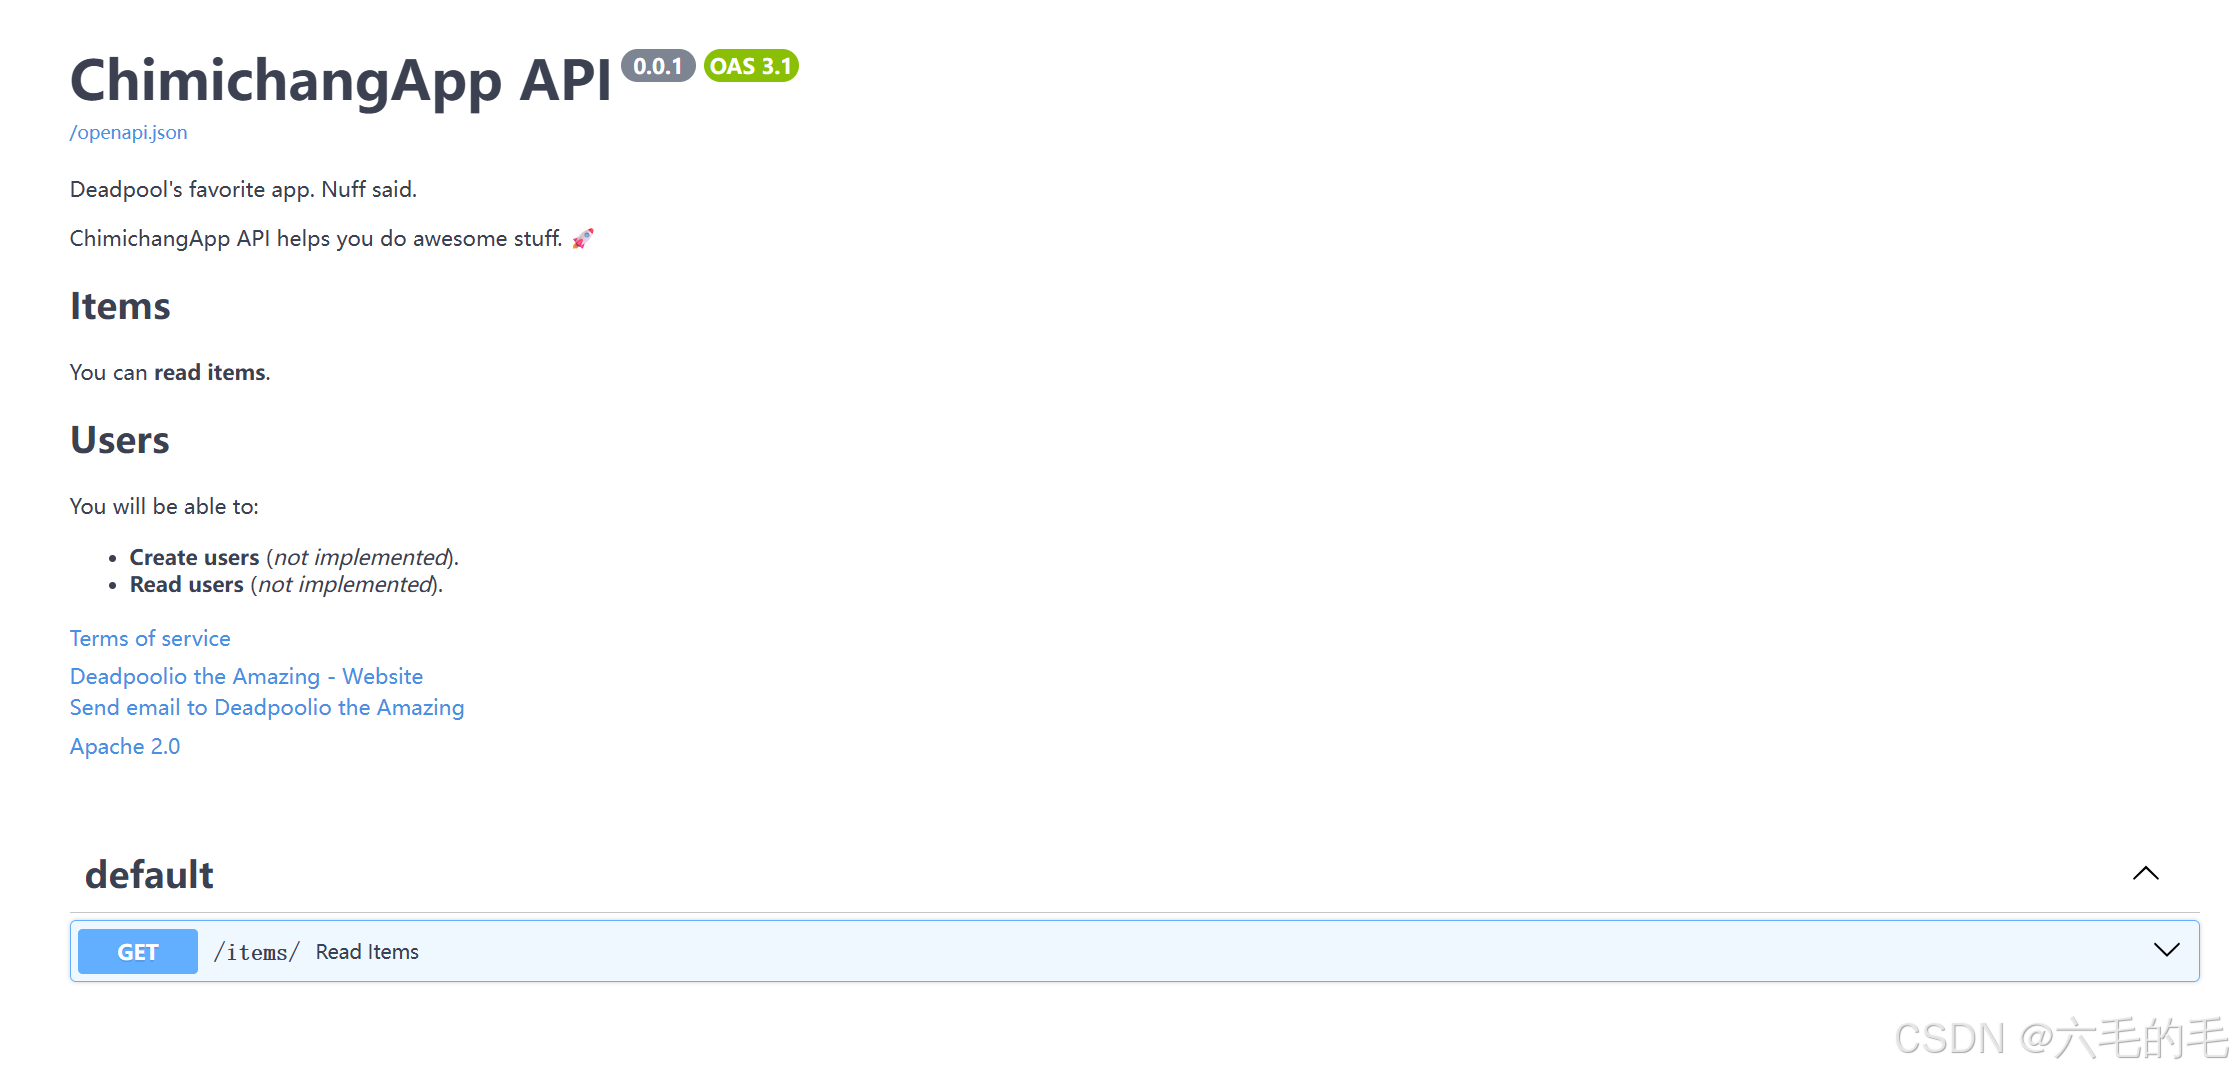
from fastapi import FastAPIdescription = """
ChimichangApp API helps you do awesome stuff. 🚀## ItemsYou can **read items**.## UsersYou will be able to:* **Create users** (_not implemented_).
* **Read users** (_not implemented_).
"""app = FastAPI(title="ChimichangApp API",description=description,summary="Deadpool's favorite app. Nuff said.",version="0.0.1",terms_of_service="http://example.com/terms/",contact={"name": "Deadpoolio the Amazing","url": "http://x-force.example.com/contact/","email": "dp@x-force.example.com",},license_info={"name": "Apache 2.0","url": "https://www.apache.org/licenses/LICENSE-2.0.html",},
)@app.get("/items/")
async def read_items():return [{"name": "Katana"}]
運行程序,查看API文檔
標簽元數據
創建標簽元數據并把它傳遞給 openapi_tags 參數,將 tags 參數和路徑操作(以及 APIRouter)一起使用,將其分配給不同的標簽:
from fastapi import FastAPItags_metadata = [{"name": "users","description": "Operations with users. The **login** logic is also here.",},{"name": "items","description": "Manage items. So _fancy_ they have their own docs.","externalDocs": {"description": "Items external docs","url": "https://fastapi.tiangolo.com/",},},
]app = FastAPI(openapi_tags=tags_metadata)@app.get("/users/", tags=["users"])
async def get_users():return [{"name": "Harry"}, {"name": "Ron"}]@app.get("/items/", tags=["items"])
async def get_items():return [{"name": "wand"}, {"name": "flying broom"}]
運行程序,打開docs文檔
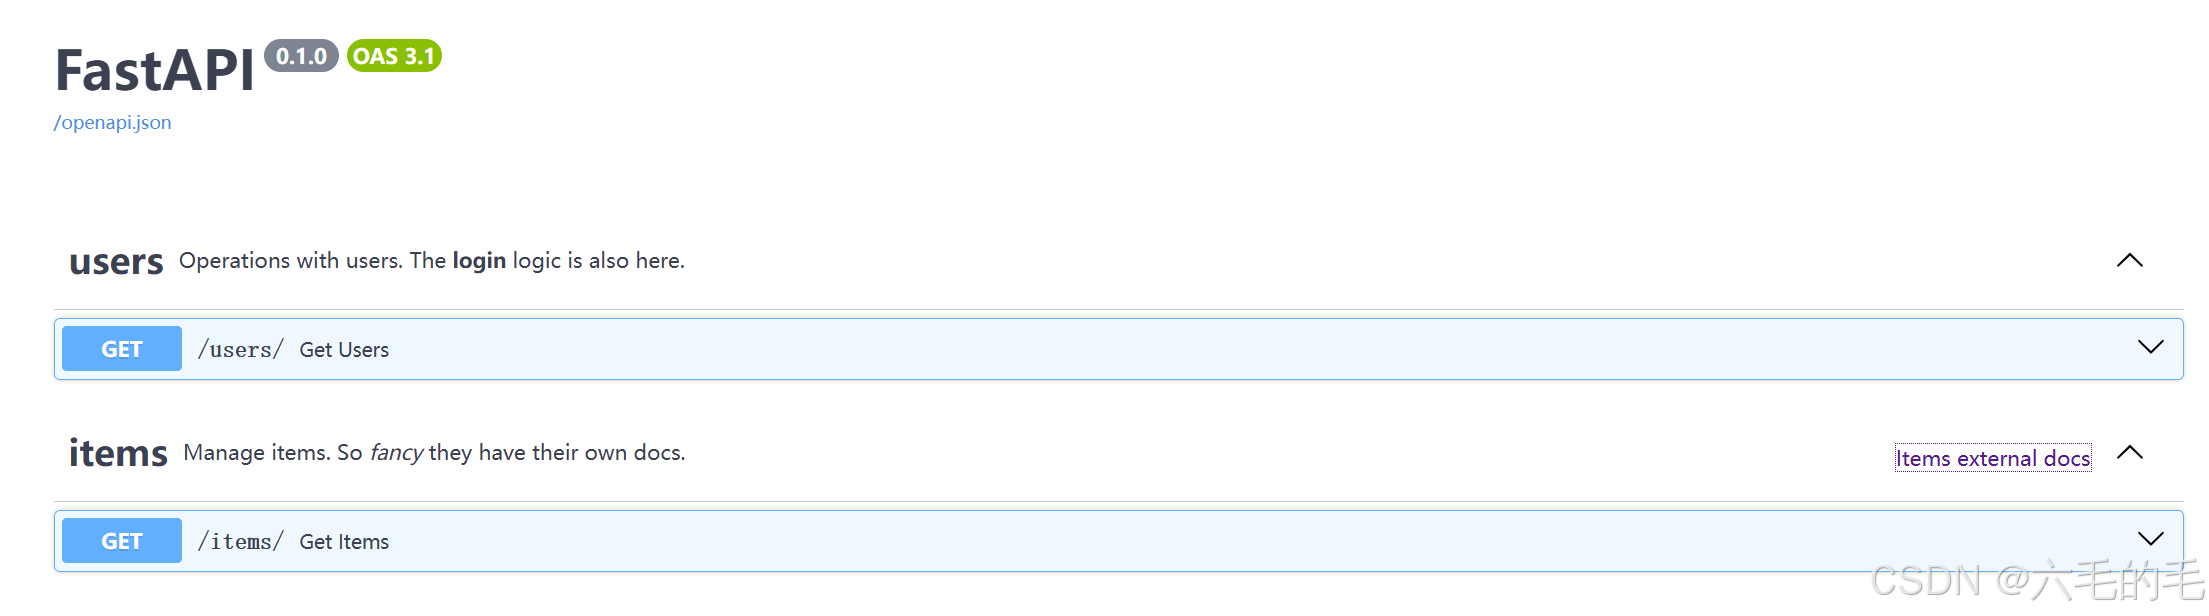
每個標簽元數據字典的順序也定義了在文檔用戶界面顯示的順序。
例如按照字母順序,即使 users 排在 items 之后,它也會顯示在前面,因為我們將它的元數據添加為列表內的第一個字典。
文檔 URLs
你可以配置兩個文檔用戶界面,包括:
- Swagger UI:服務于 /docs。
- 可以使用參數 docs_url 設置它的 URL。
- 可以通過設置 docs_url=None 禁用它。
- ReDoc:服務于 /redoc。
- 可以使用參數 redoc_url 設置它的 URL。
- 可以通過設置 redoc_url=None 禁用它。
from fastapi import FastAPIapp = FastAPI(docs_url="/documentation", redoc_url=None)@app.get("/items/")
async def read_items():return [{"name": "Foo"}]


系統:構建認知推理的骨架結構)


創建新的slave從機)


)

回文鏈表)


