基本概念
- 目標(Destination):已經存在的像素。
- 源(Source):要繪制的新像素。
組合模式:決定源和目標如何混合。
總結
- SourceOver:源繪制在目標之上。
- DestinationOver:目標繪制在源之上。
- Clear:二者重疊區域被清空為透明。
- Source:結果完全由源決定。
- Destination:結果完全由目標決定。
- SourceIn:輸出RGB值由源決定,且受到目標的透明度影響,只有在目標不透明處才顯示。
- DestinationIn:輸出RGB值由目標決定,且受到源的透明度影響。在源的透明區域,目標不保留。
- SourceOut:輸出RGB值由源決定,且受到目標的不透明度的補集調制。結果在目標完全不透明的區域不顯示。
- DestinationOut:輸出RGB值由目標決定,且受到源的不透明度的補集調制。結果在源完全不透明的區域不顯示
- SourceAtop:只在目標不透明的區域繪制,目標只在源透明的區域保留。
- DestinationAtop:只在源不透明的區域繪制,源只在目標透明的區域保留。
- Xor:源和目標在彼此透明的區域顯示,在都不透明的區域變透明。
Plus:相當于 Photoshop 中的“線性減淡”混合模式。- Multiply:相當于 Photoshop 中的“正片疊底”混合模式。
- Screen:相當于 Photoshop 中的“濾色”混合模式。
- Overlay:相當于 Photoshop 中的“疊加”混合模式。
- Darken:相當于 Photoshop 中的“變暗”混合模式。
- Lighten:相當于 Photoshop 中的“變亮”混合模式。
- ColorDodge:相當于 Photoshop 中的“顏色減淡”混合模式。
- ColorBurn:相當于 Photoshop 中的“顏色加深”混合模式。
- HardLight:相當于 Photoshop 中的“強光”混合模式。
- SoftLight:相當于 Photoshop 中的“柔光”混合模式。
- Difference:相當于 Photoshop 中的“差值”混合模式。
- Exclusion:相當于 Photoshop 中的“排除”混合模式。
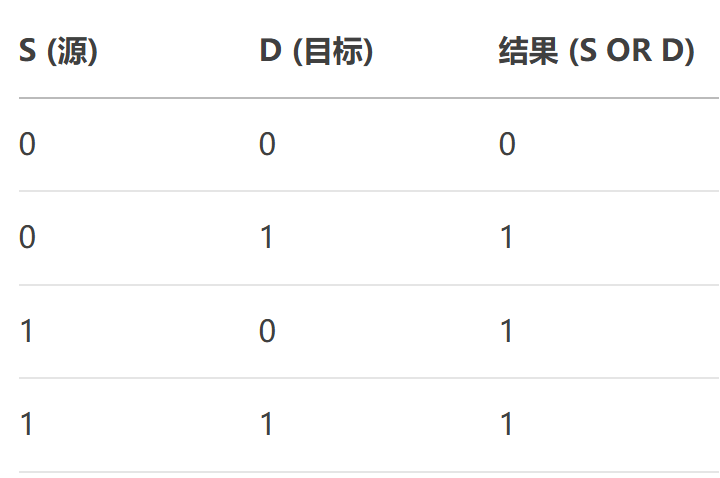
SourceOrDestination:位運算,結果 = Source | Destination。- SourceAndDestination:位運算,結果 = Source & Destination。
- SourceXorDestination:位運算,結果 = Source ^ Destination。
- NotSourceAndNotDestination:位運算,結果 = (~Source) & (~Destination)。
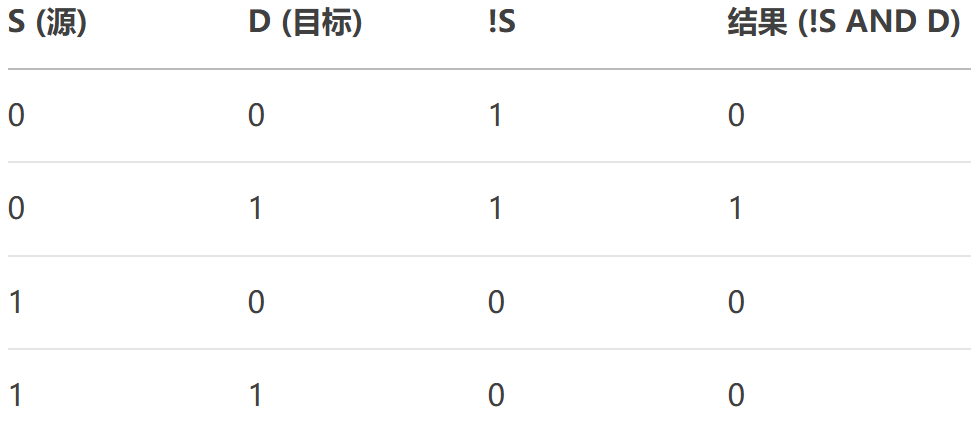
- NotSourceOrNotDestination:位運算,結果 = (~Source) | (~Destination)。
- NotSourceXorDestination:位運算,結果 = (~Source) ^ Destination。
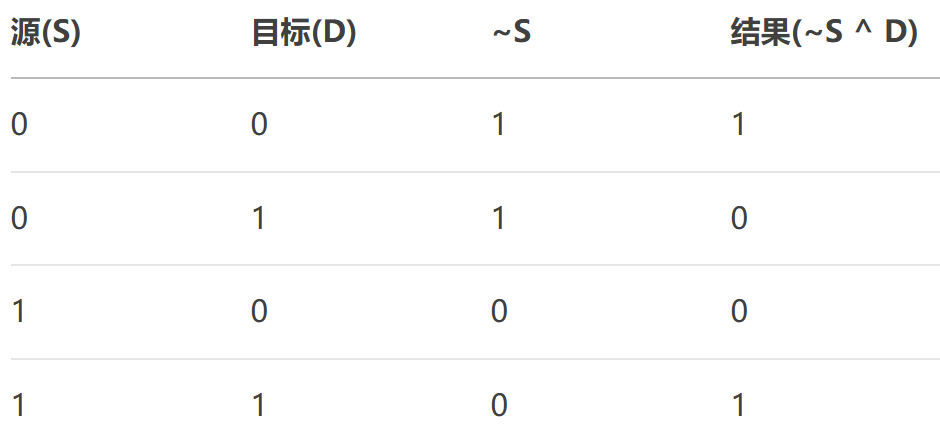
- NotSource:位運算,結果 = ~Source。
- NotSourceAndDestination:位運算,結果 = (~Source) & Destination。
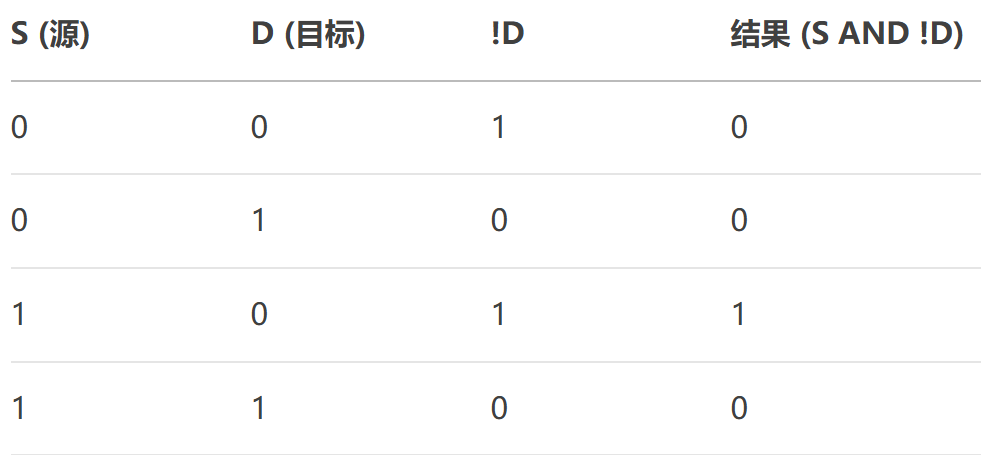
- SourceAndNotDestination:位運算,結果 = Source?& (~Destination)。?
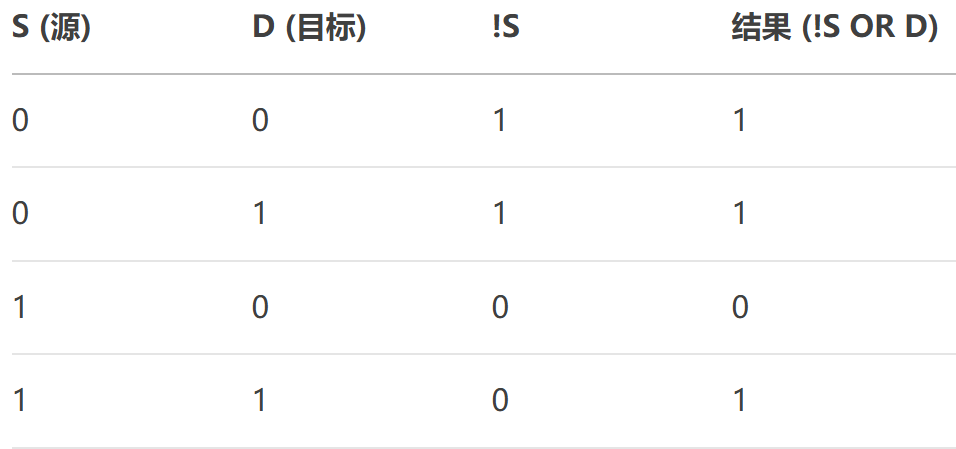
- NotSourceOrDestination:位運算,結果 = (~Source) | Destination。
- SourceOrNotDestination:位運算,結果 = Source |?(~Destination)。?
- ClearDestination:無視目標像素和源像素,結果像素值所有位都設為?0。
- SetDestination:無視目標像素和源像素,結果像素值所有位都設為?1。
- NotDestination:位運算,結果 =?~Destination。
一、Porter-Duff合成模式
1~12為Porter-Duff合成模式。
計算時要預乘透明度。
下面這個模擬函數展示了這12種模式的原理:
QColor blendPorterDuff(const QColor &dst, const QColor &src, QPainter::CompositionMode mode)
{// 獲取預乘顏色值qreal a_dst = dst.alphaF();qreal a_src = src.alphaF();qreal r_dst = dst.redF() * a_dst;qreal g_dst = dst.greenF() * a_dst;qreal b_dst = dst.blueF() * a_dst;qreal r_src = src.redF() * a_src;qreal g_src = src.greenF() * a_src;qreal b_src = src.blueF() * a_src;// 輸出變量qreal r_out = 0.0, g_out = 0.0, b_out = 0.0, a_out = 0.0;// 根據模式選擇合成算法switch (mode) {// Porter-Duff 12種基本模式case QPainter::CompositionMode_Clear: // [0]// R = 0// A = 0a_out = 0.0;break;case QPainter::CompositionMode_Source: // [1]// R = Cs// A = Asr_out = r_src;g_out = g_src;b_out = b_src;a_out = a_src;break;case QPainter::CompositionMode_Destination: // [2]// R = Cd// A = Adr_out = r_dst;g_out = g_dst;b_out = b_dst;a_out = a_dst;break;case QPainter::CompositionMode_SourceOver: // [3] (最常見的模式)// R = Cs + Cd*(1-As)// A = As + Ad*(1-As)r_out = r_src + r_dst * (1.0 - a_src);g_out = g_src + g_dst * (1.0 - a_src);b_out = b_src + b_dst * (1.0 - a_src);a_out = a_src + a_dst * (1.0 - a_src);break;case QPainter::CompositionMode_DestinationOver: // [4]// R = Cd + Cs*(1-Ad)// A = Ad + As*(1-Ad)r_out = r_dst + r_src * (1.0 - a_dst);g_out = g_dst + g_src * (1.0 - a_dst);b_out = b_dst + b_src * (1.0 - a_dst);a_out = a_dst + a_src * (1.0 - a_dst);break;case QPainter::CompositionMode_SourceIn: // [5]// R = Cs*Ad// A = As*Adr_out = r_src * a_dst;g_out = g_src * a_dst;b_out = b_src * a_dst;a_out = a_src * a_dst;break;case QPainter::CompositionMode_DestinationIn: // [6]// R = Cd*As// A = Ad*Asr_out = r_dst * a_src;g_out = g_dst * a_src;b_out = b_dst * a_src;a_out = a_dst * a_src;break;case QPainter::CompositionMode_SourceOut: // [7]// R = Cs*(1-Ad)// A = As*(1-Ad)r_out = r_src * (1.0 - a_dst);g_out = g_src * (1.0 - a_dst);b_out = b_src * (1.0 - a_dst);a_out = a_src * (1.0 - a_dst);break;case QPainter::CompositionMode_DestinationOut: // [8]// R = Cd*(1-As)// A = Ad*(1-As)r_out = r_dst * (1.0 - a_src);g_out = g_dst * (1.0 - a_src);b_out = b_dst * (1.0 - a_src);a_out = a_dst * (1.0 - a_src);break;case QPainter::CompositionMode_SourceAtop: // [9]// R = Cs*Ad + Cd*(1-As)// A = As*Ad + Ad*(1-As) = Adr_out = r_src * a_dst + r_dst * (1.0 - a_src);g_out = g_src * a_dst + g_dst * (1.0 - a_src);b_out = b_src * a_dst + b_dst * (1.0 - a_src);a_out = a_dst; // 簡化計算break;case QPainter::CompositionMode_DestinationAtop: // [10]// R = Cd*As + Cs*(1-Ad)// A = Ad*As + As*(1-Ad) = Asr_out = r_dst * a_src + r_src * (1.0 - a_dst);g_out = g_dst * a_src + g_src * (1.0 - a_dst);b_out = b_dst * a_src + b_src * (1.0 - a_dst);a_out = a_src; // 簡化計算break;case QPainter::CompositionMode_Xor: // [11]// R = Cs*(1-Ad) + Cd*(1-As)// A = As*(1-Ad) + Ad*(1-As)r_out = r_src * (1.0 - a_dst) + r_dst * (1.0 - a_src);g_out = g_src * (1.0 - a_dst) + g_dst * (1.0 - a_src);b_out = b_src * (1.0 - a_dst) + b_dst * (1.0 - a_src);a_out = a_src * (1.0 - a_dst) + a_dst * (1.0 - a_src);break;default:// 默認使用 SourceOverr_out = r_src + r_dst * (1.0 - a_src);g_out = g_src + g_dst * (1.0 - a_src);b_out = b_src + b_dst * (1.0 - a_src);a_out = a_src + a_dst * (1.0 - a_src);break;}// 處理完全透明的情況(避免除以零)if (a_out <= 0.0) {return QColor(0, 0, 0, 0);}// 轉換回非預乘格式并裁剪范圍r_out = qBound(0.0, r_out / a_out, 1.0);g_out = qBound(0.0, g_out / a_out, 1.0);b_out = qBound(0.0, b_out / a_out, 1.0);a_out = qBound(0.0, a_out, 1.0);return QColor::fromRgbF(r_out, g_out, b_out, a_out);
}1、SourceOver
默認模式,源覆蓋在目標上。
2、DestinationOver
源被放置在目標的下面。這就是說要看見新繪制的內容,已有的內容不能是不透明的。
3、Clear
將目標和源重疊的部分設置為透明。使用這個模式進行繪制時,相當于“橡皮擦”效果。
QImage image(200, 200, QImage::Format_ARGB32);image.fill(Qt::blue); // 背景是藍色的QPainter painter(&image);painter.setCompositionMode(QPainter::CompositionMode_Clear);painter.fillRect(50, 50, 100, 100, Qt::white); // 這個區域會被清空(變成透明或默認背景)painter.end();image.save("D://123.png");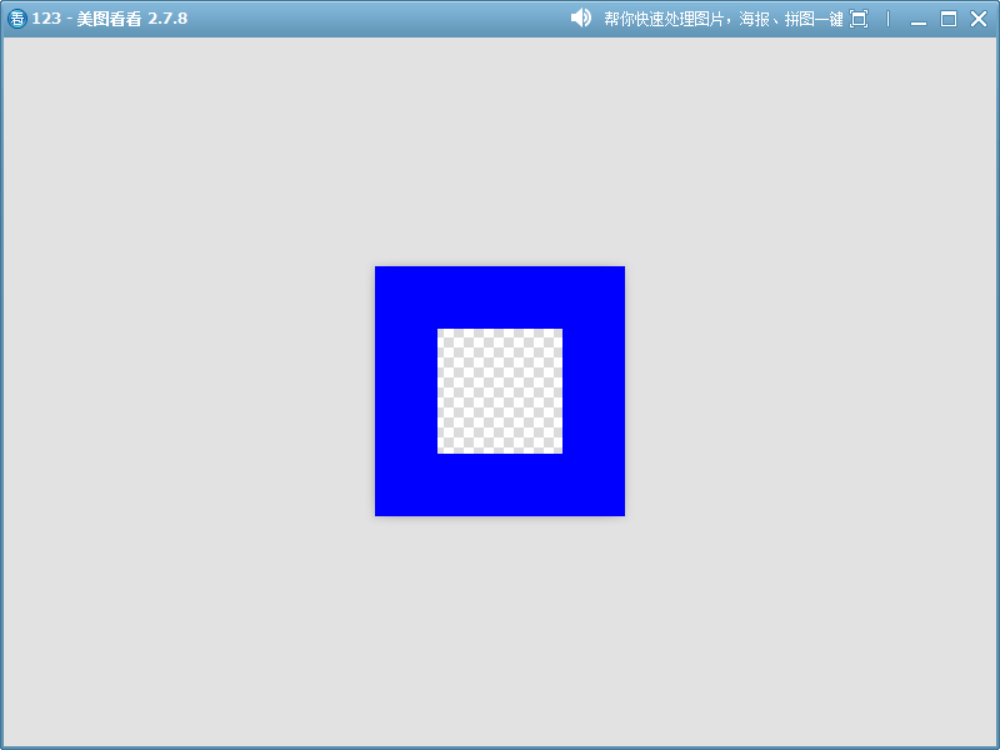
4、Source
輸出結果完全由源像素決定,目標像素會被直接忽略(無論源像素是否透明)。
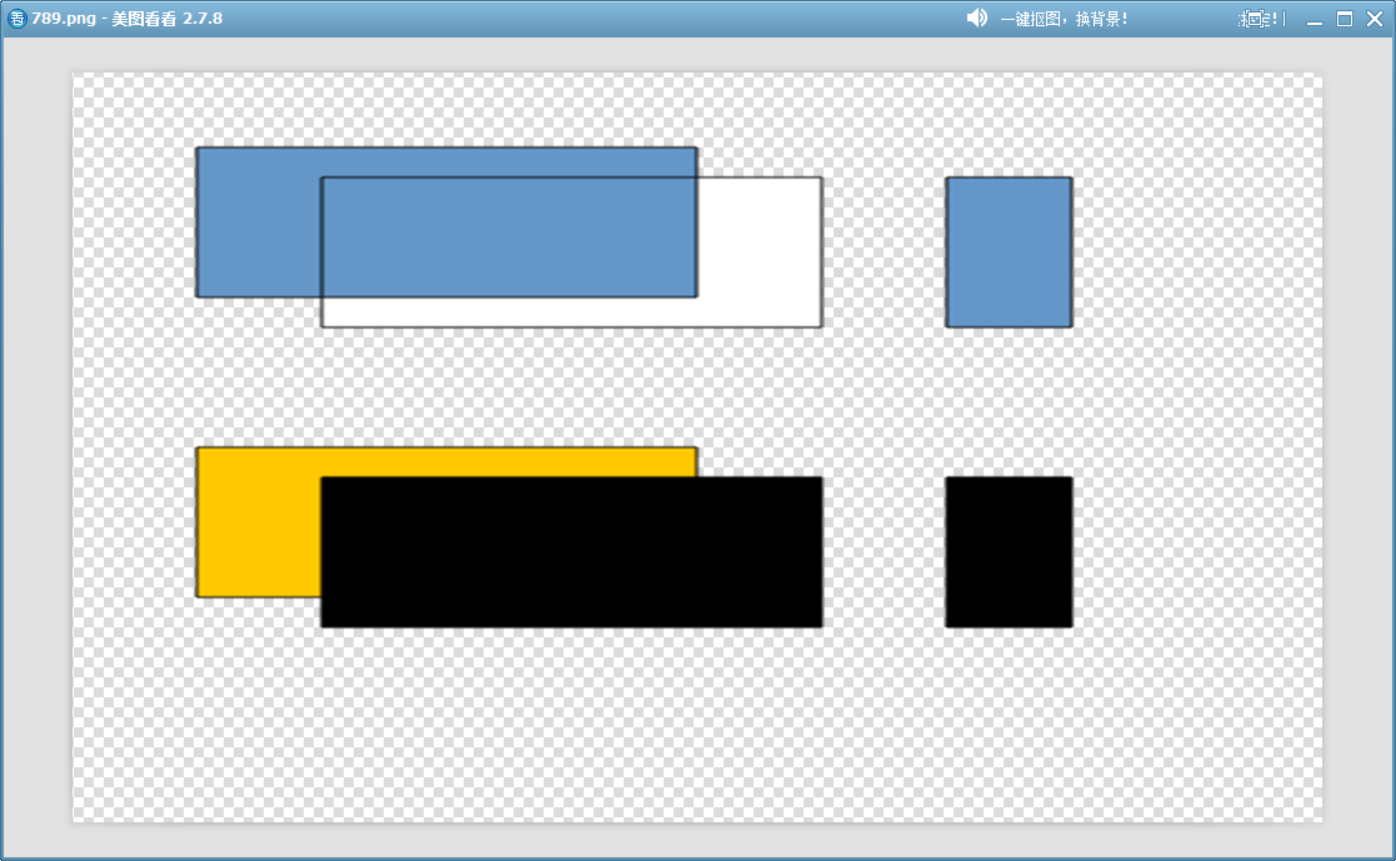
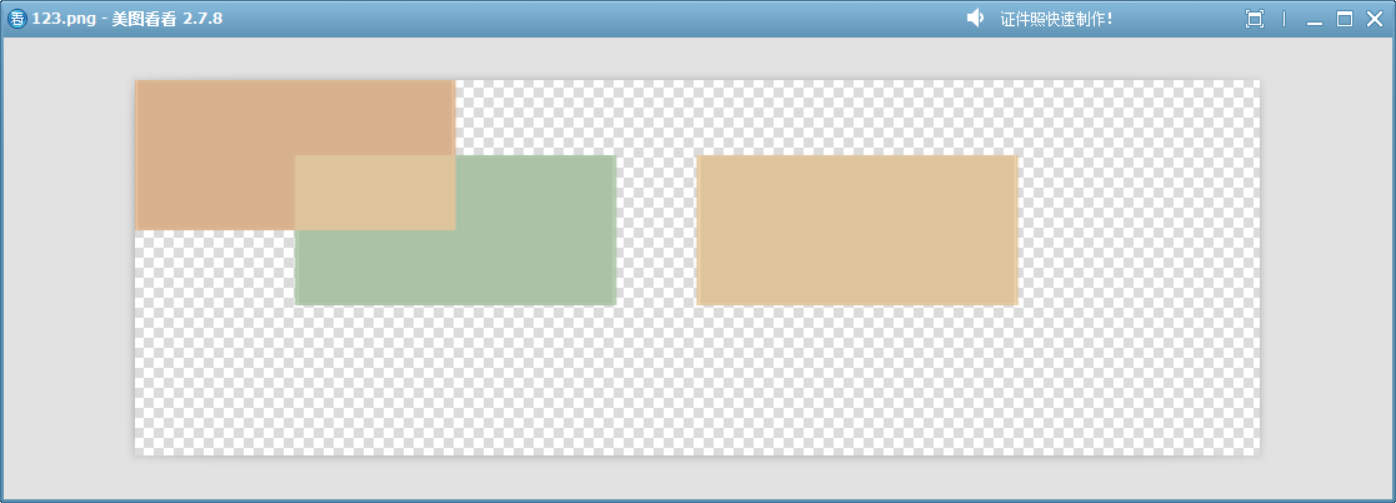
5、Destination
與?Source?模式相反,輸出結果完全由目標像素決定,源像素會被完全忽略。也就是新繪制的內容不會產生影響。
void drawImage()
{QColor destinationColor = QColor(255,0,0,100);QColor sourceColor = QColor(0,255,0,100);QImage image(500, 500, QImage::Format_ARGB32);image.fill(Qt::transparent);QPainter painter(&image);painter.setBrush(destinationColor);painter.drawRect(210, 10, 100, 100);painter.setCompositionMode(QPainter::CompositionMode_Destination);painter.setBrush(sourceColor);painter.drawRect(250, 50, 100, 100);image.save("D://123.png");
}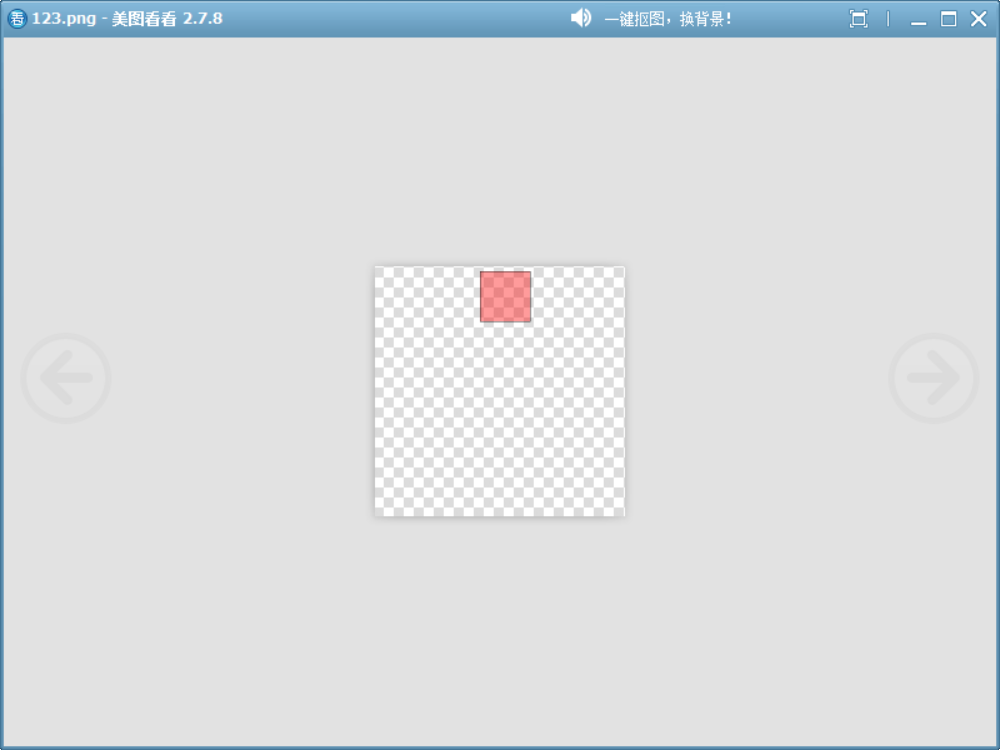
如圖,源像素沒有繪制出來。
這種模式看起來沒用,實際上可以用來根據某種標識選擇性繪制。
void ColorBlenderWidget::paintEvent(QPaintEvent *event)
{QPainter painter(this);painter.fillRect(rect(), QColor(240, 240, 240));painter.setPen(Qt::darkGray);painter.drawRect(rect().adjusted(0, 0, -1, -1));// 根據條件繪制或不繪制logoQRect logoRect(20, 20, 100, 50);bool shouldDrawLogo = false;{painter.save();if(!shouldDrawLogo){painter.setCompositionMode(QPainter::CompositionMode_Destination);}// 正常繪制logopainter.fillRect(logoRect, QColor(200, 50, 50));painter.setPen(Qt::white);painter.drawText(logoRect, Qt::AlignCenter, "LOGO");painter.restore();}// 繪制其他內容painter.setPen(Qt::black);painter.drawText(QRect(20, 80, 200, 30),QString("Logo顯示狀態: %1").arg(shouldDrawLogo ? "開" : "關"));
}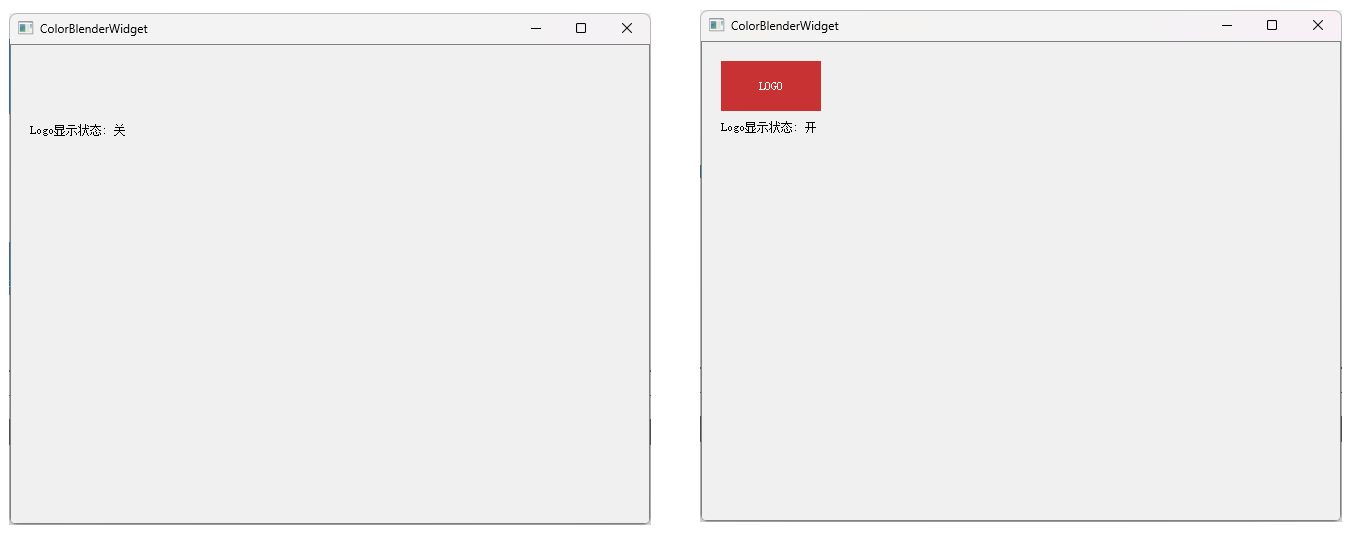
使用此模式通過設置一個標識可以對繪制內容進行控制。
6、SourceIn
此模式可以結合上面的模擬函數理解:r_out = r_src * a_dst; g_out = g_src * a_dst; b_out = b_src * a_dst; a_out = a_src * a_dst;可見此模式的特點:
- 結果的RGB值由源決定,且受到目標的透明度影響。
- 只有在目標不透明處才顯示(在目標透明處 a_out = a_src * a_dst 結果是 0)
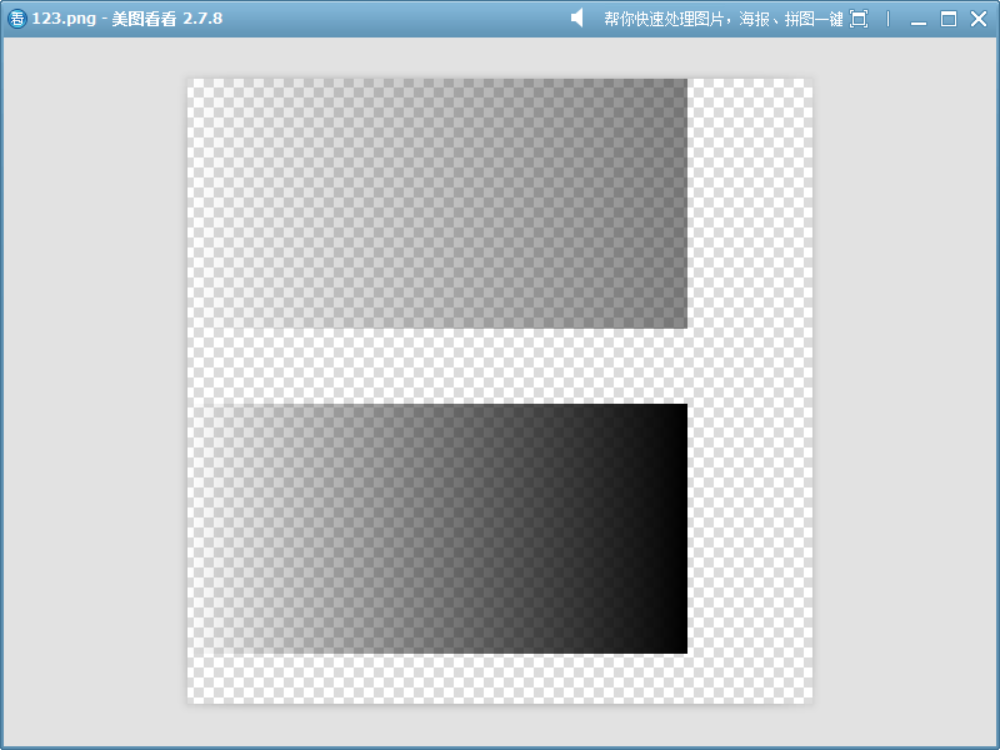
void drawImage()
{QImage image(500, 500, QImage::Format_ARGB32);image.fill(Qt::transparent);QPainter painter(&image);QLinearGradient gradient(0, 0, 400, 0);gradient.setColorAt(0, QColor(0, 0, 0, 0));    // 左:完全透明(Alpha=0)gradient.setColorAt(1, QColor(0, 0, 0, 255));  // 右:完全不透明(Alpha=255)painter.fillRect(QRect(0, 0, 400, 200), gradient);painter.setCompositionMode(QPainter::CompositionMode_SourceIn);painter.fillRect(QRect(0, 0, 400, 200), Qt::red);image.save("D://123.png");
}
如圖,填充一個不透明的矩形,視覺效果是漸變矩形。
ColorBlenderWidget::ColorBlenderWidget(QWidget *parent): QWidget(parent)
{setAttribute(Qt::WA_OpaquePaintEvent);//窗口背景透明
}void ColorBlenderWidget::paintEvent(QPaintEvent *event)
{QPainter painter(this);painter.setRenderHint(QPainter::Antialiasing);QFont font("Arial", 48, QFont::Bold);painter.setFont(font);QPainterPath textPath;textPath.addText(20, height()/2 + 20, font, "黃河之水天上來");painter.setPen(Qt::NoPen);painter.setBrush(Qt::black);painter.drawPath(textPath);painter.setCompositionMode(QPainter::CompositionMode_SourceIn);//注意背景透明QLinearGradient grad(0, 0, width(), 0);grad.setColorAt(0, Qt::red);grad.setColorAt(0.5, Qt::yellow);grad.setColorAt(1, Qt::green);painter.fillRect(rect(), grad);
}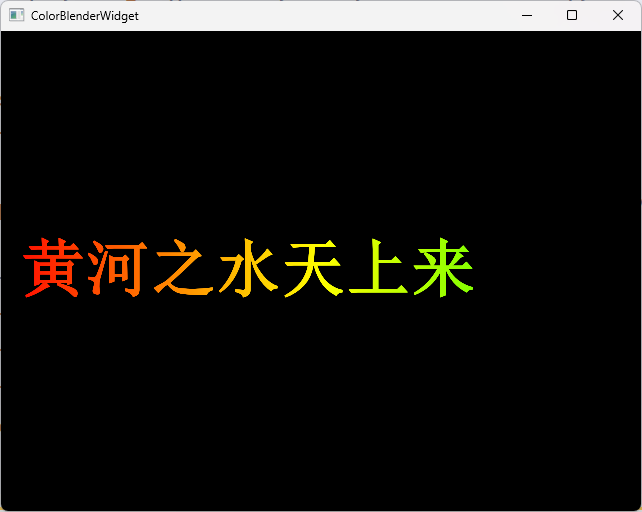
如圖,透明背景上先繪制黑色文字,再在整個窗口填充漸變,視覺效果是漸變只顯示在非透明區(黑色文字上)。?
7、DestinationIn
此模式可結合上面的模擬函數來看:
r_out = r_dst * a_src;
g_out = g_dst * a_src;
b_out = b_dst * a_src;
a_out = a_dst * a_src;
可見:
- 結果的RGB值由目標決定,且受到源的透明度影響。
- 在源的透明區域,目標不保留(源透明的區域 a_out = a_dst * a_src 結果是 0)。
void drawImage()
{QImage image(500, 500, QImage::Format_ARGB32);image.fill(Qt::transparent);QPainter painter(&image);QLinearGradient gradient(0, 0, 400, 0);gradient.setColorAt(0, QColor(0, 0, 0, 0));    // 左:完全透明(Alpha=0)gradient.setColorAt(1, QColor(0, 0, 0, 255));  // 右:完全不透明(Alpha=255)painter.fillRect(QRect(0, 0, 400, 200), gradient);painter.fillRect(QRect(0, 260, 400, 200), gradient);painter.setCompositionMode(QPainter::CompositionMode_DestinationIn);QColor color = Qt::red;color.setAlpha(120);painter.fillRect(QRect(0, 0, 400, 200), color);image.save("D://123.png");
}
如圖,先繪制兩個相同的漸變矩形,下方的漸變矩形作為對比,上方的漸變矩形作為目標,然后在上方漸變矩形上使用此模式繪制半透明紅色,可見:繪制的不透明紅色(源)的RGB沒有起作用,源的透明度稀釋了目標顏色。
8、SourceOut
此模式可結合上面的模擬函數來看:r_out = r_src * (1.0 - a_dst); g_out = g_src * (1.0 - a_dst); b_out = b_src * (1.0 - a_dst); a_out = a_src * (1.0 - a_dst);可見:
- 結果的RGB值由源決定,且受到目標的不透明度的補集調制。
- 結果在目標完全不透明的區域不顯示(目標完全不透明時 a_out = a_src * (1.0 - a_dst) 結果為 0)
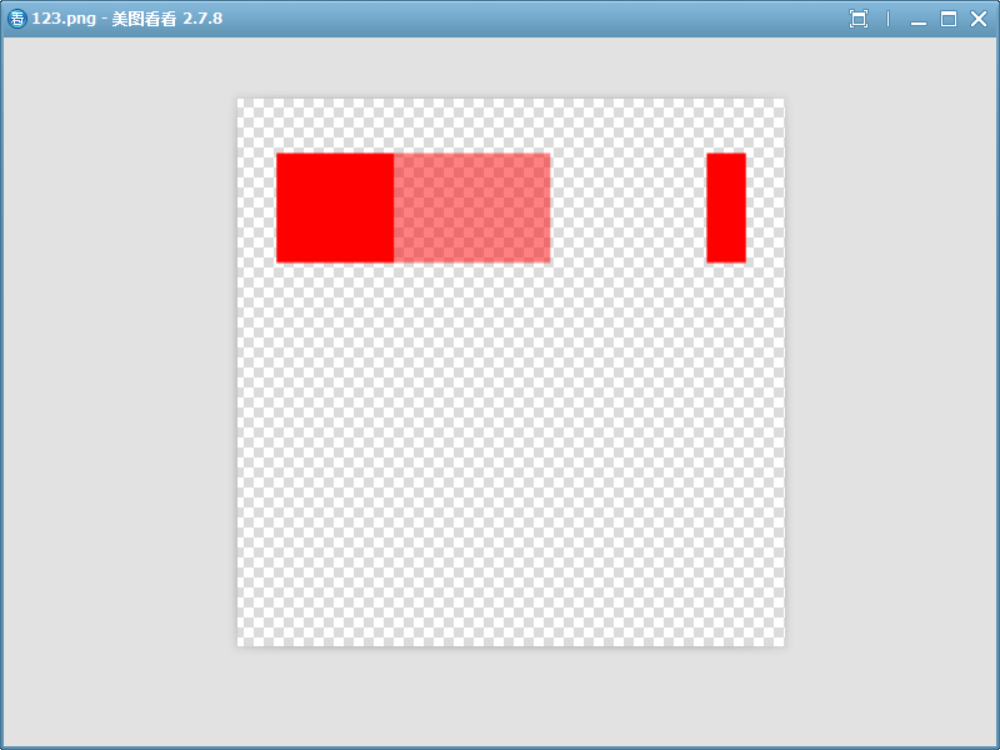
void drawImage()
{QImage image(700, 500, QImage::Format_ARGB32);image.fill(Qt::transparent);QPainter painter(&image);// 1. 繪制目標圖像(Destination):一個從左到右 alpha 漸變(0.0 -> 1.0)的藍色矩形painter.fillRect(0, 0, 200, 200, QColor(0, 0, 255, 0));     // 完全透明(alpha=0)painter.fillRect(200, 0, 200, 200, QColor(0, 0, 255, 128)); // 半透明(alpha=128)painter.fillRect(400, 0, 200, 200, QColor(0, 0, 255, 255)); // 完全不透明(alpha=255)// 2. 設置合成模式為 SourceOutpainter.setCompositionMode(QPainter::CompositionMode_SourceOut);// 3. 繪制源圖像(Source):一個完全不透明(alpha=255)的紅色矩形painter.fillRect(50, 50, 600, 100, Qt::red);painter.end();image.save("D://123.png");
}
如圖,三種不同透明度的顏色作為目標,可見:
- 如果目標完全不透明(alpha = 1.0),則源完全消失(因為 1 - 1 = 0)。
- 如果目標完全透明(alpha = 0.0),則源完全保留(因為 1 - 0 = 1)。
- 中間值會按比例縮減源的 alpha。
9、DestinationOut
此模式可結合上面的模擬函數來看:r_out = r_dst * (1.0 - a_src); g_out = g_dst * (1.0 - a_src); b_out = b_dst * (1.0 - a_src); a_out = a_dst * (1.0 - a_src);可見:
- 結果的RGB值由目標決定,且受到源的不透明度的補集調制。
- 結果在源完全不透明的區域不顯示(源完全不透明時 a_out = a_dst * (1.0 - a_src)?結果為 0)
void drawImage()
{QImage image(700, 500, QImage::Format_ARGB32);image.fill(Qt::transparent);QPainter painter(&image);painter.fillRect(50, 50, 600, 100, Qt::red);painter.setCompositionMode(QPainter::CompositionMode_DestinationOut);painter.fillRect(0, 0, 200, 200, QColor(0, 0, 255, 0));     // 完全透明藍色(alpha=0)painter.fillRect(200, 0, 200, 200, QColor(0, 0, 255, 128)); // 半透明藍色(alpha=128)painter.fillRect(400, 0, 200, 200, QColor(0, 0, 255, 255)); // 完全不透明藍色(alpha=255)image.save("D://123.png");
}
如圖,三種不同透明度的源覆蓋目標。?
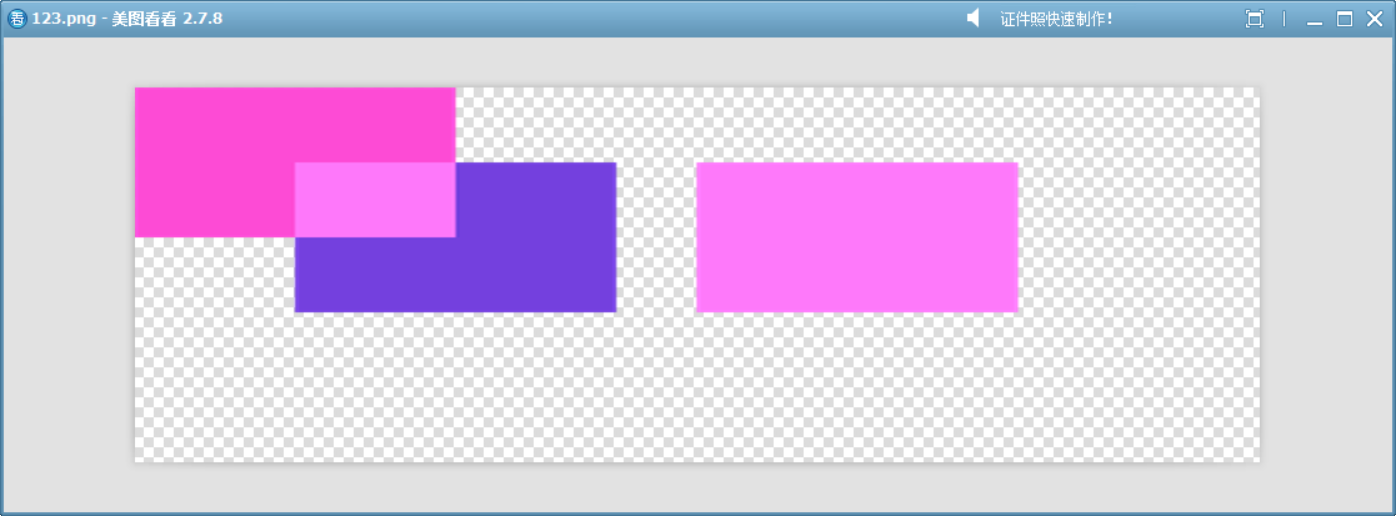
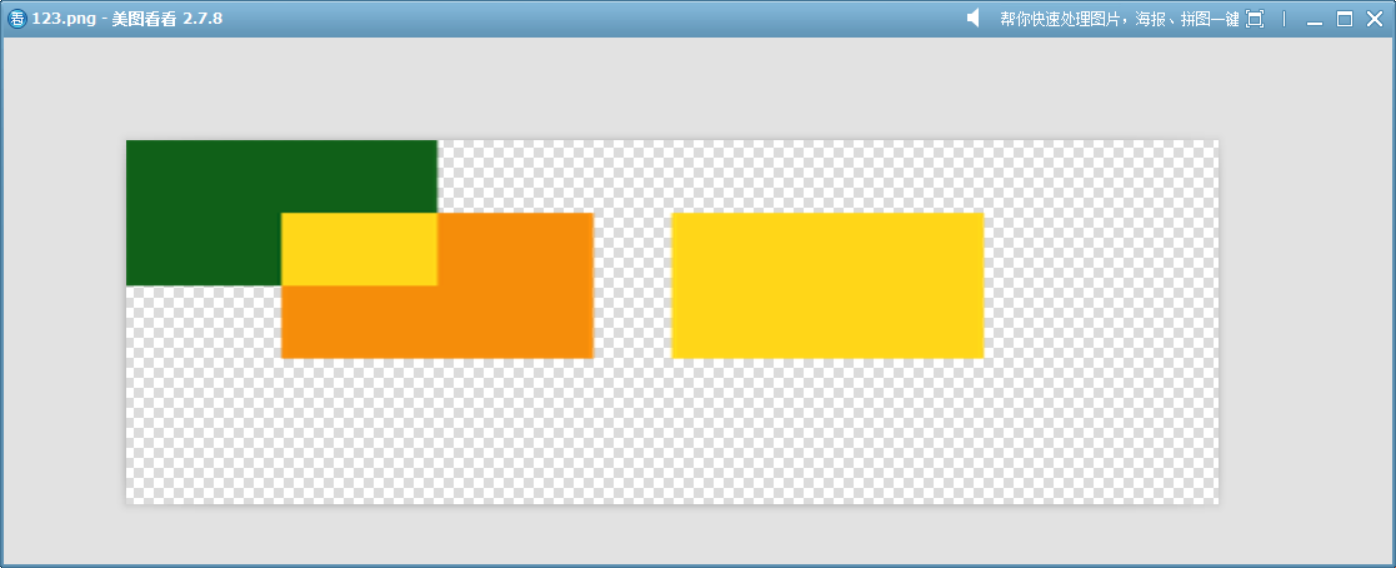
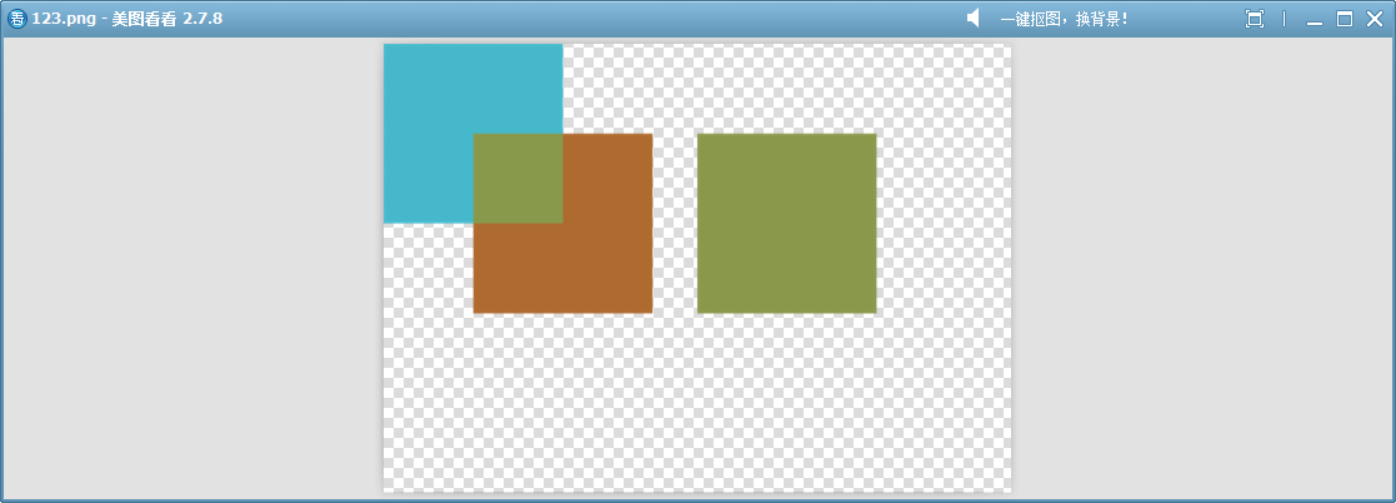
10、SourceAtop
此模式可結合上面的模擬函數來看:
?r_out = r_src * a_dst + r_dst * (1.0 - a_src);
g_out = g_src * a_dst + g_dst * (1.0 - a_src);
b_out = b_src * a_dst + b_dst * (1.0 - a_src);
a_out = a_dst;
可見:
- 結果只在目標不透明的區域繪制(a_out = a_dst)。
- 目標只在源透明的區域保留(在源不透明時 out = src * a_dst + dst * (1.0 - a_src) 的結果為:out = src * a_dst,沒有目標的顏色值參與)。
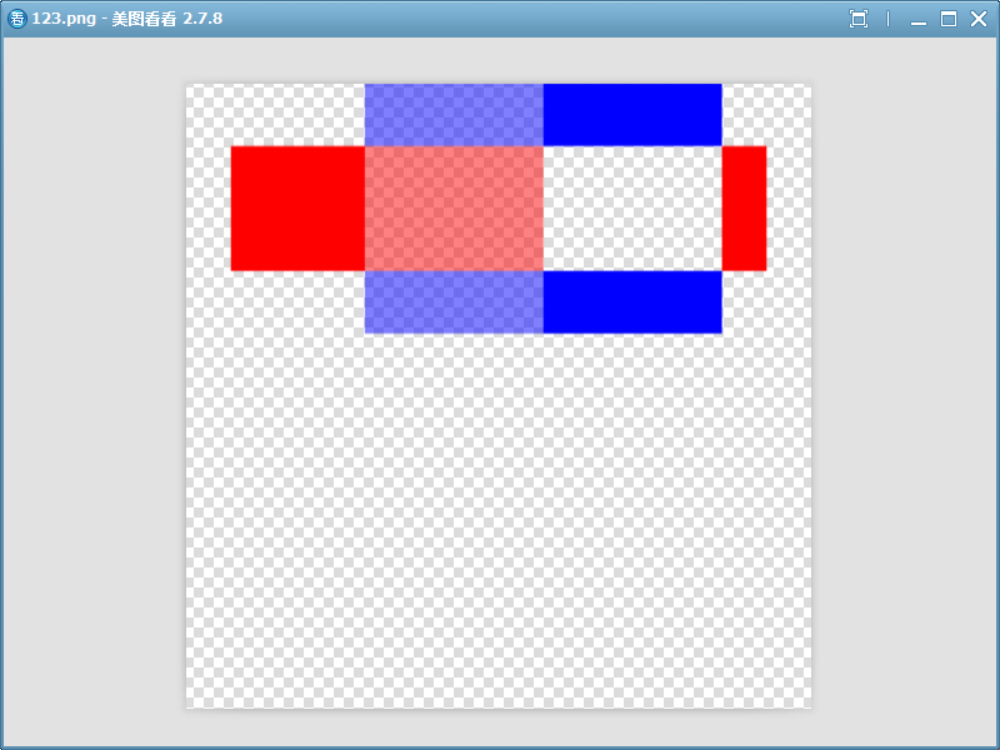
void drawImage()
{QImage image(700, 500, QImage::Format_ARGB32);image.fill(Qt::transparent);QPainter painter(&image);// 1. 繪制目標圖像(Destination):三個不同透明度的藍色矩形painter.fillRect(0,   0, 200, 200, QColor(0, 0, 255, 255));   // 完全不透明painter.fillRect(200, 0, 200, 200, QColor(0, 0, 255, 128));   // 半透明painter.fillRect(400, 0, 200, 200, QColor(0, 0, 255, 0));     // 完全透明// 2. 設置合成模式為 SourceAtoppainter.setCompositionMode(QPainter::CompositionMode_SourceAtop);// 3. 繪制源圖像(Source):一個完全不透明的紅色矩形(覆蓋所有三個區域)painter.fillRect(50, 50, 500, 100, Qt::red);image.save("D://123.png");
}
如圖,三種不同透明度的藍色作為目標,不透明的紅色覆蓋它們。
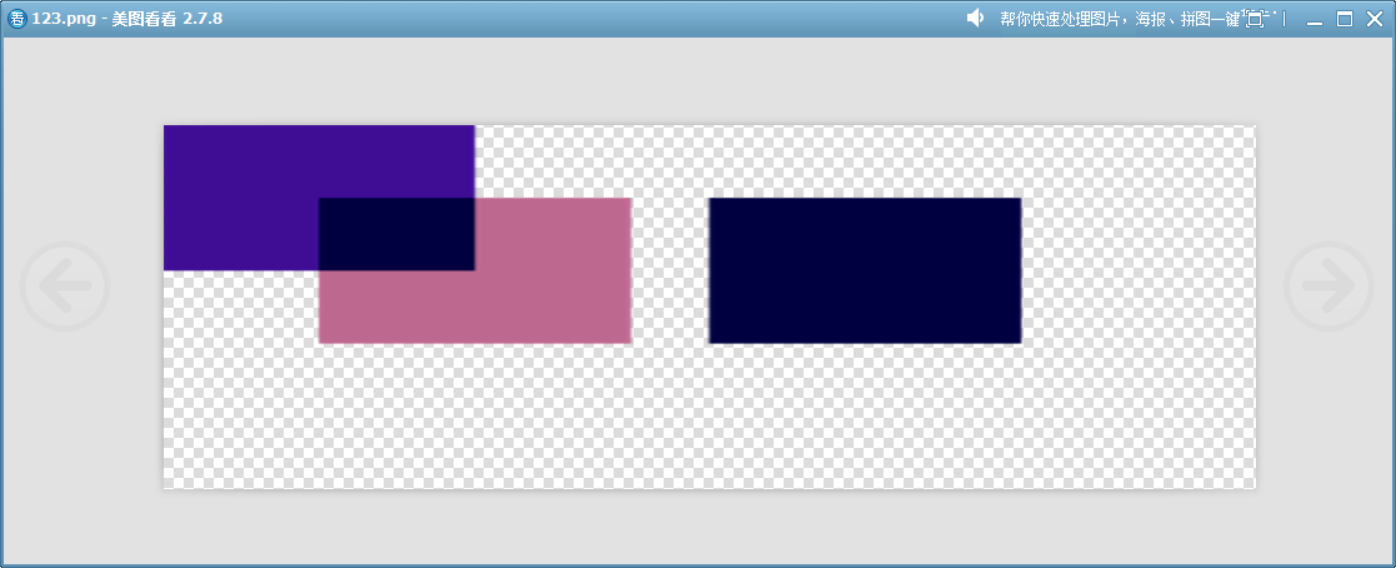
11、DestinationAtop
此模式可結合上面的模擬函數來看:
r_out = r_dst * a_src + r_src * (1.0 - a_dst);
g_out = g_dst * a_src + g_src * (1.0 - a_dst);
b_out = b_dst * a_src + b_src * (1.0 - a_dst);
a_out = a_src;
可見:
- 結果只在源不透明的區域繪制(a_out = a_src)。
- 源只在目標透明的區域保留(在目標不透明時 out = dst * a_src + src * (1.0 - a_dst) 的結果為:out = dst * a_src,沒有源的顏色值參與)。
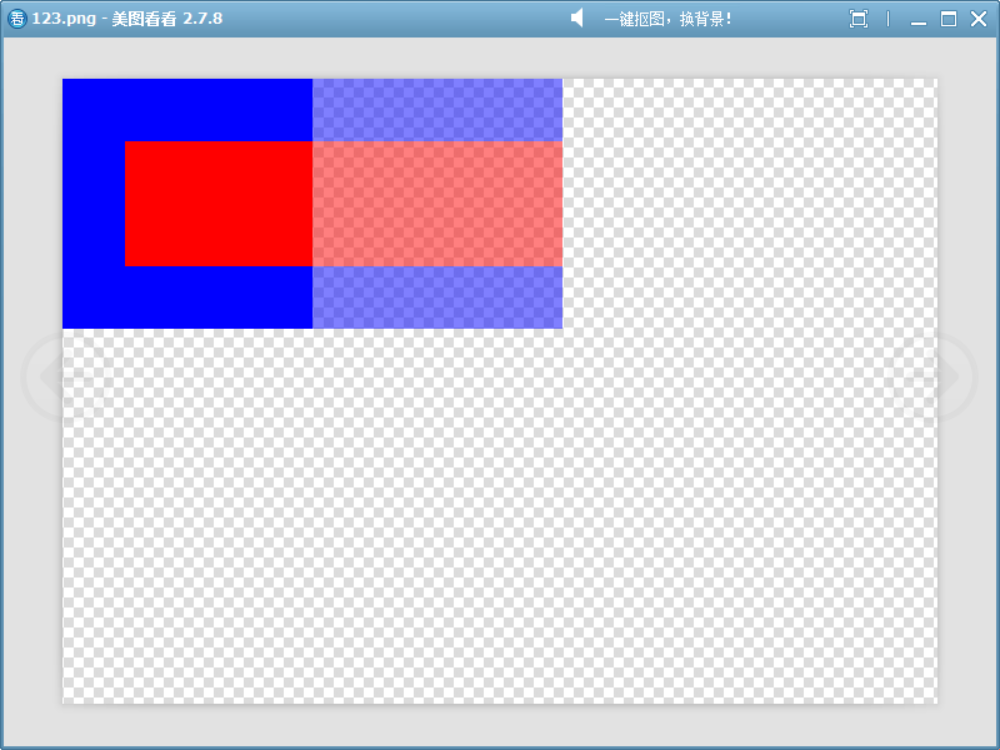
void drawImage()
{QImage image(700, 500, QImage::Format_ARGB32);image.fill(Qt::transparent);QPainter painter(&image);painter.fillRect(0,   0, 200, 200, QColor(0, 0, 255, 255));   // 完全不透明painter.fillRect(200, 0, 200, 200, QColor(0, 0, 255, 128));   // 半透明painter.fillRect(400, 0, 200, 200, QColor(0, 0, 255, 0));     // 完全透明painter.setCompositionMode(QPainter::CompositionMode_DestinationAtop);QColor color = Qt::red;color.setAlpha(100);painter.fillRect(0, 50, 700, 100, color);image.save("D://123.png");
}
如圖,三種不同透明度的藍色作為目標,半透明紅色作為源。
12、Xor
此模式可結合上面的模擬函數來看:
r_out = r_src * (1.0 - a_dst) + r_dst * (1.0 - a_src);
g_out = g_src * (1.0 - a_dst) + g_dst * (1.0 - a_src);
b_out = b_src * (1.0 - a_dst) + b_dst * (1.0 - a_src);
a_out = a_src * (1.0 - a_dst) + a_dst * (1.0 - a_src);
可見,此模式的核心特點是:源和目標在彼此透明的區域顯示,在都不透明的區域變透明。
更具體地說:
- 在源不透明、目標透明的區域:顯示源。
- 在源透明、目標不透明的區域:顯示目標。
- 在源和目標都不透明的區域:兩者都消失(變透明)。
void drawImage()
{QImage image(500, 500, QImage::Format_ARGB32);image.fill(Qt::transparent);QPainter painter(&image);painter.setRenderHint(QPainter::Antialiasing);QColor source(QColor(255,0,0));QColor dest(QColor(0,255,0));// 1、使用 Qt 的 XOR 合成模式繪制紅矩形和藍圓重疊區域painter.setBrush(source);painter.drawRect(50, 50, 100, 100); // 紅色矩形painter.setCompositionMode(QPainter::CompositionMode_Xor);painter.setBrush(dest);painter.drawEllipse(100, 100, 100, 100); // 藍色圓形image.save("D://123.png");
}
二、類似?Photoshop 中的混合模式
下面的13~24的原理在上圖可見。
注:這些模式的數學計算公式僅依賴 RGB 值,不直接處理 Alpha,下面的例子也不處理 Alpha。
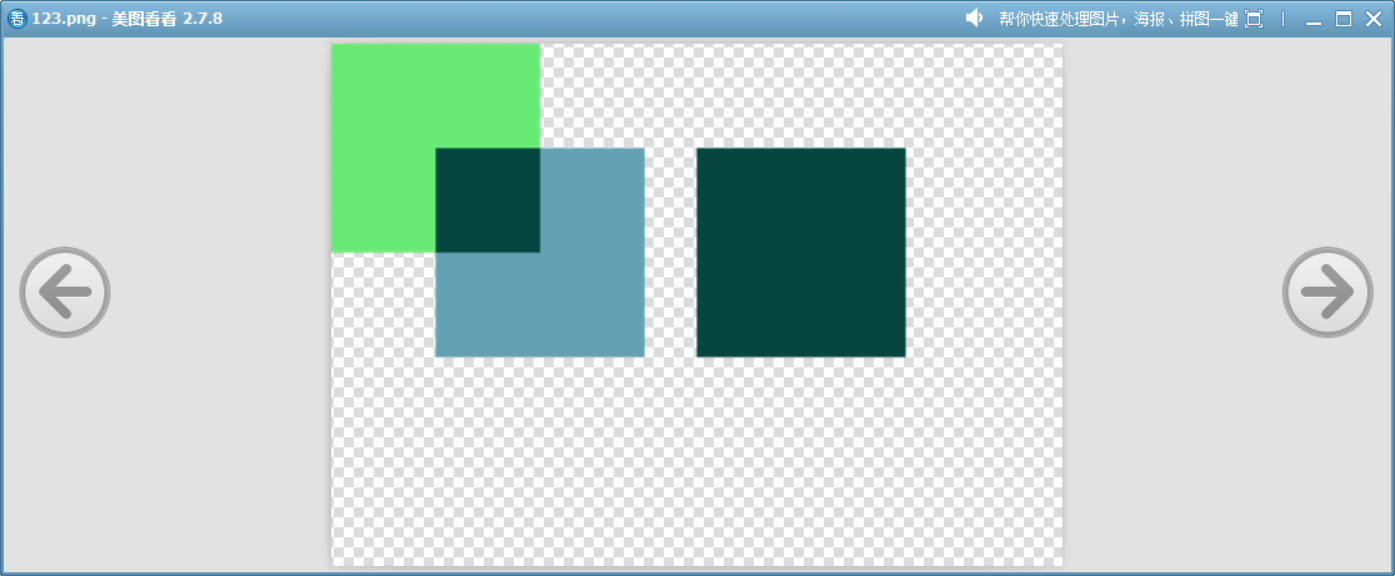
13、Plus
源顏色和目標顏色的 RGB 分量逐通道加。類似于 Photoshop 中的“線性減淡”混合模式。
QColor randomColor()
{// 使用 QRandomGenerator 生成 0-255 之間的隨機整數int r = QRandomGenerator::global()->bounded(256);int g = QRandomGenerator::global()->bounded(256);int b = QRandomGenerator::global()->bounded(256);int a = QRandomGenerator::global()->bounded(256);return QColor(r, g, b, 255); //不透明
}QColor simulatePlusMode(const QColor &src, const QColor &dst)
{int srcR = src.red();int srcG = src.green();int srcB = src.blue();int dstR = dst.red();int dstG = dst.green();int dstB = dst.blue();return QColor::fromRgb(qBound(0,srcR + dstR,255),qBound(0,srcG + dstG,255),qBound(0,srcB + dstB,255),255);
}void drawImage()
{QPixmap pixmap(900, 300);pixmap.fill(Qt::transparent);QPainter painter(&pixmap);QColor color1 = randomColor();QColor color2 = randomColor();painter.setBrush(color1);painter.drawRect(50, 50, 100, 100);painter.setCompositionMode(QPainter::CompositionMode_Plus);painter.setBrush(color2);painter.drawRect(100, 75, 100, 100);QColor color3 = simulatePlusMode(color1,color2);painter.setBrush(color3);painter.drawRect(300, 75, 100, 100);pixmap.save("D://123.png");
}
這個模擬函數說明了該模式的工作方式。
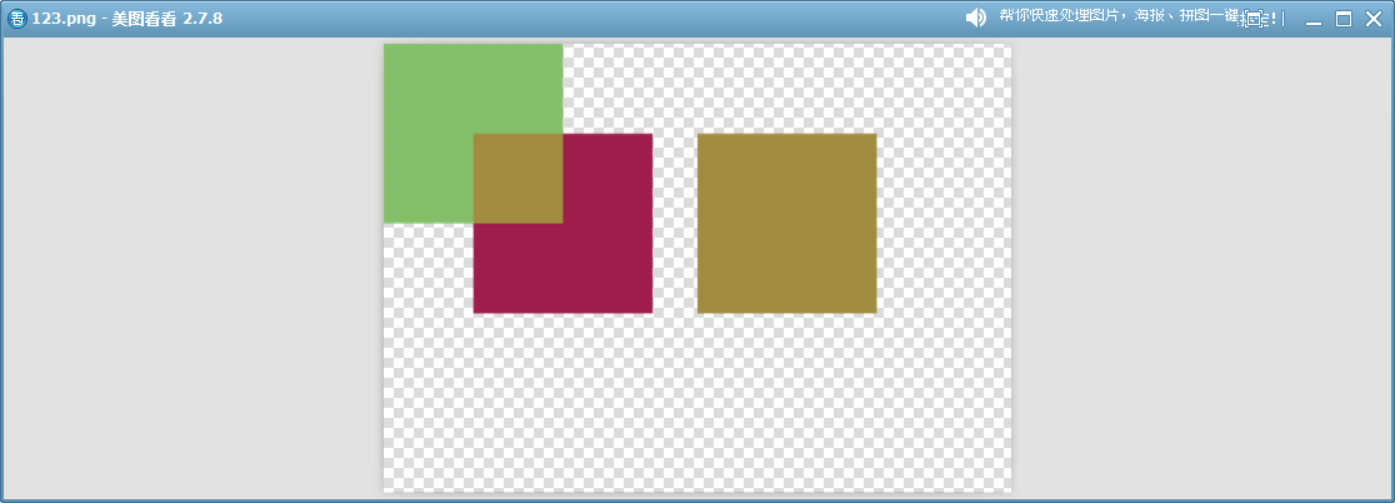
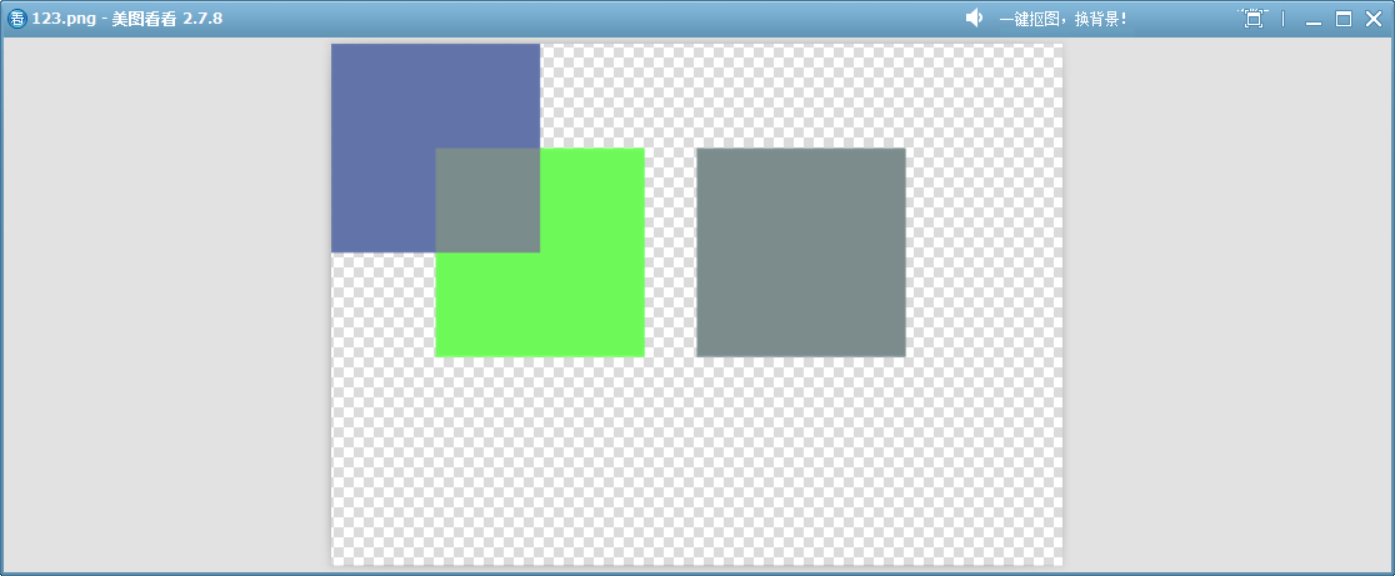
14、Multiply
將源顏色和目標顏色的 RGB 分量逐通道相乘。類似于 Photoshop 中的“正片疊底”混合模式。
白色作為源不會改變目標顏色。
黑色作為源會吸收所有顏色,結果總是黑色。
QColor randomColor()
{// 使用 QRandomGenerator 生成 0-255 之間的隨機整數int r = QRandomGenerator::global()->bounded(256);int g = QRandomGenerator::global()->bounded(256);int b = QRandomGenerator::global()->bounded(256);int a = QRandomGenerator::global()->bounded(256);return QColor(r, g, b, 255);
}QColor multiplyColors(const QColor &src, const QColor &dst)
{int srcR = src.red();int srcG = src.green();int srcB = src.blue();int dstR = dst.red();int dstG = dst.green();int dstB = dst.blue();return QColor::fromRgb(qBound(0,srcR * dstR / 255,255),qBound(0,srcG * dstG / 255,255),qBound(0,srcB * dstB / 255,255),255);
}void drawImage()
{QPixmap pixmap(900, 300);pixmap.fill(Qt::transparent);QPainter painter(&pixmap);QColor color1 = randomColor();QColor color2 = randomColor();painter.setBrush(color1);painter.drawRect(50, 50, 100, 100);painter.setCompositionMode(QPainter::CompositionMode_Multiply);painter.setBrush(color2);painter.drawRect(100, 75, 100, 100);QColor color3 = multiplyColors(color1,color2);painter.setBrush(color3);painter.drawRect(300, 75, 100, 100);pixmap.save("D://123.png");
}
這個模擬函數展示了此模式的工作原理。
QColor randomColor()
{// 使用 QRandomGenerator 生成 0-255 之間的隨機整數int r = QRandomGenerator::global()->bounded(256);int g = QRandomGenerator::global()->bounded(256);int b = QRandomGenerator::global()->bounded(256);int a = QRandomGenerator::global()->bounded(256);return QColor(r, g, b, 255);
}QColor multiplyColors(const QColor &src, const QColor &dst)
{int srcR = src.red();int srcG = src.green();int srcB = src.blue();int dstR = dst.red();int dstG = dst.green();int dstB = dst.blue();return QColor::fromRgb(qBound(0,srcR * dstR / 255,255),qBound(0,srcG * dstG / 255,255),qBound(0,srcB * dstB / 255,255),255);
}void demonstrateMultiplyFeatures()
{QImage image(500, 500, QImage::Format_ARGB32);image.fill(Qt::transparent);QPainter painter(&image);painter.setRenderHint(QPainter::Antialiasing);// 1. 白色是乘法單位元(不改變目標顏色){painter.setPen(Qt::black);painter.setBrush(QColor(100, 150, 200)); // 初始藍色painter.drawRect(50, 50, 200, 100);painter.setCompositionMode(QPainter::CompositionMode_Multiply);painter.setBrush(Qt::white); // 白色painter.drawRect(100, 70, 200, 100); // 疊加后藍色不變painter.setCompositionMode(QPainter::CompositionMode_SourceOver); // 重置混合模式painter.setBrush(multiplyColors(Qt::white,QColor(100, 150, 200)));painter.drawRect(350, 70, 50, 100);}// 2. 黑色會吸收所有顏色(結果黑色){painter.setBrush(QColor(255, 200, 0)); // 初始黃色painter.drawRect(50, 250, 200, 100);painter.setCompositionMode(QPainter::CompositionMode_Multiply);painter.setBrush(Qt::black);painter.drawRect(100, 270, 200, 100); // 疊加區域變為黑色painter.setCompositionMode(QPainter::CompositionMode_SourceOver);painter.setBrush(multiplyColors(Qt::black,QColor(255, 200, 0)));painter.drawRect(350, 270, 50, 100);}image.save("D://789.png");
}
15、Screen
反色相乘后再反色,使顏色變亮,與白色混合得白色,與黑色混合則保留原色。類似于 Photoshop 中的“濾色”混合模式。
QColor randomColor()
{// 使用 QRandomGenerator 生成 0-255 之間的隨機整數int r = QRandomGenerator::global()->bounded(256);int g = QRandomGenerator::global()->bounded(256);int b = QRandomGenerator::global()->bounded(256);int a = QRandomGenerator::global()->bounded(256);return QColor(r, g, b, 255);
}QColor screenBlendColors(const QColor &dst, const QColor &src)
{auto screenBlend = [](int dst,int src){return 255 - ((255 - dst) * (255 - src)) / 255;};return QColor::fromRgb(qBound(0,screenBlend(dst.red(),src.red()),255),qBound(0,screenBlend(dst.green(),src.green()),255),qBound(0,screenBlend(dst.blue(),src.blue()),255),255);
}void drawImage()
{QImage image(700, 500, QImage::Format_ARGB32);image.fill(Qt::transparent);QPainter painter(&image);QColor dst = randomColor();painter.fillRect(0, 0, 200, 200, dst);painter.setCompositionMode(QPainter::CompositionMode_Screen);QColor src = randomColor();painter.fillRect(100, 100, 200, 200, src);QColor mixedColor = screenBlendColors(dst, src);// 繪制第三個矩形,使用混合后的顏色painter.fillRect(350, 100, 200, 200, mixedColor);image.save("D://123.png");
}
這個模擬函數展示了此模式的工作方式。
QColor randomColor()
{// 使用 QRandomGenerator 生成 0-255 之間的隨機整數int r = QRandomGenerator::global()->bounded(256);int g = QRandomGenerator::global()->bounded(256);int b = QRandomGenerator::global()->bounded(256);int a = QRandomGenerator::global()->bounded(256);return QColor(r, g, b, 255);
}QColor screenBlendColors(const QColor &dst, const QColor &src)
{auto screenBlend = [](int dst,int src){return 255 - ((255 - dst) * (255 - src)) / 255;};return QColor::fromRgb(qBound(0,screenBlend(dst.red(),src.red()),255),qBound(0,screenBlend(dst.green(),src.green()),255),qBound(0,screenBlend(dst.blue(),src.blue()),255),255);
}void demonstrateScreenMode()
{// 創建透明畫布QImage canvas(700, 600, QImage::Format_ARGB32);canvas.fill(Qt::transparent);QPainter painter(&canvas);painter.setRenderHint(QPainter::Antialiasing);// 1. 基本公式演示 -----------------------------------QColor baseColor(153, 0, 0);QColor blendColor(0, 0, 77);painter.setPen(Qt::black);painter.drawText(50, 30, "1. 預期");painter.fillRect(50, 50, 100, 100, baseColor);painter.drawText(50, 170, "基色");painter.fillRect(200, 50, 100, 100, blendColor);painter.drawText(200, 170, "混合色");painter.fillRect(350, 50, 100, 100, baseColor);painter.setCompositionMode(QPainter::CompositionMode_Screen);painter.fillRect(350, 50, 100, 100, blendColor);painter.setCompositionMode(QPainter::CompositionMode_SourceOver);painter.drawText(350, 170, "結果");painter.fillRect(500, 50, 100, 100, screenBlendColors(baseColor, blendColor));painter.drawText(500, 170, "預期值");// 2. 與白色混合得白色 -------------------------------painter.drawText(50, 220, "2. 與白色混合 → 白色");QColor anyColor = randomColor();painter.fillRect(50, 240, 100, 100, anyColor);painter.drawText(50, 360, "任意顏色");painter.fillRect(200, 240, 100, 100, anyColor);painter.setCompositionMode(QPainter::CompositionMode_Screen);painter.fillRect(200, 240, 100, 100, Qt::white);painter.setCompositionMode(QPainter::CompositionMode_SourceOver);painter.drawText(200, 360, "結果應為白色");// 3. 與黑色混合 透明--------------------------------painter.drawText(350, 220, "3. 與黑色混合 → 結果不變");painter.fillRect(350, 240, 100, 100, anyColor);painter.drawText(350, 360, "相同任意顏色");painter.fillRect(500, 240, 100, 100, anyColor);painter.setCompositionMode(QPainter::CompositionMode_Screen);painter.fillRect(500, 240, 100, 100, Qt::black);painter.setCompositionMode(QPainter::CompositionMode_SourceOver);painter.drawText(500, 360, "結果不變");// 4. 可交換性演示 ---------------------------------painter.drawText(50, 410, "4. 可交換性: Screen(A,B) ≡ Screen(B,A)");QColor colorA = randomColor();QColor colorB = randomColor();painter.fillRect(50, 430, 100, 100, colorA);painter.setCompositionMode(QPainter::CompositionMode_Screen);painter.fillRect(50, 430, 100, 100, colorB);painter.setCompositionMode(QPainter::CompositionMode_SourceOver);painter.fillRect(200, 430, 100, 100, colorB);painter.setCompositionMode(QPainter::CompositionMode_Screen);painter.fillRect(200, 430, 100, 100, colorA);painter.setCompositionMode(QPainter::CompositionMode_SourceOver);painter.drawText(50, 550, "A+B");painter.drawText(200, 550, "B+A");canvas.save("D://789.png");
}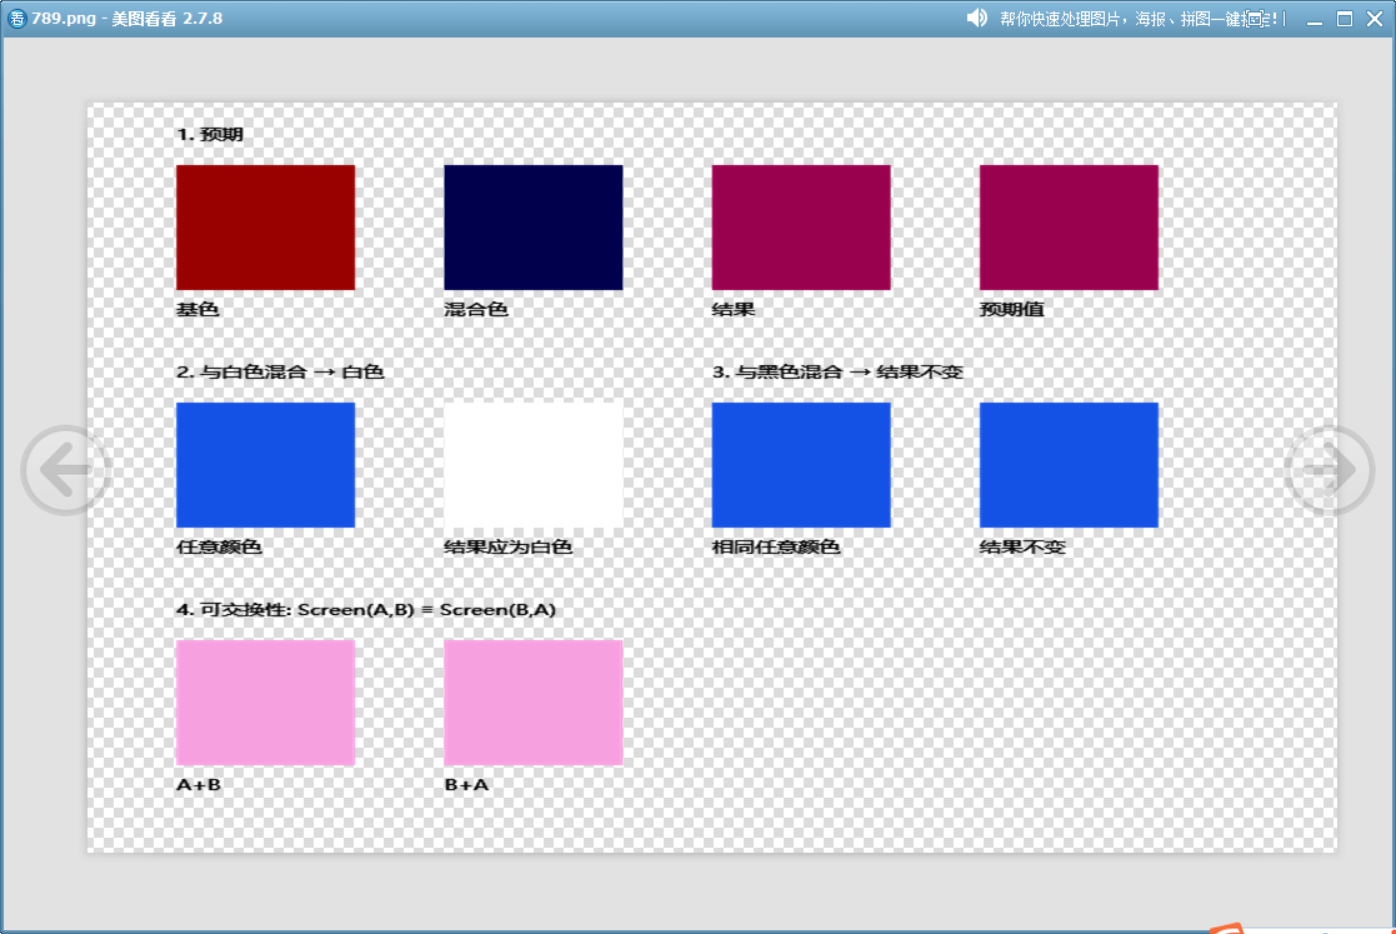
這個例子展示了此模式的一些特性。
16、Overlay
基于目標顏色的通道亮度,決定是進行“正片疊底”還是“濾色”的混合:
- 目標顏色亮度 < 0.5,則變暗(正片疊底)。
- 目標顏色亮度 ≥ 0.5,則提亮(濾色)。
目標亮則結果更亮,目標暗則結果更暗。類似于 Photoshop 中的“疊加”混合模式。
與?HardLight?模式類似,但此模式以目標顏色為基準,而?HardLight?以源顏色為基準。
QColor randomColor()
{// 使用 QRandomGenerator 生成 0-255 之間的隨機整數int r = QRandomGenerator::global()->bounded(256);int g = QRandomGenerator::global()->bounded(256);int b = QRandomGenerator::global()->bounded(256);int a = QRandomGenerator::global()->bounded(256);return QColor(r, g, b, 255);
}QColor overlayBlendColors(const QColor &dst, const QColor &src)
{auto overlayBlendChannel = [](float src, float dst) -> int {src /= 255.0f;  // 歸一化到 [0, 1]dst /= 255.0f;float result;if (dst < 0.5f){result = 2 * src * dst;  // 正片疊底(Multiply)} else {result = 1 - 2 * (1 - src) * (1 - dst);  // 濾色(Screen)}return static_cast<int>(qBound(0.0f, result, 1.0f) * 255.0f);  // 還原到 [0, 255]};int r = overlayBlendChannel(static_cast<float>(src.red()), static_cast<float>(dst.red()));int g = overlayBlendChannel(static_cast<float>(src.green()), static_cast<float>(dst.green()));int b = overlayBlendChannel(static_cast<float>(src.blue()), static_cast<float>(dst.blue()));return QColor(r, g, b, 255);
}void drawImage()
{QImage image(700, 500, QImage::Format_ARGB32);image.fill(Qt::transparent);QPainter painter(&image);QColor dst = randomColor();painter.fillRect(0, 0, 200, 200, dst);painter.setCompositionMode(QPainter::CompositionMode_Overlay);QColor src = randomColor();painter.fillRect(100, 100, 200, 200, src);QColor mixedColor = overlayBlendColors(dst, src);// 繪制第三個矩形,使用混合后的顏色painter.fillRect(350, 100, 200, 200, mixedColor);image.save("D://123.png");
}
這個模擬函數說明了此模式的工作原理。?
17、Darken
比較源顏色和目標顏色的每個顏色通道,并選擇更暗的值作為最終繪制的顏色。類似于 Photoshop 中的“變暗”混合模式。
下面這個例子繪制三個矩形,比背景亮的沒有顯示:
QImage image(400, 400, QImage::Format_ARGB32);image.fill(Qt::transparent);QPainter painter(&image);// 先畫一個淺色背景(比如淺黃色)painter.fillRect(0, 0, 400, 400, QColor(255, 250, 200));// 設置合成模式為 Darkenpainter.setCompositionMode(QPainter::CompositionMode_Darken);// 在圖像上繪制幾個不同顏色的圖形painter.setBrush(QColor(200, 100, 100)); // 紅色painter.drawRect(50, 50, 100, 100); // 紅色矩形painter.setBrush(QColor(100, 200, 100)); // 綠色painter.drawRect(100, 100, 100, 100); // 綠色矩形painter.setBrush(QColor(Qt::white));painter.drawRect(150, 150, 100, 100);image.save("D://123.png");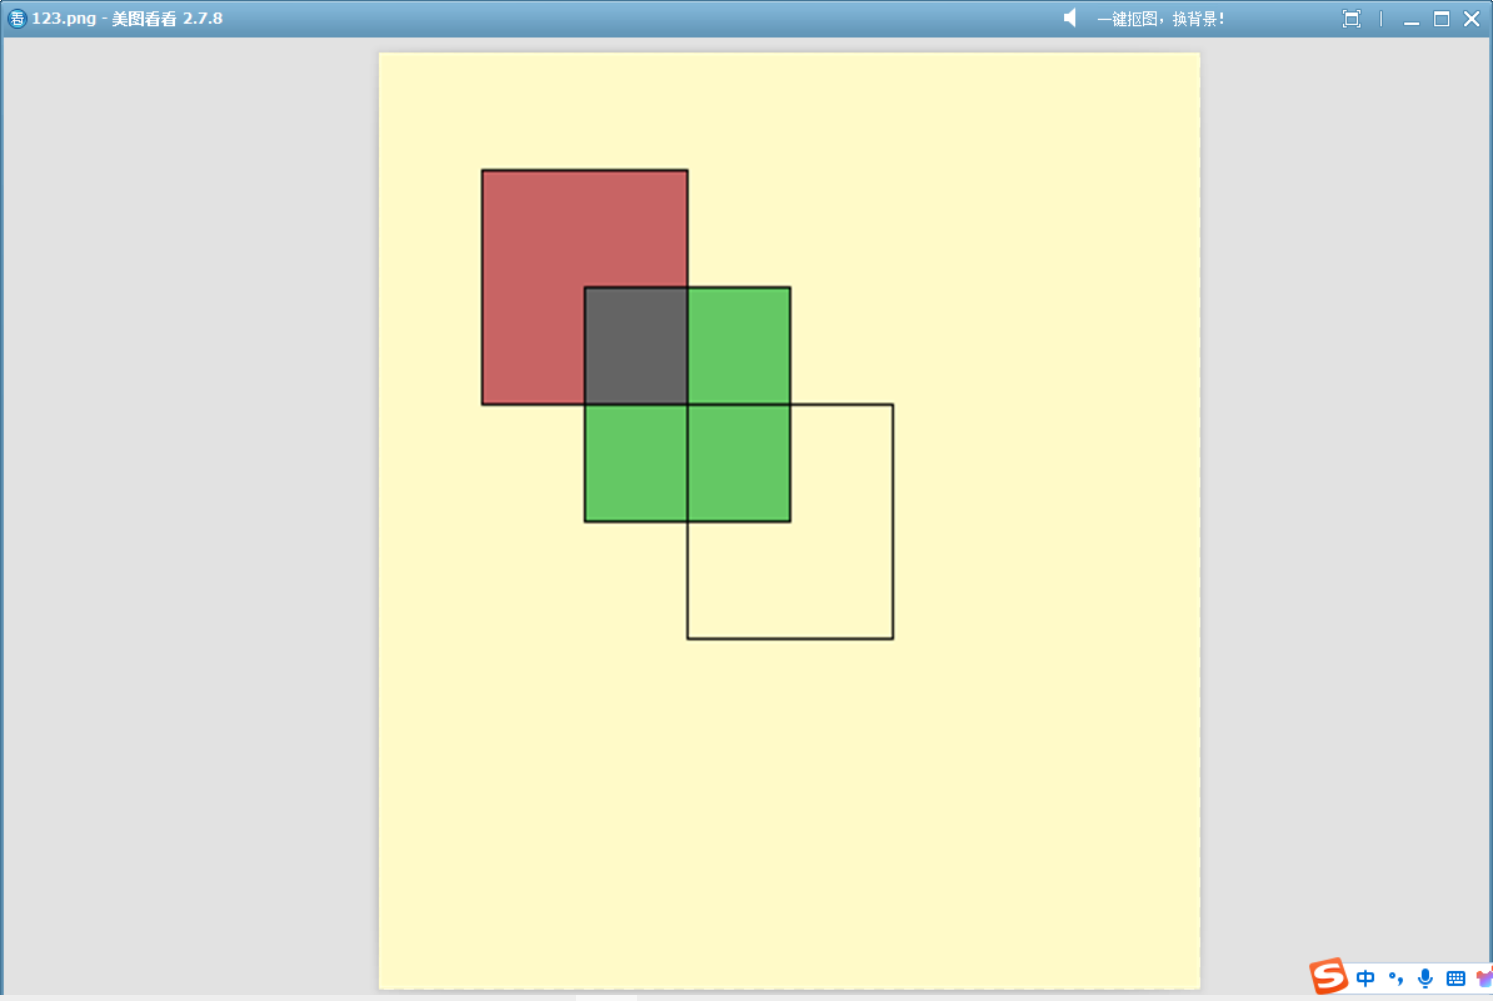
18、Lighten
比較源顏色和目標顏色的每個顏色通道,并選擇更亮的值作為最終繪制的顏色。類似于 Photoshop 中的“變亮”混合模式。
19、ColorDodge
提亮目標顏色(降低目標顏色的暗度)來反映源顏色,黑色源色不會對目標產生影響。類似于 Photoshop 中的“顏色減淡”混合模式。
QColor randomColor()
{// 使用 QRandomGenerator 生成 0-255 之間的隨機整數int r = QRandomGenerator::global()->bounded(256);int g = QRandomGenerator::global()->bounded(256);int b = QRandomGenerator::global()->bounded(256);int a = QRandomGenerator::global()->bounded(256);return QColor(r, g, b, 255);
}QColor colorDodgeBlendColors(const QColor &dst, const QColor &src)
{auto colorDodgeBlend = [](int dst,int src){return dst + (dst * src) / (255 - src);};return QColor::fromRgb(qBound(0,colorDodgeBlend(dst.red(),src.red()),255),qBound(0,colorDodgeBlend(dst.green(),src.green()),255),qBound(0,colorDodgeBlend(dst.blue(),src.blue()),255),255);
}void drawImage()
{QImage image(700, 500, QImage::Format_ARGB32);image.fill(Qt::transparent);QPainter painter(&image);QColor dst = randomColor();painter.fillRect(0, 0, 200, 200, dst);painter.setCompositionMode(QPainter::CompositionMode_ColorDodge);QColor src = randomColor();painter.fillRect(100, 100, 200, 200, src);QColor mixedColor = colorDodgeBlendColors(dst, src);// 繪制第三個矩形,使用混合后的顏色painter.fillRect(350, 100, 200, 200, mixedColor);image.save("D://123.png");
}
這個模擬函數展示了此模式的原理。?
20、ColorBurn
降低目標顏色的亮度來增強對比度,尤其強化暗部區域。類似于 Photoshop 中的“顏色加深”混合模式。
QColor randomColor()
{// 使用 QRandomGenerator 生成 0-255 之間的隨機整數int r = QRandomGenerator::global()->bounded(256);int g = QRandomGenerator::global()->bounded(256);int b = QRandomGenerator::global()->bounded(256);int a = QRandomGenerator::global()->bounded(256);return QColor(r, g, b, 255);
}QColor colorBurnBlendColors(const QColor &dst, const QColor &src)
{auto colorBurnBlend = [](int dst,int src){return dst - ((255 - dst) * (255 - src)) / src;};return QColor::fromRgb(qBound(0,colorBurnBlend(dst.red(),src.red()),255),qBound(0,colorBurnBlend(dst.green(),src.green()),255),qBound(0,colorBurnBlend(dst.blue(),src.blue()),255),255);
}void drawImage()
{QImage image(700, 500, QImage::Format_ARGB32);image.fill(Qt::transparent);QPainter painter(&image);QColor dst = randomColor();painter.fillRect(0, 0, 200, 200, dst);painter.setCompositionMode(QPainter::CompositionMode_ColorBurn);QColor src = randomColor();painter.fillRect(100, 100, 200, 200, src);QColor mixedColor = colorBurnBlendColors(dst, src);// 繪制第三個矩形,使用混合后的顏色painter.fillRect(350, 100, 200, 200, mixedColor);image.save("D://123.png");
}
這個模擬函數展示了此模式的原理。?
21、HardLight
基于源顏色的通道亮度,決定是進行“正片疊底”還是“濾色”的混合:
- 源顏色亮度 < 0.5,則變暗(正片疊底)。
- 源顏色亮度 ≥ 0.5,則提亮(濾色)。
源亮則結果更亮,源暗則結果更暗。類似于 Photoshop 中的“強光”混合模式。
與?Overlay 模式類似,但此模式以源顏色為基準,而?Overlay?以目標顏色為基準。
QColor randomColor()
{// 使用 QRandomGenerator 生成 0-255 之間的隨機整數int r = QRandomGenerator::global()->bounded(256);int g = QRandomGenerator::global()->bounded(256);int b = QRandomGenerator::global()->bounded(256);int a = QRandomGenerator::global()->bounded(256);return QColor(r, g, b, 255);
}QColor hardLightBlendColors(const QColor &dst, const QColor &src)
{auto hardLightBlendChannel = [](float src, float dst) -> int {src /= 255.0f;  // 歸一化到 [0, 1]dst /= 255.0f;float result;if (src <= 0.5f) {result = 2 * src * dst;  // 正片疊底(Multiply)} else {result = 1 - 2 * (1 - src) * (1 - dst);  // 濾色(Screen)}return static_cast<int>(qBound(0.0f, result, 1.0f) * 255.0f);  // 還原到 [0, 255]};int r = hardLightBlendChannel(static_cast<float>(src.red()), static_cast<float>(dst.red()));int g = hardLightBlendChannel(static_cast<float>(src.green()), static_cast<float>(dst.green()));int b = hardLightBlendChannel(static_cast<float>(src.blue()), static_cast<float>(dst.blue()));return QColor(r, g, b, 255);
}void drawImage()
{QImage image(700, 500, QImage::Format_ARGB32);image.fill(Qt::transparent);QPainter painter(&image);QColor dst = randomColor();painter.fillRect(0, 0, 200, 200, dst);painter.setCompositionMode(QPainter::CompositionMode_HardLight);QColor src = randomColor();painter.fillRect(100, 100, 200, 200, src);QColor mixedColor = hardLightBlendColors(dst, src);// 繪制第三個矩形,使用混合后的顏色painter.fillRect(350, 100, 200, 200, mixedColor);image.save("D://123.png");
}
這個模擬函數展示了此模式的工作原理。?
22、SoftLight
比 HardLight 更柔和,類似漫反射光的效果,適合自然的光影調整。
基于源顏色的通道亮度動態調整目標顏色的對比度:
- 源顏色亮度 > 0.5:輕微提亮目標顏色。
- 源顏色亮度 ≤ 0.5:輕微壓暗目標顏色。
類似于 Photoshop 中的“柔光”混合模式。
QColor randomColor()
{// 使用 QRandomGenerator 生成 0-255 之間的隨機整數int r = QRandomGenerator::global()->bounded(256);int g = QRandomGenerator::global()->bounded(256);int b = QRandomGenerator::global()->bounded(256);int a = QRandomGenerator::global()->bounded(256);return QColor(r, g, b, 255);
}QColor softLightBlendColors(const QColor &dst, const QColor &src)
{auto blendChannel = [](float src, float dst) -> float {src /= 255.0f; // 歸一化到 [0, 1]dst /= 255.0f;float result;if (src > 0.5f) {// 提亮公式result = dst + (2.0f * src - 1.0f) * (sqrt(dst) - dst);} else {// 壓暗公式result = dst - (1.0f - 2.0f * src) * dst * (1.0f - dst);}return qBound(0.0f, result, 1.0f) * 255.0f; // 還原到 [0, 255]};int r = blendChannel(src.red(), dst.red());int g = blendChannel(src.green(), dst.green());int b = blendChannel(src.blue(), dst.blue());return QColor(r, g, b, 255);
}void drawImage()
{QImage image(700, 500, QImage::Format_ARGB32);image.fill(Qt::transparent);QPainter painter(&image);QColor dst = randomColor();painter.fillRect(0, 0, 200, 200, dst);painter.setCompositionMode(QPainter::CompositionMode_SoftLight);QColor src = randomColor();painter.fillRect(100, 100, 200, 200, src);QColor mixedColor = softLightBlendColors(dst, src);// 繪制第三個矩形,使用混合后的顏色painter.fillRect(350, 100, 200, 200, mixedColor);image.save("D://123.png");
}
這個模擬函數展示了此模式的原理。
23、Difference
目標和源的顏色二者中較亮的顏色中減去較暗的顏色。類似于 Photoshop 中的“差值”混合模式。
QColor randomColor()
{// 使用 QRandomGenerator 生成 0-255 之間的隨機整數int r = QRandomGenerator::global()->bounded(256);int g = QRandomGenerator::global()->bounded(256);int b = QRandomGenerator::global()->bounded(256);int a = QRandomGenerator::global()->bounded(256);return QColor(r, g, b, 255);
}QColor differenceBlend(const QColor &dst, const QColor &src)
{int r = std::abs(dst.red() - src.red());int g = std::abs(dst.green() - src.green());int b = std::abs(dst.blue() - src.blue());return QColor(r, g, b, 255); // Alpha 固定為不透明
}void drawImage()
{QImage image(700, 500, QImage::Format_ARGB32);image.fill(Qt::transparent);QPainter painter(&image);QColor dst = randomColor();painter.fillRect(0, 0, 200, 200, dst);painter.setCompositionMode(QPainter::CompositionMode_Difference);QColor src = randomColor();painter.fillRect(100, 100, 200, 200, src);QColor mixedColor = differenceBlend(dst, src);// 繪制第三個矩形,使用混合后的顏色painter.fillRect(350, 100, 200, 200, mixedColor);image.save("D://123.png");
}
這個函數展示了此模式的原理。?
24、Exclusion
類似于 Difference 模式,但整體效果要柔和。類似于 Photoshop 中的“排除”混合模式。
QColor randomColor()
{// 使用 QRandomGenerator 生成 0-255 之間的隨機整數int r = QRandomGenerator::global()->bounded(256);int g = QRandomGenerator::global()->bounded(256);int b = QRandomGenerator::global()->bounded(256);int a = QRandomGenerator::global()->bounded(256);return QColor(r, g, b, 255);
}QColor exclusionBlend(const QColor &dst, const QColor &src)
{auto blendChannel = [](int dstChannel, int srcChannel) -> int {return dstChannel + srcChannel - 2 * dstChannel * srcChannel / 255;};int r = blendChannel(dst.red(), src.red());int g = blendChannel(dst.green(), src.green());int b = blendChannel(dst.blue(), src.blue());return QColor(r, g, b, 255); // Alpha 固定為不透明
}void drawImage()
{QImage image(700, 500, QImage::Format_ARGB32);image.fill(Qt::transparent);QPainter painter(&image);QColor dst = randomColor();painter.fillRect(0, 0, 200, 200, dst);painter.setCompositionMode(QPainter::CompositionMode_Exclusion);QColor src = randomColor();painter.fillRect(100, 100, 200, 200, src);QColor mixedColor = exclusionBlend(dst, src);// 繪制第三個矩形,使用混合后的顏色painter.fillRect(350, 100, 200, 200, mixedColor);image.save("D://123.png");
}
這個模擬函數展示了此模式的原理。
三、位運算混合模式
剩余的模式都是基于位運算來實現像素的混合。
位運算混合在特定的歷史條件下非常適合當時的硬件和軟件環境。然而,隨著技術的進步,尤其是對更高圖像質量和更復雜視覺效果的需求,這些傳統方法逐漸被更為先進的合成技術和算法所取代。盡管如此,在某些特定的情況下,比如低級圖形編程或特定硬件加速中,位運算仍然可能找到它的用武之地。
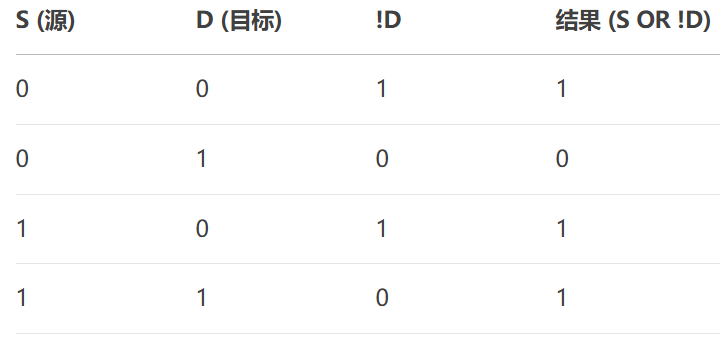
25、SourceOrDestination
將源和目標像素進行按位或(OR)操作。
原理:
QColor sourceOrDestination(const QColor& src, const QColor& dst)
{// 確保顏色都是預乘格式QColor source = src.toRgb();QColor destination = dst.toRgb();// 對每個通道執行按位OR操作int r = source.red() | destination.red();int g = source.green() | destination.green();int b = source.blue() | destination.blue();// 返回結果顏色,保持原始alpha預乘狀態return QColor(r, g, b);
}
這個模式可以用來疊加圖像,從二進制數據來看:
源像素(紅色):
- R: 11111111 (255)
- G: 00000000 (0)
- B: 00000000 (0)
目標像素(藍色)
- R: 00000000 (0)
- G: 00000000 (0)
- B: 11111111 (255)
執行 src OR dst 操作:
- R: 11111111 | 00000000 = 11111111 → 255
- G: 00000000 | 00000000 = 00000000 → 0
- B: 00000000 | 11111111 = 11111111 → 255
從二進制角度看這個操作的意義:
- 如果源或目標中某個顏色位為 1,那么最終顏色中該位就是 1。
- 這相當于將兩個圖像的“亮”部分(即非零值)合并在一起,不會覆蓋或減弱。
// 創建一個帶有透明通道的ARGB圖像
QImage createTransparentImage(int width, int height) {QImage image(width, height, QImage::Format_ARGB32);image.fill(Qt::transparent); // 完全透明背景return image;
}// 繪制一個圓形光源(使用半透明顏色)
void drawLight(QPainter& painter, int x, int y, int radius) {QRadialGradient gradient(x, y, radius);gradient.setColorAt(0, QColor(255, 255, 0, 200)); // 中心黃色gradient.setColorAt(1, Qt::transparent);         // 邊緣透明painter.setBrush(gradient);painter.setPen(Qt::NoPen);painter.drawEllipse(QPoint(x, y), radius, radius);
}void drawImage()
{const int width = 800, height = 400;// 創建透明背景圖像QImage result = createTransparentImage(width, height);// 使用OR模式繪制多個光源QPainter painter(&result);painter.setCompositionMode(QPainter::RasterOp_SourceOrDestination);// 繪制三個重疊的光源drawLight(painter, 100, 100, 80);drawLight(painter, 150, 150, 80);drawLight(painter, 200, 100, 80);painter.setCompositionMode(QPainter::CompositionMode_SourceOver);painter.translate(400,0);drawLight(painter, 100, 100, 80);drawLight(painter, 150, 150, 80);drawLight(painter, 200, 100, 80);result.save("D://123.png");
}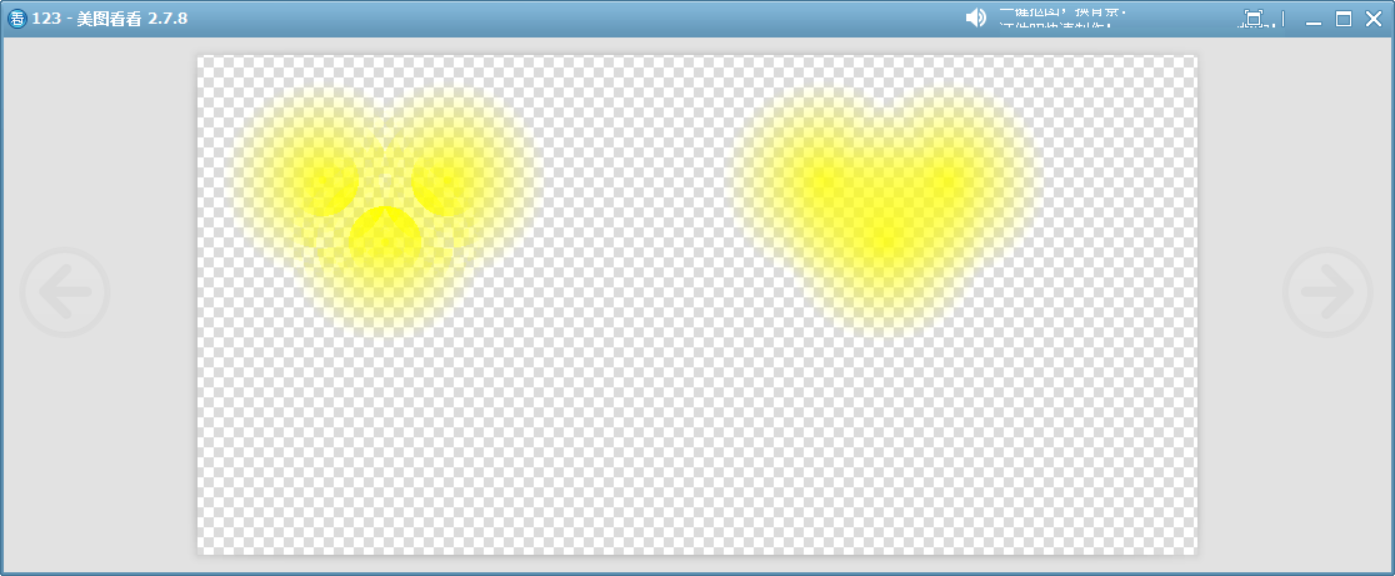
這個代碼模擬了"光照疊加"效果。繪制多個光源效果,當光源重疊時,亮度應該疊加(而不是簡單的覆蓋)。使用普通的合成模式會導致重疊區域被覆蓋,而使用OR操作可以實現亮度疊加效果。
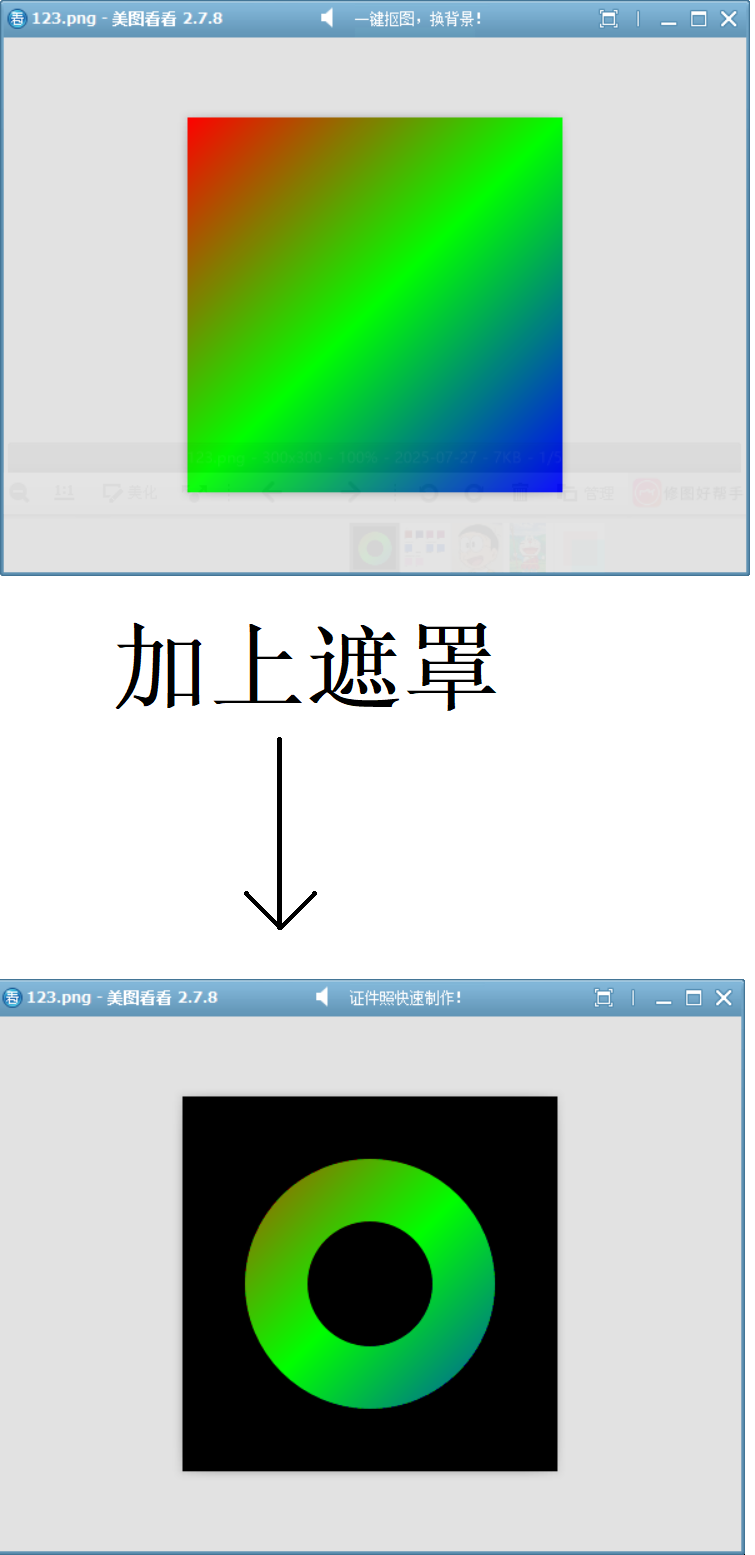
26、SourceAndDestination
將源和目標像素進行按位與(AND)操作。
原理:
QColor sourceAndrDestination(const QColor& src, const QColor& dst)
{// 確保顏色都是預乘格式QColor source = src.toRgb();QColor destination = dst.toRgb();// 對每個通道執行按位OR操作int r = source.red() & destination.red();int g = source.green() & destination.green();int b = source.blue() & destination.blue();// 返回結果顏色,保持原始alpha預乘狀態return QColor(r, g, b);
}
例1:繪制一個環形遮罩
// 創建環形遮罩
QImage createRingMask(int width, int height) {QImage mask(width, height, QImage::Format_ARGB32);mask.fill(Qt::transparent);QPainter painter(&mask);painter.setRenderHint(QPainter::Antialiasing);painter.setRenderHint(QPainter::SmoothPixmapTransform);painter.setBrush(Qt::white);painter.setPen(Qt::NoPen);// 白色的外圓painter.drawEllipse(50, 50, 200, 200);painter.setCompositionMode(QPainter::CompositionMode_Clear);//清空內圓,形成環形painter.drawEllipse(100, 100, 100, 100);return mask;
}// 創建彩色圖像
QImage createColorImage(int width, int height) {QImage image(width, height, QImage::Format_ARGB32);QPainter painter(&image);QLinearGradient gradient(0, 0, width, height);gradient.setColorAt(0, Qt::red);gradient.setColorAt(0.5, Qt::green);gradient.setColorAt(1, Qt::blue);painter.fillRect(image.rect(), gradient);return image;
}void drawImage()
{const int width = 300, height = 300;// 創建素材QImage colorImage = createColorImage(width, height);QImage ringMask = createRingMask(width, height);QImage result(width, height, QImage::Format_ARGB32);// 方法1:使用QPainter直接繪制QPainter painter(&result);painter.drawImage(0, 0, colorImage);painter.setCompositionMode(QPainter::RasterOp_SourceAndDestination);painter.drawImage(0, 0, ringMask);// 方法2:使用模擬的函數手動混合for (int y = 0; y < height; ++y) {for (int x = 0; x < width; ++x) {QColor src = colorImage.pixelColor(x, y);QColor dst = ringMask.pixelColor(x, y);result.setPixelColor(x, y, sourceAndrDestination(src, dst));}}result.save("D://123.png");
}
例2:簡易X光效果
class XRayViewer : public QWidget
{Q_OBJECT
public:XRayViewer(const QString &humanImagePath, const QString &xRayImagePath, QWidget *parent = nullptr): QWidget(parent),bodyImage(humanImagePath),boneMask(xRayImagePath){connect(new QPushButton("切換顯示", this), &QPushButton::clicked, this, &XRayViewer::toggleImage);setMinimumSize(1024,512);}void paintEvent(QPaintEvent *event){QPainter resultPainter(this);resultPainter.drawImage(0, 0, bodyImage.convertToFormat(QImage::Format_Grayscale8));if(showX){// 使用AND操作只顯示骨骼區域resultPainter.setCompositionMode(QPainter::RasterOp_SourceAndDestination);resultPainter.drawImage(0, 0, boneMask);//增強骨骼亮度resultPainter.setCompositionMode(QPainter::CompositionMode_Plus);resultPainter.drawImage(0, 0, boneMask);}}private:void toggleImage(){showX = !showX;update();}private:QImage bodyImage, boneMask;bool showX{false};
};int main(int argc, char *argv[])
{QApplication a(argc, argv);QString humanImagePath = "D://shou.png";QString xRayImagePath = "D://shouX.png";XRayViewer viewer(humanImagePath, xRayImagePath);viewer.setWindowTitle("人體與X光圖像切換");viewer.show();return a.exec();
}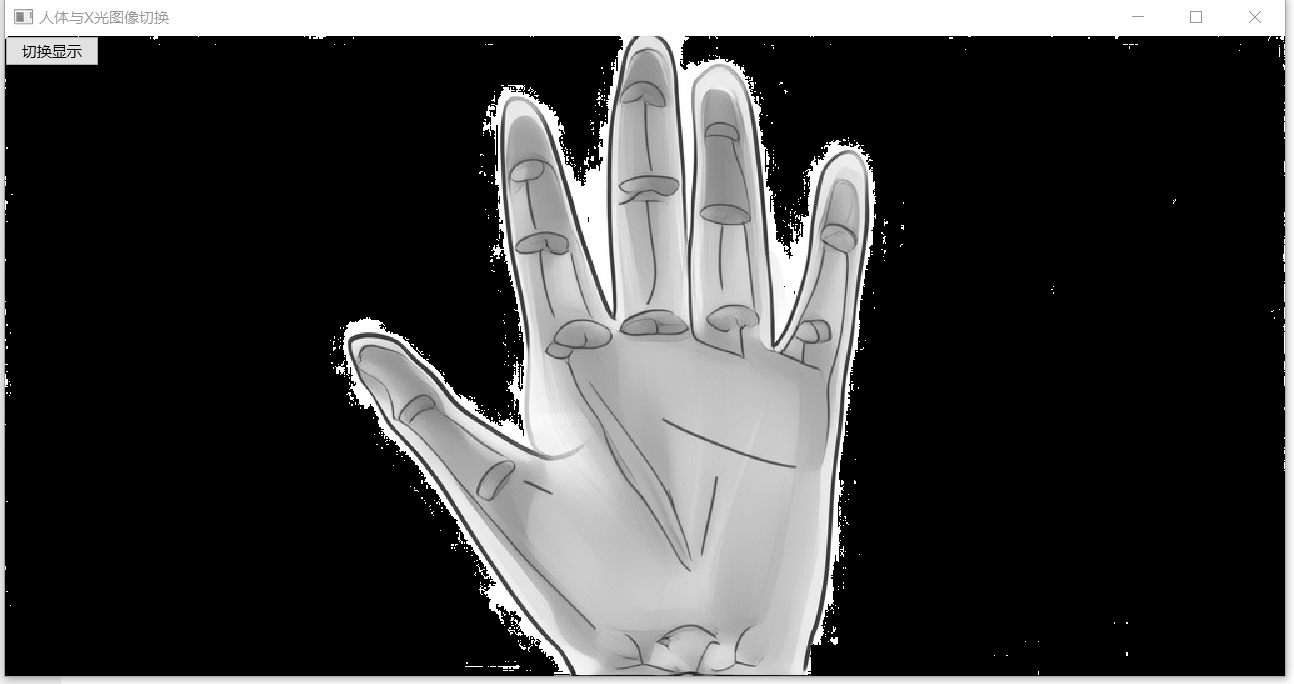
這倆圖片是AI生成的,不太精確,知道意思得了,X光圖片用PS處理一下背景改成透明的。

27、SourceXorDestination
將源和目標像素進行按位異或(XOR)操作。
視覺特性:
1、可逆性:對同一圖像應用兩次 XOR 操作會恢復原狀
XOR 運算有以下基本性質:
- 自反性:X ^ X = 0 (任何數與自己異或結果為0)
- 恒等性:X ^ 0 = X (與0異或保持不變)
- 結合律:(X ^ Y) ^ Z = X ^ (Y ^ Z)
位運算示例(單像素):
假設原始顏色值: 10110011 (179)
XOR圖案值: ? ? 01100110 (102)
第一次XOR:
10110011
^
01100110
=
11010101 (213)第二次XOR:
11010101
^
01100110
=
10110011 (179) // 恢復原值
2、對比反轉:與白色區域交互會產生顏色反轉效果(X ^ 255 = 255 - X)
對于8位顏色通道(值范圍0-255):
- 255的二進制表示為11111111
- XOR的真值表特性:0^1=1, 1^1=0
- 因此:X ^ 255相當于對X的每一位取反
3、差異突出:能突出顯示兩幅圖像的差異部分
當且僅當兩個位不同時,XOR結果為1,因此 A ^ B 的結果中:
- 為0的位表示A和B對應位相同
- 為1的位表示A和B對應位不同
QColor randomColor()
{// 使用 QRandomGenerator 生成 0-255 之間的隨機整數int r = QRandomGenerator::global()->bounded(256);int g = QRandomGenerator::global()->bounded(256);int b = QRandomGenerator::global()->bounded(256);int a = QRandomGenerator::global()->bounded(256);return QColor(r, g, b, 255);
}QColor xorBlendColors(const QColor& src, const QColor& dst) {// 確保顏色是有效的RGB顏色(預處理)QColor source = src.toRgb();QColor destination = dst.toRgb();// 對每個通道執行XOR運算(核心算法)auto xorChannel = [](int src, int dst) {// XOR運算(0-255范圍)int result = src ^ dst;// 確保結果在合法范圍內(實際上XOR結果不會越界,這里是為了防御性編程)return std::clamp(result, 0, 255);};// 計算各通道int r = xorChannel(source.red(), destination.red());int g = xorChannel(source.green(), destination.green());int b = xorChannel(source.blue(), destination.blue());// 構造結果顏色(后處理)return QColor(r, g, b);
}void drawImage()
{QImage image(700, 500, QImage::Format_ARGB32);image.fill(Qt::transparent);QPainter painter(&image);QColor dst = randomColor();painter.fillRect(0, 0, 200, 200, dst);painter.setCompositionMode(QPainter::RasterOp_SourceXorDestination);QColor src = randomColor();painter.fillRect(100, 100, 200, 200, src);QColor mixedColor = xorBlendColors(dst, src);painter.setCompositionMode(QPainter::CompositionMode_SourceOver);// 繪制第三個矩形,使用混合后的顏色painter.fillRect(350, 100, 200, 200, mixedColor);image.save("D://123.png");
}
這個模擬函數展示了此模式的工作原理。
例:動態選框,特點是框的顏色可以疊加在任何背景上
class XORRubberBandWidget : public QWidget
{QPoint start, end;bool drawing = false;public:XORRubberBandWidget(QWidget *parent = nullptr) : QWidget(parent){setWindowTitle("XOR Rubber Band - Corrected Version");resize(800, 600);setMouseTracking(true);}
protected:void paintEvent(QPaintEvent *) override{QPainter painter(this);painter.fillRect(rect(),Qt::white);painter.setBrush(Qt::blue);for (int i = 0; i < 10; ++i){painter.drawRect(50 + i*60, 100, 40, 40);}if (drawing && (start != end)){QPen pen(Qt::DotLine);pen.setWidth(3);pen.setColor(Qt::white/*black*/);painter.setPen(pen);painter.setBrush(Qt::NoBrush);painter.setCompositionMode(QPainter::RasterOp_SourceXorDestination);painter.drawRect(QRect(start, end).normalized());}}void mousePressEvent(QMouseEvent *ev) override {if (ev->button() == Qt::LeftButton) {start = end = ev->pos();drawing = true;update();}}void mouseMoveEvent(QMouseEvent *ev) override {if (drawing) {end = ev->pos();update();}}void mouseReleaseEvent(QMouseEvent *ev) override {if (ev->button() == Qt::LeftButton) {drawing = false;end = ev->pos();update();}}
};
28、NotSourceAndNotDestination
進行三步操作:
- 對源像素取反
- 對目標像素取反
- 對上述兩個結果進行邏輯與操作
原理:
QColor notSourceAndNotDestination(const QColor& src, const QColor& dst)
{QColor source = src.toRgb();QColor destination = dst.toRgb();// 公式: result = (~src & ~dst) & 0xFF (確保在0-255范圍內)int r = (~source.red() & ~destination.red()) & 0xFF;int g = (~source.green() & ~destination.green()) & 0xFF;int b = (~source.blue() & ~destination.blue()) & 0xFF;return QColor(r, g, b);
}
29、NotSourceOrNotDestination
進行三步操作:
- 對源像素取反
- 對目標像素取反
- 對上述兩個結果進行邏輯或操作
視覺效果特點:
- 全白保留:只有當源像素和目標像素都為白色(1)時,結果才為黑色(0)
- 其他情況:任何一方或雙方為黑色(0)時,結果都為白色(1)
原理:
QColor notSourceOrNotDestination(const QColor& src, const QColor& dst)
{QColor source = src.toRgb();QColor destination = dst.toRgb();// 公式: result = (~src & ~dst) | 0xFF (確保在0-255范圍內)int r = (~source.red() | ~destination.red()) & 0xFF;int g = (~source.green() | ~destination.green()) & 0xFF;int b = (~source.blue() | ~destination.blue()) & 0xFF;return QColor(r, g, b);
}
?30、NotSourceXorDestination
進行兩步操作:
- 對源像素取反
- 然后與目標像素進行異或操作
原理:
QColor notSourceXorDestination(const QColor& source, const QColor& destination)
{QColor src = source.toRgb();QColor dst = destination.toRgb();return QColor((~src.red() ^ dst.red()) & 0xFF,(~src.green() ^ dst.green()) & 0xFF,(~src.blue() ^ dst.blue()) & 0xFF);
}
31、NotSource
完全忽略目標像素值,僅反轉源像素。
原理:
?QColor notSource(const QColor& source, const QColor& destination)
{QColor src = source.toRgb();return QColor((~src.red() & 0xFF,(~src.green() & 0xFF,(~src.blue() & 0xFF);
}
32、NotSourceAndDestination
源像素取反后再和目標像素進行與操作。
從真值表可以看出:此模式的特點是保留目標中與源透明區域重疊的部分。
原理:
QColor notSourceAndDestination(const QColor& source, const QColor& destination)
{QColor src = source.toRgb();QColor dst = destination.toRgb();return QColor((~src.red() & dst.red()) & 0xFF,(~src.green() & dst.green()) & 0xFF,(~src.blue() & dst.blue()) & 0xFF);
}
33、SourceAndNotDestination
目標像素取反后再和源像素進行與操作。
從真值表可以看出:此模式的特點是保留源中與目標透明區域重疊的部分。
原理:
QColor sourceAndNotDestination(const QColor& source, const QColor& destination)
{QColor src = source.toRgb();QColor dst = destination.toRgb();return QColor((~dst.red() & src.red()) & 0xFF,(~dst.green() & src.green()) & 0xFF,(~dst.blue() & src.blue()) & 0xFF);
}
34、NotSourceOrDestination
源像素取反再和目標像素進行或操作。
原理:
QColor notSourceOrDestination(const QColor& source, const QColor& destination)
{QColor src = source.toRgb();QColor dst = destination.toRgb();return QColor((~src.red() | dst.red()) & 0xFF,(~src.green() | dst.green()) & 0xFF,(~src.blue() | dst.blue()) & 0xFF);
}
35、SourceOrNotDestination
目標像素取反再和源像素進行或操作。
原理:
QColor sourceOrNotDestination(const QColor& source, const QColor& destination)
{QColor src = source.toRgb();QColor dst = destination.toRgb();return QColor((src.red() | ~dst.red()) & 0xFF,(src.green() | ~dst.green()) & 0xFF,(src.blue() | ~dst.blue()) & 0xFF);
}
36、ClearDestination
無條件清除,無論源像素和目標像素的值如何,結果像素值所有位都設為?0。
與?Clear 模式的區別:此模式的操作無關透明度而?Clear 模式把透明度也設置為 0。
原理:
QColor simulateClearDestination(const QColor& source, const QColor& destination)
{Q_UNUSED(source);Q_UNUSED(destination);return QColor(0, 0, 0);
}
37、SetDestination
無條件填充,無論源像素和目標像素的值如何,結果總是1。
原理:
QColor simulateSetDestination(const QColor& source, const QColor& destination)
{Q_UNUSED(source);      // 明確標記參數未使用Q_UNUSED(destination); // 明確標記參數未使用// 始終返回完全不透明白色return QColor(255, 255, 255);
}
38、NotDestination
完全忽略源像素值,僅反轉目標像素。
原理:
?QColor notDestination(const QColor& source, const QColor& destination)
{QColor dst = destination.toRgb();return QColor((~dst.red() & 0xFF,(~dst.green() & 0xFF,(~dst.blue() & 0xFF);
})


)
