作者:來自 Elastic?Dayananda Srinivas

探索組織如何利用 Elasticsearch 檢測和處理貸款或保險申請中的重復項。
Elasticsearch 帶來了大量新功能,幫助你為你的使用場景構建最佳搜索方案。深入了解我們的示例 notebooks,開始免費云試用,或立即在本地機器上嘗試 Elastic。
想象這個場景:一位客戶在周一以 “Katherine Johnson” 申請了一筆 $50,000 的貸款,然后在周三又以 “Kate Johnson” 提交了另一份申請。是同一個人,同一個地址,但你的系統將他們視為不同的申請人。結果?重復批準、違規操作、嚴重財務損失。
這個挑戰遠不止簡單拼寫錯誤,它涉及復雜的欺詐手段、真實用戶失誤,以及人們實際填寫表單時的各種情況。當你的重復檢測失效時,你不僅是在虧錢 —— 你還在違反監管規定,破壞客戶信任,并引發運營混亂。
讓我們構建一個可以在后端處理數千份申請時捕捉這些重復項的解決方案。借助 Elasticsearch 的音近搜索能力和 LLM,我們將打造一個既強大又實用的系統。
重復檢測的隱藏復雜性
重復檢測的挑戰遠比多數組織意識到的更深。以下是真實場景中傳統系統難以應對的情況:
姓名變化誤導系統:
-
經典拼寫錯誤:"John Smith" vs "Jon Smith" vs "Jonathon Smith" —— 是拼寫錯誤,還是不同的人?
-
發音混淆:"Shawn" vs "Shaun" vs "Sean" vs "Shon" —— 發音相同,拼寫不同
-
昵稱與變體:"Alexander" vs "Alex" vs "Xander" —— 同一個人,多種稱呼
地址差異帶來盲區:
-
街道縮寫:"123 Maple Street" vs "123 Maple St" vs "123 Maple Avenue" —— 同一地址,不同寫法
-
公寓表示差異:"Unit 5, 42 Elm Road" vs "42 Elm Rd, Apt 5" —— 同一地址,不同結構
-
城市名稱混淆:"Los Angeles" vs "LA" —— 地理名稱的不同表達
家庭關系使檢測復雜化:
-
名字相似、地址相同:"Bob Brown" 和 "Rob Brown",住在 "789 Pine Rd" —— 他們是雙胞胎,不是重復
-
世代后綴:"James Carter Sr." vs "James Carter Jr." —— 一個字母的差異卻意義重大
如果沒有可靠方式標記這些重復記錄,組織可能無意中為同一客戶批準多筆貸款或保險單,違反資格規定,增加違約風險,并帶來收入損失。
解決方案
通過將 Elasticsearch 與現代 AI 模型結合,我們可以構建一個智能、可擴展且高性價比的重復記錄識別與清除方案。
姓名的音近搜索:
Elasticsearch 支持音近算法,能識別發音相同但拼寫不同的名字。例如,“Smith” 和 “Smyth” 被視為相同,因為發音一致。這使系統能夠發現簡單文本匹配無法識別的重復項。你可以將其理解為教搜索引擎像人一樣? “聽” 名字 —— 讓 “John” 和 “Jon” 被認為是同一個人。
處理地址格式差異:
用戶輸入的地址格式往往各不相同。我們使用 AI 模型生成地址的不同形式或同義詞 —— 如 “Syd.” 和 “Sydney”、 “Bengaluru” 和 “Bangalore” —— 并利用這些變體優化 Elasticsearch 查詢。即使用戶輸入與系統存儲內容不完全匹配,也能實現地址匹配。
使用 AI 進行去重判斷:
當我們從 Elasticsearch 檢索到可能重復的記錄后,將其傳遞給 AI 模型進行去重判斷。雖然我們也可以使用 Levenshtein 或 Jaro-Winkler 等算法,但當涉及更多字段(如出生日期、身份證號或電話號碼)時,邏輯會變復雜。AI 模型提供了靈活性,能夠整體分析數據,簡化判斷邏輯,更容易在多個字段間識別真正的重復項。
架構概覽
以下是該解決方案的高級工作流程:

親自體驗一下!
先決條件與設置
在進入具體實現之前,我們先確認所需的全部內容。
所需基礎設施
-
Elasticsearch 集群 —— 你需要訪問一個 Elasticsearch 集群。本次設置中,我使用的是 Elastic Cloud 托管的 Elasticsearch 9.0.0 版本。如果你還沒有集群,有以下兩種選擇:
-
Elastic Cloud —— 你可以在這里創建一個新集群,并選擇 Elastic Cloud 托管或 Elasticsearch Serverless 選項。
-
本地設置 —— 如果你更喜歡本地運行,可以使用這里提供的腳本快速啟動一個集群。
-
-
Phonetic Analysis 插件 —— 為支持姓名音近匹配,請確保你的 Elasticsearch 安裝已啟用 Phonetic Analysis 插件。
-
Ollama LLM 服務器 —— 鑒于我們要處理姓名、地址、出生日期等敏感信息,建議使用本地 LLM。可以使用 Ollama 運行輕量模型如 LLaMa 3.2 8B。它運行快速、本地部署,適合此類數據處理。
-
先從這里下載并安裝與你操作系統兼容的 Ollama 版本。
-
安裝完成后,運行
ollama run llama3:8b拉取并運行該模型。
-
-
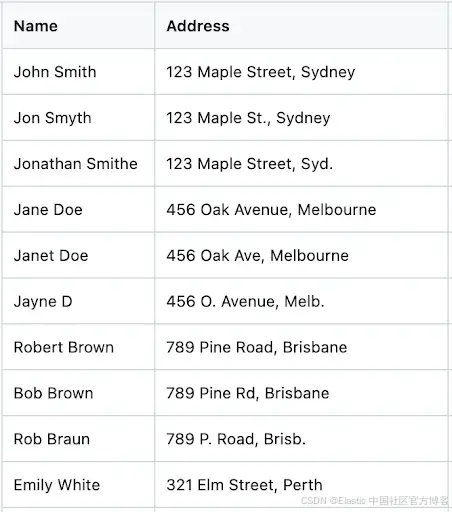
樣例數據集 —— 為測試設置并模擬真實場景,我準備了一個包含姓名、地址等細微差異的小型數據集。你可以從此鏈接下載包含 101 條記錄的樣例數據集。
下方是樣例數據集的截圖:
開發環境:
!pip install elasticsearch==9.0.2
!pip install pandas==2.2.2
!pip install -U langchain-community==0.3.26
!pip install -U streamlit==1.46.1
!npm install -g localtunnel@2.0.2
這些安裝提供以下功能:
-
elasticsearch:用于連接 Elasticsearch 的客戶端庫
-
pandas:用于數據處理和 CSV 操作
-
langchain-community:用于集成 OpenAI,進行 AI 分析
-
streamlit:用于構建交互式網頁界面
-
localtunnel:用于將本地開發環境暴露到公網
第 1 步:連接到 Elasticsearch
我們需要 Elasticsearch 的 endpoint 和 API Key 進行身份驗證。
獲取你的 Elasticsearch endpoint:
- 登錄 Elastic Cloud
- 進入你的部署
- 從部署概覽中復制 Elasticsearch endpoint
創建 API key:
- 從你的部署中打開 Kibana
- 進入 Stack Management → API Keys
- 創建一個新的 API key 并妥善保存
當你獲取到憑證后,建立連接。
將下面的代碼保存并執行,文件名為 “es_connect.py”。記得填寫 ES_URL 和 API_KEY 的值。
from elasticsearch import Elasticsearch,helpers
import os# Set environment variables
os.environ["ES_URL"] = ""
os.environ["API_KEY"] = ""# Use them
es = Elasticsearch(hosts=[os.environ["ES_URL"]],api_key=os.environ["API_KEY"]
)
# Test the connection
if es.ping():print("? Connected to Elasticsearch!")
else:print("? Connection failed.")
第 2 步:創建索引模板
我們重復檢測系統的核心在于索引配置,尤其是我們指示 Elasticsearch 根據姓名生成音近編碼的部分。我們將創建一個索引模板,使用姓名的音近匹配以及地址的最佳匹配。
了解語音分析器:
我們的模板使用了兩種音近算法:
-
Double Metaphone:處理復雜的發音變化,適用于多樣化的姓名
-
Soundex:為發音相似的姓名提供一致的編碼
以下是完整的索引模板。
將下面的代碼保存并執行,文件名為 “create_index_template.py”
from es_connect import es
# Define the index template
index_template = {"index_patterns": ["names-*"],"settings": {"index": {"analysis": {"filter": {"my_dmetaphone_filter": {"replace": "false","type": "phonetic","encoder": "double_metaphone"},"my_soundex": {"type": "phonetic","encoder": "soundex"}},"analyzer": {"name_analyzer_soundex": {"filter": ["lowercase","my_soundex"],"tokenizer": "standard"},"name_analyzer_dmetaphone": {"filter": ["lowercase","my_dmetaphone_filter"],"tokenizer": "standard"}}},"number_of_shards": "1","number_of_replicas": "1"}},"mappings": {"properties": {"address": {"type": "text","fields": {"keyword": {"ignore_above": 256,"type": "keyword"}}},"name": {"analyzer": "name_analyzer_dmetaphone","type": "text","fields": {"soundex": {"analyzer": "name_analyzer_soundex","type": "text"}}}}}}# Create the template
try:response = es.indices.put_template(name="name-search",body=index_template)print("Index template created successfully:", response)
except Exception as e:print("Error creating index template:", e)這個模板的作用:
-
音近處理:在索引時,姓名會自動轉換為音近編碼
-
多字段分析:每個姓名同時使用 Double Metaphone 和 Soundex 進行分析
-
地址優化:地址同時支持全文匹配和精確匹配的索引方式
-
靈活匹配:該模板支持多種搜索策略,適用于不同使用場景
第 3 步:加載并索引數據
現在,我們來加載樣例數據集,并將其索引到 Elasticsearch 以便進行搜索。將以下代碼保存并執行,文件名為 “index_csv_data.py”
import pandas as pd
from es_connect import es, helpers
file_path = input("Enter the path to your CSV file: ")
try:df = pd.read_csv(file_path)print("\nFirst 5 rows of the file:")print(df.head())
except Exception as e:print(f"Error reading the file: {e}")# Define the index name where the data will be ingested
INDEX_NAME = 'names-search'def generate_bulk_data(df):for index, row in df.iterrows():yield {"_index": INDEX_NAME,"_source": row.to_dict() }
# Delete if index already exists
if es.indices.exists(index=INDEX_NAME):es.indices.delete(index=INDEX_NAME)print(f"Index '{INDEX_NAME}' deleted.")try:response = helpers.bulk(es, generate_bulk_data(df))print("Data ingestion complete!")print(f"Indexed {response[0]} documents successfully.")
except Exception as e:print("Error during bulk ingestion:", e)
第 4 步:啟動 Llama 模型并生成地址變體
獲取用戶輸入的地址,并通過調用 LLM 生成該地址的多種變體,以處理一些細微差異。
例如,如果用戶輸入 "123 Maple St., Syd",模型將生成關鍵詞,如 ["123 Maple St., Sydney", "Street", "Str", "Sydnei", "Syd"]。
# Import required libraries
import pandas as pd
import streamlit as st
import json
from es_connect import es
from langchain_community.llms.ollama import Ollama
from langchain.prompts import PromptTemplate
from langchain.chains import LLMChain@st.cache_resource
def get_ollama_model():return Ollama(model="llama3:8b",temperature=0.1,  # Low temperature for consistent resultsbase_url="http://localhost:11434"  # Default Ollama URL)def get_address_variations(model, input_address):prompt_template = PromptTemplate(template=("Given the address below, generate a concise JSON array of common synonyms, place name variations, abbreviations, misspellings, and variations people might use for this address.""Return ONLY a JSON array, with no explanation or extra text.""If no variations are found, return an array with only the original address.""Address: {address}"),input_variables=["address"],)chain = LLMChain(llm=model, prompt=prompt_template)try:llm_response = chain.run({"address": input_address})print("Raw LLM response:", llm_response)address_variations = json.loads(llm_response.strip())if not isinstance(address_variations, list):address_variations = [input_address]except Exception as e:print(f"Error parsing LLM response: {e}")address_variations = [input_address]return address_variations
第 5 步:構建最終搜索查詢
使用從上述姓名和地址變體生成的值來構建搜索查詢。
def query_elasticsearch(index, input_name, input_address, size=5):model = get_ollama_model()address_variations = get_address_variations(model, input_address)print(f"Address variations used for search: {address_variations}")# Use multi_match to search for all variations in the address fieldbody = {"query": {"bool": {"must": [{"match_phrase": {"name": input_name}},{"multi_match": {"query": " ".join(address_variations),"fields": ["address"],"type": "best_fields"}}]}},"size": size}print("Elasticsearch query body:", json.dumps(body, indent=2))response = es.search(index=index, body=body)return response['hits']['hits']第 6 步:檢查重復項
上述搜索查詢會找到潛在匹配項。隨后,這些姓名和地址將作為上下文提供給模型。通過以下函數,我們將提示模型計算它們是重復項的概率。
def check_duplicates(search_name, input_address, response):# Create prompt template optimized for local modelsprompt_template = PromptTemplate(template="""
You are a data deduplication expert. Analyze the following information and provide a structured comparison.Input Name: {search_name}
Input Address: {input_address}Potential matches from database:
{response}Instructions:
1. Compare each potential match against the input name and address
2. Calculate a match percentage (0-100%) for each record
3. Consider name variations, spelling differences, and address similarities
4. Classification Rules:- 80%+ match = Duplicate- 60-79% match = Review Required- Below 60% = Not Duplicate
5. Use the Jaro-Winkler algorithm principles.Format your response as a markdown table. Sort results based on match percentage. Include the columns:
| Name | Address | Match % | Status | Explanation |Example format:
| John Smith | 123 Main St | 95% | DUPLICATE | Exact name match, address variation |
| Jon Smyth | 123 Main Street | 85% | DUPLICATE | Name spelling variation, same address |""",input_variables=["search_name", "input_address", "response"],)# Prepare prompt inputprompt_input = {"search_name": search_name,"input_address": input_address,"response": response}# Create the LLM chainmodel = get_ollama_model()chain = LLMChain(llm=model, prompt=prompt_template)# Get the response from Ollamaresponse = chain.run(prompt_input)return response
第 7 步:創建 Streamlit 界面
現在,使用下面的 Streamlit 代碼來創建一個簡潔、直觀的界面。
# Main function for Streamlit app
def main():st.set_page_config(page_title="Duplicate Detection (Local LLM)", layout="centered")# Custom CSS for stylingst.markdown("""<style>body { font-family: 'Arial', sans-serif; color: #333; }.stTextInput input { background-color: #f0f8ff; padding: 10px; border-radius: 5px; }.stButton button { background-color: #4CAF50; color: white; border-radius: 5px; }.stButton button:hover { background-color: #45a049; }.response-table th, .response-table td { padding: 10px; border: 1px solid #ddd; }.response-table th { background-color: #f4f4f4; }.response-table td { text-align: center; }</style>""", unsafe_allow_html=True)st.title("🔍 Duplicate Detection (Local LLM)")st.write("Enter the name and address to search for potential duplicates in the database.")# Input fieldsinput_name = st.text_input("Search Name", placeholder="Enter the name you want to search for...")input_address = st.text_input("Enter Address", placeholder="Enter the address")if st.button("Search 🔍"):if input_name and input_address:index_name = "names-search"with st.spinner("Searching for duplicates..."):# Query Elasticsearch for potential duplicateses_response = query_elasticsearch(index_name, input_name, input_address)# Build context from resultsif es_response:# Format the response data for the LLMformatted_response = []for hit in es_response:source = hit['_source']formatted_response.append(f"Name: {source['name']}, Address: {source['address']}")response = "\n".join(formatted_response)# Send the details to Ollama for analysisresponse = check_duplicates(input_name, input_address, response)# Display the response on the UIst.write("### Results Comparison from Dataset")st.markdown(response)# Show raw Elasticsearch results for referencewith st.expander("Raw Elasticsearch Results"):for hit in es_response:st.json(hit['_source'])else:st.write("? No potential duplicates found.")else:st.write("?? Please enter both the name and address to search.")if __name__ == "__main__":main()
第 8 步:執行并測試系統
為優化性能,避免重復加載模型和過多連接打開,將第 4、5、6、7 步的代碼整合到一個名為 app.py 的文件中。然后用該文件啟動 Streamlit 界面。
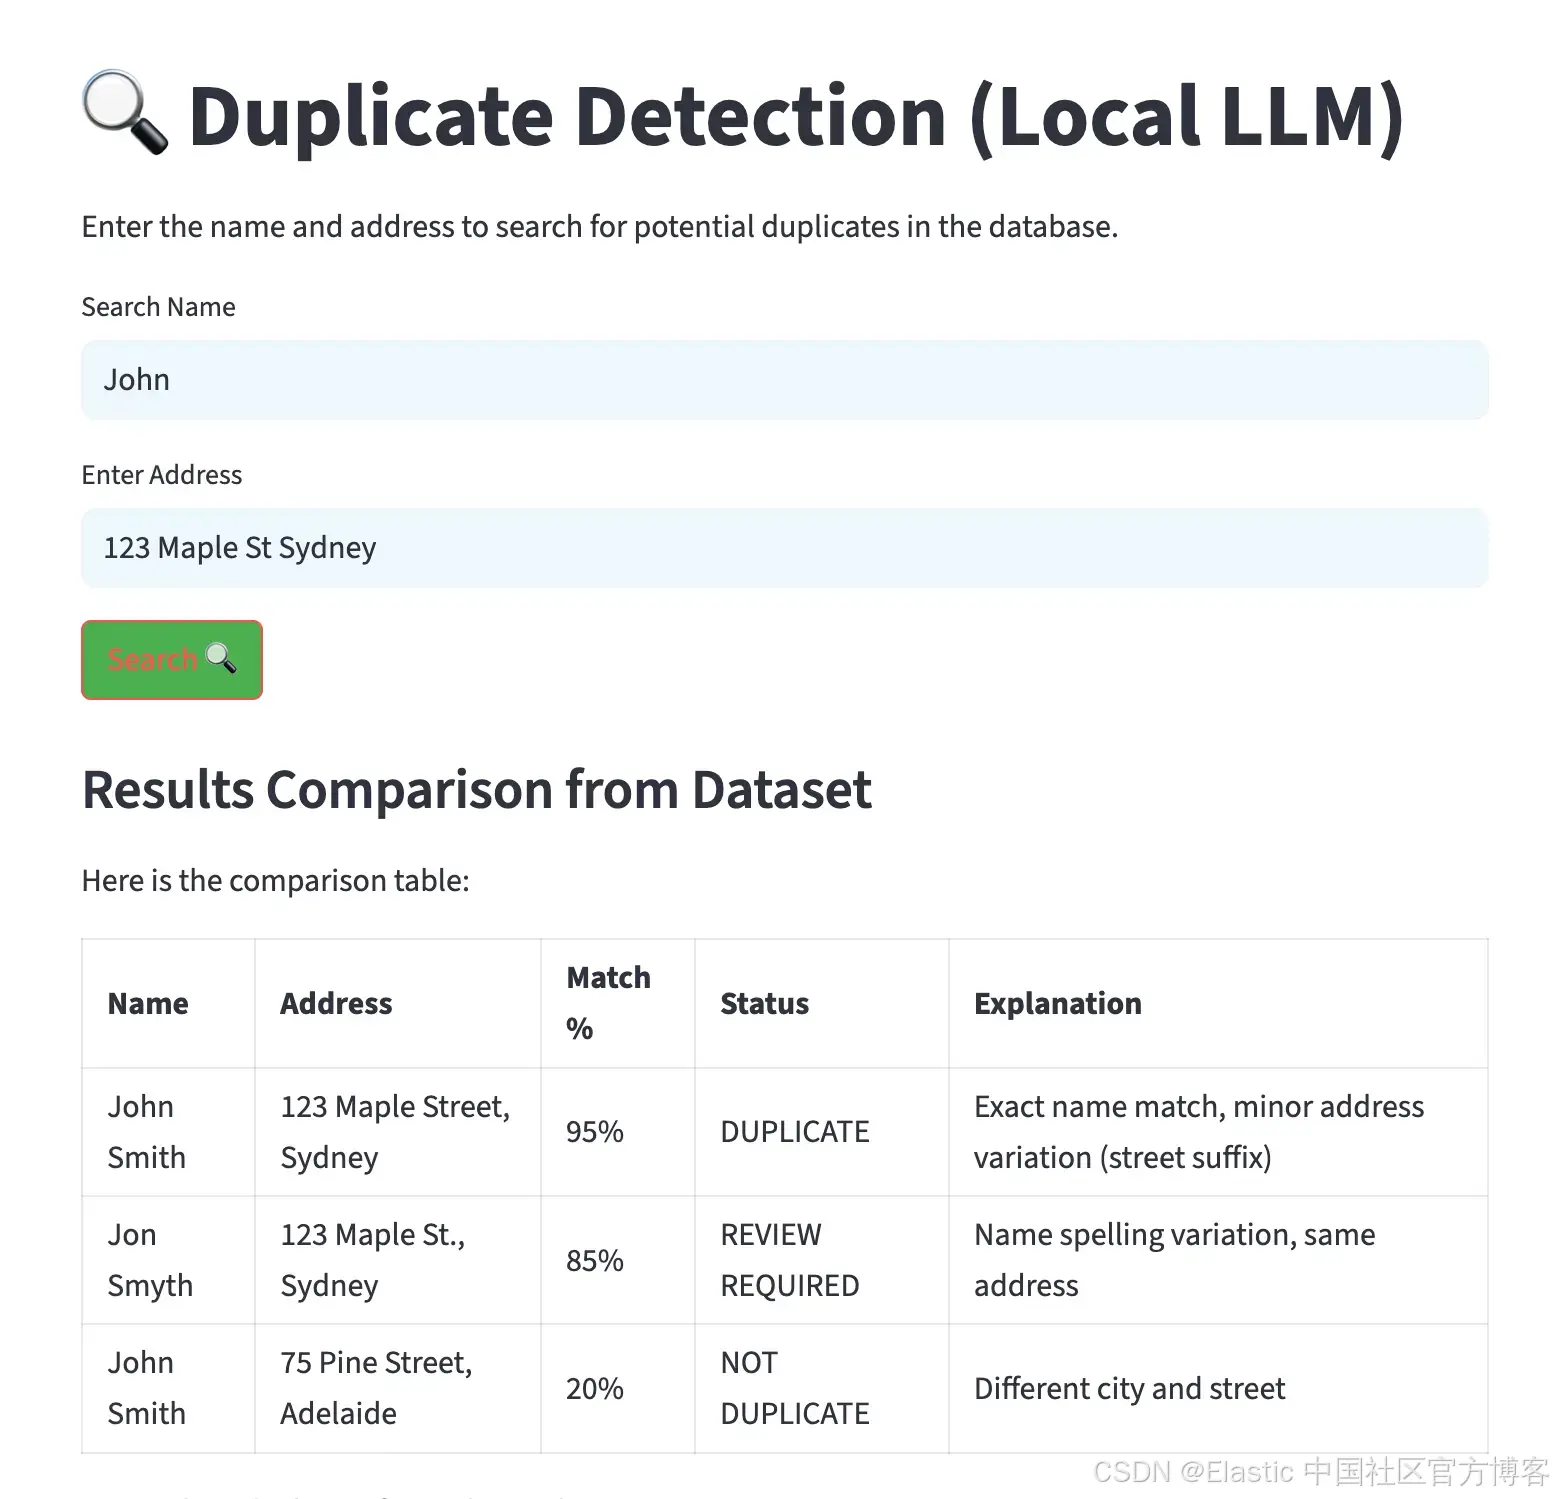
streamlit run app.py執行后,會生成一個界面,允許輸入姓名和地址。結果會以表格形式顯示,按匹配百分比排序,并包含潛在重復項的解釋,如下圖所示。
貸款和保險申請之外的應用場景
去重技術在多個行業和領域有廣泛應用。以下是一些主要例子:
-
政府和公共服務 —— 標記重復的選民登記、稅務記錄、社會保障申請或公共福利項目注冊。
-
客戶關系管理(CRM) —— 識別 CRM 數據庫中的重復客戶記錄,提升數據質量,避免冗余。
-
醫療系統 —— 發現醫院管理系統中的重復病人記錄,確保醫療歷史和賬單準確。
-
電子商務平臺 —— 識別重復的產品列表或賣家檔案,維護干凈的目錄,提升用戶體驗。
-
房地產與物業管理 —— 發現物業管理系統中重復的房源或租戶信息。
總結:使用 Elasticsearch 構建去重流程
我們展示了如何結合 Elasticsearch 的音近搜索功能和本地 LLM 處理,創建一個應對真實復雜情況的強大去重流程。
首先,準備好集群和所需數據集,并部署本地模型。然后,利用姓名、地址及其變體等關鍵實體查詢 Elasticsearch 找到相似匹配。接著,將 Elasticsearch 返回結果作為上下文傳給模型進行重復分析。模型根據指令判斷哪些記錄可能是重復。
請記住,重復檢測不是一次性項目,而是持續改進的過程。AI 組件會根據反饋學習,搜索算法也能基于結果不斷優化,系統的準確性隨時間提升。
通過在這些場景中實施 Elasticsearch,企業能夠領先一步,確保數據準確、合規,并在快速變化的市場中保持競爭優勢。
原文:Building intelligent duplicate detection with Elasticsearch and AI - Elasticsearch Labs


,案例:邏輯回歸 交叉尋找最佳懲罰因子C)


)

