文章目錄
- 前言
- 可變參數的原理
- 實現系統調用write
- 更新syscall.h
- 更新syscall.c
- 更新syscall-init.c
- 實現printf
- 編寫stdio.h
- 編寫stdio.c
- 第一次測試
- main.c
- makefile
- 結果截圖
- 完善printf
- 修改main.c
- 結語
前言
上部分鏈接:《操作系統真象還原》第十二章(1)——進一步完善內核-CSDN博客。上部分我們是寄存器存參數,書的結尾還提到了用棧傳遞參數實現系統調用,我們不使用這種方法。
之前我們屏幕打印是直接操作顯存,顯然用戶進程沒有這樣的權限。這部分完成printf函數,讓用戶進程也能打印信息。
可變參數的原理
這里摘一些我認為比較關鍵的內容吧。
早期操作系統只能申請靜態內存。隨著計算機的進步,操作系統開始支持堆內存管理,堆內存專 門用于程序運行時的內存申請,因此編譯器也開始支持程序在運行時動態內存申請,也就是編譯器開始支 持源碼中的變長數據結構。
程序中的數據結構終歸有個長度,此長度要么在編譯時確定,要么在運行時確 定。編譯時確定是指數據結構在源碼編譯階段就能確定下來,說白了就是編譯器必須提前知道數據結構的 長度,它為此類數據結構分配的是靜態內存,也就是程序被操作系統加載時分配的內存。運行時確定是指 數據結構的長度是在程序運行階段確定下來的,編譯器為此類數據結構(如 C99 中的變長數組)在堆中 分配內存,已經說過了,堆本來就是用于程序運行時的動態內存分配,因此可以在運行階段確定長度。
函數占用的也是靜態內存,因此也得提前告訴編譯器自己占用的內存大小。為了在 編譯時獲取函數調用時所需要的內存空間(這通常是在棧中分配內存單元),編譯器要求提供函數聲明, 聲明中描述了函數參數的個數及類型,編譯器用它們來計算參數所占據的棧空間。因此編譯器不關心函數 聲明中參數的名稱,它只關心參數個數及類型(您懂的,函數聲明中的參數可以不包括參數名,但必須包 括類型),編譯器用這兩個信息才能確定為函數在棧中分配的內存大小。重點來了,函數并不是在堆中分 配內存,因此它需要提前確定內存空間,這通常取決于參數的個數及類型 大小,但編譯器卻允許函數的參數個數不固定(可變參數)。
其實這種可變仍然是靜態的。參數是由調用者壓入的,調用者當然知道棧中壓入了幾個參數,參數占用了多少空間,因 此無論函數的參數個數是否固定,采用 C 調用約定,調用者都能完好地回收棧空間,不必擔心棧溢出等 問題。因此,看似“動態”的可變參數函數,其實也是“靜態”“固定”的,傳入參數的個數是由編譯器 在編譯階段就確定下來的。
拿格式化輸出函數 printf(char* format, arg1, arg2,…)舉例,比如printf(”hello %s!”, ”martin”),其中的”hello %s!”便是 format——格式化字符串。通過%+占位符,就能實現可變參數。
linux通過三個宏定義支持可變參數,下面是3個宏的說明。
- va_start(ap,v),參數 ap 是用于指向可變參數的指針變量,參數v是支持可變參數的函數的第1個 參數(如對于printf來說,參數v就是字符串format)。此宏的功能是使指針ap指向v的地址,它的調用 必須先于其他兩個宏,相當于初始化ap指針的作用。
- va_arg(ap,t),參數 ap 是用于指向可變參數的指針變量,參數t是可變參數的類型,此宏的功能是 使指針ap指向棧中下一個參數的地址并返回其值。
- va_end(ap),將指向可變參數的變量ap置為null,也就是清空指針變量ap。
后續我們會實現這三個宏。
實現系統調用write
linux的系統調用write 接受 3個參數,其中的fd是文件描述符,buf是被 輸出數據所在的緩沖區,count 是輸出的字符數,write 的功 能是把buf中count個字符寫到文件描述符fd指向的文件中。
我們這里先實現一個簡易版本,只接受一個參數——待打印字符指針。
我們按三部曲完成簡單版write。
更新syscall.h
第一步添加新的子功能號
#ifndef __LIB_USER_SYSCALL_H
#define __LIB_USER_SYSCALL_H
#include "../kernel/stdint.h"enum SYSCALL_NR
{SYS_GETPID,SYS_WRITE
};
uint32_t getpid(void);     // 獲取任務pid
uint32_t write(char *str); // 打印字符串并返回字符串長度#endif
更新syscall.c
第二步添加系統調用的用戶接口
#include "./syscall.h"/*從上到下,分別是0、1、2、3參數的系統調用,結構基本一致*eax是子程序號,剩下三個存在ebx、ecx、edx中*//*({ ... })是gcc擴展*將一組語句封裝為一個表達式,返回最后一個語句的值*/
#define _syscall0(NUMBER) ({ \int retval;              \asm volatile(            \"int $0x80"          \: "=a"(retval)       \: "a"(NUMBER)        \: "memory");         \retval;                  \
})#define _syscall1(NUMBER, ARG1) ({ \int retval;                    \asm volatile(                  \"int $0x80"                \: "=a"(retval)             \: "a"(NUMBER), "b"(ARG1)   \: "memory");               \retval;                        \
})#define _syscall2(NUMBER, ARG1, ARG2) ({    \int retval;                             \asm volatile(                           \"int $0x80"                         \: "=a"(retval)                      \: "a"(NUMBER), "b"(ARG1), "c"(ARG2) \: "memory");                        \retval;                                 \
})#define _syscall3(NUMBER, ARG1, ARG2, ARG3) ({         \int retval;                                        \asm volatile(                                      \"int $0x80"                                    \: "=a"(retval)                                 \: "a"(NUMBER), "b"(ARG1), "c"(ARG2), "d"(ARG3) \: "memory");                                   \retval;                                            \
})/*返回當前任務的pid*/
uint32_t getpid()
{return _syscall0(SYS_GETPID);
}/*打印字符串str*/
uint32_t write(char *str)
{return _syscall1(SYS_WRITE, str);
}
更新syscall-init.c
第三步定義子功能處理函數,并在syscall_table中注冊
#include "./syscall-init.h"
#include "../lib/kernel/stdint.h"
#include "../lib/user/syscall.h"
#include "../thread/thread.h"
#include "../lib/kernel/print.h"
#include "../device/console.h"
#include "../lib/string.h"#define syscall_nr 32 // 最大支持的子功能個數
typedef void *syscall;
syscall syscall_table[syscall_nr];/*返回當前任務的pid*/
uint32_t sys_getpid(void)
{return running_thread()->pid;
}/*打印字符串str*/
uint32_t sys_wirte(char *str)
{console_put_str(str);return strlen(str);
}/*初始化系統調用*/
void syscall_init(void)
{put_str("syscall_init start\n");syscall_table[SYS_GETPID] = sys_getpid;syscall_table[SYS_WRITE] = sys_wirte;put_str("syscall_init done\n");
}
到此我們實現了文件管理系統之前的簡化版write。
實現printf
printf是vsprintf和write的封裝,write已經完成,本 節要完成vsprintf、用于可變參數解析的3個宏以及轉換函數itoa,這些實現后就完成了基本的printf,本 節的目標是使printf支持十六進制輸出,即完成“%x”的功能。
關于linux中的vsprintf函數:
此函數的功能是把 ap 指向的可變參數,以字符串格式format中的符號’%'為替 換標記,不修改原格式字符串format,將format中除“%類型字符”以外的內容復制到str,把“%類型字 符”替換成具體參數后寫入str中對應“%類型字符”的位置,也就是說函數執行后,str的內容相當于格 式字符串format中的“%類型字符”被具體參數替換后的format字符串。vsprintf 執行完成后返回字符串str的長度。
同樣,我們參考這個函數寫我們的vsprintf,路徑是lib/stdio.c .h
編寫stdio.h
#ifndef __LIB_STDIO_H
#define __LIB_STDIO_H
#include "./kernel/stdint.h"
typedef char *va_list;
uint32_t vsprintf(char *str, const char *format, va_list ap);
uint32_t printf(const char *format, ...);#endif
先給出頭文件,再給出函數實現。
編寫stdio.c
這部分最長的代碼,注釋很清楚,不再贅述
#include "./stdio.h"
#include "./kernel/stdint.h"
#include "./string.h"
#include "../kernel/debug.h"
#include "./user/syscall.h"#define va_start(ap, v) ap = (va_list) & v // ap指向第一個固定參數v
#define va_arg(ap, t) *((t *)(ap += 4))    // ap依次指向下一個參數,通過解除引用返回其值
#define va_end(ap) ap = NULL/*將整型轉化為字符ascii*/
/*三個參數依次是帶轉化數值,轉化后字符保存的緩沖區,轉化進制*/
static void itoa(uint32_t value, char **buf_ptr_addr, uint8_t base)
{uint32_t m = value % base; // 余數uint32_t i = value / base; // 倍數if (i){itoa(i, buf_ptr_addr, base);}if (m < 10){// 第一次解引用后是緩沖區地址,++提供下一個字符的位置// 第二次解引用后是char,賦值為對應的字符*((*buf_ptr_addr)++) = m + '0';}else{*((*buf_ptr_addr)++) = m - 10 + 'A';}
}/*將參數ap按照格式format輸出到字符串str,并返回替換后str長度*/
uint32_t vsprintf(char *str, const char *format, va_list ap)
{char *buf_ptr = str;const char *index_ptr = format;char index_char = *index_ptr;int32_t arg_int;while (index_char) // 沒有到達末尾就一直處理{if (index_char != '%') // 沒有遇到%,直接復制即可{*buf_ptr = index_char;buf_ptr++;index_ptr++;index_char = *index_ptr;continue;}// 以下為遇到%后的處理過程// 先跳過%index_ptr++;index_char = *index_ptr;// 然后判斷占位符是哪種// 目前先實現x,代表后面的參數是無符號整形if (index_char == 'x'){// 獲得第一個參數,并且ap指向下一個參數arg_int = va_arg(ap, int);// 將無符號整型轉化為字符,并放到str后面itoa(arg_int, &buf_ptr, 16);// 跳過x,并且準備好進行后面的處理index_ptr++;index_char = *index_ptr;}else{PANIC("Undefined placeholder");}}return strlen(str);
}/*格式化輸出字符串format,即printf*/
/*包含可變參數*/
uint32_t printf(const char *format, ...)
{va_list args; // 可變參數列表va_start(args, format);char buf[1024] = {0}; // 最終拼接后字符串儲存位置vsprintf(buf, format, args);va_end(args);return write(buf);
}
第一次測試
main.c
// 內核的入口函數
#include "../lib/kernel/print.h"
#include "./init.h"
#include "../thread/thread.h"
#include "../device/console.h"
#include "./interrupt.h"
#include "../userprog/process.h"
// 本章測試頭文件
#include "../lib/user/syscall.h"
#include "../userprog/syscall-init.h"
#include "../lib/stdio.h"void k_thread_a(void *);
void k_thread_b(void *);
void u_prog_a(void);
void u_prog_b(void);
int main(void)
{put_str("HongBai's OS kernel\n");init_all(); // 初始化所有模塊process_execute(u_prog_a, "user_prog_a");process_execute(u_prog_b, "user_prog_b");intr_enable();console_put_str(" main_pid:0x");console_put_int(sys_getpid());console_put_char('\n');thread_start("k_thread_a", 31, k_thread_a, "argA: ");thread_start("k_thread_b", 31, k_thread_b, "argB: ");while (1){};
}void k_thread_a(void *arg)
{char *para = arg;console_put_str(" thread_a_pid:0x");console_put_int(sys_getpid());console_put_char('\n');while (1){};
}void k_thread_b(void *arg)
{char *para = arg;console_put_str(" thread_b_pid:0x");console_put_int(sys_getpid());console_put_char('\n');while (1){};
}void u_prog_a(void)
{printf(" program_a_pid:0x%x\n", getpid());while (1){};
}void u_prog_b(void)
{printf(" program_b_pid:0x%x\n", getpid());while (1){};
}
makefile
BUILD_DIR = ./build
ENTRY_POINT = 0xc0001500
AS = nasm
CC = gcc
LD = ld
LIB = -I lib/ -I lib/kernel/ -I lib/user/ -I kernel/ -I device/
ASFLAGS = -f elf
CFLAGS =  -Wall -m32 -fno-stack-protector $(LIB) -c -fno-builtin -W -Wstrict-prototypes -Wmissing-prototypes
LDFLAGS =  -m elf_i386 -Ttext $(ENTRY_POINT) -e main -Map $(BUILD_DIR)/kernel.map
OBJS = $(BUILD_DIR)/main.o $(BUILD_DIR)/init.o $(BUILD_DIR)/interrupt.o \$(BUILD_DIR)/timer.o $(BUILD_DIR)/kernel.o $(BUILD_DIR)/print.o \$(BUILD_DIR)/debug.o $(BUILD_DIR)/string.o $(BUILD_DIR)/memory.o \$(BUILD_DIR)/bitmap.o $(BUILD_DIR)/thread.o $(BUILD_DIR)/list.o \$(BUILD_DIR)/switch.o $(BUILD_DIR)/sync.o $(BUILD_DIR)/console.o \$(BUILD_DIR)/keyboard.o $(BUILD_DIR)/ioqueue.o $(BUILD_DIR)/tss.o \$(BUILD_DIR)/process.o $(BUILD_DIR)/syscall-init.o $(BUILD_DIR)/syscall.o \$(BUILD_DIR)/stdio.o################	c代碼編譯   ##################
$(BUILD_DIR)/main.o: kernel/main.c lib/kernel/print.h \lib/kernel/stdint.h kernel/init.h kernel/debug.h \kernel/memory.h thread/thread.h kernel/interrupt.h \device/console.h userprog/process.h lib/user/syscall.h \userprog/syscall-init.h lib/stdio.h$(CC) $(CFLAGS) $< -o $@$(BUILD_DIR)/init.o: kernel/init.c kernel/init.h lib/kernel/print.h \lib/kernel/stdint.h kernel/interrupt.h device/timer.h \kernel/memory.h thread/thread.h device/console.h \device/keyboard.h userprog/tss.h userprog/syscall-init.h$(CC) $(CFLAGS) $< -o $@$(BUILD_DIR)/interrupt.o: kernel/interrupt.c kernel/interrupt.h \lib/kernel/stdint.h kernel/global.h kernel/io.h \lib/kernel/print.h$(CC) $(CFLAGS) $< -o $@$(BUILD_DIR)/timer.o: device/timer.c device/timer.h lib/kernel/stdint.h \kernel/io.h lib/kernel/print.h kernel/interrupt.h \thread/thread.h kernel/debug.h$(CC) $(CFLAGS) $< -o $@$(BUILD_DIR)/debug.o: kernel/debug.c kernel/debug.h \lib/kernel/print.h kernel/interrupt.h$(CC) $(CFLAGS) $< -o $@$(BUILD_DIR)/string.o: lib/string.c lib/string.h \kernel/debug.h$(CC) $(CFLAGS) $< -o $@$(BUILD_DIR)/memory.o: kernel/memory.c kernel/memory.h \lib/kernel/stdint.h lib/kernel/bitmap.h kernel/debug.h \lib/string.h thread/sync.h thread/thread.h$(CC) $(CFLAGS) $< -o $@$(BUILD_DIR)/bitmap.o: lib/kernel/bitmap.c lib/kernel/bitmap.h \lib/string.h kernel/interrupt.h lib/kernel/print.h \kernel/debug.h$(CC) $(CFLAGS) $< -o $@$(BUILD_DIR)/thread.o: thread/thread.c thread/thread.h \lib/kernel/stdint.h lib/kernel/list.h lib/string.h \kernel/memory.h kernel/interrupt.h kernel/debug.h \lib/kernel/print.h userprog/process.h$(CC) $(CFLAGS) $< -o $@$(BUILD_DIR)/list.o: lib/kernel/list.c lib/kernel/list.h \lib/kernel/stdint.h kernel/interrupt.h kernel/debug.h$(CC) $(CFLAGS) $< -o $@$(BUILD_DIR)/sync.o: thread/sync.c thread/sync.h \lib/kernel/stdint.h thread/thread.h kernel/debug.h \kernel/interrupt.h$(CC) $(CFLAGS) $< -o $@$(BUILD_DIR)/console.o: device/console.c device/console.h \lib/kernel/print.h thread/sync.h$(CC) $(CFLAGS) $< -o $@$(BUILD_DIR)/keyboard.o: device/keyboard.c device/keyboard.h \lib/kernel/print.h kernel/interrupt.h kernel/io.h \lib/kernel/stdint.h device/ioqueue.h$(CC) $(CFLAGS) $< -o $@$(BUILD_DIR)/ioqueue.o: device/ioqueue.c device/ioqueue.h \lib/kernel/stdint.h thread/thread.h thread/sync.h \kernel/interrupt.h kernel/debug.h$(CC) $(CFLAGS) $< -o $@$(BUILD_DIR)/tss.o: userprog/tss.c userprog/tss.h \lib/kernel/stdint.h thread/thread.h kernel/global.h \lib/kernel/print.h lib/string.h$(CC) $(CFLAGS) $< -o $@$(BUILD_DIR)/process.o: userprog/process.c userprog/process.h \kernel/global.h lib/kernel/stdint.h thread/thread.h \kernel/debug.h userprog/tss.h device/console.h \lib/string.h kernel/interrupt.h$(CC) $(CFLAGS) $< -o $@$(BUILD_DIR)/syscall.o: lib/user/syscall.c lib/user/syscall.h$(CC) $(CFLAGS) $< -o $@$(BUILD_DIR)/syscall-init.o: userprog/syscall-init.c userprog/syscall-init.h \lib/kernel/stdint.h lib/user/syscall.h thread/thread.h \lib/kernel/print.h$(CC) $(CFLAGS) $< -o $@$(BUILD_DIR)/stdio.o: lib/stdio.c lib/stdio.h \lib/kernel/stdint.h lib/string.h kernel/debug.h \lib/user/syscall.h$(CC) $(CFLAGS) $< -o $@##############    匯編代碼編譯    ###############
$(BUILD_DIR)/kernel.o: kernel/kernel.S$(AS) $(ASFLAGS) $< -o $@$(BUILD_DIR)/print.o: lib/kernel/print.S$(AS) $(ASFLAGS) $< -o $@$(BUILD_DIR)/switch.o: thread/switch.S$(AS) $(ASFLAGS) $< -o $@##############    連接所有目標文件    #############
$(BUILD_DIR)/kernel.bin: $(OBJS)$(LD) $(LDFLAGS) $^ -o $@.PHONY : mk_dir hd clean allmk_dir:if [ ! -d $(BUILD_DIR) ]; then mkdir $(BUILD_DIR); fihd:dd if=$(BUILD_DIR)/kernel.bin \of=/home/hongbai/bochs/bin/c.img \bs=512 count=200 seek=10 conv=notruncclean:cd $(BUILD_DIR) && rm -f ./*build: $(BUILD_DIR)/kernel.binall: mk_dir build hd
結果截圖
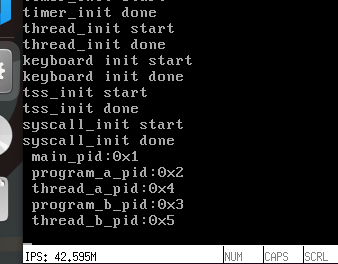
還是非常成功的。
完善printf
一口氣實現對“%c”、“%s”和“%d”三種占位符的處理。
對應單個字符,字符串,int類型。
#include "./stdio.h"
#include "./kernel/stdint.h"
#include "./string.h"
#include "../kernel/debug.h"
#include "./user/syscall.h"#define va_start(ap, v) ap = (va_list) & v // ap指向第一個固定參數v
#define va_arg(ap, t) *((t *)(ap += 4))    // ap依次指向下一個參數,通過解除引用返回其值
#define va_end(ap) ap = NULL/*將整型轉化為字符ascii*/
/*三個參數依次是帶轉化數值,轉化后字符保存的緩沖區,轉化進制*/
static void itoa(uint32_t value, char **buf_ptr_addr, uint8_t base)
{uint32_t m = value % base; // 余數uint32_t i = value / base; // 倍數if (i){itoa(i, buf_ptr_addr, base);}if (m < 10){// 第一次解引用后是緩沖區地址,++提供下一個字符的位置// 第二次解引用后是char,賦值為對應的字符*((*buf_ptr_addr)++) = m + '0';}else{*((*buf_ptr_addr)++) = m - 10 + 'A';}
}/*將參數ap按照格式format輸出到字符串str,并返回替換后str長度*/
uint32_t vsprintf(char *str, const char *format, va_list ap)
{char *buf_ptr = str;const char *index_ptr = format;char index_char = *index_ptr;int32_t arg_int;char *arg_str;while (index_char) // 沒有到達末尾就一直處理{if (index_char != '%') // 沒有遇到%,直接復制即可{*buf_ptr = index_char;buf_ptr++;index_ptr++;index_char = *index_ptr;continue;}// 以下為遇到%后的處理過程// 先跳過%index_ptr++;index_char = *index_ptr;// 然后判斷占位符是哪種類型// %x,后面的參數是16進制unsigned intif (index_char == 'x'){// 獲得第一個參數,并且ap指向下一個參數arg_int = va_arg(ap, int);// 將無符號整型轉化為字符,并放到str后面itoa(arg_int, &buf_ptr, 16);// 跳過x,并且準備好進行后面的處理index_ptr++;index_char = *index_ptr;}// %d,后面的參數是intelse if (index_char == 'd'){arg_int = va_arg(ap, int);// 負數需要進行補碼操作轉化為正數,然后額外輸出一個-if (arg_int < 0){arg_int = 0 - arg_int;*buf_ptr = '-';buf_ptr++;}itoa(arg_int, &buf_ptr, 10);index_ptr++;index_char = *index_ptr;}// %c,后面的參數是charelse if (index_char == 'c'){*buf_ptr = va_arg(ap, char);buf_ptr++;index_ptr++;index_char = *index_ptr;}// %s,后面的參數是string(char*)else if (index_char == 's'){arg_str = va_arg(ap, char *);strcpy(buf_ptr, arg_str);buf_ptr += strlen(arg_str);index_ptr++;index_char = *index_ptr;}else{PANIC("Undefined placeholder");}}return strlen(str);
}/*格式化輸出字符串format,即printf*/
/*包含可變參數*/
uint32_t printf(const char *format, ...)
{va_list args; // 可變參數列表va_start(args, format);char buf[1024] = {0}; // 最終拼接后字符串儲存位置vsprintf(buf, format, args);va_end(args);return write(buf);
}uint32_t sprintf(char *buf, const char *format, ...)
{va_list args;uint32_t retval;va_start(args, format);retval = vsprintf(buf, format, args);va_end(args);return retval;
}
修改main.c
// 內核的入口函數
#include "../lib/kernel/print.h"
#include "./init.h"
#include "../thread/thread.h"
#include "../device/console.h"
#include "./interrupt.h"
#include "../userprog/process.h"
// 本章測試頭文件
#include "../lib/user/syscall.h"
#include "../userprog/syscall-init.h"
#include "../lib/stdio.h"void k_thread_a(void *);
void k_thread_b(void *);
void u_prog_a(void);
void u_prog_b(void);
int main(void)
{put_str("HongBai's OS kernel\n");init_all(); // 初始化所有模塊process_execute(u_prog_a, "user_prog_a");process_execute(u_prog_b, "user_prog_b");intr_enable();printf(" main_pid:0x%x\n",getpid());thread_start("k_thread_a", 31, k_thread_a, "argA: ");thread_start("k_thread_b", 31, k_thread_b, "argB: ");while (1){};
}void k_thread_a(void *arg)
{char *para = arg;printf(" thread_a_pid:0x%x\n",getpid());while (1){};
}void k_thread_b(void *arg)
{char *para = arg;printf(" thread_b_pid:0x%x\n",getpid());while (1){};
}void u_prog_a(void)
{printf("%s%d%c", " program_a_pid:",getpid(),'\n');while (1){};
}void u_prog_b(void)
{printf("%s%d%c", " program_b_pid:",getpid(),'\n');while (1){};
}
makefile不變,結果截圖
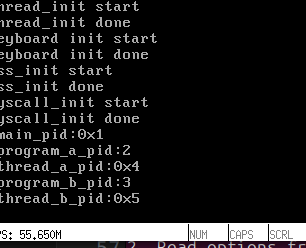
ok那么四種占位符都測試完畢,prints初步實現。
結語
第二部分,整體還是比較簡單,馬上就要進入最難的內存部分了,鄭鋼老師提到我們要重構我們的內存管理系統,還好我之前梳理過,希望下一部分能高效率順利完成。


)


