視頻:https://www.bilibili.com/video/BV1Z14y1Z7LJ/?spm_id_from=333.337.search-card.all.click&vd_source=7a1a0bc74158c6993c7355c5490fc600
別人的筆記:https://zhuanlan.zhihu.com/p/626966526
8. 聊天機器人(Chatbot)
關于大型語言模型的一個令人興奮的事情是,你只需花費少量的精力,就可以使用它來構建自定義的聊天機器人。
ChatGPT 的 Web 界面,是一種使用大型語言模型進行聊天的對話界面。但一個很酷的事情是,你也可以使用大型語言模型來構建你的自定義聊天機器人,可以扮演一個 AI 客服代理或餐廳的 AI 訂單員的角色。在這個視頻中,你將學習如何來做聊天機器人。
我將更詳細地描述 OpenAI 的聊天完成(Chat Completions)格式,然后你將自己構建一個聊天機器人。
8.1 聊天格式的設計
讓我們開始吧。首先,我們將像往常一樣設置 OpenAI Python 包。
ChatGPT 這樣的聊天模型,實際上被訓練成將一系列消息作為輸入,并返回模型生成的消息作為輸出。因此,盡管聊天格式的設計是為了使這樣的多輪對話變得容易而設計的,但我們在之前的視頻中已經看到,它對于沒有對話的單回合任務也同樣有效。
接下來,我們將定義兩個輔助函數。
import openai
import os
from openai import OpenAI# 1. 根據環境變量獲取 openai key
from dotenv import load_dotenv, find_dotenv
_ = load_dotenv(find_dotenv())openai.api_key = os.getenv('OPENAI_API_KEY') client = OpenAI()def get_completion(prompt, model="gpt-3.5-turbo", temperature=0):messages = [{"role": "user", "content": prompt}]response = client.chat.completions.create(model=model,messages=messages,temperature=temperature, # this is the degree of randomness of the model's output)return response.choices[0].message.contentdef get_completion_from_messages(messages, model="gpt-3.5-turbo", temperature=0):response = client.chat.completions.create(model=model,messages=messages,temperature=temperature, # this is the degree of randomness of the model's output)return response.choices[0].message.content
一個就是我們在視頻中一直使用的 get_completion 函數。但看一下,我們給出了一個提示,在這個函數內部,我們實際是將這個提示放入看起來像某種用戶消息的內容中。這是因為 ChatGPT 模型是一個聊天模型,這意味著它被訓練成接受一系列消息作為輸入,然后返回模型生成的消息作為輸出。所以用戶消息是一種輸入,然后助理(模型)的消息是輸出。
在這個視頻中,我們將使用一個不同的輔助函數,而不是將單個的提示作為輸入,并獲得單個的輸出結果。我們將傳遞一個消息列表,這些消息可以來自各種不同的角色。
下面我來描述一下。這里有一個消息列表的例子。第一條消息是系統消息,它給出了一個總體指令,然后在這條消息之后,我們在用戶和助理之間有幾輪對話,這種對話通常會繼續下去。
messages = [
{'role':'system', 'content':'You are an assistant that speaks like Shakespeare.'},
{'role':'user', 'content':'tell me a joke'},
{'role':'assistant', 'content':'Why did the chicken cross the road'},
{'role':'user', 'content':'I don\'t know'} ]
如果你曾經使用過 ChatGPT 的 Web 界面,那么你輸入的內容就是用戶消息,然后 ChatGPT 輸出的內容就是助理消息。
系統消息有助于在某種程度上設置助理的行為和角色,它充當了對話的高級指令。因此,你可以將其視為在助理耳邊竊竊私語,并引導它的響應,而用戶并不知道系統的消息。所以,作為用戶,如果你曾經使用過 ChatGPT,你可能不知道 ChatGPT 的系統消息中有什么,這正是我們的意圖。
系統消息的好處是,它為開發人員提供了一種構建對話框架的方法,而無需將請求本身作為對話的一部分。因此,你可以悄悄地引導助理,指導模型的回復,而不讓用戶意識到。
現在讓我們試著在對話中使用這些消息。我們將使用新的輔助函數,從消息中獲取完成情況。我們將使用更高的溫度值。
response = get_completion_from_messages(messages, temperature=1)
print(response)
系統消息說,你是一個說話像莎士比亞的助理,這是我們向助手描述它應該如何表現。然后第一條用戶消息是,給我講個笑話。然后下一個問題是,雞為什么過馬路?最后的用戶信息是,我不知道。
如果我們運行這個程序,系統的響應是:“去另一邊”。
to get to the other side!
我們再來一次。這次的輸出是:“去另一邊,公平的先生/夫人,這是一個古老而經典的方法,永遠不會失敗。” 這就是我們莎士比亞式的回應。
To get to the other side, fair sir/madam! 'Tis an olden classic that never fails.
讓我們再試一次。我想讓它更清楚,讓我們打印整個消息響應。
{ “content”: “To get to the other side! Oh, that one always gets me.”, “role”: “assistant” } To get to the other side! Oh, that one always gets me.
為了更清楚,這個響應是一個助理消息,角色是助理,內容是消息本身。這就是這個輔助函數中發生的事情。我們只是傳遞了消息的內容。
8.2 上下文內容
現在,讓我們再舉一個例子。
這里我們的消息是,系統消息是“你是一個友好的聊天機器人“,第一條用戶消息是,“嗨,我的名字是 Isa”。我們想獲得第一條用戶信息,所以,讓我們執行第一條助理消息。
messages = [
{'role':'system', 'content':'You are friendly chatbot.'},
{'role':'user', 'content':'Hi, my name is Isa'} ]
response = get_completion_from_messages(messages, temperature=1)
print(response)
第一條消息是,“”你好 Isa,很高興認識你。今天我可以幫助的嗎?“
{ “content”: “Hello Isa! It is nice to meet you. How can I assist you today?”, “role”: “assistant” } Hello Isa! It is nice to meet you. How can I assist you today?
讓我們再試試另一個例子。
這里我們的消息是,系統消息是,“你是一個友好的聊天機器人”,第一條用戶消息是,“是的,你能提醒我的名字是什么嗎?”。
messages = [
{'role':'system', 'content':'You are friendly chatbot.'},
{'role':'user', 'content':'Yes, can you remind me, What is my name?'} ]
response = get_completion_from_messages(messages, temperature=1)
print(response)
讓我們得到輸出響應。
I’m sorry, but as an AI language model, I do not have access to information about your personal details like your name or any other kind of personal information. However, I am here to assist you with any general queries or have a friendly conversation.
正如你所看到的,模型實際上并不知道我的名字。因此,與語言模型的每次對話都是一次獨立的交互,這意味著你必須提供所有相關的信息,以便模型在當前對話中使用。
如果你想讓模型從前期的對話中引用內容,或者記住前期的對話內容,你就必須在模型的輸入中提供前期的交流內容。我們將把這稱為上下文。讓我們試試這個。
messages = [
{'role':'system', 'content':'You are friendly chatbot.'},
{'role':'user', 'content':'Hi, my name is Isa'},
{'role':'assistant', 'content': "Hi Isa! It's nice to meet you. \
Is there anything I can help you with today?"},
{'role':'user', 'content':'Yes, you can remind me, What is my name?'} ]
response = get_completion_from_messages(messages, temperature=1)
print(response)
現在我們已經給出了模型需要的上下文。嗯,這是我在之前的消息中的名字,我們會問同樣的問題,會問“我的名字是什么”。
Your name is Isa.
模型能夠作出響應,因為它在我們輸入的消息列表中,擁有所有上下文內容。
所以現在你要建立自己的聊天機器人了。
8.3 點餐機器人(OrderBot)
這個聊天機器人被稱為 OrderBot(點餐機器人)。
為了構建這個 OrderBot,我們將自動收集用戶的提示和助理的響應。它將在披薩店接受訂單,所以首先我們將定義這個輔助函數。輔助函數將收集我們的用戶信息,這樣我們就不需要像上面那樣手工輸入信息。這將從下面建立的用戶界面中收集提示,然后將其追加到一個稱為“上下文(context)”的列表中,然后它每次都會調用這個帶有上下文的模型。然后模型響應也會被添加到上下文中,所以模型消息的被添加到上下文中,用戶消息也被添加到上下文中,以此類推,所以它越來越長。通過這種方式,模型就獲得了它所需要的信息來決定下一步要做什么。
import panel as pn # GUIdef collect_messages(_):prompt = inp.value_inputinp.value = ''context.append({'role':'user', 'content':f"{prompt}"})response = get_completion_from_messages(context) context.append({'role':'assistant', 'content':f"{response}"})panels.append(pn.Row('User:', pn.pane.Markdown(prompt, width=600)))panels.append(pn.Row('Assistant:', pn.pane.Markdown(response, width=600, styles={'background-color': '#F6F6F6'})))return pn.Column(*panels)
現在我們將設置并運行這個用戶界面(UI)來顯示訂單機器人。這里是上下文,它包含了包括菜單的系統消息。請注意,每次我們調用語言模型時,我們都會使用相同的上下文,并且這個上下文會隨著時間的推移而不斷構建。
pn.extension()panels = [] # collect display context = [ {'role':'system', 'content':"""
You are OrderBot, an automated service to collect orders for a pizza restaurant. \
You first greet the customer, then collects the order, \
and then asks if it's a pickup or delivery. \
You wait to collect the entire order, then summarize it and check for a final \
time if the customer wants to add anything else. \
If it's a delivery, you ask for an address. \
Finally you collect the payment.\
Make sure to clarify all options, extras and sizes to uniquely \
identify the item from the menu.\
You respond in a short, very conversational friendly style. \
The menu includes \
pepperoni pizza 12.95, 10.00, 7.00 \
cheese pizza 10.95, 9.25, 6.50 \
eggplant pizza 11.95, 9.75, 6.75 \
fries 4.50, 3.50 \
greek salad 7.25 \
Toppings: \
extra cheese 2.00, \
mushrooms 1.50 \
sausage 3.00 \
canadian bacon 3.50 \
AI sauce 1.50 \
peppers 1.00 \
Drinks: \
coke 3.00, 2.00, 1.00 \
sprite 3.00, 2.00, 1.00 \
bottled water 5.00 \
"""} ] # accumulate messagesinp = pn.widgets.TextInput(value="Hi", placeholder='Enter text here…')
button_conversation = pn.widgets.Button(name="Chat!")interactive_conversation = pn.bind(collect_messages, button_conversation)dashboard = pn.Column(inp,pn.Row(button_conversation),pn.panel(interactive_conversation, loading_indicator=True, height=300),
)dashboard
上面的代碼用 WSL-vscode-jupyter 是無法運行的,需要在 windows 安裝 anaconda 配置 jupyter notebook 才行。具體參考這兩篇博客:【windows anaconda 配置 ipynb 環境】 和 【windows anaconda jupyter notebook 怎么才能開飛機?】
大概的樣子如下:通過 UI 和點餐機器人交互:
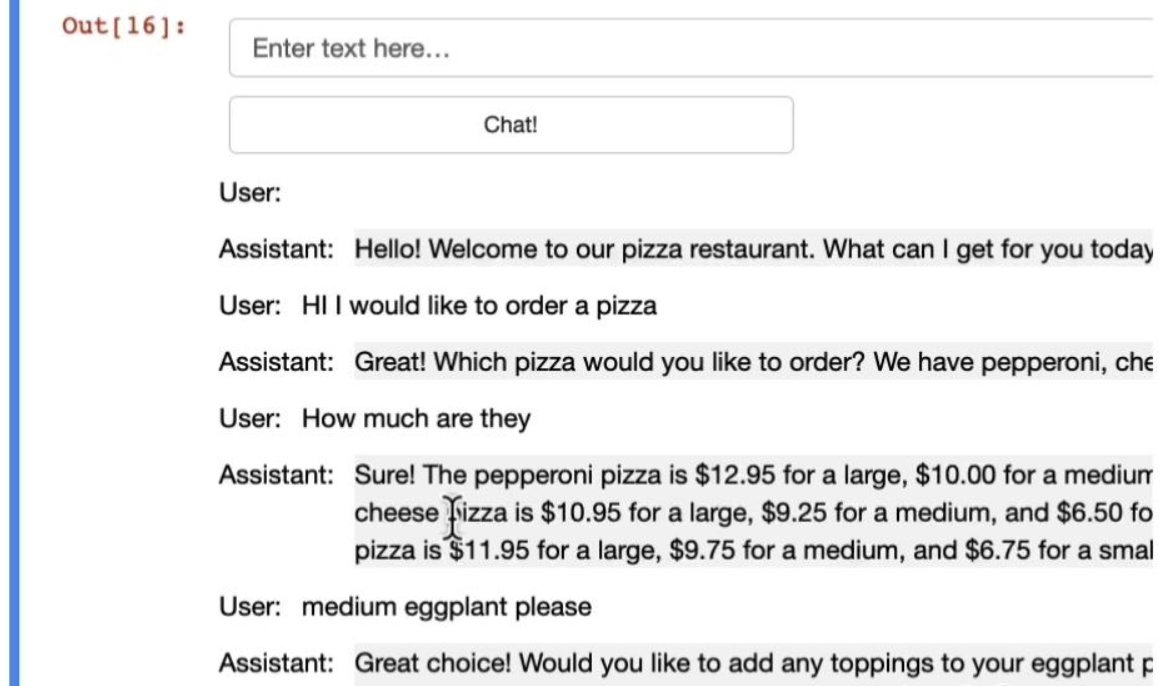
我說:嗨,我想點一份披薩。
助理說:太好了,你想點什么披薩?我們有意大利香腸、奶酪和茄子披薩。
我說:它們多少錢?
助理:(各種比薩的價格)
太好了,助理告訴了我們比薩的價格。我想我覺得可以點中號的茄子披薩。所以,正如你所能想象的,我們可以繼續這個對話。
讓我們看看我們在系統消息中放了什么。
你是訂單機器人,為一家披薩店收集訂單的自動化服務,你首先要問候顧客,然后接受訂單,然后問是自取還是配送。你等待收集整個訂單,然后進行匯總,最后檢查客戶是否還想添加其他東西。如果是配送,你可以詢問配送地址。最后,你收到付款,確保清晰地描述所有選項、附加服務、額外費用和尺寸,以便從菜單中精確地識別項目。你以簡短的、健談的、友好的風格來回答客戶。系統信息還包括菜單,這里我們有全部的菜單。
讓我們回到我們的對話中,看看助理是否一直在遵循指示。
很好,助理問我們是否需要配料,我們在系統信息中指定了這一點。我回答我們不需要額外的配料。
當然可以。還有什么想要點的嗎?嗯,我來點水。事實上,我輸入的是薯條。
小份還是大份?很好,因為我們在系統消息中要求助理說明額外配料。
這樣你就明白了,你可以隨意自己玩這個過程。你可以暫停視頻,在左邊的 Notebook 上運行這個點餐機器人。
現在我們可以要求模型創建一個 JSON 摘要,可以在對話的基礎上生成訂單,將其發送到訂單系統。所以我們現在要加上另一條系統消息,這是一條指令,要求創建一個關于以上對話中食物訂單的 JSON 摘要,逐項列出每種食物的價格,字段應該是一個披薩,包括配菜,兩張配料列表,三張飲料列表,四個面列表,最后是總價格。你也可以在這里使用用戶消息,這不一定是系統消息。
messages = context.copy()
messages.append(
{'role':'system', 'content':'create a json summary of the previous food order. Itemize the price for each item\The fields should be 1) pizza, include size 2) list of toppings 3) list of drinks, include size 4) list of sides include size 5)total price '},
)#The fields should be 1) pizza, price 2) list of toppings 3) list of drinks, include size include price 4) list of sides include size include price, 5)total price '}, response = get_completion_from_messages(messages, temperature=0)
print(response)
讓我們來執行一下。
注意,在這種情況下,我們使用較低的溫度參數。因為對于這些類型的任務,我們希望輸出是相當可預測的。對于一個對話式助理,你可能希望使用更高的溫度值。但對這種點餐機器人,我會使用較低的溫度值,因為對于客戶助理聊天機器人來說,我們希望輸出是更加可預測的。
于是,這里我們得到訂單的摘要。如果需要,我們可以將其提交給訂單系統。這就是我們所需要的。
Sure, here’s a JSON summary of the order:
{"pizza": [{"type": "pepperoni","size": "large","price": 12.95},{"type": "cheese","size": "medium","price": 9.25}],"toppings": [{"type": "extra cheese","price": 2.00},{"type": "mushrooms","price": 1.50}],"drinks": [{"type": "coke","size": "large","price": 3.00},{"type": "sprite","size": "small","price": 2.00}],"sides": [{"type": "fries","size": "large","price": 4.50}],"total_price": 35.20
}
好的,現在你已經建立了自己的點餐聊天機器人。
你可以自行地定制,可以使用系統消息來改變聊天機器人的行為,讓它扮演具有不同知識的不同角色。
)
)


![[Unity]設置自動打包腳本](http://pic.xiahunao.cn/[Unity]設置自動打包腳本)

——計算量(FLOPs)、參數量(Params)、計算速度(FLOPS/TOPS)))


GD32VF103 MCU架構了解)


