前言
為提高前端代碼格式化和規范開發。主要使用eslint、prettier、husky完成對git提交commit信息校驗和代碼eslint格式化校驗,不符合要求的代碼,提交不到倉庫。
參考鏈接1
參考鏈接2
文章目錄
- 前言
- 一、效果圖
- 1.git提交觸發eslint規范校驗
- 2.版本與分支名不一致校驗
- 3.commit提交不規范校驗
- 4.代碼提交規范相關介紹
- 二、Prettier準備
- 1.安裝Prettier
- 2.安裝對應插件
- 3.配置
- 4.配置格式化
- 5.保存自動格式化代碼設置
- 三、eslint準備
- 1.安裝eslint插件
- 2.勾選
- 3.安裝eslint依賴
- 4.根添加配置
- 5.package.json添加校驗命令
- 四、git檢查提交分支和package.json的version版本是否一致
- 1.安裝命令husky和lint-staged
- 2.初始化
- 3.創建校驗腳本?
- 4.配置ckage.json
- 5.更新 Husky 鉤子?
- 6.測試版本不一致的提交效果
- 五、支持eslint.config.js的解析
- 1.原生語法解析(無就jsx、無ts)
- 2.有jsx無ts
- 3.有jsx有ts
- 六、git提交規范化類型
- 1.package.json添加命令和初始化husky
- 2.安裝
- 3.配置git提交類型
- 4.添加commit-msg
- 5.測試git提交規范
- 七、git提交觸發eslint
- 1.package.json修改
- 2.測試git提交觸發eslint
- 八、最終結構
- 九、eslint相關報錯
一、效果圖
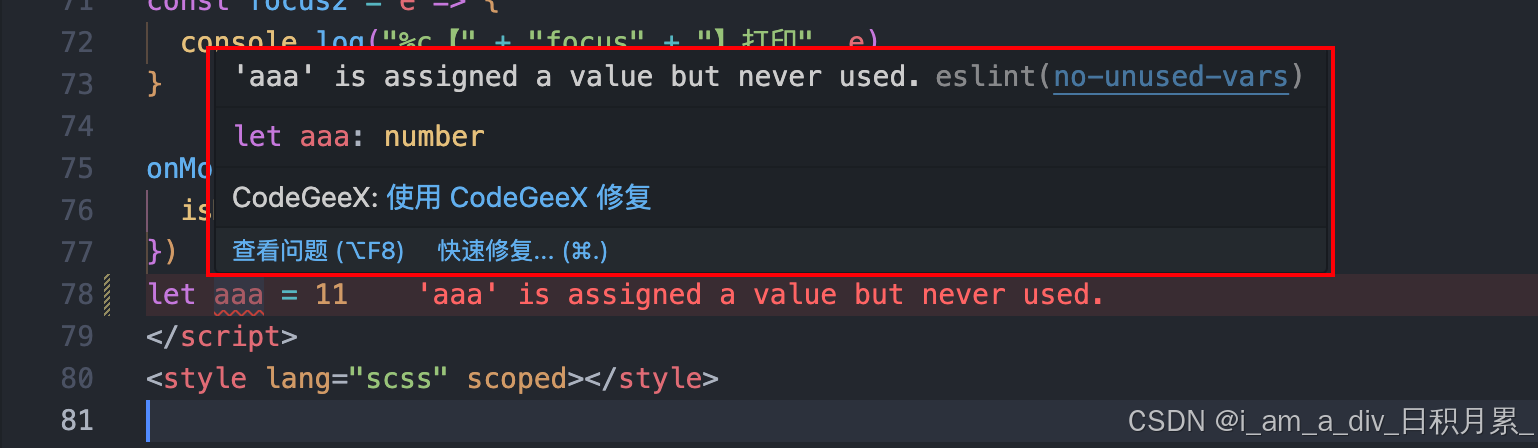
1.git提交觸發eslint規范校驗

2.版本與分支名不一致校驗

3.commit提交不規范校驗

4.代碼提交規范相關介紹
代碼格式規范相關:
- eslint:代碼格式校驗
- prettier:prettier 主要是為了格式化代碼,而在沒有 prettier 之前,是用 eslint —fix和 編輯器自帶代碼格式來進行代碼格式化的。
- stylelint:css樣式格式校驗
代碼提交規范相關:
- lint-staged:一個在git暫存文件上運行linters的工具,檢查本次修改更新的代碼,并自動修復并且可以添加到暫存區
- husky: 是一個Git Hook 工具。將其安裝到所在倉庫的過程中它會自動在 .git/ 目錄下增加相應的鉤子實現對應的功能,這里我們通過使用husky來
監測commit-msg鉤子,完成提交信息校驗;監測 pre-commit 鉤子,完成代碼校驗。 - pre-commit:git hooks的鉤子,在代碼提交前檢查代碼是否符合規范,不符合規范將不可被提交
- commit-msg:git hooks的鉤子,在代碼提交前檢查commit信息是否符合規范
- commitizen:git的規范化提交工具,幫助你填寫commit信息,符合約定式提交要求
- commitlint:用于檢測提交的信息。
文檔:
- git規范提交文檔
- stylelint
- eslint
二、Prettier準備
1.安裝Prettier
Prettier是一個代碼格式化工具,它可以自動調整代碼的縮進、換行、引號等格式,使代碼風格保持一致。與ESLint不同,Prettier主要關注代碼的格式問題,而不是語法或邏輯錯誤。
npm install prettier --save-dev
package.json添加
"scripts": {"prettier": "npx prettier . --write",},
2.安裝對應插件

3.配置
.prettierignore忽略文件
.github
.husky
.vscode
/public/**
/node_modules/**
**/*.svg
**/*.sh
.prettierrc.cjs配置文件
module.exports = {printWidth: 200,tabWidth: 2,useTabs: false,semi: false,trailingComma: "none",singleQuote: false,bracketSpacing: true,jsxBracketSameLine: false,endOfLine: "auto",arrowParens: "avoid",singleAttributePerLine: false,htmlWhitespaceSensitivity: "ignore"
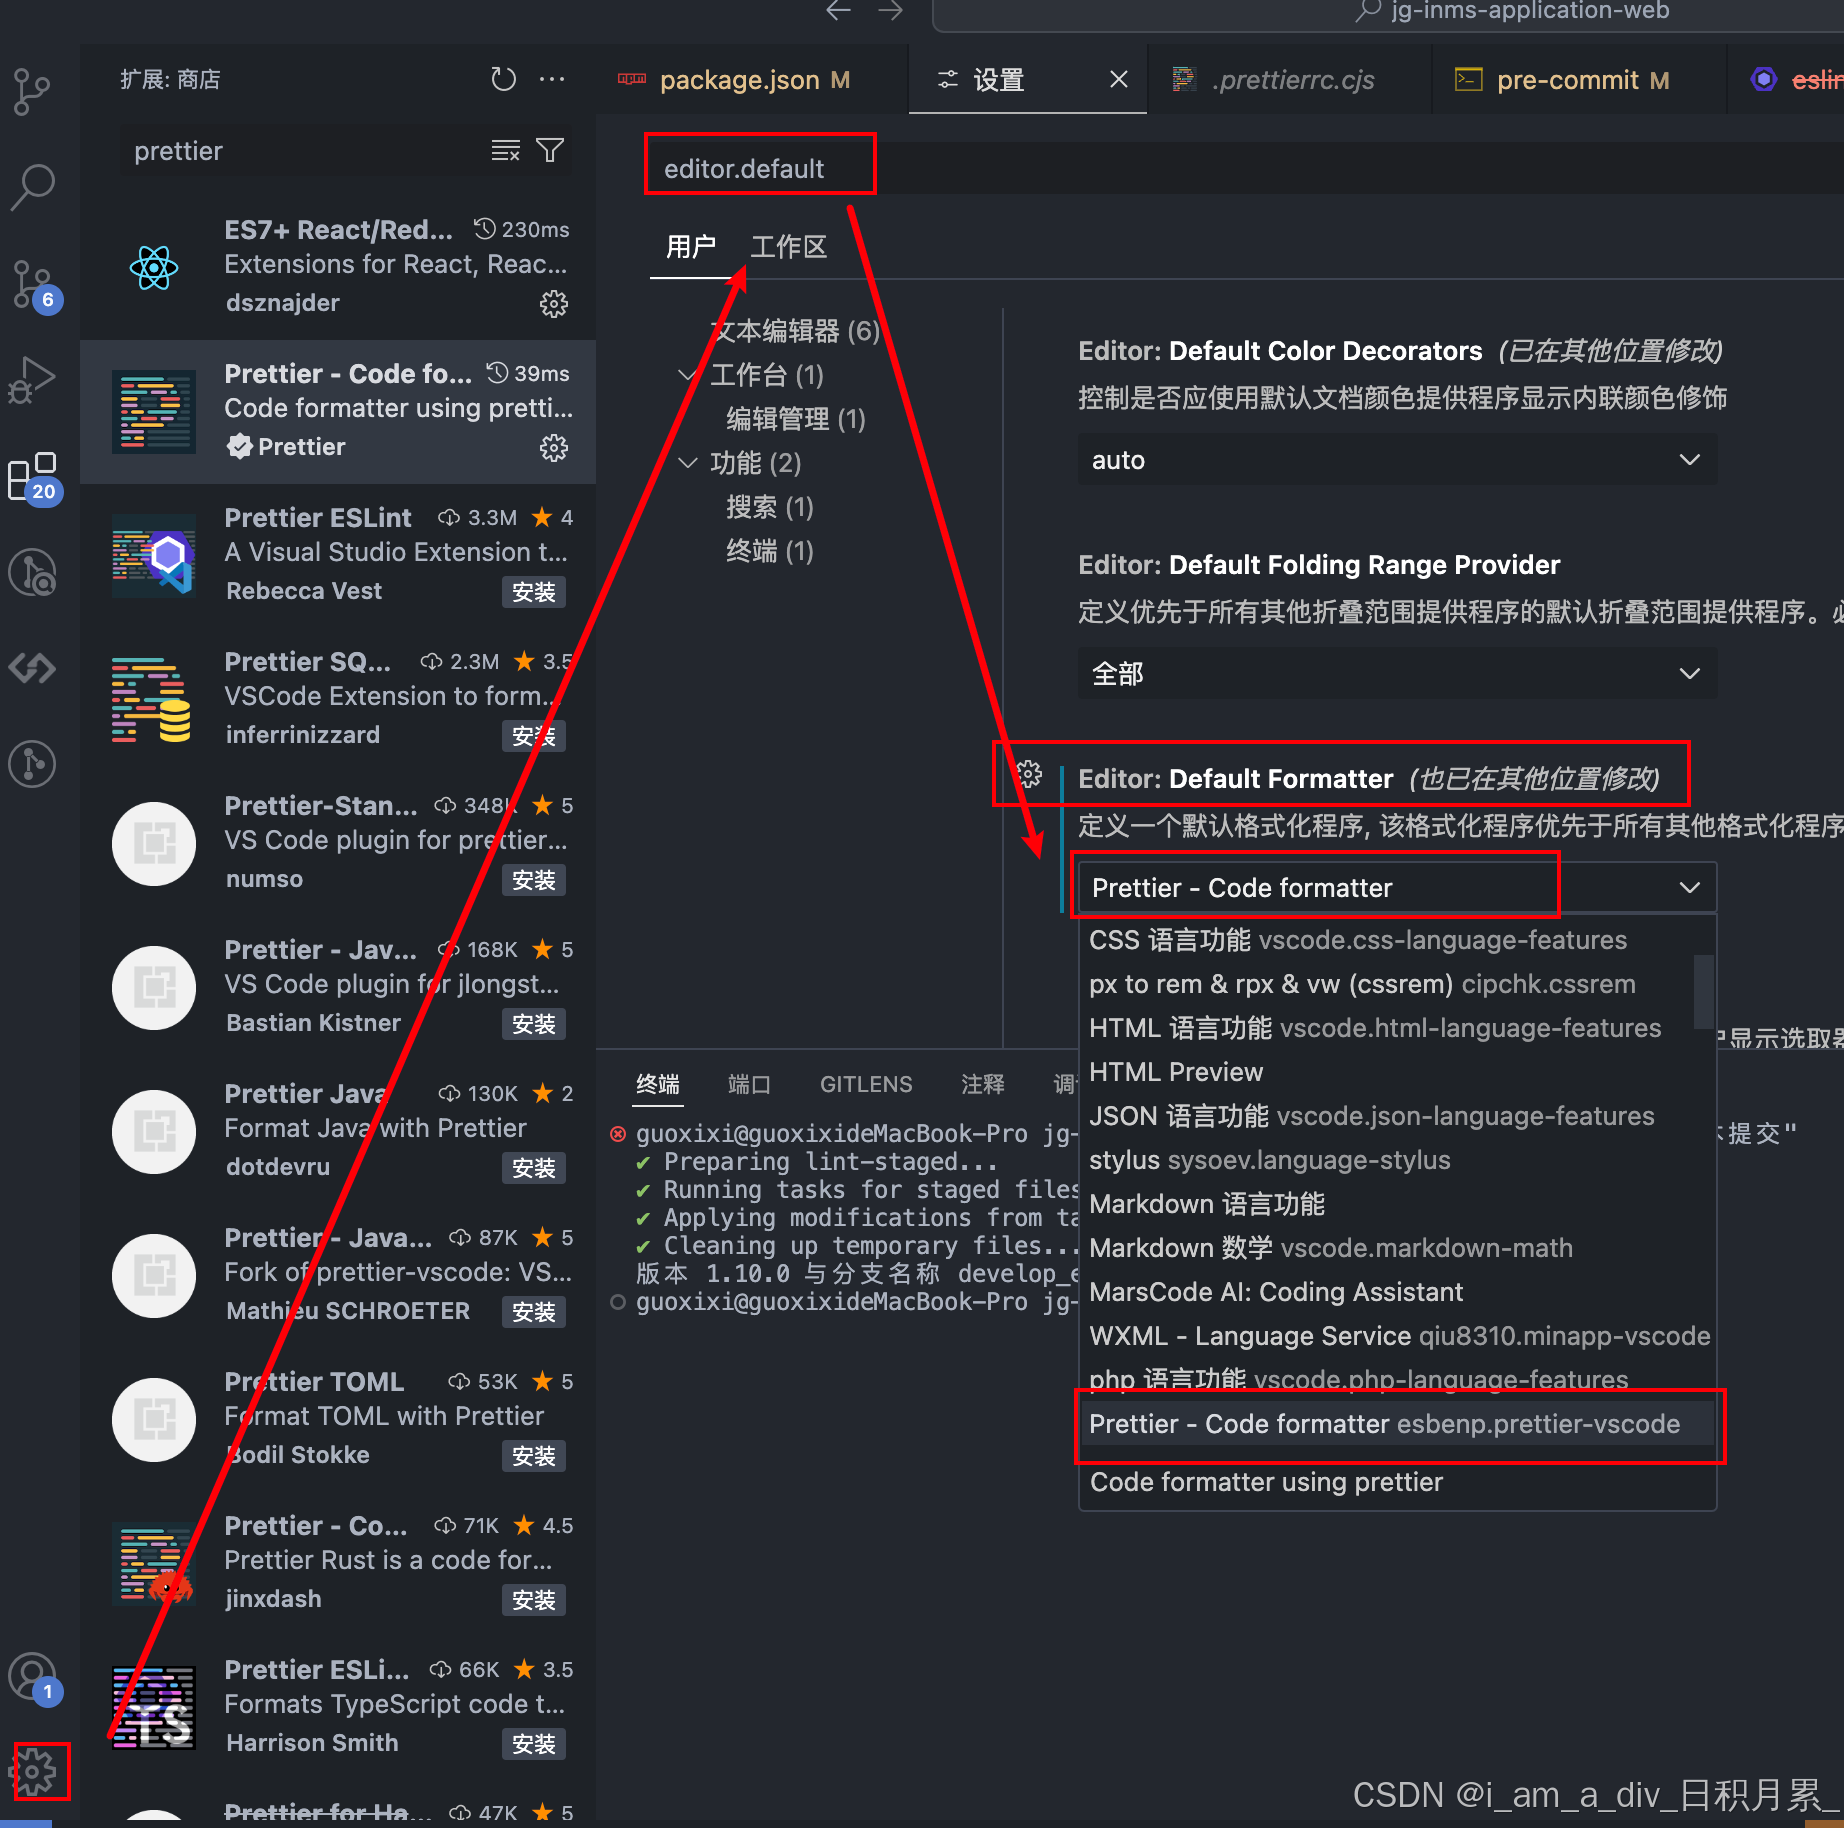
}4.配置格式化
在vscode 的設置里面 找到代碼格式化設置,設置為使用 prettier格式化代碼
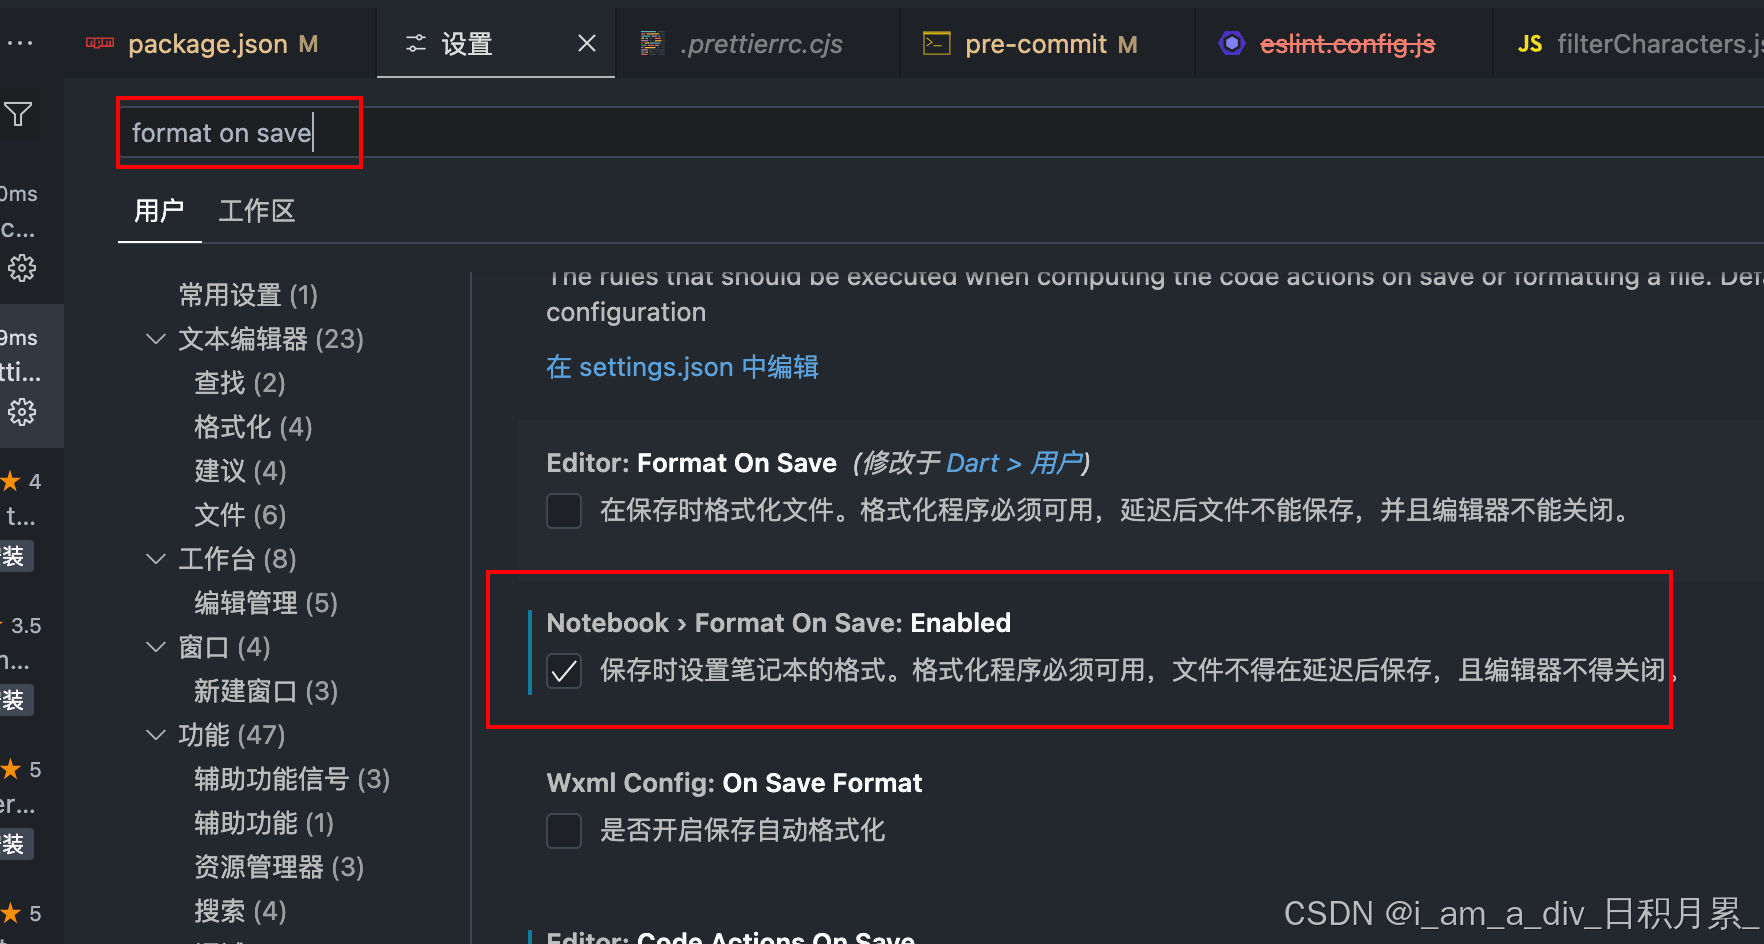
5.保存自動格式化代碼設置
三、eslint準備
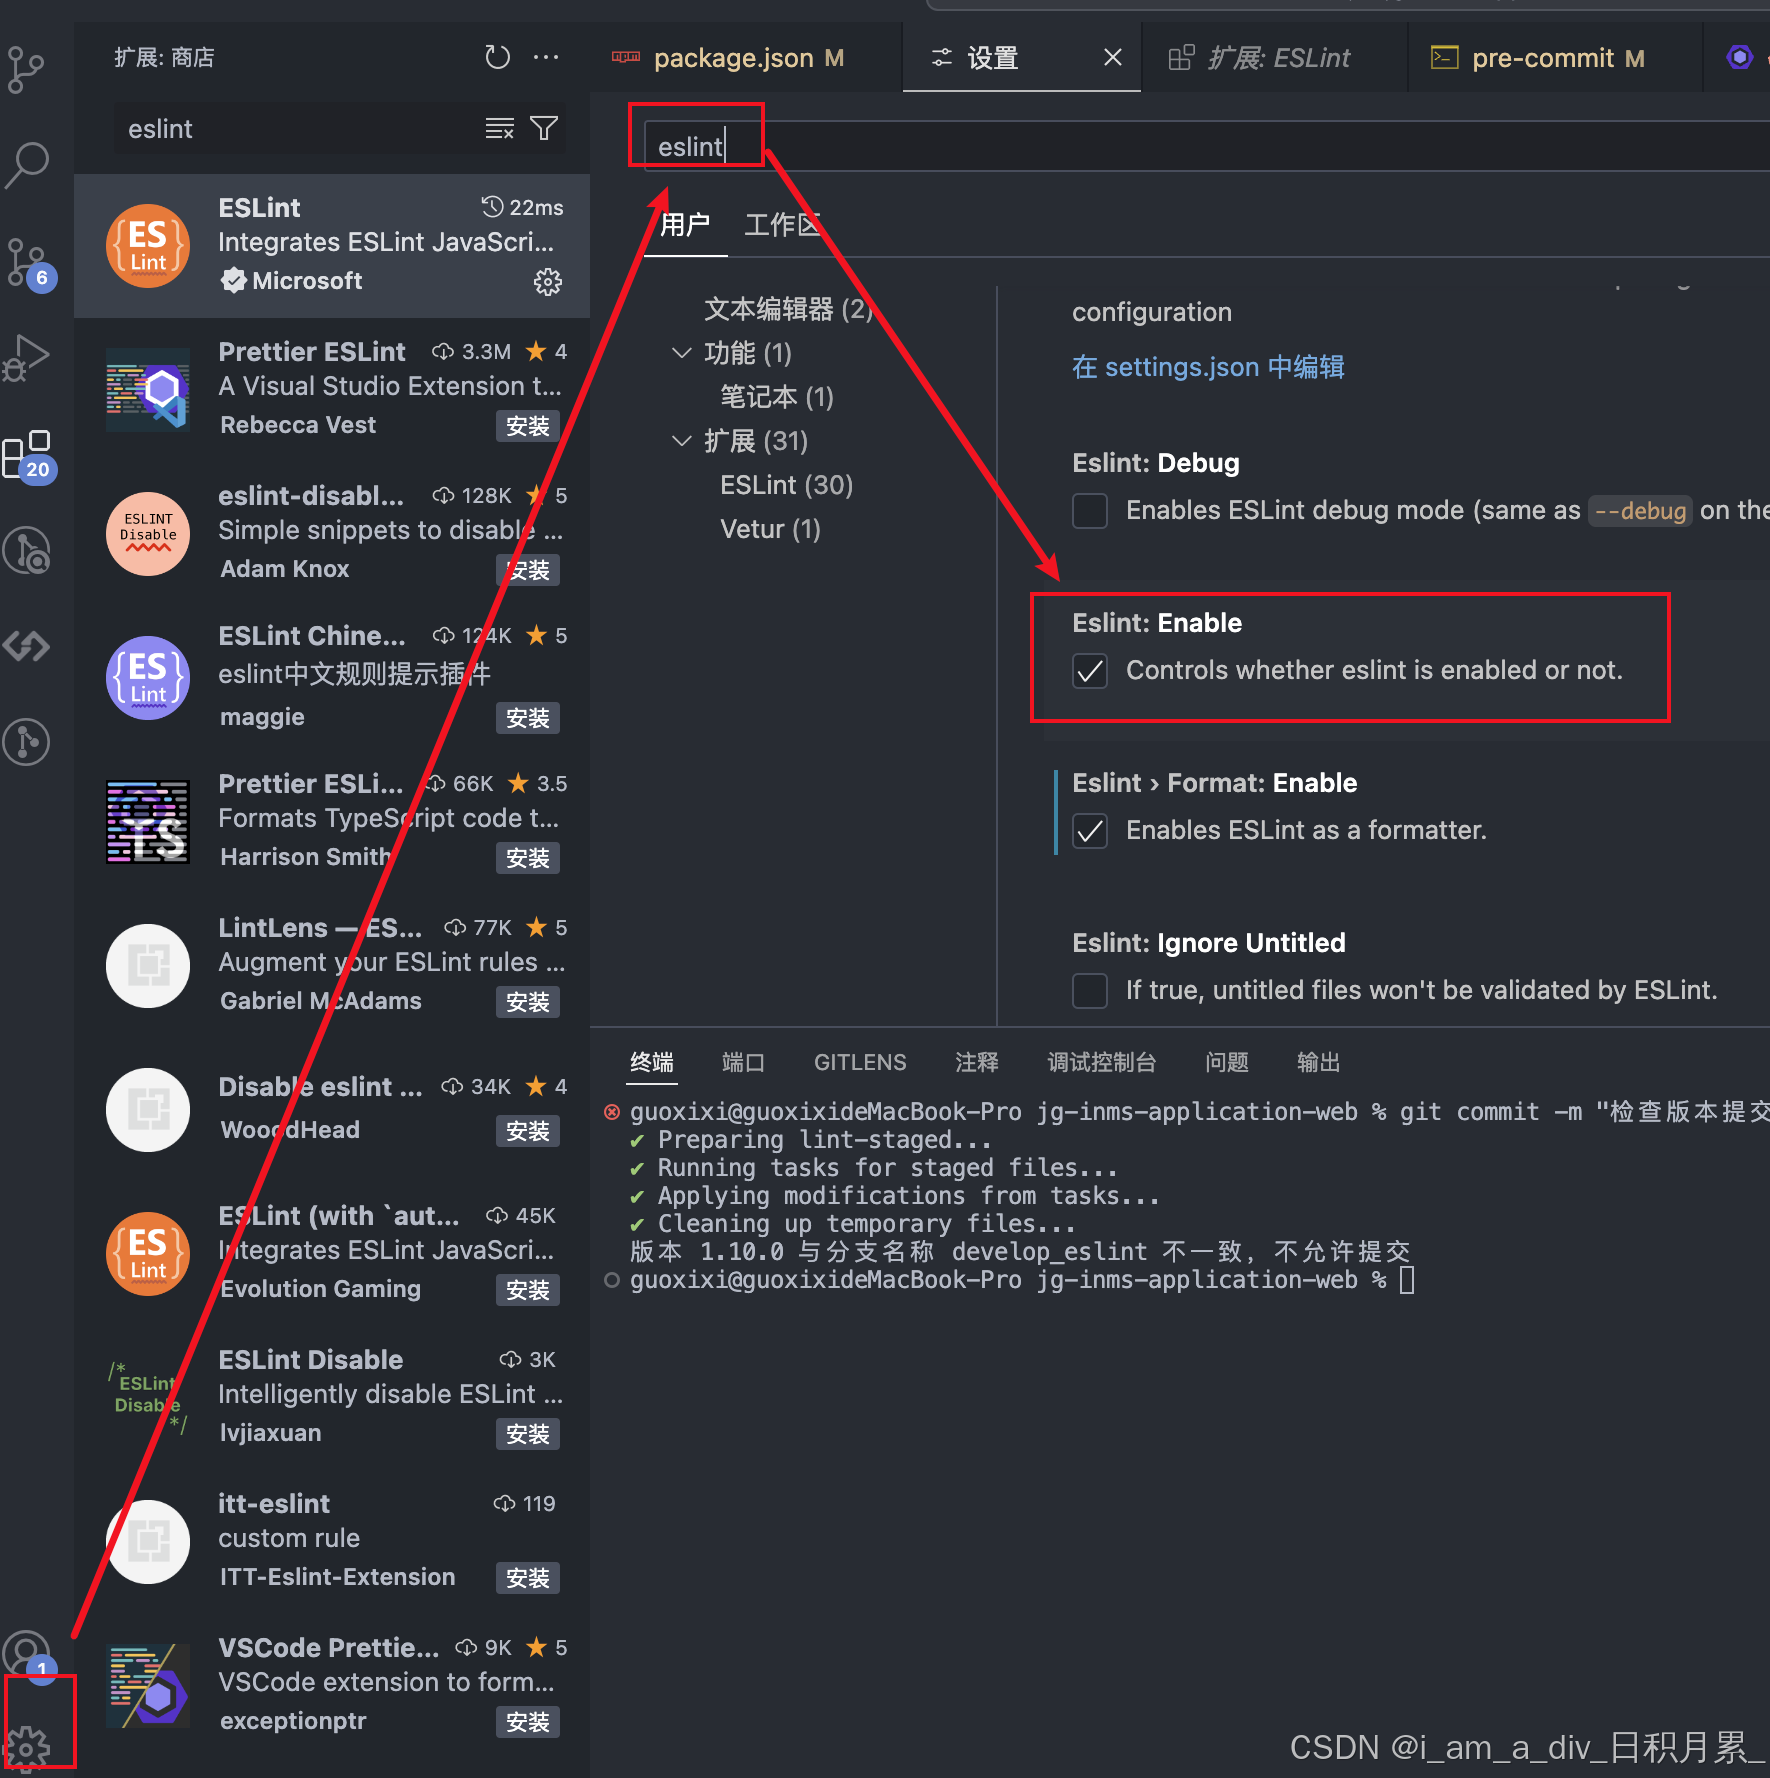
1.安裝eslint插件

2.勾選
3.安裝eslint依賴
pnpm add @eslint/js@9.8.0 eslint@9.8.0 eslint-plugin-vue@9.27.0 globals@15.8.0 --save-dev
4.根添加配置
.eslintignore
*.sh
*.md
*.woff
*.ttf
.vscode
.husky
.githubnode_modules
dist
eslint.config.js: 添加這個文件后才可以支持eslnt觸發校驗
這個文件的配置,具體可以看文章最后的 五、支持eslint.config.js的解析 內容
import globals from "globals"
import pluginJs from "@eslint/js"
import pluginVue from "eslint-plugin-vue"export default [{ files: ["**/*.{js,mjs,cjs,vue}"] }, // 注意范圍{ languageOptions: { globals: { ...globals.browser, ...globals.node } } },pluginJs.configs.recommended,...pluginVue.configs["flat/essential"],{files: ["**/*.vue"],rules: {"vue/html-self-closing": "off","vue/multi-word-component-names": "off","vue/max-attributes-per-line": "off","vue/singleline-html-element-content-newline": "off","max-lines": ["error", { max: 500, skipBlankLines: true, skipComments: true }]}},{ignores: ["node_modules/*", "dist/*", "public/*"]}
]
5.package.json添加校驗命令
5.1命令
"scripts": {"prettier": "npx prettier . --write","lint": "npx eslint ."},
5.2執行npm run lint就會觸發eslint的校驗,看到eslint報錯。
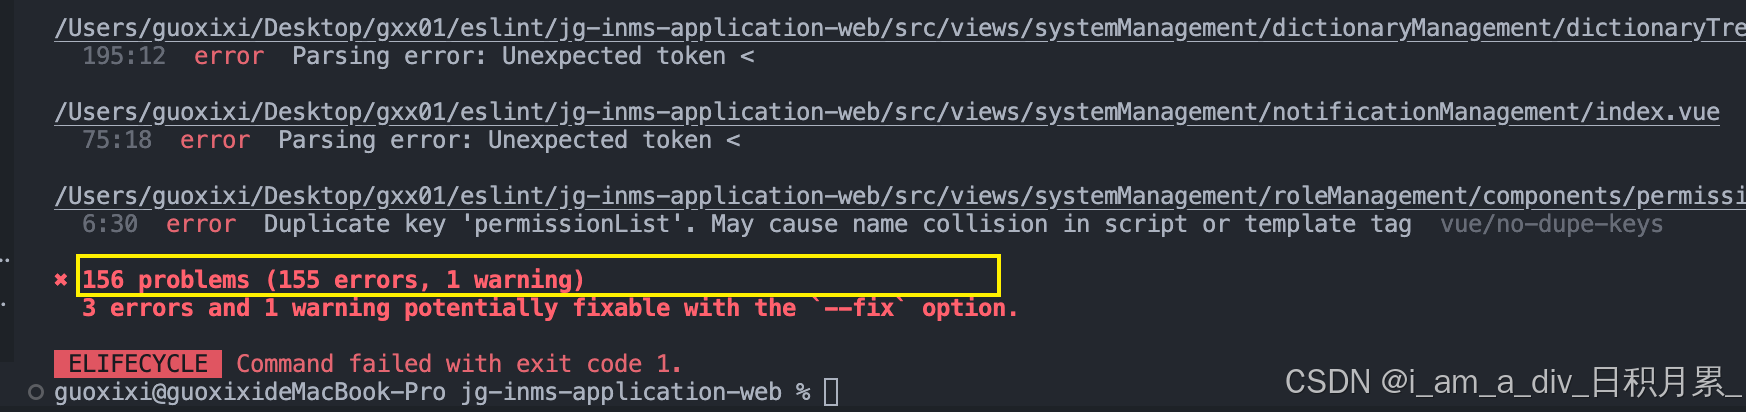
5.3同時頁面應該也可以看到eslint的報錯了。
- 如果此時vscode看不到具體的頁面的eslint報錯,那就關閉項目,重啟vscode。
- 如果發現做了上述操作之后,還是沒觸發,那就把vscode的 eslint、prettier 擴展插件 卸載了重新安裝,然后重啟vscode,就可以解決了
四、git檢查提交分支和package.json的version版本是否一致
詳細單獨配置版本檢查看此篇
| husky | 操作git鉤子的工具 |
|---|---|
| lint-staged | 在提交前進行eslint校驗,并使用prettier格式化暫存區的代碼 |
| @commitlint/cli | 校驗提交信息 |
| @commitlint/config-conventional | Angular 的提交規范 |
| commitizen | 生成標準化的commit message |
| cz-git | 輕量級、高度自定義。輸出標準格式的commitize 適配器 |
新增內容:
1.安裝命令husky和lint-staged
npm install husky@9.1.4 lint-staged@15.2.9 --save-dev
2.初始化
npx husky-init && pnpm install
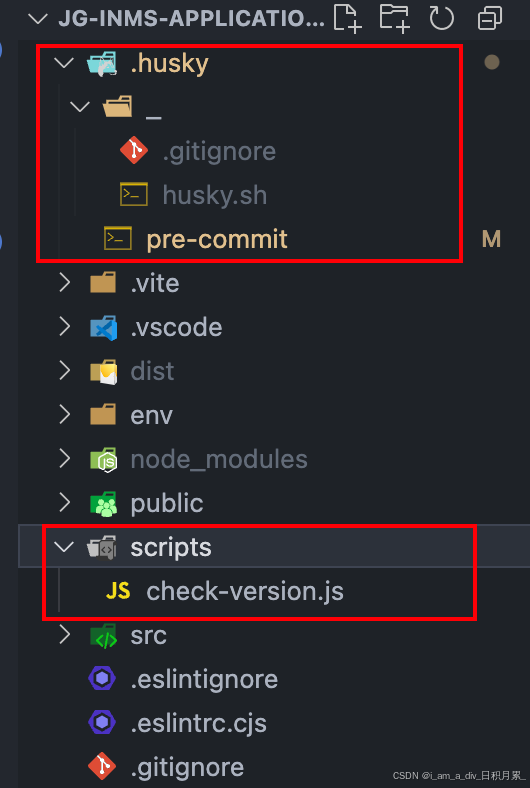
生成 .husky 目錄及 pre-commit 鉤子文件
3.創建校驗腳本?
在項目根目錄新建 scripts/check-version.js:
import fs from "fs"
import { execSync } from "child_process"// 獲取packageJson內容
const packageJson = JSON.parse(fs.readFileSync("package.json", "utf8"))// 獲取當前分支名
const branchName = execSync("git rev-parse --abbrev-ref HEAD").toString().trim()if (!branchName.includes(packageJson.version)) {console.error(`版本 ${packageJson.version} 與分支名稱 ${branchName} 不一致,不允許提交`)process.exit(1)
}
4.配置ckage.json
配置lint-staged?,添加校驗:
注意此時僅僅校驗版本,沒有校驗eslint
"scripts": {"prepare": "husky install"},"lint-staged": {"*.{js,jsx,ts,tsx}": ["prettier --write"],"*.vue": ["prettier --write"]}
5.更新 Husky 鉤子?
修改 .husky/pre-commit:
npx lint-staged
node scripts/check-version.js
6.測試版本不一致的提交效果
五、支持eslint.config.js的解析
1.原生語法解析(無就jsx、無ts)
import globals from "globals"
import pluginJs from "@eslint/js"
import pluginVue from "eslint-plugin-vue"export default [{ files: ["**/*.{js,mjs,cjs,vue}"] }, // 注意范圍{ languageOptions: { globals: { ...globals.browser, ...globals.node } } },pluginJs.configs.recommended,...pluginVue.configs["flat/essential"],{files: ["**/*.vue"],rules: {"vue/html-self-closing": "off","vue/multi-word-component-names": "off","vue/max-attributes-per-line": "off","vue/singleline-html-element-content-newline": "off","max-lines": ["error", { max: 500, skipBlankLines: true, skipComments: true }]}},{ignores: ["node_modules/*", "dist/*", "public/*"]}
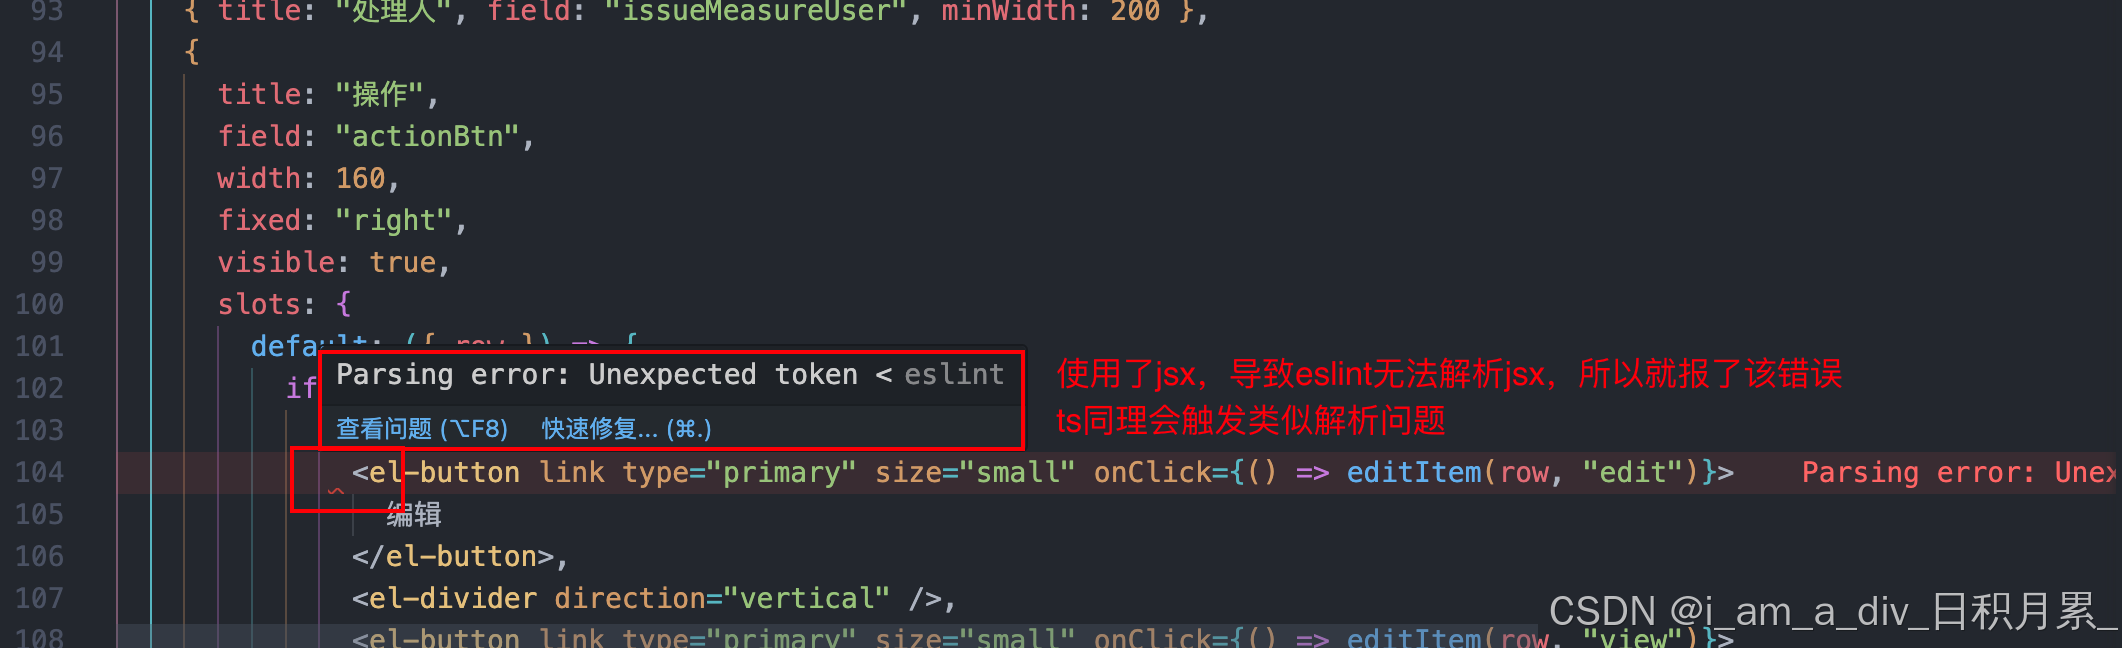
]2.有jsx無ts
報錯:jsx報錯Parsing error: Unexpected token <eslint
安裝依賴
npm install vue-eslint-parser --save-dev
import globals from "globals"
import pluginJs from "@eslint/js"
import pluginVue from "eslint-plugin-vue"
import babelParser from "vue-eslint-parser"; // 顯式導入解析器對象-否則引入報錯export default [{files: ["**/*.{js,jsx,vue}"], // 注意范圍languageOptions: {// 正確引用解析器對象(非字符串)parser: babelParser,parserOptions: {ecmaVersion: "latest",sourceType: "module",ecmaFeatures: { jsx: true }},globals: { ...globals.browser, ...globals.node }}},pluginJs.configs.recommended,...pluginVue.configs["flat/essential"],{files: ["**/*.vue"],rules: {"vue/html-self-closing": "off","vue/multi-word-component-names": "off","vue/max-attributes-per-line": "off","vue/singleline-html-element-content-newline": "off","max-lines": ["error", { max: 500, skipBlankLines: true, skipComments: true }]}},{ignores: ["node_modules/*", "dist/*", "public/*"]}
]
3.有jsx有ts
- 我的這里比較特殊,最初有jsx和ts代碼時候,沒有安裝
@typescript-eslint/parser和@typescript-eslint/eslint-plugin這兩個插件時候,ts的代碼是會報Parsing error: Unexpected token {的eslint問題。 - 但是當我安裝下面兩個依賴后,
eslint.config.js繼續使用2.有jsx無ts的配置時,發現ts的報錯也沒了。。。 - 原因:
files: ["**/*.{js,jsx,ts,tsx,vue}"],漏了寫ts,tsx - 正確解決問題的方式如下
安裝依賴
npm install @typescript-eslint/parser @typescript-eslint/eslint-plugin --save-dev
注意:project: "./tsconfig.json"的路徑
import globals from "globals";
import pluginJs from "@eslint/js";
import pluginVue from "eslint-plugin-vue";
import vueParser from "vue-eslint-parser";
import tsParser from "@typescript-eslint/parser"; // 導入 TS 解析器
import tsEslintParser from "@typescript-eslint/eslint-plugin"; // 導入 TS 解析器export default [// 核心配置{files: ["**/*.{js,jsx,ts,tsx,vue}"], // 注意范圍languageOptions: {// 主解析器:處理 Vue 文件parser: vueParser,parserOptions: {// 子解析器:處理非 Vue 文件(TS/JS)parser: {js: tsParser, // 處理 JS/JSXts: tsParser, // 處理 TS/TSXjsx: tsParser,tsx: tsParser},ecmaVersion: "latest",sourceType: "module",ecmaFeatures: { jsx: true },// 關聯 tsconfig.json(路徑根據實際項目調整)project: "./tsconfig.json" // 【【【【【【【【【【【【【【【【【【【【【【【【【【【【【【【【【【注意這里路徑調整,沒有ts配置文件就注釋掉該行】】】】】】】】】】】】】】】】】】】】】】】】】】】】】】】】】】】】】},globals: { ...globals.browser, ...globals.node }}},// 應用推薦規則pluginJs.configs.recommended,// Vue3 配置...pluginVue.configs["flat/essential"],// TypeScript 配置{plugins: {"@typescript-eslint": tsEslintParser},rules: {// "@typescript-eslint/no-unused-vars": "warn" // 示例規則}},// 自定義規則{files: ["**/*.vue"],rules: {"vue/html-self-closing": "off","vue/multi-word-component-names": "off","vue/max-attributes-per-line": "off","vue/singleline-html-element-content-newline": "off","max-lines": ["error", { max: 500, skipBlankLines: true, skipComments: true }]}},// 忽略文件{ignores: ["node_modules/*", "dist/*", "public/*"]}
]
六、git提交規范化類型
規范提交文檔
1.package.json添加命令和初始化husky
package.json至少要有這些配置
"scripts": {"prettier": "npx prettier . --write","prepare": "husky install","commitlint": "commitlint --edit"},"husky": {"hooks": {"commit-msg": "commitlint -E HUSKY_GIT_PARAMS"}},"lint-staged": {"*.{js,jsx,ts,tsx}": ["prettier --write"],"*.vue": ["prettier --write"]}
執行npm run prepare,初始化husky的文件
2.安裝
npm i @commitlint/cli @commitlint/config-conventional -D
3.配置git提交類型
根目錄配置:commitlint.config.js
const config = {ignores: [commit => commit.includes("init")],rules: {"header-max-length": [2, "always", 100],"scope-case": [2, "always", "lowerCase"],"subject-empty": [2, "never"],"subject-case": [2, "always", ["lower-case", "sentence-case", "start-case", "pascal-case", "upper-case"]],"subject-full-stop": [2, "never", "."],"type-empty": [2, "never"],"type-case": [2, "always", "lowerCase"],"type-enum": [2, "always", ["feat", "fix", "style", "perf", "docs", "refactor", "test"]]}
}export default config
4.添加commit-msg
在.husky/下新增commit-msg
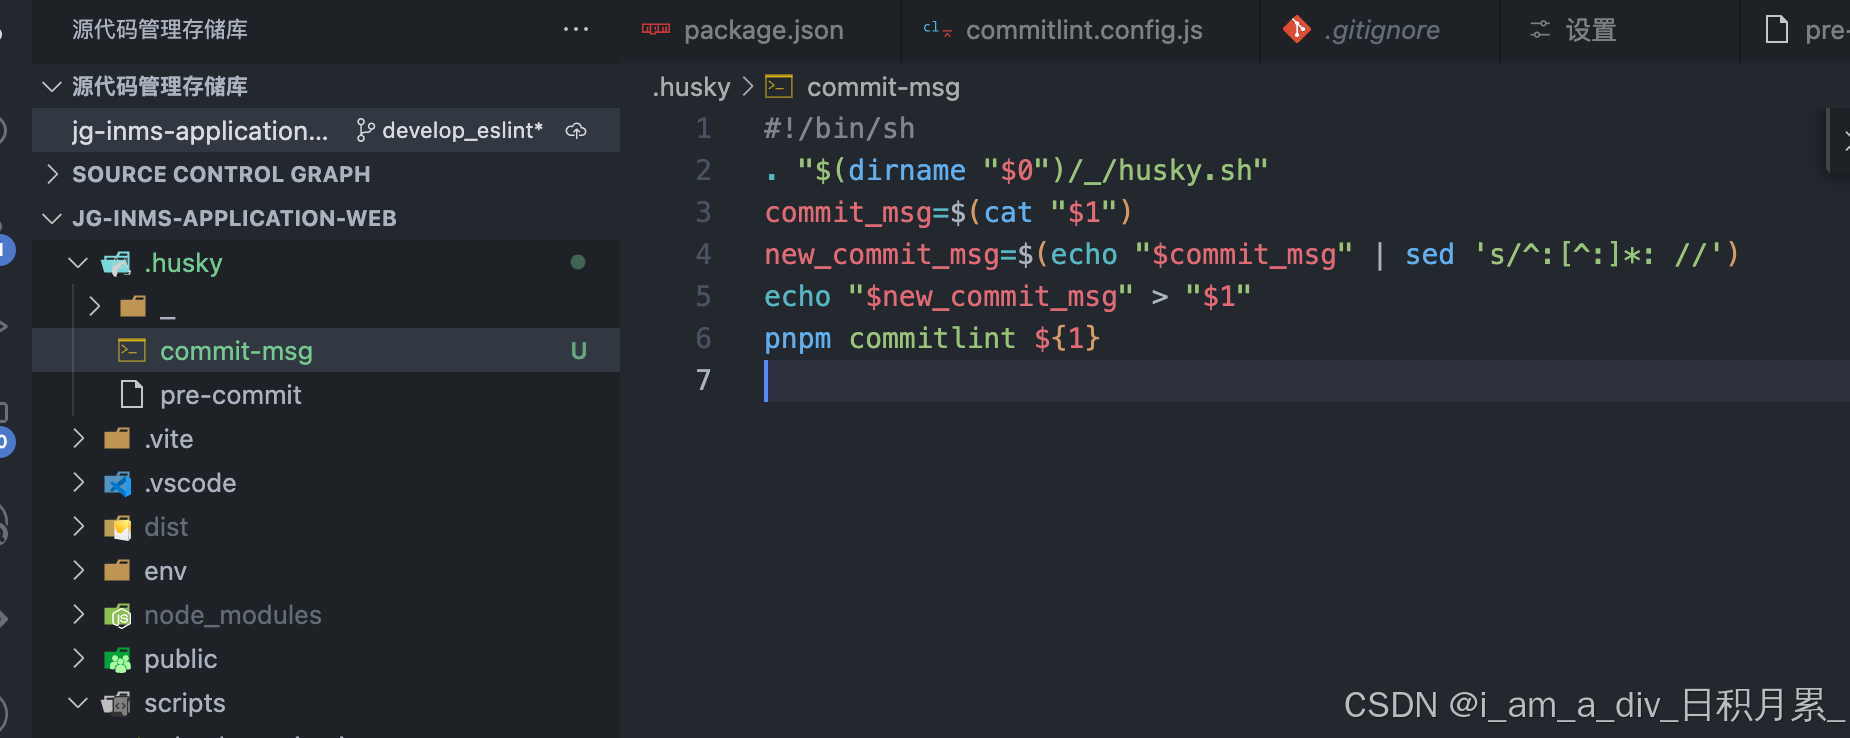
#!/bin/sh
. "$(dirname "$0")/_/husky.sh"
commit_msg=$(cat "$1")
new_commit_msg=$(echo "$commit_msg" | sed 's/^:[^:]*: //')
echo "$new_commit_msg" > "$1"
pnpm commitlint ${1}
5.測試git提交規范
七、git提交觸發eslint
注意:只是針對當前新增的緩存區文件,觸發eslint;歷史提交成功的文件,eslint就不校驗了。可以通過npm run eslint去單獨觸發,單獨依次修改掉
1.package.json修改
在上述所有步驟的基礎上加上"eslint --fix",
"lint-staged": {"*.{js,jsx,ts,tsx}": ["eslint --fix","prettier --write"],"*.vue": ["eslint --fix","prettier --write"]}
2.測試git提交觸發eslint
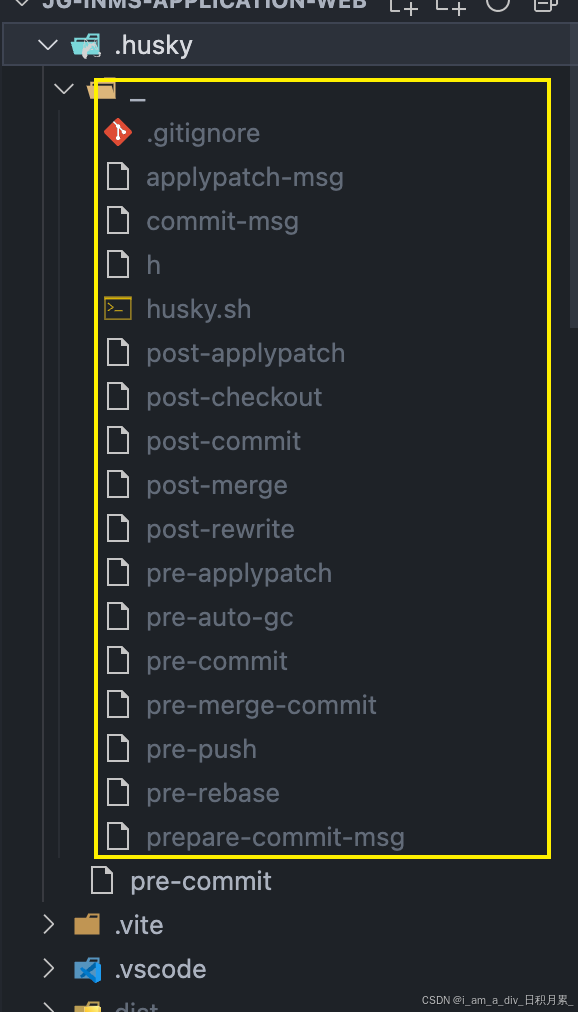
八、最終結構
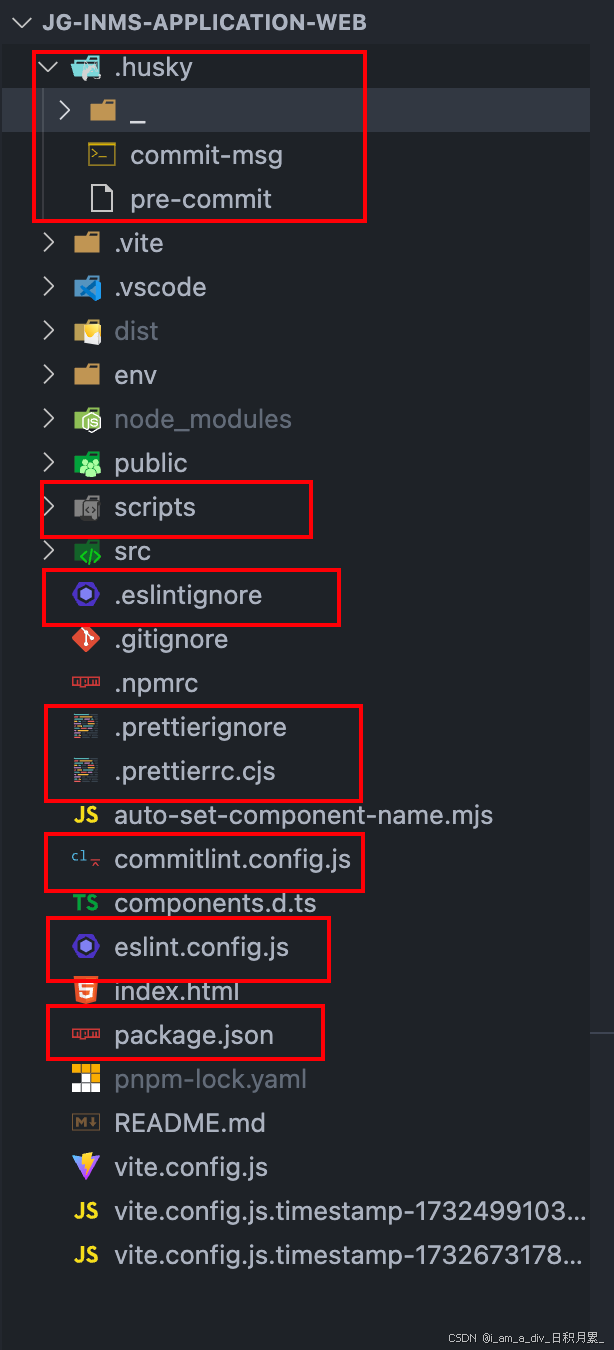
package.json配置
{"name": "jg-risk-detection-web","private": true,"version": "develop_eslint","type": "module","scripts": {"dev": "pnpm setName && vite --mode beta --host","setName": "node auto-set-component-name.mjs","develop": "vite build --mode develop","test": "vite build --mode test","online": "vite build --mode online","build": "vite build","build:electron": "vite build --mode electron","build:prod": "pnpm test && pnpm build:electron","preview": "vite preview","prettier": "npx prettier . --write","prepare": "husky install","lint": "npx eslint .","commitlint": "commitlint --edit"},"dependencies": {"@antv/g6": "^4.8.24","@element-plus/icons-vue": "^2.3.1","@jg/jg-ui": "^0.0.1","@vueuse/core": "^10.11.1","@web/jg-plugin": "^0.0.34","@xterm/addon-fit": "^0.10.0","@xterm/xterm": "^5.5.0","axios": "^1.6.8","dayjs": "^1.11.10","echarts": "^5.4.3","element-plus": "2.8.4","element-resize-detector": "^1.2.4","fast-glob": "^3.3.2","highlight.js": "^11.10.0","lodash": "^4.17.21","pinia": "^2.1.7","pinia-plugin-persist": "1.0.0","pinia-plugin-persistedstate": "^3.2.1","sortablejs": "^1.15.6","vite-plugin-svg-icons": "^2.0.1","vue": "^3.4.21","vue-diff": "^1.2.4","vue-draggable-plus": "^0.6.0","vue-router": "4","vxe-pc-ui": "4.3.82","vxe-table": "4.9.29"},"devDependencies": {"@commitlint/cli": "^19.8.0","@commitlint/config-conventional": "^19.8.0","@eslint/js": "9.8.0","@typescript-eslint/eslint-plugin": "^8.31.0","@typescript-eslint/parser": "^8.31.0","@vitejs/plugin-vue": "^5.0.4","@vitejs/plugin-vue-jsx": "^4.0.1","eslint": "^9.8.0","eslint-plugin-vue": "^9.27.0","globals": "15.8.0","gm-crypt": "^0.0.2","gm-crypto": "^0.1.12","husky": "^9.1.4","lint-staged": "^15.2.9","prettier": "3.2.5","sass": "1.65.1","unplugin-auto-import": "^0.17.5","unplugin-vue-components": "^0.26.0","unplugin-vue-define-options": "^1.4.2","vite": "^5.2.0","vite-plugin-lazy-import": "^1.0.7","vue-eslint-parser": "^10.1.3"},"husky": {"hooks": {"commit-msg": "commitlint -E HUSKY_GIT_PARAMS"}},"lint-staged": {"*.{js,jsx,ts,tsx}": ["eslint --fix","prettier --write"],"*.vue": ["eslint --fix","prettier --write"]}
}
九、eslint相關報錯
鏈接


)


 — zookeeper集群部署(親和性、污點與容忍測試))


:人工智能與數學)


)

