階段?2 – 購物車(超詳細版)
目標
- 把“加入購物車”做成 全局狀態,任何頁面都能讀寫
- 在本地 持久化(關閉小程序后購物車仍在)
- 新建 購物車頁:數量增減、總價實時計算、去結算入口
- 打 Git?Tag
v2.0?cart
1. 學到的核心技術
| 技術/概念 | 關鍵 API/組件 | 為什么要學 |
|---|---|---|
| 全局狀態 | App.globalData / 簡易 store.js | 小項目先不引入第三方狀態庫,足夠用 |
| 本地持久化 | wx.setStorageSync / wx.getStorageSync | 保證用戶切后臺、重進小程序后數據不丟 |
| UI 組件 | (彈出購物車) ?(底部結算條) ?(數量加減) | 快速完成電商式交互 |
| TabBar Badge | wx.setTabBarBadge | 在底部“購物車”圖標上顯示件數 |
2. 項目結構新增
miniprogram/├─ store/ # 新增│ └─ cart.js├─ pages/│ ├─ index/ # 首頁已存在│ └─ cart/ # 新建購物車頁面
3. 編寫輕量級全局 Store
路徑:
miniprogram/store/cart.js
const CART_KEY = 'CART_V1'
const store = {data: { items: {} },load() {this.data.items = wx.getStorageSync(CART_KEY) || {}},save() {wx.setStorageSync(CART_KEY, this.data.items)},add(dish) {const { _id } = dishif (this.data.items[_id]) {this.data.items[_id].count += 1} else {this.data.items[_id] = { ...dish, count: 1 }}this.save()},totalCount() {return Object.values(this.data.items).reduce((s, i) => s + i.count, 0)},totalPrice() {return Object.values(this.data.items).reduce((s, i) => s + i.count * i.price, 0).toFixed(2)}}
module.exports = store
4. 在 app.js 中加載購物車
// miniprogram/app.js
App({onLaunch() {const cart = require('./store/cart')cart.load()this.globalData = { cart }}
})
5. 修改首頁:加入購物車 & 更新角標
文件:
pages/index/index.js
只需要把之前的 onAddCart 改成:
import cart from '../../store/cart'onAddCart(e) {const dish = e.currentTarget.dataset.dishcart.add(dish)wx.setTabBarBadge({ index: 1, text: String(cart.totalCount()) })wx.showToast({ title: '已加入購物車', icon: 'success' })}
}
提示:在
app.json的tabBar數組里,把第二項頁面路徑設成"pages/cart/index",這樣角標才會顯示在購物車圖標上。
6. 新建購物車頁面
6.1 組件聲明 pages/cart/index.json
{"navigationBarTitleText": "購物車"
}
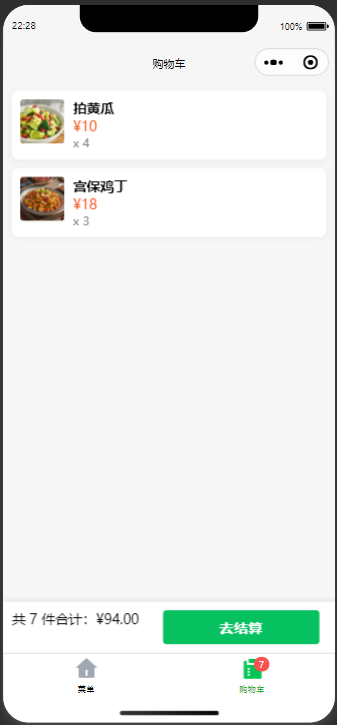
6.2 頁面布局 index.wxml
<view class="page"><block wx:for="{{list}}" wx:key="_id"><view class="cart-item"><image class="thumb" src="{{item.img}}" mode="aspectFill" /><view class="info"><text class="name">{{item.name}}</text><text class="price">¥{{item.price}}</text><text class="count">x {{item.count}}</text></view></view></block><view class="bottom-bar"><text>共 {{totalCount}} 件</text><text>合計:¥{{totalPrice}}</text><button type="primary" bindtap="onCheckout">去結算</button></view>
</view>
6.3 頁面邏輯 index.js
const cart = require('../../store/cart')Page({data: {list: [],totalCount: 0,totalPrice: '0.00'},onShow() {cart.load()this.refresh()},refresh() {const items = Object.values(cart.data.items)const totalCount = cart.totalCount()const totalPrice = cart.totalPrice()this.setData({list: items,totalCount,totalPrice})},onCheckout() {if (!this.data.totalCount) {wx.showToast({ title: '購物車為空', icon: 'none' })return}wx.navigateTo({ url: '/pages/confirm/index' }) // 下一階段頁}
})
6.4 簡單樣式 index.wxss
.page {padding: 20rpx;
}.cart-item {display: flex;background: #fff;padding: 20rpx;margin-bottom: 20rpx;border-radius: 16rpx;box-shadow: 0 4rpx 12rpx rgba(0,0,0,0.05);
}.thumb {width: 100rpx;height: 100rpx;border-radius: 8rpx;margin-right: 20rpx;
}.info {display: flex;flex-direction: column;justify-content: space-around;
}.name {font-weight: bold;font-size: 32rpx;
}.price {color: #fa541c;
}.count {font-size: 28rpx;color: #888;
}.bottom-bar {position: fixed;bottom: 0;left: 0;width: 100%;background: #fff;padding: 20rpx;display: flex;justify-content: space-between;box-shadow: 0 -2rpx 12rpx rgba(0,0,0,0.1);
}
7. TabBar 配置示例
// app.json(節選)
"tabBar": {"list": [{ "pagePath": "pages/index/index", "text": "菜單", "iconPath": "images/icons/home.png", "selectedIconPath": "images/icons/home-active.png" },{ "pagePath": "pages/cart/index",  "text": "購物車", "iconPath": "images/icons/business.png", "selectedIconPath": "images/icons/business-active.png" }]}
8. 自測清單 & Git?Tag
- 首頁點兩道菜 → 角標顯示 2
- 進入購物車頁
- 看得到兩條記錄
- 關閉小程序再打開 → 數據依舊存在
- 一切通過后:
git add .
git commit -m "feat: shopping cart"
git tag v2.0-cart
git push --tags
9. 練習(進階挑戰)
| 難度 | 練習內容 |
|---|---|
| ? | 給 cart.js 增加 clear() 方法,在購物車頁提供“一鍵清空”。 |
| ?? | 在首頁卡片上顯示當前已選數量(小圓角徽標)。 |
| ??? | 把 Store 升級為 Pinia 或 Remax Recoil,體驗響應式自動刷新。 |
階段小結
- 你已擁有 加入購物車 → 全局狀態 → 本地持久化 → 購物車 UI 的完整鏈路。
- 代碼量 ≈?250 行,但邏輯清晰、易維護。
- 接下來進入 階段?3 – 下單 & 云數據庫:把購物車內容寫入
orders集合,實現真正的下單流程。
繼續加油,愉快編碼!
)


方法啟動)
)

 入門進階實戰』實戰入門 - Pod 詳解)
)


