一、前言
在Spring Boot項目開發過程中,對于接口API發布URL訪問路徑,一般都是在類上標識@RestController或者@Controller注解,然后在方法上標識@RequestMapping相關注解,比如:@PostMapping、@GetMapping注解,通過設置注解屬性,發布URL。在某些場景下,我覺得這樣發布URL太麻煩了,不適用,有沒有什么其他方法自由發布定義的接口呢?答案是肯定的。
二、一般開發流程
按照上面的描述,我們先看一下一般常用的開發代碼:
import org.springframework.web.bind.annotation.RequestBody;
import org.springframework.web.bind.annotation.RequestMapping;
import org.springframework.web.bind.annotation.RequestParam;
import org.springframework.web.bind.annotation.RestController;import java.util.Map;@RestController
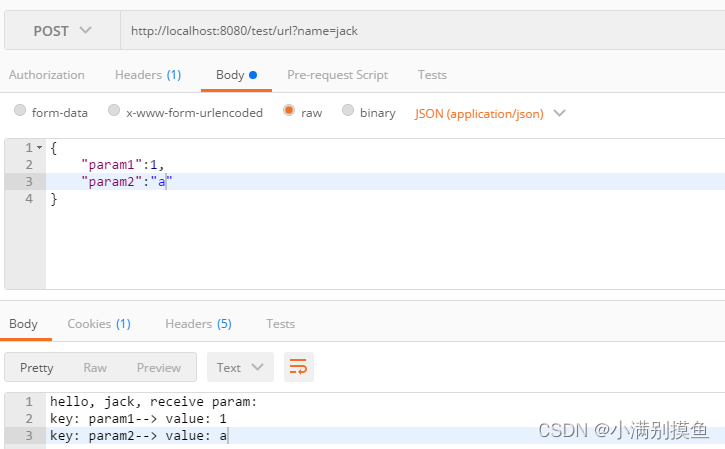
public class TestController {@RequestMapping("/test/url")public String test(@RequestParam String name, @RequestBody Map<String, Object> map) { // 這里只是方便測試,實際情況下,請勿使用Map作為參數接收StringBuilder stringBuilder = new StringBuilder();stringBuilder.append("hello, ").append(name).append(", receive param:");for (Map.Entry<String, Object> entry : map.entrySet()) {stringBuilder.append("\n").append("key: ").append(entry.getKey()).append("--> value: ").append(entry.getValue());}return stringBuilder.toString();}}
測試效果:
三、自定義URL發布邏輯
參考步驟二的測試截圖效果,我們自定義發布一個URL。
1. 新建一個spring boot項目,導入相關依賴
<dependency><groupId>org.springframework.boot</groupId><artifactId>spring-boot-starter-web</artifactId></dependency><dependency><groupId>org.projectlombok</groupId><artifactId>lombok</artifactId></dependency>
2. 修改Controller實現類代碼
去掉@RestController和@RequestMapping相關注解,示例代碼如下:
import org.springframework.stereotype.Component;
import org.springframework.web.bind.annotation.ResponseBody;import java.util.Map;// @RestController
@Component
public class TestController {//@RequestMapping("/test/url")@ResponseBody  // 注意:此注解需要添加,不能少public String test(/*@RequestParam*/ String name,/* @RequestBody*/ Map<String, Object> map) { // 這里只是方便測試,實際情況下,請勿使用Map作為參數接收StringBuilder stringBuilder = new StringBuilder();stringBuilder.append("hello, ").append(name).append(", receive param:");for (Map.Entry<String, Object> entry : map.entrySet()) {stringBuilder.append("\n").append("key: ").append(entry.getKey()).append("--> value: ").append(entry.getValue());}return stringBuilder.toString();}}
3. 自定義一個事件監聽,實現URL發布功能
參考代碼如下:
import lombok.SneakyThrows;
import org.springframework.beans.factory.annotation.Autowired;
import org.springframework.boot.web.context.WebServerInitializedEvent;
import org.springframework.context.ApplicationListener;
import org.springframework.stereotype.Component;
import org.springframework.web.bind.annotation.RequestMethod;
import org.springframework.web.servlet.mvc.method.RequestMappingInfo;
import org.springframework.web.servlet.mvc.method.annotation.RequestMappingHandlerMapping;import java.util.Map;
import java.util.concurrent.atomic.AtomicBoolean;/*** 注冊一個web容器初始化以后的事件監聽,注冊自定義URL*/
@Component
public class CustomRegisterUrl implements ApplicationListener<WebServerInitializedEvent> {/*** 標識事件監聽器是否已經注冊,避免重復注冊*/private volatile AtomicBoolean flag = new AtomicBoolean(false);/*** 需要發布的地址*/public static final String CUSTOM_URL = "/test/url";@Autowiredprivate RequestMappingHandlerMapping requestMappingHandlerMapping;@Autowiredprivate TestController testController;@SneakyThrows@Overridepublic void onApplicationEvent(WebServerInitializedEvent event) {if (flag.compareAndSet(false, true)) {// 構建請求映射對象RequestMappingInfo requestMappingInfo = RequestMappingInfo.paths(CUSTOM_URL) // 請求URL.methods(RequestMethod.POST, RequestMethod.GET) // 請求方法,可以指定多個.build();// 發布url,同時指定執行該請求url的具體類變量的的具體方法requestMappingHandlerMapping.registerMapping(requestMappingInfo, testController, testController.getClass().getMethod("test", String.class, Map.class));}}
}
4. 測試效果
同樣請求:http://localhost:8080/test/url?name=jack
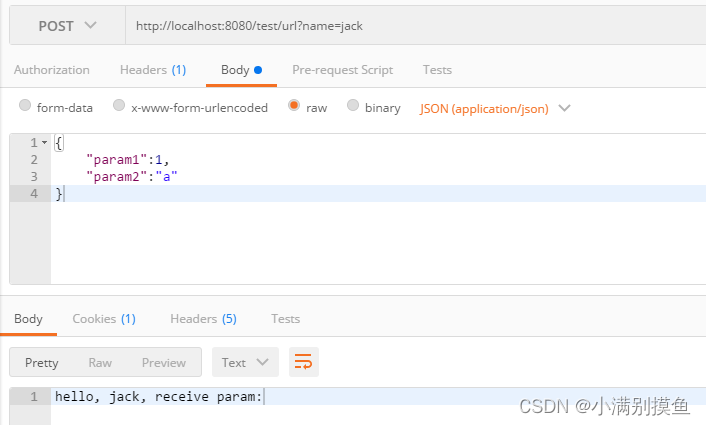
可以看到,此時請求效果并不是正常的,存在參數丟失,怎么辦呢?
注意:如果請求出現如下錯誤:
java.lang.IllegalArgumentException: Expected lookupPath in request attribute "org.springframework.web.util.UrlPathHelper.PATH".
可以在application.yaml文件中添加如下內容:
spring:mvc:pathmatch:matching-strategy: ant_path_matcher
5. 增加統一請求處理器
為了實現參數可以正常解析,同時方便增加自定義處理邏輯,我們可以增加一個統一的請求處理器,參考示例:
import com.fasterxml.jackson.databind.ObjectMapper;
import org.springframework.beans.factory.annotation.Autowired;
import org.springframework.stereotype.Component;
import org.springframework.web.bind.annotation.ResponseBody;import javax.servlet.http.HttpServletRequest;
import javax.servlet.http.HttpServletResponse;
import java.io.IOException;
import java.lang.reflect.Method;
import java.util.Map;@Component
public class CustomHandlerUrl {public static final Method HANDLE_CUSTOM_URL_METHOD;private static final ObjectMapper OBJECTMAPPER = new ObjectMapper();@Autowiredprivate TestController testController;static {// 提前準備好參數對象Method tempMethod = null;try {tempMethod = CustomHandlerUrl.class.getMethod("handlerCustomUrl", HttpServletRequest.class, HttpServletResponse.class);} catch (NoSuchMethodException e) {e.printStackTrace();}HANDLE_CUSTOM_URL_METHOD = tempMethod;}@ResponseBody/***  攔截自定義請求的url,可以做成統一的處理器,這里我只做簡單實現,專門處理test*/public Object handlerCustomUrl(HttpServletRequest request, HttpServletResponse response) throws IOException {// 獲取參數 get方式請求參數String name = request.getParameter("name");// 獲取 post方式請求參數Map<String, Object> map = OBJECTMAPPER.readValue(request.getInputStream(), Map.class);// 執行業務方法String result = testController.test(name, map);return result;}
}
6. 修改事件監聽邏輯
修改事件監聽邏輯,此時注冊URL時,綁定統一處理器就行了。
示例代碼:
import org.springframework.beans.factory.annotation.Autowired;
import org.springframework.boot.web.context.WebServerInitializedEvent;
import org.springframework.context.ApplicationListener;
import org.springframework.stereotype.Component;
import org.springframework.web.bind.annotation.RequestMethod;
import org.springframework.web.servlet.mvc.method.RequestMappingInfo;
import org.springframework.web.servlet.mvc.method.annotation.RequestMappingHandlerMapping;import java.util.concurrent.atomic.AtomicBoolean;/*** 注冊一個web容器初始化以后的事件監聽,注冊自定義URL*/
@Component
public class CustomRegisterUrl implements ApplicationListener<WebServerInitializedEvent> {/*** 標識事件監聽器是否已經注冊,避免重復注冊*/private volatile AtomicBoolean flag = new AtomicBoolean(false);/*** 需要發布的地址*/public static final String CUSTOM_URL = "/test/url";@Autowiredprivate RequestMappingHandlerMapping requestMappingHandlerMapping;@Autowiredprivate CustomHandlerUrl customHandlerUrl;@Overridepublic void onApplicationEvent(WebServerInitializedEvent event) {if (flag.compareAndSet(false, true)) {// 構建請求映射對象RequestMappingInfo requestMappingInfo = RequestMappingInfo.paths(CUSTOM_URL) // 請求URL.methods(RequestMethod.POST, RequestMethod.GET) // 請求方法,可以指定多個.build();// 發布url,指定一下url的處理器requestMappingHandlerMapping.registerMapping(requestMappingInfo, customHandlerUrl, CustomHandlerUrl.HANDLE_CUSTOM_URL_METHOD);}}
}
7. 重新測試
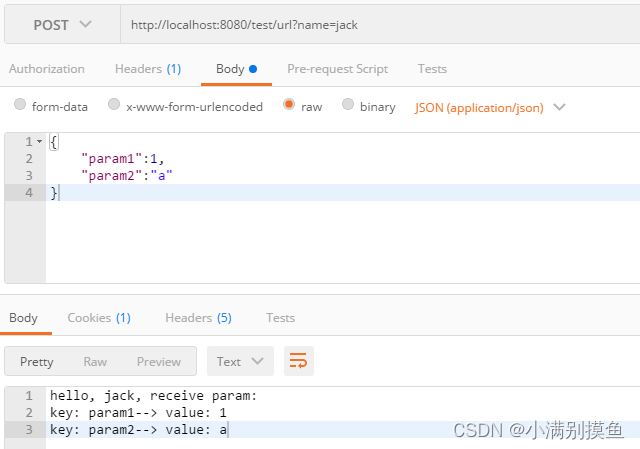
此時,請求可以發現,效果和使用@RestController+@RequestMapping注解就一樣了。
四、寫在最后
自定義發布URL路徑一般情況下很少使用,不過針對特殊url的處理,以及自定義rpc框架發布url時,選擇這樣處理好了,可以達到出其不意的效果。
)


0.5.000)


)


