忘記過去,超越自己
- ?? 博客主頁 單片機菜鳥哥,一個野生非專業硬件IOT愛好者 ??
- ?? 本篇創建時間 2024-03-02??
- ?? 本篇更新時間 2024-03-02??
- 🎉 歡迎關注 🔎點贊 👍收藏 ??留言📝
- 🙏 此博客均由博主單獨編寫,不存在任何商業團隊運營,如發現錯誤,請留言轟炸哦!及時修正!感謝支持!
快速導讀
- 1. 前言
- 1.1 模塊步驟
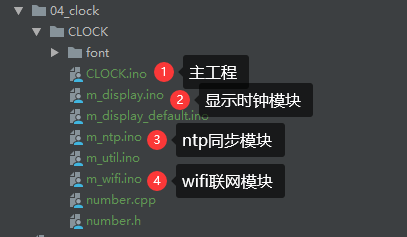
- 1.2 代碼結構
- 2. 詳細介紹
- 2.1 主工程 —— CLOCK
- 2.2 模塊化細節
- 2.2.1 m_wifi —— 管理聯網過程
- 2.2.2 m_ntp —— ntp網絡時間同步
- 2.2.3 m_display —— 顯示聯網過程
- 2.2.4 m_display_default —— 時間刷新顯示
- 3.成果
- 3.1 串口調試
- 3.2 實物效果
合宙ESP32C3 Arduino開發付費專欄群
689271933,不喜勿加,憑借付費專欄訂單號加入
1. 前言
在前篇中,我們學習了 TFT_eSPI 驅動 合宙Air101 ST7735 LCD,這一節我們來學習一下基于它基礎上做一個簡單時鐘,并且開始接觸模塊化編程思想。
【合宙ESP32C3 Arduino開發】第三篇:TFT_eSPI 驅動 合宙Air101 ST7735 LCD
1.1 模塊步驟
第一步:聯網,顯示聯網過程
第二步:通過ntp同步最新網絡時間
第三步:時間同步到單片機中,每隔秒級進行刷新。
1.2 代碼結構
為了區分模塊化,博主拆開了主工程和功能模塊。
2. 詳細介紹
2.1 主工程 —— CLOCK
#include <Arduino.h>
#include <ArduinoJson.h>
#include <TimeLib.h>
#include <WiFi.h>
#include <WiFiUdp.h>
#include <HTTPClient.h>
#include <TFT_eSPI.h>
#include <SPI.h>
#include <TJpg_Decoder.h>// 當前版本
#define Version  "CL V1.0"/* ******************************************************************  字庫、圖片庫* *****************************************************************/
#include "number.h"
#include "font/ZdyLwFont_20.h"
#include "font/fangzheng/fangzheng20.h"
#include "font/hanyi/hanyi20.h"
#define TEXT_FONT  ZdyLwFont_20// 設備啟動打印信息
const char projectInfo[] PROGMEM = R"rawliteral(
/* ****************************************************************** 基于ESP32C3 160x80 TFT屏 時鐘* 當前固件版本:V1.3* 創 建 日 期:2024.02.27* 最后更改日期:2024.02.27** *****************************************************************/
)rawliteral";/* ******************************************************************  字庫、圖片庫* *****************************************************************/
// 屏幕區域
#define  TFT_WIDTH      80
#define  TFT_HEIGHT     160TFT_eSPI tft = TFT_eSPI();              // 引腳請自行配置tft_eSpi庫中的 User_Setup.h文件
TFT_eSprite clk = TFT_eSprite(&tft);
time_t time_old = 0; //上次時間刷新時間
time_t time_now = 0; //當前秒Number      dig;uint16_t bgColor = TFT_BLACK;   // 黑色背景色
uint16_t txtColor = TFT_WHITE;  // 字體顏色
uint32_t targetTime = 0;void setup() {Serial.begin(115200);Serial.println(projectInfo);tft_init(); //屏幕初始化// 連接wifiwhile(!wifi_connect());ntp_init(); //ntp服務初始化tft_display_layout();             // 繪制屏幕布局
}void loop(){time_now = now();//刷新時間信息,每秒刷新if (time_now != time_old){time_old = time_now;tft_display_time();}
}
主工程就管理整個代碼運行過程。
- 初始化tft屏幕,并且進行網絡連接,這里會展示聯網界面
- ntp服務初始化,然后持續繪制顯示時間
2.2 模塊化細節
2.2.1 m_wifi —— 管理聯網過程
String WifiSSID = "xxxxx";  // 填寫自己的wifi賬號,只支持2.4G
String WifiPassword = "xxxx";  // 填寫自己的wifi密碼,只支持2.4G
int animate_refresh_Time = 0;
int animate_key = -1; //初始化圖標顯示幀數// 連接wifi
extern bool wifi_connect(void){bool conn_result = false;if (WifiSSID.length() == 0){return conn_result;}WiFi.mode(WIFI_STA);WiFi.disconnect();WiFi.setTxPower(WIFI_POWER_5dBm);WiFi.begin(WifiSSID.c_str(), WifiPassword.c_str());const uint8_t *animate_value;       // 指向關鍵幀的指針uint32_t animate_size;        // 指向關鍵幀大小的指針uint32_t index = 0;while (true){if (millis() - animate_refresh_Time > 30){index++;Serial.print(".");animate_refresh_Time = millis();tft_display_loading(50); //每50毫秒檢測一次,刷新一次進度條// 查詢連接結果int status = WiFi.status();if (status == WL_CONNECT_FAILED ||status == WL_NO_SSID_AVAIL ||status == WL_CONNECTION_LOST){conn_result = false;Serial.println("【m_wifi】連接失敗");break;} else if (status == WL_CONNECTED){conn_result = true;Serial.print("【m_wifi】wifi連接成功,當前IP地址:");Serial.println(WiFi.localIP());tft_display_loading_complete();   // 將進度條刷到100%Serial.println("【m_wifi】結束loading");break;}// 超過當做連接失敗if (index > 300){// 連接超時WiFi.disconnect();break;}}}if (WiFi.status() != WL_CONNECTED){return false;}return true;
}在wifi_connect中,進行begin網絡連接后,開始間隔一段時間進行刷新聯網進度 tft_display_loading。
當網絡連接成功后,還需要把進度漲到100% tft_display_loading_complete。當然,總不能一直在聯網,會有一個錯誤時間,這里超過300次就表示連接失敗。
2.2.2 m_ntp —— ntp網絡時間同步
//NTP服務器
WiFiUDP Udp;
const char ntpServerName[] = "ntp6.aliyun.com";
const int timeZone = 8;     //東八區
unsigned int localPort = 8000;
const int NTP_PACKET_SIZE = 48; // NTP時間在消息的前48字節中
byte packetBuffer[NTP_PACKET_SIZE]; //buffer to hold incoming & outgoing packetsstatic time_t getNtpTime()
{IPAddress ntpServerIP; // NTP server's ip addresswhile (Udp.parsePacket() > 0) ; // discard any previously received packets//Serial.println("Transmit NTP Request");// get a random server from the poolWiFi.hostByName(ntpServerName, ntpServerIP);//Serial.print(ntpServerName);//Serial.print(": ");//Serial.println(ntpServerIP);sendNTPpacket(ntpServerIP);uint32_t beginWait = millis();while (millis() - beginWait < 1500) {int size = Udp.parsePacket();if (size >= NTP_PACKET_SIZE) {Serial.println("Receive NTP Response");Udp.read(packetBuffer, NTP_PACKET_SIZE);  // read packet into the bufferunsigned long secsSince1900;// convert four bytes starting at location 40 to a long integersecsSince1900 =  (unsigned long)packetBuffer[40] << 24;secsSince1900 |= (unsigned long)packetBuffer[41] << 16;secsSince1900 |= (unsigned long)packetBuffer[42] << 8;secsSince1900 |= (unsigned long)packetBuffer[43];//Serial.println(secsSince1900 - 2208988800UL + timeZone * SECS_PER_HOUR);return secsSince1900 - 2208988800UL + timeZone * SECS_PER_HOUR;}}Serial.println("【m_ntp】ntp服務器無響應");return 0; // 無法獲取時間時返回0
}// 向NTP服務器發送請求
static void sendNTPpacket(IPAddress &address)
{// set all bytes in the buffer to 0memset(packetBuffer, 0, NTP_PACKET_SIZE);// Initialize values needed to form NTP request// (see URL above for details on the packets)packetBuffer[0] = 0b11100011;   // LI, Version, ModepacketBuffer[1] = 0;     // Stratum, or type of clockpacketBuffer[2] = 6;     // Polling IntervalpacketBuffer[3] = 0xEC;  // Peer Clock Precision// 8 bytes of zero for Root Delay & Root DispersionpacketBuffer[12] = 49;packetBuffer[13] = 0x4E;packetBuffer[14] = 49;packetBuffer[15] = 52;// all NTP fields have been given values, now// you can send a packet requesting a timestamp:Udp.beginPacket(address, 123); //NTP requests are to port 123Udp.write(packetBuffer, NTP_PACKET_SIZE);Udp.endPacket();
}extern void ntp_init(void)
{Udp.begin(localPort);setSyncProvider(getNtpTime);setSyncInterval(60 * 60); // 1小時同步一次
}
這里我們設置了1小時同步一次時間。
關于ntp深入學習可以,參考
ESP8266開發之旅 網絡篇? NTP——時間服務
2.2.3 m_display —— 顯示聯網過程
//初始化屏幕
extern void tft_init(void){tft.begin();           // TFT初始化tft.setRotation(3);    // 旋轉角度0-3tft.setTextColor(TFT_BLACK, TFT_WHITE); //設置字體顏色tft.fillScreen(TFT_BLACK); // 清屏TJpgDec.setJpgScale(1);       // 設置放大倍數TJpgDec.setSwapBytes(true);   // 它的作用是設置TFT液晶屏的像素字節序。在某些情況下,像素字節序可能需要被交換,以確保圖像正確顯示。這段代碼中的true表示需要交換字節序,而false則表示不需要交換字節序。TJpgDec.setCallback(tft_output);  // 回調函數
}extern bool tft_output(int16_t x, int16_t y, uint16_t w, uint16_t h, uint16_t *bitmap) {if (y >= tft.height())return 0;// 這句代碼是將一個位圖(bitmap)顯示在TFT屏幕上,其中x和y是位圖左上角的坐標,w和h是位圖的寬度和高度。具體來說,它將位圖的像素數據推送到TFT屏幕上,從而在指定的位置顯示出來。tft.pushImage(x, y, w, h, bitmap);return 1;
}// 進度條
byte loadNum = 6;
extern void tft_display_loading(byte delayTime){clk.setColorDepth(8);                                // 設置TFT屏幕的顏色深度為8位。TFT屏幕的顏色深度指的是每個像素點可以顯示的顏色數量,8位顏色深度可以顯示256種顏色。clk.createSprite(160, 50);                           // 創建Spriteclk.fillSprite(TFT_BLACK);                           // 填充顏色:黑色clk.drawRoundRect(0, 0, 160, 16, 8, TFT_WHITE);      // 畫一個圓角矩形框,白色clk.fillRoundRect(3, 3, loadNum, 10, 5, TFT_WHITE);  // 畫一個填充的圓角矩形,白色clk.setTextDatum(CC_DATUM);                          // 設置文本顯示基準為居中對齊clk.setTextColor(TFT_WHITE, TFT_BLACK);              // 設置文本的前景色和背景色clk.drawString("Connecting to WiFi", 80, 40, 2);    // 顯示“Connecting to WiFi”這個字符串,位置為(80,40),字體大小為2。clk.pushSprite(0, 10);                             // Sprite中內容一次推向屏幕clk.deleteSprite();                                  // 刪除SpriteloadNum += 1;if (loadNum >= 154){loadNum = 154;}delay(delayTime);
}// 將進度條刷到100%
extern void tft_display_loading_complete(void){while (loadNum < 154) { //讓動畫走完tft_display_loading(1);}
} // 繪制屏幕布局
extern void tft_display_layout(void){tft.setRotation(3);tft.fillScreen(bgColor);                                   //清屏
}
2.2.4 m_display_default —— 時間刷新顯示
// 刷新時間顯示
extern void tft_display_time(void){int timeY = 20;// 記錄上一次時間static String hourMinute_old = "";static String second_old = "";static unsigned char Hour_old   = 60;static unsigned char Minute_old = 60;static unsigned char Second_old = 60;String hourMinute_now = hourMinute();//--------------------中間時間區顯示開始--------------------// 時分if(hourMinute_now != hourMinute_old){hourMinute_old = hourMinute_now;// 小時刷新if(hour()!= Hour_old){dig.printfW1830(10, timeY, hour()/10);dig.printfW1830(30, timeY, hour()%10);Hour_old = hour();}// 分鐘刷新if(minute()!= Minute_old ){dig.printfW1830(60, timeY, minute()/10);dig.printfW1830(80, timeY, minute()%10);Minute_old = minute();}}// 秒if(second()!= Second_old){dig.printfW1830(120, timeY, second()/10);dig.printfW1830(140, timeY, second()%10);Second_old = second();}//--------------------中間時間區顯示結束--------------------
}
為了做到性能優化,做了新舊數據對比,只有數據變化了才會去刷新。
3.成果
3.1 串口調試

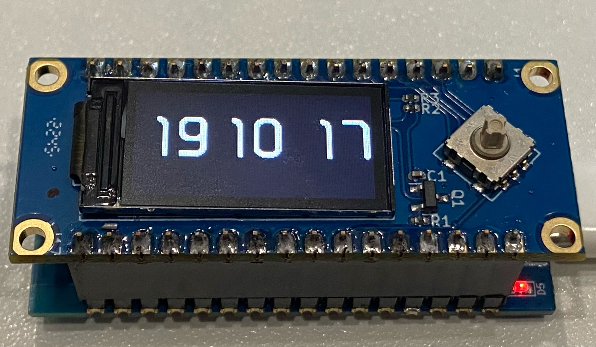
3.2 實物效果
- wifi聯網過程

- 時鐘顯示效果


![[技巧]Arcgis之圖斑四至范圍批量計算](http://pic.xiahunao.cn/[技巧]Arcgis之圖斑四至范圍批量計算)


)


)


-OpenGL)