上篇文章 《使用mininet快速入門ONOS路由交換技術與原理-交換篇》
使用mininet搭建了一個簡單的網絡拓撲,并實現了同一交換機下同網段多主機的通信,其中涉及到的通信知識主要以二層mac地址通信為主。
但在蕓蕓網絡的世界中,主機間的通信除了二層域外更多的還是紛繁復雜的三層ip路由通信。
路由協議可分為靜態路由協議和動態路由協議,在動態路由協議中,根據路由協議的作用范圍主要又分為IGP與EGP。
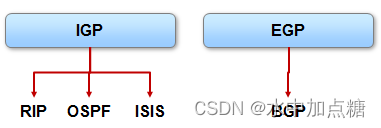
其中EGP中的BGP協議根據其強悍的設計可支撐起各數以億記的路由條目,同是也是動態路由協議中最為復雜的一個。
本文將結合BGP路由協議,通過onos官方的一個sdnip小示例實現SDN下不同網段多主機的通信。
環境說明
linux系統主機一臺(可虛擬機,筆者使用的是ubuntu)
拓撲如下:
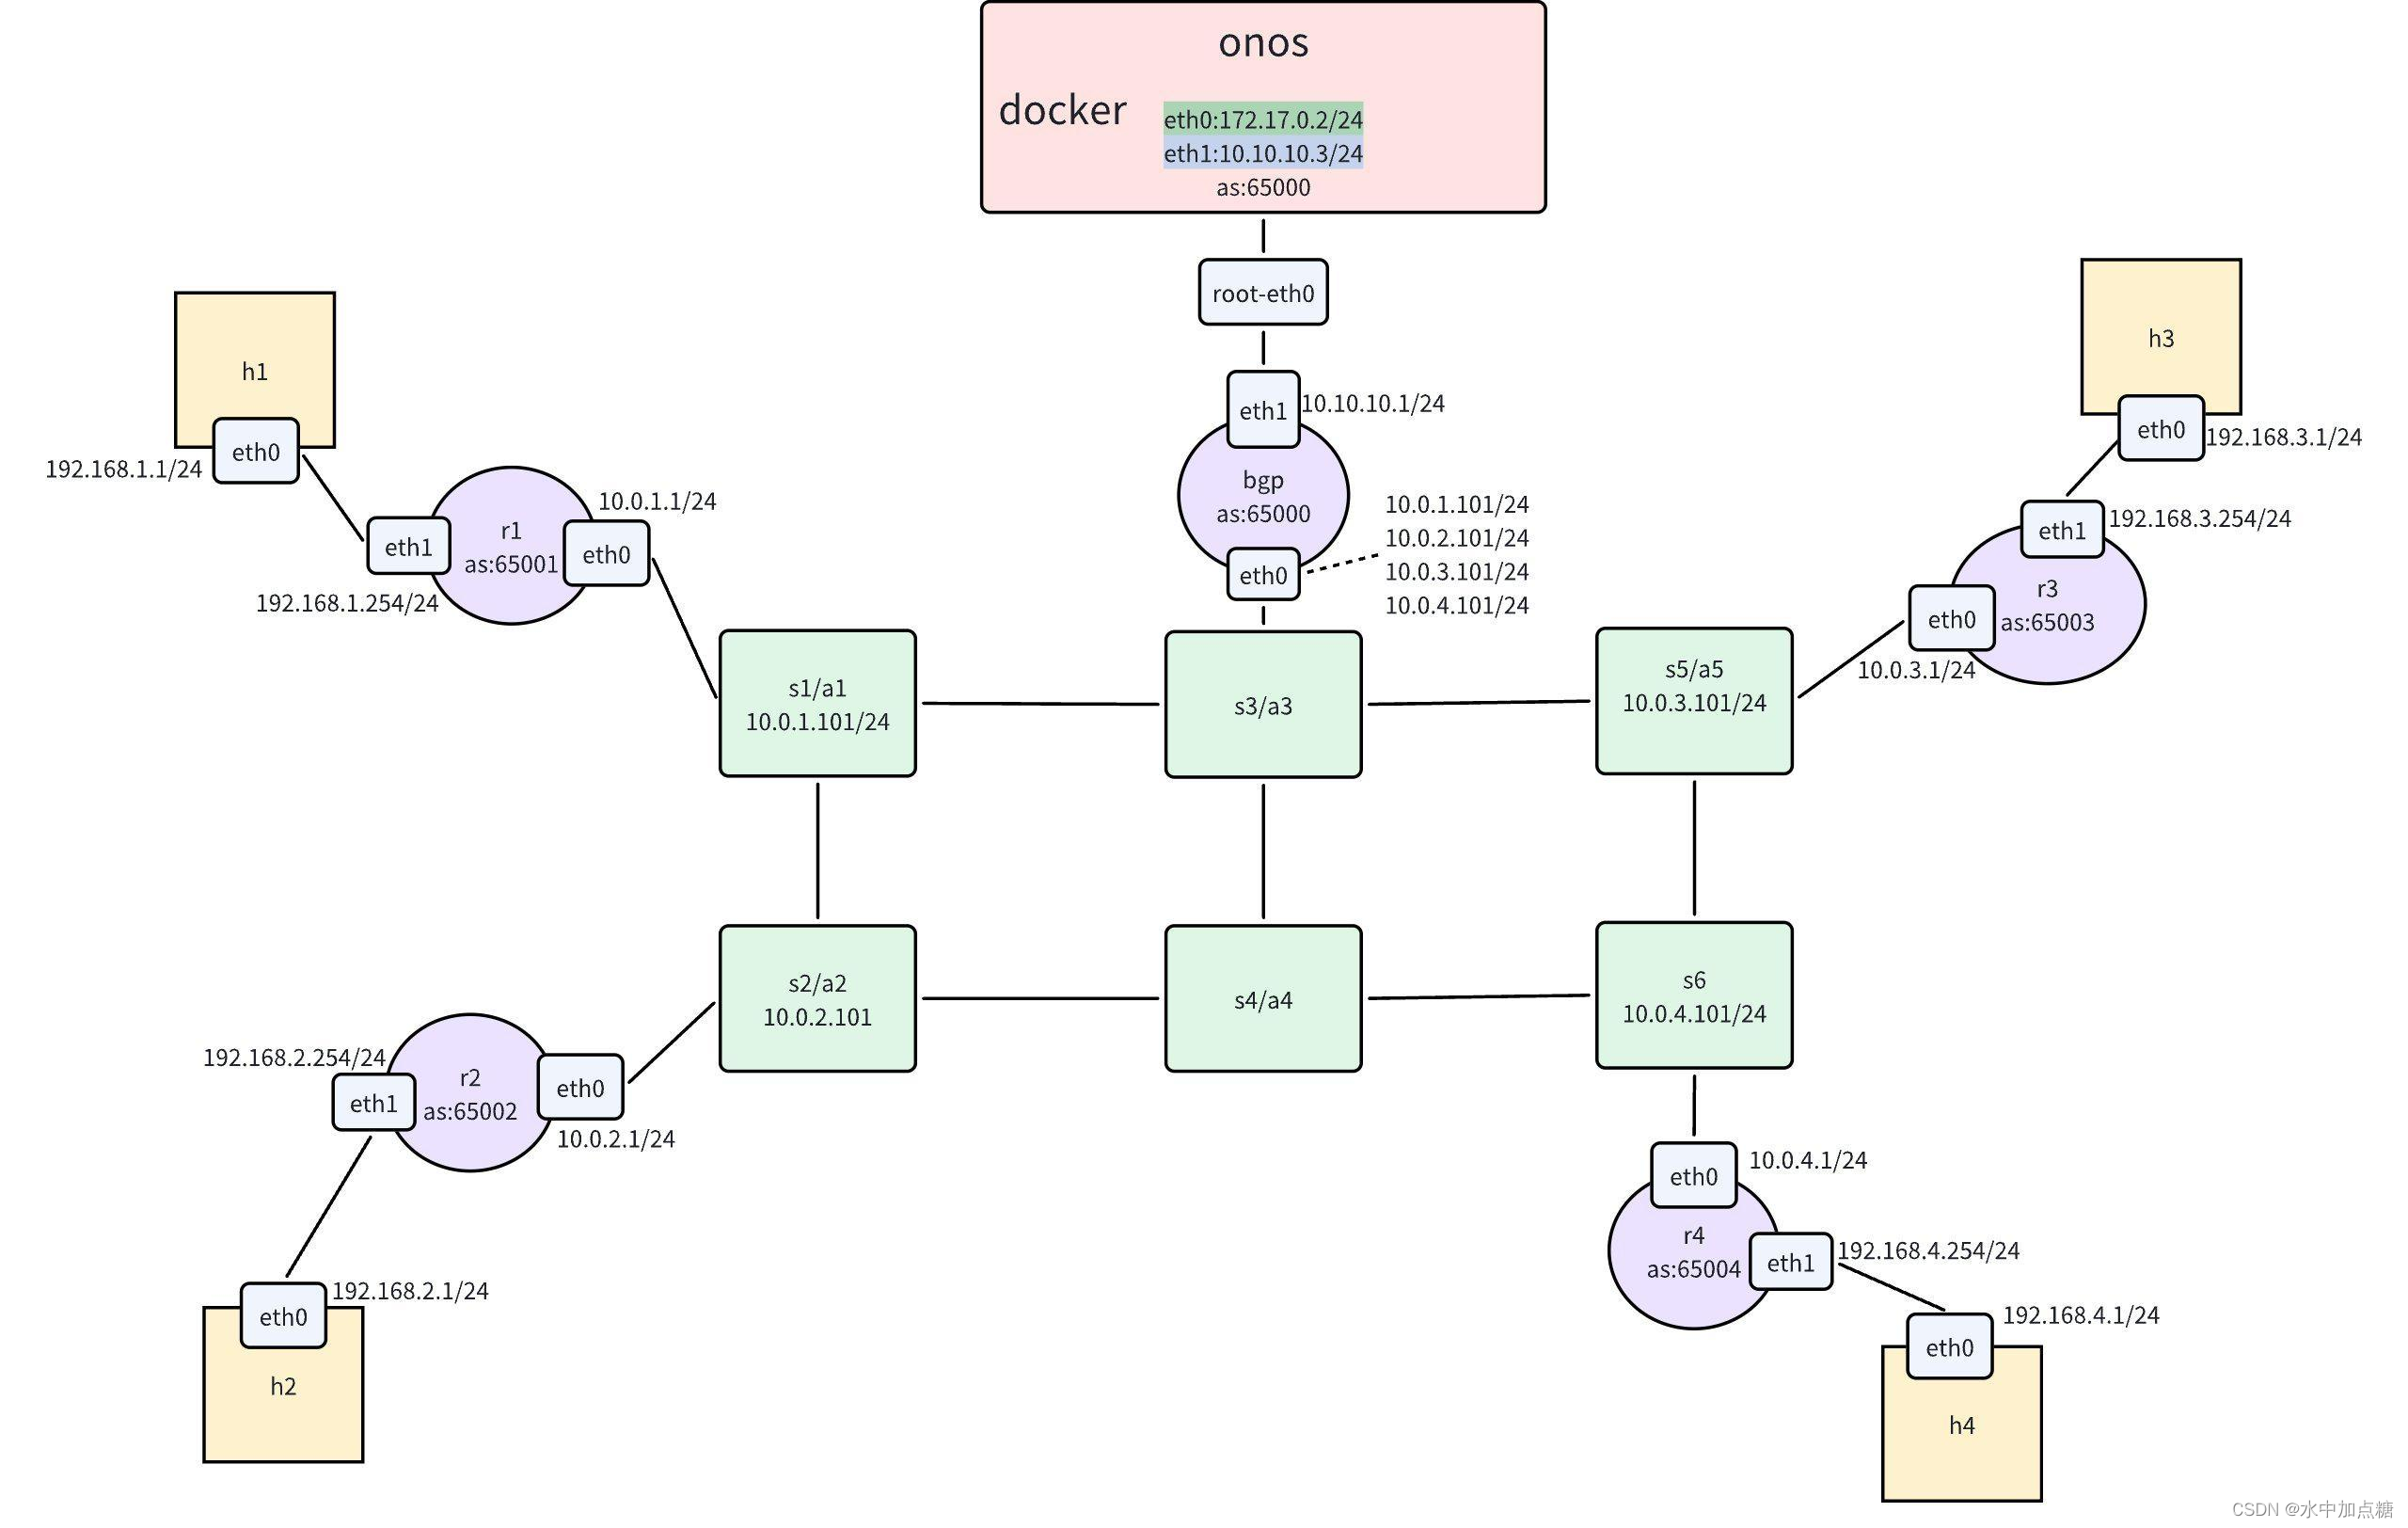
拓撲說明
- 一個onos
- 6個ovs交換機
- 其中5臺交換機各自連一個路由器,且其4臺路由器上各自連接一個主機,另一臺路由器與onos連通
- 4個主機處于不同的網段
quagga安裝與操作
quagga介紹
由于后續需要模擬外部路由器,這里使用quagga進行模擬。
qugga是一個實現了常用路由協議的軟件套件,在進行網絡設備模擬時非常有用,其官網地址為:https://www.nongnu.org/quagga
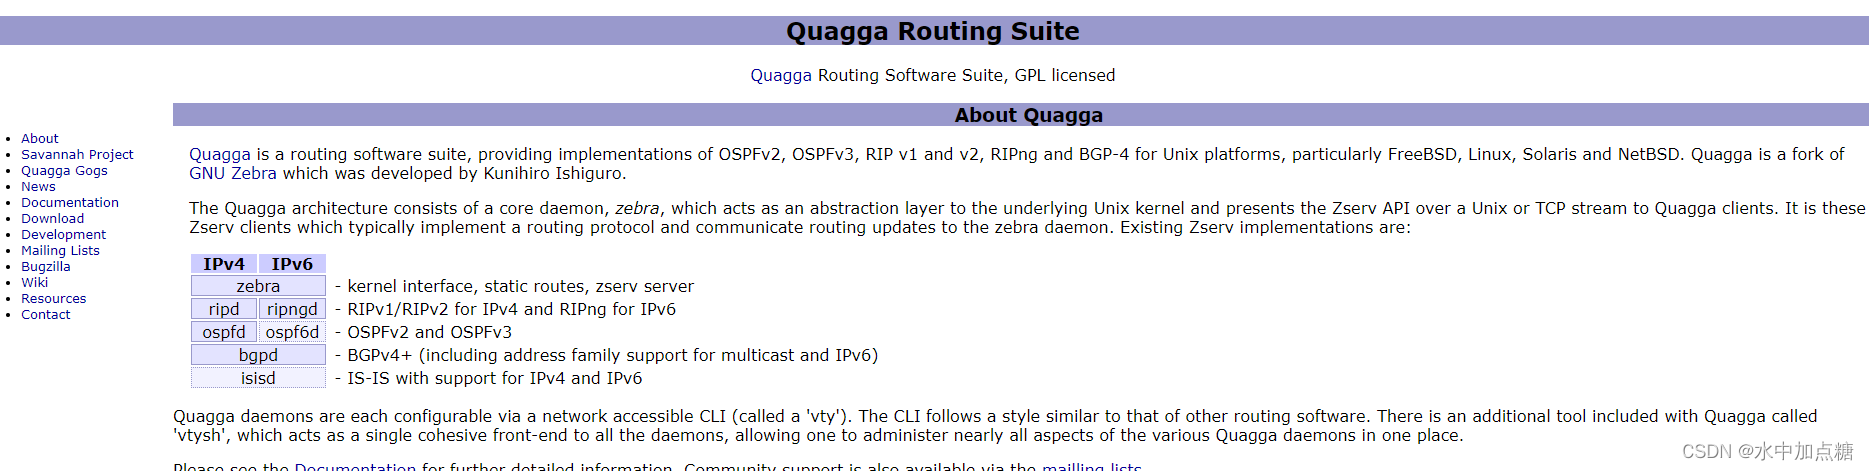
同時它也是一個開源軟件,源碼源碼地址為:https://github.com/Quagga/quagga
quagga安裝
選擇一個系統對應的安裝方式進行安裝,如ubuntu執行下命令直接安裝即可:
sudo apt install bridge-utils
#quagga 1.2.4
sudo apt-get install quagga
可選項:
sudo cp /usr/share/doc/quagga-core/examples/zebra.conf.sample /etc/quagga/zebra.conf
sudo cp /usr/share/doc/quagga-core/examples/ospfd.conf.sample /etc/quagga/ospfd.conf
sudo cp /usr/share/doc/quagga-core/examples/zebra.conf.sample /etc/quagga/r1zebra.conf
sudo cp /usr/share/doc/quagga-core/examples/zebra.conf.sample /etc/quagga/r2zebra.conf
sudo cp /usr/share/doc/quagga-core/examples/ospfd.conf.sample /etc/quagga/r1ospfd.conf
sudo cp /usr/share/doc/quagga-core/examples/ospfd.conf.sample /etc/quagga/r2ospfd.conf
可選項:
sudo cp /usr/lib/quagga/* /lib
quagga操作
quagga提供了豐富的配置選項以支持對模擬的路由器進行相應的配置,對應的操作手冊地址為:
https://www.nongnu.org/quagga/docs/quagga.html
如要查看bgp路由列表,在進入控制臺后輸入以下命令查看即可
telnet localhost 2605
show ip bgp
另,為了后續在mininet中可正確使用xterm命令,需要確保已安裝xterm工具
sudo apt install xterm
拓撲創建
quagga仿真軟件安裝就緒后,接下來便可以對整個拓撲創建就可以了。
onos仍然使用docker運行,其余交換機、路由器、主機的創建創建使用自定義的mininet腳本進行創建。
onos與網橋創建
#啟動onos,并映射端口(驗證:訪問8181web界面)
docker run -d -e TZ=Asia/Shanghai -p 6653:6653 -p 8101:8101 -p 8181:8181 --name onos onosproject/onos:2.7.0
創建docker網橋,并指定10.10.10網段
docker network create --subnet 10.10.10.0/24 --ip-range 10.10.10.0/24 --gateway 10.10.10.2 sdnip
讓onos容器與docker網橋連接,并分配10.10.10.3地址(驗證:主機ping通10.10.10.3)
docker network connect --ip 10.10.10.3 sdnip onos
啟動openflow應用
app activate org.onosproject.openflow
定義拓撲腳本
#!/usr/bin/python3from mininet.cli import CLI
from mininet.log import setLogLevel, info, debug
from mininet.net import Mininet
from mininet.node import Host, RemoteController
from mininet.topo import TopoQUAGGA_DIR = '/usr/lib/quagga'
# Must exist and be owned by quagga user (quagga:quagga by default on Ubuntu)
# QUAGGA_RUN_DIR = '/var/run/quagga'
QUAGGA_RUN_DIR = '/tmp'
CONFIG_DIR = 'configs'class SdnIpHost(Host):def __init__(self, name, ip, route, *args, **kwargs):Host.__init__(self, name, ip=ip, *args, **kwargs)self.route = routedef config(self, **kwargs):Host.config(self, **kwargs)debug("configuring route %s" % self.route)self.cmd('ip route add default via %s' % self.route)class Router(Host):def __init__(self, name, quaggaConfFile, zebraConfFile, intfDict, *args, **kwargs):Host.__init__(self, name, *args, **kwargs)self.quaggaConfFile = quaggaConfFileself.zebraConfFile = zebraConfFileself.intfDict = intfDictdef config(self, **kwargs):Host.config(self, **kwargs)self.cmd('sysctl net.ipv4.ip_forward=1')for intf, attrs in self.intfDict.items():self.cmd('ip addr flush dev %s' % intf)if 'mac' in attrs:self.cmd('ip link set %s down' % intf)self.cmd('ip link set %s address %s' % (intf, attrs['mac']))self.cmd('ip link set %s up ' % intf)for addr in attrs['ipAddrs']:self.cmd('ip addr add %s dev %s' % (addr, intf))# self.cmd('/usr/lib/quagga/zebra -d -f %s -z %s/zebra%s.api -i %s/zebra%s.pid' % (self.cmd('zebra -d -f %s -z %s/zebra%s.api -i %s/zebra%s.pid' % (self.zebraConfFile, QUAGGA_RUN_DIR, self.name, QUAGGA_RUN_DIR, self.name))# self.cmd('/usr/lib/quagga/bgpd -d -f %s -z %s/zebra%s.api -i %s/bgpd%s.pid' % (self.cmd('bgpd -d -f %s -z %s/zebra%s.api -i %s/bgpd%s.pid' % (self.quaggaConfFile, QUAGGA_RUN_DIR, self.name, QUAGGA_RUN_DIR, self.name))def terminate(self):self.cmd("ps ax | egrep 'bgpd%s.pid|zebra%s.pid' | awk '{print $1}' | xargs kill" % (self.name, self.name))Host.terminate(self)class SdnIpTopo(Topo):"SDN-IP tutorial topology"def build(self):s1 = self.addSwitch('s1', dpid='00000000000000a1')s2 = self.addSwitch('s2', dpid='00000000000000a2')s3 = self.addSwitch('s3', dpid='00000000000000a3')s4 = self.addSwitch('s4', dpid='00000000000000a4')s5 = self.addSwitch('s5', dpid='00000000000000a5')s6 = self.addSwitch('s6', dpid='00000000000000a6')zebraConf = '%s/zebra.conf' % CONFIG_DIR# Switches we want to attach our routers to, in the correct orderattachmentSwitches = [s1, s2, s5, s6]for i in range(1, 4 + 1):name = 'r%s' % ieth0 = {'mac': '00:00:00:00:0%s:01' % i,'ipAddrs': ['10.0.%s.1/24' % i]}eth1 = {'ipAddrs': ['192.168.%s.254/24' % i]}intfs = {'%s-eth0' % name: eth0,'%s-eth1' % name: eth1}quaggaConf = '%s/quagga%s.conf' % (CONFIG_DIR, i)router = self.addHost(name, cls=Router, quaggaConfFile=quaggaConf,zebraConfFile=zebraConf, intfDict=intfs)host = self.addHost('h%s' % i, cls=SdnIpHost,ip='192.168.%s.1/24' % i,route='192.168.%s.254' % i)self.addLink(router, attachmentSwitches[i - 1])self.addLink(router, host)# Set up the internal BGP speakerbgpEth0 = {'mac': '00:00:00:00:00:01','ipAddrs': ['10.0.1.101/24','10.0.2.101/24','10.0.3.101/24','10.0.4.101/24', ]}bgpEth1 = {'ipAddrs': ['10.10.10.1/24']}bgpIntfs = {'bgp-eth0': bgpEth0,'bgp-eth1': bgpEth1}bgp = self.addHost("bgp", cls=Router,quaggaConfFile='%s/quagga-sdn.conf' % CONFIG_DIR,zebraConfFile=zebraConf,intfDict=bgpIntfs)self.addLink(bgp, s3)# Connect BGP speaker to the root namespace so it can peer with ONOSroot = self.addHost('root', inNamespace=False, ip='10.10.10.2/24')self.addLink(root, bgp)# Wire up the switches in the topologyself.addLink(s1, s2)self.addLink(s1, s3)self.addLink(s2, s4)self.addLink(s3, s4)self.addLink(s3, s5)self.addLink(s4, s6)self.addLink(s5, s6)topos = {'sdnip': SdnIpTopo}if __name__ == '__main__':setLogLevel('debug')topo = SdnIpTopo()net = Mininet(topo=topo, controller=RemoteController)net.start()CLI(net)net.stop()info("done\n")
定義一個python3的拓撲,名為tutorial-py3.py。其中定義了所需要的交換機、主機、路由器的link關系。
bgp路由器配置文件
如上面拓撲定義python腳本所示,各bgp路由器還需要讀取對應的quagga配置文件,其中描述的對應bgp路由器的bgp配置信息。
quagga1.conf
! BGP configuration for r1
!
hostname r1
password sdnip
!
router bgp 65001bgp router-id 10.0.1.1timers bgp 3 9neighbor 10.0.1.101 remote-as 65000neighbor 10.0.1.101 ebgp-multihopneighbor 10.0.1.101 timers connect 5neighbor 10.0.1.101 advertisement-interval 5network 192.168.1.0/24
!
log stdout
quagga2.conf
! BGP configuration for r2
!
hostname r2
password sdnip
!
router bgp 65002bgp router-id 10.0.2.1timers bgp 3 9neighbor 10.0.2.101 remote-as 65000neighbor 10.0.2.101 ebgp-multihopneighbor 10.0.2.101 timers connect 5neighbor 10.0.2.101 advertisement-interval 5network 192.168.2.0/24
!
log stdout
quagga3.conf
! BGP configuration for r3
!
hostname r3
password sdnip
!
router bgp 65003bgp router-id 10.0.3.1timers bgp 3 9neighbor 10.0.3.101 remote-as 65000neighbor 10.0.3.101 ebgp-multihopneighbor 10.0.3.101 timers connect 5neighbor 10.0.3.101 advertisement-interval 5network 192.168.3.0/24
!
log stdout
quagga4.conf
! BGP configuration for r4
!
hostname r4
password sdnip
!
router bgp 65004bgp router-id 10.0.4.1timers bgp 3 9neighbor 10.0.4.101 remote-as 65000neighbor 10.0.4.101 ebgp-multihopneighbor 10.0.4.101 timers connect 5neighbor 10.0.4.101 advertisement-interval 5!network 192.168.4.0/24
!
log stdout
注意,這里的quagga4.conf中并未并192.168.4.0/24網段進行公告
quagga-sdn.conf
!
hostname bgp
password sdnip
!
!
router bgp 65000bgp router-id 10.10.10.1timers bgp 3 9!neighbor 10.0.1.1 remote-as 65001neighbor 10.0.1.1 ebgp-multihopneighbor 10.0.1.1 timers connect 5neighbor 10.0.1.1 advertisement-interval 5!neighbor 10.0.2.1 remote-as 65002neighbor 10.0.2.1 ebgp-multihopneighbor 10.0.2.1 timers connect 5neighbor 10.0.2.1 advertisement-interval 5!neighbor 10.0.3.1 remote-as 65003neighbor 10.0.3.1 ebgp-multihopneighbor 10.0.3.1 timers connect 5neighbor 10.0.3.1 advertisement-interval 5!neighbor 10.0.4.1 remote-as 65004neighbor 10.0.4.1 ebgp-multihopneighbor 10.0.4.1 timers connect 5neighbor 10.0.4.1 advertisement-interval 5!! ONOSneighbor 10.10.10.3 remote-as 65000neighbor 10.10.10.3 port 2000neighbor 10.10.10.3 timers connect 5
!
log stdout
quagga-sdn.conf為bgp反射器那個路由器的配置,與r1-r4屬于ebgp關系,與onos屬于ibgp關系。
mininet模擬交換機、路由器、主機
拓撲描述腳本與quagga配置文件準備好后便可啟動拓撲了
#啟動mininet,連接指定控制器(驗證:onos中查看設備是否上線)
sudo mn --custom tutorial-py3.py --topo sdnip --controller remote,172.17.0.2 --nolistenport
拓撲中的設備創建好后,為了能讓ibgp通信正常,還需要讓bgp-router與onos連通。
找到docker容器10.10.10.3對應的網橋,將root-eth0加入到其中
brctl show
#sdnip網橋中添加root-eth0(驗證:bgp與onos能ping通)
sudo brctl addif br-baab72ffcdfc root-eth0
測試連通性,此時是不通的
h1 ping h2
sdn-ip應用與配置
前面的步驟僅完成了拓撲的搭建,拓撲中的節點間還是處于無法通信的狀態。
如想要拓撲中的各節點進行正常通信,需要onos下發流表到交換機指導數據包的轉發。
此刻sdn-ip的作用便可以發揮出來了,在sdn-ip應用中實現了bgp的協議與路由儲存的基本功能,并能通過所學到的route下發對應的intent,最后下發flowRule到交換機中。細節部分此處不詳細展開。
sdnip應用啟動
#onos集群下需要先啟動confgi
app activate org.onosproject.config
#啟動sdnip應用
app activate org.onosproject.sdnip
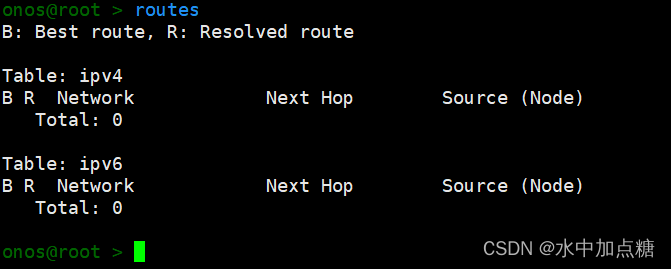
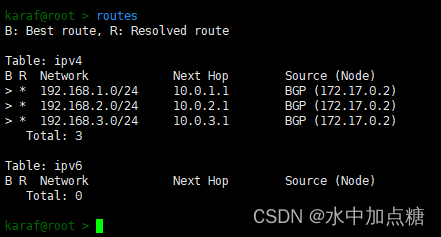
待sdnip應用啟動后便可以使用routes命令,此時onos中的route列表仍然是空的
sdnIp應用配置
訪問onos的http接口,找到network配置項注入配置信息。如訪問地址為:
http://172.17.0.2:8181/onos/v1/docs/#!/network47configuration/post_network_configuration
也可使用curl進行更新,如:
curl --user onos:rocks -X POST -H “Content-Type: application/json” http://172.17.0.2:8181/onos/v1/network/configuration/ -d @/home/sdn/sdnip/configs/network-cfg.json
其中傳入的配置信息內容如下:
{"ports" : {"of:00000000000000a1/1" : {"interfaces" : [{"name" : "sw1-1","ips"  : [ "10.0.1.101/24" ],"mac"  : "00:00:00:00:00:01"}]},"of:00000000000000a2/1" : {"interfaces" : [{"name" : "sw2-1","ips"  : [ "10.0.2.101/24" ],"mac"  : "00:00:00:00:00:01"}]},"of:00000000000000a5/1" : {"interfaces" : [{"name" : "sw5-1","ips"  : [ "10.0.3.101/24" ],"mac"  : "00:00:00:00:00:01"}]},"of:00000000000000a6/1" : {"interfaces" : [{"name" : "sw6-1","ips"  : [ "10.0.4.101/24" ],"mac"  : "00:00:00:00:00:01"}]}},"apps" : {"org.onosproject.router" : {"bgp" : {"bgpSpeakers" : [{"name" : "speaker1","connectPoint" : "of:00000000000000a3/1","peers" : ["10.0.1.1","10.0.2.1","10.0.3.1","10.0.4.1"]}]}}}
}
配置成功后使用interfaces和bgp-speakers命令驗證一下

連通驗證
當sdn-ip應用啟動成功后,并且配置了對應的信息后,sdn-ip會執行一系列的操作最終會下發所學到的路由記錄到交換機中

此時再查看routes信息,發現也學到了路由記錄
查看flows信息也可看到由intent所下發的流表項,片段如下:
deviceId=of:00000000000000a1, flowRuleCount=17ADDED, bytes=65330, packets=470, table=0, priority=40000, selector=[ETH_TYPE:lldp], treatment=[immediate=[OUTPUT:CONTROLLER], clearDeferred]ADDED, bytes=65330, packets=470, table=0, priority=40000, selector=[ETH_TYPE:bddp], treatment=[immediate=[OUTPUT:CONTROLLER], clearDeferred]ADDED, bytes=84, packets=2, table=0, priority=40000, selector=[ETH_TYPE:arp], treatment=[immediate=[OUTPUT:CONTROLLER], clearDeferred]ADDED, bytes=29699, packets=378, table=0, priority=1000, selector=[IN_PORT:1, ETH_TYPE:ipv4, IP_PROTO:6, IPV4_SRC:10.0.1.1/32, IPV4_DST:10.0.1.101/32, TCP_DST:179], treatment=[immediate=[OUTPUT:3]]ADDED, bytes=0, packets=0, table=0, priority=1000, selector=[IN_PORT:1, ETH_TYPE:ipv4, IP_PROTO:1, IPV4_SRC:10.0.1.1/32, IPV4_DST:10.0.1.101/32], treatment=[immediate=[OUTPUT:3]]ADDED, bytes=0, packets=0, table=0, priority=1000, selector=[IN_PORT:2, ETH_TYPE:ipv4, IP_PROTO:6, IPV4_SRC:10.0.2.1/32, IPV4_DST:10.0.2.101/32, TCP_SRC:179], treatment=[immediate=[OUTPUT:3]]ADDED, bytes=0, packets=0, table=0, priority=1000, selector=[IN_PORT:1, ETH_TYPE:ipv4, IP_PROTO:6, IPV4_SRC:10.0.1.1/32, IPV4_DST:10.0.1.101/32, TCP_SRC:179], treatment=[immediate=[OUTPUT:3]]ADDED, bytes=36604, packets=482, table=0, priority=1000, selector=[IN_PORT:3, ETH_TYPE:ipv4, IP_PROTO:6, IPV4_SRC:10.0.1.101/32, IPV4_DST:10.0.1.1/32, TCP_SRC:179], treatment=[immediate=[OUTPUT:1]]ADDED, bytes=0, packets=0, table=0, priority=1000, selector=[IN_PORT:2, ETH_TYPE:ipv4, IP_PROTO:1, IPV4_SRC:10.0.2.1/32, IPV4_DST:10.0.2.101/32], treatment=[immediate=[OUTPUT:3]]ADDED, bytes=33197, packets=431, table=0, priority=1000, selector=[IN_PORT:2, ETH_TYPE:ipv4, IP_PROTO:6, IPV4_SRC:10.0.2.1/32, IPV4_DST:10.0.2.101/32, TCP_DST:179], treatment=[immediate=[OUTPUT:3]]ADDED, bytes=0, packets=0, table=0, priority=1000, selector=[IN_PORT:3, ETH_TYPE:ipv4, IP_PROTO:6, IPV4_SRC:10.0.1.101/32, IPV4_DST:10.0.1.1/32, TCP_DST:179], treatment=[immediate=[OUTPUT:1]]ADDED, bytes=0, packets=0, table=0, priority=1000, selector=[IN_PORT:3, ETH_TYPE:ipv4, IP_PROTO:1, IPV4_SRC:10.0.1.101/32, IPV4_DST:10.0.1.1/32], treatment=[immediate=[OUTPUT:1]]ADDED, bytes=98, packets=1, table=0, priority=220, selector=[IN_PORT:1, ETH_TYPE:ipv4, IPV4_DST:192.168.3.0/24], treatment=[immediate=[ETH_DST:00:00:00:00:03:01, OUTPUT:3]]ADDED, bytes=98, packets=1, table=0, priority=220, selector=[IN_PORT:3, ETH_DST:00:00:00:00:01:01], treatment=[immediate=[OUTPUT:1]]ADDED, bytes=196, packets=2, table=0, priority=220, selector=[IN_PORT:2, ETH_DST:00:00:00:00:01:01], treatment=[immediate=[OUTPUT:1]]ADDED, bytes=196, packets=2, table=0, priority=220, selector=[IN_PORT:1, ETH_TYPE:ipv4, IPV4_DST:192.168.2.0/24], treatment=[immediate=[ETH_DST:00:00:00:00:02:01, OUTPUT:2]]ADDED, bytes=0, packets=0, table=0, priority=220, selector=[IN_PORT:3, ETH_DST:00:00:00:00:02:01], treatment=[immediate=[OUTPUT:2]]
deviceId=of:00000000000000a2, flowRuleCount=14ADDED, bytes=65052, packets=468, table=0, priority=40000, selector=[ETH_TYPE:bddp], treatment=[immediate=[OUTPUT:CONTROLLER], clearDeferred]ADDED, bytes=84, packets=2, table=0, priority=40000, selector=[ETH_TYPE:arp], treatment=[immediate=[OUTPUT:CONTROLLER], clearDeferred]ADDED, bytes=65052, packets=468, table=0, priority=40000, selector=[ETH_TYPE:lldp], treatment=[immediate=[OUTPUT:CONTROLLER], clearDeferred]ADDED, bytes=33197, packets=431, table=0, priority=1000, selector=[IN_PORT:1, ETH_TYPE:ipv4, IP_PROTO:6, IPV4_SRC:10.0.2.1/32, IPV4_DST:10.0.2.101/32, TCP_DST:179], treatment=[immediate=[OUTPUT:2]]ADDED, bytes=0, packets=0, table=0, priority=1000, selector=[IN_PORT:1, ETH_TYPE:ipv4, IP_PROTO:6, IPV4_SRC:10.0.2.1/32, IPV4_DST:10.0.2.101/32, TCP_SRC:179], treatment=[immediate=[OUTPUT:2]]ADDED, bytes=0, packets=0, table=0, priority=1000, selector=[IN_PORT:3, ETH_TYPE:ipv4, IP_PROTO:6, IPV4_SRC:10.0.2.101/32, IPV4_DST:10.0.2.1/32, TCP_DST:179], treatment=[immediate=[OUTPUT:1]]ADDED, bytes=0, packets=0, table=0, priority=1000, selector=[IN_PORT:1, ETH_TYPE:ipv4, IP_PROTO:1, IPV4_SRC:10.0.2.1/32, IPV4_DST:10.0.2.101/32], treatment=[immediate=[OUTPUT:2]]ADDED, bytes=34822, packets=455, table=0, priority=1000, selector=[IN_PORT:3, ETH_TYPE:ipv4, IP_PROTO:6, IPV4_SRC:10.0.2.101/32, IPV4_DST:10.0.2.1/32, TCP_SRC:179], treatment=[immediate=[OUTPUT:1]]ADDED, bytes=0, packets=0, table=0, priority=1000, selector=[IN_PORT:3, ETH_TYPE:ipv4, IP_PROTO:1, IPV4_SRC:10.0.2.101/32, IPV4_DST:10.0.2.1/32], treatment=[immediate=[OUTPUT:1]]ADDED, bytes=0, packets=0, table=0, priority=220, selector=[IN_PORT:3, ETH_DST:00:00:00:00:02:01], treatment=[immediate=[OUTPUT:1]]ADDED, bytes=196, packets=2, table=0, priority=220, selector=[IN_PORT:1, ETH_TYPE:ipv4, IPV4_DST:192.168.1.0/24], treatment=[immediate=[ETH_DST:00:00:00:00:01:01, OUTPUT:2]]ADDED, bytes=196, packets=2, table=0, priority=220, selector=[IN_PORT:2, ETH_DST:00:00:00:00:02:01], treatment=[immediate=[OUTPUT:1]]ADDED, bytes=0, packets=0, table=0, priority=220, selector=[IN_PORT:3, ETH_DST:00:00:00:00:01:01], treatment=[immediate=[OUTPUT:2]]ADDED, bytes=0, packets=0, table=0, priority=220, selector=[IN_PORT:1, ETH_TYPE:ipv4, IPV4_DST:192.168.3.0/24], treatment=[immediate=[ETH_DST:00:00:00:00:03:01, OUTPUT:3]]
……
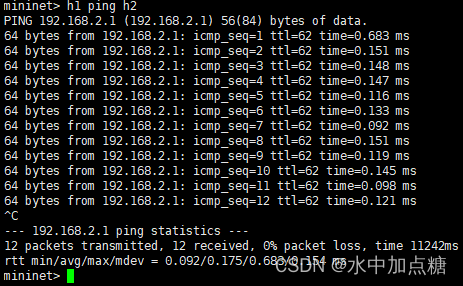
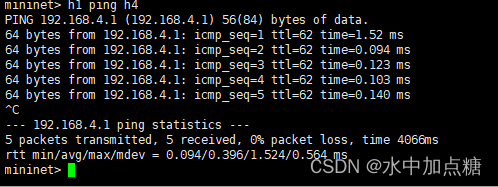
此時再在mininet中進行h1 ping h2便會發現可以ping通了,且ttl值也作了對應的減少
通信過程原理
sdnip可以讓以上拓撲通信成功的過程內容稍微有點多,這里從onos官網中拷貝出幾張有價值的圖例可參考一下:

上圖描述了BGP路由記錄由routes轉為intents,再由intents轉為flowRule流表項的大體流程
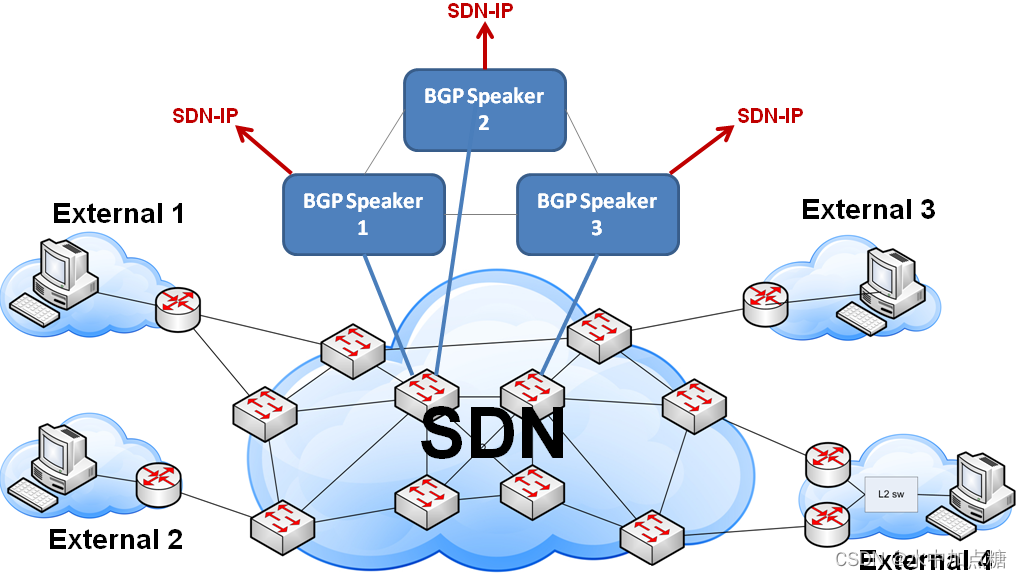
上圖描述了在BGP網絡中,路由傳遞到SDN-IP的大體過程,主要為由EBGP進行路由匯總。
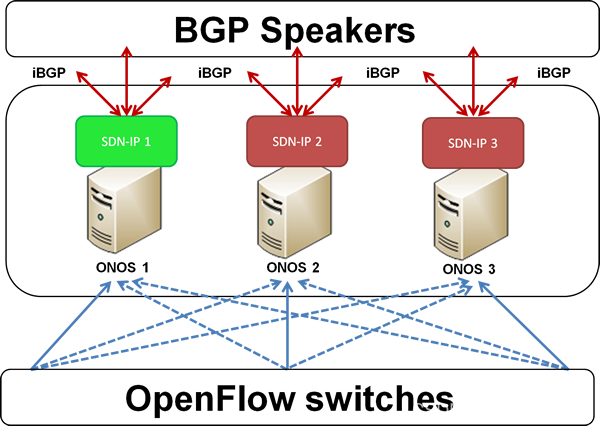
以上圖描述了在由BGP反射器學到了EBGP的路由后,再由IBGP傳遞給onos應用sdn-ip的過程。
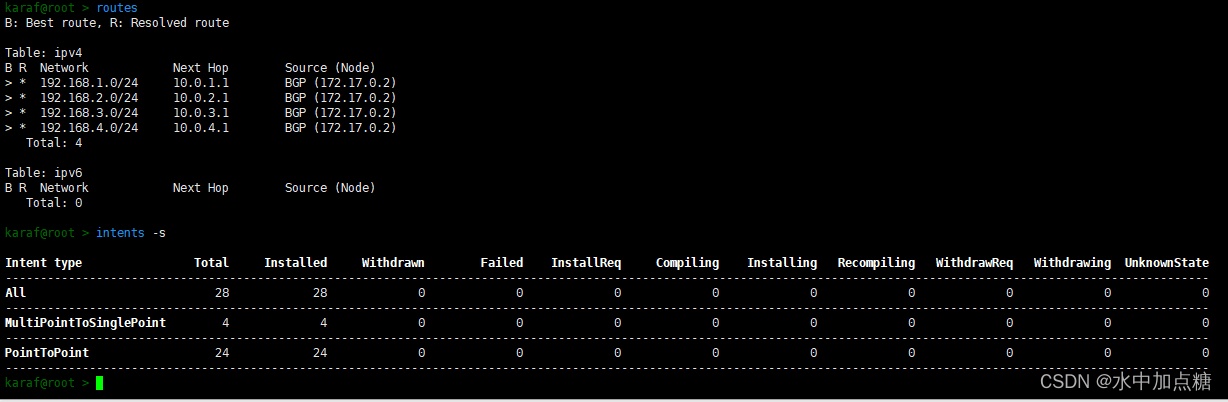
再總結一下:
通信成功的原理可以參考onos官方wiki中sdnip應用的架構描述部分,主要為在onos配置了bgp信息和interface后下發了
Single-point to single-point intents,實現了bgp各節點的通信;隨后在onos學到了bgp路由信息后向交換機下發了
Multi-point to single-point intents,實現了各主機間的通信。
新增ebgp節點路由公告
上面實現了h1、h2、h3這3個主機間的互相通信,但h4還沒有通,這是因為在r4路由器的bgp配置中未將192.168.4.0/24網段公告出去,也就導致onos不能通過ibgp學到r4路由器的主機路由信息。
此時想要讓r4能通在r4的路由器修改配置使其生效即可。
操作如下:
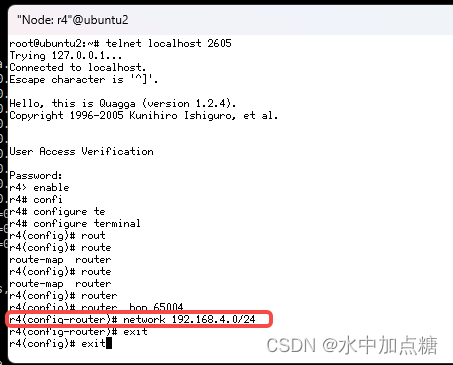
xterm r4
在彈出的r4界面中登錄bgp路由器cli
#login bgp router,passwd: sdnip
telnet localhost 2605
并配置如下:
r4> enable
r4# configure terminal
r4(config)# router bgp 65004
r4(config-router)# network 192.168.4.0/24
r4(config-router)# exit
r4(config)# exit
r4# exit
Connection closed by foreign host.
之后再ping就可以通了
最終的路由記錄與intent信息如下:
最后再來個拓撲圖回憶一下:

參考資料
- https://wiki.onosproject.org/display/ONOS/Basic+ONOS+Tutorial#BasicONOSTutorial-Introduction
- https://wiki.onosproject.org/display/ONOS/SDN-IP+Architecture
- quagga+mininet ospf
- https://medium.com/@sreejithkj52/onos-tutorial-with-mininet-part-2-ed1b30582da0
- https://wiki.onosproject.org/display/ONOS/SDN-IP+Reactive+Routing
- https://wiki.onosproject.org/display/ONOS/vRouter
- https://github.com/ralvarep/ONOS-SDN-IP/blob/master/scenario_1/README.md
- https://wiki.onosproject.org/display/ONOS/Intent+Framework
- https://wiki.onosproject.org/display/ONOS/SDN-IP+Deployment+Guidelines

)


)


)


