前言
本節我們先來搭建幾個Demo來感受一下書生浦語大模型
InternLM-Chat-7B 智能對話 Demo
我們將使用 InternStudio 中的 A100(1/4) 機器和 InternLM-Chat-7B 模型部署一個智能對話 Demo
環境準備
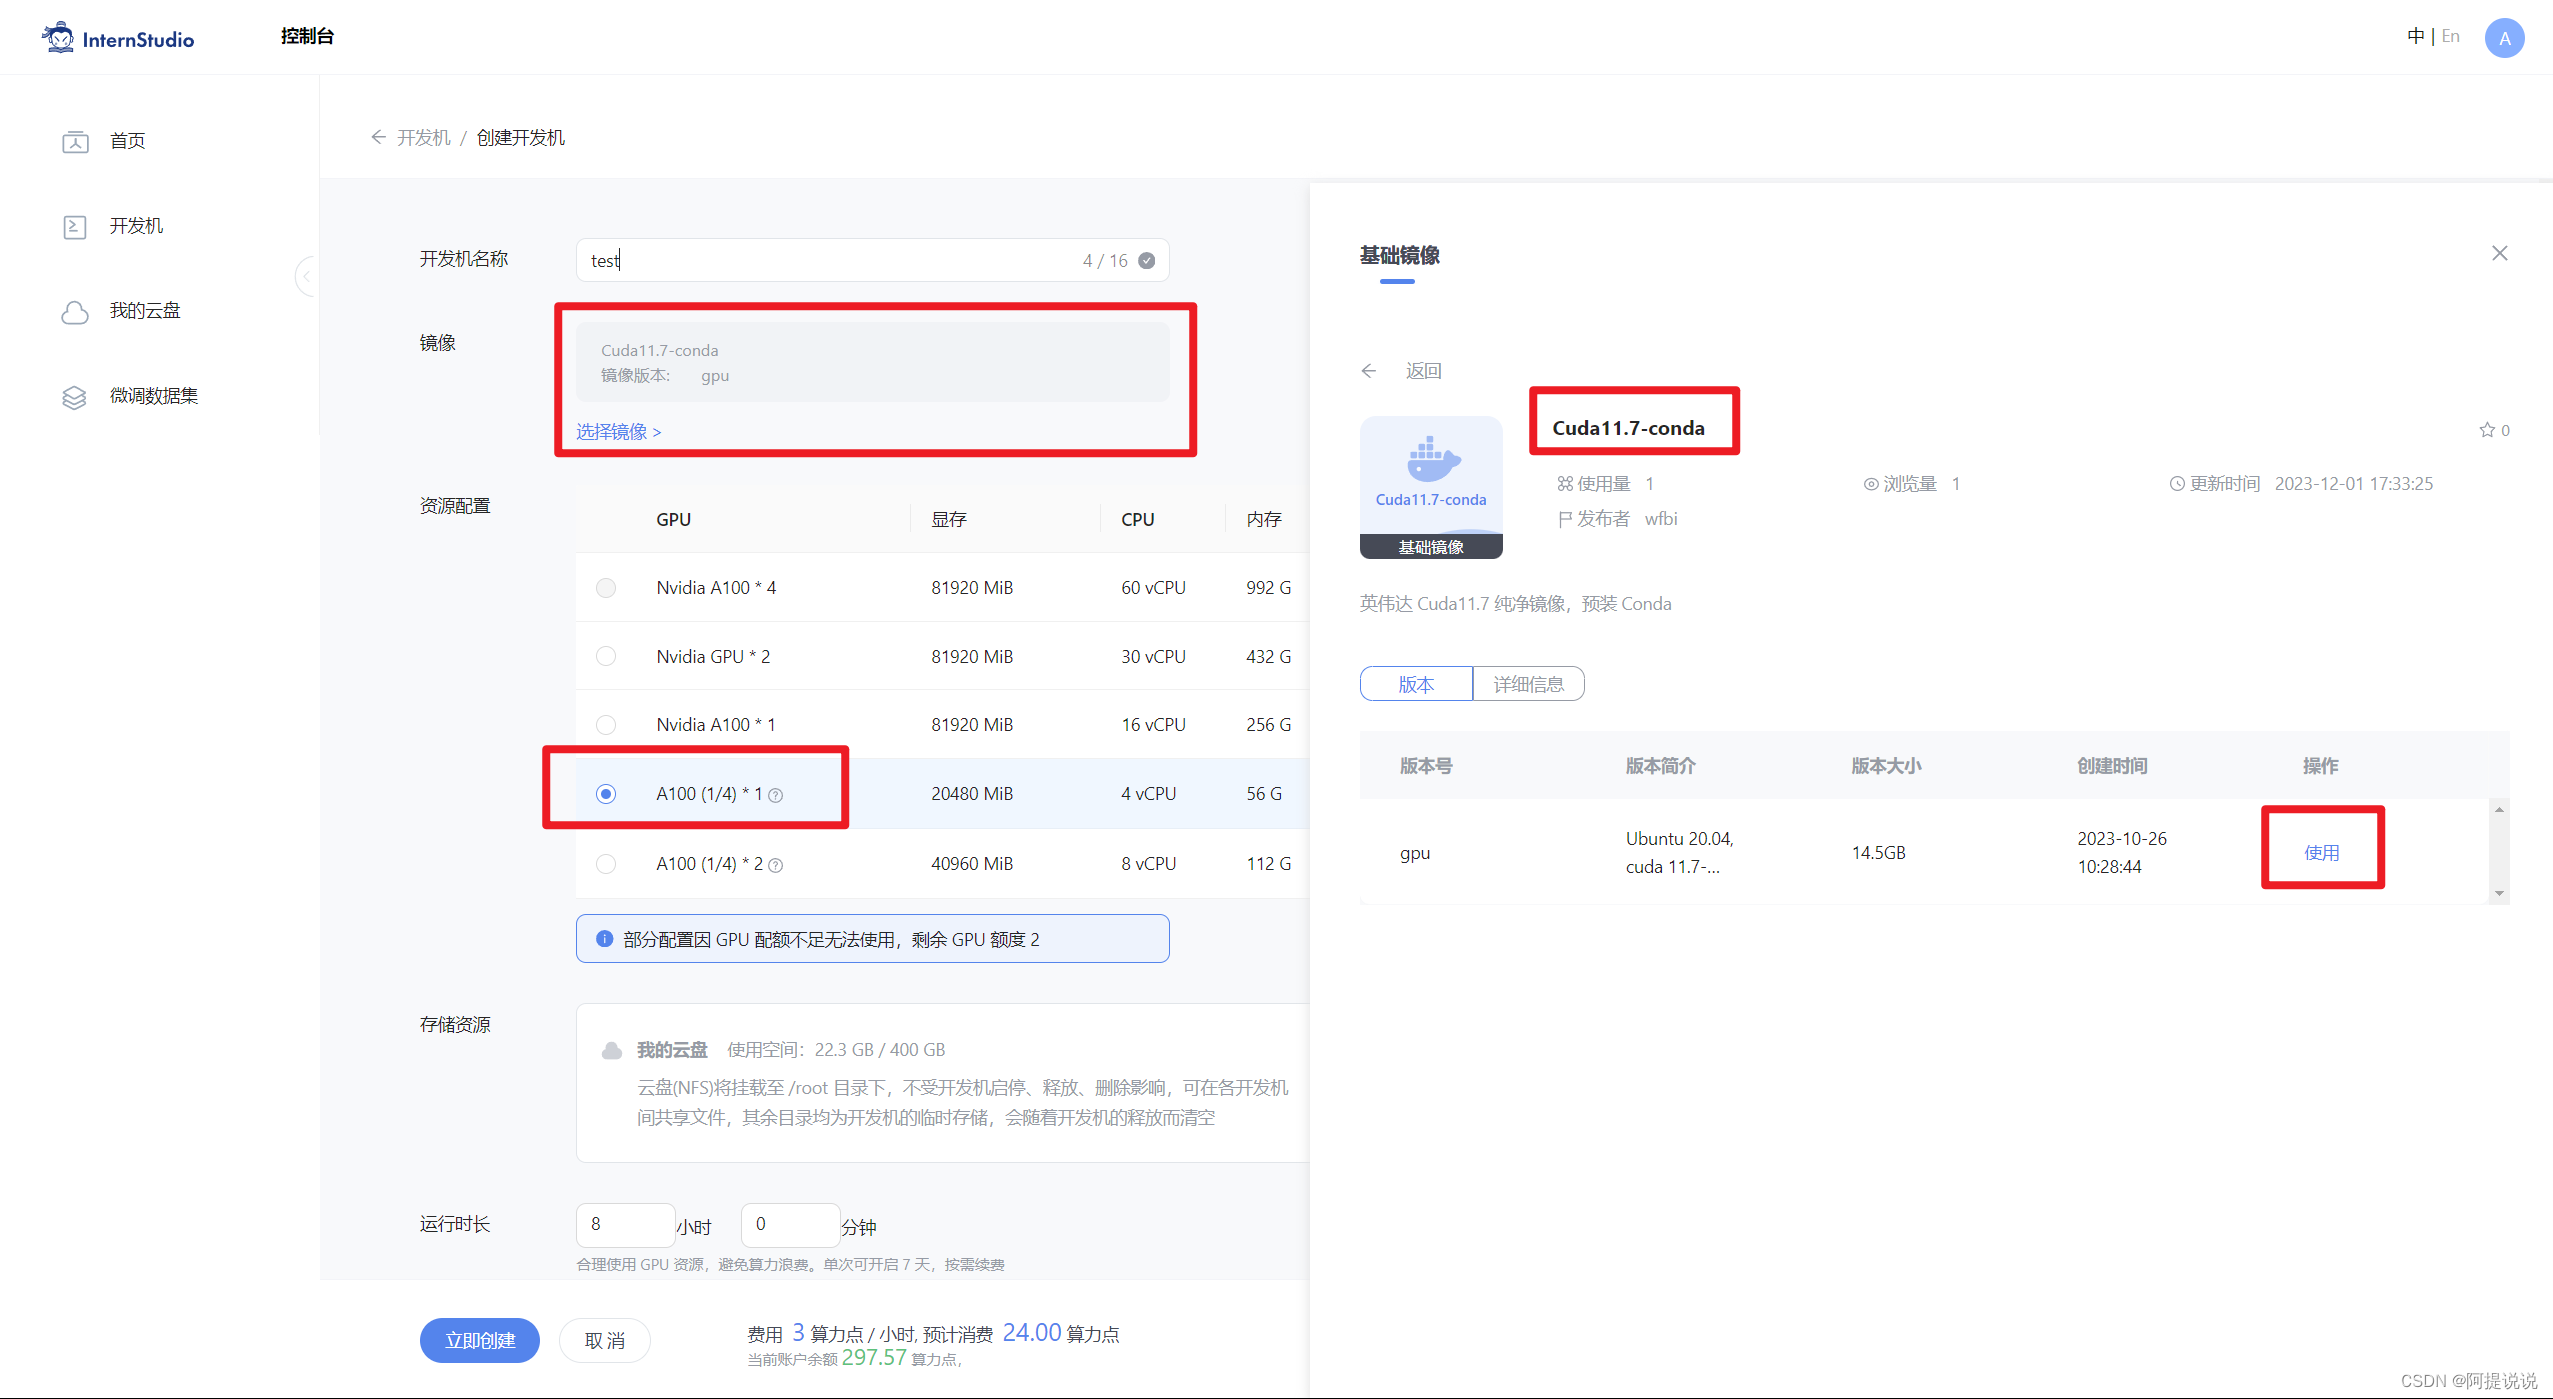
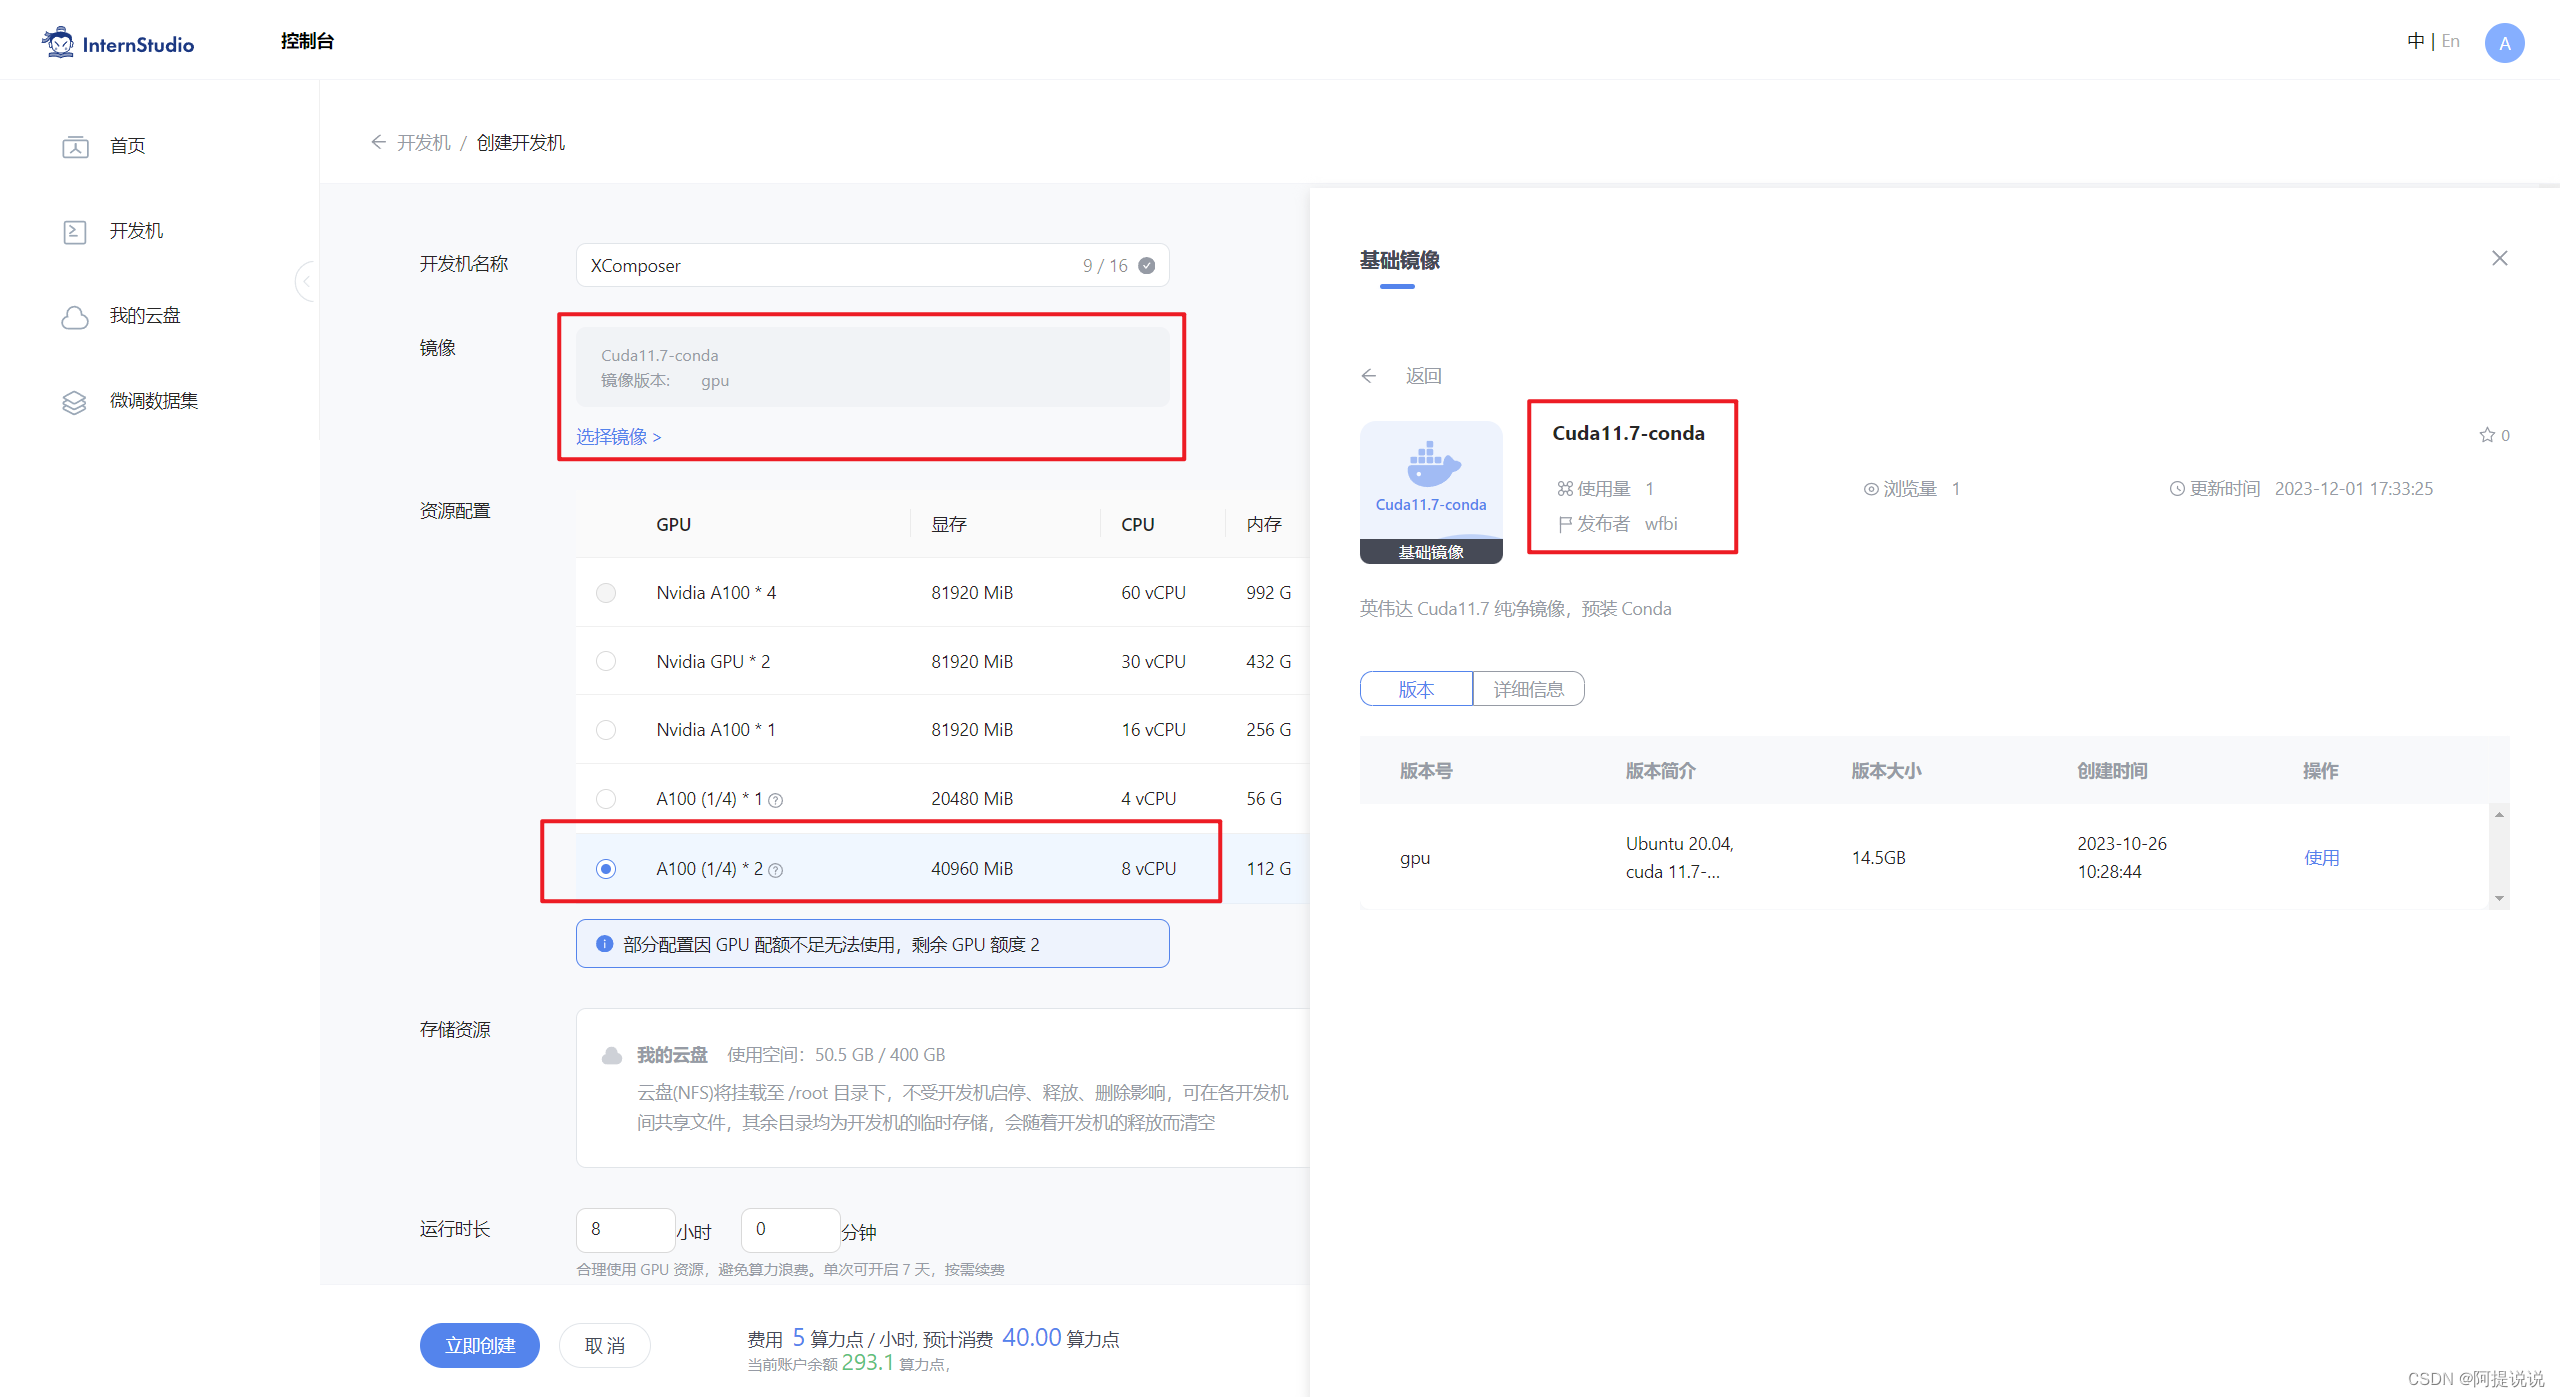
在 InternStudio 平臺中選擇 A100(1/4) 的配置,如下圖所示鏡像選擇 Cuda11.7-conda,如下圖所示:
接下來打開剛剛租用服務器的進入開發機,并且打開其中的終端開始環境配置、模型下載和運行 demo。

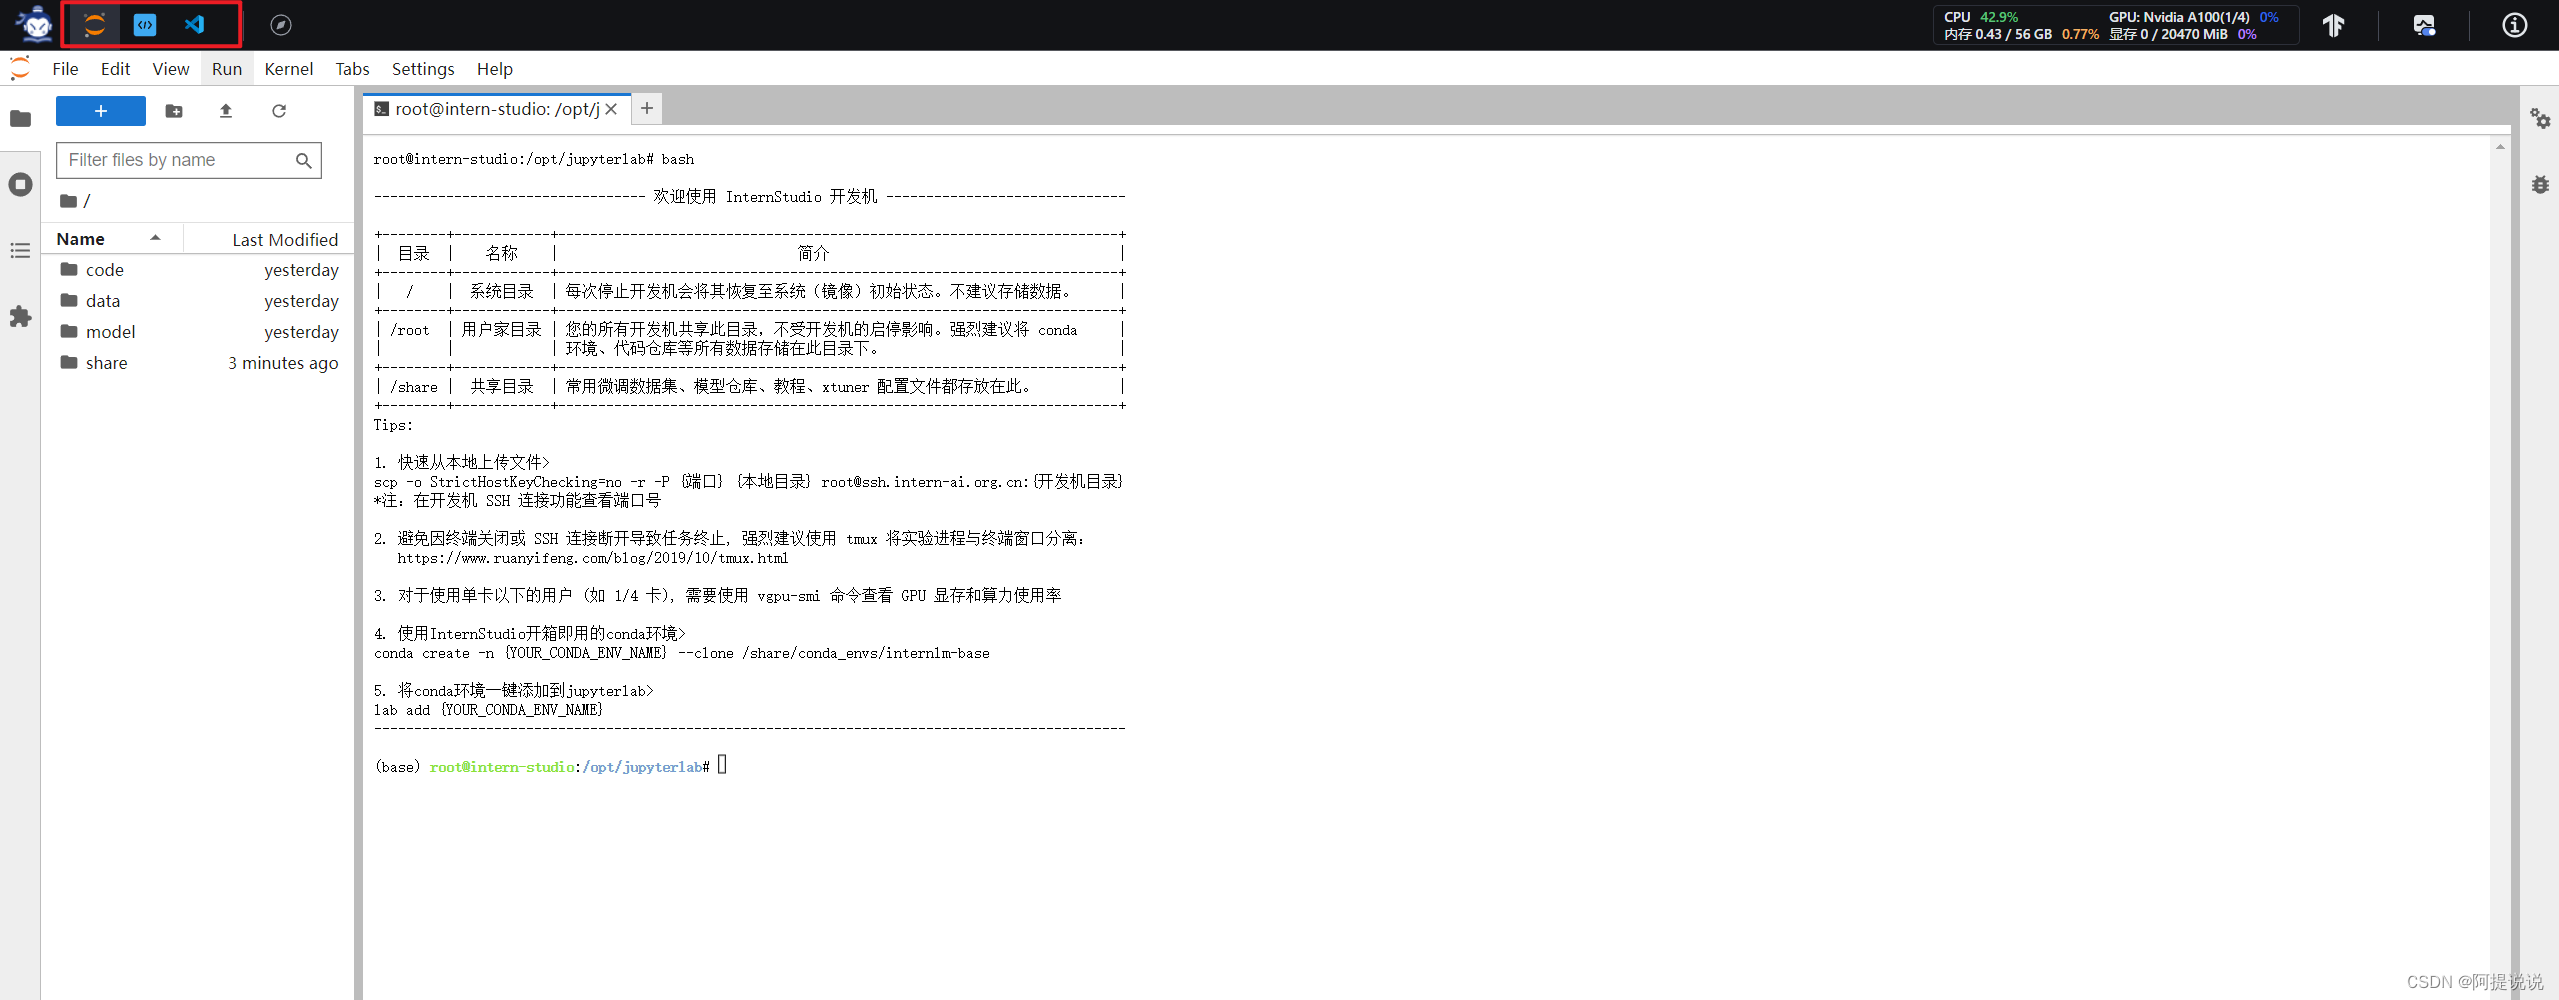
進入開發機后,在頁面的左上角可以切換 JupyterLab、終端和 VScode,并在終端輸入 bash 命令,進入 conda 環境。如下圖所示:
進入 conda 環境之后,使用以下命令從本地克隆一個已有的 pytorch 2.0.1 的環境
bash # 請每次使用 jupyter lab 打開終端時務必先執行 bash 命令進入 bash 中
bash /root/share/install_conda_env_internlm_base.sh internlm-demo  # 執行該腳本文件來安裝項目實驗環境
然后使用以下命令激活環境
conda activate internlm-demo
并在環境中安裝運行 demo 所需要的依賴。
# 升級pip
python -m pip install --upgrade pippip install modelscope==1.9.5
pip install transformers==4.35.2
pip install streamlit==1.24.0
pip install sentencepiece==0.1.99
pip install accelerate==0.24.1
模型下載
InternStudio 平臺的 share 目錄下已經為我們準備了全系列的 InternLM 模型,所以我們可以直接復制即可。使用如下命令復制:
mkdir -p /root/model/Shanghai_AI_Laboratory
cp -r /root/share/temp/model_repos/internlm-chat-7b /root/model/Shanghai_AI_Laboratory
-r 選項表示遞歸地復制目錄及其內容
也可以使用 modelscope 中的 snapshot_download 函數下載模型,第一個參數為模型名稱,參數 cache_dir 為模型的下載路徑。
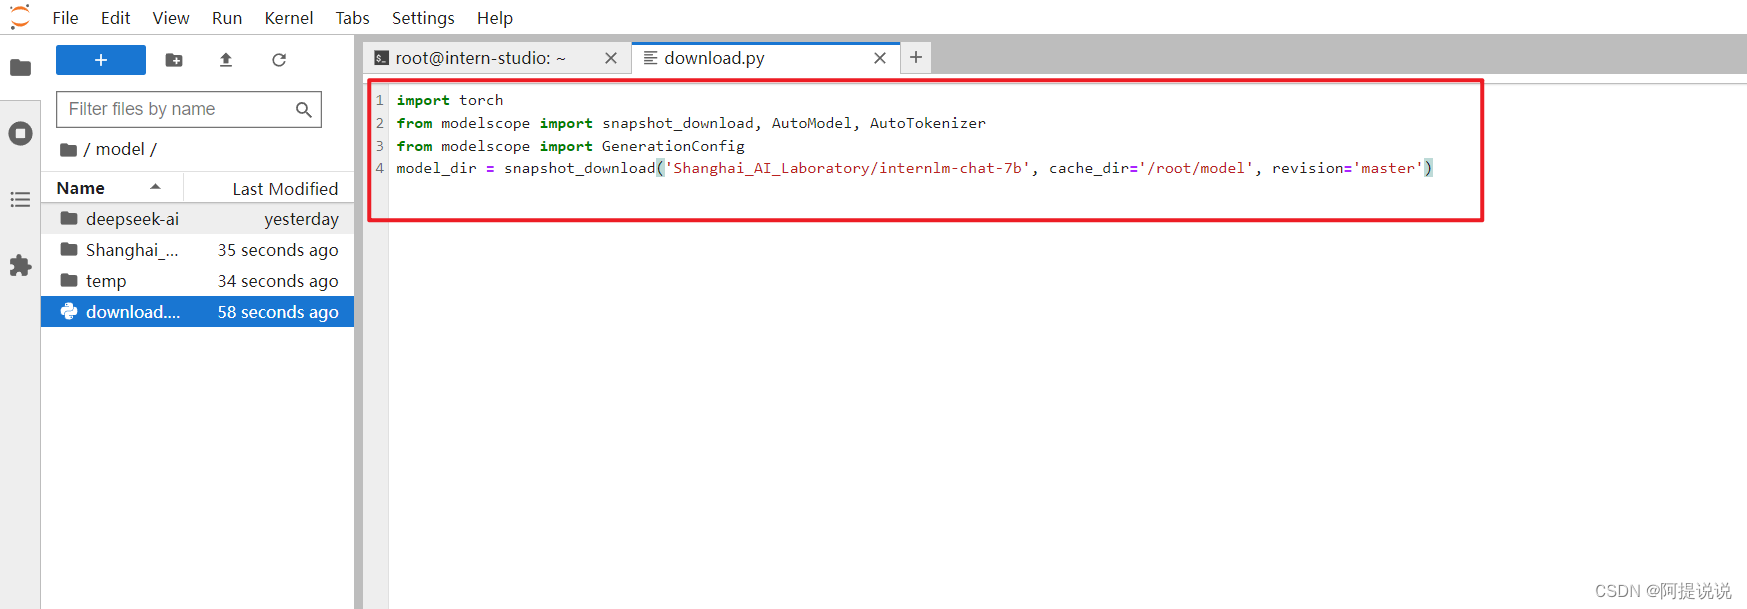
在 /root 路徑下新建目錄 model,在目錄下新建 download.py 文件并在其中輸入以下內容,粘貼代碼后記得保存文件,如下圖所示。并運行 python /root/model/download.py 執行下載,模型大小為 14 GB,下載模型大概需要 10~20 分鐘
import torch
from modelscope import snapshot_download, AutoModel, AutoTokenizer
import os
model_dir = snapshot_download('Shanghai_AI_Laboratory/internlm-chat-7b', cache_dir='/root/model', revision='v1.0.3')
注意:使用 pwd 命令可以查看當前的路徑,JupyterLab 左側目錄欄顯示為 /root/ 下的路徑。
代碼準備
首先 clone 代碼,在 /root 路徑下新建 code 目錄,然后切換路徑, clone 代碼.
cd /root/code
git clone https://gitee.com/internlm/InternLM.git
切換 commit 版本,與教程 commit 版本保持一致,可以讓大家更好的復現。
cd InternLM
git checkout 3028f07cb79e5b1d7342f4ad8d11efad3fd13d17
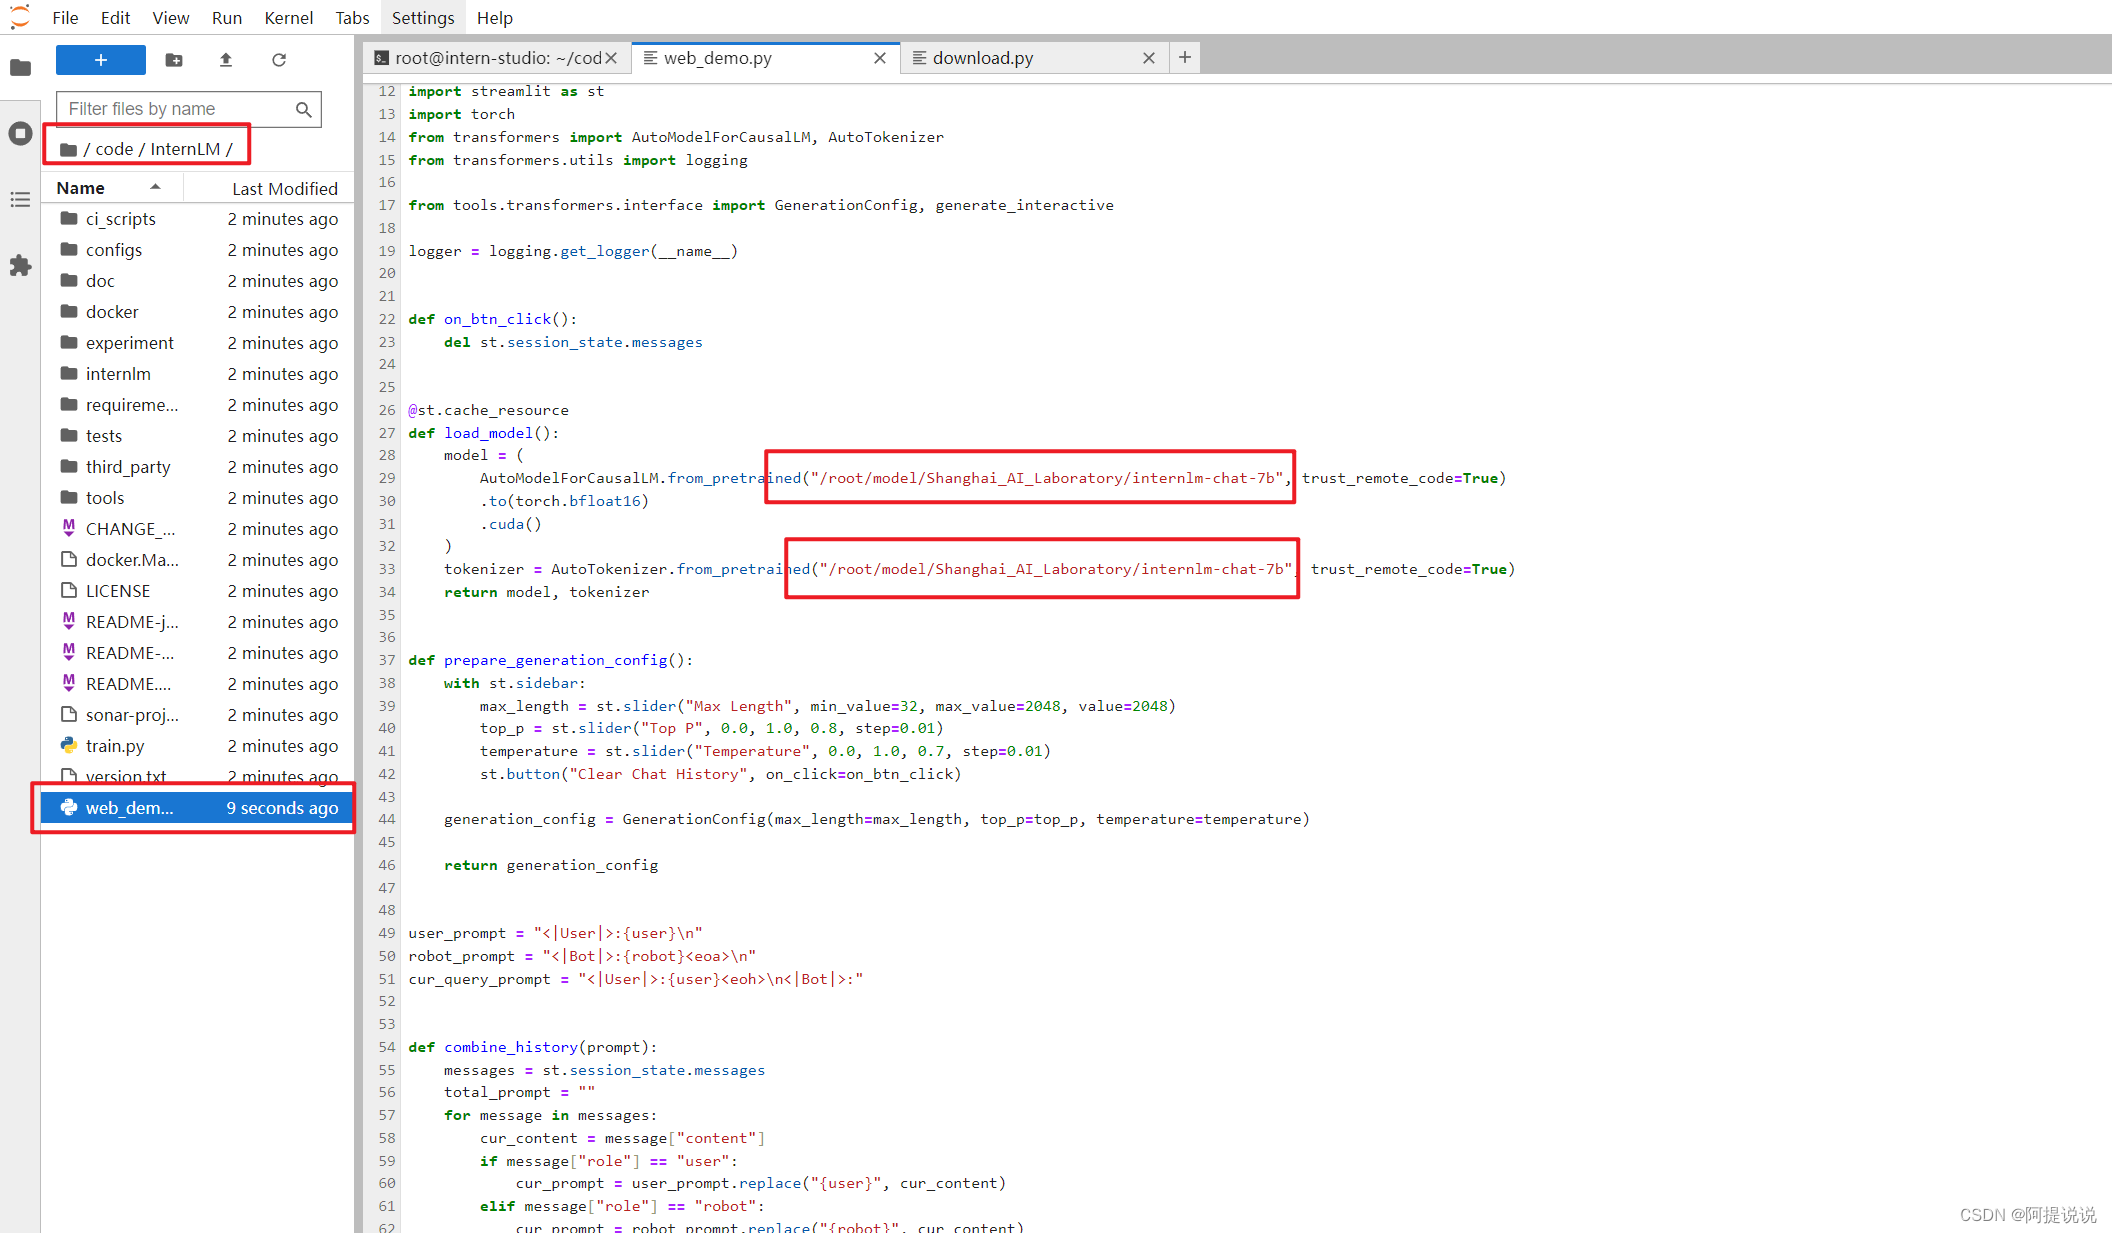
將 /root/code/InternLM/web_demo.py 中 29 行和 33 行的模型更換為本地的 /root/model/Shanghai_AI_Laboratory/internlm-chat-7b。
終端運行
我們可以在 /root/code/InternLM 目錄下新建一個 cli_demo.py 文件,將以下代碼填入其中:
import torch
from transformers import AutoTokenizer, AutoModelForCausalLMmodel_name_or_path = "/root/model/Shanghai_AI_Laboratory/internlm-chat-7b"tokenizer = AutoTokenizer.from_pretrained(model_name_or_path, trust_remote_code=True)
model = AutoModelForCausalLM.from_pretrained(model_name_or_path, trust_remote_code=True, torch_dtype=torch.bfloat16, device_map='auto')
model = model.eval()system_prompt = """You are an AI assistant whose name is InternLM (書生·浦語).
- InternLM (書生·浦語) is a conversational language model that is developed by Shanghai AI Laboratory (上海人工智能實驗室). It is designed to be helpful, honest, and harmless.
- InternLM (書生·浦語) can understand and communicate fluently in the language chosen by the user such as English and 中文.
"""messages = [(system_prompt, '')]print("=============Welcome to InternLM chatbot, type 'exit' to exit.=============")while True:input_text = input("User  >>> ")input_text = input_text.replace(' ', '')if input_text == "exit":breakresponse, history = model.chat(tokenizer, input_text, history=messages)messages.append((input_text, response))print(f"robot >>> {response}")
然后在終端運行以下命令,即可體驗 InternLM-Chat-7B 模型的對話能力。對話效果如下所示:
python /root/code/InternLM/cli_demo.py
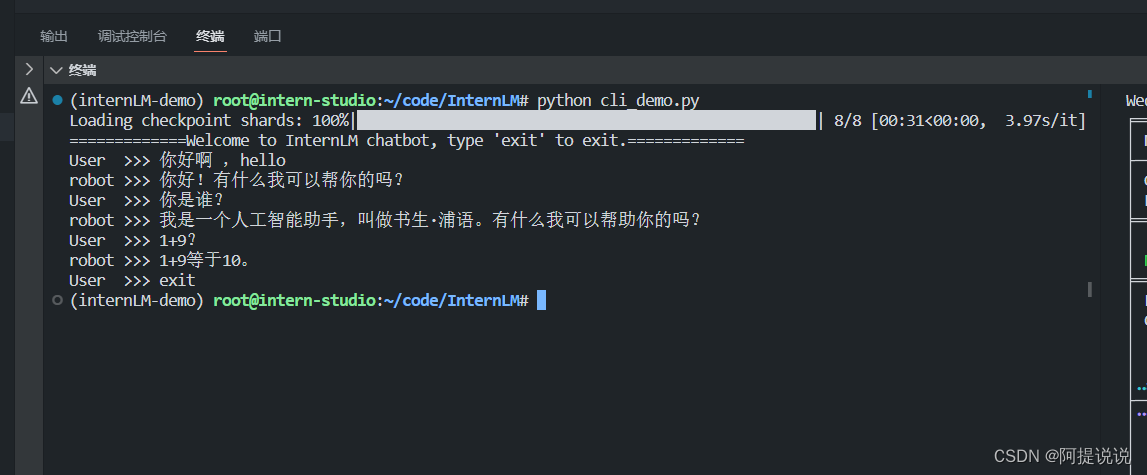
web demo 運行
我們切換到 VScode 中,運行 /root/code/InternLM 目錄下的 web_demo.py 文件,輸入以下命令后,查看本教程配置本地端口后,將端口映射到本地。在本地瀏覽器輸入 http://127.0.0.1:6006 即可。
bash
conda activate internlm-demo  # 首次進入 vscode 會默認是 base 環境,所以首先切換環境
cd /root/code/InternLM
streamlit run web_demo.py --server.address 127.0.0.1 --server.port 6006
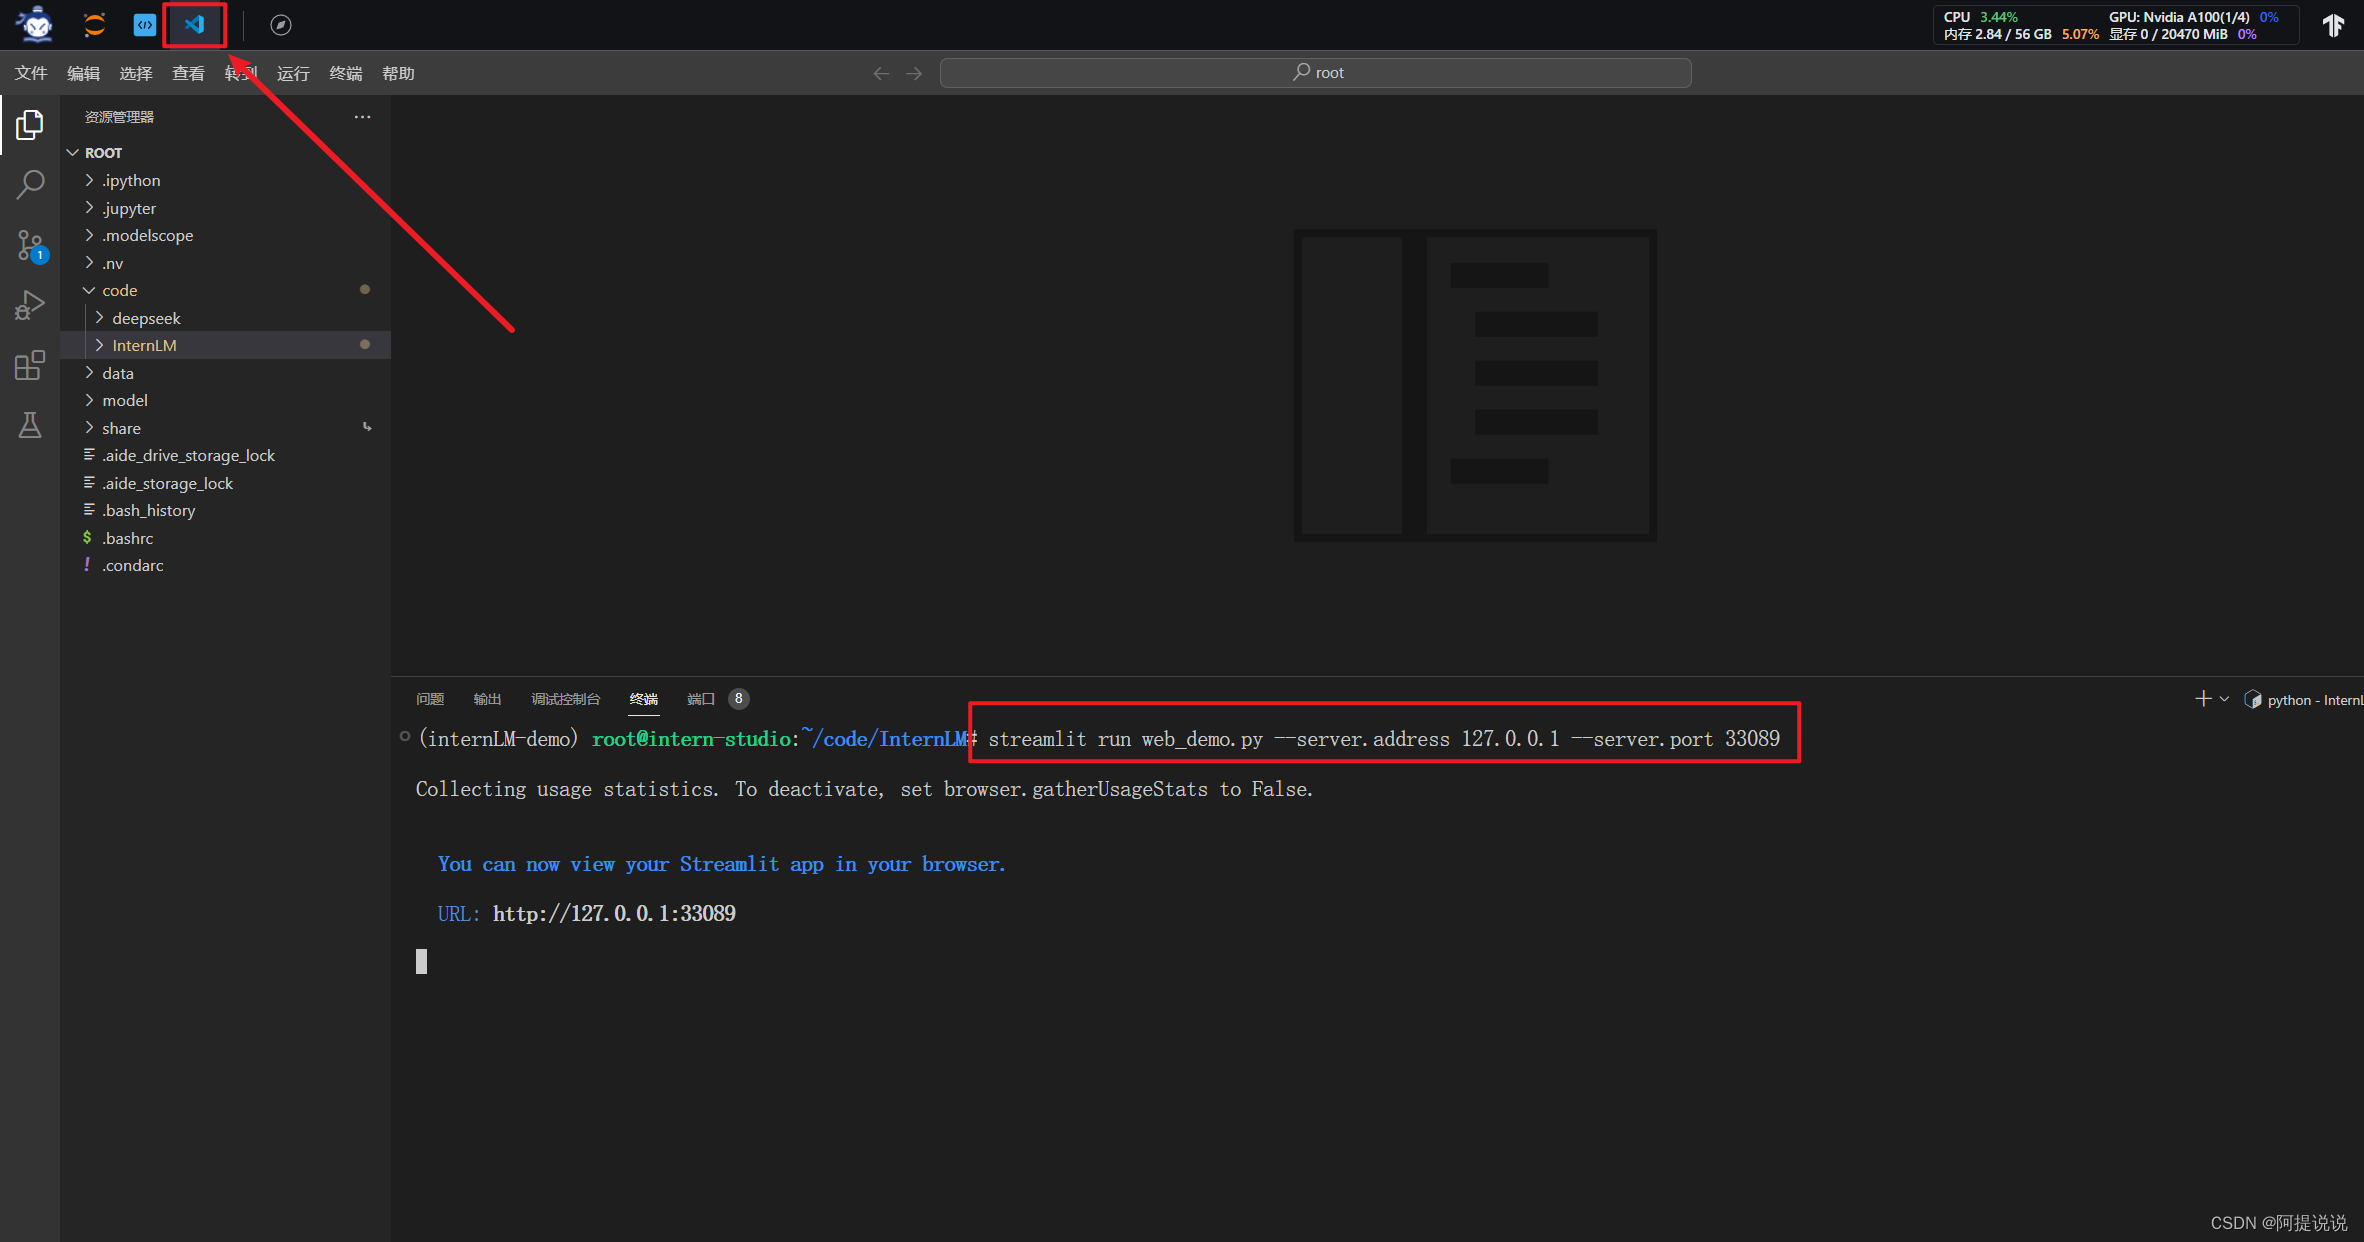
注意:要在瀏覽器打開 http://127.0.0.1:6006 頁面后,模型才會加載,如下圖所示:

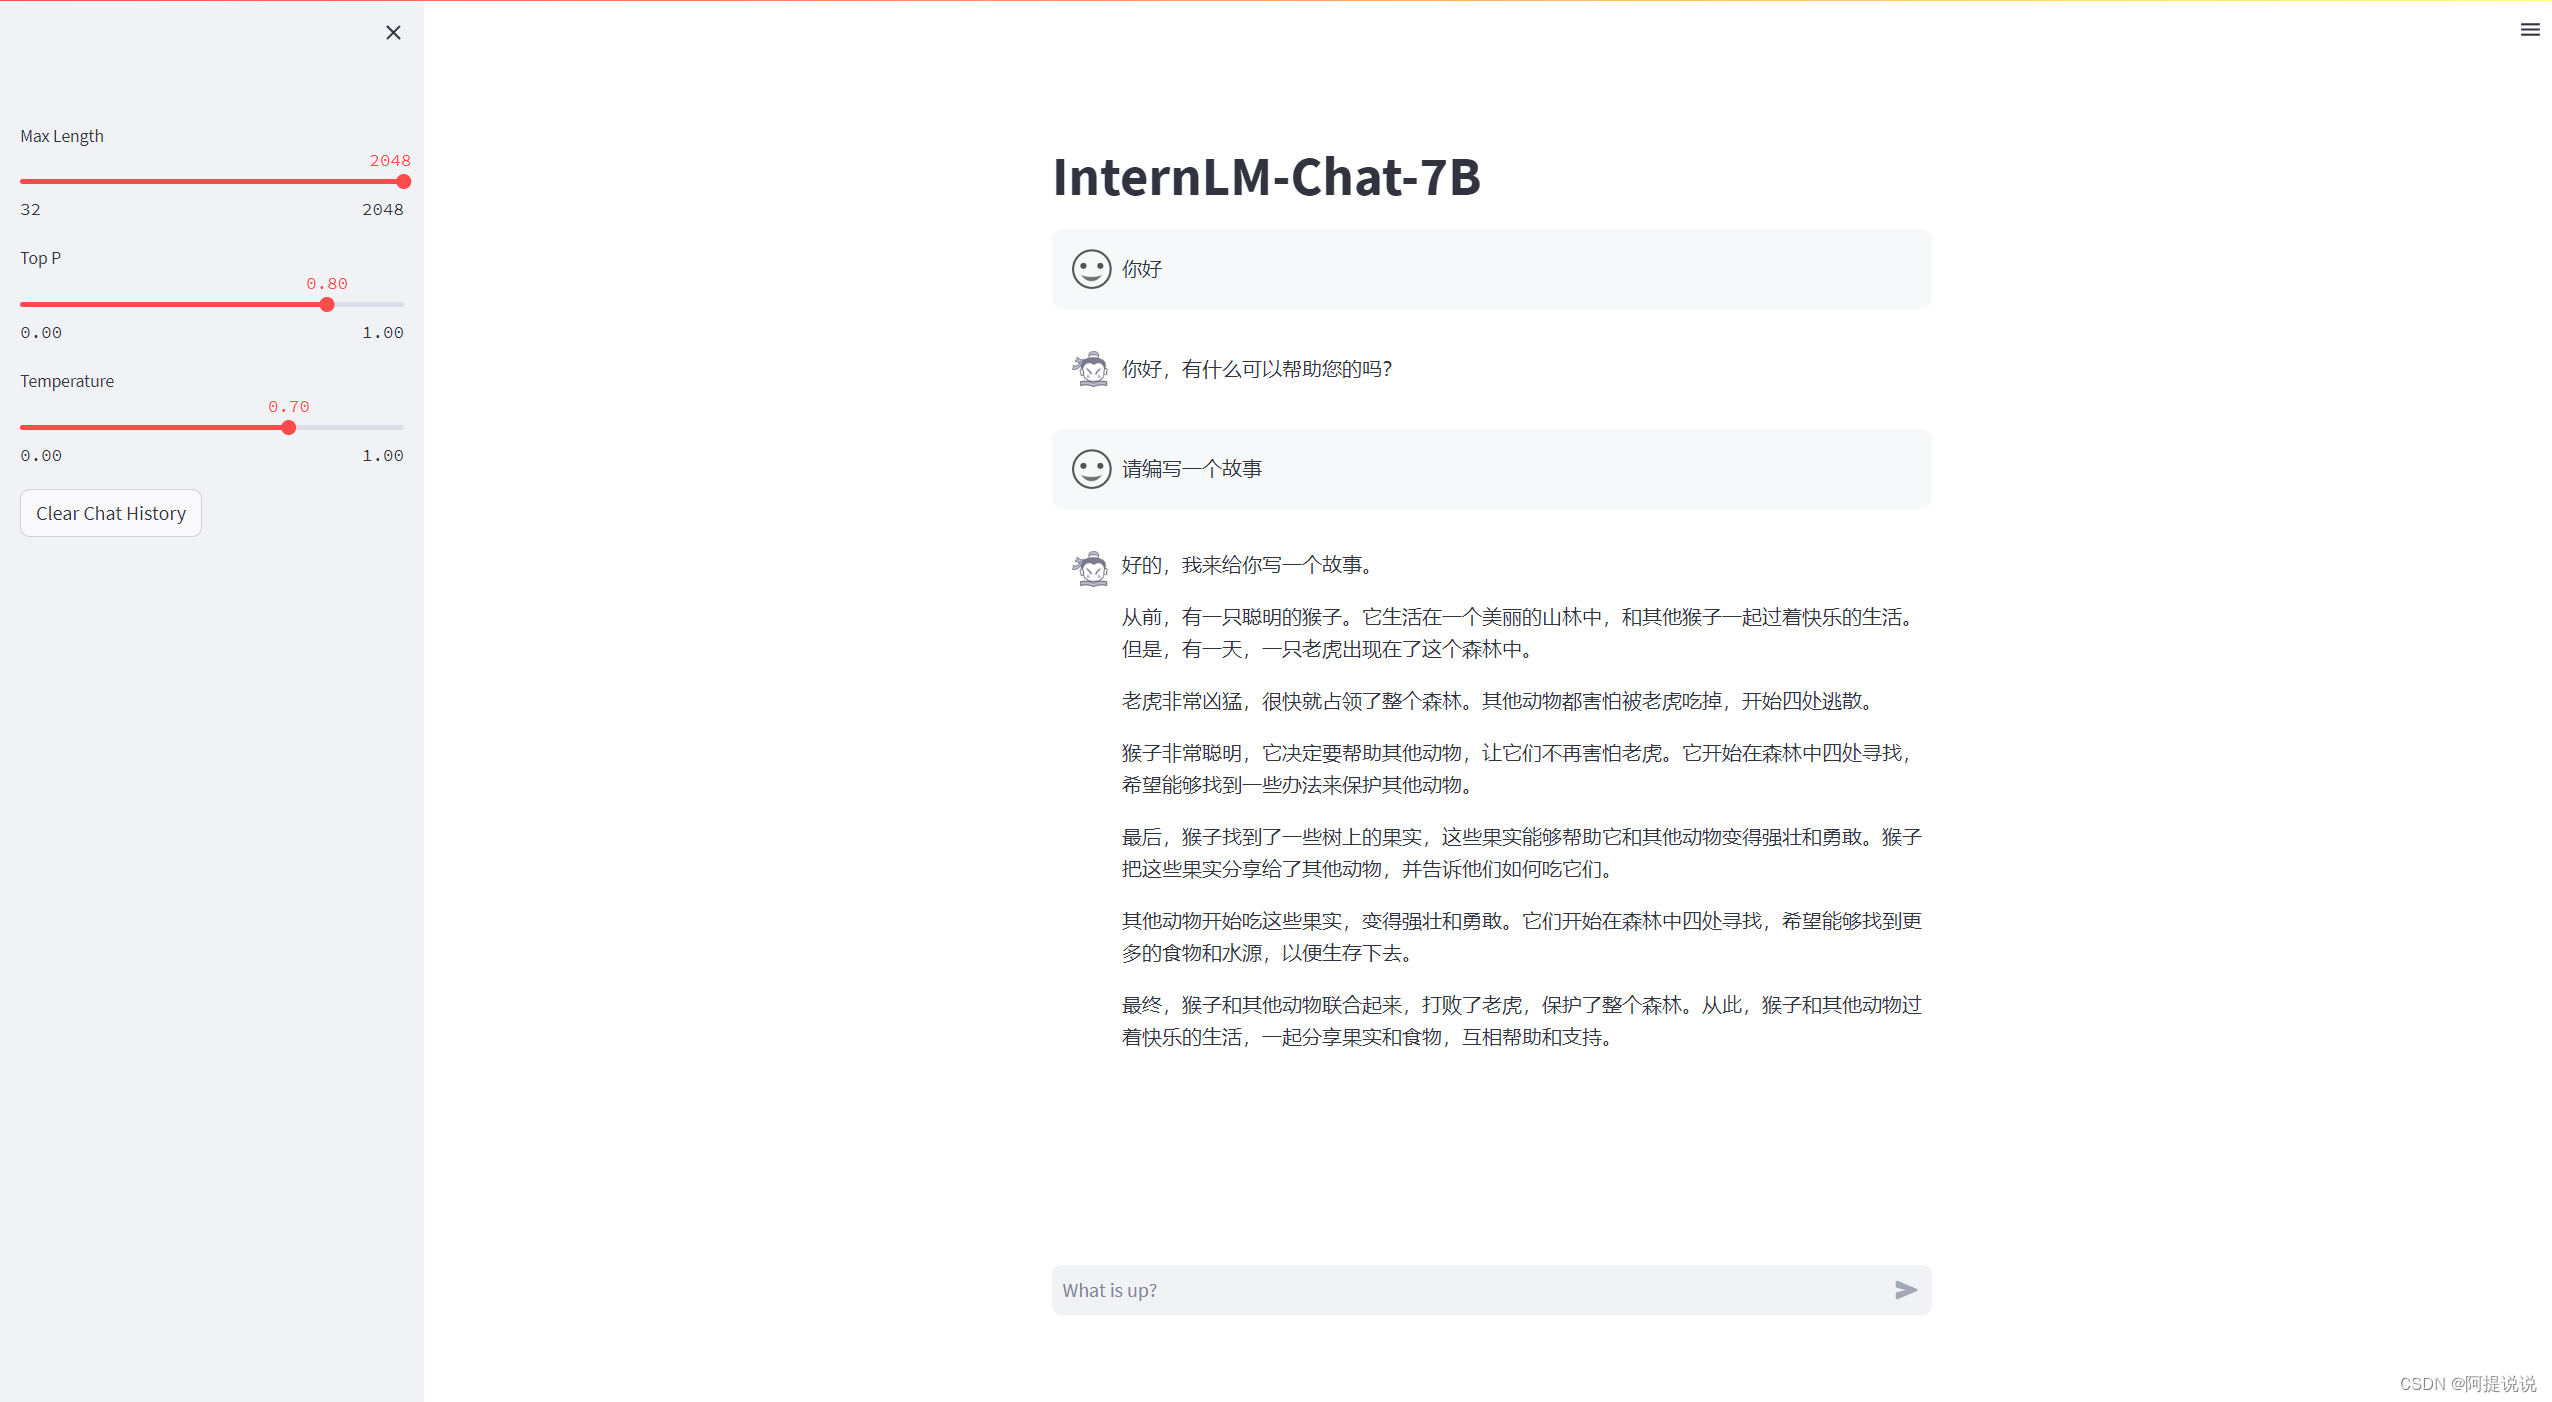
在加載完模型之后,就可以與 InternLM-Chat-7B 進行對話了,如下圖所示:
Lagent 智能體工具調用 Demo
我們將使用 InternStudio 中的 A100(1/4) 機器、InternLM-Chat-7B 模型和 Lagent 框架部署一個智能工具調用 Demo。
Lagent 是一個輕量級、開源的基于大語言模型的智能體(agent)框架,支持用戶快速地將一個大語言模型轉變為多種類型的智能體,并提供了一些典型工具為大語言模型賦能。通過 Lagent 框架可以更好的發揮 InternLM 的全部性能。
下面我們就開始動手實現!
環境準備
選擇和第一個 InternLM 一樣的鏡像環境,運行以下命令安裝依賴,如果上一個 InternLM-Chat-7B 已經配置好環境不需要重復安裝.
# 升級pip
python -m pip install --upgrade pippip install modelscope==1.9.5
pip install transformers==4.35.2
pip install streamlit==1.24.0
pip install sentencepiece==0.1.99
pip install accelerate==0.24.1
模型下載
InternStudio 平臺的 share 目錄下已經為我們準備了全系列的 InternLM 模型,所以我們可以直接復制即可。使用如下命令復制:
mkdir -p /root/model/Shanghai_AI_Laboratory
cp -r /root/share/temp/model_repos/internlm-chat-7b /root/model/Shanghai_AI_Laboratory
-r 選項表示遞歸地復制目錄及其內容
也可以在 /root/model 路徑下新建 download.py 文件并在其中輸入以下內容,并運行 python /root/model/download.py 執行下載,模型大小為 14 GB,下載模型大概需要 10~20 分鐘
import torch
from modelscope import snapshot_download, AutoModel, AutoTokenizer
import os
model_dir = snapshot_download('Shanghai_AI_Laboratory/internlm-chat-7b', cache_dir='/root/model', revision='v1.0.3')
Lagent 安裝
首先切換路徑到 /root/code 克隆 lagent 倉庫,并通過 pip install -e . 源碼安裝 Lagent
cd /root/code
git clone https://gitee.com/internlm/lagent.git
cd /root/code/lagent
git checkout 511b03889010c4811b1701abb153e02b8e94fb5e # 盡量保證和教程commit版本一致
pip install -e . # 源碼安裝
修改代碼
由于代碼修改的地方比較多,大家直接將 /root/code/lagent/examples/react_web_demo.py 內容替換為以下代碼
import copy
import osimport streamlit as st
from streamlit.logger import get_loggerfrom lagent.actions import ActionExecutor, GoogleSearch, PythonInterpreter
from lagent.agents.react import ReAct
from lagent.llms import GPTAPI
from lagent.llms.huggingface import HFTransformerCasualLMclass SessionState:def init_state(self):"""Initialize session state variables."""st.session_state['assistant'] = []st.session_state['user'] = []#action_list = [PythonInterpreter(), GoogleSearch()]action_list = [PythonInterpreter()]st.session_state['plugin_map'] = {action.name: actionfor action in action_list}st.session_state['model_map'] = {}st.session_state['model_selected'] = Nonest.session_state['plugin_actions'] = set()def clear_state(self):"""Clear the existing session state."""st.session_state['assistant'] = []st.session_state['user'] = []st.session_state['model_selected'] = Noneif 'chatbot' in st.session_state:st.session_state['chatbot']._session_history = []class StreamlitUI:def __init__(self, session_state: SessionState):self.init_streamlit()self.session_state = session_statedef init_streamlit(self):"""Initialize Streamlit's UI settings."""st.set_page_config(layout='wide',page_title='lagent-web',page_icon='./docs/imgs/lagent_icon.png')# st.header(':robot_face: :blue[Lagent] Web Demo ', divider='rainbow')st.sidebar.title('模型控制')def setup_sidebar(self):"""Setup the sidebar for model and plugin selection."""model_name = st.sidebar.selectbox('模型選擇:', options=['gpt-3.5-turbo','internlm'])if model_name != st.session_state['model_selected']:model = self.init_model(model_name)self.session_state.clear_state()st.session_state['model_selected'] = model_nameif 'chatbot' in st.session_state:del st.session_state['chatbot']else:model = st.session_state['model_map'][model_name]plugin_name = st.sidebar.multiselect('插件選擇',options=list(st.session_state['plugin_map'].keys()),default=[list(st.session_state['plugin_map'].keys())[0]],)plugin_action = [st.session_state['plugin_map'][name] for name in plugin_name]if 'chatbot' in st.session_state:st.session_state['chatbot']._action_executor = ActionExecutor(actions=plugin_action)if st.sidebar.button('清空對話', key='clear'):self.session_state.clear_state()uploaded_file = st.sidebar.file_uploader('上傳文件', type=['png', 'jpg', 'jpeg', 'mp4', 'mp3', 'wav'])return model_name, model, plugin_action, uploaded_filedef init_model(self, option):"""Initialize the model based on the selected option."""if option not in st.session_state['model_map']:if option.startswith('gpt'):st.session_state['model_map'][option] = GPTAPI(model_type=option)else:st.session_state['model_map'][option] = HFTransformerCasualLM('/root/model/Shanghai_AI_Laboratory/internlm-chat-7b')return st.session_state['model_map'][option]def initialize_chatbot(self, model, plugin_action):"""Initialize the chatbot with the given model and plugin actions."""return ReAct(llm=model, action_executor=ActionExecutor(actions=plugin_action))def render_user(self, prompt: str):with st.chat_message('user'):st.markdown(prompt)def render_assistant(self, agent_return):with st.chat_message('assistant'):for action in agent_return.actions:if (action):self.render_action(action)st.markdown(agent_return.response)def render_action(self, action):with st.expander(action.type, expanded=True):st.markdown("<p style='text-align: left;display:flex;'> <span style='font-size:14px;font-weight:600;width:70px;text-align-last: justify;'>插    件</span><span style='width:14px;text-align:left;display:block;'>:</span><span style='flex:1;'>"  # noqa E501+ action.type + '</span></p>',unsafe_allow_html=True)st.markdown("<p style='text-align: left;display:flex;'> <span style='font-size:14px;font-weight:600;width:70px;text-align-last: justify;'>思考步驟</span><span style='width:14px;text-align:left;display:block;'>:</span><span style='flex:1;'>"  # noqa E501+ action.thought + '</span></p>',unsafe_allow_html=True)if (isinstance(action.args, dict) and 'text' in action.args):st.markdown("<p style='text-align: left;display:flex;'><span style='font-size:14px;font-weight:600;width:70px;text-align-last: justify;'> 執行內容</span><span style='width:14px;text-align:left;display:block;'>:</span></p>",  # noqa E501unsafe_allow_html=True)st.markdown(action.args['text'])self.render_action_results(action)def render_action_results(self, action):"""Render the results of action, including text, images, videos, andaudios."""if (isinstance(action.result, dict)):st.markdown("<p style='text-align: left;display:flex;'><span style='font-size:14px;font-weight:600;width:70px;text-align-last: justify;'> 執行結果</span><span style='width:14px;text-align:left;display:block;'>:</span></p>",  # noqa E501unsafe_allow_html=True)if 'text' in action.result:st.markdown("<p style='text-align: left;'>" + action.result['text'] +'</p>',unsafe_allow_html=True)if 'image' in action.result:image_path = action.result['image']image_data = open(image_path, 'rb').read()st.image(image_data, caption='Generated Image')if 'video' in action.result:video_data = action.result['video']video_data = open(video_data, 'rb').read()st.video(video_data)if 'audio' in action.result:audio_data = action.result['audio']audio_data = open(audio_data, 'rb').read()st.audio(audio_data)def main():logger = get_logger(__name__)# Initialize Streamlit UI and setup sidebarif 'ui' not in st.session_state:session_state = SessionState()session_state.init_state()st.session_state['ui'] = StreamlitUI(session_state)else:st.set_page_config(layout='wide',page_title='lagent-web',page_icon='./docs/imgs/lagent_icon.png')# st.header(':robot_face: :blue[Lagent] Web Demo ', divider='rainbow')model_name, model, plugin_action, uploaded_file = st.session_state['ui'].setup_sidebar()# Initialize chatbot if it is not already initialized# or if the model has changedif 'chatbot' not in st.session_state or model != st.session_state['chatbot']._llm:st.session_state['chatbot'] = st.session_state['ui'].initialize_chatbot(model, plugin_action)for prompt, agent_return in zip(st.session_state['user'],st.session_state['assistant']):st.session_state['ui'].render_user(prompt)st.session_state['ui'].render_assistant(agent_return)# User input form at the bottom (this part will be at the bottom)# with st.form(key='my_form', clear_on_submit=True):if user_input := st.chat_input(''):st.session_state['ui'].render_user(user_input)st.session_state['user'].append(user_input)# Add file uploader to sidebarif uploaded_file:file_bytes = uploaded_file.read()file_type = uploaded_file.typeif 'image' in file_type:st.image(file_bytes, caption='Uploaded Image')elif 'video' in file_type:st.video(file_bytes, caption='Uploaded Video')elif 'audio' in file_type:st.audio(file_bytes, caption='Uploaded Audio')# Save the file to a temporary location and get the pathfile_path = os.path.join(root_dir, uploaded_file.name)with open(file_path, 'wb') as tmpfile:tmpfile.write(file_bytes)st.write(f'File saved at: {file_path}')user_input = '我上傳了一個圖像,路徑為: {file_path}. {user_input}'.format(file_path=file_path, user_input=user_input)agent_return = st.session_state['chatbot'].chat(user_input)st.session_state['assistant'].append(copy.deepcopy(agent_return))logger.info(agent_return.inner_steps)st.session_state['ui'].render_assistant(agent_return)if __name__ == '__main__':root_dir = os.path.dirname(os.path.dirname(os.path.abspath(__file__)))root_dir = os.path.join(root_dir, 'tmp_dir')os.makedirs(root_dir, exist_ok=True)main()
Demo 運行
streamlit run /root/code/lagent/examples/react_web_demo.py --server.address 127.0.0.1 --server.port 6006
用同樣的方法我們依然切換到 VScode 頁面,運行成功后,查看本教程配置本地端口后,將端口映射到本地。在本地瀏覽器輸入 http://127.0.0.1:6006 即可。
我們在 Web 頁面選擇 InternLM 模型,等待模型加載完畢后,輸入數學問題 已知 2x+3=10,求x ,此時 InternLM-Chat-7B 模型理解題意生成解此題的 Python 代碼,Lagent 調度送入 Python 代碼解釋器求出該問題的解。

浦語·靈筆圖文理解創作 Demo
我們將使用 InternStudio 中的 A100(1/4) * 2 機器和 internlm-xcomposer-7b 模型部署一個圖文理解創作 Demo 。
環境準備
首先在 InternStudio 上選擇 A100(1/4)*2 的配置。如下圖所示:
接下來打開剛剛租用服務器的 進入開發機,并在終端輸入 bash 命令,進入 conda 環境,接下來就是安裝依賴。
進入 conda 環境之后,使用以下命令從本地克隆一個已有的pytorch 2.0.1 的環境
/root/share/install_conda_env_internlm_base.sh xcomposer-demo
然后使用以下命令激活環境
conda activate xcomposer-demo
接下來運行以下命令,安裝 transformers、gradio 等依賴包。請嚴格安裝以下版本安裝!
pip install transformers==4.33.1 timm==0.4.12 sentencepiece==0.1.99 gradio==3.44.4 markdown2==2.4.10 xlsxwriter==3.1.2 einops accelerate
模型下載
InternStudio平臺的 share 目錄下已經為我們準備了全系列的 InternLM 模型,所以我們可以直接復制即可。使用如下命令復制:
mkdir -p /root/model/Shanghai_AI_Laboratory
cp -r /root/share/temp/model_repos/internlm-xcomposer-7b /root/model/Shanghai_AI_Laboratory
-r 選項表示遞歸地復制目錄及其內容
也可以安裝 modelscope,下載模型的老朋友了
pip install modelscope==1.9.5
在 /root/model 路徑下新建 download.py 文件并在其中輸入以下內容,并運行 python /root/model/download.py 執行下載
import torch
from modelscope import snapshot_download, AutoModel, AutoTokenizer
import os
model_dir = snapshot_download('Shanghai_AI_Laboratory/internlm-xcomposer-7b', cache_dir='/root/model', revision='master')
代碼準備
在 /root/code目錄 git clone InternLM-XComposer 倉庫的代碼
cd /root/code
git clone https://gitee.com/internlm/InternLM-XComposer.git
cd /root/code/InternLM-XComposer
git checkout 3e8c79051a1356b9c388a6447867355c0634932d  # 最好保證和教程的 commit 版本一致
Demo 運行
在終端運行以下代碼:
cd /root/code/InternLM-XComposer
python examples/web_demo.py  \--folder /root/model/Shanghai_AI_Laboratory/internlm-xcomposer-7b \--num_gpus 1 \--port 6006
這里 num_gpus 1 是因為InternStudio平臺對于 A100(1/4)*2 識別仍為一張顯卡。但如果有小伙伴課后使用兩張 3090 來運行此 demo,仍需將 num_gpus 設置為 2 。
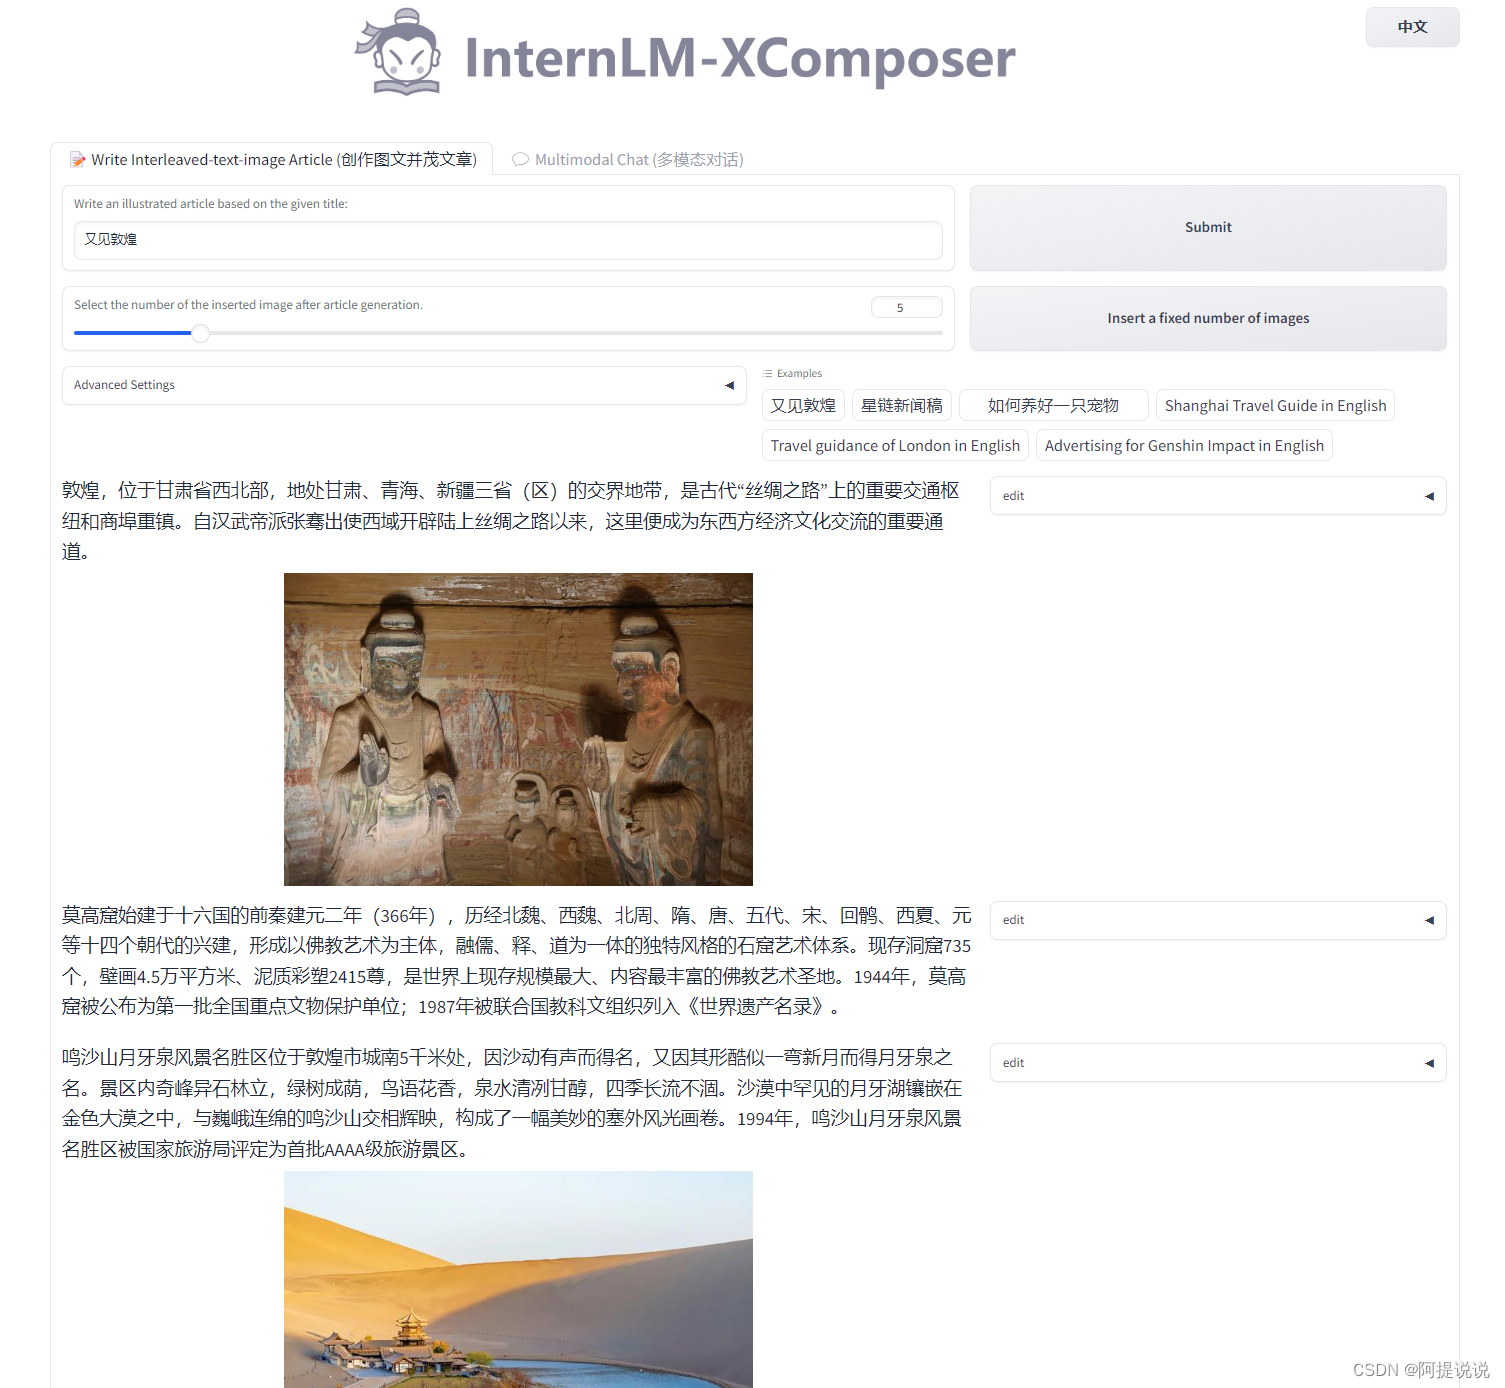
將端口映射到本地。在本地瀏覽器輸入 http://127.0.0.1:6006 即可。我們以又見敦煌為提示詞,體驗圖文創作的功能,如下圖所示:
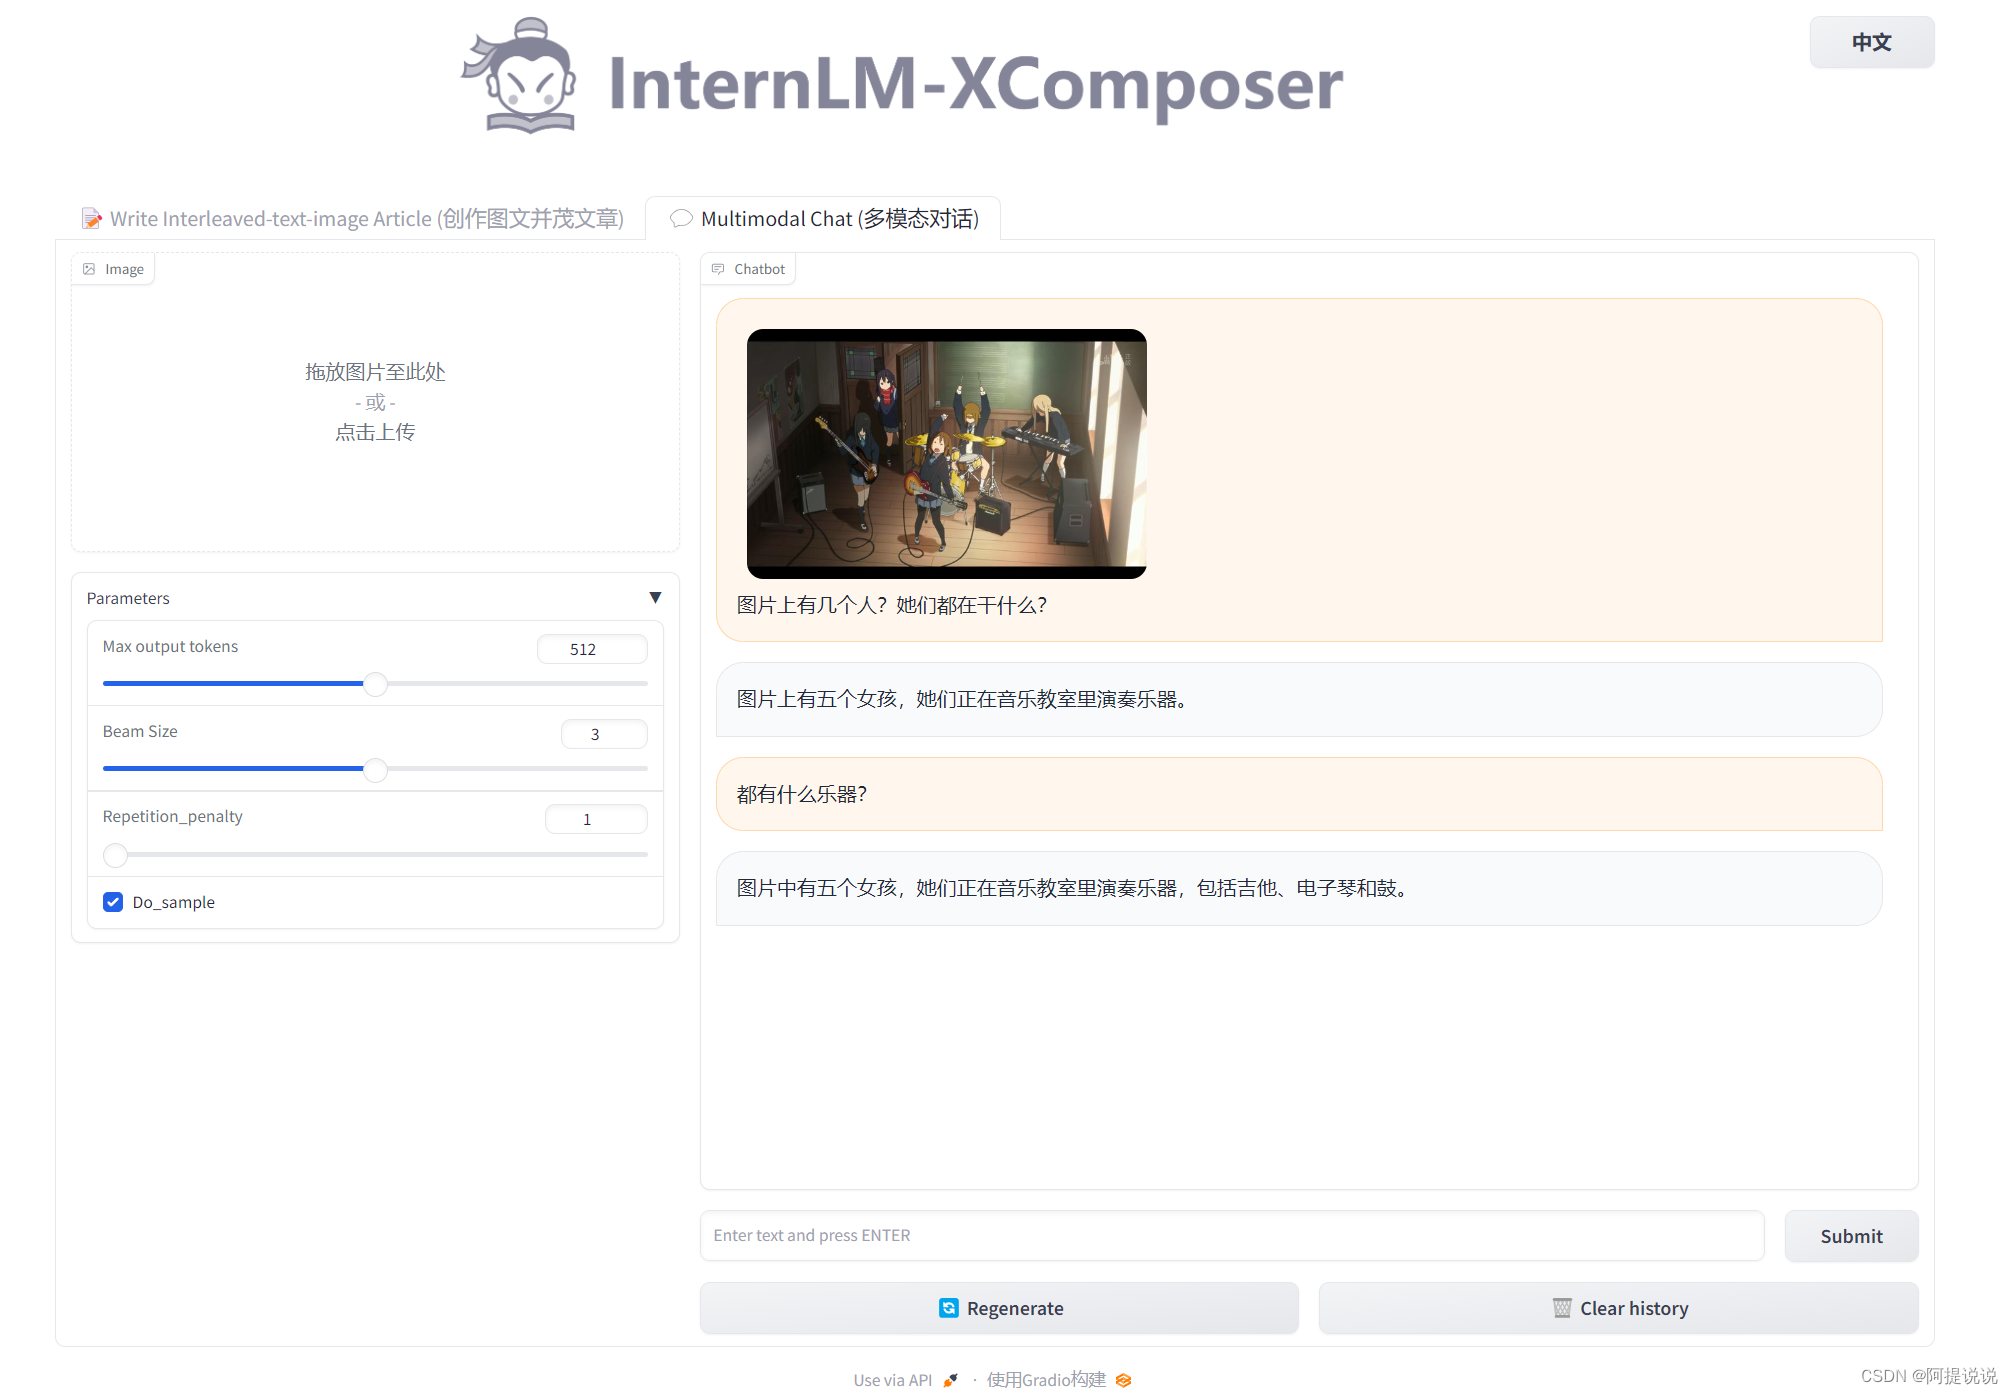
接下來,我們可以體驗一下圖片理解的能力,如下所示~
通用環境配置
pip、conda 換源
更多詳細內容可移步至 MirrorZ Help 查看。
pip 換源
臨時使用鏡像源安裝,如下所示:some-package 為你需要安裝的包名
pip install -i https://mirrors.cernet.edu.cn/pypi/web/simple some-package
設置pip默認鏡像源,升級 pip 到最新的版本 (>=10.0.0) 后進行配置,如下所示:
python -m pip install --upgrade pip
pip config set global.index-url https://mirrors.cernet.edu.cn/pypi/web/simple
如果您的 pip 默認源的網絡連接較差,臨時使用鏡像源升級 pip:
python -m pip install -i https://mirrors.cernet.edu.cn/pypi/web/simple --upgrade pip
conda 換源
鏡像站提供了 Anaconda 倉庫與第三方源(conda-forge、msys2、pytorch 等),各系統都可以通過修改用戶目錄下的 .condarc 文件來使用鏡像站。
不同系統下的 .condarc 目錄如下:
Linux:${HOME}/.condarcmacOS:${HOME}/.condarcWindows:C:\Users\<YourUserName>\.condarc
注意:
Windows用戶無法直接創建名為.condarc的文件,可先執行conda config --set show_channel_urls yes生成該文件之后再修改。
快速配置
cat <<'EOF' > ~/.condarc
channels:- defaults
show_channel_urls: true
default_channels:- https://mirrors.tuna.tsinghua.edu.cn/anaconda/pkgs/main- https://mirrors.tuna.tsinghua.edu.cn/anaconda/pkgs/r- https://mirrors.tuna.tsinghua.edu.cn/anaconda/pkgs/msys2
custom_channels:conda-forge: https://mirrors.tuna.tsinghua.edu.cn/anaconda/cloudpytorch: https://mirrors.tuna.tsinghua.edu.cn/anaconda/cloud
EOF
配置本地端口
由于服務器通常只暴露了用于安全遠程登錄的 SSH(Secure Shell)端口,如果需要訪問服務器上運行的其他服務(如 web 應用)的特定端口,需要一種特殊的設置。我們可以通過使用SSH隧道的方法,將服務器上的這些特定端口映射到本地計算機的端口。這樣做的步驟如下:
首先我們需要配置一下本地的 SSH Key ,我們這里以 Windows 為例。
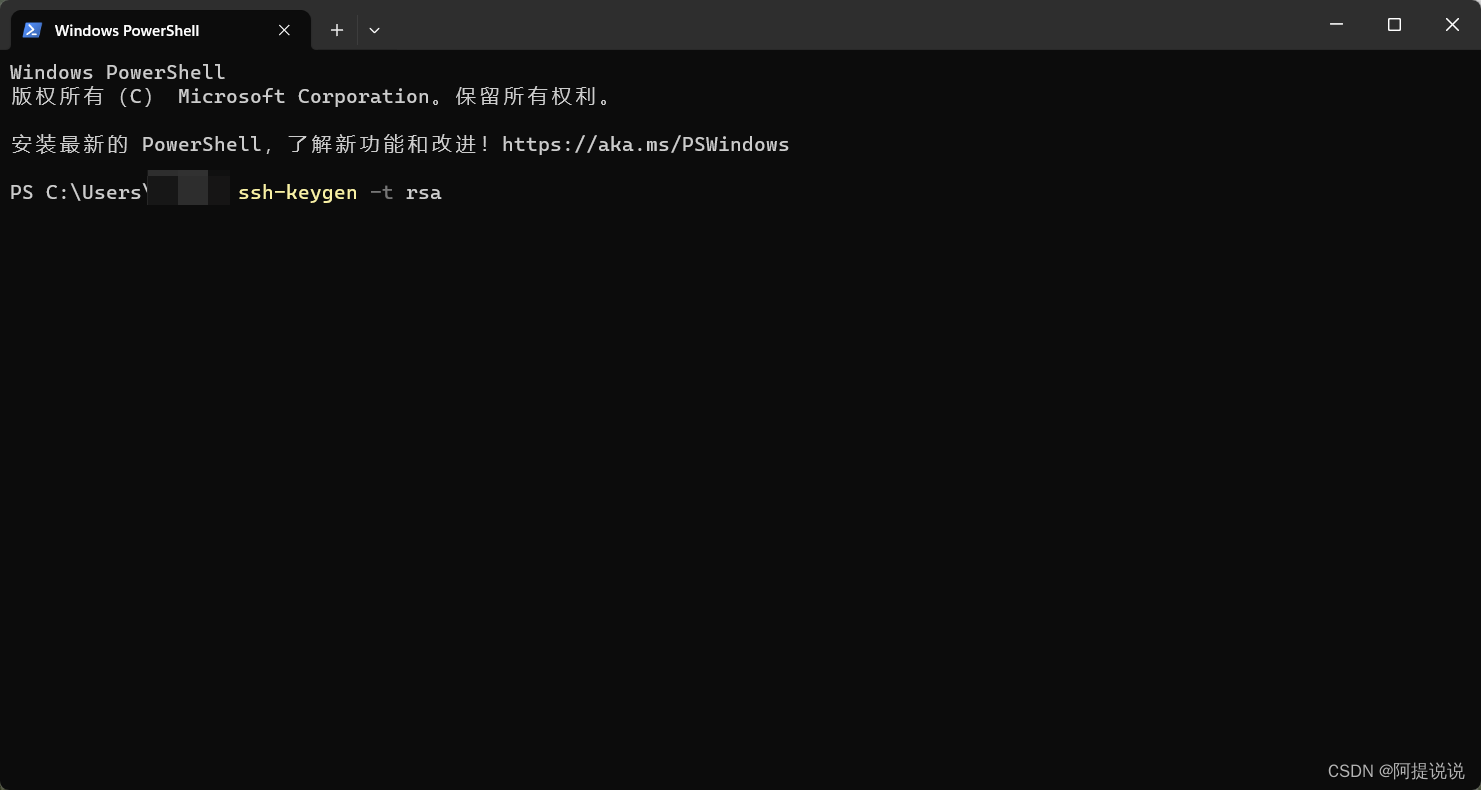
步驟①:在本地機器上打開 Power Shell 終端。在終端中,運行以下命令來生成 SSH 密鑰對:(如下圖所示)
ssh-keygen -t rsa
步驟②: 您將被提示選擇密鑰文件的保存位置,默認情況下是在 ~/.ssh/ 目錄中。按 Enter 鍵接受默認值或輸入自定義路徑。
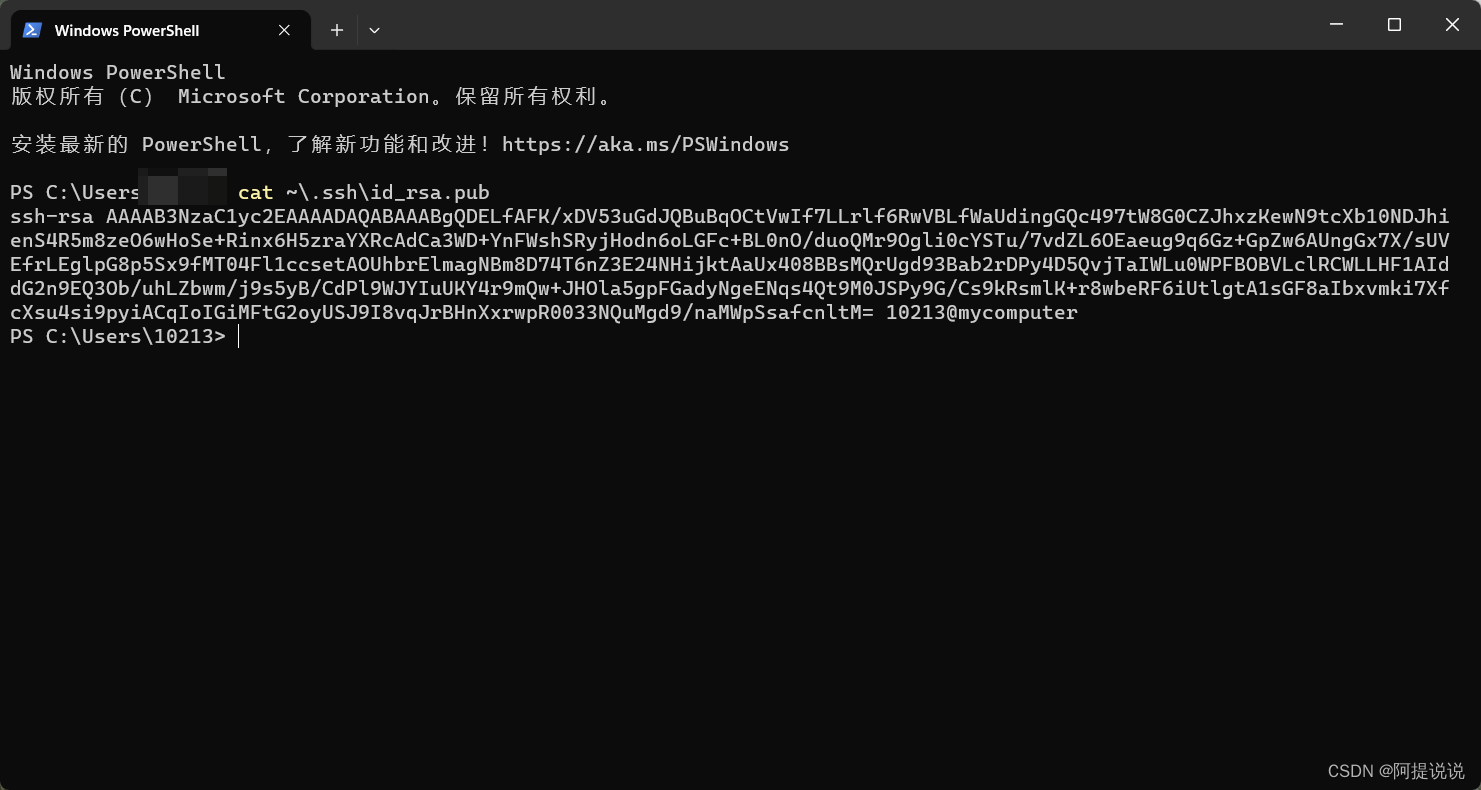
步驟③:公鑰默認存儲在 ~/.ssh/id_rsa.pub,可以通過系統自帶的 cat 工具查看文件內容:(如下圖所示)
cat ~\.ssh\id_rsa.pub
~是用戶主目錄的簡寫,.ssh是SSH配置文件的默認存儲目錄,id_rsa.pub是 SSH 公鑰文件的默認名稱。所以,cat ~\.ssh\id_rsa.pub的意思是查看用戶主目錄下的.ssh目錄中的id_rsa.pub文件的內容。
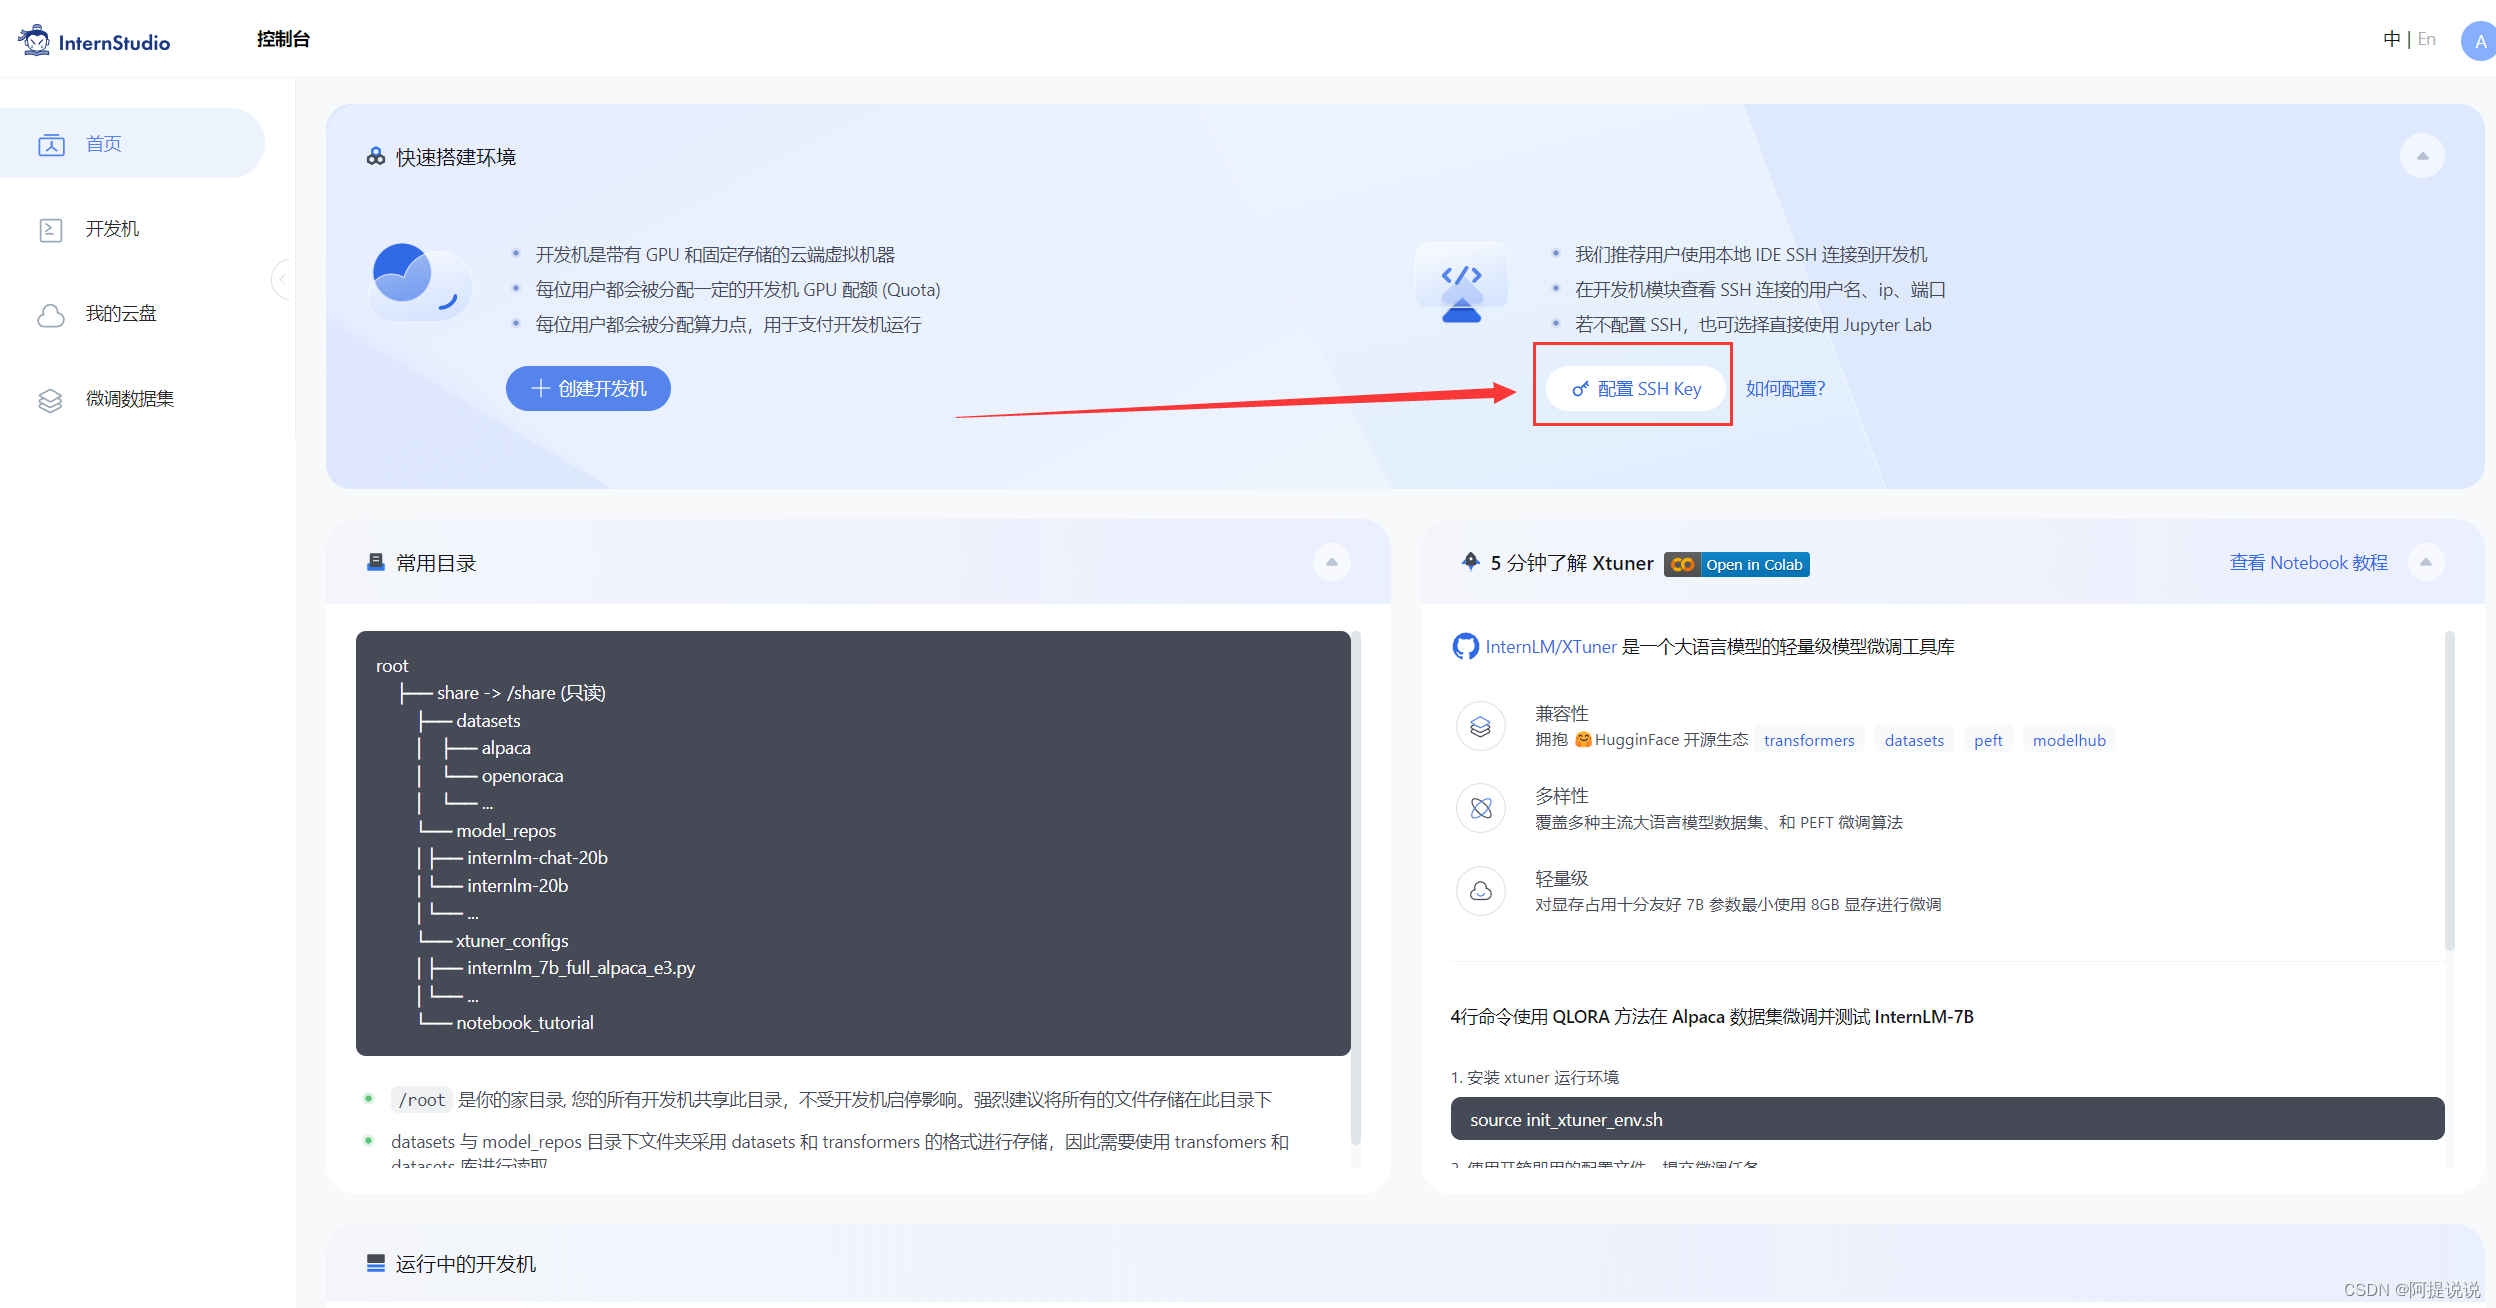
步驟④:將公鑰復制到剪貼板中,然后回到 InternStudio 控制臺,點擊配置 SSH Key。如下圖所示:
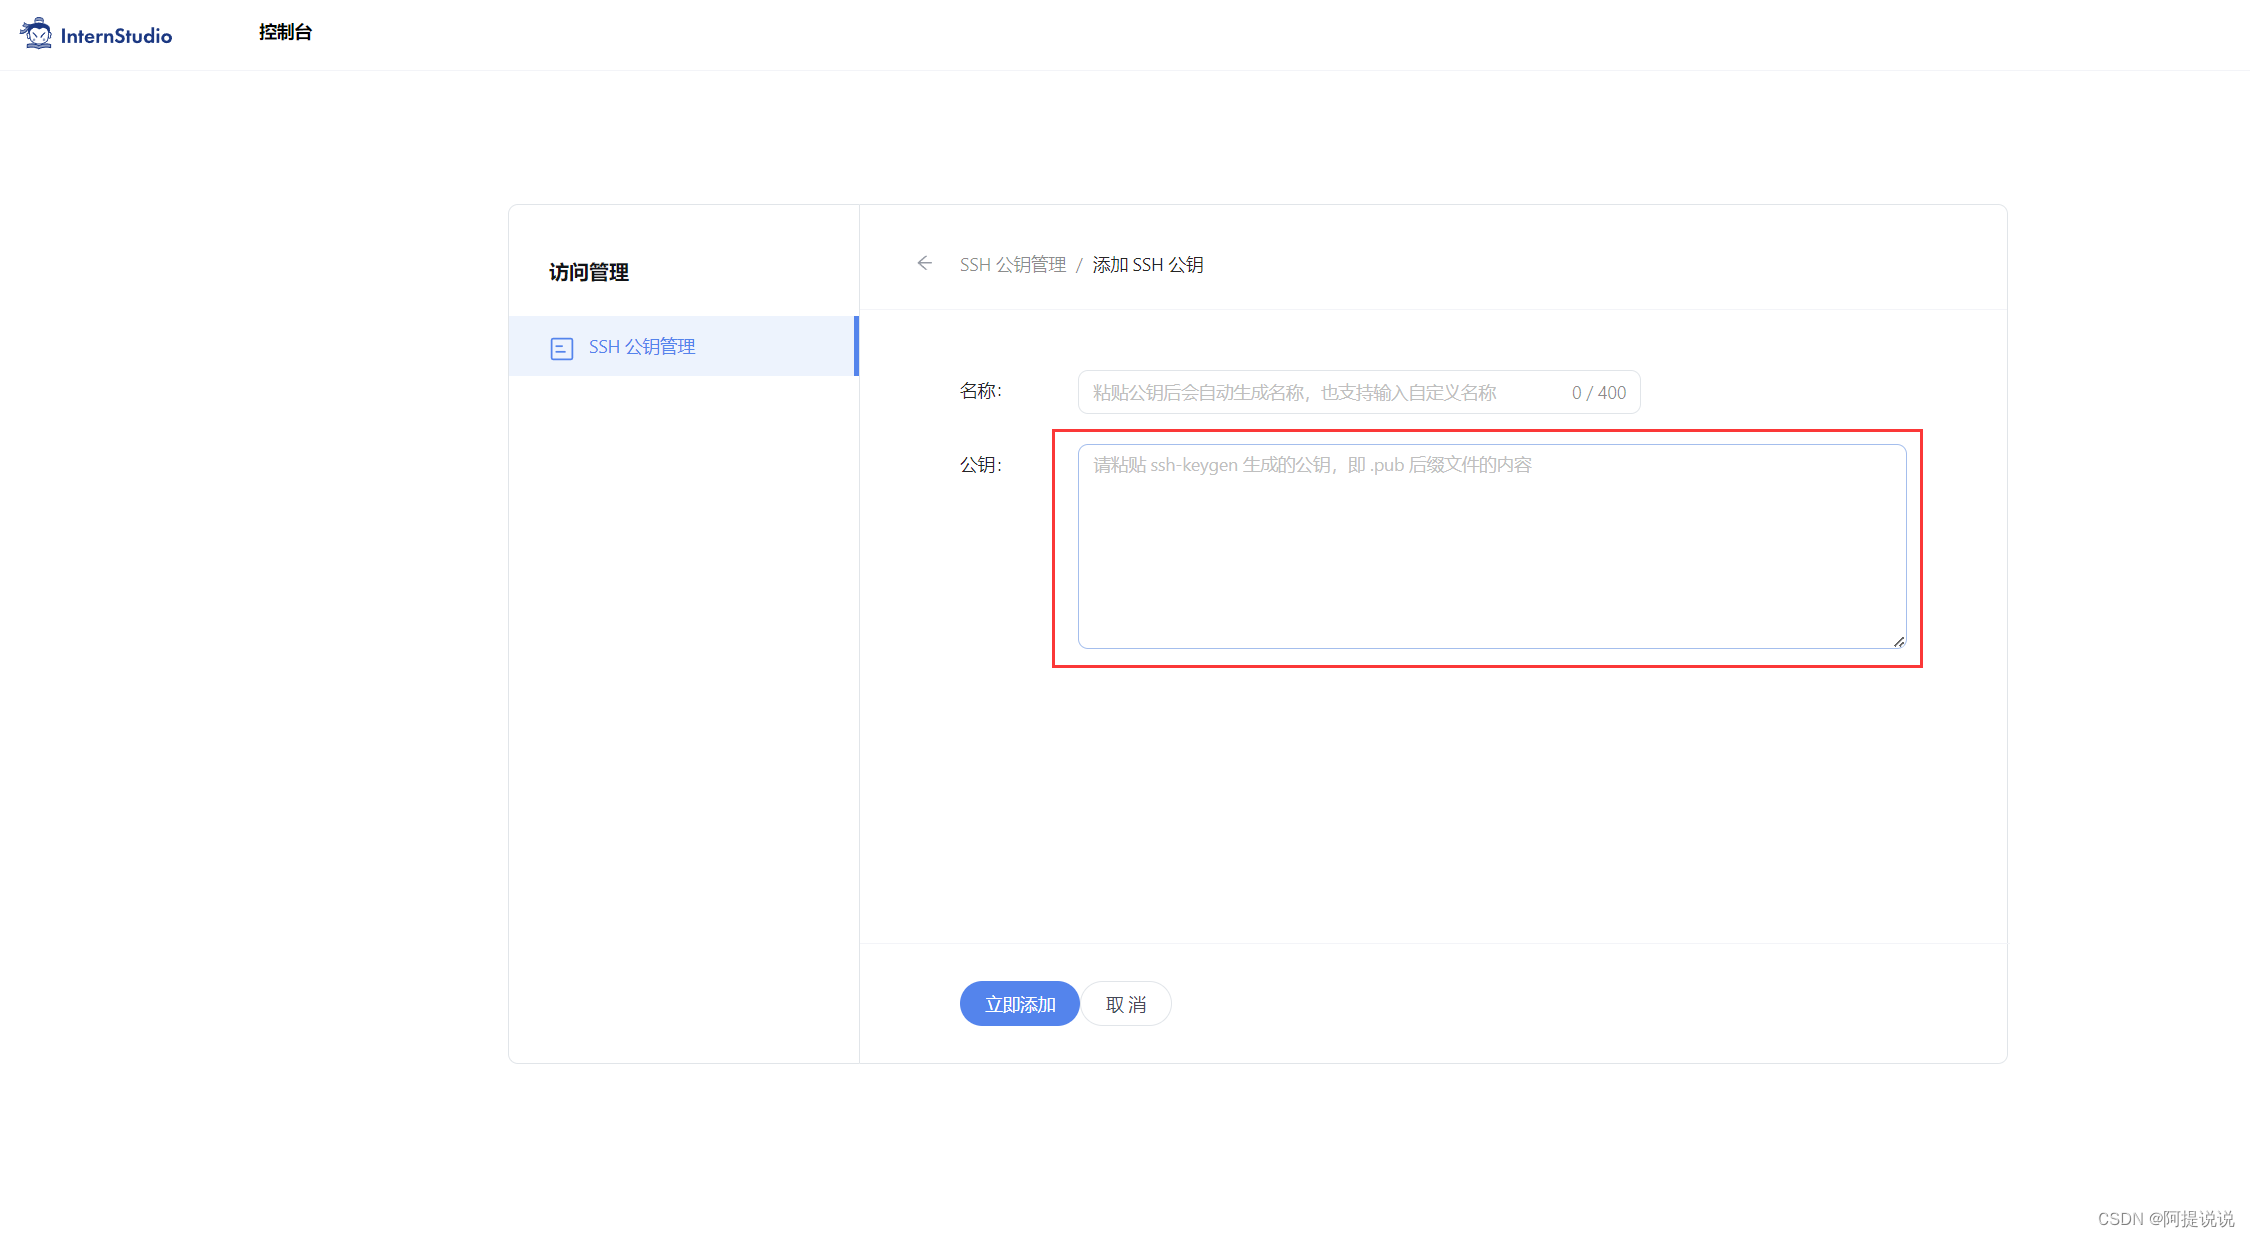
步驟⑤:將剛剛復制的公鑰添加進入即可。
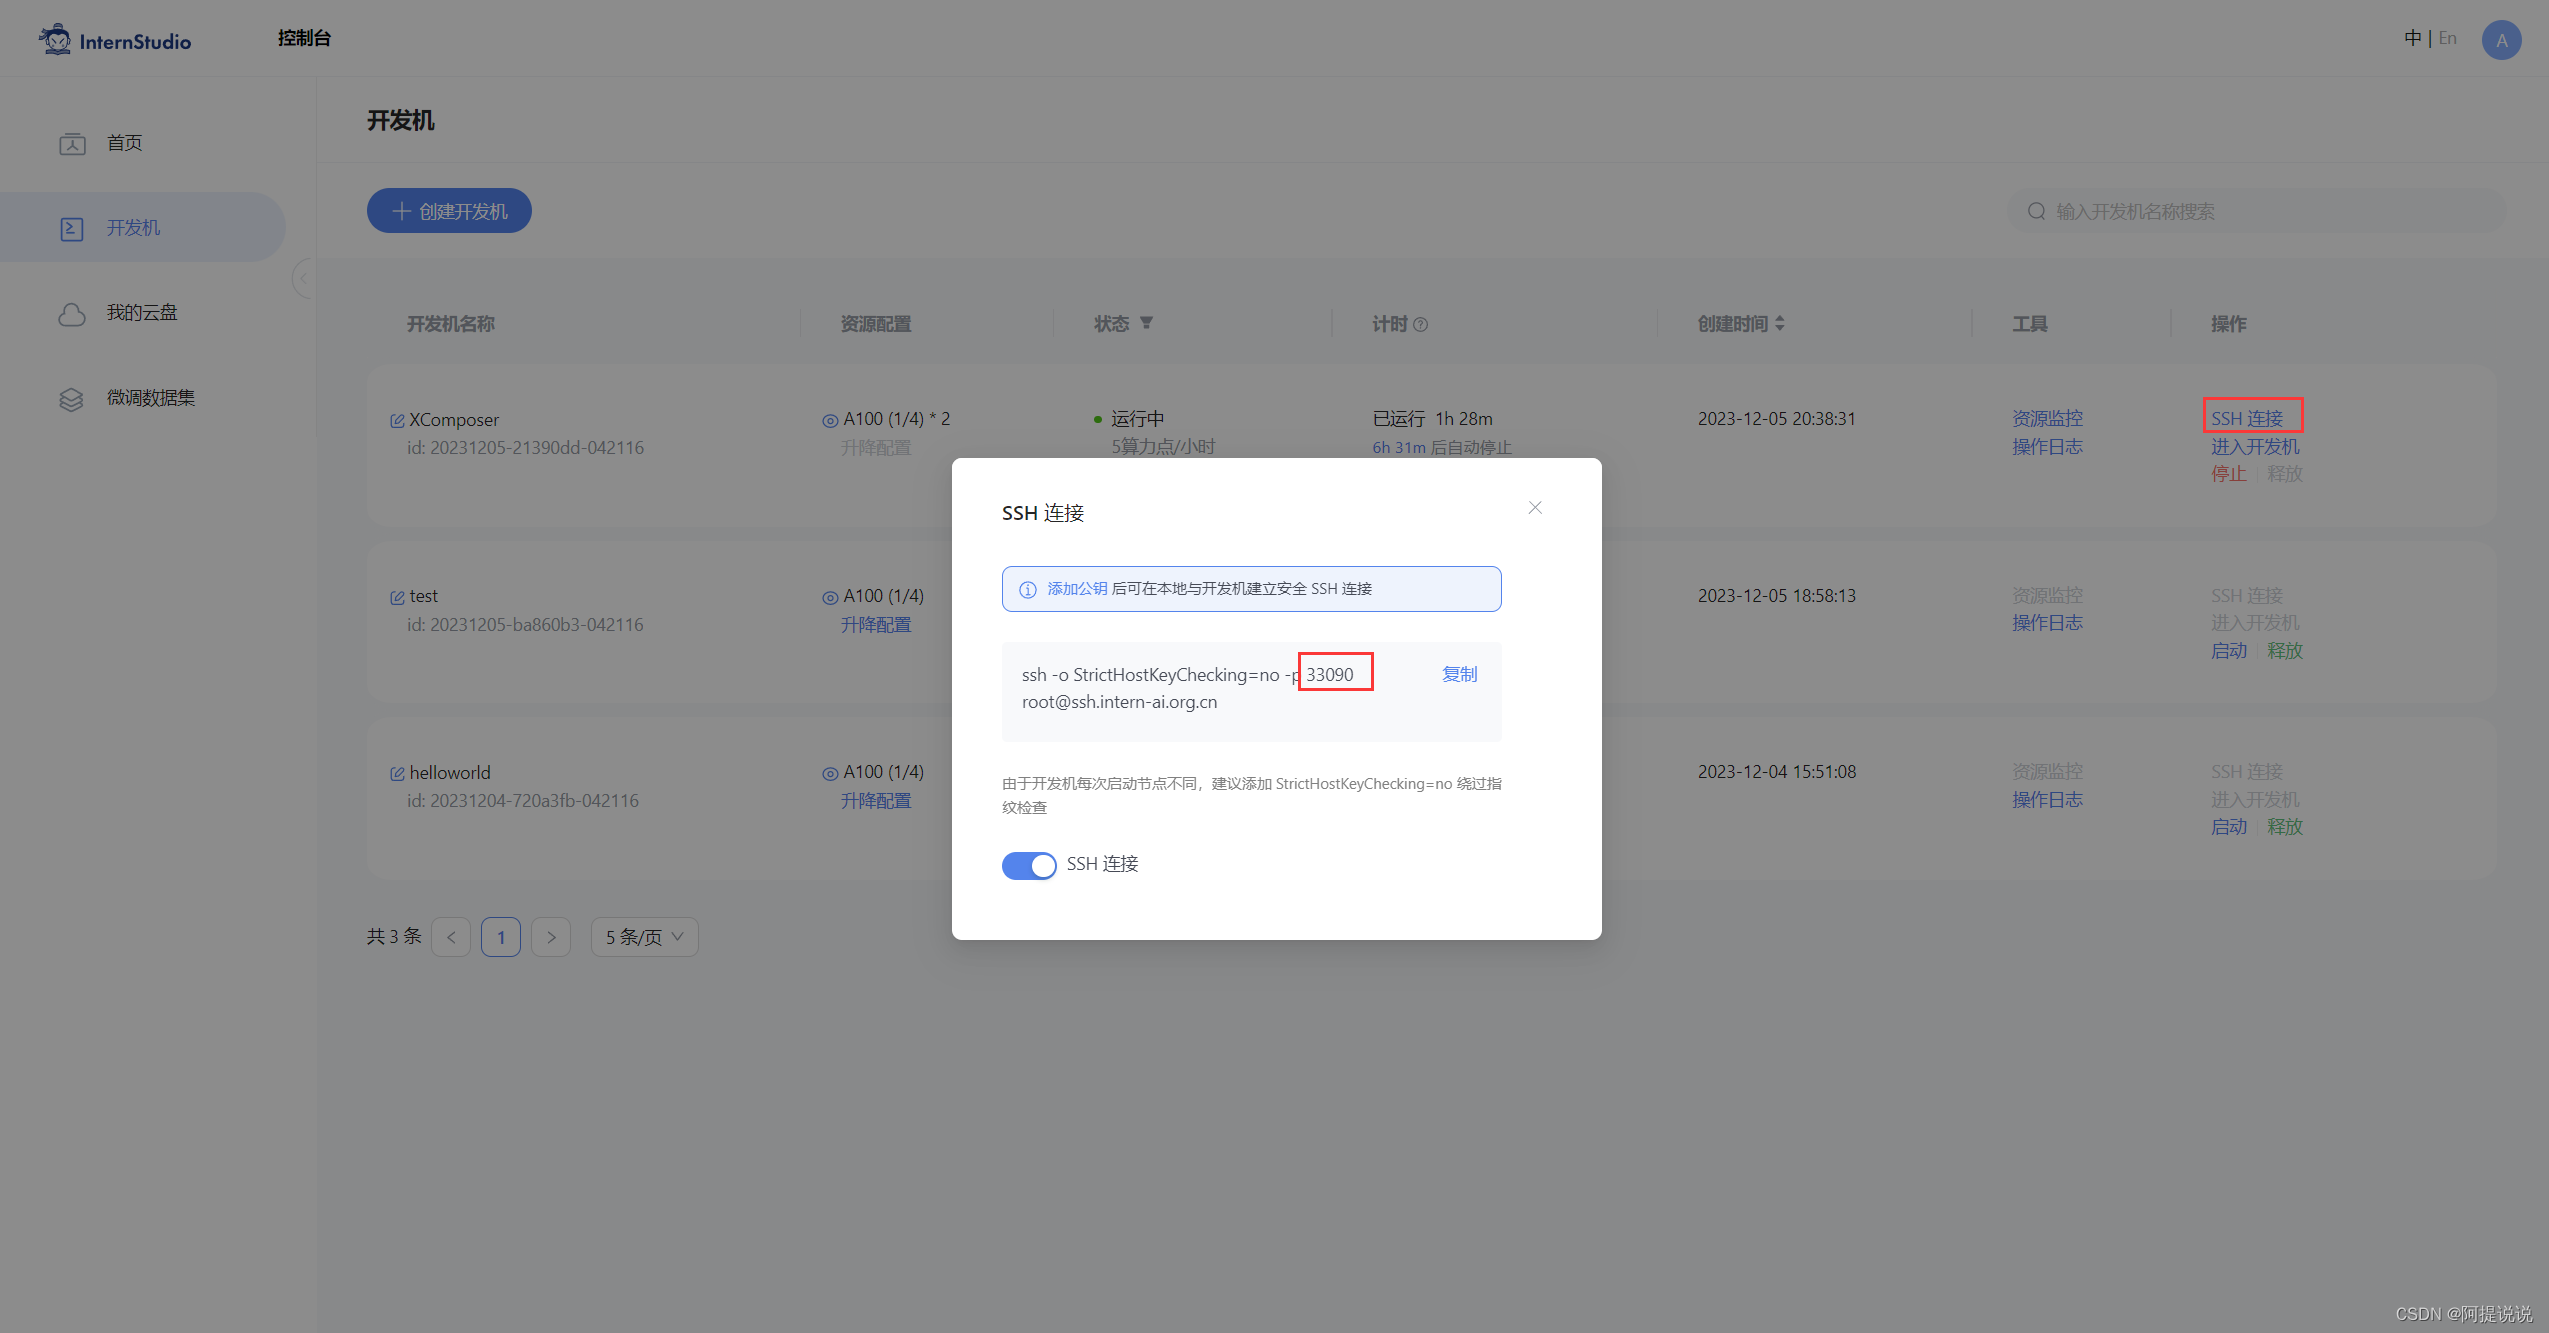
步驟⑥:在本地終端輸入以下指令 .6006 是在服務器中打開的端口,而 33090 是根據開發機的端口進行更改。如下圖所示:
ssh -CNg -L 6006:127.0.0.1:6006 root@ssh.intern-ai.org.cn -p 33090
模型下載
以下下載模型的操作不建議大家在開發機進行哦,在開發機下載模型會占用開發機的大量帶寬和內存,下載等待的時間也會比較長,不利于大家學習。大家可以在自己的本地電腦嘗試哦~
Hugging Face
使用 Hugging Face 官方提供的 huggingface-cli 命令行工具。安裝依賴:
pip install -U huggingface_hub
然后新建 python 文件,填入以下代碼,運行即可。
- resume-download:斷點續下
- local-dir:本地存儲路徑。(linux 環境下需要填寫絕對路徑)
import os# 下載模型
os.system('huggingface-cli download --resume-download internlm/internlm-chat-7b --local-dir your_path')
以下內容將展示使用 huggingface_hub 下載模型中的部分文件
import os
from huggingface_hub import hf_hub_download  # Load model directly hf_hub_download(repo_id="internlm/internlm-7b", filename="config.json")
ModelScope
使用 modelscope 中的 snapshot_download 函數下載模型,第一個參數為模型名稱,參數 cache_dir 為模型的下載路徑。
注意:cache_dir 最好為絕對路徑。
安裝依賴:
pip install modelscope==1.9.5
pip install transformers==4.35.2
在當前目錄下新建 python 文件,填入以下代碼,運行即可。
import torch
from modelscope import snapshot_download, AutoModel, AutoTokenizer
import os
model_dir = snapshot_download('Shanghai_AI_Laboratory/internlm-chat-7b', cache_dir='your path', revision='master')
OpenXLab
OpenXLab 可以通過指定模型倉庫的地址,以及需要下載的文件的名稱,文件所需下載的位置等,直接下載模型權重文件。
使用python腳本下載模型首先要安裝依賴,安裝代碼如下:pip install -U openxlab 安裝完成后使用 download 函數導入模型中心的模型。
from openxlab.model import download
download(model_repo='OpenLMLab/InternLM-7b', model_name='InternLM-7b', output='your local path')
作者其他不相干的專欄,也來看看:
- Prometheus+Grafana 實踐派
Prometheus來自CNCF的產品,云原生時代監控產品; Grafana是一款開源的指標可視化工具,擁有大量的插件和圖表工具來查詢,展示您的指標,本專欄從基礎知識開始學習,逐漸進階,最終實現企業級統一監控目標
- Loki + Tempo
一步步學習Grafana家族的輕量型聚合日志框架-Loki,鏈路追蹤框架-Tempo
- Spring Boot 3.x
Spring Boot 具有 Spring 一切優秀特性,Spring 能做的事,Spring Boot 都可以做,本專欄將全面介紹Spring Boot特性,繼而對其進行全面的源碼分析,不再犀牛望月,Spring Boot 版本:3.x
- Spring Security
使用Spring Security版本5.7.2
- Spring Boot Admin2
SBA2 源碼解析
- 阿提小作
作者平時心血來潮開發的小系統,都在運行玩了一段時間后停了
等等,還有其他很多

)


-- 繼承與異常)
)


)
