一、前言
前段時間公司預研了設備app端與服務端的交互方案,出于多方面考量最終選用了阿里云的微服務隊列MQTT方案,基于此方案,本人主要實踐有:
1. 封裝了RocketMQ實現MQTT訂閱與發布的實現細節;
2. 實現了注解式分發處理,可利用如MqttController, MqttTopicMapping等相關自定義注解的方式來統一訂閱MQTT的Topic以及消息處理的分發;
3. 使用了一套請求和響應的同步機制來達到PUB/SUB異步通信的偽同步調用。
Github 地址點此鏈接
二、RocketMQ的接入細節
1. 為什么服務端要使用RocketMQ接入
阿里云微消息隊列MQTT是在以消息隊列 RocketMQ 為核心存儲的基礎上,實現更適合移動互聯網和IoT領域的無狀態網關,兩者之間具備天然的數據互通性。MQTT實例本身并不提供消息數據持久化功能,消息數據持久化需要搭配后端的消息存儲實例來使用。因此現階段每一個阿里云MQTT實例都必須配套一個消息存儲實例,即RocketMQ實例來提供消息數據持久化功能,因此他們之間可以說是消息互通的,即可用RocketMQ訂閱的方式來消費用MQTT協議發布的消息,同理也可用 MQTT協議訂閱的方式來消費RocketMQ發布的消息。
幫助文檔也給出了以下兩種產品的區別說明:
微消息隊列MQTT基于MQTT協議實現,單個客戶端的處理能力較弱。因此,微消息隊列MQTT適用于擁有大量在線客戶端(很多企業設備端過萬,甚至上百萬),但每個客戶端消息較少的場景。
相比之下,消息隊列RocketMQ是面向服務端的消息引擎,主要用于服務組件之間的解耦、異步通知、削峰填谷等,服務器規模較小(極少企業服務器規模過萬),但需要大量的消息處理,吞吐量要求高。因此,消息隊列RocketMQ適用于服務端進行大批量的數據處理和分析的場景。
基于以上區別,官方也推薦在移動端設備上使用微消息隊列MQTT,而在服務端應用中則使用消息隊列RocketMQ,具體則可以通過 MQTT SDK 以公網訪問方式來實現設備間的通信,通過MQ SDK以內網方式來實現服務端通信。
2. RocketMQ如何對接
RocketMQ與MQTT在消息結構和一些屬性字段上都有一定的映射關系,具體內容(摘自幫助文檔)如下。
微消息隊列MQTT使用MQTT協議接入,而消息隊列RocketMQ使用的是私有協議,因此,兩者的關鍵概念存在如下映射關系。
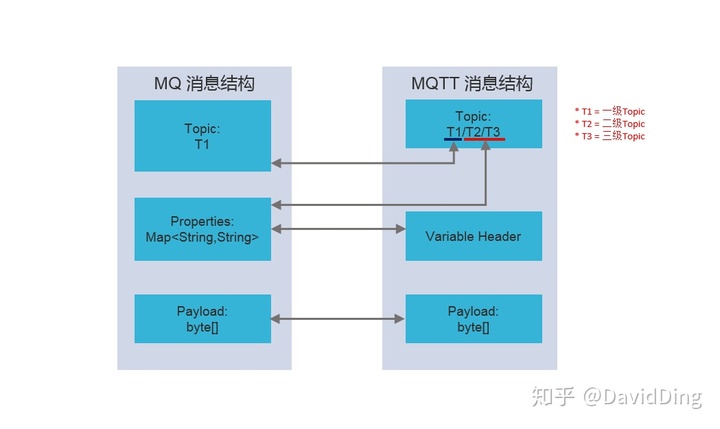
如上圖所示,MQTT協議中Topic是多級結構,而消息隊列RocketMQ的Topic 僅有一級,因此,MQTT中的一級Topic映射到消息隊列RocketMQ的Topic,而二級和三級Topic則映射到消息隊列RocketMQ的消息屬性(Properties)中。
消息隊列 RocketMQ 協議中的消息(Message)可以擁有自定義屬性(Properties),而MQTT協議目前的版本不支持屬性,但為了方便對MQTT協議中的Header信息和設備信息進行溯源,MQTT的部分信息將被映射到 RocketMQ的消息屬性中,方便使用消息隊列RocketMQ的SDK接入的用戶獲取。
目前,微消息隊列MQTT和消息隊列RocketMQ支持的屬性字段映射表如下圖所示。使用消息隊列RocketMQ的SDK的應用和使用消息隊列MQTT的SDK的應用進行交互時,可以通過讀寫這些屬性字段來達到信息獲取或者設置的目的。

3. RocketMQ對MQTT消息訂閱的實現
Properties properties = new Properties();
// 在控制臺創建的Group ID
properties.put(PropertyKeyConst.GROUP_ID, "xxx");
// 阿里云AccessKey
properties.put(PropertyKeyConst.AccessKey, "xxx");
// 阿里云SecretKey
properties.put(PropertyKeyConst.SecretKey, "xxx");
// 在RocketMQ控制臺的實例基本信息中可查看到的TCP協議接入點
properties.put(PropertyKeyConst.NAMESRV_ADDR,"xxx");
Consumer consumer = ONSFactory.createConsumer(properties);
consumer.subscribe("topic", "*", new MessageListener() { //訂閱全部 Tagpublic Action consume(Message message, ConsumeContext context) {//獲得mqtt消息中的第一級topicString mqttFirstTopic = message.getTopic();//獲得mqtt消息中除去1級后的所有topicString mqttSecondTopic = message.getUserProperties(PropertyKeyConst.MqttSecondTopic);//獲得mqtt消息中的messageIdString messageId = message.getUserProperties("UNIQ_KEY");//獲得mqtt消息中的消息體String messageBody = new String(message.getBody());//...return Action.CommitMessage;}});
consumer.start();
實現主要注意2點:
- 這邊的 MQ 只需要訂閱 MQTT 的一級 Topic 。如果 MQTT 會發布2個 Topic 的消息
robot/alarm和robot/task/test,則在此處只需要訂閱robot這個第一級Topic即可。 - MQTT 的一些屬性字段可以從 RocketMQ 消息
Message的userProperties字段中獲得,比如上面代碼中通過message.getUserProperties(PropertyKeyConst.MqttSecondTopic);可以獲得 MQTT 中的 除去1級后的所有 Topic 字符串,如上述舉例的2個 Topic 可分別獲得/alarm和/task/test。 具體能夠獲得哪些字段可以參考上一節的屬性字段映射表,也可自行查看PropertyKeyConst類中定義的一些字符串常量來大概知曉。
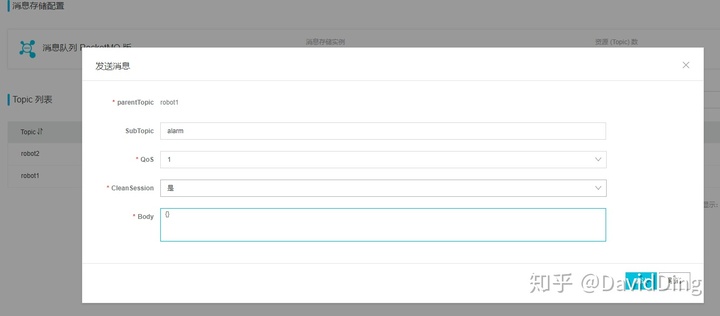
使用阿里云MQTT控制臺發送一個MQTT消息,如圖所示:
在程序中加一個斷點獲得當前Message對象的字段如下:
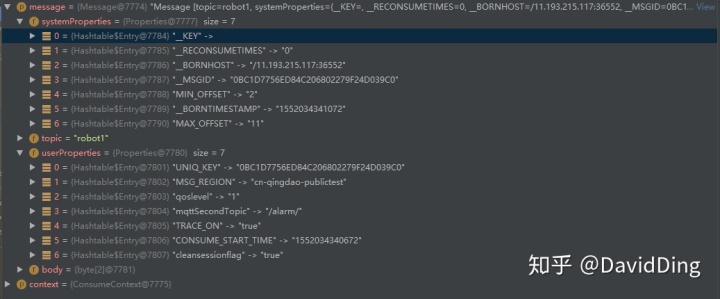
上圖可看到userProperties中的一些值,比如qoslevel,mqttSecondTopic等,這些字段都可以在PropertyKeyConst 類中找到對應的字符串常量,但是UNIQ_KEY,cleansessionflag等PropertyKeyConst 類中并沒有對應的字符串常量,這邊暫時就message.getUserProperties("UNIQ_KEY")這樣使用自定義字符量來獲得。
4. RocketMQ對MQTT消息發布的實現
Properties properties = new Properties();
// 在控制臺創建的Group ID
properties.put(PropertyKeyConst.GROUP_ID, "xxx");
// 阿里云AccessKey
properties.put(PropertyKeyConst.AccessKey, "xxx");
// 阿里云SecretKey
properties.put(PropertyKeyConst.SecretKey, "xxx");
// 在RocketMQ控制臺的實例基本信息中可查看到的TCP協議接入點
properties.put(PropertyKeyConst.NAMESRV_ADDR,"xxx");
//設置發送超時時間,單位毫秒
properties.setProperty(PropertyKeyConst.SendMsgTimeoutMillis, "3000");
Producer producer = ONSFactory.createProducer(properties);
// 在發送消息前,必須調用 start 方法來啟動 Producer,只需調用一次即可
producer.start();//發送一個mqtt消息
String parentTopic = topic.substring(0, topic.indexOf("/"));
String subTopic = topic.substring(topic.indexOf("/"));
Message msg = new Message(parentTopic, "", message.getBytes());
msg.putUserProperties(PropertyKeyConst.MqttSecondTopic, subTopic);
msg.putUserProperties(PropertyKeyConst.MqttQOS, qos);
msg.putUserProperties("cleansessionflag", "" + cleanSessionFlag);
SendResult result = producer.send(msg);- 該代碼僅實現了普通消息的同步發送,若需發送順序消息、延時消息等,可參考SDK幫助文檔創建不同的
Producer實現即可。 - 上述代碼將需要發送的MQTT全量Topic拆分成1級與2級,1級Topic設置為MQ中的Topic參數,2級Topic字符串則設為
userProperties中PropertyKeyConst.MqttSecondTopic的,其他屬相如qoslevel和cleansessionflag等也是通過userProperties的相關字段來設置。
三、注解式分發處理的實現
1. 前置知識點
1.1 BeanPostProcessor
BeanPostProcessor是Spring IOC容器給我們提供的一個擴展接口。BeanPostProcessor接口定義了兩個方法:
public interface BeanPostProcessor {// 前置處理Object postProcessBeforeInitialization(Object bean, String beanName) throws BeansException;// 后置處理Object postProcessAfterInitialization(Object bean, String beanName) throws BeansException;
}
Spring中Bean的整個生命周期如圖所示:
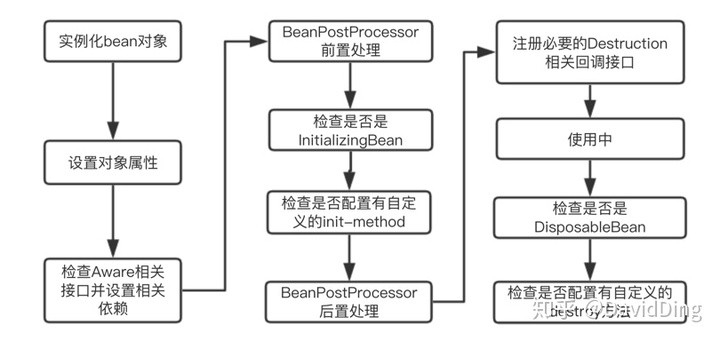
postProcessBeforeInitialization()方法與postProcessAfterInitialization()分別對應圖中前置處理和后置處理兩個步驟將執行的方法。這兩個方法中都傳入了bean對象實例的引用,為擴展容器的對象實例化過程提供了很大便利,在這兒幾乎可以對傳入的實例執行任何操作。
可以看到,Spring容器通過BeanPostProcessor給了我們一個機會對Spring管理的bean進行再加工,注解、AOP等功能的實現均大量使用了BeanPostProcessor。通過實現BeanPostProcessor的接口,在其中處理方法中判斷bean對象上是否有自定義的一些注解,如果有,則可以對這個bean實例繼續進行其他操作,這也是本例中使用該接口要實現的主要目的。
1.2 ApplicationListener
在IOC的容器的啟動過程,當所有的bean都已經處理完成之后,spring ioc容器會有一個發布事件的動作。從 AbstractApplicationContext 的源碼中就可以看出:
protected void finishRefresh() {// Initialize lifecycle processor for this context.initLifecycleProcessor();// Propagate refresh to lifecycle processor first.getLifecycleProcessor().onRefresh();// Publish the final event.publishEvent(new ContextRefreshedEvent(this));// Participate in LiveBeansView MBean, if active.LiveBeansView.registerApplicationContext(this);
}因此當所有的bean都初始化完成并被成功裝載后會觸發ContextRefreshedEvent事件。
ApplicationListener是spring中用來監聽事件(ApplicationEvent)的傳遞,每個實現了ApplicationListener接口的bean都會收到ApplicationEvent對象的通知,每個ApplicationListener可根據事件類型只接收處理自己感興趣的事件,因此利用實現ApplicationListener的接口可以收到監聽ContextRefreshedEvent動作,然后可以寫自己的一些處理邏輯,比如初始化環境,準備測試數據、加載一些數據到內存等等。用法如下:
@Component
public class TestApplicationListener  implements ApplicationListener<ContextRefreshedEvent>{@Overridepublic void onApplicationEvent(ContextRefreshedEvent event) {//todo:一些處理邏輯}}
1.3 反射
Java反射機制是在運行狀態中,對于任意一個類,都能夠知道這個類的所有屬性和方法;對于任意一個對象,都能夠調用它的任意一個方法和屬性;這種動態獲取的信息以及動態調用對象的方法的功能稱為java語言的反射機制。
在Java中,Class類與java.lang.reflect類庫一起對反射技術進行了全力的支持。獲取Class對象有三種方式:
- 通過實例對象獲得:
Class<?> class = object.getClass(); - 通過類名獲得:
Class<?> class = ClassName.class; - 通過類名全路徑獲得:
Class<?> class = Class.forName("類名全路徑");
反射包中常用的類主要有
- Constructor,表示的類的構造方法信息,利用它可以在運行時動態創建對象
- Field,表示類的成員變量信息,通過它可以在運行時動態修改成員變量的屬性值(包含private)
- Method,表示類的成員方法信息,通過它可以動態調用對象的方法(包含private)
下面說明一下本例中用到的一些反射api:
//獲得Class對象
Class clazz= obj.getClass();//判斷注解B是否在此A上
boolean isAnnotation= A.isAnnotationPresent(B.class);//獲得該clazz上的注解對象
B b=clazz.getAnnotation(B.class));//獲得本類以及父類或者父接口中所有的公共方法
Method[] methods=clazz.getMethods();//獲取方法上的所有參數
Parameter[] parameters = method.getParameters();//執行某對象的方法,owner為該對象,paramValues為入參數組,method為Method對象
method.invoke(owner, paramValues);
2. 整體實現思路
- 自定義注解
MqttController,MqttTopicMapping,MqttMessageId,MqttMessageBody; - 利用BeanPostProcessor,獲得所有注解了
MqttController的bean及其注解值,獲得其所有注解了MqttTopicMapping的Method方法及其注解值,利用兩者的注解值作為其key,分別將bean,Method為value放入不同的map中,記錄所有注解了MqttController的注解值作為下一步需要訂閱的Topic; - 利用ApplicationListener在所有bean加載完成后使用實例化的
mqConsumer來訂閱所有需要訂閱的Topic; - 在mq訂閱的處理方法中,根據消息的全Topic在上述步驟的map中獲得其對應的bean和Method,同時根據
MqttMessageId,MqttMessageBody來設置相關參數,使用method.invoke(owner, paramValues);實現方法的調用,來達到消息的處理分發。
3. 實現細節
3.1 自定義注解
@MqttController在類上使用,其中parentTopic值為需要監聽的1級Topic,其中使用@Component可以使其注解的類實例化為為Bean對象放入到Spring容器中,基于此才能在利用BeanPostProcessor中獲得其對象。
@Target(ElementType.TYPE)
@Retention(RetentionPolicy.RUNTIME)
@Documented
@Component
public @interface MqttController {/*** 監聽的父topic** @return 監聽的父topic*/String parentTopic();
}@MqttTopicMapping在方法上使用,其中subTopic的值為需要訂閱的子Topic,與1級Topic共同組成MQTT的Topic
@Target(ElementType.METHOD)
@Retention(RetentionPolicy.RUNTIME)
@Documented
public @interface MqttTopicMapping {/*** 訂閱的子topic,默認可以只訂閱1級topic** @return 訂閱的子topic*/String subTopic() default "";
}MqttMessageBody在方法參數上使用,使得參數自動獲得messageBody對象
@Target(ElementType.PARAMETER)
@Retention(RetentionPolicy.RUNTIME)
@Documented
public @interface MqttMessageBody {}MqttMessageId在方法參數上使用,使得參數自動獲得messageId的值
@Target(ElementType.PARAMETER)
@Retention(RetentionPolicy.RUNTIME)
@Documented
public @interface MqttMessageId {}
自定義注解的使用示例如下:
@Slf4j
@MqttController(parentTopic = "robot1")
public class MqttRobot1 {@MqttTopicMappingpublic void dealFirstTopic() {log.info("MqttRobot1.dealAlarm 收到消息啦,只處理了一級topic");}@MqttTopicMapping(subTopic = "alarm")public void dealAlarm(@MqttMessageId String messageId, @MqttMessageBody AlarmVo alarmVo) {log.info("MqttRobot1.dealAlarm 收到消息啦");log.info("messageId:{}", messageId);log.info("alarmVo:{}", alarmVo);}@MqttTopicMapping(subTopic = "task")public void dealTask() {log.info("MqttRobot1.dealTask 收到消息啦");}
}
3.2 提取Method和Bean對象
在MqttHandlerFactory類中定義以下幾個容器,分別存儲mqtt處理類的bean,mqtt處理方法以及parentTopic列表
/*** 用于存儲mqtt處理類的bean,key為parentTopic/subTopic*/
private static Map<String, Object> mqttControllers = new HashMap<>();/*** 用于存儲mqtt處理方法,key為parentTopic/subTopic*/
private static Map<String, Method> mqttHandlers = new HashMap<>();/*** 存儲parentTopic列表*/
private static Set<String> parentTopicSet = new HashSet<>();
利用BeanPostProcessor接口來處理實現了自定義注解的Bean對象。
具體代碼及注釋如下:
@Override
public Object postProcessAfterInitialization(Object bean, String beanName) throws BeansException {Class beanClazz = bean.getClass();//使用的MqttController注解的bean對象if (beanClazz.isAnnotationPresent(MqttController.class)) {//獲得MqttController的注解值//存儲parentTopic列表String parentTopic = ((MqttController) beanClazz.getAnnotation(MqttController.class)).parentTopic();MqttHandlerFactory.getParentTopicSet().add(parentTopic);for (Method method : beanClazz.getMethods()) {//獲得MqttTopicMapping的Method對象if (method.isAnnotationPresent(MqttTopicMapping.class)) {//獲得MqttTopicMapping的注解值String subTopic = method.getAnnotation(MqttTopicMapping.class).subTopic();String realTopic;if ("".equals(subTopic)) {realTopic = parentTopic + "/";} else {realTopic = (parentTopic + "/" + subTopic + "/").replaceAll("/+", "/");}if (null != MqttHandlerFactory.getMqttHandler(realTopic)) {throw new MqttBeansException(bean.getClass().getSimpleName() + " topic 重復定義,值為" + realTopic);}//存儲mqtt處理類的beanMqttHandlerFactory.registerMqttHandler(realTopic, method);//存儲mqtt處理方法MqttHandlerFactory.registerMqttController(realTopic, bean);log.info("MqttHandler Mapped "{}" onto {}", realTopic, method.toString());}}}return bean;
}
3.3 mq的消息訂閱與處理
實現ApplicationListener接口在所有Bean對象加載完之后根據前面記錄的parentTopicSet作為所有需要訂閱的1級Topic開始訂閱。
在訂閱消息處理中從message信息可以獲得其對應的1級Topic與2級Topic,將其處理成MQTT的全Toic并從前面記錄的mqttHandlers,mqttControllers中獲得對應的Method對象及Bean對象,從message信息中提取對應的messageId級messageBody并設置為使用了@MqttMessageBody和@MqttMessageId的注解的參數中,利用反射method.invoke(MqttHandlerFactory.getMqttController(mqttTopic), paramValues);來實現方法的調用。
具體代碼及注釋如下:
@Overridepublic void onApplicationEvent(ContextRefreshedEvent event) {//...//設置mqConsumer實例化所需propertiesConsumer mqConsumer = ONSFactory.createConsumer(properties);Set<String> parentTopicSet = MqttHandlerFactory.getParentTopicSet();if (parentTopicSet.size() == 0) {log.warn("當前應用并未有任何topic訂閱");}//根據parentTopic和subTopic訂閱parentTopicSet.forEach(parentTopic -> {log.info("Add a new rocketMq subscription,topic:{}", parentTopic);mqConsumer.subscribe(parentTopic, "*", (message, context) -> {log.debug("MqReceive Message: " + message);//獲得topicString mqttFirstTopic = message.getTopic();String mqttSecondTopic = message.getUserProperties(PropertyKeyConst.MqttSecondTopic);if (null == mqttSecondTopic) {//只有1級topic的情況mqttSecondTopic = "/";}if (!"/".equals(mqttSecondTopic.substring(mqttSecondTopic.length() - 1))) {mqttSecondTopic += "/";}String mqttTopic = mqttFirstTopic + mqttSecondTopic;Method method = MqttHandlerFactory.getMqttHandler(mqttTopic);if (null == method) {log.warn("當前沒有處理該topic的handler,topic:{}", mqttTopic);return Action.CommitMessage;} else {//獲得mqtt的一些數據String messageId = message.getUserProperties("UNIQ_KEY");String messageBody = new String(message.getBody());//處理入參Parameter[] parameters = method.getParameters();Object[] paramValues = new Object[parameters.length];for (int i = 0; i < parameters.length; i++) {if (parameters[i].isAnnotationPresent(MqttMessageId.class)) {//@MqttMessageId注解的參數paramValues[i] = messageId;} else if (parameters[i].isAnnotationPresent(MqttMessageBody.class)) {//@MqttMessageBody注解的參數Class parameterClazz = parameters[i].getType();try {paramValues[i] = JSONObject.parseObject(messageBody, parameterClazz);} catch (Exception e) {log.error("mqttMessageBody 格式錯誤,messageId:{},messageBody:{}", messageId, messageBody);// return Action.ReconsumeLater;return Action.CommitMessage;}} else {//自己定義的一些參數就給null把paramValues[i] = null;}}try {method.invoke(MqttHandlerFactory.getMqttController(mqttTopic), paramValues);} catch (Exception e) {log.error("處理失敗啦");}}return Action.CommitMessage;});});mqConsumer.start();log.info("MqConsumer Started");}四、MQTT同步調用的實現
MQTT協議是基于PUB/SUB的異步通信模式,不適用于服務端同步控制設備端返回結果的場景。通過制定一套請求和響應的同步機制,可以無需改動MQTT協議來達到同步調用的目的。
1. 整體實現思路
MQTT的同步調用實際上是使用了兩個異步調用完成的,即生產者調用消費者的同時,自己也作為消費者等待某一隊列的返回消息,消費者接受到生產者的消息同時,也作為消息發送者發送一消息給生產者。
具體同步調用機制示意如下:
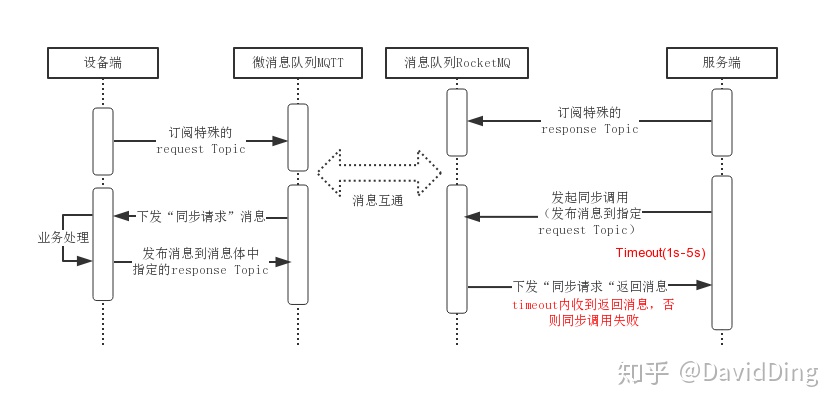
首先服務端和設備端服務端都訂閱了相關的Topic,服務端發起同步調用即發布一個示意需同步返回的message到指定request Topic,設備端接收到該message后處理完業務邏輯則會將調用結果發布一個返回message到request消息體中攜帶的response Topic中,最后服務端接收到設備端返回的message可以從消息體中獲得其調用結果。
整個調用過程中客戶端需要做的工作有:
- 訂閱request Topic
- 收到消息,判斷消息是否是同步消息,是的話則處理完業務邏輯后異步發送特別的response Topic
服務端需要做的工作有:
- 統一訂閱特別的設備的response Topic
- 發送消息到特別的request Topic
- Future.get(timeout) 模式處理request和response的關系
- 異步超時請求線程處理(處理超時請求,30ms運行一次)
- 消息監控和異常補救
服務端處理異步為同步調用的邏輯借鑒了Dubbo底層將Netty的異步調用轉化成同步的方式,下面在實現細節中會具體闡述。
2. 實現細節
MQTT同步調用的代碼如下:
public String publishSync(String topic, String qos, boolean cleanSessionFlag, Object data, int timeout)throws MqttRemoteException {String parentTopic = topic.substring(0, topic.indexOf("/"));String subTopic = topic.substring(topic.indexOf("/"));String mId = UUID.randomUUID().toString().replaceAll("-", "");MqttMessage mqttMessage = new MqttMessage(mId, replyParentTopic + "/" + mId, data);Message msg = new Message(parentTopic, "", JSON.toJSONString(mqttMessage).getBytes());msg.putUserProperties(PropertyKeyConst.MqttSecondTopic, subTopic);msg.putUserProperties(PropertyKeyConst.MqttQOS, qos);msg.putUserProperties("cleansessionflag", "" + cleanSessionFlag);MqttFuture mqttFuture = new MqttFuture(mqttMessage, timeout);try {producer.send(msg);} catch (ONSClientException e) {mqttFuture.cancel();throw e;}return mqttFuture.get();
}前部分就是正常RocketMQ發布MQTT消息的代碼,但是發送的消息是自定義的MqttMessage,同時這邊在調用producer.send(msg);前先構建了一個MqttFuture對象然后發送完消息后使用mqttFuture.get();來獲得同步調用的結果。
MqttMessage定義如下,其中syncFlag表示該消息是否需要同步返回,mId表示該消息的唯一id,用于本地判斷消息返回具體映射哪個同步調用的key,replyTopic表示該消息需要返回消息的Topic,data則是具體業務數據。
@Data
public class MqttMessage implements Serializable {private static final long serialVersionUID = 6648680154051903549L;/*** 是否需要同步返回,默認為true*/private boolean syncFlag = true;/*** 生成的id,用uuid生成把*/private final String mId;/*** 客戶端返回消息的Topic*/private final String replyTopic;/*** 發送數據*/private Object data;public MqttMessage(String mId, String replyTopic, Object data) {this.mId = mId;this.replyTopic = replyTopic;this.data = data;}
}
MqttFuture對象則是用來處理同步調用的邏輯,每一個MqttFuture對象都有有一個mId作為唯一標識,發送的message消息體,調用返回結果MqttResponse(包括正常mqtt返回或者超時等異常返回結果)和同步調用超時時間,還有一個鎖及其創建的Condition,用來處理線程的等待與通知,后面會對其具體邏輯進行分析。每創建一個新的MqttFuture對象都會將其放入到存儲MqttFuture的Map中,key即為該消息的mId。
@Slf4j
@Data
public class MqttFuture {public static final int DEFAULT_TIMEOUT = 1000;public static final Map<String, MqttFuture> FUTURES = new ConcurrentHashMap<>();private final Lock lock = new ReentrantLock();private final Condition done = lock.newCondition();/*** 唯一id*/private final String mId;/*** 發送的message消息體*/private final MqttMessage message;/*** 設置的同步調用超時時間*/private final int timeout;/*** 等待開始時間*/private final long start = System.currentTimeMillis();/*** 返回結果*/private volatile MqttResponse response;public MqttFuture(MqttMessage message, int timeout) {this.message = message;this.timeout = timeout;this.mId = message.getMId();FUTURES.put(mId, this);}//...
調用返回結果MqttResponse定義如下,如果是正常成功返回則返回狀態是OK且會有對應的消息體messageResult,如果超時或者其他異常情況則會返回對應的錯誤消息errorMessage。
@Data
public class MqttResponse {/*** ok狀態,正常返回result,否則返回errorMessage*/public static final Integer OK = 20000;/*** 客戶端超時未處理*/public static final Integer TIMEOUT = 40001;/*** 服務端主動取消*/public static final Integer CANCEL = 40002;private Integer mStatus = OK;/*** request生成的messageId*/private String mId;/*** 收到的消息體*/private String messageResult;/*** 狀態不是成功返回的錯誤信息*/private String errorMessage;public MqttResponse(String mId) {this.mId = mId;}
}在上述MQ同步調用代碼中,若調用producer.send(msg);同步發送mqtt消息失敗的話,則會調用mqttFuture.cancel();來取消該MqttFture對象,代碼如下,這邊主要是設置了異常的相應response避過將該MqttFuture對象從存儲MqttFuture的Map中移除。
@Slf4j
@Data
public class MqttFuture {//...public void cancel() {MqttResponse errorResult = new MqttResponse(mId);errorResult.setMStatus(MqttResponse.CANCEL);errorResult.setErrorMessage("主動請求取消");response = errorResult;FUTURES.remove(mId);}//...若調用producer.send(msg);同步發送mqtt消息成功的話則會調用mqttFuture.get();來獲得其同步調用的結果,具體代碼如下,首先判斷是否調用已完成(有響應結果mqttResponse,包括正常獲得返回結果或者超時等其他異常的情況),若完成的話則直接返回調用結果或者拋出相應的異常,若沒有調用完成則獲得鎖并循環判斷是否調用完成,沒有的話則調用done.await(timeout, TimeUnit.MILLISECONDS);來實現該線程的超時等待直至其他線程調用該Condition的signal方法將其喚醒。
@Slf4j
@Data
public class MqttFuture {//...public String get() throws MqttRemoteException {return this.get(timeout);}public String get(int timeout) throws MqttRemoteException {if (timeout <= 0) {timeout = DEFAULT_TIMEOUT;}if (!isDone()) {long start = System.currentTimeMillis();lock.lock();try {while (!isDone()) {done.await(timeout, TimeUnit.MILLISECONDS);if (isDone() || System.currentTimeMillis() - start > timeout) {break;}}} catch (InterruptedException e) {throw new RuntimeException(e);} finally {lock.unlock();}if (!isDone()) {throw new MqttTimeoutException("Waiting client-side response timeout");}}if (response == null) {throw new IllegalStateException("response cannot be null");}if (response.getMStatus().equals(MqttResponse.OK)) {return response.getMessageResult();}if (response.getMStatus().equals(MqttResponse.TIMEOUT)) {throw new MqttTimeoutException("Waiting client-side response timeout");}throw new MqttRemoteException(response.getErrorMessage());}/*** 判斷是否有response結果** @return 是否返回結果*/public boolean isDone() {return response != null;}//...
將上述等待喚醒的代碼如下,只需調用下面的received方法并傳入相應的MqttResponse結果即可,該方法會在后面講的判斷調用超時和正常mqtt消息結果返回的情況中調用。
@Slf4j
@Data
public class MqttFuture {//...private void doReceived(MqttResponse res) {lock.lock();try {response = res;done.signal();} finally {lock.unlock();}}public static void received(MqttResponse response) {MqttFuture future = FUTURES.remove(response.getMId());if (future != null) {future.doReceived(response);} else {log.warn("The timeout response finally returned at " + (new SimpleDateFormat("yyyy-MM-dd HH:mm:ss.SSS").format(new Date())) + ", response " + response);}}//...后臺會開啟一個線程來掃描超時任務,主要是遍歷上述存儲MqttFuture的Map,如果對應的MqttFuture并沒有完成(獲得對應的response)且調用時間已超過設置的超時時間,則設置一個超時異常的MqttResponse并調用MqttFuture.received(timeoutResponse);來喚醒上述代碼中的done.await(timeout, TimeUnit.MILLISECONDS);的線程等待。該線程每30s會遍歷一個存儲MqttFuture的Map。
@Slf4j
@Data
public class MqttFuture {//...private static class RemotingInvocationTimeoutScan implements Runnable {@Overridepublic void run() {while (true) {try {for (MqttFuture future : FUTURES.values()) {if (future == null || future.isDone()) {continue;}if (System.currentTimeMillis() - future.getStartTimestamp() > future.getTimeout()) {//當前mqtt請求已超時MqttResponse timeoutResponse = new MqttResponse(future.getMId());timeoutResponse.setMStatus(MqttResponse.TIMEOUT);MqttFuture.received(timeoutResponse);}}//每30ms掃一次Thread.sleep(30);} catch (Throwable e) {log.error("Exception when scan the timeout invocation of remoting.", e);}}}}static {Thread th = new Thread(new RemotingInvocationTimeoutScan(), "MqttResponseTimeoutScanTimer");th.setDaemon(true);th.start();}//...為了處理正常的mqtt的消息返回,除了使用上一節中講到的自定義注解MqttController來訂閱相關的Topic,還需要訂閱特殊的一個Topic來處理mqtt同步調用的返回消息,訂閱代碼如下,根據收到的mId和messageBody設置對應的MqttResponse并調用MqttFuture.received(response);來喚醒上述代碼中的done.await(timeout, TimeUnit.MILLISECONDS);的線程等待。
//訂閱偽同步請求回復
log.info("Add a new rocketMq subscription,topic:{}", replyParentTopic);
mqConsumer.subscribe(replyParentTopic, "*", (message, context) -> {String mqttSecondTopic = message.getUserProperties(PropertyKeyConst.MqttSecondTopic);if (null == mqttSecondTopic) {mqttSecondTopic = "";}String mId = mqttSecondTopic.replaceAll("/", "");String messageBody = new String(message.getBody());MqttResponse response = new MqttResponse(mId);response.setMessageResult(messageBody);MqttFuture.received(response);return Action.CommitMessage;
});
五、demo使用
1. 項目結構
由于使用了springboot框架來實現該demo,所以項目結構如下:
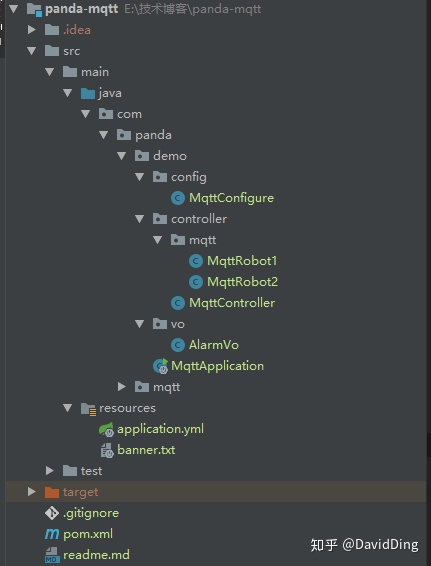
其中mqtt工具包目錄如下:
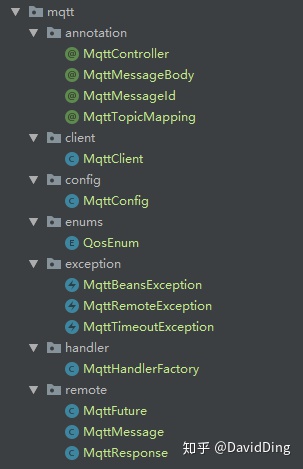
2. mqtt工具包的使用
2.1 在yml配置中添加相關配置
配置示例如下,其中xxx改為自己使用的即可
ali:mqtt:accessKey: xxxsecretKey: xxxgroupId: xxxnamesrvAddr: xxxsendMsgTimeoutMillis: 3000#消費者線程固定位50個consumeThreadNums: 50
#    用于同步調用返回發送的topicreplyParentTopic: xxx
2.2 添加工具包中的MqttConfig
@Import({ MqttConfig.class})
@Configuration
public class MqttConfigure {}
2.3 自定義注解的使用
@Slf4j
@MqttController(parentTopic = "robot1")
public class MqttRobot1 {@MqttTopicMappingpublic void dealFirstTopic() {log.info("MqttRobot1.dealAlarm 收到消息啦,只處理了一級topic");}@MqttTopicMapping(subTopic = "alarm")public void dealAlarm(@MqttMessageId String messageId, @MqttMessageBody AlarmVo alarmVo) {log.info("MqttRobot1.dealAlarm 收到消息啦");log.info("messageId:{}", messageId);log.info("alarmVo:{}", alarmVo);}@MqttTopicMapping(subTopic = "task")public void dealTask() {log.info("MqttRobot1.dealTask 收到消息啦");}
}
2.4 測試同步調用,模擬MQTT客戶端消息返回代碼
mqtt客戶端實現代碼示例參考阿里云官方demo https://github.com/AliwareMQ/lmq-demo
其中xxx的地方都改成自己的即可,下面代碼中mqttClient2.publish(replyTopic, message);即將結果發送到replyTopic中。
public class MqttClientTest {public static void main(String[] args) throws Exception {String instanceId = "xxx";String endPoint = "xxx";String accessKey = "xxx";String secretKey = "xxx";String clientId = "xxx";final String parentTopic = "xxx";//這邊需自定義mqtt客戶端topic,final String mq4IotTopic = parentTopic + "/" + "xxx" + "/xxx";final int qosLevel = 0;ConnectionOptionWrapper connectionOptionWrapper = new ConnectionOptionWrapper(instanceId, accessKey, secretKey,clientId);final MemoryPersistence memoryPersistence = new MemoryPersistence();final MqttClient mqttClient = new MqttClient("tcp://" + endPoint + ":1883", clientId, memoryPersistence);final MqttClient mqttClient2 = new MqttClient("tcp://" + endPoint + ":1883", clientId, memoryPersistence);/*** 客戶端設置好發送超時時間,防止無限阻塞*/mqttClient.setTimeToWait(5000);final ExecutorService executorService = new ThreadPoolExecutor(1, 1, 0, TimeUnit.MILLISECONDS,new LinkedBlockingQueue<Runnable>());mqttClient.setCallback(new MqttCallbackExtended() {@Overridepublic void connectComplete(boolean reconnect, String serverURI) {/*** 客戶端連接成功后就需要盡快訂閱需要的 topic*/System.out.println("connect success");executorService.submit(new Runnable() {@Overridepublic void run() {try {final String topicFilter[] = { mq4IotTopic };final int[] qos = { qosLevel };mqttClient.subscribe(topicFilter, qos);} catch (MqttException e) {e.printStackTrace();}}});}@Overridepublic void connectionLost(Throwable throwable) {throwable.printStackTrace();}@Overridepublic void messageArrived(String s, MqttMessage mqttMessage) throws Exception {System.out.println("receive msg from topic " + s + " , body is " + new String(mqttMessage.getPayload()));JSONObject jsonObject = JSON.parseObject(new String(mqttMessage.getPayload()));String mId = jsonObject.getString("mId");String replyTopic = jsonObject.getString("replyTopic");String result = mId + "回復啦";MqttMessage message = new MqttMessage(result.getBytes());message.setQos(qosLevel);//這邊會將結果發送到replyTopic中mqttClient2.publish(replyTopic, message);System.out.println("發送啦");}@Overridepublic void deliveryComplete(IMqttDeliveryToken iMqttDeliveryToken) {System.out.println("send msg succeed topic is : " + iMqttDeliveryToken.getTopics()[0]);}});mqttClient.connect(connectionOptionWrapper.getMqttConnectOptions());mqttClient2.connect(connectionOptionWrapper.getMqttConnectOptions());Thread.sleep(Long.MAX_VALUE);}
}
3. demo體驗
啟動項目可以在控制臺看到有如下日志:


從日志中可以看出程序自動處理了自定義注解的Mqtt消息處理的映射,并根據mqtt的1級Topic進行了RocketMQ的相關訂閱。
提供了一個測試MQTT消息簡單發送接口如下:
@GetMapping("/publish")
public String doPublish(@RequestParam("topic") String topic, @RequestParam("message") String message) {try {return mqttClient.publish(topic, message);} catch (ONSClientException e) {return e.getMessage();}
}
使用 http://localhost:8080/mqtt/publish?topic=robot1/alarm&message={id:"1",code:"heheh"}來調用該接口。
可以在控制臺看到如下日志打印:

由于本demo中使用自定義注解訂閱了該Topic,所以調用該接口發送消息之后也會被本demo成功接收,并分發到對應的處理函數中,因此調用了該接口后可以在控制臺看到如上日志打印,可以看到MQTT消息成功發布,訂閱到該消息并實現了MQTT消息的處理分發。
提供了一個測試MQTT同步調用的接口如下:
@GetMapping("/publish-sync")public String publishSync(@RequestParam("topic") String topic, @RequestParam("message") String message) {try {return mqttClient.publishSync(topic, message, 5000);} catch (MqttRemoteException e) {return e.getMessage();}
}
使用http://localhost:8080/mqtt/publish-sync?topic=robot1/alarm/GID_ROBOT@@@DEVICEID_001&message=hehehe來調用接口。
可以看到下圖的結果:

這是MQTT同步調用超時的情況,因為此時還沒有開啟對應的MQTT客戶端,因此發送的MQTT消息并沒有客戶端進行回應,所以出現了調用超時的情況,如果運行上述模擬MQTT客戶端消息返回的代碼后再次調用該接口,可以看到同步調用成功返回了對應的結果,如圖所示。

源碼地址如下,僅供學習參考
DavidDingXu/panda-mqtt?github.com
六、參考
- 阿里云微消息隊列 MQTT幫助文檔
- 阿里云消息隊列 RocketMQ幫助文檔
本文原創,歡迎轉載,轉載請注明出處,如有不正確的地方懇請各位看官指正。
)

按鍵事件(2))


呢)


)


一遍文章搞定...)


