本文將介紹如何使用Trigger.io創建原生的頂部欄、標簽欄、以及HTML/CSS/JavaScript的混合型移動應用程序。
以后我們將添加更多的原生UI組件到Trigger.io,但現在你只需要使用web技術就可以在IOS和Android上創建漂亮而流暢的移動應用。

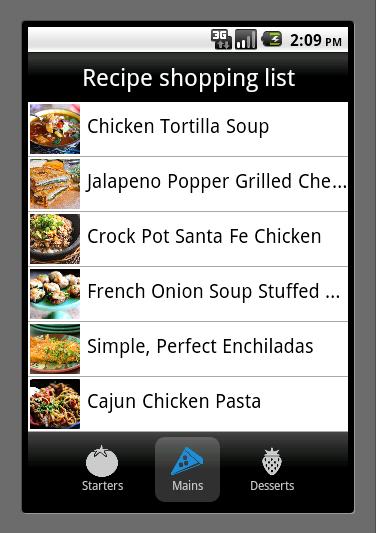
這是一個簡單的菜譜應用程序的屏幕截圖,我們使用Trigger.io提供的原生UI組件,我們將向你展示該應用程序是如何構建的:
配置Trigger.io,并添加頂部欄和標簽欄到應用程序中
給原生控件添加樣式
用JavaScript給控件添加監聽器
第一步:創建App并添加頂部欄
你需要使用Trigger.io生成App的基本框架,然后使用web技術來獲取原生的UI組件。因此,在開始之前,你需要先進行注冊簽約。這里有完整的文檔教你如何設置Trigger.io,一旦你完成設置只需要運行:
forge create
這時會提示你給app命名,命令完成后會自動生成app的項目文件夾。
讓我們開始給app添加一個頂部欄,之后在Android模擬器上運行測試。
將src/config.json文件的代碼替換成以下代碼:
{
"author": "amir@trigger.io",
"config_version": "2",
"description": "View ingredients for your favorite recipes",
"modules": {
"is": true,
"logging": {
"level": "INFO"
},
"prefs": true,
"request": {
"permissions": []
},
"tools": true,
"topbar": true
},
"name": "Recipe list",
"platform_version": "v1.3",
"version": "0.1"
}
在模塊配置中設置頂部欄可用:“topbar”: true。
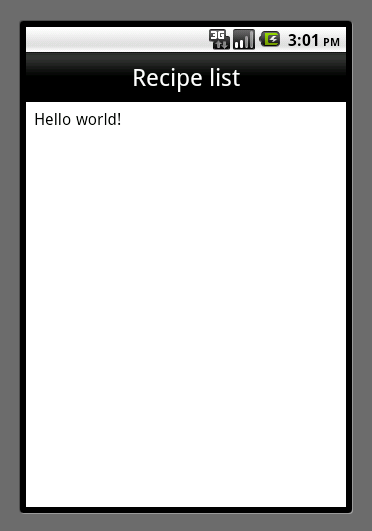
然后修改一下index.html
Hello world!
現在你可以使用forge命令運行并測試app了:
forge build
forge run android --android.sdk ~/Desktop/android-sdk-macosx
第二步:配置標簽欄
在app的底部添加標簽欄也很容易,你只需要在src/config.json(模塊配置)中加上“tabbar”: true,如下:
{
"author": "amir@trigger.io",
"config_version": "2",
"description": "View ingredients for your favorite recipes",
"modules": {
"is": true,
"logging": {
"level": "INFO"
},
"prefs": true,
"request": {
"permissions": []
},
"tools": true,
"topbar": true,
"tabbar": true
},
"name": "Recipe list",
"platform_version": "v1.3",
"version": "0.1"
}
但是,在運行之前,我們還需要添加一些按鈕和偵聽器。這樣,當點擊每個選項卡時,我們就可以執行JavaScript來處理頁面的切換。
讓我們添加一個JavaScript文件,命名為src/js/main.js:
// A helper function so that when we change tab the web view scrolls to the top of the new page
var scrollTop = function () {
setTimeout(function () {
document.body.scrollTop = 0;
}, 0);
}
// This is the method we are going to call when a tab button is pressed
var updateRecipes = function (search) {
scrollTop();
// For now just pop up a message with the tab which was pressed
alert(search);
}
// Set a better title for the topbar
forge.topbar.setTitle("Recipe shopping list");
// Add our 3 tab buttons to the tabbar and add press listeners
var starterButton = forge.tabbar.addButton({
text: "Starters",
icon: "img/tomato.png",
index: 0
}, function (button) {
button.onPressed.addListener(function () {
updateRecipes("starter");
});
// This is the default button, activate it immediately
button.setActive();
updateRecipes("starter");
});
var mainButton = forge.tabbar.addButton({
text: "Mains",
icon: "img/pizza.png",
index: 1
}, function (button) {
button.onPressed.addListener(function () {
updateRecipes("main");
});
});
var dessertButton = forge.tabbar.addButton({
text: "Desserts",
icon: "img/strawberry.png",
index: 2
}, function (button) {
button.onPressed.addListener(function () {
updateRecipes("dessert");
});
});
這里我們調用了forge.topbbar.setTitle,該API會改變頂部的標題,然后用forge.tabbar.addButton來添加標簽欄的按鈕,以及該按鈕的監聽器。
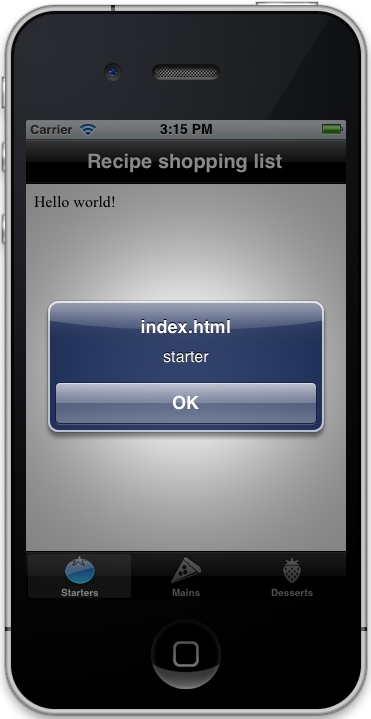
我們修改src/index.html這個文件:
Hello world!
src/js/main.js文件里面引用了一些圖片,這些圖片你可以從代碼示例中獲取,并放在src/img目錄里。
這次我們在IOS里面運行測試:
第三步:創建列表視圖
OK,現在我們需要創建菜譜列表,并讓它們點擊后可跳轉。
我們將使用輕量級的zepto.js庫,以幫助我們處理DOM操作。我們已經發表了一篇關于如何使用zepto.js和backbone.js快速創建HTML5的移動應用程序的博客。因此,我們就不在這對做介紹了。接下來在菜譜列表中使用HTML/CSS/JavaScript。
首先,讓我們將菜譜數據導入到zepto.js庫。你可以下載zepto.js和data.js從Github上的例子,并把它們放在你的src/js目錄里。
然后我們更新src/js/的main.js中的updateRecipe功能 - 這是當標簽欄按鈕被按下時調用的:
var updateRecipes = function (search) {
scrollTop();
$('.content').html('
$.each(data[search], function (i, recipe) {
var el = $('
el.on('click', function () {
scrollTop();
$('.content').html('
'+recipe.title+'
View full recipe
$.each(recipe.ingredients, function (i, ingredient) {
$('.ingredients').append('
'+ingredient+'');});
forge.tabbar.setInactive();
});
$('.list').append(el);
});
}
現在完成應用程序,我們只需要在src/index.html添加一些簡單的樣式并導入JavaScript文件:
body, html, li, ul {
padding: 0;
margin: 0;
}
body {
font-size: 1.2em;
}
.recipe {
text-align: center;
}
.recipe img {
max-width: 80%;
}
.recipe li {
display: block;
font-size: 0.9em;
padding: 2px;
}
.list {
margin: 0;
padding: 0;
}
.list li {
display: block;
border-bottom: 1px solid #aaa;
padding: 0;
margin: 0;
width: 100%;
overflow: hidden;
white-space: nowrap;
text-overflow: ellipsis;
}
.list li img {
height: 50px;
width: 50px;
padding: 2px 7px 2px 2px;
vertical-align: middle
}
完成
現在,你運行應用程序就會看起來跟本篇文章的頂部截圖一樣了。除此之外,你也可以嘗試調用以下API來探索頂部欄和標簽欄的不同造型:
因此,你也可以使用Trigger.io中的原生UI組件創建出豐富的混合應用程序!


)


