說明:由于該數據結構是由java并且是原生實現,所以與C有一些出入,不過原理是相同的
1.鏈表的定義
為了表示線性表元素a與a+1的邏輯關系,存儲數據時,除了存儲元素本身的信息之外,還存儲了直接后繼元素的位置信息。這兩部分組成的數據元素被稱為“結點”,一個結點分為兩部分,存放數據元素信息的部分被稱為數據域,
存放直接后繼元素位置的部分被稱為指針域。
單鏈表:結點指針域只存放直接后繼元素位置的鏈表,也叫單向鏈表。
雙鏈表:結點指針域同時存放前驅元素和后繼元素位置的鏈表,也叫雙向鏈表。
循環鏈表:一般的鏈表尾結點(最后一個結點)的指針域一般null,但是有的鏈表將最后一個節點的指針域指向頭結點,構成一個環,稱作循環鏈表。
頭結點: 一個鏈表的頭節點,就是指針域指向該鏈表的第一個結點的結點,一般用來唯一確定一個鏈表(也有的鏈表是不帶頭結點的,那時我們通過鏈表的第一個結點來確定鏈表),注意:頭結點的數據與是null
2.實現原理
鏈表的每一個結點包括兩部分,數據域和指針域,數據域用來存儲數據,指針域用來存儲后繼結點的位置。
 1 class Link<T>{
 2     /**
 3     *用來存儲數據
 4     */
 5     T data;
 6     /**
 7     *用來存儲下一結點位置
 8      */
 9     Link next;
10 }
3.鏈表的基本操作
1.初始化 init() 創建一個鏈表
2.清空 clear() 清空一個鏈表
3.銷毀 destroy() 銷毀鏈表
4.在頭部插入一個結點 insertFront()
5.在尾部插入一個結點 insertBackend()
6.在任意位置插入一個結點 insertIndex()
7.刪除任意位置元素 delete()
8.查找元素 find()
9.獲取指定位置節點的值 get()
4.代碼實現
4.1鏈表代碼實現
  1 package com.xiaobai.linelist;
  2
  3 /**
  4  * @Author: xiaobai
  5  * @Date: 2019/5/1 9:00
  6  * @email:
  7  * @address:
  8  * @desc 模擬單鏈表操作
  9  * @Version 1.0
 10  */
 11 @SuppressWarnings("ALL")
 12 public final class Link<T> {
 13     /**
 14      * data 是要存儲的數據
 15      */
 16     private T data;
 17     /**
 18      * next是下一結點的引用位置
 19      */
 20     public Link<T> next;
 21
 22     /**
 23      * 初始化操作 構造方法返回一個空結點
 24      */
 25     public Link(){
 26         this.next = null;
 27         this.data = null;
 28     }
 29
 30     /**
 31      * 構造一個新的鏈表結點
 32      * 新結點是沒有后繼結點的 所以直接null
 33      * @param data 數據
 34      */
 35     public Link(T data){
 36         this.data = data;
 37         this.next = null;
 38     }
 39
 40     /**
 41      * 清空鏈表操作
 42      * @param link 要被清空的鏈表頭節點
 43      */
 44     public void clear(){
 45         //讓每一個結點的引用都為 null GC 自動回收
 46         Link<T> link = this;
 47         while(link.next!=null){
 48             Link curr = link.next;
 49             link.next = link.next.next;
 50             curr = null;
 51         }
 52         link = null;
 53     }
 54
 55     /**
 56      * 銷毀鏈表 這里的銷毀和清空我認為沒有什么區別,所以直接調用
 57      * 如果大家認為有區別的話,可以與我交流
 58      * @param link 被銷毀的鏈表
 59      */
 60     public void destroy(){
 61         this.clear();
 62     }
 63
 64     /**
 65      * 在鏈表的頭部插入一個結點(默認是帶頭結點的鏈表)
 66      * @param head 鏈表的頭節點
 67      * @param data 被插入的數據
 68      * @return 插入結果
 69      */
 70     public boolean insertFront(T data){
 71         //先構建一個新的結點
 72         Link<T> node = new Link<T>(data);
 73         try {
 74             //將結點插入到頭部 即 新節點后繼指向原來的第一個結點  頭節點后繼指向新節點
 75             node.next = this.next;
 76             this.next = node;
 77             return true;
 78         }catch (Exception e){
 79             e.printStackTrace();
 80             return false;
 81         }
 82     }
 83
 84     /**
 85      * 在鏈表的尾部插入一個結點
 86      * @param head 鏈表頭節點
 87      * @param data 要插入的數據
 88      * @return 插入結果
 89      */
 90     public boolean insertBackend(T data){
 91         //先構建一個新的結點
 92         try {
 93             Link<T> node = new Link<T>(data);
 94             //然后找到鏈表的尾
 95             Link<T> point = this.next;
 96             while(point.next!=null){
 97                 point = point.next;
 98             }
 99             //插入
100             point.next = node;
101             return true;
102         } catch (Exception e) {
103             e.printStackTrace();
104             return false;
105         }
106     }
107
108     /**
109      * 在任意位置插入一個結點
110      * @param head 要插入的鏈表
111      * @param i  插入位置 從0開始
112      * @param data 插入的數據
113      * @return 插入結果
114      */
115     public boolean insertIndex(int i,T data){
116         Link curr = this.next;
117         //空鏈表 拒絕插入
118         if(null == curr && i > 0){
119             return false;
120         }
121         int count = 0;
122         //找到被插入的位置(要找被插入位置前一個)
123         while(count != i-1 && null != curr){
124             curr = curr.next;
125             count ++;
126         }
127         //如果循環提前結束 說明i值過大
128         if(count != i-1){
129             return false;
130         }
131         //開始插入節點
132         Link<T> node = new Link<T>(data);
133         node.next = curr.next;
134         curr.next = node;
135         return true;
136     }
137
138     /**
139      * 刪除任意位置元素
140      * @param i 被刪除的位置  從0 開始
141      * @return 被刪除的元素 刪除失敗返回null
142      */
143     public T delete(int i){
144         T del = null;
145         int count = 0;
146         Link<T> curr = this.next;
147         //找到被刪除結點的前一個結點
148         while (curr != null&& count < i-1){
149             curr = curr.next;
150             count++;
151         }
152         //如果不滿足條件 刪除失敗
153         if(count!=i-1){
154             return del;
155         }
156         //如果找到 執行刪除操作 (GC 自動釋放)
157         del = curr.next.data;
158         curr.next = curr.next.next;
159         return del;
160     }
161
162     /**
163      * 查找元素是否存在  可能需要重寫存儲對象的equals方法
164      * @param data 被查找元素
165      * @return 查找結果
166      */
167     public boolean find(T data){
168         Link curr = this.next;
169         while(curr != null){
170             if(curr.data.equals(data)||curr.data ==data){
171                 return true;
172             }
173             curr = curr.next;
174         }
175         return false;
176     }
177
178     /**
179      * 獲取指定位置的元素
180      * @param i 位置
181      * @return 獲取到的值 沒有返回null
182      */
183     public T get(int i) {
184         T data = null;
185         Link<T> curr = this.next;
186         int count = 0;
187         while(count!=i && curr!=null){
188             curr = curr.next;
189             count ++;
190         }
191         if(count == i && curr!= null){
192             data = curr.data;
193         }
194         return data;
195     }
196
197     @Override
198     public String toString() {
199         StringBuilder sb = new StringBuilder().append("HashCode = "+this.hashCode()).append(" {head -> ");
200         Link<T> curr = this.next;
201         while (curr!=null){
202             sb.append(curr.data+" -> ");
203             curr = curr.next;
204         }
205         sb.append(" null}");
206         return sb.toString();
207     }
208 }
?
4.2? 測試代碼及結果
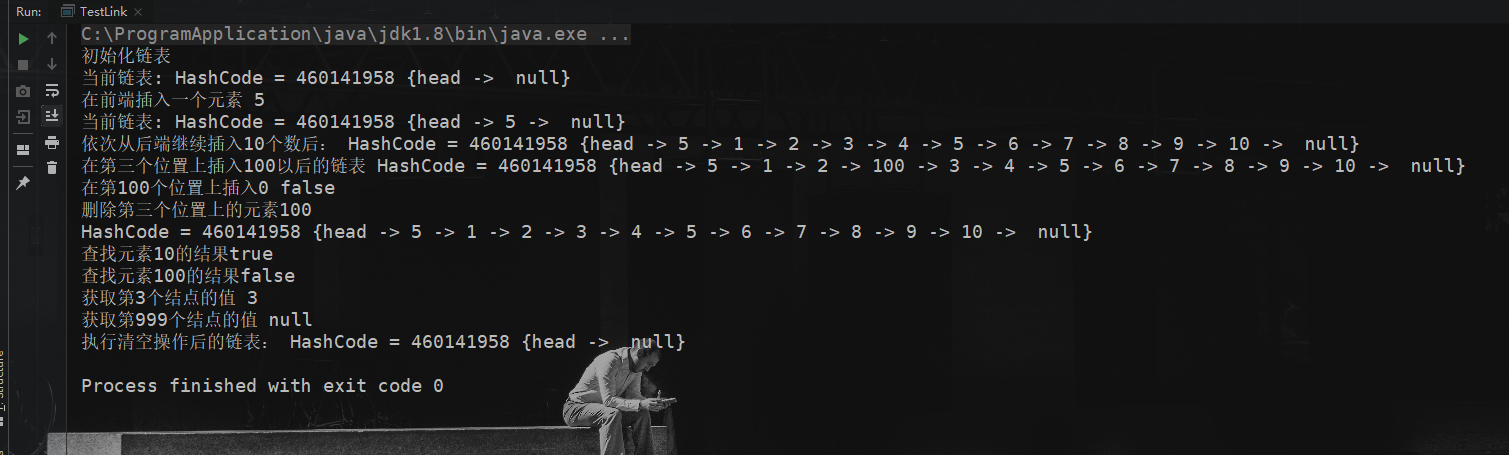
 1 /**
 2  * @Author: xiaobai
 3  * @Date: 2019/5/1 9:42
 4  * @email:
 5  * @address:
 6  * @Version 1.0
 7  */
 8 public class TestLink {
 9     public static void main(String[] args) {
10         System.out.println("初始化鏈表");
11         Link<Integer> link = new Link<>();
12         System.out.println("當前鏈表: "+link);
13
14         System.out.println("在前端插入一個元素 5");
15         link.insertFront(5);
16         System.out.println("當前鏈表: "+link);
17
18         for(int i=1;i<=10;i++){
19             link.insertBackend(i);
20         }
21         System.out.println("依次從后端繼續插入10個數后: "+link);
22
23         link.insertIndex(3,100);
24         //索引從0開始
25         System.out.println("在第三個位置上插入100以后的鏈表 "+link);
26
27         System.out.println("在第100個位置上插入0 "+link.insertIndex(100,0));
28
29         System.out.println("刪除第三個位置上的元素"+link.delete(3));
30         System.out.println(link);
31
32         System.out.println("查找元素10的結果"+link.find(10));
33         System.out.println("查找元素100的結果"+link.find(100));
34
35         System.out.println("獲取第3個結點的值 "+link.get(3));
36         System.out.println("獲取第999個結點的值 "+link.get(999));
37
38         link.clear();
39         System.out.println("執行清空操作后的鏈表: "+link);
40
41         link.destroy();
42
43     }
44 }
運行結果圖:
?


)


![[xsy3132]數表](http://pic.xiahunao.cn/[xsy3132]數表)


)
: nohup: ignoring input and appending output to ‘nohup.out’)


 中安裝配置 RocketMQ)


