Github地址
- 參考地址
- 作者大人,十分熱心,對于我的問題,提供了大量的幫助,使我少走了很多的彎路,在此表示由衷的感謝
注意事項
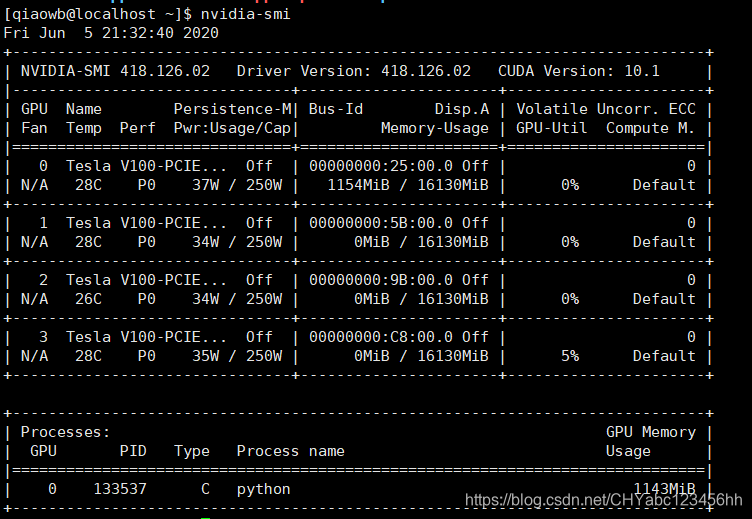
- 使用nvidia-smi命令查看cuda的版本,必須是10.1或者10.0,10.2是萬萬不可以的
- 所需要的版本之間的版本協調關系,僅供參考
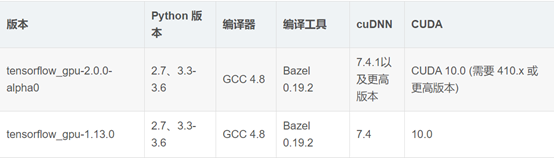 ?
?
GPU部署
1,安裝conda
- 安裝conda參考文檔
- 執行權限/運行
chmod 777 Miniconda3-latest-Linux-x86_64.sh #給執行權限
bash Miniconda3-latest-Linux-x86_64.sh #運行- 找到你剛才安裝的conda位置,如果一路選擇yes,沒有更改過安裝位置的話,安裝位置應該位于
/home下面,默認文件夾的名字是conda3,cd到conda3的bin目錄下面,能看到有一個activate - 給activate賦予權限?
chmod 777 activate - 激活activate,使用命令如下
. ./activate #或者使用source activate,效果是一樣的- 當命令行前面出現
(base)的時候說明現在已經在conda的環境中了。這時候輸入conda list?命令,查看已經安裝的包文件 -
添加頻道,也就是國內鏡像,加快下載包文件的速度,命令如下
//官方channel:conda config --add channels bioconda
conda config --add channels conda-forge
//清華鏡像源
conda config --add channels https://mirrors.tuna.tsinghua.edu.cn/anaconda/pkgs/free/
conda config --add channels https://mirrors.tuna.tsinghua.edu.cn/anaconda/pkgs/main/
conda config --add channels https://mirrors.tuna.tsinghua.edu.cn/anaconda/cloud/conda-forge/
conda config --add channels https://mirrors.tuna.tsinghua.edu.cn/anaconda/cloud/bioconda/- 使用如下命令,是的鏡像源生效
conda config --set show_channel_urls yes- 關于conda的更多知識請參考??參考鏈接?
2,下載Chinesocr-app壓縮包
- 從github下載chineseocr-app,下載的地址在文章開頭已經給出
- 使用xftp軟件,將chineseocr-app上傳到服務器的指定位置
- 使用命令對其進行解壓,命令如下
unzip chineseocr-app.zip?3,下載/導入模型文件
- 百度網盤地址,下載模型文件
- 將模型文件上傳到服務器的chineseocr-app的moduls文件夾里面
- 需要注意,有些模型已經存在,無需上傳
4,修改作者提供的setup.md文件
- 修改的地方是tensorflow-gpu的版本,以及刪除了tensorflow,因為使用的是GPU服務
- 修改后的文件如下圖所示,建議是在本機改完上傳替換原先的版本,使用vi的方式修改不易
## 環境配置,支持linux\macOs
conda create -n chineseocr python=3.6 pip scipy numpy jupyter ipython ##運用conda 創建python環境
source activate chineseocr
git submodule init && git submodule update
pip install easydict opencv-contrib-python==4.0.0.21 Cython h5py lmdb mahotas pandas requests bs4 matplotlib lxml -i https://pypi.tuna.tsinghua.edu.cn/simple/
pip install -U pillow -i https://pypi.tuna.tsinghua.edu.cn/simple/
pip install keras==2.1.5 tensorflow-gpu==1.13.1
pip install web.py==0.40.dev0      redis
conda install pytorch torchvision -c pytorch
## pip install torch torchvision
-
?修改完,執行命令?sh setup.md進行環境配置,執行這條命令,需要將當前目錄切換到chineseocr-app路徑下
5,執行核心代碼 python app.py
- 這一步并不簡單,因為python文件缺失很多的包文件,參考我的文章?缺失包文件處理方式
- 每次安完一個包文件,需要執行python app.py進行驗證一下
- 注意的是,如果涉及到opencv這個包文件,需要指定版本,參考命令如下
pip install opencv-contrib-python==4.0.0.21 -i https://pypi.tuna.tsinghua.edu.cn/simple/- 直到這條命令不在報錯
6,開啟服務器的8080端口
- 命令如下
iptables -I INPUT -p tcp --dport 8090 -j ACCEPT7,進行OCR服務
- 在本地電腦瀏覽器輸入http://IP:8080/ocr進行ocr服務,IP為服務器的地址
8,驗證
- 速度提升很快,祝大家好運


 winexec,shellexecute ,createprocess)


的排序)


)

