參考鏈接
- FFmpeg源代碼簡單分析:日志輸出系統(av_log()等)_雷霄驊的博客-CSDN博客_ffmpeg源碼分析
日志輸出系統(av_log()等)
- 本文分析一下FFmpeg的日志(Log)輸出系統的源代碼。
- 日志輸出部分的核心函數只有一個:av_log()。
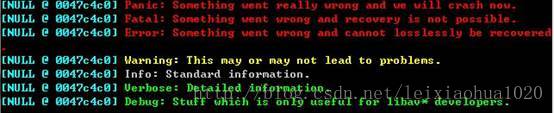
- 使用av_log()在控制臺輸出日志的效果如下圖所示。
- ?av_log()是FFmpeg中輸出日志的函數。隨便打開一個FFmpeg的源代碼文件,就會發現其中遍布著av_log()函數。一般情況下FFmpeg類庫的源代碼中是不允許使用printf()這種的函數的,所有的輸出一律使用av_log()。
- av_log()的聲明位于libavutil\log.h,如下所示。
/*** Send the specified message to the log if the level is less than or equal* to the current av_log_level. By default, all logging messages are sent to* stderr. This behavior can be altered by setting a different logging callback* function.* @see av_log_set_callback** @param avcl A pointer to an arbitrary struct of which the first field is a*        pointer to an AVClass struct or NULL if general log.* @param level The importance level of the message expressed using a @ref*        lavu_log_constants "Logging Constant".* @param fmt The format string (printf-compatible) that specifies how*        subsequent arguments are converted to output.*/
void av_log(void *avcl, int level, const char *fmt, ...) av_printf_format(3, 4);- 這個函數的聲明有兩個地方比較特殊:
- (1)函數最后一個參數是“…”。
- 在C語言中,在函數參數數量不確定的情況下使用“…”來代表參數。
- 例如printf()的原型定義如下? int printf (const char*, ...);
- 后文中對此再作詳細分析。
- (2)它的聲明后面有一個av_printf_format(3, 4)。有關這個地方的左右還沒有深入研究,網上資料中說它的作用是按照printf()的格式檢查av_log()的格式。
- 參數介紹
- avcl:指定一個包含AVClass的結構體。
- level:log的級別
- fmt:和printf()一樣。
- 由此可見,av_log()和printf()的不同主要在于前面多了兩個參數。
- 其中第一個參數指定該log所屬的結構體,例如AVFormatContext、AVCodecContext等等。
- 第二個參數指定log的級別,源代碼中定義了如下幾個級別。
/*** Print no output.*/
#define AV_LOG_QUIET    -8/*** Something went really wrong and we will crash now.*/
#define AV_LOG_PANIC     0/*** Something went wrong and recovery is not possible.* For example, no header was found for a format which depends* on headers or an illegal combination of parameters is used.*/
#define AV_LOG_FATAL     8/*** Something went wrong and cannot losslessly be recovered.* However, not all future data is affected.*/
#define AV_LOG_ERROR    16/*** Something somehow does not look correct. This may or may not* lead to problems. An example would be the use of '-vstrict -2'.*/
#define AV_LOG_WARNING  24/*** Standard information.*/
#define AV_LOG_INFO     32/*** Detailed information.*/
#define AV_LOG_VERBOSE  40/*** Stuff which is only useful for libav* developers.*/
#define AV_LOG_DEBUG    48/*** Extremely verbose debugging, useful for libav* development.*/
#define AV_LOG_TRACE 56#define AV_LOG_MAX_OFFSET (AV_LOG_TRACE - AV_LOG_QUIET)- 從定義中可以看出來,隨著嚴重程度逐漸下降,一共包含如下級別:AV_LOG_PANIC,AV_LOG_FATAL,AV_LOG_ERROR,AV_LOG_WARNING,AV_LOG_INFO,AV_LOG_VERBOSE,AV_LOG_DEBUG等。
- 每個級別定義的數值代表了嚴重程度,數值越小代表越嚴重。
- 默認的級別是AV_LOG_INFO。
- 此外,還有一個級別不輸出任何信息,即AV_LOG_QUIET。
- 當前系統存在著一個“Log級別”。所有嚴重程度高于該級別的Log信息都會輸出出來。例如當前的Log級別是AV_LOG_WARNING,則會輸出AV_LOG_PANIC,AV_LOG_FATAL,AV_LOG_ERROR,AV_LOG_WARNING級別的信息,而不會輸出AV_LOG_INFO級別的信息。
- 可以通過av_log_get_level()獲得當前Log的級別,通過另一個函數av_log_set_level()設置當前的Log級別。
av_log_get_level()
-
av_log_get_level()的定義如下所示
/*** Get the current log level** @see lavu_log_constants** @return Current log level*/
int av_log_get_level(void);
int av_log_get_level(void)
{return av_log_level;
}av_log_set_level()
/*** Set the log level** @see lavu_log_constants** @param level Logging level*/
void av_log_set_level(int level);
void av_log_set_level(int level)
{av_log_level = level;
}
- ?從代碼中可以看出,以上兩個函數主要操作了一個靜態全局變量av_log_level。
- 該變量用于存儲當前系統Log的級別。它的定義如下所示。
- static int av_log_level = AV_LOG_INFO;
- 它的源代碼位于libavutil\log.c,如下所示
void av_log(void* avcl, int level, const char *fmt, ...)
{va_list vl;va_start(vl, fmt);av_vlog(avcl, level, fmt, vl);va_end(vl);
}
- 首先來提一下C語言函數中“…”參數的含義。與它相關還涉及到以下4個部分:
- (1)va_list變量? ?va_list是一個指向函數的參數的指針
- (2)va_start()? ?va_start()用于初始化va_list變量
- (3)va_arg()? ?va_arg()用于返回可變參數
- (4)va_end()??va_end()用于結束可變參數的獲取
- 使用的例子
#include <stdio.h>
#include<stdarg.h>
void fun(int a,...){va_list pp;va_start(pp,a);do{printf("param =%d\n",a);a=va_arg(pp,int);//使 pp 指向下一個參數,將下一個參數的值賦給變量 a}while (a!=0);//直到參數為 0 時停止循環
}int main(){fun(20,40,60,80,0);return 0;
}
- av_log()的源代碼中,在va_start()和va_end()之間,調用了另一個函數av_vlog()。
av_vlog()
- av_vlog()是一個FFmpeg的API函數。它的聲明位于libavutil\log.h中,如下所示。
/*** Send the specified message to the log if the level is less than or equal* to the current av_log_level. By default, all logging messages are sent to* stderr. This behavior can be altered by setting a different logging callback* function.* @see av_log_set_callback** @param avcl A pointer to an arbitrary struct of which the first field is a*        pointer to an AVClass struct.* @param level The importance level of the message expressed using a @ref*        lavu_log_constants "Logging Constant".* @param fmt The format string (printf-compatible) that specifies how*        subsequent arguments are converted to output.* @param vl The arguments referenced by the format string.*/
void av_vlog(void *avcl, int level, const char *fmt, va_list vl);
- 從聲明中可以看出,av_vlog()和av_log()的參數基本上是一模一樣的。唯一的不同在于av_log()中的“…”變成了av_vlog()中的va_list。
- av_vlog()的定義位于libavutil\log.c中,如下所示。?
void av_vlog(void* avcl, int level, const char *fmt, va_list vl)
{AVClass* avc = avcl ? *(AVClass **) avcl : NULL;void (*log_callback)(void*, int, const char*, va_list) = av_log_callback;if (avc && avc->version >= (50 << 16 | 15 << 8 | 2) &&avc->log_level_offset_offset && level >= AV_LOG_FATAL)level += *(int *) (((uint8_t *) avcl) + avc->log_level_offset_offset);if (log_callback)log_callback(avcl, level, fmt, vl);
}- 從定義中可以看出,av_vlog()簡單調用了一個函數指針av_log_callback。
- av_log_callback是一個全局靜態變量,定義如下所示
static void (*av_log_callback)(void*, int, const char*, va_list) =av_log_default_callback;
- 從代碼中可以看出,av_log_callback指針默認指向一個函數av_log_default_callback()。
- av_log_default_callback()即FFmpeg默認的Log函數。
- 需要注意的是,這個Log函數是可以自定義的。
- 按照指定的參數定義一個自定義的函數后,可以通過FFmpeg的另一個API函數av_log_set_callback()設定為Log函數。
- av_log_set_callback()的聲明如下所示。
/*** Set the logging callback** @note The callback must be thread safe, even if the application does not use*       threads itself as some codecs are multithreaded.** @see av_log_default_callback** @param callback A logging function with a compatible signature.*/
void av_log_set_callback(void (*callback)(void*, int, const char*, va_list));- 從聲明中可以看出,需要指定一個參數為(void*, int, const char*, va_list),返回值為void的函數作為Log函數。
- av_log_set_callback()的定義很簡單,做了一個函數指針賦值的工作,如下所示。?
void av_log_set_callback(void (*callback)(void*, int, const char*, va_list))
{av_log_callback = callback;
}- 例如,我們可以指定一個my_logoutput()函數作為Log的輸出函數,就可以將Log信息輸出到文本中(而不是屏幕上)。
void my_logoutput(void* ptr, int level, const char* fmt,va_list vl){FILE *fp = fopen("my_log.txt","a+");   if(fp){   vfprintf(fp,fmt,vl);fflush(fp);fclose(fp);}
}- 編輯好函數之后,使用av_log_set_callback()函數設置該函數為Log輸出函數即可。
av_log_set_callback(my_logoutput);av_log_default_callback()
下面我們看一下FFmpeg的默認Log輸出函數av_log_default_callback()。它的定義如下。
void av_log_default_callback(void* ptr, int level, const char* fmt, va_list vl)
{static int print_prefix = 1;static int count;static char prev[LINE_SZ];AVBPrint part[4];char line[LINE_SZ];static int is_atty;int type[2];unsigned tint = 0;if (level >= 0) {tint = level & 0xff00;level &= 0xff;}if (level > av_log_level)return;ff_mutex_lock(&mutex);format_line(ptr, level, fmt, vl, part, &print_prefix, type);snprintf(line, sizeof(line), "%s%s%s%s", part[0].str, part[1].str, part[2].str, part[3].str);#if HAVE_ISATTYif (!is_atty)is_atty = isatty(2) ? 1 : -1;
#endifif (print_prefix && (flags & AV_LOG_SKIP_REPEATED) && !strcmp(line, prev) &&*line && line[strlen(line) - 1] != '\r'){count++;if (is_atty == 1)fprintf(stderr, "    Last message repeated %d times\r", count);goto end;}if (count > 0) {fprintf(stderr, "    Last message repeated %d times\n", count);count = 0;}strcpy(prev, line);sanitize(part[0].str);colored_fputs(type[0], 0, part[0].str);sanitize(part[1].str);colored_fputs(type[1], 0, part[1].str);sanitize(part[2].str);colored_fputs(av_clip(level >> 3, 0, NB_LEVELS - 1), tint >> 8, part[2].str);sanitize(part[3].str);colored_fputs(av_clip(level >> 3, 0, NB_LEVELS - 1), tint >> 8, part[3].str);#if CONFIG_VALGRIND_BACKTRACEif (level <= BACKTRACE_LOGLEVEL)VALGRIND_PRINTF_BACKTRACE("%s", "");
#endif
end:av_bprint_finalize(part+3, NULL);ff_mutex_unlock(&mutex);
}
- av_log_default_callback()的代碼是比較復雜的。其實如果我們僅僅是希望把Log信息輸出到屏幕上,遠不需要那么多代碼,只需要簡單打印一下就可以了。av_log_default_callback()之所以會那么復雜,主要是因為他還包含了很多的功能,比如說根據Log級別的不同將輸出的文本設置成不同的顏色等等。下圖顯示了不同級別的Log不同的背景顏色。?
- 下面看一下av_log_default_callback()的源代碼大致的流程:
- (1)如果輸入參數level大于系統當前的日志級別av_log_level,表明不需要做任何處理,直接返回。
- (2)調用format_line()設定Log的輸出格式。
- (3)調用colored_fputs()設定Log的顏色。?
format_line(), av_log_format_line()
- format_line()用于設定Log的輸出格式。
- 它本身并不是一個FFmpeg的API,但是FFmpeg有一個API函數av_log_format_line()調用了這個函數。
- av_log_format_line()的聲明如下所示。
/*** Format a line of log the same way as the default callback.* @param line          buffer to receive the formatted line* @param line_size     size of the buffer* @param print_prefix  used to store whether the prefix must be printed;*                      must point to a persistent integer initially set to 1*/
void av_log_format_line(void *ptr, int level, const char *fmt, va_list vl,char *line, int line_size, int *print_prefix);- av_log_format_line()的定義如下所示。
void av_log_format_line(void *ptr, int level, const char *fmt, va_list vl,char *line, int line_size, int *print_prefix)
{av_log_format_line2(ptr, level, fmt, vl, line, line_size, print_prefix);
}int av_log_format_line2(void *ptr, int level, const char *fmt, va_list vl,char *line, int line_size, int *print_prefix)
{AVBPrint part[4];int ret;format_line(ptr, level, fmt, vl, part, print_prefix, NULL);ret = snprintf(line, line_size, "%s%s%s%s", part[0].str, part[1].str, part[2].str, part[3].str);av_bprint_finalize(part+3, NULL);return ret;
}
- 從代碼中可以看出,首先聲明了一個AVBPrint類型的數組,其中包含了4個元素;
- 接著調用format_line()設定格式;
- 最后將設置格式后的AVBPrint數組中的4個元素連接起來。
- 在這里遇到了一個結構體AVBPrint,它的定義位于libavutil\bprint.h,如下所示。?
/*** Buffer to print data progressively** The string buffer grows as necessary and is always 0-terminated.* The content of the string is never accessed, and thus is* encoding-agnostic and can even hold binary data.** Small buffers are kept in the structure itself, and thus require no* memory allocation at all (unless the contents of the buffer is needed* after the structure goes out of scope). This is almost as lightweight as* declaring a local "char buf[512]".** The length of the string can go beyond the allocated size: the buffer is* then truncated, but the functions still keep account of the actual total* length.** In other words, buf->len can be greater than buf->size and records the* total length of what would have been to the buffer if there had been* enough memory.** Append operations do not need to be tested for failure: if a memory* allocation fails, data stop being appended to the buffer, but the length* is still updated. This situation can be tested with* av_bprint_is_complete().** The size_max field determines several possible behaviours:** size_max = -1 (= UINT_MAX) or any large value will let the buffer be* reallocated as necessary, with an amortized linear cost.** size_max = 0 prevents writing anything to the buffer: only the total* length is computed. The write operations can then possibly be repeated in* a buffer with exactly the necessary size* (using size_init = size_max = len + 1).** size_max = 1 is automatically replaced by the exact size available in the* structure itself, thus ensuring no dynamic memory allocation. The* internal buffer is large enough to hold a reasonable paragraph of text,* such as the current paragraph.*/FF_PAD_STRUCTURE(AVBPrint, 1024,char *str;         /**< string so far */unsigned len;      /**< length so far */unsigned size;     /**< allocated memory */unsigned size_max; /**< maximum allocated memory */char reserved_internal_buffer[1];
)- AVBPrint的注釋代碼很長,不再詳細敘述。在這里只要知道他是用于打印字符串的緩存就可以了。
- 它的名稱BPrint的意思應該就是“Buffer to Print”。
- 其中的str存儲了將要打印的字符串。
- format_line()函數的定義如下所示。
static void format_line(void *avcl, int level, const char *fmt, va_list vl,AVBPrint part[4], int *print_prefix, int type[2])
{AVClass* avc = avcl ? *(AVClass **) avcl : NULL;av_bprint_init(part+0, 0, AV_BPRINT_SIZE_AUTOMATIC);av_bprint_init(part+1, 0, AV_BPRINT_SIZE_AUTOMATIC);av_bprint_init(part+2, 0, AV_BPRINT_SIZE_AUTOMATIC);av_bprint_init(part+3, 0, 65536);if(type) type[0] = type[1] = AV_CLASS_CATEGORY_NA + 16;if (*print_prefix && avc) {if (avc->parent_log_context_offset) {AVClass** parent = *(AVClass ***) (((uint8_t *) avcl) +avc->parent_log_context_offset);if (parent && *parent) {av_bprintf(part+0, "[%s @ %p] ",(*parent)->item_name(parent), parent);if(type) type[0] = get_category(parent);}}av_bprintf(part+1, "[%s @ %p] ",avc->item_name(avcl), avcl);if(type) type[1] = get_category(avcl);}if (*print_prefix && (level > AV_LOG_QUIET) && (flags & AV_LOG_PRINT_LEVEL))av_bprintf(part+2, "[%s] ", get_level_str(level));av_vbprintf(part+3, fmt, vl);if(*part[0].str || *part[1].str || *part[2].str || *part[3].str) {char lastc = part[3].len && part[3].len <= part[3].size ? part[3].str[part[3].len - 1] : 0;*print_prefix = lastc == '\n' || lastc == '\r';}
}
- 從代碼中可以看出,其分別處理了AVBPrint類型數組part的4個元素。
- 由此我們也可以看出FFmpeg一條Log可以分成4個組成部分。
- 在這里涉及到幾個與AVBPrint相關的函數,由于篇幅的關系,不再分析它們的源代碼,僅僅列出它們的定義:
- 初始化AVBPrint的函數av_bprint_init()。
/*** Init a print buffer.** @param buf        buffer to init* @param size_init  initial size (including the final 0)* @param size_max   maximum size;*                   0 means do not write anything, just count the length;*                   1 is replaced by the maximum value for automatic storage;*                   any large value means that the internal buffer will be*                   reallocated as needed up to that limit; -1 is converted to*                   UINT_MAX, the largest limit possible.*                   Check also AV_BPRINT_SIZE_* macros.*/
void av_bprint_init(AVBPrint *buf, unsigned size_init, unsigned size_max);
void av_bprint_init(AVBPrint *buf, unsigned size_init, unsigned size_max)
{unsigned size_auto = (char *)buf + sizeof(*buf) -buf->reserved_internal_buffer;if (size_max == 1)size_max = size_auto;buf->str = buf->reserved_internal_buffer;buf->len = 0;buf->size = FFMIN(size_auto, size_max);buf->size_max = size_max;*buf->str = 0;if (size_init > buf->size)av_bprint_alloc(buf, size_init - 1);
}
- 向AVBPrint添加一個字符串的函數av_bprintf()
/*** Append a formatted string to a print buffer.*/
void av_bprintf(AVBPrint *buf, const char *fmt, ...) av_printf_format(2, 3);
void av_bprintf(AVBPrint *buf, const char *fmt, ...)
{unsigned room;char *dst;va_list vl;int extra_len;while (1) {room = av_bprint_room(buf);dst = room ? buf->str + buf->len : NULL;va_start(vl, fmt);extra_len = vsnprintf(dst, room, fmt, vl);va_end(vl);if (extra_len <= 0)return;if (extra_len < room)break;if (av_bprint_alloc(buf, extra_len))break;}av_bprint_grow(buf, extra_len);
}
- 可以看出av_bprintf()實際上調用了系統的vsnprintf()完成了相應的功能。
- 向AVBPrint添加一個字符串的函數av_vbprintf (),注意與av_bprintf()的不同在于其第3個參數不一樣。
/*** Append a formatted string to a print buffer.*/
void av_vbprintf(AVBPrint *buf, const char *fmt, va_list vl_arg);- 看完以上幾個與AVBPrint相關函數之后,就可以來看一下format_line()的代碼了。
- 例如,part[0]對應的是目標結構體的父結構體的名稱(如果父結構體存在的話);其打印格式形如“[%s @ %p]”,其中前面的“%s”對應父結構體的名稱,“%p”對應其所在的地址。
- part[1]對應的是目標結構體的名稱;其打印格式形如“[%s @ %p]”,其中前面的“%s”對應本結構體的名稱,“%p”對應其所在的地址。
- part[2]用于輸出Log的級別,這個字符串只有在flag中設置AV_LOG_PRINT_LEVEL的時候才能打印。
- part[3]則是打印原本傳送進來的文本。
- 將format_line()函數處理后得到的4個字符串連接其來,就可以的到一條完整的Log信息。
- 下面圖顯示了flag設置AV_LOG_PRINT_LEVEL后的打印出來的Log的格式。

- 默認情況下不設置flag打印出來的格式下所示。
?

colored_fputs()
- colored_fputs()函數用于將輸出的文本“上色”并且輸出。在這里有一點需要注意:Windows和Linux下控制臺程序上色的方法是不一樣的。
- Windows下是通過SetConsoleTextAttribute()方法給控制臺中的文本上色;
- Linux下則是通過添加一些ANSI控制碼完成上色。
Linux下控制臺文字上色的方法
- Linux下控制臺顏色是通過添加專用數字來選擇的。
- 這些數字夾在 "\e["和 "m"之間。如果指定一個以上的數字,則用分號將它們分開。
舉幾個例子:
- (1)第一個數字(31)為前景顏色(紅色);第二個數字為(42)背景顏色(綠色)? echo -e "\e[31;42m"
- (2)使用"\e[0m"序列將顏色重新設置為正常值? ? echo -e "\e[0m" 或 echo -e "\033[0m"
- (3)顏色對應關系如下所示:? ?\e[30m -- \e[37m ? ?設置前景色(字體顏色)
- echo -e "\e[30m" ? ?灰色
- echo -e "\e[31m" ? ?紅色 ? ?
- echo -e "\e[32m" ? ?綠色
- echo -e "\e[33m" ? ?黃色
- echo -e "\e[34m" ? ?藍色
- echo -e "\e[35m" ? ?紫色
- echo -e "\e[36m" ? ?淡藍色
- echo -e "\e[37m" ? ?白色 ? ??
- \e[40m -- \e[47m ? ?設置背景色
- echo -e "\e[40m" ? ?灰色
- echo -e "\e[41m" ? ?紅色
- echo -e "\e[42m" ? ?綠色
- echo -e "\e[43m" ? ?黃色
- echo -e "\e[44m" ? ?藍色
- echo -e "\e[45m" ? ?紫色
- echo -e "\e[46m" ? ?淡藍色
- echo -e "\e[47m" ? ?白色
- 具體到編程中,printf() 顏色設置示例代碼如下所示。
int main()
{
printf("\e[31m Hello World. \e[0m \n"); // 紅色字體
return 0;
}
Windows下控制臺文字上色的方法
- Windows下控制臺顏色是通過SetConsoleTextAttribute()函數完成的。SetConsoleTextAttribute()函數的原型如下所示。
- BOOL SetConsoleTextAttribute(HANDLE hConsoleOutput, WORD wAttributes);
- 其中2個參數的含義如下所示:
- hConsoleOutput:指向控制臺的句柄。
- wAttributes:文本屬性。
- hConsoleOutput可以選擇以下3種句柄:
- STD_INPUT_HANDLE: ?標準輸入的句柄
- STD_OUTPUT_HANDLE: ?標準輸出的句柄
- STD_ERROR_HANDLE: ?標準錯誤的句柄
- wAttributes可以控制前景色和背景色:
- FOREGROUND_BLUE: ?字體顏色:藍
- FOREGROUND_GREEN: ?字體顏色:綠
- FOREGROUND_RED: ?字體顏色:紅
- FOREGROUND_INTENSITY: ?前景色高亮顯示
- BACKGROUND_BLUE: ?背景顏色:藍
- BACKGROUND_GREEN: ?背景顏色:綠
- BACKGROUND_RED: ?背景顏色:紅
- BACKGROUND_INTENSITY ?背景色高亮顯示
- 控制臺文本上色demo代碼如下所示。
/*** 雷霄驊 Lei Xiaohua* leixiaohua1020@126.com* http://blog.csdn.net/leixiaohua1020*/
#include <stdio.h>
#include <windows.h>int main()
{SetConsoleTextAttribute(GetStdHandle(STD_OUTPUT_HANDLE), FOREGROUND_RED);printf("red\n");SetConsoleTextAttribute(GetStdHandle(STD_OUTPUT_HANDLE), FOREGROUND_GREEN);printf("green\n");SetConsoleTextAttribute(GetStdHandle(STD_OUTPUT_HANDLE), FOREGROUND_BLUE);printf("blue\n");SetConsoleTextAttribute(GetStdHandle(STD_OUTPUT_HANDLE), FOREGROUND_RED|FOREGROUND_GREEN);printf("red+green=yellow\n");SetConsoleTextAttribute(GetStdHandle(STD_OUTPUT_HANDLE), FOREGROUND_RED|FOREGROUND_BLUE);printf("red+blue=purple\n");SetConsoleTextAttribute(GetStdHandle(STD_OUTPUT_HANDLE), FOREGROUND_GREEN|FOREGROUND_BLUE);printf("green+blue=cyan\n");SetConsoleTextAttribute(GetStdHandle(STD_OUTPUT_HANDLE), FOREGROUND_RED|BACKGROUND_GREEN);printf("Add background\n");return 0;
}
colored_fputs()源代碼
static void colored_fputs(int level, int tint, const char *str)
{int local_use_color;if (!*str)return;if (use_color < 0)check_color_terminal();if (level == AV_LOG_INFO/8) local_use_color = 0;else                        local_use_color = use_color;#if defined(_WIN32) && HAVE_SETCONSOLETEXTATTRIBUTE && HAVE_GETSTDHANDLEif (con != INVALID_HANDLE_VALUE) {if (local_use_color)SetConsoleTextAttribute(con, background | color[level]);win_console_puts(str);if (local_use_color)SetConsoleTextAttribute(con, attr_orig);} else {ansi_fputs(level, tint, str, local_use_color);}
#elseansi_fputs(level, tint, str, local_use_color);
#endif}- 首先判定根據宏定義系統的類型,如果系統類型是Windows,那么就調用SetConsoleTextAttribute()方法設定控制臺文本的顏色,然后調用fputs()將Log記錄輸出到stderr(注意不是stdout);如果系統類型是Linux,則通過添加特定字符串的方式設定控制臺文本的顏色,然后將Log記錄輸出到stderr。
- 至此FFmpeg的日志輸出系統的源代碼就分析完畢了。


)


)

)


