參考鏈接
- FFmpeg源代碼簡單分析:libavdevice的gdigrab_雷霄驊的博客-CSDN博客_gdigrab
libavdevice的gdigrab
- GDIGrab用于在Windows下屏幕錄像(抓屏)
- gdigrab的源代碼位于libavdevice\gdigrab.c。
- 關鍵函數的調用關系圖如下圖所示。
- 圖中綠色背景的函數代表源代碼中自己聲明的函數,紫色背景的函數代表Win32的API函數。
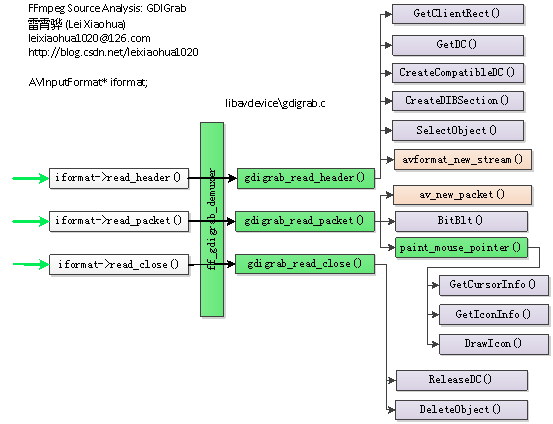
ff_gdigrab_demuxer
- 在FFmpeg中Device也被當做是一種Format,因為GDIGrab是一個輸入設備,因此被當作一個AVInputFormat。
- GDIGrab對應的AVInputFormat結構體如下所示。
/** gdi grabber device demuxer declaration */
const AVInputFormat ff_gdigrab_demuxer = {.name           = "gdigrab",.long_name      = NULL_IF_CONFIG_SMALL("GDI API Windows frame grabber"),.priv_data_size = sizeof(struct gdigrab),.read_header    = gdigrab_read_header,.read_packet    = gdigrab_read_packet,.read_close     = gdigrab_read_close,.flags          = AVFMT_NOFILE,.priv_class     = &gdigrab_class,
};- 從該結構體可以看出:
- 設備名稱是“gdigrab”;
- 設備完整名稱是“GDI API Windows frame grabber”;
- 初始化函數指針read_header()指向gdigrab_read_header();
- 讀取數據函數指針read_packet()指向gdigrab_read_packet();
- 關閉函數指針read_close()指向gdigrab_read_close();
- Flags設置為AVFMT_NOFILE;
- AVClass指定為gdigrab_class。
- 下面分析一下這些數據。
gdigrab_class
- ff_gdigrab_demuxer指定它的AVClass為一個名稱為“gdigrab_class”的靜態變量。
- gdigrab_class的定義如下。
static const AVClass gdigrab_class = {.class_name = "GDIgrab indev",.item_name  = av_default_item_name,.option     = options,.version    = LIBAVUTIL_VERSION_INT,.category   = AV_CLASS_CATEGORY_DEVICE_VIDEO_INPUT,
};-
從gdigrab_class的定義可以看出,它指定了一個名稱為“options”的數組作為它的選項數組(賦值給AVClass的option變量)
options
- 下面看一下這個options數組的定義,如下所示。
#define OFFSET(x) offsetof(struct gdigrab, x)
#define DEC AV_OPT_FLAG_DECODING_PARAM
static const AVOption options[] = {{ "draw_mouse", "draw the mouse pointer", OFFSET(draw_mouse), AV_OPT_TYPE_INT, {.i64 = 1}, 0, 1, DEC },{ "show_region", "draw border around capture area", OFFSET(show_region), AV_OPT_TYPE_INT, {.i64 = 0}, 0, 1, DEC },{ "framerate", "set video frame rate", OFFSET(framerate), AV_OPT_TYPE_VIDEO_RATE, {.str = "ntsc"}, 0, INT_MAX, DEC },{ "video_size", "set video frame size", OFFSET(width), AV_OPT_TYPE_IMAGE_SIZE, {.str = NULL}, 0, 0, DEC },{ "offset_x", "capture area x offset", OFFSET(offset_x), AV_OPT_TYPE_INT, {.i64 = 0}, INT_MIN, INT_MAX, DEC },{ "offset_y", "capture area y offset", OFFSET(offset_y), AV_OPT_TYPE_INT, {.i64 = 0}, INT_MIN, INT_MAX, DEC },{ NULL },
};- options數組中包含了該Device支持的選項。可以看出GDIGrab支持如下選項:
- draw_mouse:畫出鼠標指針。
- show_region:劃出抓屏區域的邊界。
- framerate:抓屏幀率。
- video_size:抓屏的大小。
- offset_x:抓屏起始點x軸坐標。
- offset_y:抓屏起始點y軸坐標。
- 從宏定義“#define OFFSET(x) offsetof(struct gdigrab, x)”中可以看出,這些選項都存儲在一個名稱為“gdigrab”的結構體中。
Gdigrab 上下文結構體
- Gdigrab上下文結構體中存儲了GDIGrab設備用到的各種變量,定義如下所示。
/*** GDI Device Demuxer context*/
struct gdigrab {const AVClass *class;   /**< Class for private options */int        frame_size;  /**< Size in bytes of the frame pixel data */int        header_size; /**< Size in bytes of the DIB header */AVRational time_base;   /**< Time base */int64_t    time_frame;  /**< Current time */int        draw_mouse;  /**< Draw mouse cursor (private option) */int        show_region; /**< Draw border (private option) */AVRational framerate;   /**< Capture framerate (private option) */int        width;       /**< Width of the grab frame (private option) */int        height;      /**< Height of the grab frame (private option) */int        offset_x;    /**< Capture x offset (private option) */int        offset_y;    /**< Capture y offset (private option) */HWND       hwnd;        /**< Handle of the window for the grab */HDC        source_hdc;  /**< Source device context */HDC        dest_hdc;    /**< Destination, source-compatible DC */BITMAPINFO bmi;         /**< Information describing DIB format */HBITMAP    hbmp;        /**< Information on the bitmap captured */void      *buffer;      /**< The buffer containing the bitmap image data */RECT       clip_rect;   /**< The subarea of the screen or window to clip */HWND       region_hwnd; /**< Handle of the region border window */int cursor_error_printed;
};
gdigrab_read_header()
- gdigrab_read_header()用于初始化gdigrab。
- 函數的定義如下所示。
/*** Initializes the gdi grab device demuxer (public device demuxer API).** @param s1 Context from avformat core* @return AVERROR_IO error, 0 success*/
static int
gdigrab_read_header(AVFormatContext *s1)
{struct gdigrab *gdigrab = s1->priv_data;HWND hwnd;HDC source_hdc = NULL;HDC dest_hdc   = NULL;BITMAPINFO bmi;HBITMAP hbmp   = NULL;void *buffer   = NULL;const char *filename = s1->url;const char *name     = NULL;AVStream   *st       = NULL;int bpp;int horzres;int vertres;int desktophorzres;int desktopvertres;RECT virtual_rect;RECT clip_rect;BITMAP bmp;int ret;if (!strncmp(filename, "title=", 6)) {wchar_t *name_w = NULL;name = filename + 6;if(utf8towchar(name, &name_w)) {ret = AVERROR(errno);goto error;}if(!name_w) {ret = AVERROR(EINVAL);goto error;}hwnd = FindWindowW(NULL, name_w);av_freep(&name_w);if (!hwnd) {av_log(s1, AV_LOG_ERROR,"Can't find window '%s', aborting.\n", name);ret = AVERROR(EIO);goto error;}if (gdigrab->show_region) {av_log(s1, AV_LOG_WARNING,"Can't show region when grabbing a window.\n");gdigrab->show_region = 0;}} else if (!strcmp(filename, "desktop")) {hwnd = NULL;} else {av_log(s1, AV_LOG_ERROR,"Please use \"desktop\" or \"title=<windowname>\" to specify your target.\n");ret = AVERROR(EIO);goto error;}/* This will get the device context for the selected window, or if* none, the primary screen */source_hdc = GetDC(hwnd);if (!source_hdc) {WIN32_API_ERROR("Couldn't get window device context");ret = AVERROR(EIO);goto error;}bpp = GetDeviceCaps(source_hdc, BITSPIXEL);horzres = GetDeviceCaps(source_hdc, HORZRES);vertres = GetDeviceCaps(source_hdc, VERTRES);desktophorzres = GetDeviceCaps(source_hdc, DESKTOPHORZRES);desktopvertres = GetDeviceCaps(source_hdc, DESKTOPVERTRES);if (hwnd) {GetClientRect(hwnd, &virtual_rect);/* window -- get the right height and width for scaling DPI */virtual_rect.left   = virtual_rect.left   * desktophorzres / horzres;virtual_rect.right  = virtual_rect.right  * desktophorzres / horzres;virtual_rect.top    = virtual_rect.top    * desktopvertres / vertres;virtual_rect.bottom = virtual_rect.bottom * desktopvertres / vertres;} else {/* desktop -- get the right height and width for scaling DPI */virtual_rect.left = GetSystemMetrics(SM_XVIRTUALSCREEN);virtual_rect.top = GetSystemMetrics(SM_YVIRTUALSCREEN);virtual_rect.right = (virtual_rect.left + GetSystemMetrics(SM_CXVIRTUALSCREEN)) * desktophorzres / horzres;virtual_rect.bottom = (virtual_rect.top + GetSystemMetrics(SM_CYVIRTUALSCREEN)) * desktopvertres / vertres;}/* If no width or height set, use full screen/window area */if (!gdigrab->width || !gdigrab->height) {clip_rect.left = virtual_rect.left;clip_rect.top = virtual_rect.top;clip_rect.right = virtual_rect.right;clip_rect.bottom = virtual_rect.bottom;} else {clip_rect.left = gdigrab->offset_x;clip_rect.top = gdigrab->offset_y;clip_rect.right = gdigrab->width + gdigrab->offset_x;clip_rect.bottom = gdigrab->height + gdigrab->offset_y;}if (clip_rect.left < virtual_rect.left ||clip_rect.top < virtual_rect.top ||clip_rect.right > virtual_rect.right ||clip_rect.bottom > virtual_rect.bottom) {av_log(s1, AV_LOG_ERROR,"Capture area (%li,%li),(%li,%li) extends outside window area (%li,%li),(%li,%li)",clip_rect.left, clip_rect.top,clip_rect.right, clip_rect.bottom,virtual_rect.left, virtual_rect.top,virtual_rect.right, virtual_rect.bottom);ret = AVERROR(EIO);goto error;}if (name) {av_log(s1, AV_LOG_INFO,"Found window %s, capturing %lix%lix%i at (%li,%li)\n",name,clip_rect.right - clip_rect.left,clip_rect.bottom - clip_rect.top,bpp, clip_rect.left, clip_rect.top);} else {av_log(s1, AV_LOG_INFO,"Capturing whole desktop as %lix%lix%i at (%li,%li)\n",clip_rect.right - clip_rect.left,clip_rect.bottom - clip_rect.top,bpp, clip_rect.left, clip_rect.top);}if (clip_rect.right - clip_rect.left <= 0 ||clip_rect.bottom - clip_rect.top <= 0 || bpp%8) {av_log(s1, AV_LOG_ERROR, "Invalid properties, aborting\n");ret = AVERROR(EIO);goto error;}dest_hdc = CreateCompatibleDC(source_hdc);if (!dest_hdc) {WIN32_API_ERROR("Screen DC CreateCompatibleDC");ret = AVERROR(EIO);goto error;}/* Create a DIB and select it into the dest_hdc */bmi.bmiHeader.biSize          = sizeof(BITMAPINFOHEADER);bmi.bmiHeader.biWidth         = clip_rect.right - clip_rect.left;bmi.bmiHeader.biHeight        = -(clip_rect.bottom - clip_rect.top);bmi.bmiHeader.biPlanes        = 1;bmi.bmiHeader.biBitCount      = bpp;bmi.bmiHeader.biCompression   = BI_RGB;bmi.bmiHeader.biSizeImage     = 0;bmi.bmiHeader.biXPelsPerMeter = 0;bmi.bmiHeader.biYPelsPerMeter = 0;bmi.bmiHeader.biClrUsed       = 0;bmi.bmiHeader.biClrImportant  = 0;hbmp = CreateDIBSection(dest_hdc, &bmi, DIB_RGB_COLORS,&buffer, NULL, 0);if (!hbmp) {WIN32_API_ERROR("Creating DIB Section");ret = AVERROR(EIO);goto error;}if (!SelectObject(dest_hdc, hbmp)) {WIN32_API_ERROR("SelectObject");ret = AVERROR(EIO);goto error;}/* Get info from the bitmap */GetObject(hbmp, sizeof(BITMAP), &bmp);st = avformat_new_stream(s1, NULL);if (!st) {ret = AVERROR(ENOMEM);goto error;}avpriv_set_pts_info(st, 64, 1, 1000000); /* 64 bits pts in us */gdigrab->frame_size  = bmp.bmWidthBytes * bmp.bmHeight * bmp.bmPlanes;gdigrab->header_size = sizeof(BITMAPFILEHEADER) + sizeof(BITMAPINFOHEADER) +(bpp <= 8 ? (1 << bpp) : 0) * sizeof(RGBQUAD) /* palette size */;gdigrab->time_base   = av_inv_q(gdigrab->framerate);gdigrab->time_frame  = av_gettime_relative() / av_q2d(gdigrab->time_base);gdigrab->hwnd       = hwnd;gdigrab->source_hdc = source_hdc;gdigrab->dest_hdc   = dest_hdc;gdigrab->hbmp       = hbmp;gdigrab->bmi        = bmi;gdigrab->buffer     = buffer;gdigrab->clip_rect  = clip_rect;gdigrab->cursor_error_printed = 0;if (gdigrab->show_region) {if (gdigrab_region_wnd_init(s1, gdigrab)) {ret = AVERROR(EIO);goto error;}}st->avg_frame_rate = av_inv_q(gdigrab->time_base);st->codecpar->codec_type = AVMEDIA_TYPE_VIDEO;st->codecpar->codec_id   = AV_CODEC_ID_BMP;st->codecpar->bit_rate   = (gdigrab->header_size + gdigrab->frame_size) * 1/av_q2d(gdigrab->time_base) * 8;return 0;error:if (source_hdc)ReleaseDC(hwnd, source_hdc);if (dest_hdc)DeleteDC(dest_hdc);if (hbmp)DeleteObject(hbmp);if (source_hdc)DeleteDC(source_hdc);return ret;
}- 從源代碼可以看出,gdigrab_read_header()的流程大致如下所示:
- (1)確定窗口的句柄hwnd。如果指定了“title=”的話,調用FindWindow()獲取hwnd;如果指定了“desktop”,則設定hwnd為NULL。
- (2)根據窗口的句柄hwnd確定抓屏的矩形區域。如果抓取指定窗口,則通過GetClientRect()函數;否則就抓取整個屏幕。
- (3)調用GDI的API完成抓屏的一些初始化工作。包括:
- a)通過GetDC()獲得某個窗口句柄的HDC(在這里是source_hdc)。
- b)通過CreateCompatibleDC()創建一個與指定設備兼容的HDC(在這里是dest_hdc)
- c)通過CreateDIBSection()創建HBITMAP
- d)通過SelectObject()綁定HBITMAP和HDC(指的是dest_hdc)
- (4)通過avformat_new_stream()創建一個AVStream。
- (5)將初始化時候的一些參數保存至GDIGrab的上下文結構體。
gdigrab_read_packet()
- gdigrab_read_packet()用于讀取一幀抓屏數據。
- 該函數的定義如下所示。
/*** Grabs a frame from gdi (public device demuxer API).** @param s1 Context from avformat core* @param pkt Packet holding the grabbed frame* @return frame size in bytes*/
static int gdigrab_read_packet(AVFormatContext *s1, AVPacket *pkt)
{struct gdigrab *gdigrab = s1->priv_data;//讀取參數HDC        dest_hdc   = gdigrab->dest_hdc;HDC        source_hdc = gdigrab->source_hdc;RECT       clip_rect  = gdigrab->clip_rect;AVRational time_base  = gdigrab->time_base;int64_t    time_frame = gdigrab->time_frame;BITMAPFILEHEADER bfh;int file_size = gdigrab->header_size + gdigrab->frame_size;int64_t curtime, delay;/* Calculate the time of the next frame */time_frame += INT64_C(1000000);/* Run Window message processing queue */if (gdigrab->show_region)gdigrab_region_wnd_update(s1, gdigrab);/* wait based on the frame rate *///延時for (;;) {curtime = av_gettime();delay = time_frame * av_q2d(time_base) - curtime;if (delay <= 0) {if (delay < INT64_C(-1000000) * av_q2d(time_base)) {time_frame += INT64_C(1000000);}break;}if (s1->flags & AVFMT_FLAG_NONBLOCK) {return AVERROR(EAGAIN);} else {av_usleep(delay);}}//新建一個AVPacketif (av_new_packet(pkt, file_size) < 0)return AVERROR(ENOMEM);pkt->pts = curtime;/* Blit screen grab *///關鍵:BitBlt()完成抓屏功能if (!BitBlt(dest_hdc, 0, 0,clip_rect.right - clip_rect.left,clip_rect.bottom - clip_rect.top,source_hdc,clip_rect.left, clip_rect.top, SRCCOPY | CAPTUREBLT)) {WIN32_API_ERROR("Failed to capture image");return AVERROR(EIO);}//畫鼠標指針?if (gdigrab->draw_mouse)paint_mouse_pointer(s1, gdigrab);/* Copy bits to packet data *///BMP文件頭BITMAPFILEHEADERbfh.bfType = 0x4d42; /* "BM" in little-endian */bfh.bfSize = file_size;bfh.bfReserved1 = 0;bfh.bfReserved2 = 0;bfh.bfOffBits = gdigrab->header_size;//往AVPacket中拷貝數據//拷貝BITMAPFILEHEADERmemcpy(pkt->data, &bfh, sizeof(bfh));//拷貝BITMAPINFOHEADERmemcpy(pkt->data + sizeof(bfh), &gdigrab->bmi.bmiHeader, sizeof(gdigrab->bmi.bmiHeader));//不常見if (gdigrab->bmi.bmiHeader.biBitCount <= 8)GetDIBColorTable(dest_hdc, 0, 1 << gdigrab->bmi.bmiHeader.biBitCount,(RGBQUAD *) (pkt->data + sizeof(bfh) + sizeof(gdigrab->bmi.bmiHeader)));//拷貝像素數據memcpy(pkt->data + gdigrab->header_size, gdigrab->buffer, gdigrab->frame_size);gdigrab->time_frame = time_frame;return gdigrab->header_size + gdigrab->frame_size;
}- 從源代碼可以看出,gdigrab_read_packet()的流程大致如下所示:
- (1)從GDIGrab上下文結構體讀取初始化時候設定的參數。
- (2)根據幀率參數進行延時。
- (3)通過av_new_packet()新建一個AVPacket。
- (4)通過BitBlt()完成抓屏功能。
- (5)如果需要畫鼠標指針的話,調用paint_mouse_pointer(),這里不做分析。
- (6)按照順序拷貝以下3項內容至AVPacket的data指向的內存:
- a)BITMAPFILEHEADER
- b)BITMAPINFOHEADER
- c)抓屏的到的像素數據
gdigrab_read_close()
- gdigrab_read_close()用于關閉gdigrab。
- 該函數的定義如下所示。
- 從源代碼可以看出,gdigrab_read_close ()完成了各種變量的清理工作。
/*** Closes gdi frame grabber (public device demuxer API).** @param s1 Context from avformat core* @return 0 success, !0 failure*/
static int gdigrab_read_close(AVFormatContext *s1)
{struct gdigrab *s = s1->priv_data;if (s->show_region)gdigrab_region_wnd_destroy(s1, s);if (s->source_hdc)ReleaseDC(s->hwnd, s->source_hdc);if (s->dest_hdc)DeleteDC(s->dest_hdc);if (s->hbmp)DeleteObject(s->hbmp);if (s->source_hdc)DeleteDC(s->source_hdc);return 0;
}


)


)