指定路由器(DR):
一個網段上的其他路由器都和指定路由器(DR)構成鄰接關系,而不是它們互相之間構成鄰接關系。
備份指定路由器(BDR):
當DR出現問題,由BDR接手DR的工作,同時會在選舉出一個BDR。
其他路由器我們叫做DR Other。
BDR首先會和DR形成鄰接關系;
其它的路由器(DR Other)也要和BDR形成鄰接關系。
這樣做是有原因的,當DR出故障以后,BDR會成為新的DR。如果DR other不和BDR形成鄰接關系,網絡的流量就會中斷時間很長,因為建立鄰居關系是要花一定時間的,在這段時間內,網絡的流量是不通的!
DR other和BDR形成鄰接關系,當BDR切換為DR時,只需要發送LSA,向DR other告知新的DR即可,LSDB的內容基本上不變!所以能夠節省時間,讓BDR真正的起到備份的作用!
DR和BDR的選舉規則:
具有最高OSPF優先級的路由器會被選為DR,優先級默認為1。
如果OSPF優先級相同,則具有最高Router ID的路由器會被選為DR。
Route-id選舉規則:
-
手工配置最優先
-
當設備有loopback口時,路由器選取它所有loopback接口上數值最高的IP地址
-
如果沒有loopback接口,就在所有物理端口中選取一個數值最高的IP地址
需求:(描述實驗的要求)
-
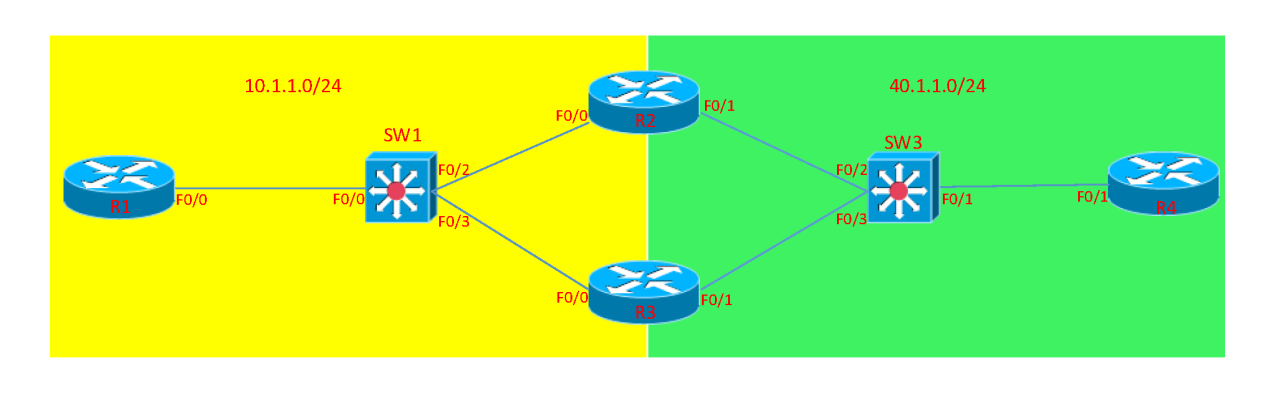
R1 R2 R3屬于OSPF 的骨干區域,R1 R2 R3位于10.1.1.0/24 網段.
-
R2 R3 R4 位于OSPF 的40.1.1.0/24 網段.
-
希望R2 作為 10.1.1.0 網段的DR, R3作為BDR;R3 作為40.1.1.0 網段的DR,R2 作為BDR.
拓撲:
?
?
分析難點以及完成的思路
按照要求配置,首先正常配置OSPF的基礎命令,保證在修改DR和 BDR之前全網互通,配置完成之后再去測試連通性,全部測試完畢之后,修改我們的DR和BDR,查看我們修改之后的DR和BDR設備是否成功達到我們的要求
配置命令
R1 配置:
R1(config)#line console 0
R1(config-line)#exec-timeout 0 0
R1(config-line)#logging synchronous
R1(config-line)#exit
R1(config)#no ip do lo
R1(config)#interface loopback 0
R1(config-if)#ip address 1.1.1.1 255.255.255.255
R1(config-if)#no shutdown
R1(config-if)#exit
R1(config)#interface f0/0
R1(config-if)#ip address 10.1.1.1 255.255.255.0
R1(config-if)#no shutdown
R1(config-if)#exit
R2配置:
R2(config)#line console 0
R2(config-line)#exec-timeout 0 0
R2(config-line)#logging synchronous
R2(config-line)#exit
R2(config)#no ip do lo
R2(config)#ho R2
R2(config)#interface loopback 0
R2(config-if)#ip address 2.2.2.2 255.255.255.255
R2(config-if)#no shutdown
R2(config-if)#exit
R2(config)#interface f0/0
R2(config-if)#ip address 10.1.1.2 255.255.255.0
R2(config-if)#no shutdown
R2(config-if)#exit
R2(config)#interface f0/1
R2(config-if)#ip address 40.1.1.2 255.255.255.0
R2(config-if)#no shutdown
R2(config-if)#exit
R3配置:
R3(config)#line console 0
R3(config-line)#exec-timeout 0 0
R3(config-line)#logging synchronous
R3(config-line)#exit
R3(config)#no ip do lo
R3(config)#ho R3
R3(config)#interface loopback 0
R3(config-if)#ip address 3.3.3.3 255.255.255.255
R3(config-if)#no shutdown
R3(config-if)#exit
R3(config)#interface f0/0
R3(config-if)#ip address 10.1.1.3 255.255.255.0
R3(config-if)#no shutdown
R3(config-if)#exit
R3(config)#interface f0/1
R3(config-if)#ip address 40.1.1.3 255.255.255.0
R3(config-if)#no shutdown
R3(config-if)#exit
R4配置:
R4(config)#line console 0
R4(config-line)#exec-timeout 0 0
R4(config-line)#logging synchronous
R4(config-line)#exit
R4(config)#no ip do lo
R4(config)#ho R4
R4(config)#interface loopback 0
R4(config-if)#ip address 4.4.4.4 255.255.255.255
R4(config-if)#no shutdown
R4(config-if)#exit
R4(config)#interface f0/1
R4(config-if)#ip address 40.1.1.4 255.255.255.0
R4(config-if)#no shutdown
R4(config-if)#exit
啟用OSPF,默認情況下,OSPF進行DR選舉時的優先級 默認為1,比較規則是 優先級越大越優先,優先級相同, router-id越大越優先。因此干預選舉可以通過設置router-id和修改接口的優先級進行。在10.1.1.0 網段上,由于R1 R2 R3的優先級為默認的1 ,因此 優先級大的 R3(3.3.3.3),就成為DR,R2(2.2.2.2)成為BDR.但是要考慮,如果R1 R2率先接入網絡,當DR BDR選舉完成之后再接入R3的話,R3錯過選舉之后,就不能搶占DR BDR了。
R2 R3 R4也一樣,因此正常情況下R4為DR,R3為BDR
R1配置:
R1(config)#router ospf 1
R1(config-router)#router-id 1.1.1.1 //手工指定router-id
R1(config-router)#network 1.1.1.1 0.0.0.0 area 0 --------采取反子網掩碼的方式進行通告,類似于通告了一個1.1.1.1 255.255.255.255 的路由信息,采用反子網掩碼,是為了區別配置IP地址是的子網掩碼
R1(config-router)#network 10.1.1.0 0.0.0.255 area 0
R1(config-router)#exit
R1(config)#end
R2配置:
R2(config)#router ospf 1
R2(config-router)#router-id 2.2.2.2
R2(config-router)#network 2.2.2.2 0.0.0.0 area 0
R2(config-router)#network 10.1.1.0 0.0.0.255 area 0
R2(config-router)#network 40.1.1.0 0.0.0.255 area 0
R2(config-router)#end
R3配置:
R3(config)#router ospf 1
R3(config-router)#router-id 3.3.3.3
R3(config-router)#network 3.3.3.3 0.0.0.0 area 0
R3(config-router)#network 10.1.1.0 0.0.0.255 area 0
R3(config-router)#network 40.1.1.0 0.0.0.255 area 0
R3(config-router)#exit
R4 配置:
R4(config)#router ospf 1
R4(config-router)#router-id 4.4.4.4
R4(config-router)#network 4.4.4.4 0.0.0.0 area 0
R4(config-router)#network 40.1.1.0 0.0.0.255 area 0
R4(config-router)#end
這時,為了滿足要求,讓R2成為10.1.1.0 網段的DR,可以修改R2的router-id,改為22.22.22.22
,只要比R3的3.3.3.3 大就可以;為了是R3成為40.1.1.0 網段的DR,可以修改R3的f0/1
的接口優先級。
R2配置:
R2(config)#router ospf 1
R2(config-router)#ro
R2(config-router)#router-id 22.22.22.22
Reload or use "clear ip ospf process" command, for this to take effect //系統提示,要想新的router-id生效,要重啟OSPF進程
R2(config-router)#end
R3 配置:
R3(config)#interface f0/1
R3(config-if)#ip ospf priority 5
R3(config-if)#end
這個時候,將R1 R2 R3 R4的OSPF進程重啟,然后再觀察。
R1配置:
R1#clear ip ospf process
Reset ALL OSPF processes? [no]: y //重啟OSPF進程,這個要在四個路由器上同時敲下去
這時可以看到10.1.1.0網段,R2的router-id最大成為DR,R3的router-id次之,成為BDR;
40.1.1.0 網段,R3的優先級最大成為DR,R2的router-id最大,成為BDR.
按照正常配置完成之后,全網互通,在修改DR和BDR之后需要清一下OSPF的進程,讓他們重新選舉DR和BDR,如果不重啟進程會發現DR和 BDR沒有變化
當DR優先級為0時,通過這個配置,也可以控制DR、BDR的選取!如果想讓某臺路由器永遠都是一個LAN上的DR,則可以將其它的路由器的DR優先級都配置為0。
DR、BDR是終身制,不能被搶占的,這一知識點也是比較奇怪的,我們上面說了DR/BDR是選取出來的,理論上在一個LAN上,應該是優先級最大的路由器被選取為DR的。
但在很多場景中,小伙伴看到的并不是優先級最大的路由器作為DR!因為DR/BDR的選取是不能被搶占的!
只要某臺路由器在一個LAN上,已經被選取為DR,則它會一直是DR!只有等它重啟或者關機了,才會重新選取,也就是說DR/BDR是終身制的!
這樣做主要是為了網絡的穩定,在真實網絡中,穩定是壓倒一切的!即使某種技術最新,某個設備性能最強,但是如果影響到穩定,就不會被優先選擇!
所以想要讓某個路由器永遠作為DR,則只能其它路由器的優先級修改為0!
?


保護詳解)

)


)

--樹與二叉查找樹)


)