本文已授權微信公眾號《鴻洋》原創首發,轉載請務必注明出處。
概述
相機差點兒是每一個APP都要用到的功能,萬一老板讓你定制相機方不方?反正我是有點方。
關于相機的兩天奮斗總結免費送給你。
Intent intent = new Intent(); intent.setAction(MediaStore.ACTION_IMAGE_CAPTURE); startActivity(intent);或者指定返回圖片的名稱mCurrentPhotoFile。
Intent intent = new Intent(MediaStore.ACTION_IMAGE_CAPTURE);intent.putExtra(MediaStore.EXTRA_OUTPUT,Uri.fromFile(mCurrentPhotoFile));startActivityForResult(intent, CAMERA_WITH_DATA);2.自己定義啟動相機。
今天以另外一種為例。
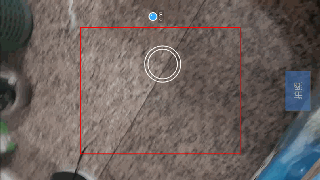
效果圖例如以下
自己定義相機的一般步驟
- 創建顯示相機畫面的布局。
Android已經為我們選定好SurfaceView - 通過
SurfaceView#getHolder()獲得鏈接Camera和SurfaceView的SurfaceHolder Camame.open()打開相機- 通過
SurfaceHolder鏈接Camera和urfaceView
一般步驟的代碼演示
public class CameraSurfaceView extends SurfaceView implements SurfaceHolder.Callback, Camera.AutoFocusCallback {private static final String TAG = "CameraSurfaceView";private Context mContext;private SurfaceHolder holder;private Camera mCamera;private int mScreenWidth;private int mScreenHeight;public CameraSurfaceView(Context context) {this(context, null);}public CameraSurfaceView(Context context, AttributeSet attrs) {this(context, attrs, 0);}public CameraSurfaceView(Context context, AttributeSet attrs, int defStyleAttr) {super(context, attrs, defStyleAttr);mContext = context;getScreenMetrix(context);initView();}private void getScreenMetrix(Context context) {WindowManager WM = (WindowManager) context.getSystemService(Context.WINDOW_SERVICE);DisplayMetrics outMetrics = new DisplayMetrics();WM.getDefaultDisplay().getMetrics(outMetrics);mScreenWidth = outMetrics.widthPixels;mScreenHeight = outMetrics.heightPixels;}private void initView() {holder = getHolder();//獲得surfaceHolder引用holder.addCallback(this);holder.setType(SurfaceHolder.SURFACE_TYPE_PUSH_BUFFERS);//設置類型}@Overridepublic void surfaceCreated(SurfaceHolder holder) {Log.i(TAG, "surfaceCreated");if (mCamera == null) {mCamera = Camera.open();//開啟相機try {mCamera.setPreviewDisplay(holder);//攝像頭畫面顯示在Surface上} catch (IOException e) {e.printStackTrace();}}}@Overridepublic void surfaceChanged(SurfaceHolder holder, int format, int width, int height) {Log.i(TAG, "surfaceChanged");mCamera.startPreview();}@Overridepublic void surfaceDestroyed(SurfaceHolder holder) {Log.i(TAG, "surfaceDestroyed");mCamera.stopPreview();//停止預覽mCamera.release();//釋放相機資源mCamera = null;holder = null;}@Overridepublic void onAutoFocus(boolean success, Camera Camera) {if (success) {Log.i(TAG, "onAutoFocus success="+success);}}
}
加入相機和自己主動聚焦限權
<uses-permission android:name="android.permission.CAMERA" />
<uses-feature android:name="android.hardware.camera.autofocus" />將CameraSurfaceView放在布局文件里,這里建議最外層為FrameLayout,后面會用到。如此。我們便有了一個沒有照相功能的相機。初次之外,細致觀察相機顯示畫面,圖片是不是變形嚴重?那是由于我們還沒有為相機設置各種參數。在預覽前要設置攝像頭的分辨率、預覽分辨率和圖片分辨率的寬高比保持一致。這樣圖片才不會變形。這是個比較難以理解的部分,想深刻理解還需讀者自己動手去實踐。
private void setCameraParams(Camera camera, int width, int height) {Log.i(TAG,"setCameraParams width="+width+" height="+height);Camera.Parameters parameters = mCamera.getParameters();// 獲取攝像頭支持的PictureSize列表List<Camera.Size> pictureSizeList = parameters.getSupportedPictureSizes();for (Camera.Size size : pictureSizeList) {Log.i(TAG, "pictureSizeList size.width=" + size.width + " size.height=" + size.height);}/**從列表中選取合適的分辨率*/Camera.Size picSize = getProperSize(pictureSizeList, ((float) height / width));if (null == picSize) {Log.i(TAG, "null == picSize");picSize = parameters.getPictureSize();}Log.i(TAG, "picSize.width=" + picSize.width + " picSize.height=" + picSize.height);// 依據選出的PictureSize又一次設置SurfaceView大小float w = picSize.width;float h = picSize.height;parameters.setPictureSize(picSize.width,picSize.height);this.setLayoutParams(new FrameLayout.LayoutParams((int) (height*(h/w)), height));// 獲取攝像頭支持的PreviewSize列表List<Camera.Size> previewSizeList = parameters.getSupportedPreviewSizes();for (Camera.Size size : previewSizeList) {Log.i(TAG, "previewSizeList size.width=" + size.width + " size.height=" + size.height);}Camera.Size preSize = getProperSize(previewSizeList, ((float) height) / width);if (null != preSize) {Log.i(TAG, "preSize.width=" + preSize.width + " preSize.height=" + preSize.height);parameters.setPreviewSize(preSize.width, preSize.height);}parameters.setJpegQuality(100); // 設置照片質量if (parameters.getSupportedFocusModes().contains(android.hardware.Camera.Parameters.FOCUS_MODE_CONTINUOUS_PICTURE)) {parameters.setFocusMode(android.hardware.Camera.Parameters.FOCUS_MODE_CONTINUOUS_PICTURE);// 連續對焦模式}mCamera.cancelAutoFocus();//自己主動對焦。 // 設置PreviewDisplay的方向。效果就是將捕獲的畫面旋轉多少度顯示 // TODO 這里直接設置90°不嚴謹。詳細見https://developer.android.com/reference/android/hardware/Camera.html#setPreviewDisplay%28android.view.SurfaceHolder%29 mCamera.setDisplayOrientation(90); mCamera.setParameters(parameters); } /** * 從列表中選取合適的分辨率 * 默認w:h = 4:3 * <p>tip:這里的w相應屏幕的height * h相應屏幕的width<p/> */ private Camera.Size getProperSize(List<Camera.Size> pictureSizeList, float screenRatio) { Log.i(TAG, "screenRatio=" + screenRatio); Camera.Size result = null; for (Camera.Size size : pictureSizeList) { float currentRatio = ((float) size.width) / size.height; if (currentRatio - screenRatio == 0) { result = size; break; } } if (null == result) { for (Camera.Size size : pictureSizeList) { float curRatio = ((float) size.width) / size.height; if (curRatio == 4f / 3) {// 默認w:h = 4:3 result = size; break; } } } return result; } 進去的是屏幕寬高。出來的是調整好了的參數。在surfaceChanged方法中運行mCamera.startPreview(); 前調用setCameraParams(mCamera, mScreenWidth, mScreenHeight); 就能夠了。最后要在AndroidManifest.xml里設置activity的方向android:screenOrientation="portrait"代碼里有非常多凝視,當中也有我自己調試時候的Log,大家能夠自己調試下。看看不同參數的效果。昨天調參數搞到一點多,都在折騰這個函數。
唉,一把辛酸淚。
身為一個相機,竟然不能照相?真是太丟臉了!
以下給我們的相機加入上照相的功能。照相核心代碼就一句:mCamera.takePicture(null, null, jpeg);
能夠看到takePicture方法有三個參數,各自是ShutterCallback、PictureCallback和PictureCallback。這里我們僅僅用了PictureCallback
// 拍照瞬間調用private Camera.ShutterCallback shutter = new Camera.ShutterCallback() {@Overridepublic void onShutter() {Log.i(TAG,"shutter");}};// 獲得沒有壓縮過的圖片數據private Camera.PictureCallback raw = new Camera.PictureCallback() {@Overridepublic void onPictureTaken(byte[] data, Camera Camera) {Log.i(TAG, "raw");}};//創建jpeg圖片回調數據對象private Camera.PictureCallback jpeg = new Camera.PictureCallback() {@Overridepublic void onPictureTaken(byte[] data, Camera Camera) {BufferedOutputStream bos = null;Bitmap bm = null;try {// 獲得圖片bm = BitmapFactory.decodeByteArray(data, 0, data.length);if (Environment.getExternalStorageState().equals(Environment.MEDIA_MOUNTED)) {Log.i(TAG, "Environment.getExternalStorageDirectory()="+Environment.getExternalStorageDirectory());String filePath = "/sdcard/dyk"+System.currentTimeMillis()+".jpg";//照片保存路徑File file = new File(filePath);if (!file.exists()){file.createNewFile();}bos = new BufferedOutputStream(new FileOutputStream(file));bm.compress(Bitmap.CompressFormat.JPEG, 100, bos);//將圖片壓縮到流中}else{Toast.makeText(mContext,"沒有檢測到內存卡", Toast.LENGTH_SHORT).show();}} catch (Exception e) {e.printStackTrace();} finally {try {bos.flush();//輸出bos.close();//關閉bm.recycle();// 回收bitmap空間mCamera.stopPreview();// 關閉預覽mCamera.startPreview();// 開啟預覽} catch (IOException e) {e.printStackTrace();}}}};在jpeg#onPictureTaken()里。我們將存儲照片信息的byte[] data解析成bitmap,然后轉換成JPG格式的圖片保存在SD卡中。注意finally中最后兩句mCamera.stopPreview();// 關閉預覽 mCamera.startPreview();// 開啟預覽 上文也提到:當調用camera.takePiture()方法后。camera關閉了預覽。這時須要調用startPreview()來又一次開啟預覽。假設不再次開啟預覽。則會一直停留在拍攝照片畫面。為了方便外部調用拍照。這里我暴露了一個方法供外部拍照。
public void takePicture(){//設置參數,并拍照setCameraParams(mCamera, mScreenWidth, mScreenHeight);// 當調用camera.takePiture方法后,camera關閉了預覽,這時須要調用startPreview()來又一次開啟預覽mCamera.takePicture(null, null, jpeg);}在布局文件里加入一個Button,點擊Button運行takePicture()方法。
不要忘了加入寫SD卡限權
<uses-permission android:name="android.permission.WRITE_EXTERNAL_STORAGE" />至此。一個具有照相并保存拍攝圖片功能的相機就做出來了。
But,我們就此滿足了嗎?要是為了這些簡單的功能我也不會寫這篇博客。這僅僅是個開始
真正的開始
別人APP在照相的時候。屏幕上竟然能夠顯示像效果圖那樣的框框啦、輔助點啦、圖片bulabulabula~。
在網上搜索一番實現方式,再加上一些自己的理解,構成了這篇博客。
上文布局文件一直沒有貼。如今貼出來大家先掃一眼,有些控件會在接下來展示
<?xml version="1.0" encoding="utf-8"?>
<FrameLayout xmlns:android="http://schemas.android.com/apk/res/android"android:layout_width="match_parent"android:layout_height="match_parent"><com.dyk.cameratest.view.CameraSurfaceView
        android:id="@+id/cameraSurfaceView"android:layout_width="match_parent"android:layout_height="match_parent" /><com.dyk.cameratest.view.RectOnCamera
        android:layout_width="match_parent"android:layout_height="match_parent" /><RelativeLayout
        android:layout_width="match_parent"android:layout_height="match_parent"><Button
            android:layout_alignParentBottom="true"android:layout_centerHorizontal="true"android:layout_marginBottom="20dp"android:id="@+id/takePic"android:layout_width="80dp"android:layout_height="50dp"android:background="#88427ac7"android:text="拍照"android:textColor="#aaa" /></RelativeLayout>
</FrameLayout>布局文件的最外層是個FrameLayout。我們知道FrameLayout是自帶覆蓋效果的。由來這個思路接下來就非常easy了。
編程重要的是思想,思想有了,其余的就剩詳細的實現細節。
自己定義邊邊框框
為了和CameraSurfaceView區分開,再自己定義一個RectOnCamera專門用來畫邊邊框框這些東西。這樣做還一個優點是方便維護,不至于將所有東西都放在一個View中。
RectOnCamera
package com.dyk.cameratest.view;
...
/*** Created by 一口仨饃 on 2016/4/7.*/
public class RectOnCamera extends View {private static final String TAG = "CameraSurfaceView";private int mScreenWidth;private int mScreenHeight;private Paint mPaint;private RectF mRectF;// 圓private Point centerPoint;private int radio;public RectOnCamera(Context context) {this(context, null);}public RectOnCamera(Context context, AttributeSet attrs) {this(context, attrs, 0);}public RectOnCamera(Context context, AttributeSet attrs, int defStyleAttr) {super(context, attrs, defStyleAttr);getScreenMetrix(context);initView(context);}private void getScreenMetrix(Context context) {WindowManager WM = (WindowManager) context.getSystemService(Context.WINDOW_SERVICE);DisplayMetrics outMetrics = new DisplayMetrics();WM.getDefaultDisplay().getMetrics(outMetrics);mScreenWidth = outMetrics.widthPixels;mScreenHeight = outMetrics.heightPixels;}private void initView(Context context) {mPaint = new Paint();mPaint.setAntiAlias(true);// 抗鋸齒mPaint.setDither(true);// 防抖動mPaint.setColor(Color.RED);mPaint.setStrokeWidth(5);mPaint.setStyle(Paint.Style.STROKE);// 空心int marginLeft = (int) (mScreenWidth*0.15);int marginTop = (int) (mScreenHeight * 0.25);mRectF = new RectF(marginLeft, marginTop, mScreenWidth - marginLeft, mScreenHeight - marginTop);centerPoint = new Point(mScreenWidth/2, mScreenHeight/2);radio = (int) (mScreenWidth*0.1);}@Overrideprotected void onDraw(Canvas canvas) {super.onDraw(canvas);mPaint.setColor(Color.RED);canvas.drawRect(mRectF, mPaint);mPaint.setColor(Color.WHITE);Log.i(TAG, "onDraw");canvas.drawCircle(centerPoint.x,centerPoint.y, radio,mPaint);// 外圓canvas.drawCircle(centerPoint.x,centerPoint.y, radio - 20,mPaint); // 內圓}
}這里簡單的畫了一個相似二維碼掃描的框框。另一個相似聚焦的內外圓。那么問題來了,聚焦的內外圓要隨著手指滑而改變位置,并且要有聚焦的效果。可又和具有聚焦功能的CameraSurfaceView不是同一個類。不僅如此聚焦內外圓還全然覆蓋了CameraSurfaceView。要處理這樣的問題,須要接口回調。這就是思想以下的細節。如今盡管確定接口回調。但另一個問題,CameraSurfaceView類和RectOnCamera類中都沒有對方的對象或者引用。沒錯,通過共同持有RectOnCamera和CameraSurfaceView的Activity能夠實現此功能。以下是詳細的實現方法
動起來
首先。想要隨著手指的滑動而改變RectOnCamera的位置肯定是要復寫onTouchEvent()方法
@Overridepublic boolean onTouchEvent(MotionEvent event) {switch (event.getAction()){case MotionEvent.ACTION_DOWN:case MotionEvent.ACTION_MOVE:case MotionEvent.ACTION_UP:int x = (int) event.getX();int y = (int) event.getY();centerPoint = new Point(x, y);invalidate();return true;}return true;}其次,定義回調接口
private IAutoFocus mIAutoFocus;/** 聚焦的回調接口 */public interface IAutoFocus{void autoFocus();}public void setIAutoFocus(IAutoFocus mIAutoFocus) {this.mIAutoFocus = mIAutoFocus;}在onTouchEvent()中return前加入
if (mIAutoFocus != null){mIAutoFocus.autoFocus();}至此我們的回調接口已經定義好了。此時還須要CameraSurfaceView暴露一個聚焦方法。以便Activity調用
public void setAutoFocus(){mCamera.autoFocus(this);}準備工作已經所有完畢。以下請看Activity的詳細實現:
public class MainActivity extends Activity implements View.OnClickListener,RectOnCamera.IAutoFocus{private CameraSurfaceView mCameraSurfaceView;private RectOnCamera mRectOnCamera;private Button takePicBtn;private boolean isClicked;@Overrideprotected void onCreate(Bundle savedInstanceState) {super.onCreate(savedInstanceState);requestWindowFeature(Window.FEATURE_NO_TITLE);// 全屏顯示     getWindow().setFlags(WindowManager.LayoutParams.FLAG_FULLSCREEN,WindowManager.LayoutParams.FLAG_FULLSCREEN);setContentView(R.layout.activity_main);mCameraSurfaceView = (CameraSurfaceView) findViewById(R.id.cameraSurfaceView);mRectOnCamera = (RectOnCamera) findViewById(R.id.rectOnCamera);takePicBtn= (Button) findViewById(R.id.takePic);mRectOnCamera.setIAutoFocus(this);takePicBtn.setOnClickListener(this);}@Overridepublic void onClick(View v) {switch (v.getId()){case R.id.takePic:mCameraSurfaceView.takePicture();break;default:break;}}@Overridepublic void autoFocus() {mCameraSurfaceView.setAutoFocus();}
}能夠看到,MainActivity實現了IAutoFocus接口,并且在復寫的IAutoFocus#autoFocus()方法中。調用了CameraSurfaceView暴露出來的方法setAutoFocus()。至此,在RectOnCamera每次的滑動過程中都會改變聚焦內外圓的位置,還會添加聚焦功能。
一心二用甚至一心多用豈不是更好。
結束語
在經歷兩次斷電沒保存和一次CSDNserver錯誤內容丟失之后終究還是完畢了這篇博客,實屬不易。十分感謝能聽我啰嗦到結尾~
PS:Demo界面并沒有做的非常精致,僅僅是提供了一種思路。依照此思路能做出比較華麗的效果,授人以魚不如授人以漁。
2016.10.12 在經歷了上述種種磨難之后。最終發表了這篇博文。然而發表沒幾天,被我自己覆蓋了。這下博文是真的丟了。心塞ing。今天沒事百度下自己CSDN昵稱“一口仨饃”,發現其它站點爬過這篇博文。隨后我復制了自己原創的博文,再次發表。感謝那些爬我博文還不署名的站點。
謝謝你全家。
源代碼下載
http://download.csdn.net/detail/qq_17250009/9484160

)


pdf)


)
