yolo人臉檢測數據集
計算機視覺 (Computer Vision)
Step by step instructions to train Yolo-v5 & do Inference(from ultralytics) to count the blood cells and localize them.
循序漸進的說明來訓練Yolo-v5和進行推理(來自Ultralytics )以對血細胞進行計數并將其定位。
I vividly remember that I tried to do an object detection model to count the RBC, WBC, and platelets on microscopic blood-smeared images using Yolo v3-v4, but I couldn’t get as much as accuracy I wanted and the model never made it to the production.
我生動地記得我曾嘗試過使用Yolo v3-v4嘗試建立對象檢測模型以對顯微血涂圖像上的RBC,WBC和血小板進行計數,但是我無法獲得想要的精度,而且該模型從未成功它的生產。
Now recently I came across the release of the Yolo-v5 model from Ultralytics, which is built using PyTorch. I was a bit skeptical to start, owing to my previous failures, but after reading the manual in their Github repo, I was very confident this time and I wanted to give it a shot.
最近,我遇到了Ultralytics發行的Yolo-v5模型,該模型是使用PyTorch構建的。 由于之前的失敗,我對起步有些懷疑,但是在閱讀他們的Github存儲庫中的手冊后,這次我非常有信心,我想嘗試一下。
And it worked like a charm, Yolo-v5 is easy to train and easy to do inference.
Yolo-v5就像是一種魅力,易于訓練且易于推理。
So this post summarizes my hands-on experience on the Yolo-v5 model on the Blood Cell Count dataset. Let’s get started.
因此,本篇文章總結了我在血細胞計數數據集的Yolo-v5模型上的動手經驗。 讓我們開始吧。
Ultralytics recently launched Yolo-v5. For time being, the first three versions of Yolo were created by Joseph Redmon. But the newer version has higher mean Average Precision and faster inference times than others. Along with that it’s built on top of PyTorch made the training & inference process very fast and the results are great.
Ultralytics最近發布了Yolo-v5。 目前,Yolo的前三個版本是由Joseph Redmon創建的。 但是較新版本具有更高的平均平均精度和更快的推理時間。 此外,它還建立在PyTorch的基礎上,使訓練和推理過程變得非常快,并且效果很好。

So let’s break down the steps in our training process.
因此,讓我們分解一下培訓過程中的步驟。
Data — Preprocessing (Yolo-v5 Compatible)
數據-預處理(與Yolo-v5兼容)
Model — Training
模型—培訓
Inference
推理
And if you wish to follow along simultaneously, open up these notebooks,
如果您希望同時進行操作,請打開這些筆記本,
Google Colab Notebook — Training and Validation: link
Google Colab Notebook —培訓和驗證: 鏈接
Google Colab Notebook — Inference: link
Google Colab Notebook —推論: 鏈接
1.數據-預處理(與Yolo-v5兼容) (1. Data — Preprocessing (Yolo-v5 Compatible))
I used the dataset BCCD dataset available in Github, the dataset has blood smeared microscopic images and it’s corresponding bounding box annotations are available in an XML file.
我使用了Github中可用的BCCD數據集,該數據集具有涂血的顯微圖像,并且在XML文件中提供了相應的邊界框注釋。
Dataset Structure:- BCCD
  - Annotations
    - BloodImage_00000.xml
    - BloodImage_00001.xml
    ...- JpegImages
    - BloodImage_00001.jpg
    - BloodImage_00001.jpg
    ...
Sample Image and its annotation :
樣本圖片及其注釋:


Upon mapping the annotation values as bounding boxes in the image will results like this,
在將注釋值映射為圖像中的邊框時,將得到如下結果:

But to train the Yolo-v5 model, we need to organize our dataset structure and it requires images (.jpg/.png, etc.,) and it’s corresponding labels in .txt format.
但是要訓練Yolo-v5模型,我們需要組織我們的數據集結構,它需要圖像(.jpg / .png等)及其對應的.txt格式標簽。
Yolo-v5 Dataset Structure:- BCCD
  - Images
    - Train (.jpg files)
    - Valid (.jpg files)- Labels
     - Train (.txt files)
     - Valid (.txt files)
And then the format of .txt files should be :
.txt文件的格式應為:
STRUCTURE OF .txt FILE :
.txt文件的結構:
- One row per object.
-每個對象一行。
- Each row is class x_center y_center width height format.
-每行都是x_center y_center width高度高度格式。
- Box coordinates must be in normalized xywh format (from 0–1). If your boxes are in pixels, divide x_center and width by image width, and y_center and height by image height.
-框坐標必須為標準化的xywh格式(從0到1)。 如果您的框以像素為單位,則將x_center和width除以圖像寬度,將y_center和height除以圖像高度。
- Class numbers are zero-indexed (start from 0).
-類號為零索引(從0開始)。
An Example label with class 1 (RBC) and class 2 (WBC) along with each of their x_center, y_center, width, height (All normalized 0–1) looks like the below one.
帶有第1類(RBC)和第2類(WBC)以及它們的x_center,y_center,寬度,高度(全部歸一化為0-1)的示例標簽如下所示。
# class x_center y_center width height #
  1     0.718    0.829    0.143 0.193
  2     0.318    0.256    0.150 0.180
...So let’s see how we can pre-process our data in the above-specified structure.
因此,讓我們看看如何在上述結構中預處理數據。
Our first step should be parsing the data from all the XML files and storing them in a data frame for further processing. Thus we run the below codes to accomplish it.
我們的第一步應該是解析所有XML文件中的數據,并將它們存儲在數據框中以進行進一步處理。 因此,我們運行以下代碼來完成它。
# Dataset Extraction from github
!git clone 'https://github.com/Shenggan/BCCD_Dataset.git'import os, sys, random, shutil
import xml.etree.ElementTree as ET
from glob import glob
import pandas as pd
from shutil import copyfile
import pandas as pd
from sklearn import preprocessing, model_selection
import matplotlib.pyplot as plt
%matplotlib inline
from matplotlib import patches
import numpy as npannotations = sorted(glob('/content/BCCD_Dataset/BCCD/Annotations/*.xml'))df = []
cnt = 0
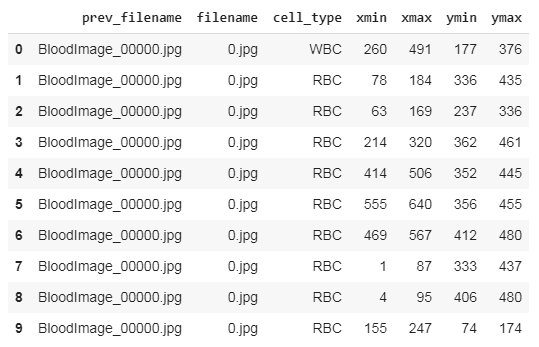
for file in annotations:prev_filename = file.split('/')[-1].split('.')[0] + '.jpg'filename = str(cnt) + '.jpg'row = []parsedXML = ET.parse(file)for node in parsedXML.getroot().iter('object'):blood_cells = node.find('name').textxmin = int(node.find('bndbox/xmin').text)xmax = int(node.find('bndbox/xmax').text)ymin = int(node.find('bndbox/ymin').text)ymax = int(node.find('bndbox/ymax').text)row = [prev_filename, filename, blood_cells, xmin, xmax, ymin, ymax]df.append(row)cnt += 1data = pd.DataFrame(df, columns=['prev_filename', 'filename', 'cell_type', 'xmin', 'xmax', 'ymin', 'ymax'])data[['prev_filename','filename', 'cell_type', 'xmin', 'xmax', 'ymin', 'ymax']].to_csv('/content/blood_cell_detection.csv', index=False)
data.head(10)And the data frame should look like this,
數據框應該看起來像這樣,
After saving this file, we need to make changes to convert them into Yolo-v5 compatible format.
保存此文件后,我們需要進行更改以將其轉換為Yolo-v5兼容格式。
REQUIRED DATAFRAME STRUCTURE- filename : contains the name of the image- cell_type: denotes the type of the cell- xmin: x-coordinate of the bottom left part of the image- xmax: x-coordinate of the top right part of the image- ymin: y-coordinate of the bottom left part of the image- ymax: y-coordinate of the top right part of the image- labels : Encoded cell-type (Yolo - label input-1)- width : width of that bbox- height : height of that bbox- x_center : bbox center (x-axis)- y_center : bbox center (y-axis)- x_center_norm : x_center normalized (0-1) (Yolo - label input-2)- y_center_norm : y_center normalized (0-1) (Yolo - label input-3)- width_norm : width normalized (0-1) (Yolo - label input-4)- height_norm : height normalized (0-1) (Yolo - label input-5)I have written some code to transform our existing data frame into the structure specified in the above snippet.
我已經編寫了一些代碼,將現有的數據幀轉換為上述片段中指定的結構。
img_width = 640
img_height = 480def width(df):return int(df.xmax - df.xmin)
def height(df):return int(df.ymax - df.ymin)
def x_center(df):return int(df.xmin + (df.width/2))
def y_center(df):return int(df.ymin + (df.height/2))
def w_norm(df):return df/img_width
def h_norm(df):return df/img_heightdf = pd.read_csv('/content/blood_cell_detection.csv')le = preprocessing.LabelEncoder()
le.fit(df['cell_type'])
print(le.classes_)
labels = le.transform(df['cell_type'])
df['labels'] = labelsdf['width'] = df.apply(width, axis=1)
df['height'] = df.apply(height, axis=1)df['x_center'] = df.apply(x_center, axis=1)
df['y_center'] = df.apply(y_center, axis=1)df['x_center_norm'] = df['x_center'].apply(w_norm)
df['width_norm'] = df['width'].apply(w_norm)df['y_center_norm'] = df['y_center'].apply(h_norm)
df['height_norm'] = df['height'].apply(h_norm)df.head(30)
After preprocessing our data frame looks like this, here we can see there exist many rows for a single image file (For instance BloodImage_0000.jpg), now we need to collect all the (labels, x_center_norm, y_center_norm, width_norm, height_norm) values for that single image file and save it as a .txt file.
預處理我們的數據幀看起來像在此之后,在這里我們可以看到存在許多行的一個圖像文件(例如BloodImage_0000.jpg),現在我們需要收集所有( 標簽,x_center_norm,y_center_norm,width_norm,height_norm)值該單個圖像文件,并將其另存為.txt文件。

Now we split the dataset into training and validation and save the corresponding images and it’s labeled .txt files. For that, I’ve written a small piece of the code snippet.
現在,我們將數據集分為訓練和驗證,并保存相應的圖像,并將其標記為.txt文件。 為此,我只寫了一小段代碼。
df_train, df_valid = model_selection.train_test_split(df, test_size=0.1, random_state=13, shuffle=True)
print(df_train.shape, df_valid.shape)os.mkdir('/content/bcc/')
os.mkdir('/content/bcc/images/')
os.mkdir('/content/bcc/images/train/')
os.mkdir('/content/bcc/images/valid/')os.mkdir('/content/bcc/labels/')
os.mkdir('/content/bcc/labels/train/')
os.mkdir('/content/bcc/labels/valid/')def segregate_data(df, img_path, label_path, train_img_path, train_label_path):filenames = []for filename in df.filename:filenames.append(filename)filenames = set(filenames)for filename in filenames:yolo_list = []for _,row in df[df.filename == filename].iterrows():yolo_list.append([row.labels, row.x_center_norm, row.y_center_norm, row.width_norm, row.height_norm])yolo_list = np.array(yolo_list)txt_filename = os.path.join(train_label_path,str(row.prev_filename.split('.')[0])+".txt")# Save the .img & .txt files to the corresponding train and validation foldersnp.savetxt(txt_filename, yolo_list, fmt=["%d", "%f", "%f", "%f", "%f"])shutil.copyfile(os.path.join(img_path,row.prev_filename), os.path.join(train_img_path,row.prev_filename))## Apply function ##
src_img_path = "/content/BCCD_Dataset/BCCD/JPEGImages/"
src_label_path = "/content/BCCD_Dataset/BCCD/Annotations/"train_img_path = "/content/bcc/images/train"
train_label_path = "/content/bcc/labels/train"valid_img_path = "/content/bcc/images/valid"
valid_label_path = "/content/bcc/labels/valid"segregate_data(df_train, src_img_path, src_label_path, train_img_path, train_label_path)
segregate_data(df_valid, src_img_path, src_label_path, valid_img_path, valid_label_path)print("No. of Training images", len(os.listdir('/content/bcc/images/train')))
print("No. of Training labels", len(os.listdir('/content/bcc/labels/train')))print("No. of valid images", len(os.listdir('/content/bcc/images/valid')))
print("No. of valid labels", len(os.listdir('/content/bcc/labels/valid')))
After running the code, we should have the folder structure as we expected and ready to train the model.
運行代碼后,我們應該具有我們期望的文件夾結構,并準備訓練模型。
No. of Training images 364
No. of Training labels 364No. of valid images 270
No. of valid labels 270&&- BCCD
  - Images
    - Train (364 .jpg files)
    - Valid (270 .jpg files)- Labels
     - Train (364 .txt files)
     - Valid (270 .txt files)
End of data pre-processing.
數據預處理結束。
2.模型—培訓 (2. Model — Training)
To start the training process, we need to clone the official Yolo-v5’s weights and config files. It’s available here.
要開始培訓過程,我們需要克隆官方的Yolo-v5的權重和配置文件。 在這里可用。
!git clone  'https://github.com/ultralytics/yolov5.git'!pip install -qr '/content/yolov5/requirements.txt'  # install dependencies## Create a yaml file and move it into the yolov5 folder ##
shutil.copyfile('/content/bcc.yaml', '/content/yolov5/bcc.yaml')
Then install the required packages that they specified in the requirements.txt file.
然后安裝它們在requirements.txt文件中指定的必需軟件包。
bcc.yaml :
bcc.yaml:
Now we need to create a Yaml file that contains the directory of training and validation, number of classes and it’s label names. Later we need to move the .yaml file into the yolov5 directory that we cloned.
現在,我們需要創建一個Yaml文件,其中包含培訓和驗證的目錄,類數及其標簽名稱。 稍后,我們需要將.yaml文件移動到克隆的yolov5目錄中。
## Contents inside the .yaml filetrain: /content/bcc/images/train
val: /content/bcc/images/validnc: 3
names: ['Platelets', 'RBC', 'WBC']
model’s — YAML :
模型的— YAML :
Now we need to select a model(small, medium, large, xlarge) from the ./models folder.
現在我們需要從./models文件夾中選擇一個模型(小,中,大,xlarge)。
The figures below describe various features such as no.of parameters etc., for the available models. You can choose any model of your choice depending on the complexity of the task in hand and by default, they all are available as .yaml file inside the models' folder from the cloned repository
下圖描述了可用型號的各種功能,例如參數編號等。 您可以根據手頭任務的復雜性來選擇任何模型,默認情況下,它們都可以從克隆的存儲庫中的模型文件夾中以.yaml文件的形式使用。


Now we need to edit the *.yaml file of the model of our choice. We just have to replace the number of classes in our case to match with the number of classes in the model’s YAML file. For simplicity, I am choosing the yolov5s.yaml for faster processing.
現在,我們需要編輯所選模型的* .yaml文件。 我們只需要替換本例中的類數即可與模型的YAML文件中的類數匹配。 為了簡單起見,我選擇yolov5s.yaml以進行更快的處理。

## parametersnc: 3 # number of classesdepth_multiple: 0.33  # model depth multiplewidth_multiple: 0.50  # layer channel multiple# anchors
anchors:
- [10,13, 16,30, 33,23]  # P3/8
- [30,61, 62,45, 59,119]  # P4/16
...............NOTE: This step is not mandatory if we didn’t replace the nc in the model’s YAML file (which I did), it will automatically override the nc value that we created before (bcc.yaml) and while training the model, you will see this line, which confirms that we don’t have to alter it.
注意 :如果我們沒有替換模型的YAML文件中的nc(我做了此步驟),則此步驟不是必需的,它將自動覆蓋我們之前創建的nc值(bcc.yaml),并且在訓練模型時,您將看到這一行,這確認我們不必更改它。
“Overriding ./yolov5/models/yolov5s.yaml nc=80 with nc=3”
“使用nc = 3覆蓋./yolov5/models/yolov5s.yaml nc = 80”
火車模型參數: (Model train parameters :)
We need to configure the training parameters such as no.of epochs, batch_size, etc.,
我們需要配置訓練參數,例如時期數,batch_size等。
Training Parameters!python
- <'location of train.py file'>
- --img <'width of image'>
- --batch <'batch size'>
- --epochs <'no of epochs'>
- --data <'location of the .yaml file'>
- --cfg <'Which yolo configuration you want'>(yolov5s/yolov5m/yolov5l/yolov5x).yaml | (small, medium, large, xlarge)
- --name <'Name of the best model to save after training'>
Also, we can view the logs in tensorboard if we wish.
另外,如果愿意,我們可以在tensorboard中查看日志。
# Start tensorboard (optional)
%load_ext tensorboard
%tensorboard --logdir runs/!python yolov5/train.py --img 640 --batch 8 --epochs 100 \--data bcc.yaml --cfg models/yolov5s.yaml --name BCCM
This will initiate the training process and takes a while to complete.
這將啟動培訓過程,并且需要一段時間才能完成。
I am posting some excerpts from my training process,
我正在發布一些培訓過程的摘錄,


METRICS FROM TRAINING PROCESSNo.of classes, No.of images, No.of targets, Precision (P), Recall (R), mean Average Precision (map)- Class | Images | Targets | P | R | mAP@.5 | mAP@.5:.95: |- all | 270 | 489 | 0.0899 | 0.827 | 0.0879 | 0.0551So from the values of P (Precision), R (Recall), and mAP (mean Average Precision) we can know whether our model is doing well or not. Even though I have trained the model for only 100 epochs, the performance was great.
因此,從P(精度),R(召回率)和mAP(平均平均精度)的值中,我們可以知道我們的模型是否運行良好。 即使我只訓練了100個時間段的模型,但效果還是不錯的。


End of model training.
模型訓練結束。
3.推論 (3. Inference)
Now it’s an exciting time to test our model, to see how it makes the predictions. But we need to follow some simple steps.
現在是測試我們的模型,看看它如何做出預測的激動人心的時刻。 但是我們需要遵循一些簡單的步驟。
推論參數 (Inference Parameters)
Inference Parameters!python
- <'location of detect.py file'>
- --source <'location of image/ folder to predict'>
- --weight <'location of the saved best weights'>
- --output <'location to store the outputs after prediction'>
- --img-size <'Image size of the trained model'>(Optional)- --conf-thres <"default=0.4", 'object confidence threshold')>
- --iou-thres <"default=0.5" , 'threshold for NMS')>
- --device <'cuda device or cpu')>
- --view-img <'display results')>
- --save-txt <'saves the bbox co-ordinates results to *.txt')>
- --classes <'filter by class: --class 0, or --class 0 2 3')>## And there are other more customization availble, check them in the detect.py file. ##
Run the below code, to make predictions on a folder/image.
運行以下代碼,對文件夾/圖像進行預測。
## TO PREDICT IMAGES IN A FOLDER ##
!python yolov5/detect.py --source /content/bcc/images/valid/ --weights '/content/drive/My Drive/Machine Learning Projects/YOLO/best_yolov5_BCCM.pt'--output '/content/inference/output'## TO PREDICT A SINGLE IMAGE FILE ##output = !python yolov5/detect.py --source /content/bcc/images/valid/BloodImage_00000.jpg --weights '/content/drive/My Drive/Machine Learning Projects/YOLO/best_yolov5_BCCM.pt'
print(output)
The results are good, some excerpts.
摘錄結果不錯。
解釋.txt文件的輸出:(可選讀取) (Interpret outputs from the .txt file : (Optional Read))
Just in case , say you are doing face detection and face recognition and want to move your process one more step say you want to crop the faces using opencv using the bbox coordinates and send them into a face recognition pipeline, in such case we not only need the output like the above figure,also we need the coordinates for every faces. So is there any way ? The answer is yes ,read along.
以防萬一,假設您正在進行面部檢測和面部識別,并且想將過程進一步移動,例如,您想使用bbox坐標使用opencv裁剪面部并將其發送到面部識別管道中,在這種情況下,我們不僅需要上圖所示的輸出,還需要每個面的坐標。 那有什么辦法嗎? 答案是肯定的,請繼續閱讀。
(I only used face detection and recognition as an example, Yolo-V5 can be used to do it as well)
(我僅以人臉檢測和識別為例,Yolo-V5也可以使用它)
Also, we can save the output to a .txt file, which contains some of the input image’s bbox co-ordinates.
同樣,我們可以將輸出保存到.txt文件,該文件包含一些輸入圖像的bbox坐標。
# class x_center_norm y_center_norm width_norm height_norm #
  1     0.718         0.829         0.143      0.193
  ...
Run the below code, to get the outputs in .txt file,
運行以下代碼,以獲取.txt文件中的輸出,
!python yolov5/detect.py --source /content/bcc/images/valid/BloodImage_00000.jpg --weights '/content/runs/exp0_BCCM/weights/best_BCCM.pt' --view-img --save-txtUpon successfully running the code, we can see the output are stored in the inference folder here,
成功運行代碼后,我們可以看到輸出存儲在此處的推理文件夾中,

Great, now the outputs in the .txt file are in the format,
太好了,現在.txt文件中的輸出采用以下格式:
[ class x_center_norm y_center_norm width_norm height_norm ] "we need to convert it to the form specified below" [ class, x_min, y_min, width, height ][ class, X_center_norm, y_center_norm, Width_norm, Height_norm ] , we need to convert this into →[ class, x_min, y_min, width, height ] , ( Also De-normalized) to make plotting easy.
[class,X_center_norm,y_center_norm,Width_norm,Height_norm],我們需要將其轉換為→ [class,x_min,y_min,width,height], (也要歸一化)以簡化繪圖。
To do so, just run the below code which performs the above transformation.
為此,只需運行以下代碼即可執行上述轉換。
# Plotting bbox ffrom the .txt file output from yolo ### Provide the location of the output .txt file ##
a_file = open("/content/inference/output/BloodImage_00000.txt", "r")# Stripping data from the txt file into a list #
list_of_lists = []
for line in a_file:stripped_line = line.strip()line_list = stripped_line.split()list_of_lists.append(line_list)
a_file.close()# Conversion of str to int #
stage1 = []
for i in range(0, len(list_of_lists)):test_list = list(map(float, list_of_lists[i])) stage1.append(test_list)# Denormalizing #
stage2 = []
mul = [1,640,480,640,480] #[constant, image_width, image_height, image_width, image_height]
for x in stage1:c,xx,yy,w,h = x[0]*mul[0], x[1]*mul[1], x[2]*mul[2], x[3]*mul[3], x[4]*mul[4]    stage2.append([c,xx,yy,w,h])# Convert (x_center, y_center, width, height) --> (x_min, y_min, width, height) #
stage_final = []
for x in stage2:c,xx,yy,w,h = x[0]*1, (x[1]-(x[3]/2)) , (x[2]-(x[4]/2)), x[3]*1, x[4]*1  stage_final.append([c,xx,yy,w,h])fig = plt.figure()
import cv2
#add axes to the image
ax = fig.add_axes([0,0,1,1])# read and plot the image## Location of the input image which is sent to model's prediction ##
image = plt.imread('/content/BCCD_Dataset/BCCD/JPEGImages/BloodImage_00000.jpg')
plt.imshow(image)# iterating over the image for different objects
for x in stage_final:class_ = int(x[0])xmin = x[1]ymin = x[2]width = x[3]height = x[4]xmax = width + xminymax = height + ymin# assign different color to different classes of objectsif class_ == 1:edgecolor = 'r'ax.annotate('RBC', xy=(xmax-40,ymin+20))elif class_ == 2:edgecolor = 'b'ax.annotate('WBC', xy=(xmax-40,ymin+20))elif class_ == 0:edgecolor = 'g'ax.annotate('Platelets', xy=(xmax-40,ymin+20))# add bounding boxes to the imagerect = patches.Rectangle((xmin,ymin), width, height, edgecolor = edgecolor, facecolor = 'none')ax.add_patch(rect)
Then the output plotted image looks like this, great isn’t.
然后輸出的繪制圖像看起來像這樣,不是很好。

4.將模型投入生產 (4. Moving Model to Production)
Just in case, if you wish to move the model to the production or to deploy anywhere, you have to follow these steps.
以防萬一,如果您希望將模型移至生產環境或部署到任何地方,則必須執行以下步驟。
First, install the dependencies to run the yolov5, and we need some files from the yolov5 folder and add them to the python system path directory to load the utils. So copy them into some location you need and later move them wherever you need.
首先,安裝依賴項以運行yolov5,我們需要yolov5文件夾中的一些文件,并將它們添加到python系統路徑目錄中以加載utils。 因此,將它們復制到所需的位置,然后將其移至所需的位置。
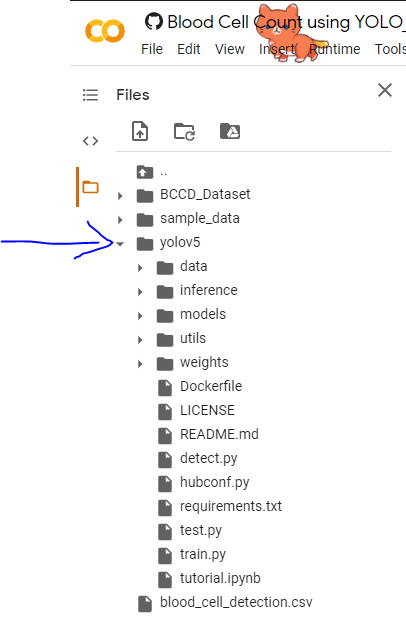
So in the below picture-1, I have boxed some folders and files, you can download them and keep them in a separate folder as in picture-2.
因此,在下面的圖片1中,我將一些文件夾和文件裝箱,您可以下載它們并將它們保存在單獨的文件夾中,如圖2所示。

Now we need to tell the python compiler to add the above folder location into account so that when we run our programs it will load the models and functions on runtime.
現在我們需要告訴python編譯器將上述文件夾位置添加到帳戶中,以便在運行程序時它將在運行時加載模型和函數。
In the below code snippet, on line-9, I have added the sys.path… command and in that, I have specified my folder location where I have moved those files, you can replace it with yours.
在下面的代碼段的第9行中,我添加了sys.path…命令,并在其中指定了我將這些文件移動到的文件夾位置,您可以將其替換為您的文件。
Then fire up these codes to start prediction.
然后啟動這些代碼以開始預測。
import os, sys, random
from glob import glob
import matplotlib.pyplot as plt
%matplotlib inline
!pip install -qr '/content/drive/My Drive/Machine Learning Projects/YOLO/SOURCE/requirements.txt'  # install dependencies## Add the path where you have stored the neccessary supporting files to run detect.py ##
## Replace this with your path.##
sys.path.insert(0, '/content/drive/My Drive/Machine Learning Projects/YOLO/SOURCE/')
print(sys.path)
cwd = os.getcwd()
print(cwd)## Single Image prediction
## Beware the contents in the output folder will be deleted for every prediction
output = !python '/content/drive/My Drive/Machine Learning Projects/YOLO/SOURCE/detect.py' --source '/content/BloodImage_00026.jpg' --weights '/content/drive/My Drive/Machine Learning Projects/YOLO/SOURCE/best_BCCM.pt' --output '/content/OUTPUTS/' --device 'cpu'
print(output)
img = plt.imread('/content/OUTPUTS/BloodImage_00026.jpg')
plt.imshow(img)## Folder Prediction
output = !python '/content/drive/My Drive/Machine Learning Projects/YOLO/SOURCE/detect.py' --source '/content/inputs/' --weights '/content/drive/My Drive/Machine Learning Projects/YOLO/SOURCE/best_BCCM.pt' --output '/content/OUTPUTS/' --device 'cpu'print(output)
And there we come to the end of this post. I hope you got some idea about how to train Yolo-v5 on other datasets you have. Let me know in the comments if you face any difficulty in training and inference.
至此,本文結束。 我希望您對如何在其他數據集中訓練Yolo-v5有一些了解。 如果您在訓練和推理方面遇到任何困難,請在評論中讓我知道。
Until then, see you next time.
在那之前,下次見。
Article By:
文章作者:
BALAKRISHNAKUMAR V
BALAKRISHNAKUMAR V
Co-Founder — DeepScopy (An AI-Based Medical Imaging Startup)
聯合創始人— DeepScopy (基于AI的醫學成像初創公司)
Connect with me → LinkedIn, GitHub, Twitter, Medium
與我聯系 → LinkedIn , GitHub , Twitter , 中

`
`
Visit us → DeepScopy
訪問我們 → DeepScopy
Connect with us → Twitter, LinkedIn, Medium
與我們聯系 → Twitter , LinkedIn , 中
翻譯自: https://medium.com/towards-artificial-intelligence/yolo-v5-object-detection-on-a-custom-dataset-61d478bc08f9
yolo人臉檢測數據集
本文來自互聯網用戶投稿,該文觀點僅代表作者本人,不代表本站立場。本站僅提供信息存儲空間服務,不擁有所有權,不承擔相關法律責任。 如若轉載,請注明出處:http://www.pswp.cn/news/390814.shtml 繁體地址,請注明出處:http://hk.pswp.cn/news/390814.shtml 英文地址,請注明出處:http://en.pswp.cn/news/390814.shtml
如若內容造成侵權/違法違規/事實不符,請聯系多彩編程網進行投訴反饋email:809451989@qq.com,一經查實,立即刪除!相關文章

oauth2-server-php-docs 授權類型

flask框架視圖和路由_角度視圖,路由和NgModule的解釋

NGUI EventDelagate事件委托
)
leetcode 461. 漢明距離(位運算)

圖深度學習-第2部分

Linux下 安裝Redis并配置服務

大omega記號_什么是大歐米茄符號?
)
leetcode 477. 漢明距離總和(位運算)

什么是跨域及跨域請求資源的方法?

量子信息與量子計算_量子計算為23美分。

全面理解Java內存模型

React Native指南
)
leetcode 1074. 元素和為目標值的子矩陣數量(map+前綴和)

失物招領php_新奧爾良圣徒隊是否增加了失物招領?

教你分分鐘使用Retrofit+Rxjava實現網絡請求


基本SQL命令-您應該知道的數據庫查詢和語句列表
)
leetcode 5756. 兩個數組最小的異或值之和(狀態壓縮dp)

客戶細分模型_Avarto金融解決方案的客戶細分和監督學習模型
