白褲子變粉褲子怎么辦
At HousingAnywhere, one of the first major obstacles we had to face when scaling the Data team was building a centralised repository that contains our ever-growing machine learning applications. Between these projects, many of them share dependencies with each other which means code refactoring can become a pain and consumes lots of time. In addition, as we’re very opposed to Data Scientists’ tendency to copy/paste codes, we need a unified location where we can store reusable functions that can be easily accessed.
在HousingAnywhere ,擴展數據團隊時我們面臨的第一個主要障礙之一是建立一個包含我們不斷增長的機器學習應用程序的集中式存儲庫。 在這些項目之間,它們中的許多彼此共享依賴關系,這意味著代碼重構可能會很麻煩并且會花費大量時間。 另外,由于我們非常反對數據科學家復制/粘貼代碼的趨勢,因此我們需要一個統一的位置,在這里我們可以存儲易于訪問的可重用功能。
The perfect solution to our use case was building a monorepo. In this article, I’ll go through how a simple monorepo can be built using the build automation system Pantsbuild.
對于我們的用例,完美的解決方案是構建一個monorepo。 在本文中,我將介紹如何使用構建自動化系統Pantsbuild構建簡單的monorepo 。
什么是monorepo? (What is a monorepo?)
A monorepo is a repository where code for many projects are stored together. Having a centralised repository for your team comes with a number of benefits:
monorepo是一個用于存儲許多項目代碼的存儲庫。 為您的團隊建立集中式存儲庫有許多好處:
Reusability: Allows projects to share functions, in the case of Data Science, codes for preprocessing data, calculating metrics and even plotting graphs can be shared across projects.
可重用性 :允許項目共享功能,就數據科學而言,可以在項目之間共享用于預處理數據 , 計算度量甚至繪圖的代碼。
Atomic changes: It only takes one operation to make changes across multiple projects.
原子更改 :只需執行一項操作即可在多個項目中進行更改。
Large scale refactoring: can be done easily and quickly, ensuring projects would still work afterwards.
大規模重構 : 可以輕松,快速地完成,從而確保項目在以后仍然可以正常工作。
Monorepo, however, is not a solution that fits all as there are a number of disadvantages:
但是,Monoropo并不是一個適合所有人的解決方案,因為存在許多缺點:
Security issues: There are no means to expose only parts of the repository.
安全問題 :沒有辦法只公開存儲庫的一部分。
Big codebase: As the repo grows in size, it can cause problems as developers have to check out the entire repository.
大型代碼庫 :隨著存儲庫大小的增加,由于開發人員必須檢出整個存儲庫,因此可能導致問題。
At HousingAnywhere, our team of Data Scientists find monorepo to be the perfect solution for our use cases in the Data team. Many of our machine learning applications have smaller projects that spin off from them. The monorepo enables us to quickly intergrate these new projects into the CI/CD pipeline, reducing the amount of time having to setup pipeline individually for each new project.
在HousingAnywhere,我們的數據科學家團隊發現monorepo是我們數據團隊中用例的理想解決方案。 我們的許多機器學習應用程序都有一些較小的項目,這些項目可以從中分離出來。 monorepo使我們能夠快速將這些新項目集成到CI / CD管道中,從而減少了為每個新項目分別設置管道的時間。
We tried out a number of build automation systems and the one that we stuck with is Pantsbuild. Pants is one of the few systems that supports Python natively, and is an open-source project widely used by Twitter, Toolchain, Foursquare, Square, and Medium.
我們嘗試了許多構建自動化系統, 我們堅持使用的是Pantsbuild 。 Pant是本機支持Python的少數系統之一,并且是Twitter,Toolchain,Foursquare,Square和Medium廣泛使用的開源項目。
Recently Pants has updated to v2 which only supports Python at the moment but it isn’t too much of a limitation for Data Science projects.
最近,Pant已更新到v2 ,目前僅支持Python,但對Data Science項目的限制不是太大。
一些基本概念 (Some basic concepts)
There are a couple of concepts in Pants that you should understand beforehand:
您需要事先了解褲子中的幾個概念:
Goals help users tell Pants what actions to take e.g.
test目標可以幫助用戶告訴褲子要采取哪些措施,例如進行
testTasks are the Pants modules that run actions
任務是運行動作的褲子模塊
Targets describe what files to take those actions upon. These targets are defined in a BUILD file
目標描述要對這些文件執行哪些操作。 這些目標在BUILD文件中定義
Target types define the types of operations that can be performed on a target e.g. you can perform tests on test targets
目標類型定義可以在目標上執行的操作的類型,例如,您可以在測試目標上執行測試
Addresses describe the location of a target in the repo
地址描述了目標在倉庫中的位置
For more information, I highly recommend reading this documentation where the developers of Pants have done an excellent job in explaining these concepts in detail.
有關更多信息,我強烈建議閱讀本文檔 ,Pant的開發人員在詳細解釋這些概念方面做得很好。
一個示例存儲庫 (An example repository)
In this section, I’ll go through how you can easily setup a monorepo using Pants. First, makes sure these requirements are met to install Pants:
在本節中,我將介紹如何使用褲子輕松設置monorepo。 首先,確保滿足以下要求才能安裝褲子:
- Linux or macOS. Linux或macOS。
Python 3.6+ discoverable on your
PATH.可在
PATH上發現的Python 3.6+。- Internet access (so that Pants can fully bootstrap itself). Internet訪問(以便褲子可以完全自舉)。
Now, let’s set up a new repository:
現在,讓我們建立一個新的存儲庫:
mkdir monorepo-example
cd monorepo-example
git init
Alternatively, you can clone the example repo via:
或者,您可以通過以下方式克隆示例存儲庫 :
git clone https://github.com/uiucanh/monorepo-example.gitNext, run these commands to download the setup file:
接下來,運行以下命令以下載安裝文件:
printf '[GLOBAL]\npants_version = "1.30.0"\nbackend_packages = []\n' > pants.toml
curl -L -o ./pants https://pantsbuild.github.io/setup/pants && \ chmod +x ./pants
Then, bootstrap Pants by running ./pants --version . You should receive 1.30.0 as output.
然后,通過運行./pants --version引導褲子。 您應該收到1.30.0作為輸出。
Let’s add a couple of simple apps to the repo. First, we’ll create a utils/data_gen.py and a utils/metrics.py that contain a couple of util functions:
讓我們向倉庫添加幾個簡單的應用程序。 首先,我們將創建一個utils/data_gen.py和一個utils/metrics.py ,其中包含幾個util函數:
import numpy as npdef generate_linear_data(n_samples: int = 100, n_features: int = 1,x_min: int = -5, x_max: int = 5,m_min: int = -10, m_max: int = 10,noise_strength: int = 1, seed: int = None,bias: int = 10):# Set the random seedif seed is not None:np.random.seed(seed)X = np.random.uniform(x_min, x_max, size=(n_samples, n_features))m = np.random.uniform(m_min, m_max, size=n_features)y = np.dot(X, m).reshape((n_samples, 1))if bias != 0:y += bias# Add Gaussian noisey += np.random.normal(size=y.shape) * noise_strengthreturn X, ydef split_dataset(X: np.ndarray, y: np.ndarray,test_size: float = 0.2, seed: int = 0):# Set the random seednp.random.seed(seed)# Shuffle datasetindices = np.random.permutation(len(X))X = X[indices]y = y[indices]# SplittingX_split_point = int(len(X) * (1 - test_size))y_split_point = int(len(y) * (1 - test_size))X_train, X_test = X[:X_split_point], X[X_split_point:]y_train, y_test = y[:y_split_point], y[y_split_point:]return X_train, X_test, y_train, y_testimport numpy as npdef mean_absolute_percentage_error(y_true: np.ndarray, y_pred: np.ndarray):y_true, y_pred = np.array(y_true), np.array(y_pred)return np.mean(np.abs((y_true - y_pred) / y_true)) * 100def r2(y_test: np.ndarray, y_pred: np.ndarray):y_mean = np.mean(y_test)ss_tot = np.square(y_test - y_mean).sum()ss_res = np.square(y_test - y_pred).sum()result = 1 - ss_res / ss_totreturn resultNow, we’ll add an application first_app/app.pythat imports these codes. The app uses data fromgenerate_linear_data , passes them to a Linear Regression model and outputs the Mean Absolute Percentage Error.
現在,我們將添加一個導入這些代碼的應用程序first_app/app.py 該應用程序使用generate_linear_data數據,將其傳遞到線性回歸模型,然后輸出平均絕對百分比誤差。
import os
import sys# Enable import from outer directory
file_path = os.path.dirname(os.path.realpath(__file__))
sys.path.insert(0, file_path + "/..")from utils.data_gen import generate_linear_data, split_dataset  # noqa
from utils.metrics import mean_absolute_percentage_error, r2  # noqa
from sklearn.linear_model import LinearRegression  # noqaclass Model:def __init__(self, X, y):self.X = Xself.y = yself.m = LinearRegression()self.y_pred = Nonedef split(self, test_size=0.33, seed=0):self.X_train, self.X_test, self.y_train, self.y_test = split_dataset(self.X, self.y, test_size=test_size, seed=seed)def fit(self):self.m.fit(self.X_train, self.y_train)def predict(self):self.y_pred = self.m.predict(self.X_test)def main():X, y = generate_linear_data()m = Model(X, y)m.split()m.fit()m.predict()print("MAPE:", mean_absolute_percentage_error(m.y_test, m.y_pred))if __name__ == '__main__':main()
And another app second_app/app.pythat uses the first app codes:
還有另一個使用第一個應用程序代碼的應用程序second_app/app.py :
import sys
import os# Enable import from outer directory
file_path = os.path.dirname(os.path.realpath(__file__))
sys.path.insert(0, file_path + "/..")from utils.metrics import r2  # noqa
from utils.data_gen import generate_linear_data, split_dataset  # noqa
from first_app.app import Model  # noqadef main():X, y = generate_linear_data()m = Model(X, y)m.split()m.fit()m.predict()result = r2(m.y_test, m.y_pred)print("R2:", result)return resultif __name__ == '__main__':_ = main()
Then we add a couple of simple tests for these apps, for example:
然后,我們為這些應用添加一些簡單的測試,例如:
import numpy as np
from first_app.app import Modeldef test_model_working():X, y = np.array([[1, 2, 3], [4, 5, 6]]), np.array([[1], [2]])m = Model(X, y)m.split()m.fit()m.predict()assert m.y_pred is not None
In each of these directories, we’ll need a BUILD file. These files contain information about your targets and their dependencies. In these files, we’ll declare what requirements are needed for these projects as well as declare the test targets.
在每個目錄中,我們需要一個BUILD文件。 這些文件包含有關目標及其依賴項的信息。 在這些文件中,我們將聲明這些項目需要哪些要求以及聲明測試目標。
Let’s start from the root of the repository:
讓我們從存儲庫的根目錄開始:
python_requirements()This BUILD file contains a macro python_requirements() that creates multiple targets to pull third party dependencies from a requirements.txt in the same directory. It saves us time from having to do it manually for each requirement:
此BUILD文件包含一個宏python_requirements() ,該宏創建多個目標以從同一目錄中的requirements.txt中提取第三方依賴項。 它為我們節省了手動完成每個需求的時間:
python_requirement_library(
    name="numpy",
    requirements=[
        python_requirement("numpy==1.19.1"),
    ],
)
The BUILD file inutils would look like below:
utils的BUILD文件如下所示:
python_library(name = "utils",sources = ["data_gen.py","metrics.py",],dependencies = [# The `//` signals that the target is at the root of your project."//:numpy"]
)python_tests(name = 'utils_test',sources = ["data_gen_test.py","metrics_test.py",],dependencies = [":utils",]
)
Here we have two targets: First one is a Python library that contains Python codes which are defined in source i.e. our two utility files. It also specifies the requirements needed to run these codes which is numpy, one of our third party dependencies we defined in the root BUILD file.
這里我們有兩個目標:第一個是Python庫,其中包含在source代碼中定義的Python代碼,即我們的兩個實用程序文件。 它還指定了運行這些代碼numpy所需的要求, numpy是我們在根BUILD文件中定義的第三方依賴項之一。
The second target is the collection of tests we defined earlier, their dependency is the previous Python library. To run these tests, it’s as simple as running ./pants test utils:utils_test or ./pants test utils:: from root. The second : tells Pants to run all the test targets in that BUILD file. The output should look like this:
第二個目標是我們前面定義的測試集合,它們的依賴關系是先前的Python庫。 要運行這些測試,就像從根目錄運行./pants test utils:utils_test或./pants test utils::一樣簡單。 第二個:告訴Pant運行該BUILD文件中的所有測試目標。 輸出應如下所示:
============== test session starts ===============
platform darwin -- Python 3.7.5, pytest-5.3.5, py-1.9.0, pluggy-0.13.1
cachedir: .pants.d/test/pytest/.pytest_cache
rootdir: /Users/ducbui/Desktop/Projects/monorepo-example, inifile: /dev/null
plugins: cov-2.8.1, timeout-1.3.4
collected 3 items
utils/data_gen_test.py .                   [ 33%]
utils/metrics_test.py ..                   [100%]
Similarly, we’ll create 2 BUILD files for first_app and second_app
同樣,我們將為first_app和second_app創建2個BUILD文件
python_library(name = "first_app",sources = ["app.py"],dependencies = ["//:numpy","//:scikit-learn","//:pytest","utils",],
)python_tests(name = 'app_test',sources = ["app_test.py"],dependencies = [":first_app",]
)
In the second_app BUILD file, we declare the library fromfirst_app above as the dependency for this library. This means that all the dependencies from that library, together with its source will be the dependencies for first_app .
在second_app BUILD文件中,我們從上面的first_app聲明該庫作為該庫的依賴項。 這意味著該庫中的所有依賴項及其源將成為first_app的依賴項。
python_library(name = "second_app",sources = ["app.py"],dependencies = ["first_app",],
)python_tests(name = 'app_test',sources = ["app_test.py"],dependencies = [":second_app",]
)
Similarly, we also add some test targets to these BUILD files and they can be run with ./pants test first_app:: or ./pants test second_app:: .
同樣,我們也向這些BUILD文件添加了一些測試目標,它們可以通過./pants test first_app::或./pants test second_app:: 。
The final directory tree should look like this:
最終目錄樹應如下所示:
.
├── BUILD
├── first_app
│   ├── BUILD
│   ├── app.py
│   └── app_test.py
├── pants
├── pants.toml
├── requirements.txt
├── second_app
│   ├── BUILD
│   ├── app.py
│   └── app_test.py
└── utils
    ├── BUILD
    ├── data_gen.py
    ├── data_gen_test.py
    ├── metrics.py
    └── metrics_test.py
The power of Pants comes from the ability to trace transitive dependencies between projects and test targets that were affected by the change. The developers of Pants provide us with this nifty bash script that can be used to track down affected test targets:
Pant的強大之處在于能夠跟蹤受更改影響的項目與測試目標之間的傳遞依賴關系。 Pants的開發人員為我們提供了這個漂亮的bash腳本,可用于跟蹤受影響的測試目標:
#!/bin/bashset -x
set -o
set -e# Disable Zinc incremental compilation to ensure no historical cruft pollutes the build used for CI testing.
export PANTS_COMPILE_ZINC_INCREMENTAL=Falsechanged=("$(./pants --changed-parent=origin/master list)")
dependees=("$(./pants dependees --dependees-transitive --dependees-closed ${changed[@]})")
minimized=("$(./pants minimize ${dependees[@]})")
./pants filter --filter-type=-jvm_binary ${minimized[@]} | sort > minimized.txt# In other contexts we can use --spec-file to read the list of targets to operate on all at
# once, but that would merge all the classpaths of all the test targets together, which may cause
# errors. See https://www.pantsbuild.org/3rdparty_jvm.html#managing-transitive-dependencies.
# TODO(#7480): Background cache activity when running in a loop can sometimes lead to race conditions which
# cause pants to error. This can probably be worked around with --no-cache-compile-rsc-write. See
# https://github.com/pantsbuild/pants/issues/7480.for target in $(cat minimized.txt); do./pants test $target
done
To showcase its power, let’s run an example. We’ll create a new branch, make a modification to data_gen.py (e.g. changing the default parameter for generate_linear_data ) and commit:
為了展示其功能,讓我們來看一個例子。 我們將創建一個新分支,對data_gen.py進行修改(例如,更改generate_linear_data的默認參數)并提交:
git checkout -b "example_1"
git add utils/data_gen.py
git commit -m "support/change-params"
Now, running the bash script we’ll see a minimized.txt that contains all the projects that are impacted and the test targets that will be executed:
現在,運行bash腳本,我們將看到一個minimized.txt ,其中包含所有受影響的項目以及將要執行的測試目標:
first_app:app_test
second_app:app_test
utils:utils_test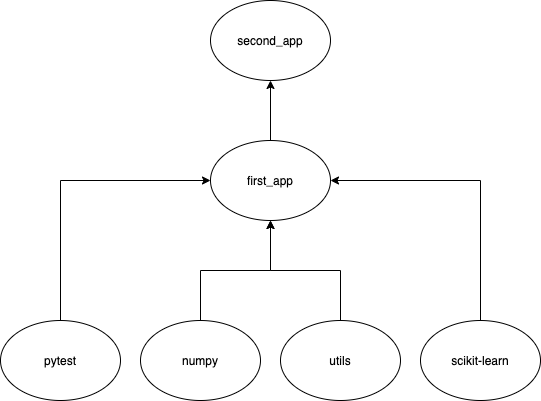
Looking at the graph above, we can clearly see that changing utils would affect all of its above nodes, including first_app and second_app .
查看上圖,我們可以清楚地看到更改utils會影響其上面的所有節點,包括first_app和second_app 。
Let’s do another example, this time we’ll only modify second_app/app.py . Switch branch, commit and run the script again. Insideminimized.txt , we’ll only get second_app:app_test as it’s the topmost node.
讓我們再舉一個例子,這次我們只修改second_app/app.py 切換分支,提交并再次運行腳本。 里面minimized.txt ,我們只得到second_app:app_test ,因為它是最頂層的節點。
And that’s it, hopefully, I’ve managed to demonstrate to you how useful Pantsbuild can be for Data Science monorepos. Together with a properly implemented CI/CD pipeline, the speed and reliability of development can be improved vastly.
就是這樣,希望我能夠向您演示Pantsbuild對Data Science monorepos的有用性。 加上正確實施的CI / CD管道,可以極大地提高開發速度和可靠性。
翻譯自: https://towardsdatascience.com/building-a-monorepo-for-data-science-with-pantsbuild-2f77b9ee14bd
白褲子變粉褲子怎么辦
本文來自互聯網用戶投稿,該文觀點僅代表作者本人,不代表本站立場。本站僅提供信息存儲空間服務,不擁有所有權,不承擔相關法律責任。 如若轉載,請注明出處:http://www.pswp.cn/news/389826.shtml 繁體地址,請注明出處:http://hk.pswp.cn/news/389826.shtml 英文地址,請注明出處:http://en.pswp.cn/news/389826.shtml
如若內容造成侵權/違法違規/事實不符,請聯系多彩編程網進行投訴反饋email:809451989@qq.com,一經查實,立即刪除!相關文章

ubuntu+anaconda+tensorflow 及相關問題

2022. 將一維數組轉變成二維數組
)
支持向量機SVM算法原理及應用(R)

mad離群值_全部關于離群值

2057. 值相等的最小索引

SpringBoot中各配置文件的優先級及加載順序

青年報告_了解青年的情緒

post提交參數過多時,取消Tomcat對 post長度限制

2048. 下一個更大的數值平衡數
![bzoj1222: [HNOI2001]產品加工](http://pic.xiahunao.cn/bzoj1222: [HNOI2001]產品加工)
bzoj1222: [HNOI2001]產品加工

map(平均平均精度_客戶的平均平均精度

Sublime Text 2搭建Go開發環境,代碼提示+補全+調試

629. K個逆序對數組

zookeeper、hbase常見命令

鮮活數據數據可視化指南_數據可視化實用指南

2049. 統計最高分的節點數目

Linux lsof命令詳解

史密斯臥推:杠鈴史密斯下斜臥推、上斜機臥推、平板臥推動作圖解

圖像特征 可視化_使用衛星圖像可視化建筑區域
