網絡思想:
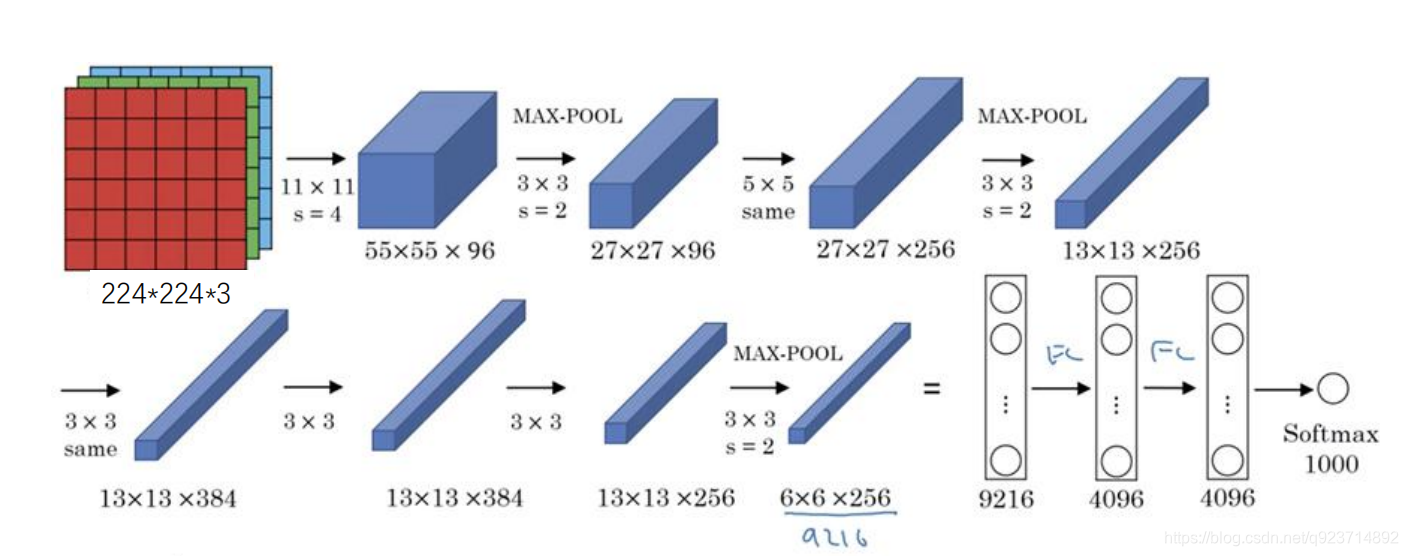
1、一張原始圖片被resize到(224,224,3);
2、使用步長為4x4,大小為11的卷積核對圖像進行卷積,輸出的特征層為96層, 輸出的shape為(55,55,96);
3、使用步長為2的最大池化層進行池化,此時輸出的shape為(27,27,96)
4、使用步長為1x1,大小為5的卷積核對圖像進行卷積,輸出的特征層為256層, 輸出的shape為(27,27,256);
5、使用步長為2的最大池化層進行池化,此時輸出的shape為(13,13,256);
6、使用步長為1x1,大小為3的卷積核對圖像進行卷積,輸出的特征層為384層, 輸出的shape為(13,13,384);
7、使用步長為1x1,大小為3的卷積核對圖像進行卷積,輸出的特征層為384層, 輸出的shape為(13,13,384);
8、使用步長為1x1,大小為3的卷積核對圖像進行卷積,輸出的特征層為256層, 輸出的shape為(13,13,256);
9、使用步長為2的最大池化層進行池化,此時輸出的shape為(6,6,256);
10、兩個全連接層,最后輸出為1000類
細節部分舉例:
第一層
第一層輸入數據為原始圖像的2242243的圖像,這個圖像被11113(3代表 深度,例如RGB的3通道)的卷積核進行卷積運算,卷積核對原始圖像的每次 卷積都會生成一個新的像素。 卷積核的步長為4個像素,朝著橫向和縱向這兩個方向進行卷積。 由此,會生成新的像素; 第一層有96個卷積核,所以就會形成555596個像素層。 pool池化層:這些像素層還需要經過pool運算(池化運算)的處理,池化運 算的尺度由預先設定為33,運算的步長為2,則池化后的圖像的尺寸為: (55-3)/2+1=27。即經過池化處理過的規模為2727*96.
代碼實現:
網絡主體部分:(AlexNet.py)
from keras.models import Sequential
from keras.layers import Dense,Activation,Conv2D,MaxPooling2D,Flatten,Dropout,BatchNormalization
from keras.datasets import mnist
from keras.utils import np_utils
from keras.optimizers import Adam# 注意,為了加快收斂,我將每個卷積層的filter減半,全連接層減為1024
def AlexNet(input_shape=(224,224,3),output_shape=2):# AlexNetmodel = Sequential()# 使用步長為4x4,大小為11的卷積核對圖像進行卷積,輸出的特征層為96層,輸出的shape為(55,55,96);# 所建模型后輸出為48特征層model.add(Conv2D(filters=48, kernel_size=(11,11),strides=(4,4),padding='valid',input_shape=input_shape,activation='relu'))model.add(BatchNormalization())# 使用步長為2的最大池化層進行池化,此時輸出的shape為(27,27,96)# 所建模型后輸出為48特征層model.add(MaxPooling2D(pool_size=(3,3), strides=(2,2), padding='valid'))# 使用步長為1x1,大小為5的卷積核對圖像進行卷積,輸出的特征層為256層,輸出的shape為(27,27,256);# 所建模型后輸出為128特征層model.add(Conv2D(filters=128, kernel_size=(5,5), strides=(1,1), padding='same',activation='relu'))model.add(BatchNormalization())# 使用步長為2的最大池化層進行池化,此時輸出的shape為(13,13,256);# 所建模型后輸出為128特征層model.add(MaxPooling2D(pool_size=(3,3),strides=(2,2),padding='valid'))# 使用步長為1x1,大小為3的卷積核對圖像進行卷積,輸出的特征層為384層,輸出的shape為(13,13,384);# 所建模型后輸出為192特征層model.add(Conv2D(filters=192, kernel_size=(3,3),strides=(1,1), padding='same', activation='relu')) # 使用步長為1x1,大小為3的卷積核對圖像進行卷積,輸出的特征層為384層,輸出的shape為(13,13,384);# 所建模型后輸出為192特征層model.add(Conv2D(filters=192, kernel_size=(3,3), strides=(1,1), padding='same', activation='relu'))# 使用步長為1x1,大小為3的卷積核對圖像進行卷積,輸出的特征層為256層,輸出的shape為(13,13,256);# 所建模型后輸出為128特征層model.add(Conv2D(filters=128, kernel_size=(3,3), strides=(1,1), padding='same', activation='relu'))# 使用步長為2的最大池化層進行池化,此時輸出的shape為(6,6,256);# 所建模型后輸出為128特征層model.add(MaxPooling2D(pool_size=(3,3), strides=(2,2), padding='valid'))# 兩個全連接層,最后輸出為1000類,這里改為2類(貓和狗)# 縮減為1024model.add(Flatten())model.add(Dense(1024, activation='relu'))model.add(Dropout(0.25))model.add(Dense(1024, activation='relu'))model.add(Dropout(0.25))model.add(Dense(output_shape, activation='softmax'))return model
圖像預處理部分:(utils.py)
import matplotlib.image as mpimg
import numpy as np
import cv2
import tensorflow as tf
from tensorflow.python.ops import array_opsdef load_image(path):# 讀取圖片,rgbimg = mpimg.imread(path)# 將圖片修剪成中心的正方形short_edge = min(img.shape[:2])yy = int((img.shape[0] - short_edge) / 2)xx = int((img.shape[1] - short_edge) / 2)crop_img = img[yy: yy + short_edge, xx: xx + short_edge]return crop_imgdef resize_image(image, size):with tf.name_scope('resize_image'):images = []for i in image:i = cv2.resize(i, size)images.append(i)images = np.array(images)return imagesdef print_answer(argmax):with open("./data/model/index_word.txt","r",encoding='utf-8') as f:synset = [l.split(";")[1][:-1] for l in f.readlines()]# print(synset[argmax])return synset[argmax]
訓練部分:(train.py)
from keras.callbacks import TensorBoard, ModelCheckpoint, ReduceLROnPlateau, EarlyStopping
from keras.utils import np_utils
from keras.optimizers import Adam
from model.AlexNet import AlexNet
import numpy as np
import utils
import cv2
from keras import backend as K
#K.set_image_dim_ordering('tf')
K.image_data_format() == 'channels_first'def generate_arrays_from_file(lines,batch_size):# 獲取總長度n = len(lines)i = 0while 1:X_train = []Y_train = []# 獲取一個batch_size大小的數據for b in range(batch_size):if i==0:np.random.shuffle(lines)name = lines[i].split(';')[0]# 從文件中讀取圖像img = cv2.imread(r".\data\image\train" + '/' + name)img = cv2.cvtColor(img,cv2.COLOR_BGR2RGB)img = img/255X_train.append(img)Y_train.append(lines[i].split(';')[1])# 讀完一個周期后重新開始i = (i+1) % n# 處理圖像X_train = utils.resize_image(X_train,(224,224))X_train = X_train.reshape(-1,224,224,3)Y_train = np_utils.to_categorical(np.array(Y_train),num_classes= 2)   yield (X_train, Y_train)if __name__ == "__main__":# 模型保存的位置log_dir = "./logs/"# 打開數據集的txtwith open(r".\data\dataset.txt","r") as f:lines = f.readlines()# 打亂行,這個txt主要用于幫助讀取數據來訓練# 打亂的數據更有利于訓練np.random.seed(10101)np.random.shuffle(lines)np.random.seed(None)# 90%用于訓練,10%用于估計。num_val = int(len(lines)*0.1)num_train = len(lines) - num_val# 建立AlexNet模型model = AlexNet()# 保存的方式,3代保存一次checkpoint_period1 = ModelCheckpoint(log_dir + 'ep{epoch:03d}-loss{loss:.3f}-val_loss{val_loss:.3f}.h5',monitor='acc', save_weights_only=False, save_best_only=True, period=3)# 學習率下降的方式,acc三次不下降就下降學習率繼續訓練reduce_lr = ReduceLROnPlateau(monitor='acc', factor=0.5, patience=3, verbose=1)# 是否需要早停,當val_loss一直不下降的時候意味著模型基本訓練完畢,可以停止early_stopping = EarlyStopping(monitor='val_loss', min_delta=0, patience=10, verbose=1)# 交叉熵model.compile(loss = 'categorical_crossentropy',optimizer = Adam(lr=1e-3),metrics = ['accuracy'])# 一次的訓練集大小batch_size = 128print('Train on {} samples, val on {} samples, with batch size {}.'.format(num_train, num_val, batch_size))# 開始訓練model.fit_generator(generate_arrays_from_file(lines[:num_train], batch_size),steps_per_epoch=max(1, num_train//batch_size),validation_data=generate_arrays_from_file(lines[num_train:], batch_size),validation_steps=max(1, num_val//batch_size),epochs=50,initial_epoch=0,callbacks=[checkpoint_period1, reduce_lr])model.save_weights(log_dir+'last1.h5')#保存模型
預測部分:(predict.py)
import numpy as np
import utils
import cv2
from keras import backend as K
from model.AlexNet import AlexNet# K.set_image_dim_ordering('tf')
K.image_data_format() == 'channels_first'if __name__ == "__main__":model = AlexNet()model.load_weights("./logs/last1.h5")img = cv2.imread("./test2.jpg")img_RGB = cv2.cvtColor(img,cv2.COLOR_BGR2RGB)img_nor = img_RGB/255img_nor = np.expand_dims(img_nor,axis = 0)img_resize = utils.resize_image(img_nor,(224,224))#utils.print_answer(np.argmax(model.predict(img)))print('the answer is: ',utils.print_answer(np.argmax(model.predict(img_resize))))cv2.imshow("ooo",img)cv2.waitKey(0)


![BZOJ 2003 [Hnoi2010]Matrix 矩陣](http://pic.xiahunao.cn/BZOJ 2003 [Hnoi2010]Matrix 矩陣)

)

之樂觀鎖插件)
)

)


