If someone asks you to define the Power Query, what should you say? If you’ve ever worked with Power BI, there is no chance that you haven’t used Power Query, even if you weren’t aware of it. Therefore, one could easily say that Power Query is the “heart and soul” of Power BI…
如果有人要求您定義超級查詢,您應該怎么說? 如果您曾經使用過Power BI,那么即使您不了解Power Query,也絕不會使用它。 因此,可以輕松地說Power Query是Power BI的“靈魂” 。
In more official wording, Power Query is Microsoft’s technology for connecting and transforming data from multiple sources. As Microsoft’s official documentation states, you can connect to hundreds of different data sources and perform more than 300 transformations on your data.
用更正式的措辭來說,Power Query是Microsoft的技術,用于連接和轉換來自多個源的數據。 如Microsoft的官方文檔所述,您可以連接到數百個不同的數據源,并對數據執行300多次轉換。
The key advantage of Power Query is that you can perform complex data transformations with little or no coding skills! Additionally, all steps you’ve applied during the data transformation process are being saved, so every time you refresh your dataset, those steps will be automatically applied to shape your data, which is a real time-saver.
Power Query的主要優勢在于,您幾乎不需要或幾乎沒有編碼技能就可以執行復雜的數據轉換! 此外,還將保存您在數據轉換過程中應用的所有步驟,因此,每次刷新數據集時,這些步驟將自動應用以成形數據,這是真正的節省時間。
Out of those 300+ transformations, it’s extremely hard to choose the most useful ones, but I will share my top 3 tips related to Power Query (and its powerful M language). You should also learn non Power Query related tips for boosting Power BI development.
在這300多個轉換中,很難選擇最有用的轉換,但是我將分享與Power Query(及其強大的M語言)相關的3個技巧。 您還應該學習與Power Query不相關的技巧,以促進Power BI的開發 。
技巧1 – Power Query Editor中的省時功能 (Tip #1 — Time Savers in Power Query Editor)
I need to say this immediately: there are tons of time-saving actions you can perform with clever usage of Power Query Editor, so I will narrow my recommendation to a few I’m using most often.
我需要立即說出這一點:通過巧妙地使用Power Query Editor,您可以執行許多省時的操作,因此,我將建議范圍縮小到最常使用的幾個。
I bet that you face this scenario almost every time you are preparing data for your Power BI report. You import a wide table with a lot of columns and you need to get rid of some of them. You are scrolling from left to right, choosing which columns to keep and which to remove.
我敢打賭,幾乎每次為Power BI報告準備數據時,您都會遇到這種情況。 您導入一個包含很多列的寬表,您需要擺脫其中的一些列。 您從左到右滾動,選擇要保留的列和要刪除的列。
But, there is a much more sophisticated way to obtain this:
但是,有一種更復雜的方法可以實現此目的:
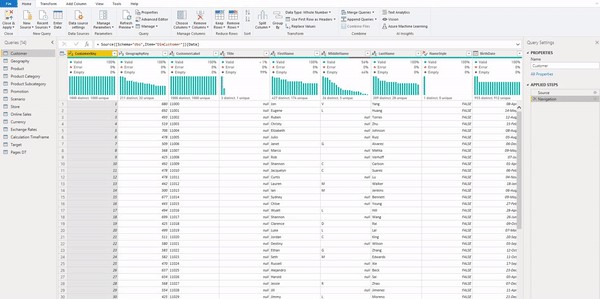
As you see in the illustration above, instead of exhausting scrolling, just open Choose Columns drop-down menu, select Choose Columns, and select columns you want to keep! Soooo handy!
如上圖所示,只需打開“選擇列”下拉菜單,選擇“選擇列”,然后選擇要保留的列即可,而不是窮盡滾動! 太好用了!
Another tip under the same drop-down menu: choose Go To Column and you will be navigated straight to that column, so you can perform any kind of transformation you want on that specific column, again without the need to waste your time trying to find it in wide “30+ column tables”…
在同一下拉菜單下的另一個提示:選擇“轉到列”,您將直接導航到該列,因此您可以在該特定列上執行所需的任何類型的轉換,而無需浪費您的時間來查找在“ 30多個列”表中…
Another hidden gem is the “Query Dependencies” button under the View tab.
另一個隱藏的元素是“視圖”選項卡下的“查詢依賴項”按鈕。
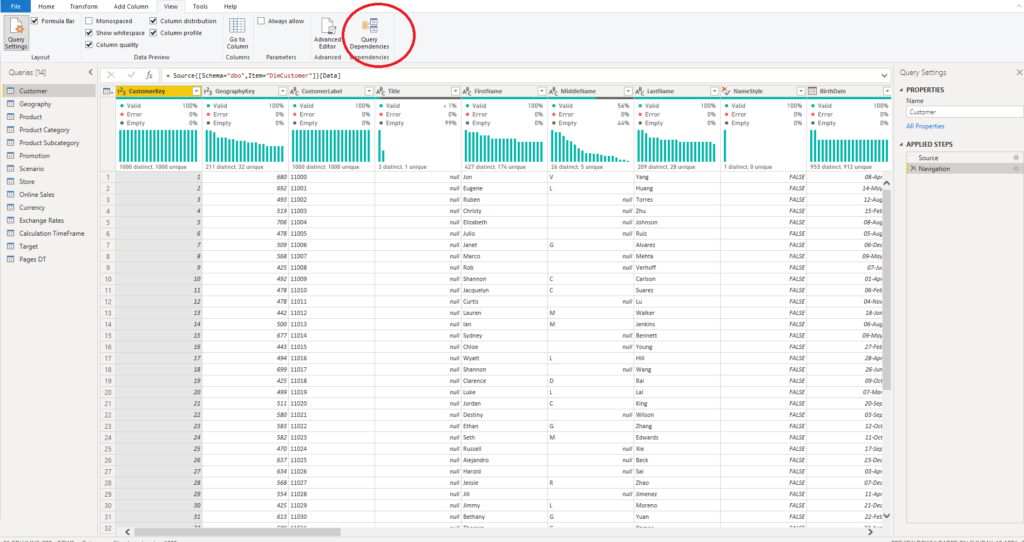
This is extremely useful when working with complex models when data comes from multiple different sources, or not all data is being loaded to the report.
當數據來自多個不同來源或并非所有數據都已加載到報表中時,這在處理復雜模型時非常有用。
Using Query Dependencies will give you a quick visual overview of your data model:
使用查詢依賴關系將使您快速直觀地了解數據模型:
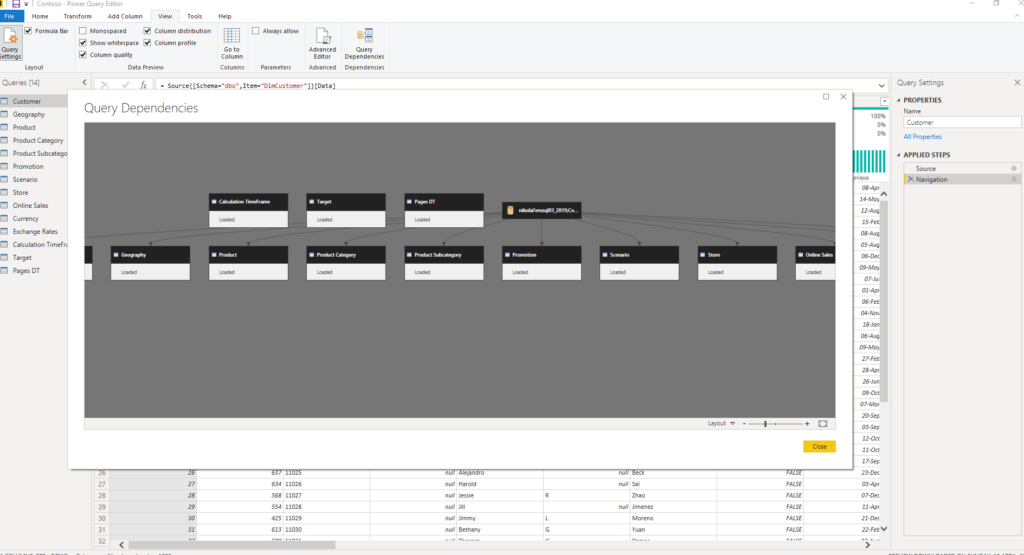
Instead of clicking on every single entity in your data model to check its status, you can have this all in one place, and even better, it’s visually represented!
您無需將數據模型中的每個實體都單擊來檢查其狀態,而是可以將它們全部集中在一個地方,甚至更好地以可視方式進行顯示!
Imagine having data coming from CSV files, SQL Server database, and Sharepoint lists, and part of that data doesn’t even being loaded to the report for whatever reasons. This is a huuuuge time saver!
想象一下,數據來自CSV文件,SQL Server數據庫和Sharepoint列表,并且無論出于何種原因,這些數據的一部分甚至都沒有加載到報表中。 這節省了很多時間!
技巧2-使用M語言進行頻繁的計算 (Tip #2 — Use M language to perform frequent calculations)
One of the most common business requests is to calculate the day difference between different events. For example, I want to know the age structure of my customers, so I need to calculate their age every time data is refreshed.
最常見的業務請求之一是計算不同事件之間的日差。 例如,我想知道客戶的年齡結構,因此我需要在每次刷新數據時計算他們的年齡。
Or, I need to check how many days are customers late with their payments. As you can assume, these figures need to be calculated dynamically, so here comes M language to the rescue!
或者,我需要檢查客戶延遲付款的天數。 如您所料,這些數字需要動態計算,因此可以使用M語言進行救援!
Let’s demonstrate on calculating customers’ age. Basically, there are two ways to achieve this in Power Query: first doesn’t need any coding, but it requires multiple steps to be applied. Therefore, I prefer the second option, when you put the whole calculation in one step!
讓我們演示一下計算客戶的年齡。 基本上,有兩種方法可以在Power Query中實現此目的:首先不需要任何編碼,但是需要應用多個步驟。 因此,當您將整個計算放在一個步驟中時,我更喜歡第二種選擇!
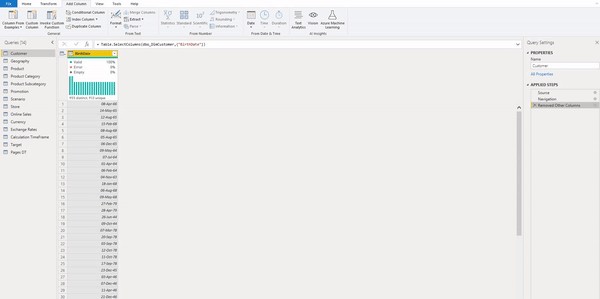
This method visualized above requires three separate steps. First, we insert a new column and under the Date drop-down menu, we choose the Age option. However, Power Query calculates Age in days since BirthDate till today. Therefore, we need to convert this awkward number to years, which is done under the Duration drop-down menu and selecting Total Years. Again, we are getting an awkward result, because age is displayed as a decimal number with multiple decimal places (this is correct, but not intuitive). One last step is to round down that number, which is performed under Rounding.
上面可視化的此方法需要三個單獨的步驟。 首先,我們插入一個新列,然后在“日期”下拉菜單下,選擇“年齡”選項。 但是,Power Query會計算從出生日期到今天的天數。 因此,我們需要將此尷尬的數字轉換為年,這可以在“持續時間”下拉菜單中選擇“總年”來完成。 再次,我們得到一個尷尬的結果,因為年齡顯示為帶有多個小數位的十進制數字(這是正確的,但不直觀)。 最后一步是將數字四舍五入,這在四舍五入下執行。
Now, nothing is wrong with this approach, but if you are doing multiple calculations, your Power Query Applied Steps pane will finish polluted with many unnecessary steps.
現在,這種方法沒有什么問題,但是,如果您進行多次計算,那么“ Power Query Applied Steps”窗格將被許多??不必要的步驟污染。
That’s why I prefer another option: under the Add Column tab, choose a Custom column and enter the following formula:
這就是為什么我喜歡另一個選項:在“添加列”選項卡下,選擇一個“自定義”列并輸入以下公式:
Number.RoundDown(Duration.TotalDays(Date.From(DateTime.LocalNow()) - [BirthDate])/365)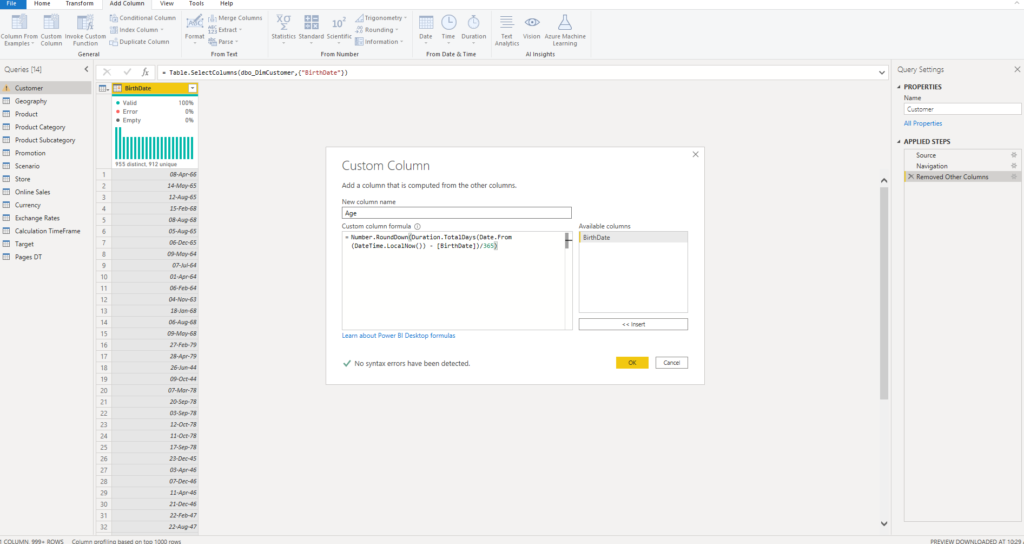
This way, we perform all iterations from the previous version in one run and we have only one step applied! Mission accomplished in a more elegant way…
這樣,我們可以一次運行執行先前版本的所有迭代,并且只應用了一個步驟! 任務以更優雅的方式完成...
提示3 –自定義靈活日期維度 (Tip #3 — Custom Flexible Date Dimension)
This one is my favorite! First, I thought to dedicate a separate post to this, but in the end, I’ve decided to put it here, since I’ve already written the whole series on proper handling of the Date dimension.
這個是我的最愛! 首先,我想為此單獨寫一篇文章,但是最后,我決定將它放在這里,因為我已經寫了整個系列有關Date維的正確處理 。
I won’t spend much time explaining the importance of having separate Date dimension (that is the topic of another article) — I will just briefly say: technically, Power BI allows you to “survive” without separate Date dimension, but don’t do it! Just don’t…
我不會花很多時間來說明使用單獨的Date維度的重要性( 這是另一篇文章的主題 )—我只是簡單地說:從技術上講,Power BI允許您在沒有單獨的Date維度的情況下“生存”,但不要做吧! 只是不要...
There are multiple solutions to create separate Date dimension in your data model, but here I will focus on using M language to achieve this.
有多種解決方案可在您的數據模型中創建單獨的Date維度 ,但是在這里,我將重點介紹使用M語言來實現這一點。
There are plenty of ready-made scripts on the web for creating a fully functional Date dimension, but I’ve chosen this solution from Reza Rad (by the way, on his blog you can learn a lot of useful stuff).
Web上有很多現成的腳本可用于創建功能齊全的Date維度,但是我從Reza Rad選擇了此解決方案 (順便說一句,在他的博客上,您可以學到很多有用的東西)。
Open new Power BI file and choose Blank query under Get data:
打開新的Power BI文件,然后在“獲取數據”下選擇“空白查詢”:
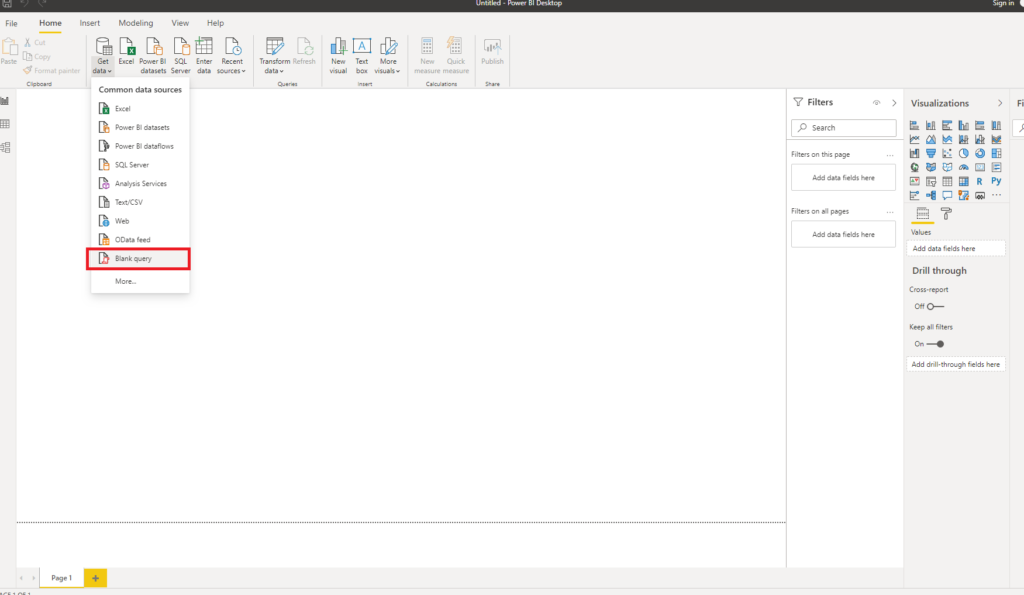
This will navigate you to Power Query Editor. The next step is of key importance in order to have a highly customized Date dimension.
這會將您導航到Power Query Editor。 下一步對于擁有高度定制的“日期”維度至關重要。
Under Manage Parameters, select New Parameter and format it like on the following image:
在“管理參數”下,選擇“新參數”,然后將其格式化,如下圖所示:
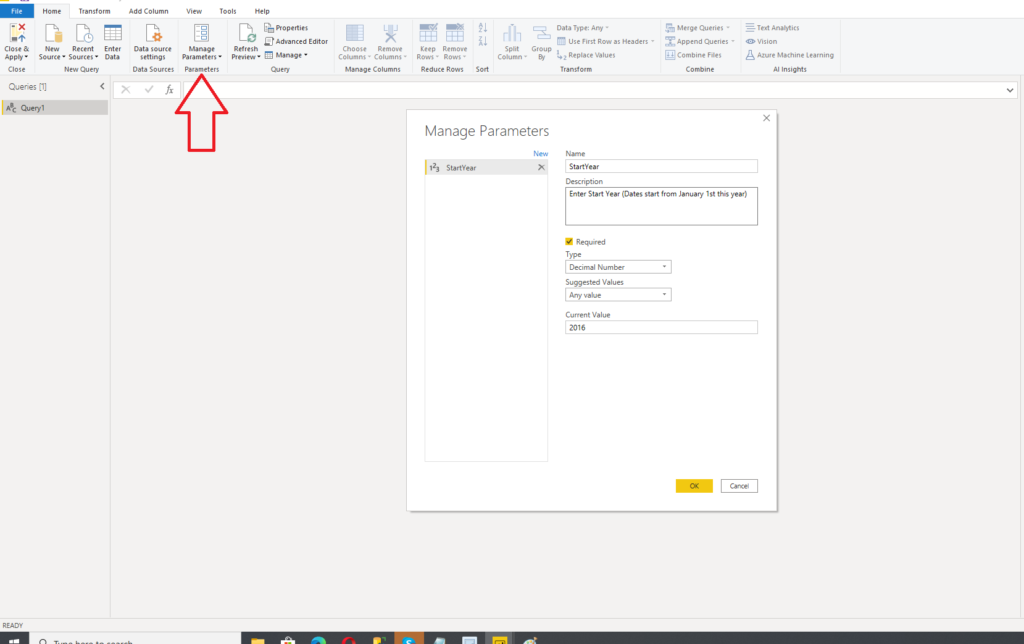
This way, you are defining from which year you want your Date dimension to start. Do exactly the same for EndYear:
這樣,您可以定義要從哪個年份開始“日期”維度。 對EndYear執行完全相同的操作:
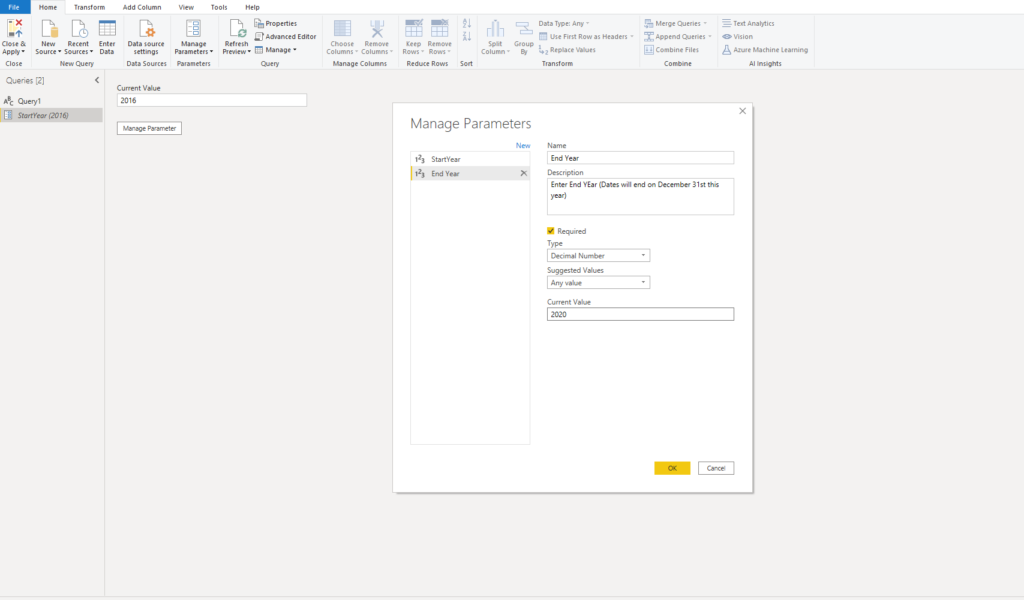
Now that we have both our parameters defined, we can switch to Advanced Editor and paste the whole Reza’s script for creating specific columns of our Date dimension (of course, feel free to include/exclude more columns according to your needs).
現在我們已經定義了兩個參數,我們可以切換到Advanced Editor并粘貼整個Reza的腳本,以創建Date維度的特定列(當然,可以根據您的需要隨意包含/排除更多列)。
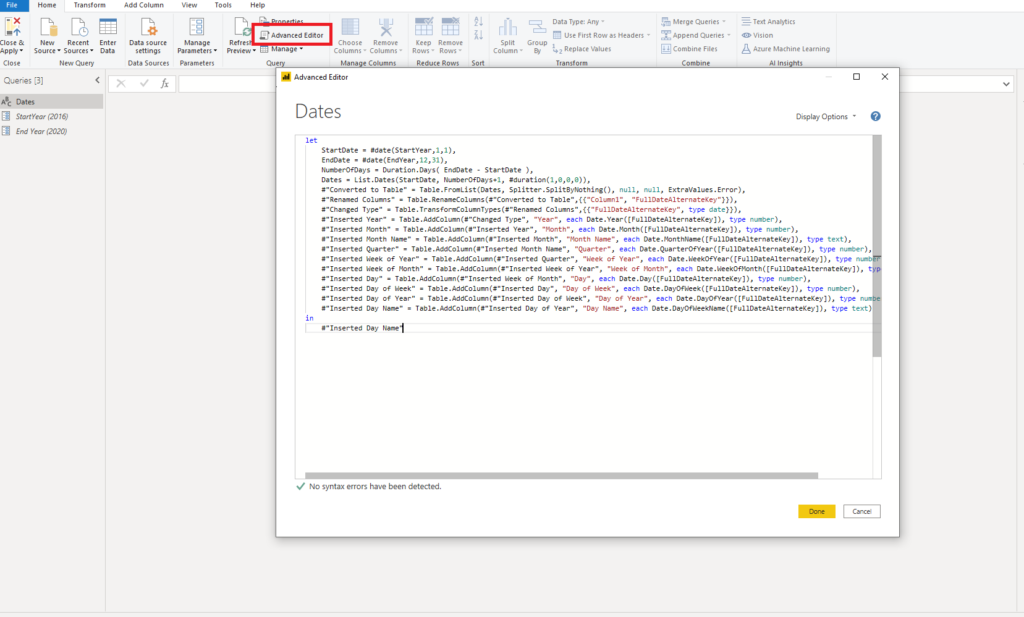
And here is the whole script:
這是整個腳本:
let
    StartDate = #date(StartYear,1,1),
    EndDate = #date(EndYear,12,31),
    NumberOfDays = Duration.Days( EndDate - StartDate ),
    Dates = List.Dates(StartDate, NumberOfDays+1, #duration(1,0,0,0)),
    #"Converted to Table" = Table.FromList(Dates, Splitter.SplitByNothing(), null, null, ExtraValues.Error),
    #"Renamed Columns" = Table.RenameColumns(#"Converted to Table",{{"Column1", "FullDateAlternateKey"}}),
    #"Changed Type" = Table.TransformColumnTypes(#"Renamed Columns",{{"FullDateAlternateKey", type date}}),
    #"Inserted Year" = Table.AddColumn(#"Changed Type", "Year", each Date.Year([FullDateAlternateKey]), type number),
    #"Inserted Month" = Table.AddColumn(#"Inserted Year", "Month", each Date.Month([FullDateAlternateKey]), type number),
    #"Inserted Month Name" = Table.AddColumn(#"Inserted Month", "Month Name", each Date.MonthName([FullDateAlternateKey]), type text),
    #"Inserted Quarter" = Table.AddColumn(#"Inserted Month Name", "Quarter", each Date.QuarterOfYear([FullDateAlternateKey]), type number),
    #"Inserted Week of Year" = Table.AddColumn(#"Inserted Quarter", "Week of Year", each Date.WeekOfYear([FullDateAlternateKey]), type number),
    #"Inserted Week of Month" = Table.AddColumn(#"Inserted Week of Year", "Week of Month", each Date.WeekOfMonth([FullDateAlternateKey]), type number),
    #"Inserted Day" = Table.AddColumn(#"Inserted Week of Month", "Day", each Date.Day([FullDateAlternateKey]), type number),
    #"Inserted Day of Week" = Table.AddColumn(#"Inserted Day", "Day of Week", each Date.DayOfWeek([FullDateAlternateKey]), type number),
    #"Inserted Day of Year" = Table.AddColumn(#"Inserted Day of Week", "Day of Year", each Date.DayOfYear([FullDateAlternateKey]), type number),
    #"Inserted Day Name" = Table.AddColumn(#"Inserted Day of Year", "Day Name", each Date.DayOfWeekName([FullDateAlternateKey]), type text)
in
    #"Inserted Day Name"
Hit Close & Apply and we now have fully functional Date dimension in our data model!
點擊“關閉并應用”,我們現在在數據模型中具有完全可用的“日期”維!

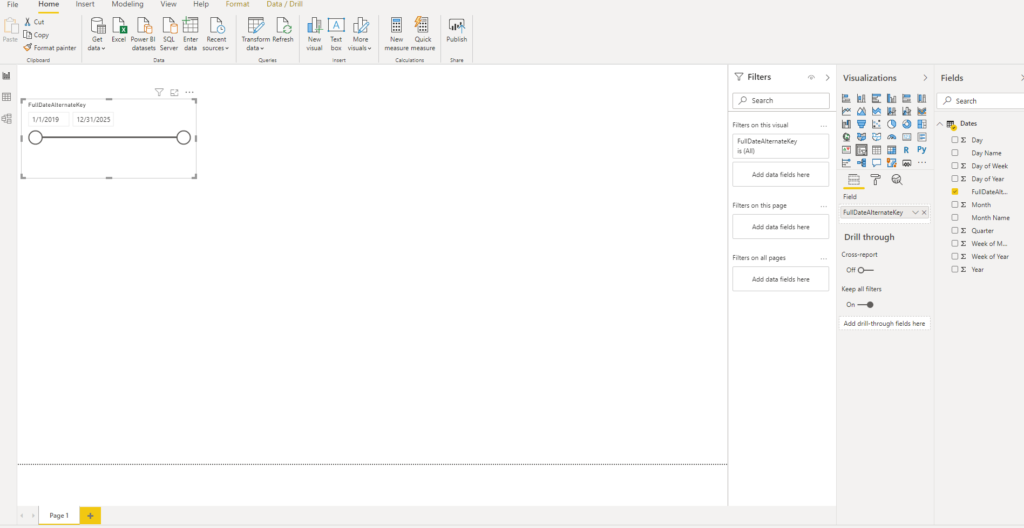
We can easily change the time frame by managing parameters and switching year values.
通過管理參數和切換年份值,我們可以輕松更改時間范圍。
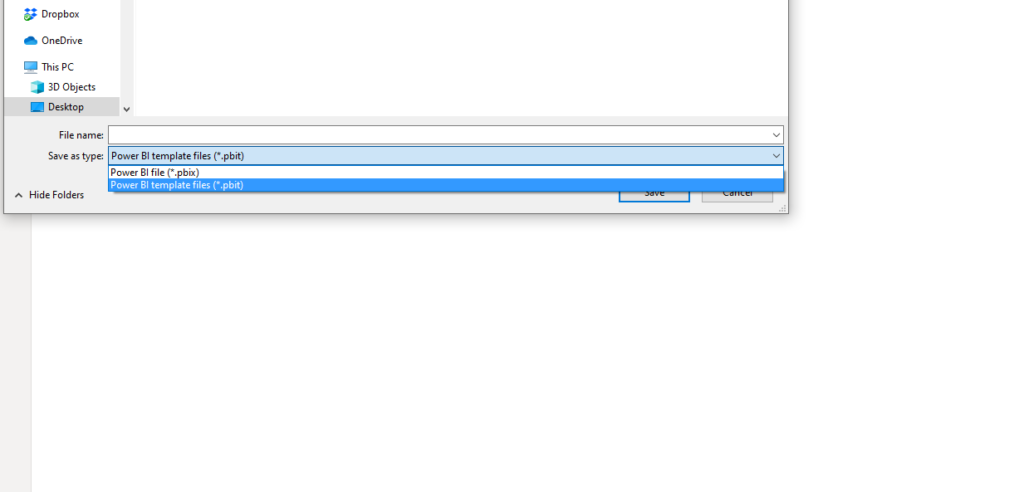
And now comes ice on the cake, as a bonus tip: save your file as .pbit (Power BI Template file). This way, when you starting your Power BI projects, you don’t need to create a Date dimension from Scratch, wasting your time and energy — it will already be there for you!
現在,錦上添花了,作為一個額外的提示:將文件另存為.pbit(Power BI Template文件)。 這樣,當您啟動Power BI項目時,無需從頭開始創建Date維度,這會浪費您的時間和精力—它已經可以為您服務!
You want more? There it is. Once you open your template file, you will be prompted to enter values for Start Year and End Year, which means that you can customize the time-frame from the report to report! How cool is that!
你想要更多? 在那里。 打開模板文件后,將提示您輸入“開始年”和“結束年”的值,這意味著您可以自定義報告的時間范圍以進行報告! 多么酷啊!
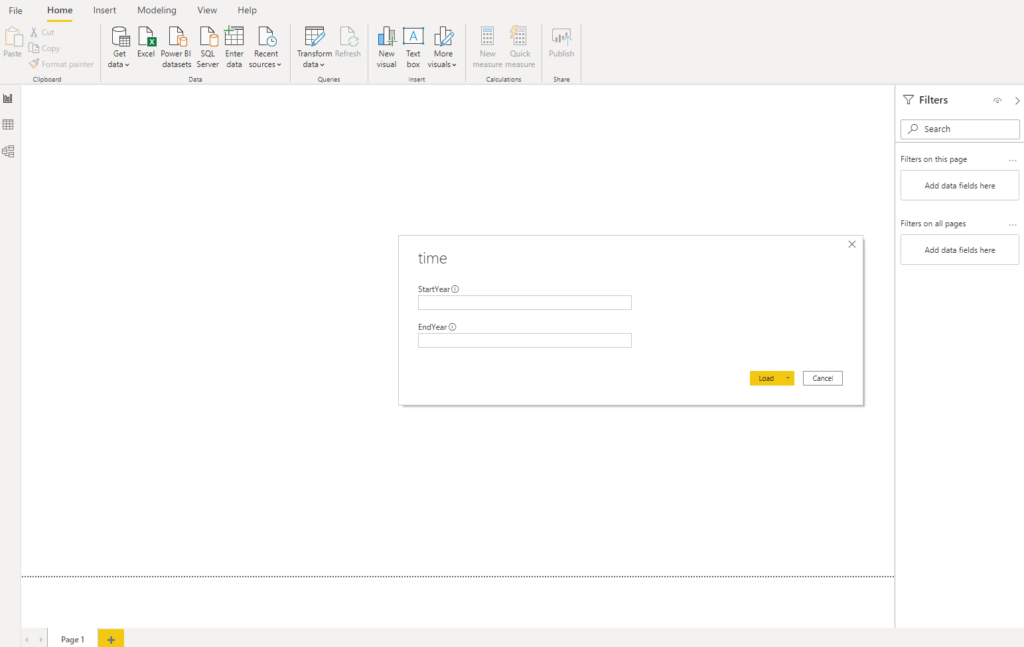
As soon as you enter values, Power BI will automatically create Date dimension for you, based on values you defined!
輸入值后,Power BI會根據您定義的值自動為您創建日期維度!
結論 (Conclusion)
Power Query offers a whole range of features when it comes to data retrieval and especially for data transformation. Describing all of them will require a book or two, so I wanted to extract just a few of them which I consider most useful in my day-to-day work with Power BI.
Power Query在數據檢索(尤其是數據轉換)方面提供了廣泛的功能。 描述所有這些都需要一兩本書,因此我只想摘錄其中的一些,我認為它們在與Power BI的日常工作中最有用。
What are your favorite Power Query features? Feel free to share them in the Comments section.
您最喜歡的Power Query功能是什么? 隨時在“評論”部分中分享它們。
翻譯自: https://towardsdatascience.com/power-query-tips-for-every-power-bi-developer-da9ebd3dcd93
本文來自互聯網用戶投稿,該文觀點僅代表作者本人,不代表本站立場。本站僅提供信息存儲空間服務,不擁有所有權,不承擔相關法律責任。 如若轉載,請注明出處:http://www.pswp.cn/news/388743.shtml 繁體地址,請注明出處:http://hk.pswp.cn/news/388743.shtml 英文地址,請注明出處:http://en.pswp.cn/news/388743.shtml
如若內容造成侵權/違法違規/事實不符,請聯系多彩編程網進行投訴反饋email:809451989@qq.com,一經查實,立即刪除!相關文章

c# PDF 轉換成圖片

java finally在return_Java finally語句到底是在return之前還是之后執行?


面試題:二叉樹的深度

a/b測試_如何進行A / B測試?

hibernate h2變mysql_struts2-hibernate-mysql開發案例 -解道Jdon

P5024 保衛王國

提取圖像感興趣區域_從圖像中提取感興趣區域

解決java compiler level does not match the version of the installed java project facet

php模板如何使用,ThinkPHP如何使用模板

理解Windows窗體和WPF中的跨線程調用


面向數據科學家的實用統計學_數據科學家必知的統計數據

字符串、指針、引用、數組基礎

suse安裝php,SUSE下安裝LAMP
)
自己動手寫事件總線(EventBus)

viz::viz3d報錯_我可以在Excel中獲得該Viz嗎?

php 數組合并字符,PHP將字符串或數組合并到一個數組內方法

xcode 4 最低的要求是 10.6.6的版本,如果你是 10.6.3的版本,又不想升級的話。可以考慮通過修改版本號的方法進行安裝
