提取圖像感興趣區域
Welcome to the second post in this series where we talk about extracting regions of interest (ROI) from images using OpenCV and Python.
歡迎來到本系列的第二篇文章,我們討論使用OpenCV和Python從圖像中提取感興趣區域(ROI)。
As a recap, in the first post of this series we went through the steps to extract balls and table edges from an image of a pool table. We used simple OpenCV functions like inRange, findContours, boundingRect, minAreaRect, minEnclosingCircle, circle, HoughLines, line etc to achieve our objective.
回顧一下,在本系列的第一篇文章中,我們完成了從臺球桌圖像中提取球和桌邊的步驟。 我們使用了簡單的OpenCV函數(例如inRange,findContours,boundingRect,minAreaRect, minEnclosingCircle,circle,HoughLines,line等)來實現我們的目標。
For beginners in OpenCV, I would recommend to go through that post in order to get familiar with the usage of the above functions.
對于OpenCV初學者,我建議您仔細閱讀該文章 ,以熟悉上述功能的用法。
In this post we will look at a somewhat more complex problem and explore some methods which we can use to obtain the desired results.
在這篇文章中,我們將研究一個更為復雜的問題,并探索一些可用于獲得所需結果的方法。
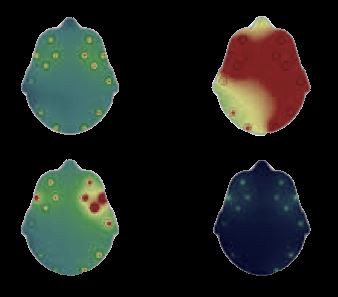
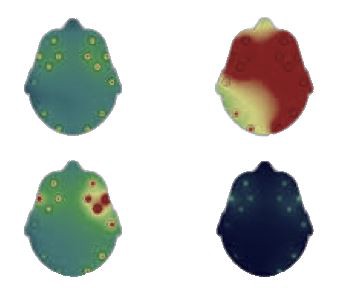
Our task today is to extract the desired segments from an image which contains a snapshot of a patients brain activity map. The extracted segments can then be used in numerous applications e.g. in a Machine Learning model which can diagnose any health anomalies.
今天的任務是從包含患者大腦活動圖快照的圖像中提取所需的片段。 然后,可以將提取的段用于多種應用程序,例如可以診斷任何健康異常的機器學習模型。
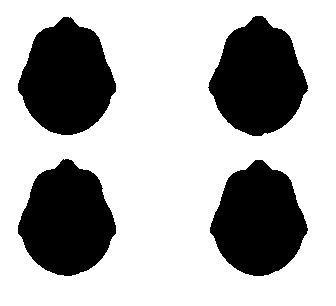
So let us start by looking at the input image itself. It is a typical report generated by medical instruments used in the field of Neurological Science which use sensors to detect signals from a patients brain and display them as colored maps. Typically there are four maps, all of which depict a certain feature and are analyzed together for diagnosis (further details are out of current scope).
因此,讓我們從查看輸入圖像本身開始。 這是由神經科學領域的醫療儀器生成的典型報告,該儀器使用傳感器檢測來自患者大腦的信號并將其顯示為彩色地圖。 通常,有四張地圖,所有地圖都描繪了某個特征并一起分析以進行診斷(更多詳細信息不在當前范圍內)。
From the above image, we want to extract only the regions corresponding to the four maps (head scans) leaving everything else out. So lets get going.
從上面的圖像中,我們只想提取與四個地圖(頭部掃描)相對應的區域,而將其他所有內容都排除在外。 因此,讓我們開始吧。
The first step is detecting the edges of the segments we want to extract. This is a multi step process as mentioned below:
第一步是檢測我們要提取的片段的邊緣。 這是一個多步驟過程,如下所述:
Convert the RGB image to gray-scale using “cvtColor()”
使用“ cvtColor()”將RGB圖像轉換為灰度
Remove noise from the gray-scale image by applying a blurring function “GaussianBlur()”
通過應用模糊函數“ GaussianBlur()”來消除灰度圖像中的噪聲
Finally applying the “Canny()” function to the blurred image to obtain the edges
最后將“ Canny()”函數應用于模糊圖像以獲得邊緣
The output of the edge detection process looks something like this:
邊緣檢測過程的輸出如下所示:
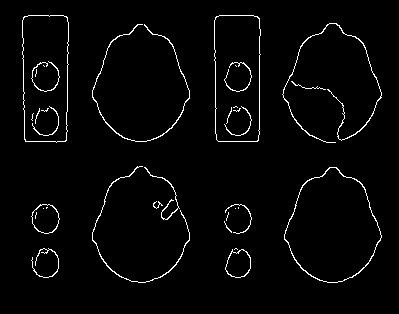
Notice that although the brain map segments are identified, there are a lot of unwanted edges which need to be eliminated and some of the edges have gaps in between which need to be closed.
請注意,盡管已識別出腦圖片段,但仍有許多不需要的邊緣需要消除,并且某些邊緣之間有間隙需要封閉。
A common method applied for such purpose is Morphological Transformation which involves using a succession of dilations and erosions on the image to remove unwanted edges and close gaps.
用于此目的的常用方法是形態轉換 ,它涉及在圖像上使用一系列的擴張和腐蝕來去除不需要的邊緣和閉合間隙。
We use OpenCV functions “dilate()” and “erode()” over multiple iterations to get an output as below.
我們通過多次迭代使用OpenCV函數“ dilate()”和“ erode()”來獲得如下輸出。
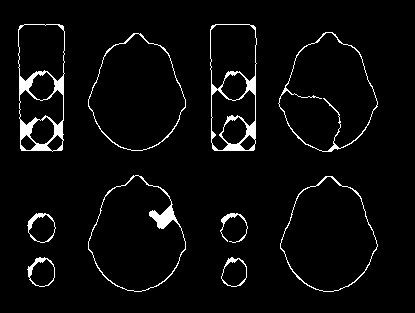
As you can see, the edges are now complete and much smoother than before.
如您所見,邊緣現在已經完成并且比以前光滑得多。
Now we can extract the contours in this image using OpenCV function “findContours()” and select only those contours which have the following properties:
現在,我們可以使用OpenCV函數“ findContours()”提取該圖像中的輪廓,并僅選擇具有以下屬性的輪廓:
- Geometry is circle or oval shaped 幾何形狀是圓形或橢圓形
- Area is above a certain threshold (the value 7000 works fine for this example). 面積大于某個閾值(在此示例中,值7000可以正常工作)。
For the first part, we will detect the bounding rectangle of each contour using OpenCV “boundingRect()” and check whether the aspect ratio (height to width ratio) is close to 1.
對于第一部分,我們將使用OpenCV“ boundingRect()”檢測每個輪廓的邊界矩形,并檢查縱橫比(高寬比)是否接近1。
It may appear that our task is finished but there is a little bit of fine tuning required.
看來我們的任務已經完成,但需要進行一些微調。
It is often the case that multiple overlapping contours are detected over a segment whereas we are interested in only one.
通常情況是在一個片段上檢測到多個重疊的輪廓,而我們只對一個感興趣。
This problem is solved using Non Maxima Suppression, i.e. we look at all overlapping contours and select the one with the maximum area as the final candidate. The logic is pretty straightforward hence we do not need any inbuilt OpenCV or Python functions.
使用非最大抑制可以解決此問題,即,我們查看所有重疊的輪廓,然后選擇面積最大的輪廓作為最終候選輪廓。 邏輯非常簡單,因此我們不需要任何內置的OpenCV或Python函數。
Another important logic is to identify the four segments separately i.e. Top-Left, Top-Right, Bottom-Left and Bottom-Right.
另一個重要的邏輯是分別識別四個段,即左上,右上,左下和右下。
This is also pretty straightforward and involves identifying the image center coordinates as well as the centroid of each of our detected segments. Centroid detection of a segment contour requires applying the OpenCV “moments()” function on the contour and then calculating the center X, Y coordinates using the formula below: center_x, center_y = (int(M[“m10”] / M[“m00”]), int(M[“m01”] / M[“m00”]))
這也非常簡單,涉及識別圖像中心坐標以及每個檢測到的片段的質心。 對段輪廓進行質心檢測需要在輪廓上應用OpenCV “ moments()”函數,然后使用以下公式計算中心 X,Y坐標: center_x,center_y =(int(M [“ m10”] / M [” m00”]),int(M [“ m01”] / M [“ m00”]))
Comparing the segment centroid coordinates with the image center coordinates lets us place the four segments in their respective positions.
將線段質心坐標與圖像中心坐標進行比較,可以將四個線段放置在各自的位置。
Now that we have the four segments identified, we need to build the image mask which will allow us to pull out the desired features from the original image.
現在我們已經確定了四個部分,我們需要構建圖像蒙版,這將使我們能夠從原始圖像中提取所需的特征。
We will use the OpenCV function “drawContours()” using color as White (R,G,B=255,2555,255) and thickness as FILLED (-1) to draw all four segment contours over a black background. The result looks like below:
我們將使用OpenCV函數“ drawContours()”,將顏色用作白色(R,G,B = 255,2555,255),將厚度用作FILLED(-1)在黑色背景上繪制所有四個線段輪廓。 結果如下所示:
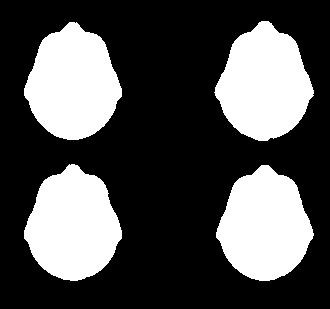
Applying this mask on the original image gets us the desired segments over a background of our choice (e.g. Black or White).
在原始圖像上應用此蒙版可以在我們選擇的背景(例如黑色或白色)上為我們提供所需的分段。
For a black background we create a black canvas and then draw upon it using the OpenCV function “bitwise_and()” with the previously obtained mask.
對于黑色背景,我們創建一個黑色畫布,然后使用OpenCV函數“ bitwise_and()”以及先前獲得的蒙版在其上進行繪制。
For a white background we first create a white canvas and then create a color inverted mask as below by drawing contours with OpenCV function “drawContours()” in black color (R,G,B = 0,0,0) and thickness as FILLED (-1).
對于白色背景,我們首先創建一個白色畫布,然后通過使用OpenCV函數“ drawContours()”繪制輪廓為黑色(R,G,B = 0,0,0)并且厚度為FILLED的顏色,如下所示創建顏色反轉的蒙版(-1)。
We then add this inverted mask with the previously obtained black background using OpenCV “add()” function and achieve the same result but with white background.
然后,我們使用OpenCV “ add()”函數將此反向蒙版添加到先前獲得的黑色背景中,并獲得相同的結果,但使用白色背景。
This concludes the current post in which we looked at few methods using which we can easily extract regions of interest from images.
到此為止,我們在當前文章中總結了幾種方法,可以輕松地從圖像中提取感興趣區域。
It should be noted that the methods used above may undergo modifications in case of other images with varying complexity. However the basics discussed above would lay the groundwork for any advanced techniques that may be required to solve such problems.
應當注意,在具有變化的復雜度的其他圖像的情況下,上面使用的方法可以進行修改。 但是,以上討論的基礎將為解決此類問題所需的任何高級技術奠定基礎。
翻譯自: https://towardsdatascience.com/extracting-regions-of-interest-from-images-dacfd05a41ba
提取圖像感興趣區域
本文來自互聯網用戶投稿,該文觀點僅代表作者本人,不代表本站立場。本站僅提供信息存儲空間服務,不擁有所有權,不承擔相關法律責任。 如若轉載,請注明出處:http://www.pswp.cn/news/388735.shtml 繁體地址,請注明出處:http://hk.pswp.cn/news/388735.shtml 英文地址,請注明出處:http://en.pswp.cn/news/388735.shtml
如若內容造成侵權/違法違規/事實不符,請聯系多彩編程網進行投訴反饋email:809451989@qq.com,一經查實,立即刪除!相關文章

解決java compiler level does not match the version of the installed java project facet

php模板如何使用,ThinkPHP如何使用模板

理解Windows窗體和WPF中的跨線程調用


面向數據科學家的實用統計學_數據科學家必知的統計數據

字符串、指針、引用、數組基礎

suse安裝php,SUSE下安裝LAMP
)
自己動手寫事件總線(EventBus)

viz::viz3d報錯_我可以在Excel中獲得該Viz嗎?

php 數組合并字符,PHP將字符串或數組合并到一個數組內方法

xcode 4 最低的要求是 10.6.6的版本,如果你是 10.6.3的版本,又不想升級的話。可以考慮通過修改版本號的方法進行安裝

android 調試技巧


java 添加用戶 數據庫,跟屌絲學DB2 第二課 建立數據庫以及添加用戶

iphone視頻教程

在Python中有效使用JSON的4個技巧

Vlan中Trunk接口配置

django中的admin組件

虛擬主機創建虛擬lan_創建虛擬背景應用
