虛擬主機創建虛擬lan
This is the Part 2 of the MediaPipe Series I am writing.
這是我正在編寫的MediaPipe系列的第2部分。
Previously, we saw how to get started with MediaPipe and use it with your own tflite model. If you haven’t read it yet, check it out here.
以前,我們了解了如何開始使用MediaPipe并將其與您自己的tflite模型一起使用。 如果您尚未閱讀,請在此處查看 。
We had tried using the portrait segmentation tflite model in the existing segmentation pipeline with the calculators already present in MediaPipe
我們嘗試在現有的細分管道中使用人像細分tflite模型,并在MediaPipe中使用計算器
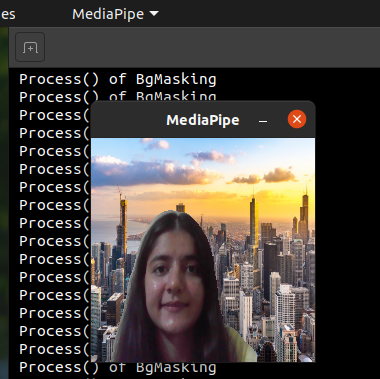
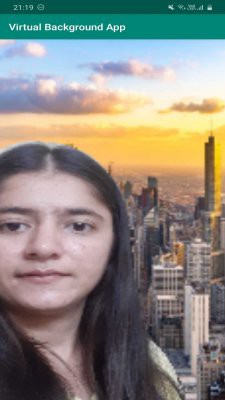
After getting bored with this Blue Background, I decided to have some fun with it by having some Zoom like Virtual Backgrounds like beautiful stars or some crazy clouds instead :)
在厭倦了這種藍色背景后,我決定通過一些縮放(例如虛擬背景(例如美麗的星星或一些瘋狂的云))來玩一些它:)

For this, I wrote a custom calculator and used it with the existing pipeline.
為此,我編寫了一個自定義計算器,并將其與現有管道一起使用。
So today I’ll show how did I go about making this App
所以今天我將展示如何制作此應用程序
Before we get started, I would suggest you to go through this part of the documentation which explains the Flow of a basic calculator.
在我們開始之前,我建議您仔細閱讀本文檔的這一部分,其中介紹了基本計算器的流程。
https://google.github.io/mediapipe/framework_concepts/calculators.html
https://google.github.io/mediapipe/framework_concepts/calculators.html
Now, let’s get started with the code
現在,讓我們開始使用代碼
1.從Part1克隆Portrait Segmentation存儲庫 (1. Clone the Portrait Segmentation repository from Part1)
$ git clone https://github.com/SwatiModi/portrait-segmentation-mediapipe.git2.管道的新流程(在圖.pbtxt文件中進行更改) (2. New Flow of the Pipeline (making changes in the graph .pbtxt file))
So earlier, the rendering/coloring was done by the RecolorCalculator , it used to take image and mask gpu buffer as input and returned gpu buffer rendered output (rendered using opengl)
因此,較早之前,渲染/著色是由RecolorCalculator完成的,它用于將圖像和蒙版gpu緩沖區作為輸入,并返回gpu緩沖區渲染的輸出(使用opengl渲染)
Here, for replacing the Background with an Image(jpg/png), I have used OpenCV operations.
在這里,為了用Image(jpg / png)替換Background,我使用了OpenCV操作。
NOTE : OpenCV operations are performed on CPU — ImageFrame datatype where as opengl operations are performed on GPU — Image-buffer datatype
注意 :OpenCV操作在CPU — ImageFrame數據類型上執行,而opengl操作在GPU —圖像緩沖區數據類型上執行
portrait_segmentation.pbtxt
portrait_segmentation.pbtxt
We will replace the RecolorCalculator with the BackgroundMaskingCalculator
我們將用 BackgroundMaskingCalculator 替換 RecolorCalculator
node {
  calculator: "BackgroundMaskingCalculator"
  input_stream: "IMAGE_CPU:mask_embedded_input_video_cpu"
  input_stream: "MASK_CPU:portrait_mask_cpu"
  output_stream: "OUTPUT_VIDEO:output_video_cpu"
  }
This calculator takes transformed Image and the Mask (Both ImageFrame Datatype) as input and changes the background with given image.
該計算器將轉換后的圖像和蒙版(兩個ImageFrame數據類型)作為輸入,并使用給定圖像更改背景。
For converting the Image and Mask GpuBuffer to ImageFrame, I used the GpuBufferToImageFrameCalculator.
為了將Image和Mask GpuBuffer轉換為ImageFrame,我使用了GpuBufferToImageFrameCalculator。
3.寫入計算器文件(background_masking_calculator.cc文件) (3. Write the Calculator File (background_masking_calculator.cc file))
In this we will write the logic of processing and creating the background masking effect
在本文中,我們將編寫處理和創建背景遮罩效果的邏輯
background_masking_calculator.cc
background_masking_calculator.cc
place this background_masking_calculator.cc in mediapipe/calculators/image/
放置這個background_masking_calculator.cc 在mediapipe /計算器/圖像/
a. Extending the Base Calculator
一個。 擴展基礎計算器
b. GetContract()
b。 GetContract()
Here we are just verifying our inputs and their data types
在這里,我們只是在驗證我們的輸入及其數據類型
c. Open()
C。 打開()
Prepares the calculator’s per-graph-run state.
準備計算器的每圖運行狀態。
d. Process()
d。 處理()
Taking the inputs, converting to OpenCV Mat and further processing for desired output
接收輸入,轉換為OpenCV Mat并進一步處理以獲得所需的輸出
4.將background_masking_calculator.cc添加到具有依賴項的圖像文件夾的BUILD文件中 (4. Add the background_masking_calculator.cc to BUILD file of image folder with the dependencies)
BUILD file in mediapipe/calculators/image
Mediapipe / calculators / image中的 BUILD文件
We need to do this so the calculator is available and accessible while compilation and execution
我們需要這樣做,以便計算器在編譯和執行時可用并且可訪問
the deps (dependencies) you see here are the imports you are using in your calculator
您在此處看到的Deps(依賴項)是您在計算器中使用的導入
The name used here is referred in graph BUILD file as well
圖BUILD文件中也引用了此處使用的名稱
5.將background_masking_calculator.cc添加到圖形BUILD文件中 (5. Add the background_masking_calculator.cc to the graph BUILD file)
BUILD file in graphs/portrait_segmentation
圖形/ portrait_segmentation中的BUILD文件
Add background_masking_calculator to deps and remove recolor_calculator which we are not using now
將background_masking_calculator添加到deps并刪除我們現在不使用的recolor_calculator
Now we are ready to build, we just have to add the asset(image to be masked on the background)
現在我們準備好構建,我們只需要添加資產(要在背景上遮蓋的圖像)
NOTE: This asset reading method is straight forward when trying on Desktop but quite different for the Android Build.
注意 :在桌面上嘗試時,這種資產讀取方法很簡單,但對于Android Build則大不相同。
So we will look at the Desktop and Android build one by one
因此,我們將逐一研究臺式機和Android
桌面版本: (Desktop Build:)
In the background_masking_calculator.cc , read the asset file as
在background_masking_calculator.cc中,將資產文件讀取為
Now, we are ready to build
現在,我們準備建立

bazel build -c opt --copt -DMESA_EGL_NO_X11_HEADERS --copt -DEGL_NO_X11 mediapipe/examples/desktop/portrait_segmentation:portrait_segmentation_gpuThe build will finish successfully in around 10–15 minutes
構建將在大約10-15分鐘內成功完成
INFO: Build completed successfully, 635 total actionsNow, you can run the Pipeline using the following
現在,您可以使用以下命令運行管道
GLOG_logtostderr=1 bazel-bin/mediapipe/examples/desktop/portrait_segmentation/portrait_segmentation_gpu --calculator_graph_config_file=mediapipe/graphs/portrait_segmentation/portrait_segmentation.pbtxtthe webcam starts and you’ll be able to see the output window
網絡攝像頭啟動,您將能夠看到輸出窗口
Android版本: (Android Build:)
1.導出背景遮罩圖像 (1. Exporting the background masking images)
Add the following code to the BUILD file in testdata folder (folder containing the background asset images)
將以下代碼添加到testdata文件夾(包含背景資產圖像的文件夾)中的BUILD文件中
exports_files(
    srcs = glob(["**"]),
)
2.將資產添加到Android應用程序使用的android_library (2. Adding the assets to android_library used by the Android App)
Adding the files to android_library along with the tflite model
將文件與tflite模型一起添加到android_library
Modify in android project BUILD file in examples/android/…./portraitsegmentationgpu/
在examples / android /…。/ portraitsegmentationgpu /中的android項目BUILD文件中進行修改
3.在background_masking_calculator中讀取此圖像文件 (3. Reading this image file in background_masking_calculator)
Here, first using the MediaPipe’s PathToResourceAsFile method, we try to look if the asset is available and if available we read it using it’s value as path to file
在這里,首先使用MediaPipe的PathToResourceAsFile方法,嘗試查看資產是否可用,如果可用,我們將其值用作文件路徑來讀取資產
On a side note, this method was a part of resource_util.h present in mediapipe/util/ folder. So whenever you import a new file into your calculator, make sure to add it to BUILD file mentioned in pt. 4
另外,此方法是存在于mediapipe / util /文件夾中的resource_util.h的一部分。 所以每當你導入一個新的文件到您的計算器,請務必將其添加到 PT提到的BUILD文件 。 4
現在我們準備構建APK (Now we are ready to Build the APK)

# BUILD
bazel build -c opt --config=android_arm64 mediapipe/examples/android/src/java/com/google/mediapipe/apps/portraitsegmentationgpu# On successfully building the APK, it printsINFO: Elapsed time: 1499.898s, Critical Path: 753.09s
INFO: 2002 processes: 1849 linux-sandbox, 1 local, 152 worker.
INFO: Build completed successfully, 2140 total actions
This would take around 20–25 minutes when building for the first time because it downloads all the external dependencies for the Build. Next time it uses the cached dependencies, so it builds much faster.
首次構建時大約需要20-25分鐘,因為它會下載Build的所有外部依賴項。 下次使用緩存的依賴項時,它的構建速度要快得多。
# INSTALL
adb install bazel-bin/mediapipe/examples/android/src/java/com/google/mediapipe/apps/portraitsegmentationgpu/portraitsegmentationgpu.apk
Now, you are ready to run the APK and test it.
現在,您可以運行APK并進行測試了。
Here we successfully added our own calculator and modified the pipeline and graph according by first testing it on Desktop and then finally on Android with minimal changes.
在這里,我們成功地添加了自己的計算器,并通過首先在桌面上對其進行測試,然后以最小的更改最終在Android上對其進行了修改,從而修改了管道和圖形。
Feel free to ask any questions in the comments or you can reach me out personally.
隨時問評論中的任何問題,或者您可以親自與我聯系。
You can find more about me on swatimodi.com
您可以在swatimodi.com上找到有關我的更多信息
翻譯自: https://towardsdatascience.com/custom-calculators-in-mediapipe-5a245901d595
虛擬主機創建虛擬lan
本文來自互聯網用戶投稿,該文觀點僅代表作者本人,不代表本站立場。本站僅提供信息存儲空間服務,不擁有所有權,不承擔相關法律責任。 如若轉載,請注明出處:http://www.pswp.cn/news/388716.shtml 繁體地址,請注明出處:http://hk.pswp.cn/news/388716.shtml 英文地址,請注明出處:http://en.pswp.cn/news/388716.shtml
如若內容造成侵權/違法違規/事實不符,請聯系多彩編程網進行投訴反饋email:809451989@qq.com,一經查實,立即刪除!相關文章

.net程序員安全注意代碼及服務器配置


python 傳不定量參數_Python中的定量金融

axis為amchart左右軸的參數

雷軍宣布紅米 Redmi 品牌獨立,這對小米意味著什么?

JAVA的rotate怎么用,java如何利用rotate旋轉圖片_如何在Java中旋轉圖形

貝葉斯 樸素貝葉斯_手動執行貝葉斯分析

vs2005 vc++ 生成非托管的 不需要.net運行環境的exe程序方法

西工大java實驗報告給,西工大數字集成電路實驗 實驗課6 加法器的設計

DS二叉樹--二叉樹之數組存儲

VS IIS Express 支持局域網訪問

前復權后復權程序C# .net


構建圖像金字塔_我們如何通過轉移學習構建易于使用的圖像分割工具

PHP mongodb運用,MongoDB在PHP下的應用學習筆記


MFC程序執行過程剖析
)
CF888E Maximum Subsequence(meet in the middle)
