python bokeh
Let’s face it, fellow data scientists: our clients LOVE dashboards. Why wouldn’t they? Visualizing our data helps us tell a story. Visualization turns thousands of rows of data into a compelling and beautiful narrative. In fact, dashboard visualizations have become so commonplace that virtually every resume features at least one (maybe several) dashboard projects. How can you make yours stand out? Bar charts and time-series line graphs aren’t going to cut it.
面對現實吧,數據科學家們:我們的客戶喜歡儀表板。 他們為什么不呢? 可視化我們的數據有助于我們講故事。 可視化將成千上萬行數據變成引人入勝且精美的敘述。 實際上,儀表板可視化已變得司空見慣,幾乎每個簡歷都至少具有一個(可能是幾個)儀表板項目。 如何使自己脫穎而出? 條形圖和時間序列折線圖不會削減它。
Enter: geographic data.What is geographic data? Broadly speaking, it’s anything you can put on a map. Does it have lat/lon coordinates? Does it exist in geographic space? That’s geographic data.
輸入:地理數據。什么是地理數據? 廣義上講,您可以在地圖上放置任何內容。 它有緯度/經度坐標嗎? 它存在于地理空間中嗎? 那是地理數據。
Maps help us tell stories. Think to some of your favorite novels — how many of them have maps in their pages? Maps immerse us in the environment of the story; in this case, the story of your client’s data.
地圖可以幫助我們講故事。 想一想您最喜歡的一些小說-他們中有幾本在頁面上有地圖? 地圖使我們沉浸在故事的環境中; 在這種情況下,就是客戶數據的故事。
This article will teach you to deal with three types of maps: heatmaps, bubble maps, and categorical maps. By the end of this tutorial, you’ll be a spatial data wizard ready to set your dashboard visualizations apart from the rest. Let’s dive in!
本文將教您處理三種類型的地圖:熱圖,氣泡圖和分類圖。 在本教程結束時,您將成為一個空間數據向導,準備將您的儀表板可視化設置為與眾不同。 讓我們潛入吧!
筆記本 (Notebook)
For the complete code associated with this project and to see the interactive legend and hover tool-tips in action, see the Jupyter Notebook associated with this project!
有關與該項目關聯的完整代碼,以及正在使用的互動式圖例和懸停工具提示,請參閱與此項目關聯的Jupyter Notebook !
我們的數據 (Our Data)
For the purpose of this tutorial, we’ll be using data from the Armed Conflict Location Event Database (ACLED). I urge you to try and use your own data on this project! If that sounds too complex for you, you can get the data I used from the github repo associated with this article.
就本教程而言,我們將使用武裝沖突位置事件數據庫(ACLED)中的數據 。 我敦促您嘗試在此項目上使用自己的數據! 如果這聽起來對您來說太復雜了,那么您可以從與本文相關聯的github存儲庫中獲取我使用的數據。
簡要免責聲明: (A Brief Disclaimer:)
This article won’t go over exploratory analysis of the dataset; I’ll be operating under the assumption that you are already familiar with basic visualization techniques and terminology as well as basic concepts associated with the Bokeh, Numpy, and Pandas libraries. To view my exploratory analysis of the data, see this notebook.
本文將不對數據集進行探索性分析。 我將假設您已經熟悉基本的可視化技術和術語以及與Bokeh,Numpy和Pandas庫相關的基本概念。 要查看我對數據的探索性分析,請參閱此筆記本 。
If this is your first time using Bokeh, try a few beginner tutorials from their user guide.
如果您是第一次使用Bokeh,請嘗試閱讀其用戶指南中的一些初學者教程。
讓我們潛入吧! (Let’s dive in!)
導入模塊 (Import Modules)
We’ll be using all of Bokeh, Pandas, and Numpy in this project.
在此項目中,我們將使用所有Bokeh,Pandas和Numpy。
加載數據 (Load the Data)
You can access the data used for this project here. Import the data using pandas ‘read_csv()’ method. You’ll need the latitude and longitude columns to be float types so that we can convert them to web mercator units later on. Whatever column you choose to define the radius of your bubble map should be an int or float type. In this demonstration, it’s the fatalities column.
您可以在此處訪問用于該項目的數據。 使用pandas'read_csv()'方法導入數據。 您需要將緯度和經度列設置為浮點類型,以便稍后我們可以將其轉換為網絡墨卡托單位。 無論您選擇定義氣泡圖半徑的任何列,都應為int或float類型。 在此演示中,它是“ 死亡人數”列。
初始化地圖對象 (Initialize the Map Object)
Like many Python libraries, Bokeh is very object-oriented. Before we can plot our data, we must initialize a map object in the form of a Bokeh plotting figure. One important consideration when using Bokeh for map-making is that Bokeh uses mercator units for plotting. Most of your spatial data likely comes in the form of lat/long coordinates (commonly known as wgs84). First, we will convert these coordinates to mercator and then we will initialize the plot object for our data.
像許多Python庫一樣,Bokeh也是非常面向對象的。 在繪制數據之前,我們必須以Bokeh繪制圖形的形式初始化地圖對象。 使用散景進行地圖繪制時,一個重要的考慮因素是散景使用墨卡托單位進行繪制。 您的大多數空間數據都可能以經/緯度坐標的形式出現(通常稱為wgs84)。 首先,我們將這些坐標轉換為墨卡托,然后初始化數據的plot對象。
To initialize the plotting object, we have to define the x and y range, or extent, for the map visibility. I want the extents of the map to have a constant proportion to the size of hexbins and bubbles that I will visualize later, so I establish the map scale using a variable. The number chosen for this is arbitrary — I simply played around with a few different numbers until I was happy with the zoom level. Setting it as one variable makes it very easy to change later!
要初始化繪圖對象,我們必須定義地圖可見性的x和y范圍或范圍。 我希望地圖的范圍與以后將可視化的六邊形和氣泡的大小具有恒定的比例,因此我使用變量來建立地圖比例。 為此選擇的數字是任意的-我只是簡單地玩幾個不同的數字,直到對縮放級別感到滿意為止。 將其設置為一個變量可以很容易地在以后進行更改!
Additionally, you will have to select a tile provider for your map. I prefer Open Street Maps (OSM), but you can find a complete list of Bokeh’s supported map tiles here. Set the map level to ‘underlay’ and use the ‘output_notebook()’ method to display the plot in-line if you’re using a Jupyter notebook.
此外,您將不得不為地圖選擇一個瓷磚提供者。 我更喜歡開放式街道地圖(OSM),但是您可以在此處找到Bokeh支持的地圖圖塊的完整列表。 如果使用的是Jupyter筆記本,則將地圖級別設置為“參考底圖”,并使用“ output_notebook()”方法在線顯示繪圖。
創建地圖生成功能 (Create Map Generation Functions)
First we will create a function for the hexbin map. Hexbins are mathematically more accurate than most standard heatmaps, especially for data that is presented elliptically or has a lower range of geographic precision. They also have the additional benefit of being visually appealing! You will also note that I created a hover tool that will display the count of items in each hex as well as the q,r coordinates associated with each hexagon.
首先,我們將為hexbin映射創建一個函數。 十六進制在數學上比大多數標準熱圖更準確,尤其是對于以橢圓形式顯示或地理精度范圍較低的數據。 它們還具有吸引人的視覺優勢! 您還將注意到,我創建了一個懸停工具,該工具將顯示每個十六進制中的項目計數以及與每個六邊形關聯的q,r坐標。
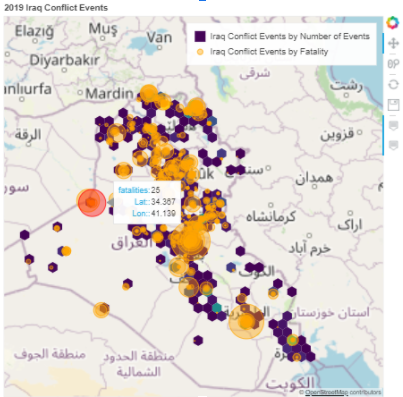
Next, we will write a function to create a bubble map. Bubble maps are useful for depicting scale of events. In this case, the radius of bubbles will be proportionate to the amount of fatalities caused by each event — this type of map is also great for depicting weather events, pandemic cases, and other scalar datasets.
接下來,我們將編寫一個函數來創建氣泡圖。 氣泡圖對于描述事件的規模非常有用。 在這種情況下,氣泡的半徑將與每個事件導致的死亡人數成比例-這種類型的地圖也非常適合描述天氣事件,大流行病例和其他標量數據集。
讓我們看看我們的工作! (Let’s See Our Work!)
Now simply input your parameters into the function you created! Note that in the functions I wrote, I set a few default parameters to make calling the function easier.
現在,只需將參數輸入到您創建的函數中即可! 請注意,在我編寫的函數中,我設置了一些默認參數以使調用函數更容易。
Once your plot appears in the window, try hovering over it with your mouse! You should see the map data change color as you hover over it in addition to informative tool-tips. Try clicking entries in the legend to toggle map layers on and off!
一旦情節出現在窗口中,請嘗試將鼠標懸停在其上方! 將鼠標懸停在地圖數據上時,除了提供提示性的工具提示外,您還應該看到地圖顏色發生變化。 嘗試單擊圖例中的條目以打開或關閉地圖圖層!
為什么起作用? (Why Functions?)
We used functions to create our maps for ease of re-use. In the future, if we have data that we want to plot using a bubble map or heatmap, we can re-use these same functions rather than completely rewriting code. Using functions for common tasks is a good habit to get into, especially if you work on a team where team members may frequently use eachother’s code!
我們使用函數來創建地圖以便于重復使用。 將來,如果我們有想要使用氣泡圖或熱圖繪制的數據,則可以重用這些相同的函數,而不必完全重寫代碼。 在常見任務中使用函數是一個好習慣,尤其是在團隊中團隊成員可能經常使用彼此代碼的情況下!
分類數據的交互式圖例 (Interactive Legends for Categorical Data)
You may have noticed in our above map that you can toggle layer visibility by clicking items in the legend. How can we make better use of this feature? Next, we will display our data categorically. For this data, I will be using event_type. Note that the code that follows is not designed for maximum efficiency or re-usability; but rather for readability. A beginner should be able to read and understand the next few steps. If you’re more advanced, try writing a function to make this plot more re-usable!
您可能已經在上面的地圖中注意到,可以通過單擊圖例中的項目來切換圖層可見性。 我們如何更好地利用此功能? 接下來,我們將分類顯示數據。 對于此數據,我將使用event_type 。 請注意,以下代碼并非旨在最大程度地提高效率或可重復使用性; 而是為了提高可讀性。 初學者應該能夠閱讀和理解接下來的幾個步驟。 如果您更高級,請嘗試編寫函數以使該圖更可重用!
First, let’s initialize a new plot object.
首先,讓我們初始化一個新的繪圖對象。
There are many ways to accomplish this next step, but each factor of the categorical variable will need to be plotted separately to its own level. In this code, I initialized empty lists for each factor and will append the information associated with each type.
有許多方法可以完成此下一步,但是分類變量的每個因素都需要分別繪制到自己的水平。 在此代碼中,我為每個因子初始化了空列表,并將附加與每種類型關聯的信息。
For each empty list, an iterator searches the dataframe for events of that type and appends the list with information such as x and y coordinates, lat/lon coordinates, and other descriptive information. If you choose this method, you will have to do this for each empty list. You can also nest iterators together to accomplish this, but for demonstration purposes I chose to write each separate block for code readability — nested iterators are often difficult to understand without extensive use of comments.
對于每個空列表,迭代器都會在數據幀中搜索該類型的事件,并在列表中附加諸如x和y坐標,緯度/經度坐標以及其他描述性信息之類的信息。 如果選擇此方法,則必須為每個空白列表執行此操作。 您也可以將迭代器嵌套在一起以實現此目的,但是出于演示目的,我選擇編寫每個單獨的塊來提高代碼的可讀性-如果不大量使用注釋,嵌套的迭代器通常很難理解。
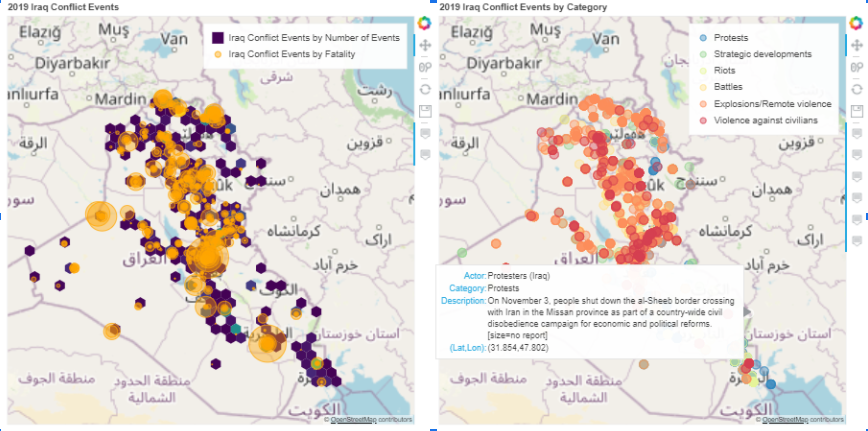
Once the lists are populated with the information associated with each category, each list gets plotted iteratively as a separate layer to the plotting object we created earlier. The reason we do this, as opposed to plotting all the data at once, is to enhance the toggle capability of the interactive legend. Now, in the resulting map plot, users can click different categories in the legend to filter the data by event type.
用與每個類別相關的信息填充列表后,每個列表將作為我們先前創建的繪圖對象的單獨圖層進行迭代繪制。 與一次繪制所有數據相反,我們這樣做的原因是要增強交互式圖例的切換功能。 現在,在生成的地圖繪圖中,用戶可以單擊圖例中的不同類別以按事件類型過濾數據。
Use the ‘show(row())’ method from Bokeh to display both maps simultaneously on a dashboard. Admire your work! Try hovering over map entries to get more information, and clicking the legend to filter the display. That’s it!
使用Bokeh的'show(row())'方法在儀表板上同時顯示兩個地圖。 欣賞你的工作! 嘗試將鼠標懸停在地圖條目上以獲取更多信息,然后單擊圖例以過濾顯示。 而已!
摘要 (Summary)
Now you can plot maps in Bokeh and create useful interactions that will allow your clients or customers to gain maximum insight from their spatial data. You learned how to create hexbin heatmaps, bubble maps, and interactive categorical maps. By combining these skills with other data visualization techniques, you will be ready to create visually stunning and useful dashboard visualizations for your next data science project!
現在,您可以在Bokeh中繪制地圖并創建有用的交互作用,從而使您的客戶可以從他們的空間數據中獲得最大的洞察力。 您學習了如何創建六邊形熱圖,氣泡圖和交互式分類圖。 通過將這些技能與其他數據可視化技術相結合,您將為下一個數據科學項目創建視覺上令人驚嘆且有用的儀表板可視化!
翻譯自: https://towardsdatascience.com/level-up-your-visualizations-make-interactive-maps-with-python-and-bokeh-7a8c1da911fd
python bokeh
本文來自互聯網用戶投稿,該文觀點僅代表作者本人,不代表本站立場。本站僅提供信息存儲空間服務,不擁有所有權,不承擔相關法律責任。 如若轉載,請注明出處:http://www.pswp.cn/news/388549.shtml 繁體地址,請注明出處:http://hk.pswp.cn/news/388549.shtml 英文地址,請注明出處:http://en.pswp.cn/news/388549.shtml
如若內容造成侵權/違法違規/事實不符,請聯系多彩編程網進行投訴反饋email:809451989@qq.com,一經查實,立即刪除!相關文章
)
用C#寫 四舍五入函數(原理版)

C++設計UDP協議通訊示例

浪里個浪 FZU - 2261
——裝飾者模式(Decorator Pattern))
C#設計模式(9)——裝飾者模式(Decorator Pattern)

北大青鳥c語言課后答案,北大青鳥C語言教程--第一章 C語言基礎.ppt

nosql_探索NoSQL系列

C++TCP和UDP屬于傳輸層協議

程序員如何利用空閑時間掙零花錢

編寫程序乘法口訣表C語言,陳廣川問:c語言編程九九乘法口訣表 怎樣用c語言寫九九乘法口訣表?...

PHP中文亂碼解決辦法

python中api_通過Python中的API查找相關的工作技能
識別欺詐性的招聘廣告)
欺詐行為識別_使用R(編程)識別欺詐性的招聘廣告

PE文件的感染C++源代碼

c語言實驗四報告,湖北理工學院14本科C語言實驗報告實驗四數組


rabbitmq channel參數詳解【轉】
)
感染EXE文件代碼(C++)

nlp gpt論文_GPT-3:NLP鎮的最新動態

