robo 3t連接
Robo 3T (formerly Robomongo) is a graphical application to connect to MongoDB. The newest version now includes support for TLS/SSL and SNI which is required to connect to Atlas M0 free tier clusters.
Robo 3T(以前稱為Robomongo )是用于連接MongoDB的圖形應用程序。 現在,最新版本包括對TLS / SSL和SNI的支持,這是連接到Atlas M0免費層群集所必需的。
先決條件 (Prerequisites)
- The latest version of Robo 3T (I’m using Studio 3T) 最新版本的Robo 3T(我正在使用Studio 3T)
Whitelist your public ip address in Atlas, or disable the whitelist by adding
0.0.0.0/0to your whitelist (Cluster > Security > IP Whitelist)在Atlas中將您的公共IP地址列入白名單,或者通過將
0.0.0.0/0添加到白名單來禁用白名單(“ 群集”>“安全性”>“ IP白名單” )No network restrictions that block you from using TCP port 27017 to your cluster
沒有網絡限制阻止您使用TCP端口27017到群集
Once you have installed the latest version, open the application and create your first Atlas profile.
安裝最新版本后,打開應用程序并創建第一個Atlas配置文件。
There are 4 tabs/sections for which you need to fill in the details.
您需要填寫4個標簽/部分的詳細信息。
第一步 (First Step)
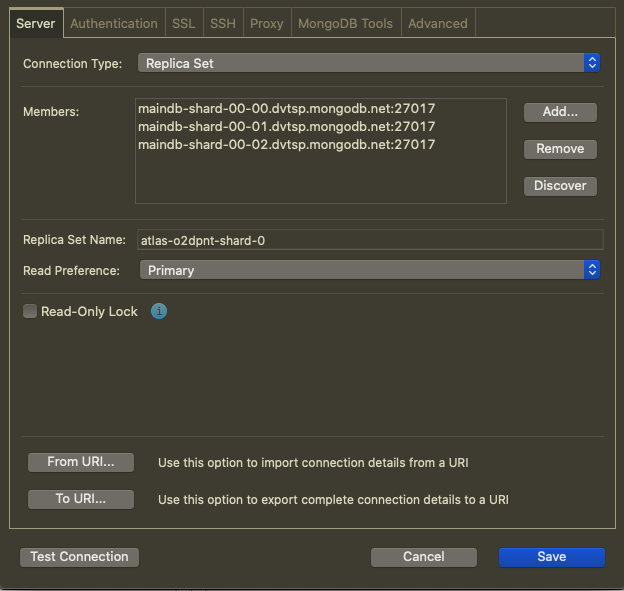
Change the Connection Type from Direct Connection to Replica Set
將連接 類型從直接連接更改為副本集
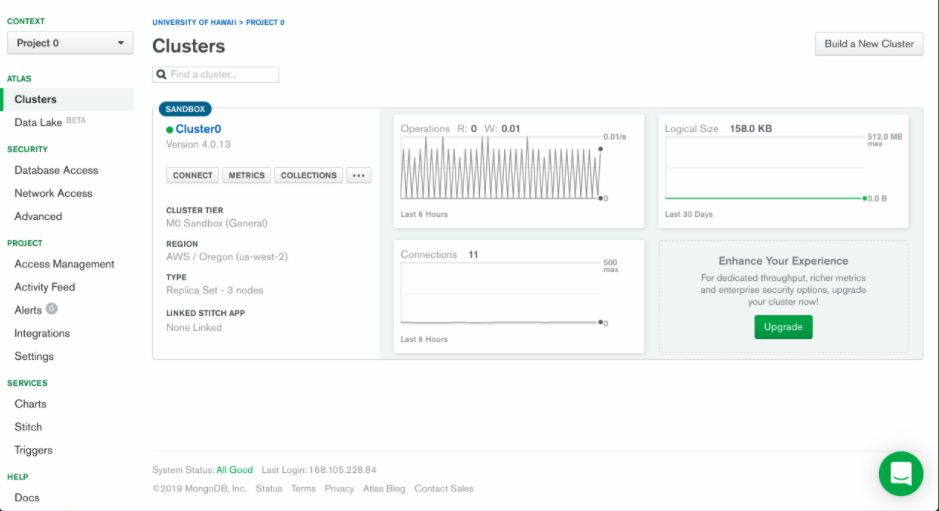
For the section Members, ( To find the members, go to your Atlas browser page, click on “Cluster0” link, then you will see three links in the region subpane. Click the first one to reveal a page whose title is the first entry for member) select the pre-defined localhost entry (by double-clicking on it) and change it to reflect your first cluster member.
對于“ 成員 ”部分,((要查找成員,請轉到Atlas瀏覽器頁面,單擊“ Cluster0”鏈接,然后您將在區域子窗格中看到三個鏈接。單擊第一個以顯示標題為第一項的頁面) (對于成員)選擇預定義的localhost條目(通過雙擊該條目)并進行更改以反映您的第一個集群成員。
(Change from
(從
localhost:27017 to your matching cluster0-shard-00–00-xxxxx.mongodb.net:27017)
本地主機:27017到您匹配的群集0-shard-00–00-xxxxx.mongodb.net:27017)

Use the (+) button to add another member. Double click it and change it to your next member.
使用( + )按鈕添加另一個成員。 雙擊它,并將其更改為您的下一個成員。
(Change from the entry it added to your matching
(將其添加到您匹配的條目中進行更改
cluster0-shard-00–01-xxxxx.mongodb.net:27017)
cluster0-shard-00–01-xxxxx.mongodb.net:27017 )
Use the (+) button to add another member. Double click it and change it to your next member.
使用( + )按鈕添加另一個成員。 雙擊它,并將其更改為您的下一個成員。
(Change from the entry it added to your matching
(將其添加到您匹配的條目中進行更改
cluster0-shard-00–02-xxxxx.mongodb.net:27017)
cluster0-shard-00-02-xxxxx.mongodb.net:27017 )
Enter your replica set name into the field Set Name (This is not optional when connecting to Atlas! Not only is it not optional, it’s actually not easy to find.)
在“設置名稱”字段中輸入您的副本集名稱 (連接到Atlas時這不是可選的!不僅不是可選的,而且實際上也不容易找到。)
After chatting with their tech support people, they told me to find the replica set name in the following way:
與他們的技術支持人員聊天之后,他們告訴我可以通過以下方式找到副本集名稱:
- From the top-level page for your cluster, click on “Connect”. 在群集的頂級頁面上,單擊“連接”。
- Click on “Connect with the Mongo Shell” 點擊“連接Mongo Shell”
- Click on “I have the Mongo Shell Installed” 單擊“我已經安裝了Mongo Shell”
- Select “3.4 or earlier” as the Mongo Shell version. 選擇“ 3.4或更早版本”作為Mongo Shell版本。
- Click the “Copy” button to copy the connection string to the clipboard. 單擊“復制”按鈕將連接字符串復制到剪貼板。
Now paste that connection string someplace. Here’s what mine looks like:
現在,將該連接字符串粘貼到某個位置。 這是我的樣子:
mongo "mongodb://cluster0-shard-00-00-vkle3.mongodb.net:27017,cluster0-shard-00-01-vkle3.mongodb.net:27017,cluster0-shard-00-02-vkle3.mongodb.net:27017/test?replicaSet=Atlas-shard-0" --ssl --authenticationDatabase admin --username admin --password <password>Out of this very long string, you can see the following substring:
在這個很長的字符串中,您可以看到以下子字符串:
replicaSet=Atlas-shard-0From this, you can see that the name of my replica set is “Atlas-shard-0” (this is case-sensitive!)
由此,您可以看到我的副本集的名稱為“ Atlas-shard-0” (區分大小寫!)
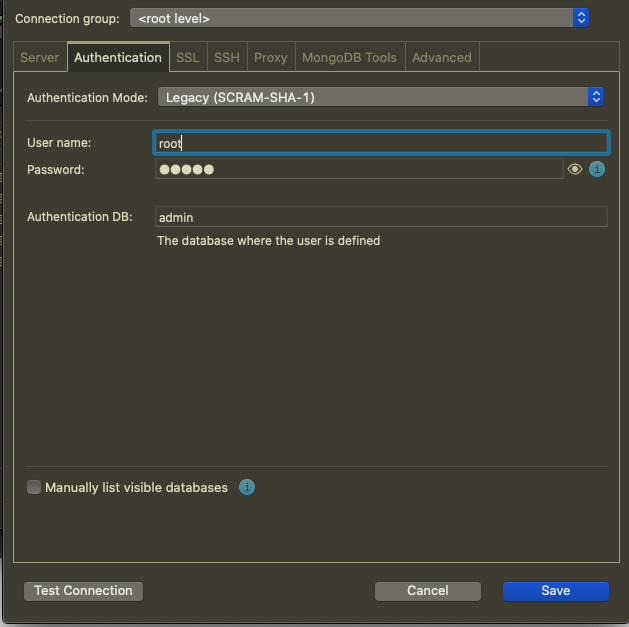
第二步 (SECOND STEP)
Provide your atlas credentials. First, write a username then password and then provide a DB name. initially, you can write test if you’ve not created a DB yet.
提供您的圖集憑據。 首先,輸入用戶名,然后輸入密碼,然后提供數據庫名稱。 最初,如果尚未創建數據庫,則可以編寫測試 。
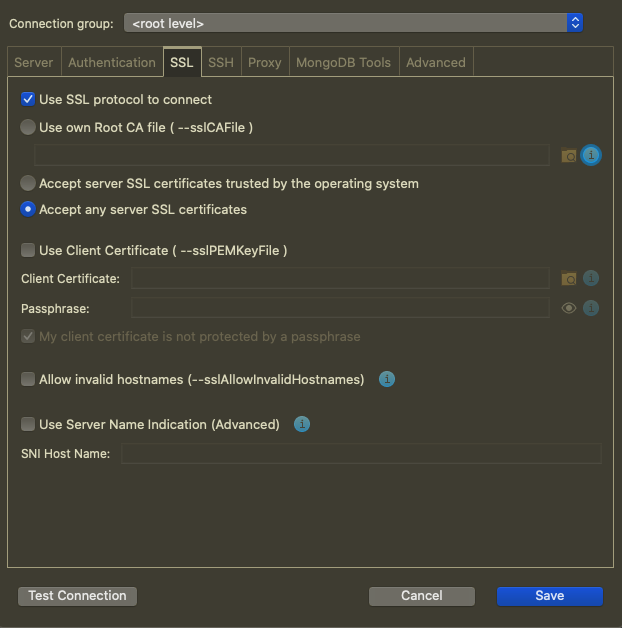
第三步 (THIRD STEP)
Here is what the SSL tab should look like:
這是SSL標簽的外觀:
(For Robo 3T click on use SSL protocol and select self-signed certificate.)
(對于Robo 3T,請單擊“使用SSL協議并選擇自簽名證書”。)
第四步 (FOURTH STEP)
Do not touch SSH tab, just skip to next.
不要觸摸“ SSH”選項卡,只需跳到下一步。

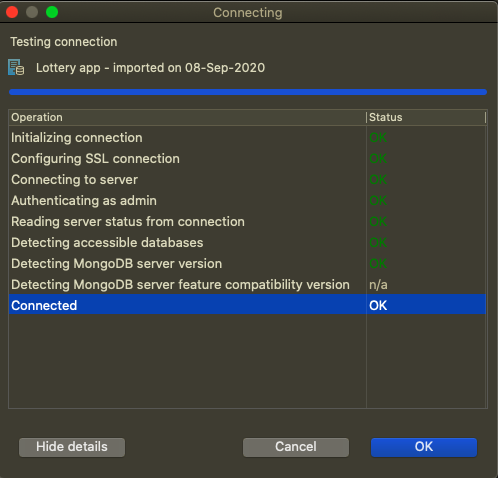
Now test your connection by clicking on the test. If it passes all the checks then it should connect to DB.
現在,通過單擊測試來測試您的連接。 如果它通過所有檢查,則應連接到DB。
Thanks for reading.
謝謝閱讀。
Cheers ?
干杯?
翻譯自: https://medium.com/weekly-webtips/connecting-to-atlas-using-robo-3t-studio-3t-dfa66ba804af
robo 3t連接
本文來自互聯網用戶投稿,該文觀點僅代表作者本人,不代表本站立場。本站僅提供信息存儲空間服務,不擁有所有權,不承擔相關法律責任。 如若轉載,請注明出處:http://www.pswp.cn/news/387837.shtml 繁體地址,請注明出處:http://hk.pswp.cn/news/387837.shtml 英文地址,請注明出處:http://en.pswp.cn/news/387837.shtml
如若內容造成侵權/違法違規/事實不符,請聯系多彩編程網進行投訴反饋email:809451989@qq.com,一經查實,立即刪除!相關文章

JavaWeb--JavaEE

軟件需求規格說明書通用模版_通用需求挑戰和機遇
)
python版PCA(主成分分析)

干貨|Spring Cloud Bus 消息總線介紹

一類動詞二類動詞三類動詞_基于http動詞的完全無效授權技術
詳解)
主成份分析(PCA)詳解

thinkphp5記錄

portainer容器可視化管理部署簡要筆記

證明您履歷表經驗的防彈五步法

2018-2019-1 20165231 實驗四 外設驅動程序設計

如何安裝pylab:python如何導入matplotlib模塊

微信掃描二維碼和瀏覽器掃描二維碼 ios和Android 分別進入不用的提示頁面
函數與緩沖區)
詳解getchar()函數與緩沖區

windows下python安裝Numpy、Scipy、matplotlib模塊

restTemplate使用和踩坑總結


啟動一個Java進程
)
Flask框架從入門到精通之參數配置(二)

BP神經網絡python簡單實現
(一))